Send Invoices
When signing up for a service, end users can easily opt-in to receive their monthly invoice in a digital format over WhatsApp. By implementing this use case, businesses can be certain when the invoice has been delivered and know whether the end user has seen the message.
This approach offers a great customer experience by providing end users with information over their preferred channel while reducing the carbon footprint. Thanks to end-to-end encryption, sharing invoices is absolutely safe.
Keep in mind, however, that to start communicating with your customers over WhatsApp, you must receive and store their opt-ins.
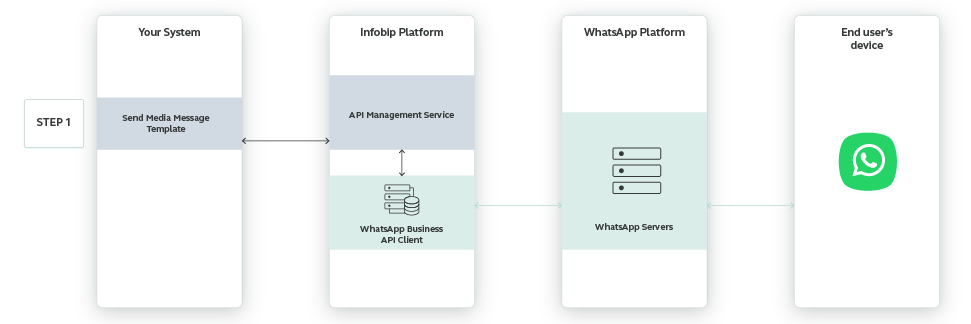
This use case will show you how to send a WhatsApp media template message containing a document file over Infobip API. Your end users will receive the invoice on their preferred communication channel—over WhatsApp.
Process Workflow
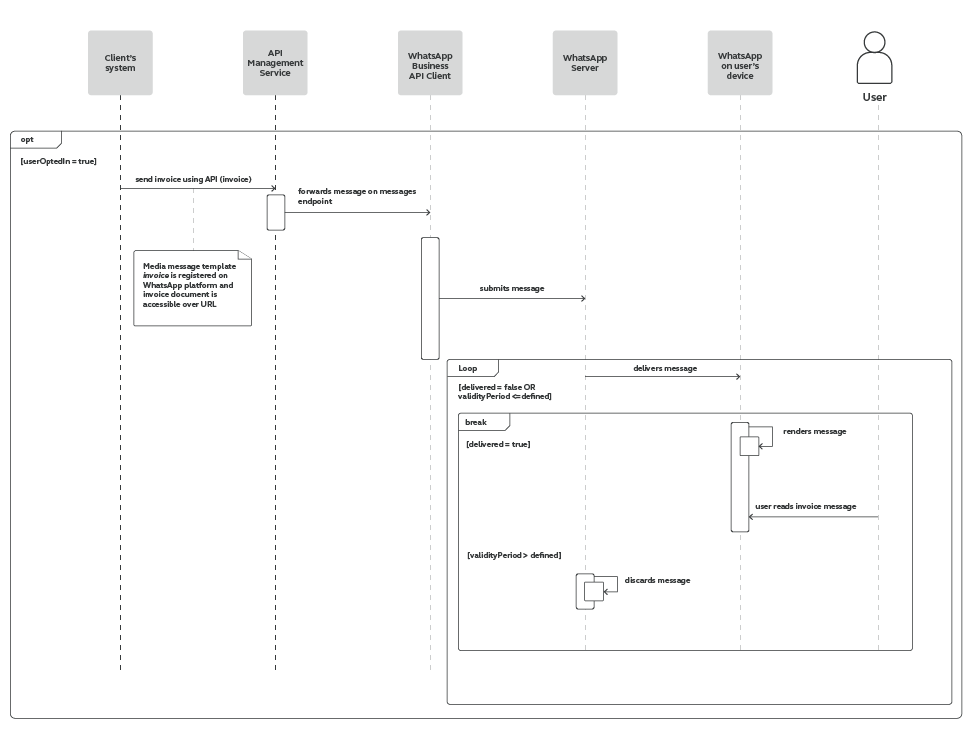
IMPLEMENTATION STEPS
Before you can send any kind of templates, such as an invoice template, the template needs to be approved by WhatsApp.
Once you create your invoice media message template, you can reuse it, personalize it for different customers, as well as attaching the appropriate invoice for each customer.
Use additional placeholders to personalize your message text.
NOTE
To register your template, you must provide a template name, content, and language info. After that, Infobip sends the template over to WhatsApp for approval.
You define the media in the header (image or document) and insert text information in the template body.
|
Template name |
Template header |
Template body |
Language |
Approved |
|---|---|---|---|---|
|
invoice |
Media - Document |
Dear {{1}}, your invoice for {{2}} is attached. |
en |
✅ |
To send this notification to a specific customer using the WhatsApp API, follow the steps described below.
1. Log in to the Infobip API Developer Hub.
2. Use your base URL (e.g., your personal base URL is https://{{BASE_URL}}.api.infobip.com/)
NOTE
The personal BASE URL is a simple way to identify who sent the API request. This means we can identify the request through DNS and then find the optimal route for API requests.
Steps over API
1. Choose the POST method.
2. Replace endpoint with https://{{BASE_URL}}.api.infobip.com/omni/1/advanced
3. Add the Authorization header.
For example, Basic: Base64 encoded username and password.
Learn more about Security and Authorization methods on the Infobip API Developer Hub.
4. Copy the scenariokey you previously created.
Learn more about Creating a scenario.
5. Specify the destination phoneNumber you wish to send the notification to.
6. Replace the templateName, documentUrl, documentFilename, placeholders, and language fields with registered ones (refer to the table above).
The header fields contain the document URL and document file name, while the placeholders in the template body are contained in placeholders field.
{
   "scenarioKey":"CC9F01A5DC7BEE2C2B829D203482A654",
   "destinations":[
      {
         "to":{
            "phoneNumber":"41793026727"
         }
      }
   ],
   "whatsApp":{
      "templateName":"invoice",
        "mediaTemplateData": {
		"header": {
		  "documentUrl": "https://documenthost.com/invoice_no10859302.pdf",
		"documentFilename": "Net4U_Invoice_01_20"
},
		"body": {
			"placeholders": ["Peter", "01/2020"]
		}
	},
      "language":"en"
   }
}
If the media type in the registered template is an image instead of document, the mediaTemplateData should contain information on image URL and real data for the placeholders.
PRO TIP
Why send only invoices over WhatsApp? Create the entire customer journey in the digital form by sending out e-receipts right after your customer makes a purchase. Check out the Send Purchase Receipts use case.