Account settings
From the audit log to branding options and security preferences, Account settings is where you will find the information that will help you choose options that are the best fit for your needs.
To use a unified configuration for multiple sub-accounts, contact our Support.
Users and roles
To find out more about managing users and roles, refer to the following pages:
Seats
The Seats section allows you to manage seat allocation across your business units. If you are using a main account with sub-accounts, you can control seat usage and resource distribution effectively.
Here, you can manage user access to Inbox by assigning available seats to selected users. You can see how seats are allocated, used, and available across all units. This removes the need to log into each individual account to gather seat information.
If you have both a main account and sub-accounts, you can establish seat limits from the main account to control the sub-accounts. This setup allows you to view all accounts from the main account, enabling you to monitor seat allocations for each and adjust them as needed.
With a single main account, you will see a list of agents with assigned seats and have the flexibility to add or remove seats without any restrictions.
To access it, log in to your Infobip account, select your profile icon, and go to Account settings → Seats. You will find two tabs:
- Seats: Manage seat assignments and view usage details.
- Logs: Track changes to seat assignments over time.
Seats
In the Seats tab, you can assign seats to users, enabling them to engage with customers in Inbox. You can also define seat limits for each account to control how many seats can be used. Accounts with no set limit can assign seats freely, up to the number of seats purchased. This helps you maintain better oversight of how seats are distributed.
You can set seat limits for each account to ensure fair and controlled distribution. Each account can assign seats only up to its defined limit. Once the limit is reached, no additional seats can be assigned. Keep in mind that accounts cannot exceed their assigned limits, so it is important to allocate your purchased seats wisely across accounts based on their actual needs.
Seat limit warnings are triggered based on usage thresholds:
- Up to 50 seats: Warning appears when 85% are used.
- 51 to 100 seats: Warning appears at 95% usage.
- More than 100 seats: Warning appears at 97% usage.
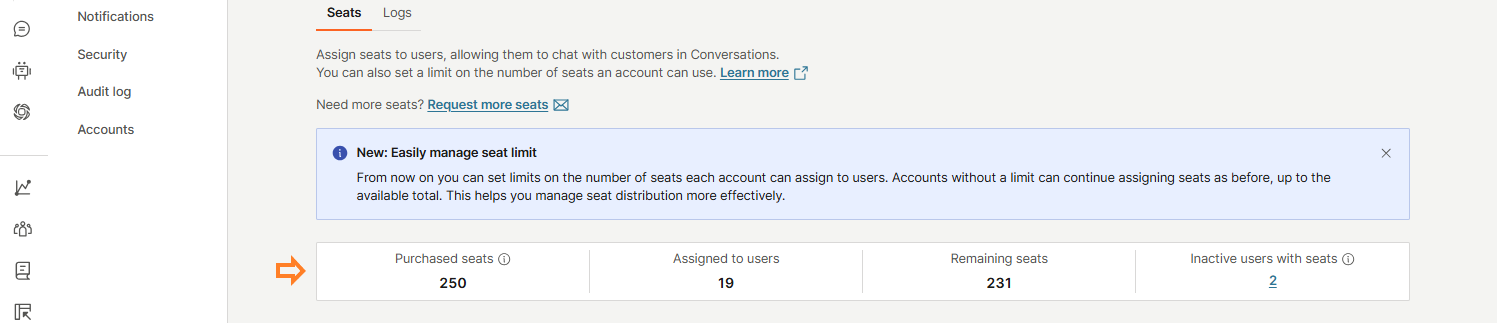
Here, you will see an overview of seat usage:
- Purchased seats
- Assigned to users
- Remaining seats
- Inactive users with seats
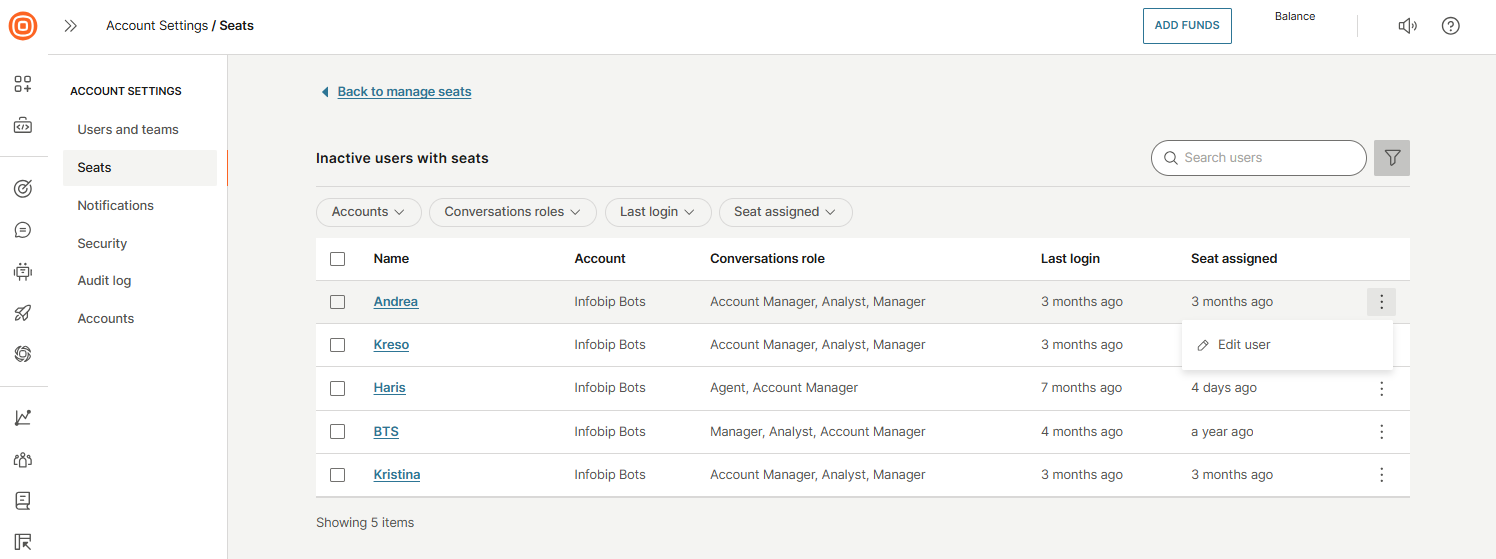
The Inactive users with seats section includes users who have been inactive for over 3 months or users who have a seat but no assigned role.
Clicking the linked number of inactive users will take you to a dedicated page showing a list of these users, where you can:
- Search for specific users
- Filter results by account, Inbox role, last login, and seat assignment
- Edit user details
- Remove seats individually or in bulk by selecting the checkbox next to the users
Under Accounts and assigned seats, you will find a list of accounts with:
- Account name
- Assigned seats
- Seat usage: Percentage of assigned vs. purchased seats.
- Seat limit: Maximum number of seats allowed per account.
You can also filter data, download reports, and assign seats directly from this view. For example, you can use reports to instantly see the current state of your seats, such as how many are allocated, used, and available at this moment across all business units.
For each account, available actions include:
- Edit
- Add user
- Remove limit

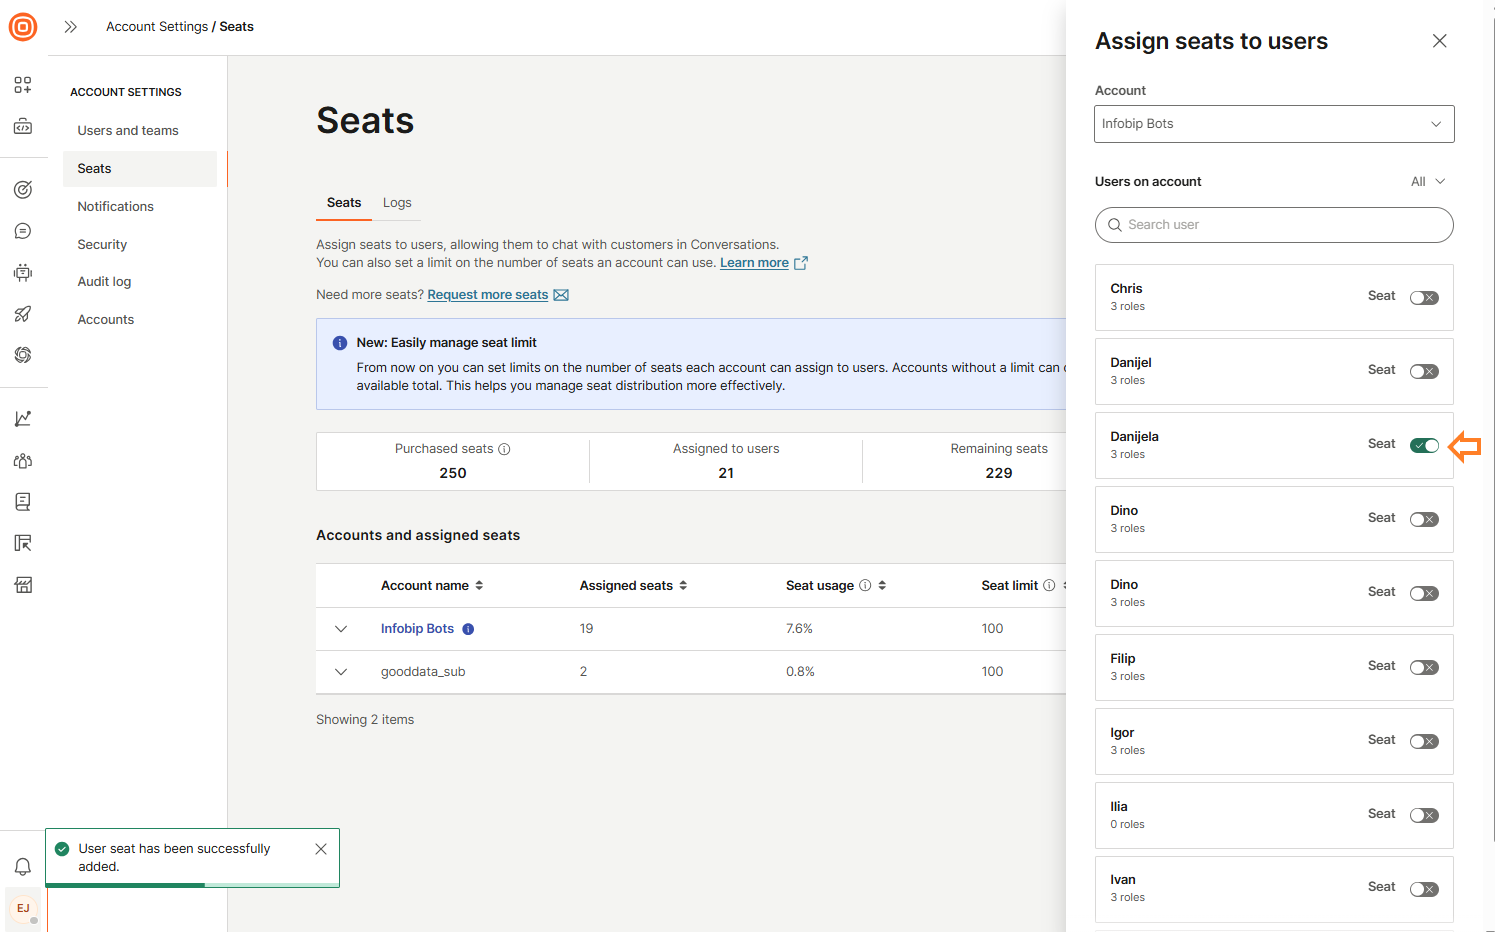
When you select the Assign Seat button, a side panel will open:
- First, select the wanted account.
- Once selected, a list of users for that account will appear.
- You can use the search bar to quickly find a specific user.
- To assign a seat, switch on the toggle next to the user’s name.
- To unassign a seat, switch off the toggle next to the user's name.
To view detailed user information for an account, select the down arrow. This reveals a list of users with assigned seats, including:
- Name
- Conversations/Inbox role
- Last login
- Seat assigned
You can remove multiple seats from users by selecting the checkbox next to each user's name using the bulk action.

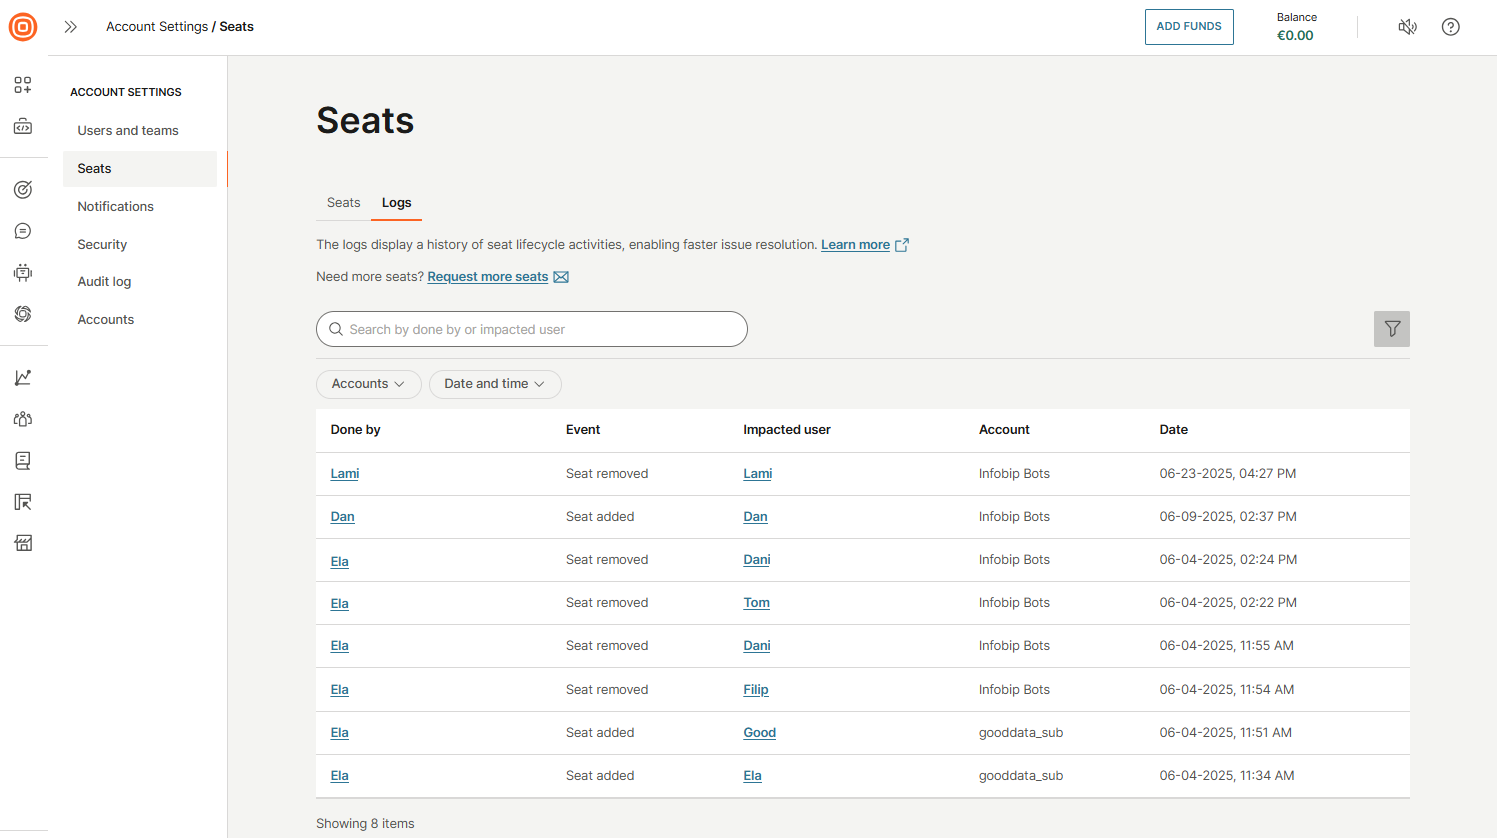
Logs
The Logs tab provides a detailed history of all seat-related activities, helping you troubleshoot and resolve issues more efficiently. Use the search bar to find specific information, and apply filters by account, date, or time to narrow down results.
Each log entry includes the following details:
- Done by: Who performed the action
- Event: Type of activity (for example, seat assigned or removed)
- Impacted user: User affected by the action
- Account: Associated account
- Date: When the event occurred
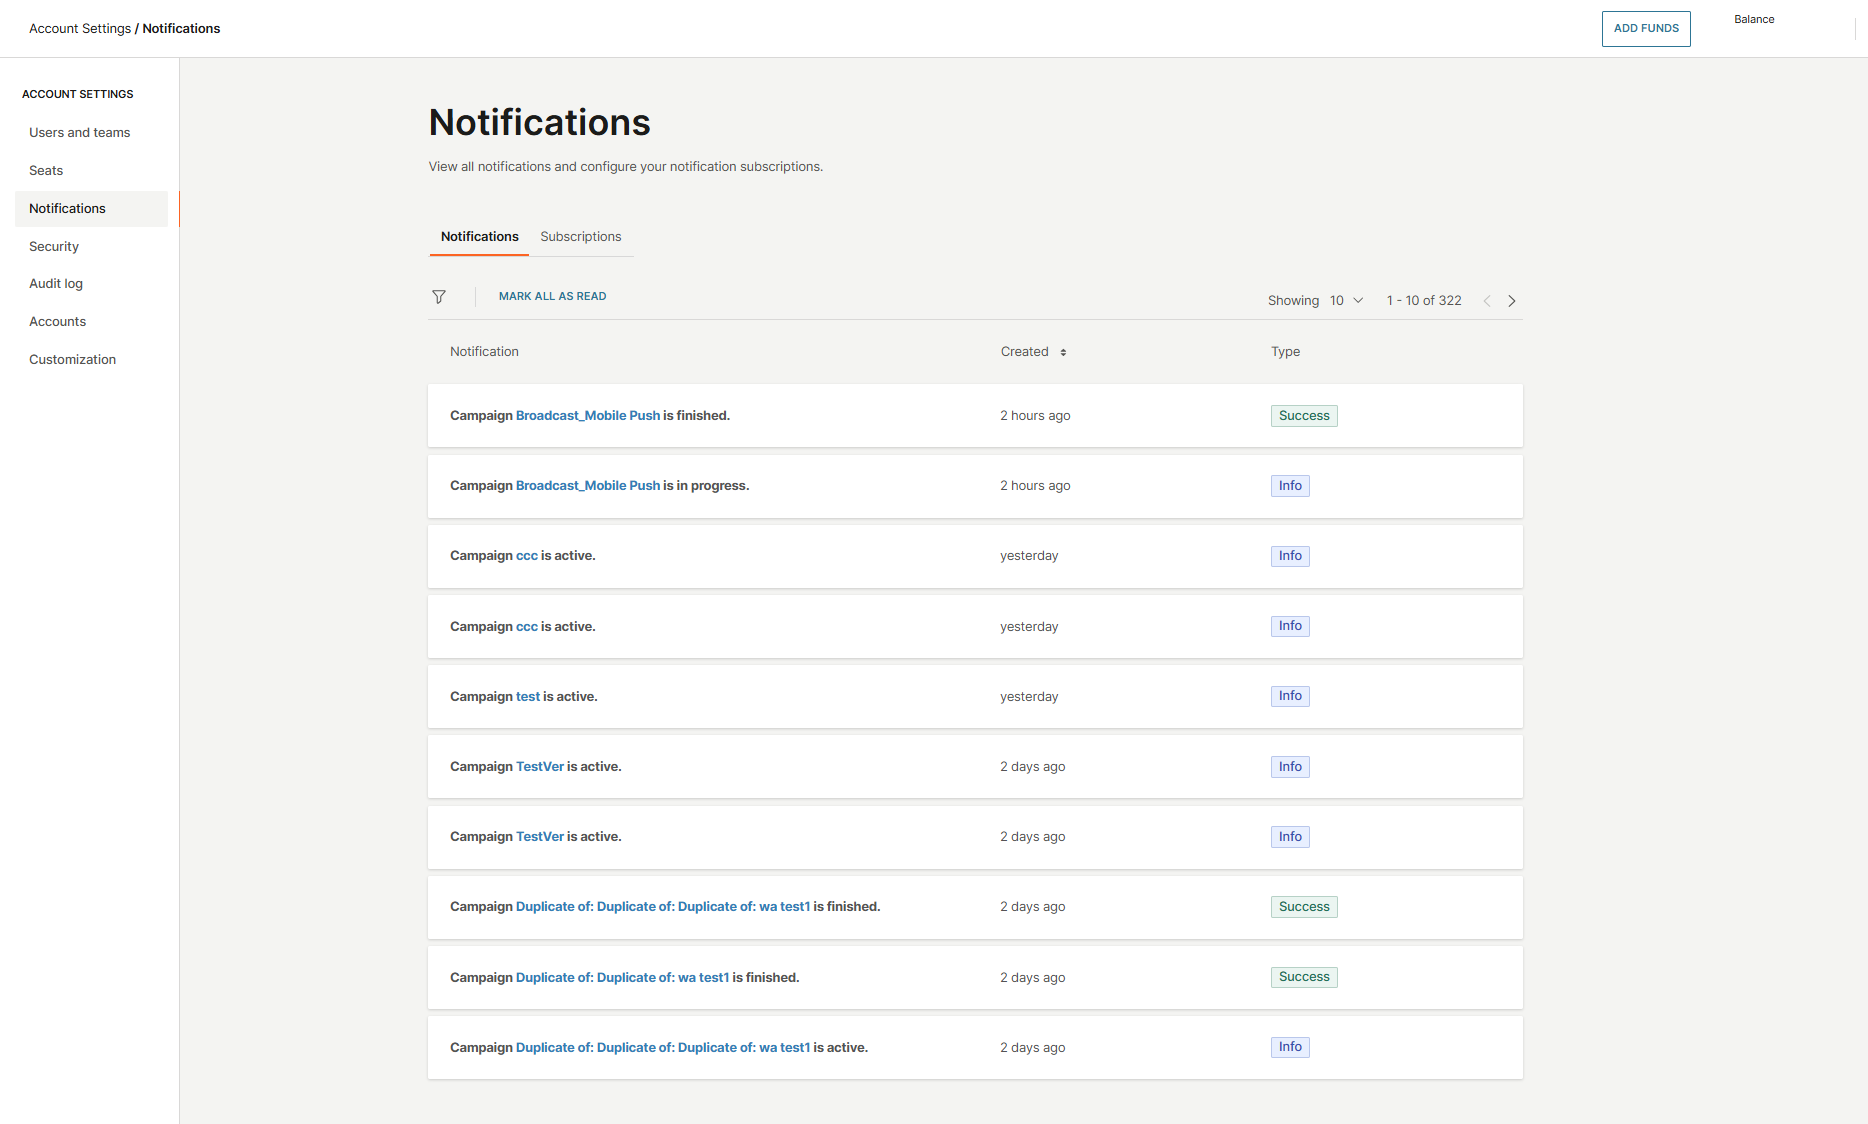
Notifications
In the Notifications section, you can view all notifications and manage your notification subscriptions. The Notifications tab displays updates from events you have subscribed to, such as low balance alerts, campaign updates, and account balance changes.
For each notification, you will see:
- Type of notification
- Creation time
- Type
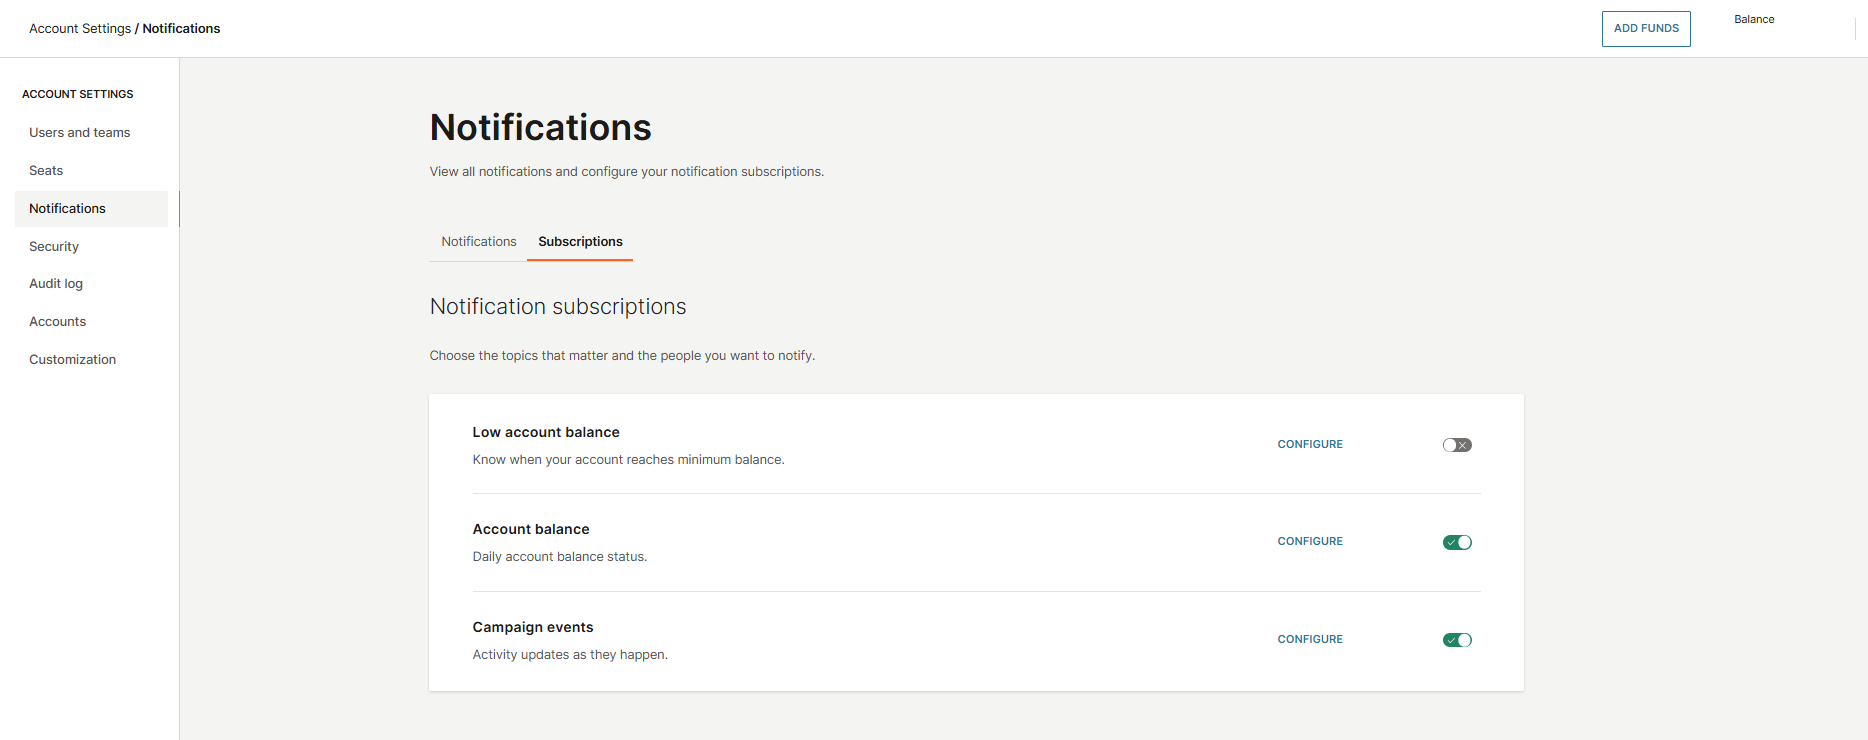
In the Subscriptions tab, you can select which events you would like to receive notifications for, including:
- Low account balance
- Account balance
- Campaign events
To subscribe, simply toggle the switch next to the event.
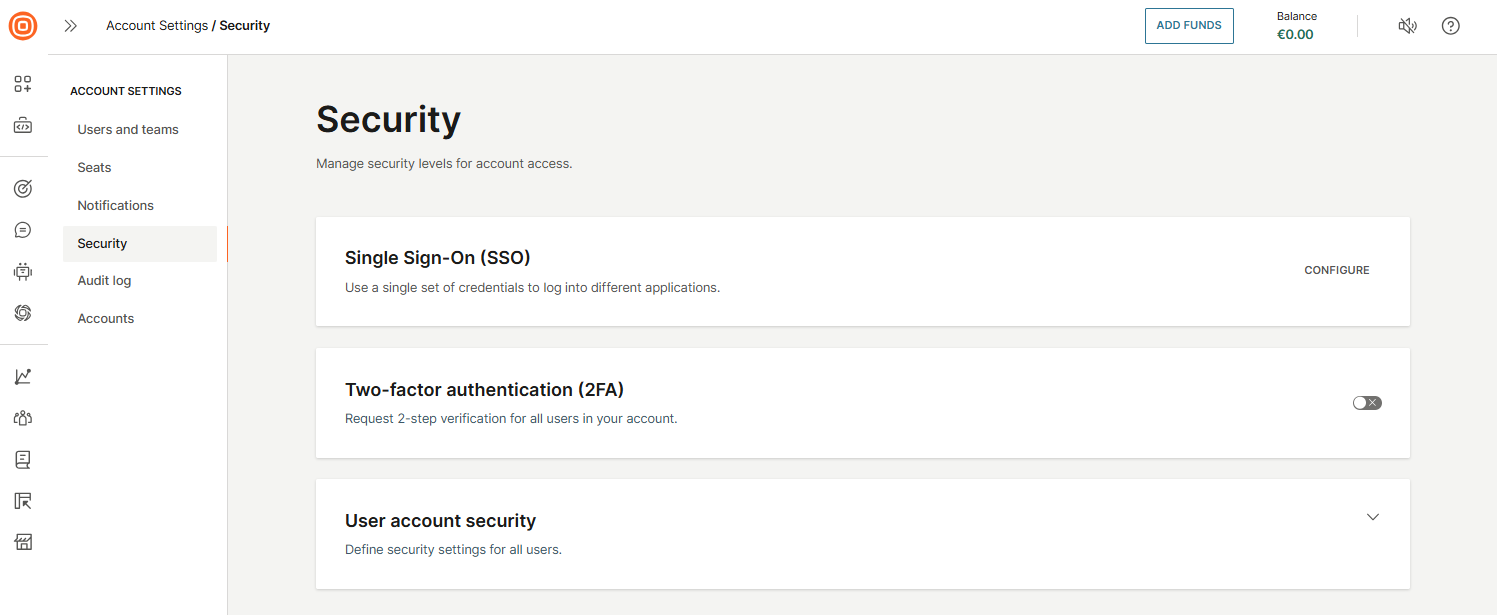
Security settings
The Security settings help you manage and enforce security measures for account access. This section includes features such as:
- Single Sign-On (SSO): Allow users to log in using your organization’s identity provider
- Two-Factor authentication (2FA): Add an extra layer of login protection
- User account security: Manage password policies and other user access controls
Configure Single Sign-On (SSO) [#configure-single-sign-on-sso-security-settings]
Single Sign-On (SSO) allows users to access multiple applications using a single set of credentials. Infobip supports SSO integration with any Identity Provider that uses the SAML 2.0 protocol. SAML 2.0, released in 2005, is still the most widely adopted standard for Enterprise SSO.
There are two types of SAML flows:
- Service Provider (SP)-initiated
- Identity Provider (IdP)-initiated
Infobip supports the SP-initiated flow, which is the most commonly used. Below is an overview of how it works and how you can configure it through the Infobip web interface.
Permissions
Only system administrators can configure SSO settings on the Identity Provider side. On the Infobip web interface, only users with the Account Manager business role have permission to define and modify the SSO configuration.
Requirements
Your Identity Provider must support the SAML 2.0 protocol. Once SSO is enabled for an account, all users accessing the Infobip web interface must authenticate through the configured Identity Provider.
How to enable SSO [#how-to-enable-sso-security-settings]
Before starting, note that SSO configuration is fully self-service, and no additional data is required from Infobip as the Service Provider. All necessary details are provided during the setup process.
Prerequisites
While Identity Providers (IdPs) vary in configuration methods, a minimum set of details is required to integrate with Infobip as a Service Provider (SP). Follow the step-by-step process below to learn how to enable Single Sign-On (SSO).
-
Access SSO settings
- Log in to the Infobip web interface.
- In the left-side menu, click your avatar icon and go to Account settings → Security.
- In the Single Sign-On (SSO) section, click Configure to open the SSO setup page.
-
Enter Identity Provider details
You will need to provide the following information from your Identity Provider:
- SP Entity ID: Unique identifier for Infobip as the Service Provider.
- IdP Signature Certificate: The certificate your IdP uses to sign SAML assertions.
- IdP Login URL: The SAML 2.0 endpoint where users are redirected to log in via the IdP.
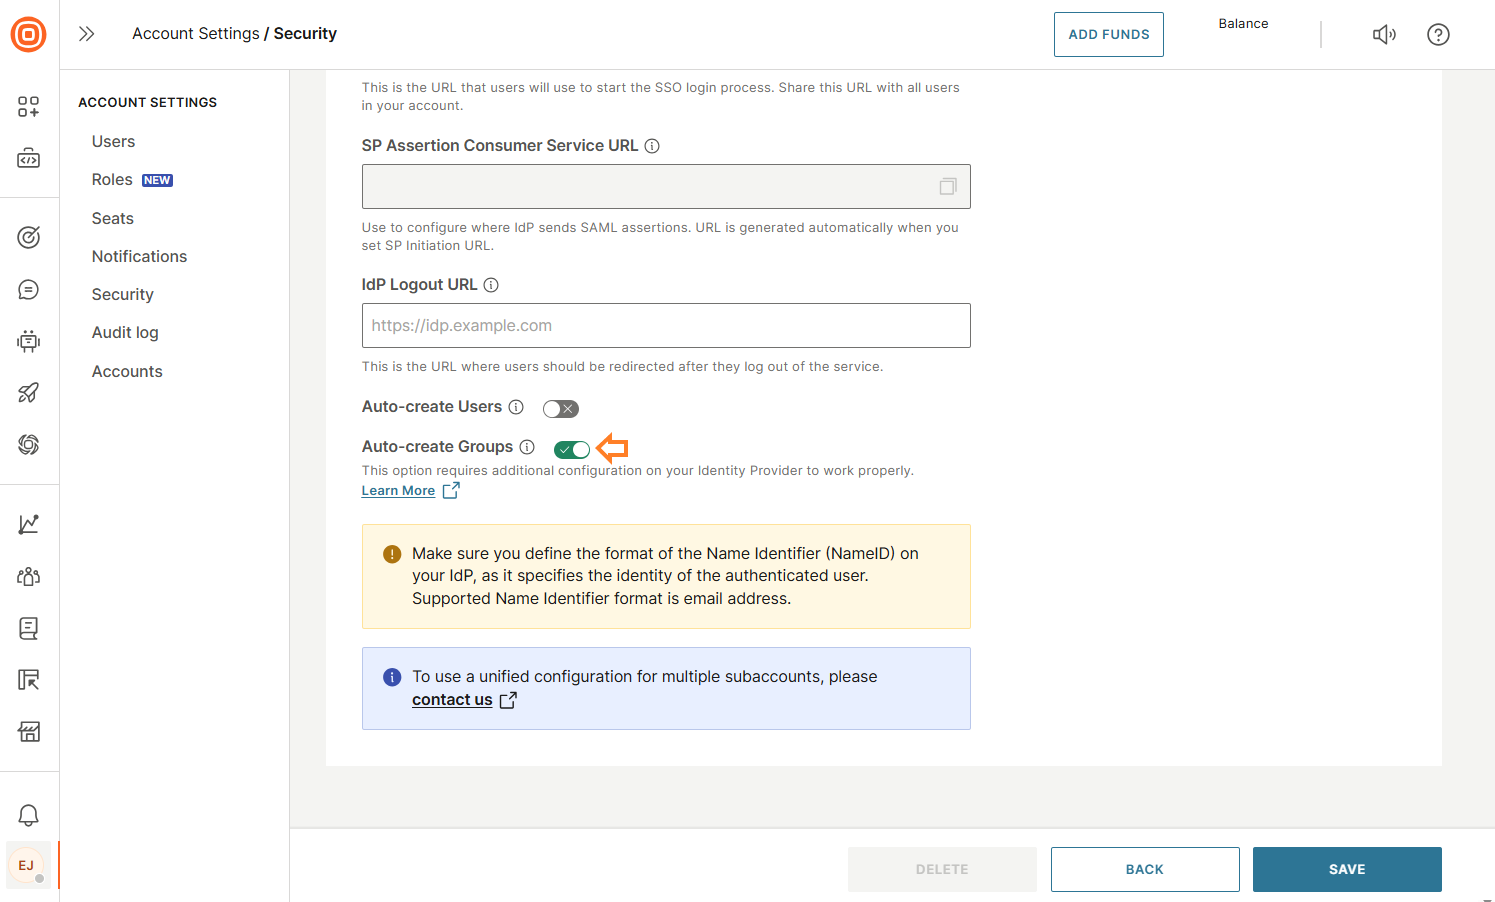
- IdP Logout URL: The URL users are redirected to after logging out on the Service Provider side.
-
Use Infobip details for your Identity Provider
Use these values when configuring SSO on your Identity Provider:
- SP Initiation URL: The unique URL to initiate the SSO login process. Share this with your users.
- SP Assertion Consumer Service (ACS) URL: URL where the IdP sends SAML assertions after successful authentication. This URL is generated automatically when you input the SP Initiation URL.
Optional configuration
Auto-create users (recommended)
Enable this option to allow automatic creation of users in Infobip upon successful authentication via your IdP. If a matching user (by email) does not exist, the system will create one based on the information in the SAML response (for example, username and email). Additional user details (for example, phone number, first name, last name) can be added later under Settings → Users.
If the auto-create users option is enabled, users who successfully authenticate through your IdP but do not already exist in Infobip will be created automatically. If the option is disabled, you must manually create users in Infobip with email addresses that exactly match the NameID sent by your IdP. If a match is not found, the login will fail.
Auto-create groups
When enabled, this option syncs user groups and memberships from your IdP during each login. If later disabled, previously synced groups become non-SSO groups.
Identity provider requirements
To ensure successful SSO login, you must configure the Name Identifier (NameID) attribute on your Identity Provider. Supported NameID options:
- UPN (User Principal Name)
NameID is an email address.Be sure to map a custom attribute on your Identity Provider to set the NameID to either the user's email or UPN value. This is a critical step—if the NameID is not configured correctly, users will not be able to authenticate through SSO. When a user attempts to log in through SSO, Infobip checks the NameID from the SAML response against the email addresses of existing users on the account.
Depending on your configuration:
-
If Auto-create users is enabled: If there is no matching user, Infobip will automatically create a new one using the NameID and details from the SAML response.
-
If Auto-create users is disabled: If there is no match, the login will fail. You must manually create all users in advance, ensuring that their email addresses exactly match the NameID.
SSO using SAML over the web interface [#sso-using-saml-over-the-web-interface-security-settings]
You can log with SSO accessing the SP Initiation URL created during the setup process, or through the login flow described here.
Example: https://portal.infobip.com/login/saml/contoso/
If Auto-create users is enabled:
- Existing users: If the email address in Infobip does not match the
NameIDfrom the SAML response, a new user will be created. - New users: When a user accesses the SP Initiation URL, Infobip creates their account using the identity details received from the SAML response and starts a session within the web interface.
If Auto-create users is disabled:
- Only existing users with an exact email match (between the SAML
NameIDand their Infobip account) will be able to log in. - If no match is found, the login attempt will fail.
When you define your SSO configuration and it is ready, your login process is always the same:
- Go to the SP Initiation URL.
- You are redirected to your Identity Provider (IdP).
- You need to authenticate using your corporate/domain credentials.
- If authentication is successful:
- The IdP sends a SAML response via HTTP POST, containing your identity data in a Base64-encoded XML format.
- Infobip processes the SAML response:
- If you are recognized (or auto-created, depending on settings), Infobip starts a session.
- You gain access to Infobip products and services.
Extending the SAML response on your identity provider [#extending-the-saml-response-on-your-identity-provider-security-settings]
Infobip offers limited support for extending the SAML response because more complex authentication scenarios can pose potential security risks to companies.
Clients can extend the SAML response sent from their Identity Provider to the Infobip web interface by including additional attributes, such as Group Membership values. Some Identity Providers, like Microsoft Active Directory, allow the creation of attribute mapping rules based on group membership. By defining these extended attributes, clients can send a list of groups along with standard user properties in the SAML response.
If you want to automatically set users’ first and last names when using the Auto-create users option, you must extend the SAML response from your Identity Provider with the following attribute statements:
- First name attribute with the claim name:
http://schemas.xmlsoap.org/ws/2005/05/identity/claims/givenname - Last name attribute with the claim name:
http://schemas.xmlsoap.org/ws/2005/05/identity/claims/surname
Including these attributes ensures that new user profiles created during login have their first and last names properly set.
http://schemas.xmlsoap.org/ws/2005/05/identity/claims/emailaddress in the SAML response.If you want the Group Membership information included in the SAML response, you need to take the following steps:
- Extend the SAML response sent from your Identity Provider by adding a new attribute statement that lists all Group Memberships for a user. The claim attribute name must be set to:
http://schemas.xmlsoap.org/claims/Group - Additionally, ensure that the Group Membership values forwarded contain the SamAccountName or Name as the identity. This is important because Infobip maps Group Names, not other identifiers like the SID.
This additional attribute claim should look like the following:
Make sure you have turned on the Auto-create groups option in User profile → Security → Single Sign-On (SSO) → Configure, so that the newly added attribute can be properly handled upon each user login.
How this reflects in the web interface:
- You do not need to create Groups in advance. The system will handle that automatically. Each time a user logs in, the Group attribute is sent along with the rest of the SAML data.
- The web interface maps these Groups to custom roles. If a Group from your Identity Provider does not exist as a custom role, it will be created automatically with the same name.
- Groups are matched and updated for every user login. User memberships are verified and synchronized based on the Group information included in the SAML response.
- While group creation, mapping to a custom role, and user membership assignments are automated, managing roles and permissions for each custom role must be done manually through the web interface.
Two-factor authentication [#two-factor-authentication-security-settings]
You can activate two-factor authentication (2FA) for all users across your account simultaneously. Once enabled, every user will be required to provide a verification code in addition to their password during login, significantly enhancing the security of your account by adding an extra layer of protection against unauthorized access.
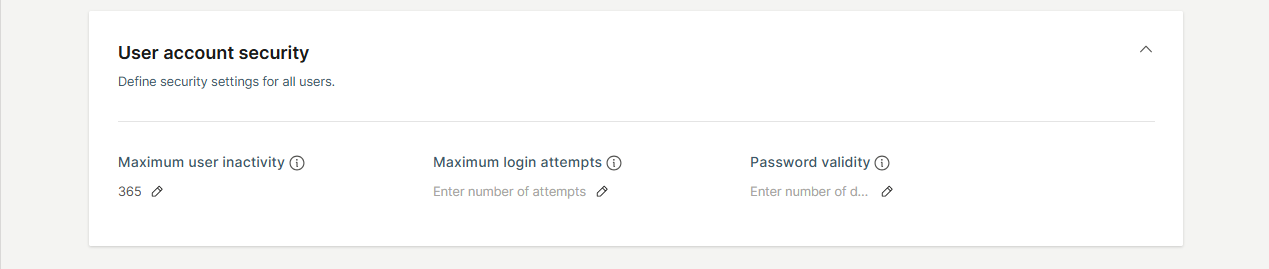
User account security [#user-account-security-security-settings]
In this section, you can set rules and policies that apply to all users within your account to enhance security and manage access effectively:
- Maximum user inactivity: Define the number of days a user can remain inactive before their account is automatically disabled. You can set this value anywhere between 15 and 365 days.
- Maximum login attempts: Specify the maximum number of consecutive unsuccessful login attempts allowed before a user’s account is locked. The recommended setting is 5 attempts.
- Password validity: Set the duration (in days) before a user’s password expires and requires renewal. Leaving this field empty means passwords will never expire. The recommended period is 90 days.
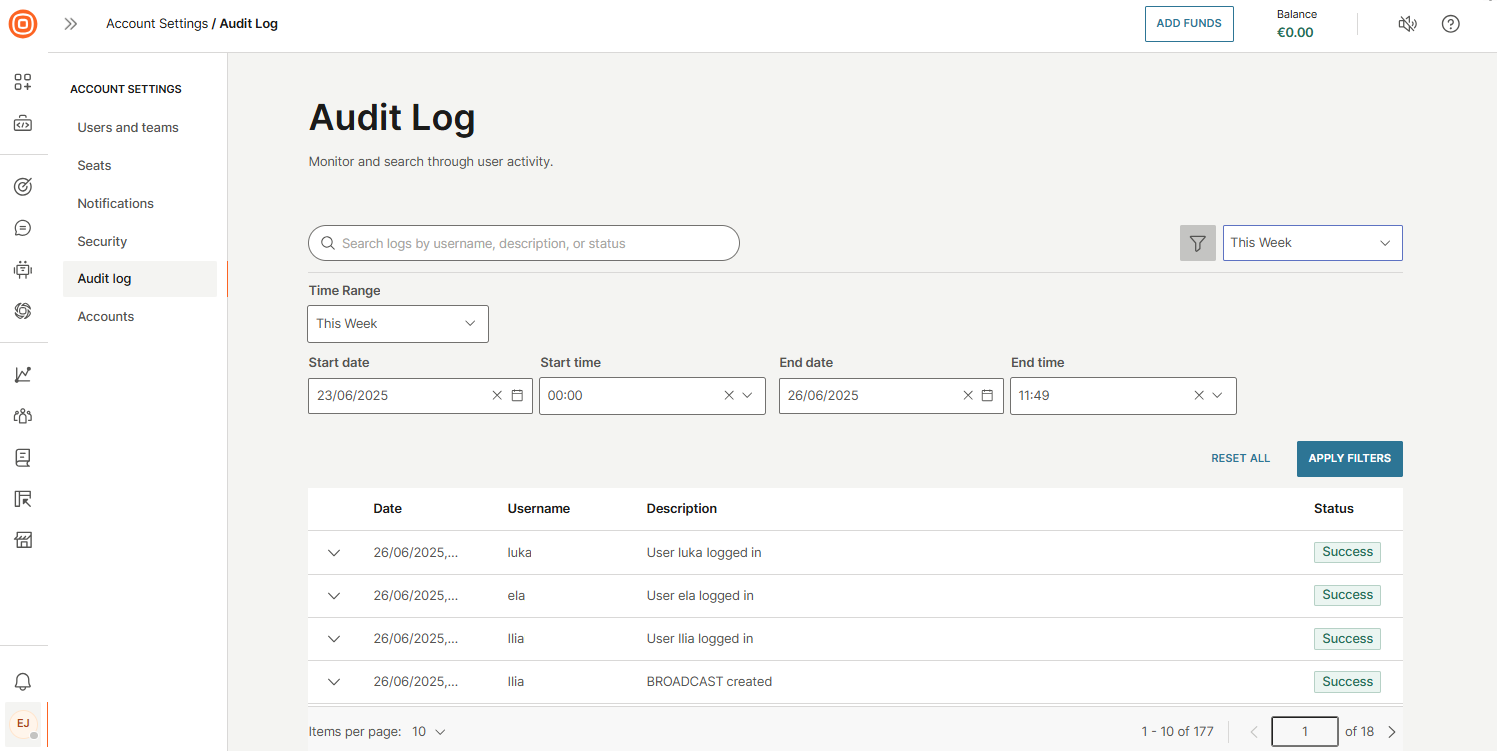
Audit log
The Audit log provides a comprehensive record of all user activities on the Infobip web interface, helping you quickly investigate issues and ensure security compliance. As an industry-standard feature, it is especially useful for troubleshooting incidents or analyzing user behavior.
Audit logs are retained for 5 years.
Events are organized by key identifiers such as:
- Date
- Username
- Description
- Status
You can filter the log by predefined time ranges (for example, last 15 minutes, last 3 hours, today, yesterday, this week, or last week) or define a custom date and time range.
Key benefits of the Audit log include:
- Complete visibility into account activity, showing what actions were taken, when, and by whom.
- Proactive anomaly detection, helping you identify unusual behavior early and reduce the risk of unauthorized access or potential security threats.
- Self-service auditing, enabling your team to review activity logs independently without needing to contact Support.
This feature is available to all users with the Account admin role.
Audit log events [#audit-log-events-audit-log]
| Item | Action | Event description |
| 2FA | Enable | Two-factor authentication enabled for all users. Enabling two-factor authentication failed. |
| Disable | Two-factor authentication enabled for all users. Disabling two-factor authentication failed. | |
| Update | Two-factor authentication settings updated. Two-factor authentication settings update failed. | |
| Account | Update | Account login options updated/failed. Account security options updated/failed. Language successfully changed/failed. Host name set/failed. Color scheme set/failed. Logo updated/failed. |
| Chatbots | Activate | Chatbot activated. |
| Deactivate | Chatbot deactivated by user, Details: Sessions expired after grace period. Chatbot deactivated by user, Details: Sessions terminated by bot deactivation. Chatbot deactivated by system, Details: Sessions terminated due to data management policy change. Chatbot deactivated by system, Details: Sessions terminated due to discontinued pricing plan. Chatbot deactivated by system, Details: Sessions terminated due to disabled channel. Chatbot deactivated by system, Details: Sessions terminated due to deactivating account. Chatbot deactivated by system, Details: Sessions terminated due to expired free trial. Chatbot deactivated by system, Details: Sessions terminated due to failure to charge sessions. | |
| Create | Chatbot created by user. Chatbot created by user, Details: Created from template XYZ. | |
| Delete | Chatbot deleted by user. Chatbot deleted due to data management policy. Chatbot deleted because of the canceled import. | |
| Import | Chatbot imported by user. | |
| Duplicate | Chatbot duplicated by user, Details: Duplicated from chatbot XYZ. | |
| API key | Create / Generate | API key generated (name, valid from)/generation failed. |
| Update | API key updated (name, expiration). | |
| Automatic Payment | Activation | Automatic payments changed (min. Balance, currency). |
| Change | Automatic payments changed (min. Balance, currency). Automatic payments deactivated. | |
| Successful | Automatic payment completed. | |
| Unsuccessful | Automatic payment failed. | |
| Billing address | Successful | Billing address changed (name, full billing address). |
| Blocklist | Import | Imported a blocklist from a completed file. |
| Add | Number/Email added to a blocklist. | |
| Delete | Number/Email deleted from a blocklist. | |
| Export | Blocklist export completed. | |
| Campaign | Update | Campaign updated. |
| Communication | Create | Flow created/failed. Broadcast created/failed. |
| Launch | Flow launched. | |
| Delete | Flow deleted/deletion failed. | |
| Cancel | Flow canceled/canceling failed. Broadcast canceled/canceling failed. | |
| Finish | Flow finished/finishing failed. Broadcast finished/finishing failed. | |
| Duplicate | Flow duplicated. Broadcast duplicated. | |
| Update | Flow updated. Broadcast updated. | |
| Create version | Flow version created. | |
| Delete version | Flow version deleted. | |
| Launch version | Flow version launched. | |
| Stop version | Flow version stopped. | |
| Schedule | Flow version scheduled. | |
| Change | Flow name changed. Broadcast name changed. | |
| Company | Add | Company added. |
| Delete | Company deleted. | |
| CustomField | Add | Custom field added. |
| Delete | Custom field deleted. | |
| Domain | Create | Domain created by the user. |
| Delete | Domain deleted by the user. | |
| Export configuration | Update | Export configuration created. |
| Create | Export configuration created. | |
| Delete | Export configuration deleted. | |
| Forms | Create | Forms created. |
| Download | Forms downloaded. | |
| Duplicate | Forms duplicated. | |
| Update | Forms updated. | |
| Keyword | Create | Keyword created on a mobile number. |
| Delete | Keyword deleted on a mobile number. | |
| Change | Keyword changed on a mobile number. | |
| Mobile Application | Create | Mobile Application has been created. |
| Delete | Mobile Application has been deleted. | |
| Update | Mobile Application has been updated. | |
| Mobile Demo Application | Invite to Mobile Demo Application | Mobile Demo Application has been shared. |
| Create | Mobile Demo Application has been created. | |
| Number | Buy | Number bought. |
| Delete | Number deleted. | |
| One-time payment | Successful | Payment successfully completed (currency). |
| Unsuccessful | Payment failed (currency). | |
| Password | Restore | Reset forgot password email sent. Reset forgot password email sending failed. |
| Updated | Password updated. | |
| Update | Password for user restored. Password for user failed. | |
| Person | Import | People import from CSV completed/failed (file name). |
| Merge | People merged. | |
| Export | People exported to the CSV completed (file name). People exported to the CSV failed (file name). | |
| Price | Update | Price updated. |
| Report | Request | Report requested. Report request failed. |
| Create | Report generated (report name/type). Report generation failed (name/type). | |
| Download | Report downloaded. Report download failed. | |
| Delete | Report deleted. Report deletion failed. | |
| Search | Export | Logs export to file completed. Logs export to file failed. |
| Segment | Create | Segment created. |
| Delete | Segment deleted. | |
| Update | Segment updated. | |
| Tag | Create | Tag created. |
| Delete | Tag deleted. | |
| Remove | Tag removed. | |
| Update | Tag updated. | |
| Assign | Tag assigned. | |
| Team | Create | Group created. Group creation failed. |
| Delete | Group deleted. Group deletion failed. | |
| Update | Group updated. Group update failed. | |
| Template | Create | Channel template created. Flow template created. |
| Duplicate | Channel template duplicated. | |
| Delete | Channel template deleted. | |
| URL | Sent | Email with password sent to user. Email with password sending failed. |
| User | Create | User created. User creation failed. |
| Update | User updated. User update failed. | |
| Disable | User disabled. Disabling user failed. | |
| Enable | User enabled. Enabling user failed. | |
| Update | User changed email address. Email address change update failed. Mobile number verified for user. Mobile number verification for user failed. | |
| Accept | User accepted. | |
| Login | User logged in (name, email) | |
| Logout | User logged out (name, email) | |
| Lock | User locked. User locking failed. | |
| Unlock | User unlocked. User unlocking failed. | |
| Verify | User verified. | |
| Website | Create | Website created. |
| Update | Website updated. | |
| Delete | Website deleted. |
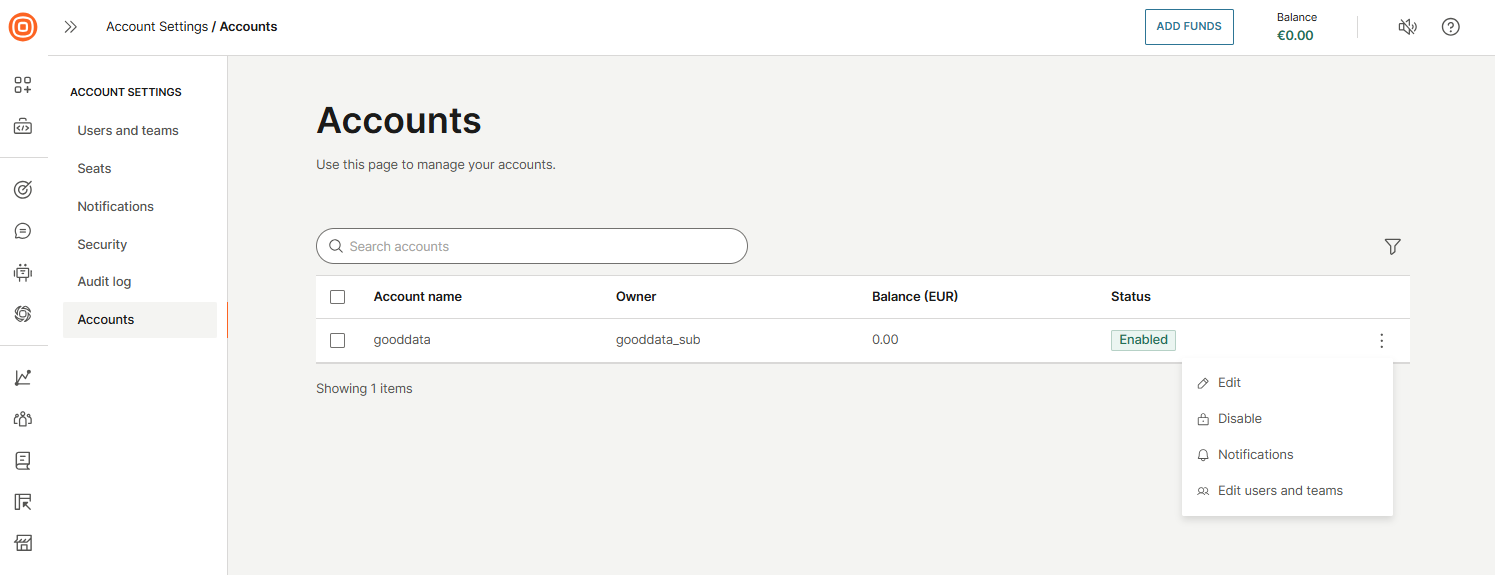
Accounts
To manage your sub-accounts, go to Account settings → Accounts. This page displays a list of all sub-accounts created under your main account. You can use the search bar to quickly locate a specific sub-account.
Select the three-dot menu next to any account to access additional actions:
- Edit: Modify account details, including security settings and Single Sign-On (SSO) configuration.
- Enable or disable account: Activate or deactivate a sub-account as needed.
- Notifications: View notifications related to that specific sub-account.
- Edit users: Manage users associated with the selected sub-account.
- Edit roles - Manage roles associated with the selected sub-account.
Customization
The Customization page lets you tailor the Infobip portal to match your organization’s branding by configuring a safelisted hostname, uploading a logo, and selecting a preferred theme and language.
To access these settings, go to your user profile and select Account settings → Customization.
Here, you can:
- Define a custom hostname
- Select the language and theme for your account
- Upload a logo that reflects your corporate visual identity
The hostname you specify will become the custom URL used to access your Infobip web interface. You will also need to update your DNS configuration accordingly. Specific DNS record details will be provided during the setup process within the interface.
If you configure a custom login page, your uploaded logo will appear there reinforcing your brand's presence throughout the login experience.
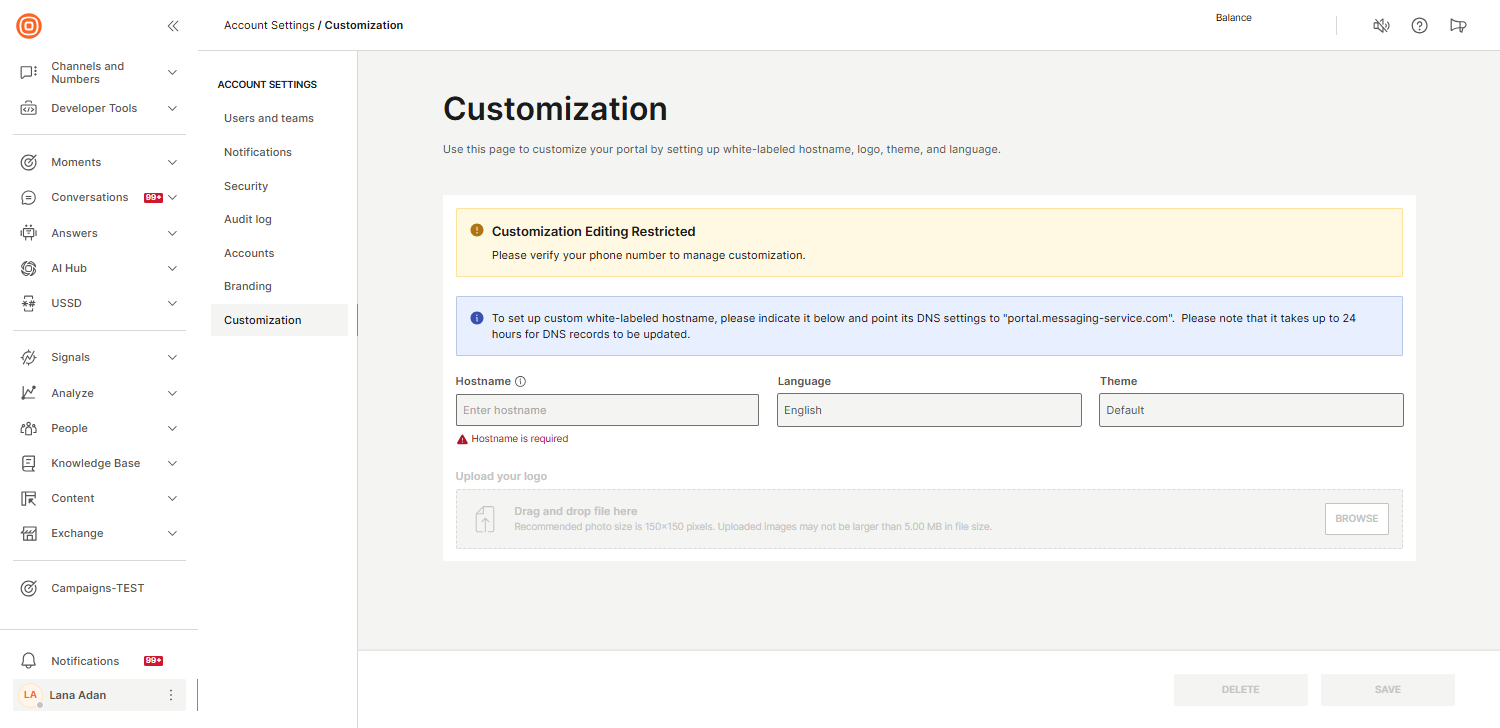
If any changes are needed to the existing customization setup, you must delete the current customization and create a new one with the updated configuration.
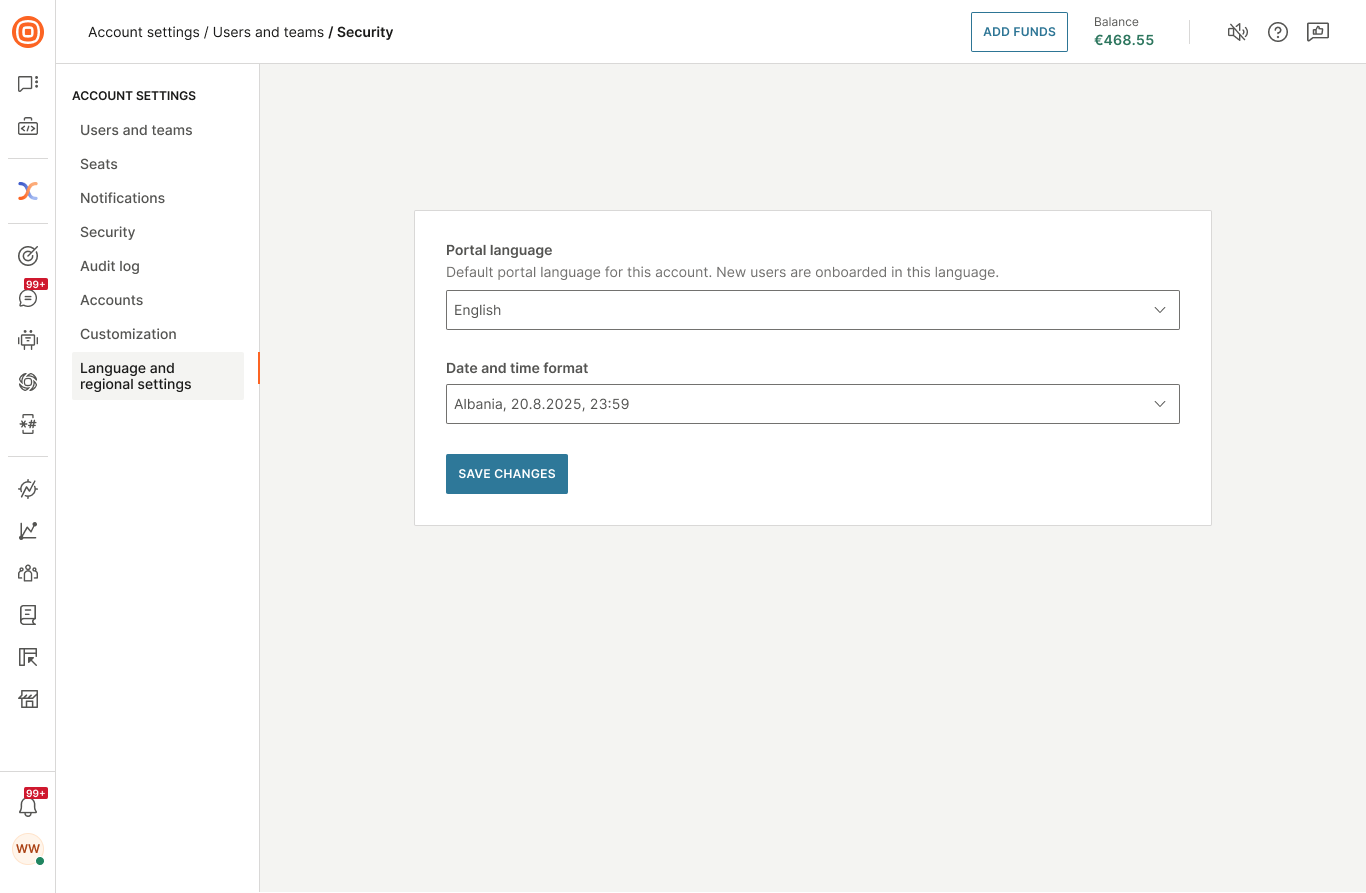
Language and regional settings
The Language and regional settings option lets you set account-level defaults for the web interface language and date and time format. These defaults apply to all new users and existing users on the account.
To access these settings, go to your user profile and select Account settings → Language and regional settings.
Here, you can configure:
- Portal language: Set the default portal language for the account. New users are onboarded in this language. Individual users can change their language preference in their user profile.
- Date and time format: Set the default date and time display format for the account.
After making changes, select Save changes to apply them.