Salesforce Sales Cloud Integration to Sync Audience
For effective and successful communication with customers, access to user information is essential. The integration between Infobip and Salesforce enables you to access the user data that you have stored in Salesforce within Infobip People.
Synchronization of your user data between Salesforce and People is continuous, so the latest changes in one system are mirrored in the other. For example, if a person attribute is changed on one platform, the mapping feature synchronizes the data on the other platform to ensure that they match. Synchronization of your user data is seamless but if there are any inconsistencies in your data, you are able to resolve them.
You can concentrate on creating and sending messages to the relevant audience without the need to import leads or contacts manually. You can efficiently segment the audience for campaigns based on different characteristics (attributes) to ensure that you do not send a message to the wrong people.
What you will need
The main prerequisites for setting up the integration are:
- Infobip account
- A Salesforce user with permissions to edit leads and contacts, API calls, and add connected apps
- API calls must be enabled on the Salesforce side
- Existing users need the Infobip account with the Integrations Manager. Contact your dedicated Account Manager to learn more.
The following Salesforce editions with enabled API access are supported: Enterprise Edition, Unlimited Edition, Developer Edition, and Performance Edition.
Installation and configuration
To start integrating Salesforce and People, go to the Exchange marketplace and use the following overall step-by-step guide:
- Logon to Infobip and go to Exchange > All Apps.
- Open the Salesforce for People integration. Click Add.
- Select Credentials and add your credentials to allow Salesforce and Infobip platforms to communicate with each other.
- Choose a Profile sync that you want to use. For example, Salesforce Contacts to People Customers. Each Profile sync component represents the type of data that you want to sync between Salesforce and Infobip.
- Click Configure.
- Map the entities and the field mappings. See Mapping entities and fields for integration.
- Click Activate to start the flow.
Use the following instructions for setting up Salesforce access.
Add Salesforce access credentials [#add-salesforce-access-credentials-installation-and-configuration]
To allow data access in Salesforce, you need to create a Connected App for OAuth authorization. For more information, see the Create a Connected App instructions in the Salesforce documentation.
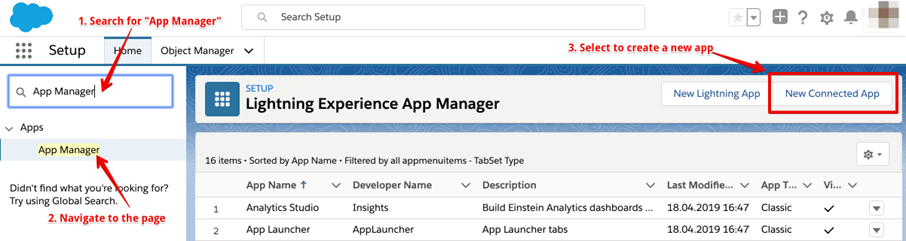
To set up a Connected App, in Salesforce, go to the Setup section.
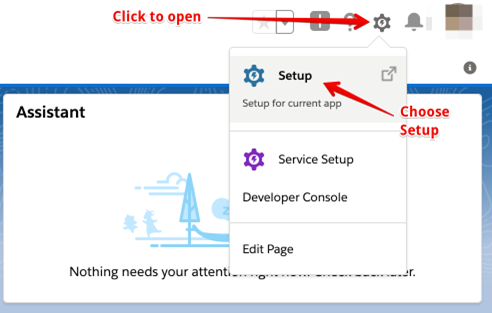
In the left-side menu, use Quick Find to search for App Manager. Select it and click New Connected App in the top right corner.
Add credentials to new connected app [#add-credentials-to-new-connected-app-installation-and-configuration]
Compete the basic information and then ensure that you select Enable OAuth Settings.
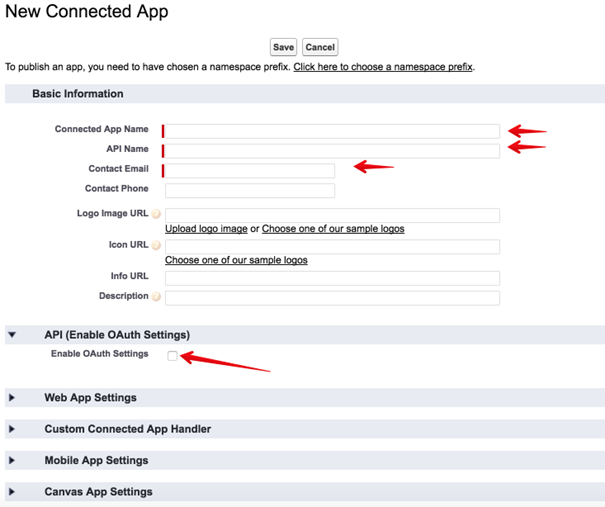
In the OAuth settings, select the scopes for the App and the callback URL that is used in the OAuth flow.
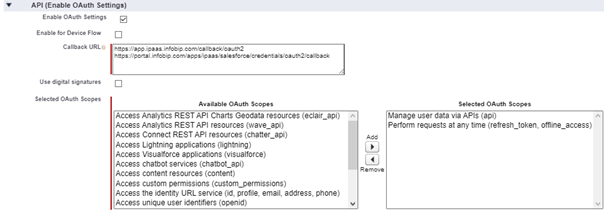
Update the Callback URL field to the following values:
-
callback URL:
https://app.ipaas.infobip.com/callback/oauth2 -
Salesforce OAuth2 callback URL (use the appropriate URL based on the location):
Frankfurt (FR) location
https://portal.infobip.com/exchange/apps/ipaas/salesforce/credentials/oauth2/callbackhttps://portal2.infobip.com/exchange/apps/ipaas/salesforce/credentials/oauth2/callback
European Union (EU) locations
https://portal-eu1.infobip.com/exchange/apps/ipaas/salesforce/credentials/oauth2/callbackhttps://portal-eu2.infobip.com/exchange/apps/ipaas/salesforce/credentials/oauth2/callback
All other locations
https://portal-<location>.infobip.com/exchange/apps/ipaas/salesforce/credentials/oauth2/callback
Replace<location>with the value in the portal URL you access after login
For the Selected OAuth scopes field, see the Salesforce documentation for the API (Enable OAuth Settings) requirements. In particular, special care must be taken to select at least these two settings:
- Full access (full)- allows access to all data accessible by the logged-in user, and encompasses all other scopes. This option does not return a refresh_token. For that purpose, you need to explicitly request the refresh_token scope.
- Perform requests on your behalf at any time (refresh_token, offline_access)- allows a refresh_token to be returned if you are eligible to receive one. This lets the app interact with the user’s data while the user is offline. The refresh_token scope is synonymous with offline_access.
In addition, it is important that you ensure that these settings are as follows:
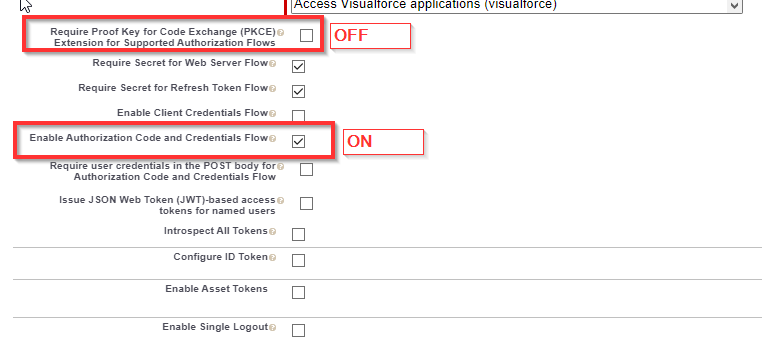
- Require Proof Key for Code Exchange (PKCE) Extension for Supported Authorization Flows
Ensure that this setting is not selected. - Enable Authorization Code and Credentials Flow
Ensure that this setting is selected.
Press Save to create your connected app for OAuth.
Add credentials to Infobip [#add-credentials-to-infobip-installation-and-configuration]
After creating the OAuth App, Salesforce shows a screen summarizing the app details.
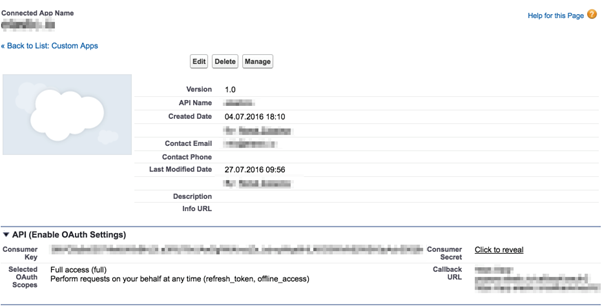
Copy the Consumer Key and the Consumer Secret and then go to the Add Credentials page in Infobip.

In the Client ID field, enter the Salesforce Consumer Key. In the Client secret field, enter the Salesforce Consumer Secret.
If you want to connect to a test/sandbox Salesforce instance, click the Sandbox switch to ON.
Mapping entities and fields for integration [#mapping-entities-and-fields-for-integration-installation-and-configuration]
On the Infobip Salesforce integration page, include the information that you want to be a part of this integration. Make sure that this information corresponds both on the Salesforce side and on the Infobip side.
Entities available for mapping in Salesforce:
- Lead – Someone who is not your client yet, but there are chances they might become one.
- Contact – Someone who is your client and you are doing business with them.
- Account- A business entity that is your client.
Entities available for mapping in People:
- Lead – Person in the Infobip People module whose information has not been confirmed.
- Customer - A person with confirmed contact information.
In People, you can add or change standard (first and last name, country, city) and custom attributes. In Salesforce, you can edit information about Contacts and Leads.
For successful integration, the mandatory fields must be completed. If some information is missing from the Infobip side (it is not available on the mapping drop-down menu), it can be created on the Configuration page in People.
After you have completed the mandatory fields and other mapping information, then set up either a one-way or two-way integration.
- One-way sets up an integration from one system to the other only
- Two-way sets up an integration so that the data is synchronized between Salesforce and Infobip in both directions
Automatic Synchronization of Leads, Contacts, and Person Profiles [#automatic-synchronization-of-leads-contacts-and-person-profiles-installation-and-configuration]
Any customer information and profiles that you create integrates between Salesforce and Infobip, either within bulk integrations or each time you enter new or modify the existing information in either system.
Changes on the Salesforce side appear in Infobip People with a delay of up to five minutes.
Create new lead or contact in Salesforce [#create-new-lead-or-contact-in-salesforce-installation-and-configuration]
In Infobip People, confirm that the lead or contact you want to create does not already exist. You can use the email address, first and last name, or company name. Next, open both Salesforce (with a user name that is not the admin user) and People.
In Salesforce, click Leads or Contacts > New and fill in the information in the pop-up form. When you have saved the information, refresh the Person Information page in People and you see the profile there too. If you are creating a Contact, it is saved in People as a Customer.

Create new lead or customer in People [#create-new-lead-or-customer-in-people-installation-and-configuration]
To create a new lead or customer in Infobip, use the Person Profile in People.
- In People, click Create Person Profile.
- In Contact Information, enter an email address or phone number.
- In **Basic Information,**enter your first and last name, address, and other optional information. Remember to select the Person Type as either Customer or Lead.
- Click Create Person to save the profile.
- Click Salesforce> Leads> Show All Open Leads. From the list of Leads, click the person whose information you want to see.