Hi, I’m Joanna, and I have just started learning Python. I have little coding background, I am a technical author who just likes to tinker with things unknown. 😉 I thought this short introduction to the Python SDK may empower other developers at the beginning of their coding adventure to start making amazing projects without too much prep work or technical knowledge.
Project setup
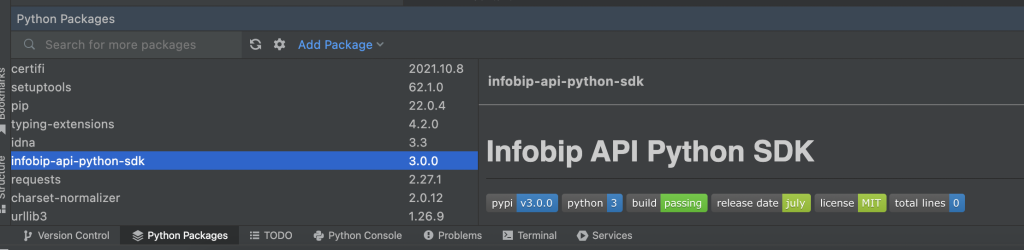
Our Python SDK lives on the PyPi website which serves as a repository of packages prepared for Python developers. Infobip Python SDK allows you to use several Infobip communication channels, like SMS, WhatsApp, and email, so you can use the SDK to send yourself a message. By default, you’ll get access to the latest version of the SDK, but you can browse through its version history and download previous versions if needed.
Setting up a local dev environment
I want to briefly explain how I have set up my local dev environment. As an IDE for my project, I have chosen to use PyCharm, so I will be referring to it from time to time, however, I will be flagging some universal concepts that are applicable to any tool you’ll end up working with.
I have created my infobip-python folder which I want to use for my project. Then, once you check whether you already have a virtual environment on your machine, you can head over to your terminal to install it. I’m using a Mac, so if you’re using a Windows machine, please Google these steps to see Windows-specific commands.
python -m pip listUse the following command to install the environment.
pip install virtualenvI then created a virtual environment on my local machine. You can use a terminal or you can do it from within PyCharm using its built-in terminal.
virtualenv venvTo finalize the setup, head over to your chosen IDE to start a new or open an existing project you’re going to work in and add to it your newly created virtual environment.
And so, I headed over to PyCharm and started a new project. I confirmed the path to my project and used the suggested new environment. I then headed to Preference to make sure Python Interpreter under Project is set to Python. Once this is done, I should be able to see in my PyCharm terminal that my project uses the virtual environment that I have just set up, because it shows (venv) in front of the path to my project.

Installing the SDK
SDKs need to be installed within the dev environment you’re going to develop your project. You’ll need to access it and within its terminal run the install command provided on the PyPi site.
pip install infobip-api-python-sdkAs soon as we install the package, we can start using it in our project.
SDK structure
the SDK does all the heavy lifting for you for some of the Infobip APIs that are available to developers as part of their free trial. All endpoints are available to call through appropriate classes that you can access as soon as you import the correct channel to your project. I will explain how to access and use them in the next sections of this post.
Authentication
Before we can use any API, we need to set up an authentication method. In this post, we’re going to use an API Key as a method of authentication. To successfully authenticate with the Infobip API, we need to provide both an API Key and the base URL that has been autogenerated when you created an Infobip account and is available to grab from the account’s main page.
I authenticate my main project with Infobip APIs by creating an authentication instance called a channel. As you can see from the code sample below, each communication channel (SMS, email, WhatsApp, etc.) needs to be authenticated separately.
channel = SMSChannel.from_auth_params(
{
"base_url": "19y4nk.api.infobip.com",
"api_key": "b07e1ed999abd7c7fec9740394fad724-re2cbbab-1ba3-4sfd-a303-61d25d995e11"
}
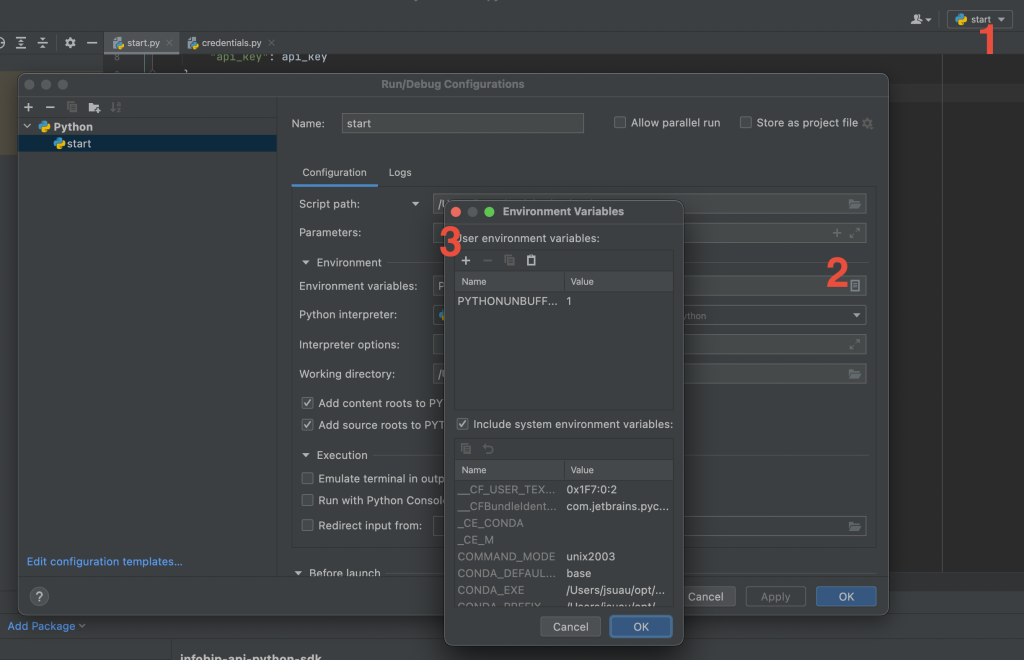
)Bear in mind that it’s not a good practice to expose your credentials in a project, so let me show you how you can use PyCharm to create environmental variables that will store this information for you. From within your project’s run configuration menu that you can access by clicking the downward-pointing arrow (1), select Edit Configuration…. Under Environment variables, click the file icon to access the file that stores your variables locally (2). Click the + icon to add your credentials (3). Make sure you follow the correct syntax and use snake case and all caps, e.g. (API_KEY, BASE_URL).
To let your main file know how to access the variables, you’ll need to import them.
import osAnd then you can access them with the os.environ[''] method and use them to authenticate Infobip API.
{
   "base_url": os.environ['BASE_URL'],
   "api_key": os.environ['API_KEY']
}
Accessing and extracting information
When making a specific API call using the Infobip Python SDK, you usually have to import a specific class. Each class contains all the data sent or returned as part of the API request you wish to make. The Python classes used to pass data to and from API endpoints are called models. Each model contains a set of methods to call. A method is nothing else but a function inside the class that will work with the object (instance) you want to declare in your project. In the case of our SDK, you’ll use the methods to pass the API body and parameters as defined by the SDK.
Importing classes
Models or classes that you can access in the SDK serve as a blueprint that you can use to define the nature of your instance. An instance is a specific object that you create based on a model that’s already defined in the SDK. Once you declare an instance, you can access all its methods that will in turn show you how to construct the payload they need to work.
First things first, we need to import the class that will determine what type of API we’re going to work with. At the time of writing, the Python SDK supports the following Infobip APIs: SMS, MMS, WhatsApp, RCS, webRTC, and email.
from infobip_channels.sms.channel import SMSChannelFrom there, you can access all methods available to the channel you have imported. These will be all endpoints available for the API you chose to work with. It is a good practice to wrap them in a variable so that you can print the response and see what happened. I will show you how to do this in the next section where we talk about calling methods.
Calling methods
Generally speaking, making API calls through the Python SDK requires calling defined methods from within a class. To see all methods available for a given module in PyCharm, once you input the full stop and then hover over the class instance, you’ll see the entire list.
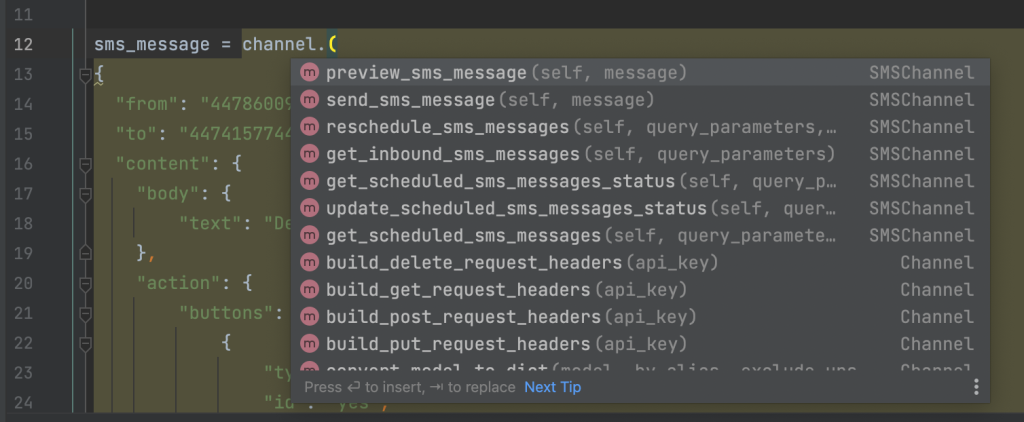
Once you access the correct method, the SDK will help you create the proper payload. For example, to send an SMS we will need to access the send_sms_message method available for the SMSChannel module (class). As mentioned before, each method that represents an HTTP request will need to include a correct payload that you can view in the Infobip API reference. Following our send SMS case, we would include the following payload within our send-sms-message method.
sms_response = channel.send_sms_message({
    "messages": [{
        "destinations": [{
            "to": ""
            }],
        "from": "InfobipSMS",
        "text": "Hi! I'm your first Infobip message. Have a lovely day!"
            }
        ]
    }
)
The SDK will take care of all data types and parse them correctly, so all you need to focus on is providing the correct payload that the SDK will then validate for you.
You’ve just seen how to pass a request body of a simple POST request. Now, I will show you how to pass in query parameters and body parameters. You just pass them in in order, so you’d start with your query parameter followed by your body request schema.
The example below shows you how to cancel a scheduled SMS for which you need to pass in its bulk ID as a query parameter and then the body request needs to define the status your message would get, which in this case is CANCELED.
canceled_sms = channel.update_scheduled_sms_messages_status(
    {"bulkId": "35823398891103573113"},
    {"status": "CANCELED"}
)
Handling new versions of the SDK
We bump the version with each change to the SDK so it’s easy for you to track changes done to the SDK. In PyCharm, every time I want to upgrade my SDK, I head to Python Packages and confirm the version of the SDK my project is using. If there’s a new version available on PyPi I just remove the current package and add the new version of the infobip-api-python-sdk package.