As an outcome of this guide, you will be able to leverage Infobip WhatsApp API and send an interactive WhatsApp message delivered to your handset.
Scenario overview
The WhatsApp sender sends a message with an image and a list of options a user can select. Once the user clicks on an option, a reply is sent back to the WhatsApp sender. That, in turn, can trigger an appropriate series of actions and responses, but this is out of scope for this guide. We will, however, discuss briefly how to intercept an incoming message with a webhook to see the user’s reply.
Prerequisites
• Working Python 3 environment
Difficulty level
This guide assumes basic knowledge of Python and basic familiarity with APIs. It is important, however, that you are familiar with the webhook technology if you wish to catch a user response. For ease of replicating the scenario, we have used a free online webhook tool, HookRelay. You may replace HookRelay with your own hook server if you need to process your events programmatically.
Summary of the steps
• Set up a webhook and add its URL to the WhatsApp sender number.
• Install the Infobip API Python SDK.
• Import WhatsApp Channel to create an instance.
• Add credentials, phone number, and WhatsApp payload to your instance.
• Send a WhatsApp message with an interactive list.
• Use the webhook to catch the user’s response.
Set up a webhook
For the purpose of this guide, we will use a simple online webhook tool, HookRelay. This section will show you how to create an account and configure the webhook with HookRelay.
Step 1. Sign in with git credentials
Sign in to HookRelay with your GitHub or GitLab credentials.
Step 2. Create a webhook
To create an inbound webhook, from your dashboard, click the New Hook button on the top right. That will take you to the configuration screen where all you need to provide is a descriptive name for your webhook, e.g. Infobip WhatsApp List Response.
Once you click the Create hook button, you’ll be able to view and copy its URL that you will need to add to your WhatsApp sender.
Add webhook URL to a WhatsApp sender
Head back to your Infobip account and access your WhatsApp sender configuration page (Channels and Numbers > WhatsApp).
- Select Senders and click the kebab (three-dot) menu on the WhatsApp sender’s tile to select Edit configuration.
- Enable the Forwarding to URL toggle to expand more options.
- Add the URL of the webhook to the URL field.
- Click Save.
That’s about it for webhook configuration. Let’s now move to creating a WhatsApp message using Infobip Python SDK.
Install the Infobip API Python SDK
Use your terminal or command prompt to install the Infobip Python SDK.
pip install infobip-api-python-sdkCreate a WhatsApp Channel instance
The WhatsAppChannel instance allows you to add your credentials and access all its methods. In this particular case, we’ll use the send_interactive_list_message method and add the WhatsApp interactive list payload to it.
Step 1. Import the WhatsAppChannel.
from infobip_channels.whatsapp.channel import WhatsAppChannelStep 2. Create WhatsAppChannel and add your unique base_url and api_key that you can access either from your Infobip account or from the Infobip API landing page once logged in.
channel = WhatsAppChannel.from_auth_params({
"base_url": "<your_base_url>",
"api_key": "<your_api_key>"
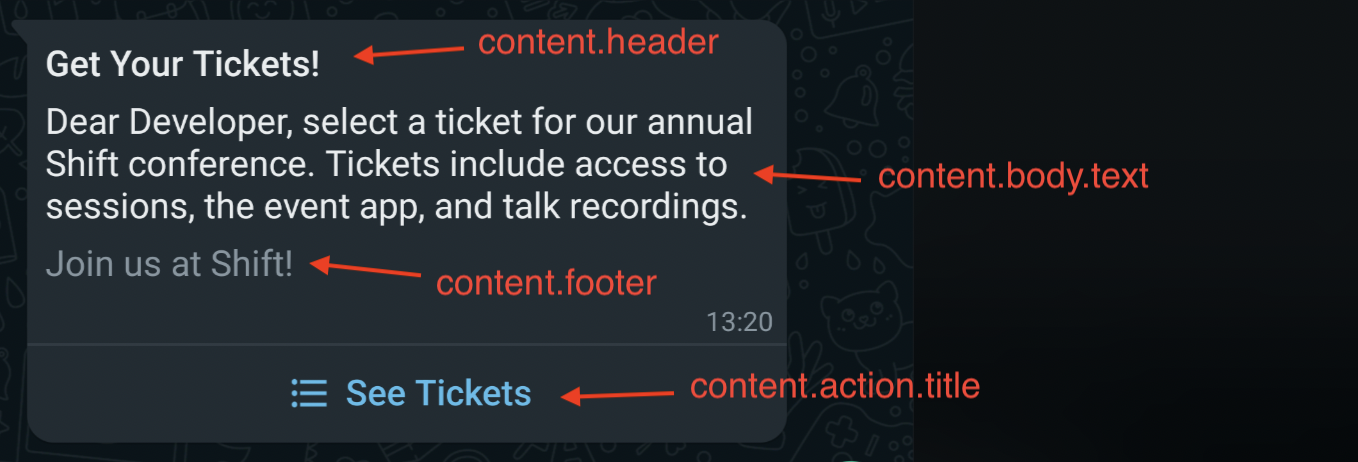
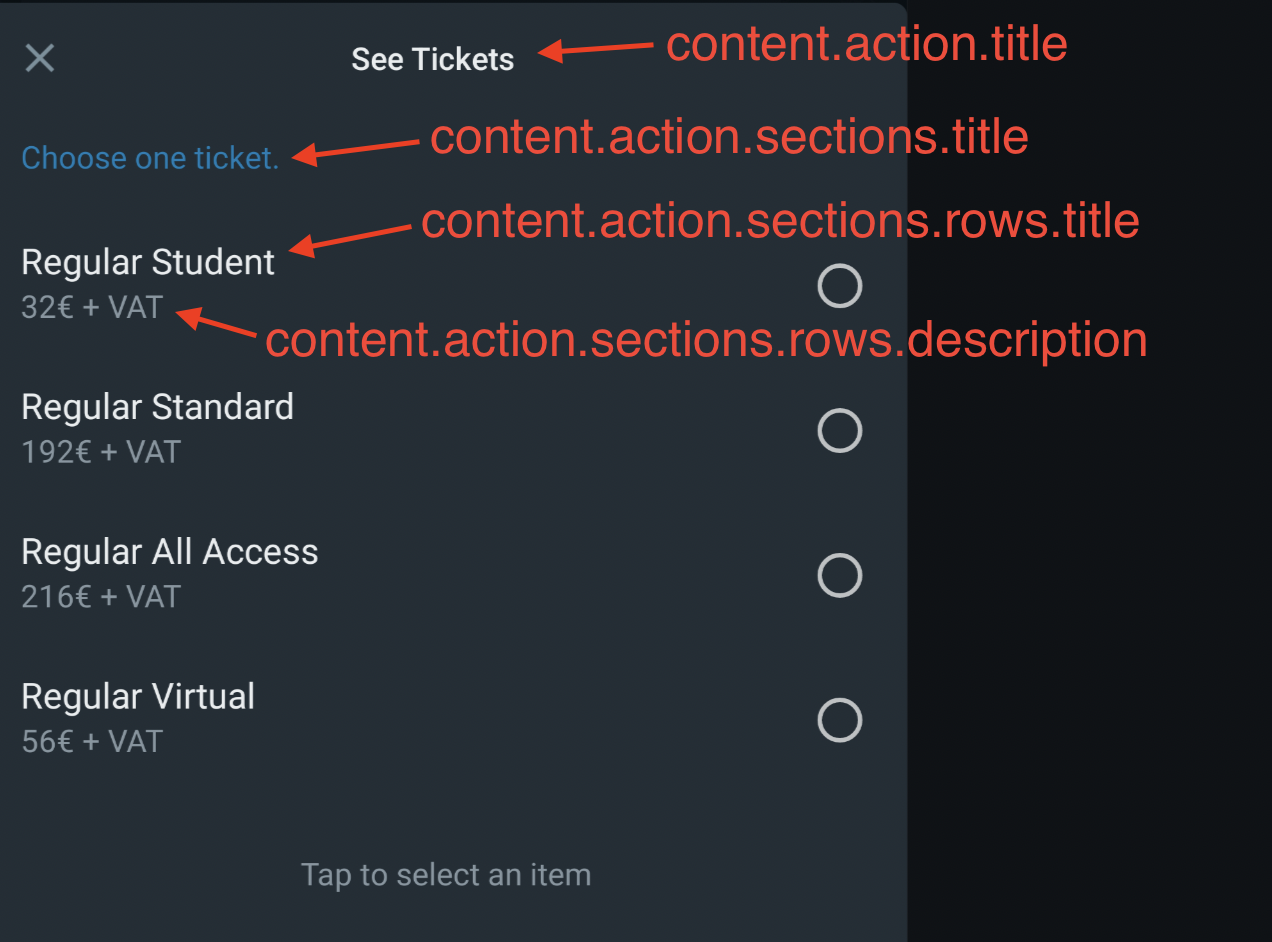
})Step 3. Use the send_interactive_list_message method to add the WhatsApp interactive list payload. We are going to send a message with an interactive list consisting of 4 options.
To make it easier for you to visualize, we have indicated in the image below which parts of the WhatsApp interactive list are driven from which fields in our WhatsApp API.
Key points:
• The to field must include a number in the international format, e.g. 447415774332.
• If using a free trial account, the phone number you use must be the same phone number you’ve registered on signup.
list_message = channel.send_interactive_list_message({
  "from": "447860099299",
  "to": "447435772332",
  "content": {
    "body": {
      "text": "Dear Developer, select a ticket for our annual Shift conference. Tickets include access to sessions, the event app, and talk recordings."
    },
    "action": {
      "title": "See Tickets",
      "sections": [
        {
          "title": "Choose one ticket.",
          "rows": [
            {
              "id": "1",
              "title": "Regular Student",
              "description": "32€ + VAT"
            },
            {
              "id": "2",
              "title": "Regular Standard",
              "description": "192€ + VAT"
            },
            {
              "id": "3",
              "title": "Regular All Access",
              "description": "216€ + VAT"
            },
            {
              "id": "4",
              "title": "Regular Virtual",
              "description": "56€ + VAT"
            }
          ]
        }
      ]
    },
    "header": {
      "type": "TEXT",
      "text": "Get Your Tickets!"
    },
    "footer": {
      "text": "Join us at Shift!"
    }
  }
})
Add multiple recipients and multiple messages
If you want to send multiple messages to multiple recipients in one request, use a templated WhatsApp message.
Monitor the progress of your WhatsApp message
Print the response variable to see whether the message has successfully left the Infobip platform. If you wish to know whether it’s been delivered to the recipient, you’ll need to set up a Delivery Report.
print(list_message)Once you run the code, you should receive a WhatsApp message on your handset and see a 200 OK response.
{
  "to": "441134960001",
  "messageCount": 1,
  "messageId": "a28dd97c-1ffb-4fcf-99f1-0b557ed381da",
  "status": {
    "groupId": 1,
    "groupName": "PENDING",
    "id": 7,
    "name": "PENDING_ENROUTE",
    "description": "Message sent to next instance"
  }
}
For troubleshooting and analytics, Use the auto-generated messageId to view the message and its details.
Catch the answer
Once a user selects an option from the list, your webhook that’s listening to that event will catch their reply. The message object will tell you which option has been selected and sent as an answer.
{
  "results": [
    {
      "from": "447435772332",
      "to": "447860099299",
      "integrationType": "WHATSAPP",
      "receivedAt": "2022-08-18T09:30:52.516+0000",
      "messageId": "ABEGRHQVd0QyAhCEOHQDx2_nQGlWh5eTJdht",
      "pairedMessageId": "e5ee7f2a-5d43-46e1-9e9c-08c83e1ae935",
      "callbackData": null,
      "message": {
        "id": "2",
        "title": "Regular Standard",
        "description": "192€ + VAT",
        "context": {
          "from": "447860099299",
          "id": "e5ee7f2a-5d43-46e1-9e9c-08c83e1ae935"
        },
        "type": "INTERACTIVE_LIST_REPLY"
      },
      "contact": {
        "name": "Joanna Suau"
      },
      "price": {
        "pricePerMessage": 0.0,
        "currency": "EUR"
      }
    }
  ],
  "messageCount": 1,
  "pendingMessageCount": 0
}