Send an interactive list with WhatsApp API
As an outcome of this guide, you will be able to leverage Infobip WhatsApp API and send an interactive WhatsApp message delivered to your handset.
Scenario overview [#scenario-overview]
The WhatsApp sender sends a message with an image and a list of options a user can select. Once the user clicks on an option, a reply is sent back to the WhatsApp sender. That, in turn, can trigger an appropriate series of actions and responses, but this is out of scope for this guide. We will, however, discuss briefly how to intercept an incoming message with a webhook to see a user's reply.
Prerequisites [#prerequisites]
- Infobip account. If you do not have one, create a free trial account.
- Infobip API key with the
whatsapp:message:sendscope. Find out more about scopes in API Authorization. - Your favorite HTTP client. In this example, we use
cURL. You can also choose an official Infobip SDK in your preferred programming language. - Sender. If in a free trial period, you can use Infobip test sender,
447860099299and activate it. If you want to configure a custom sender, request a new number or an alphanumeric sender through your Infobip account or use the Infobip Numbers API. - Destination - a phone number to which the message will be sent. In a free trial period, you can only send messages to a verified phone number.
Limitations [#limitations]
With WhatsApp, you can only send a message to your customer if they have contacted you first. This opens a 24-hour window for two-way communication. Otherwise, use a template message.
Difficulty level [#difficulty-level]
This guide assumes basic familiarity with APIs. It is important, however, that you are familiar with the webhook technology, if you wish to catch a user response. For ease of replicating the scenario, we have used a free online webhook tool, HookRelay. You may replace HookRelay with your own hook server if you need to process your events programmatically.
Summary of the steps [#steps-summary]
- Buy or configure an existing WhatsApp number capable of receiving incoming traffic.
- Set up a webhook.
- Add webhook details to the number you've purchased or configured.
- Send a WhatsApp message with an interactive list. The webhook will catch the response.
Buy a number [#buy-number]
To buy a number, you'll need to log into your Infobip account.
Skip this section, if using the Infobip test sender or an existing number.
- Expand the Channels and Numbers icon on the left-hand side menu, and select Channels.
- Select WhatsApp and click Register Sender.
- From the Register a WhatsApp sender screen, select the option you wish to choose for sender registration.
- Set up your number preferences, like a country, number type, etc.
You're all set for now. Once a webhook is configured, you'll come back to the number config to add its URL.
Set up a webhook [#set-up-webhook]
For the purpose of this guide, we will use a simple online webhook tool, HookRelay. This section will show you how to create an account and configure the webhook with HookRelay.
Step 1. Sign in with git credentials [#sign-in-with-git]
Sign into HookRelay with your GitHub or GitLab credentials.
Step 2. Create a webhook [#create-webhook]
To create an inbound webhook, from your dashboard, click the New Hook button on the top right. That will take you to the configuration screen where all you need providing is a descriptive name for your webhook, e.g. Infobip WhatsApp List Response.
Once you click the Create hook button, you'll be able to view and copy its URL that you will need to add to your WhatsApp sender.
Add webhook URL to a WhatsApp sender [#add-webhook-to-sender]
Head back to your Infobip account and access your WhatsApp sender configuration page (Channels and Numbers > WhatsApp).
- Select Senders and click the kebab (three-dot) menu on the WhatsApp sender's tile to select Edit configuration.
- Under Keywords add a new one or edit the existing default one.
- Under the Forwarding action section, select Forward to HTTP and add the webhook's URL to the URL field.
- Click Save.
That's about it for the webhook configuration. Let's now move to creating a WhatsApp message with an interactive list.
Send a WhatsApp message
We are going to send a message with an interactive list consisting of 4 options. We'll use the Send WhatsApp interactive list message endpoint.
To make it easier to visualize, the image below indicates which parts of the WhatsApp interactive list are driven from which fields in our WhatsApp API.

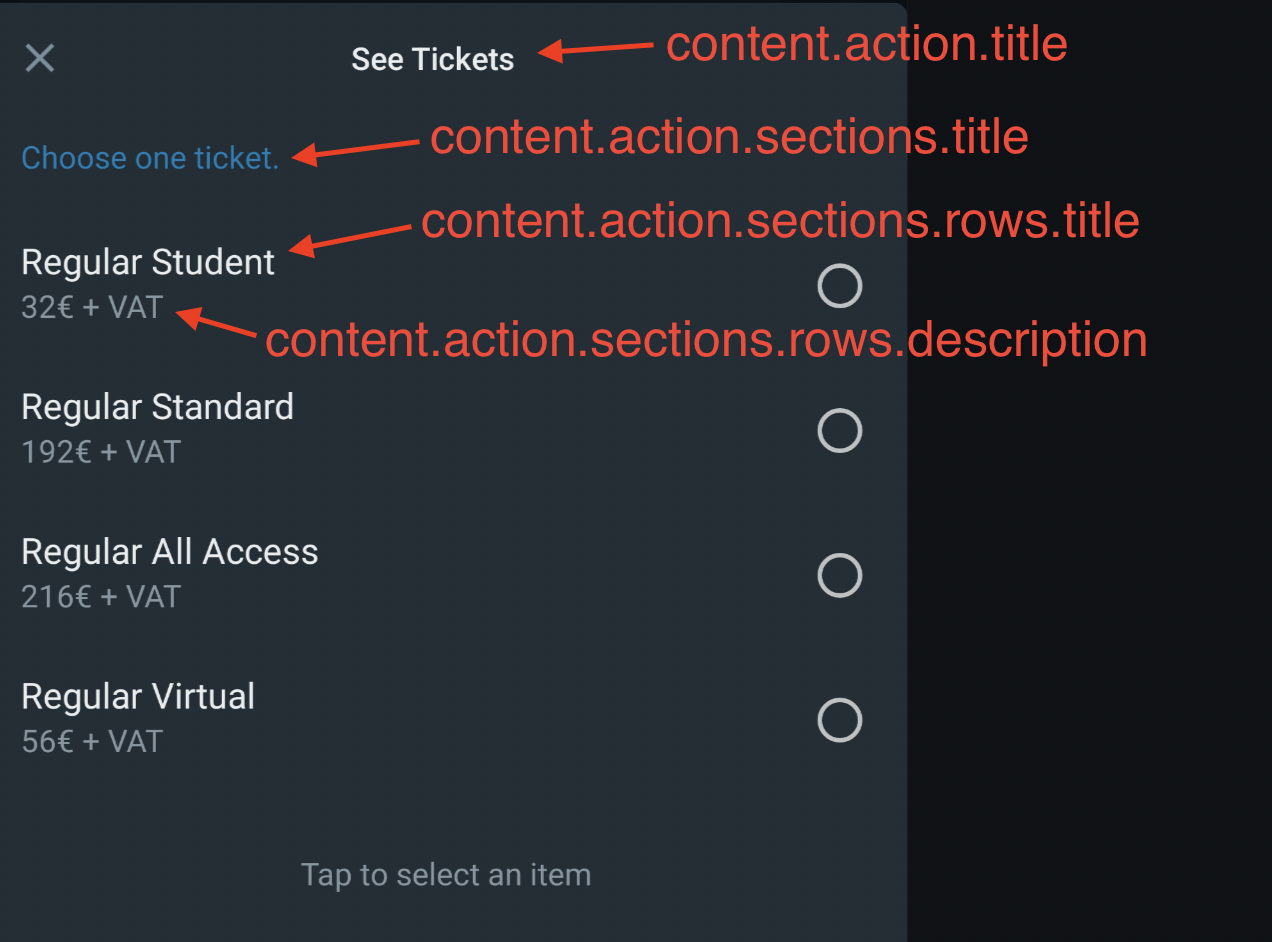
Key points:
- The
tofield must include a number in the international format, e.g.447415074332. - If using a free trial account, the phone number you use must be the same phone number you've registered on signup.
Add multiple recipients and multiple messages
If you want to send multiple messages to multiple recipients in one request, use a WhatsApp template message
Track message delivery
Once you send the request, you should receive a WhatsApp message on the handset you've specified in the to field and see a 200 OK response.
The response informs you that the message has successfully been queued within the Infobip platform and will be then sent to Meta depending on the throughput.
If you want to know whether it's been delivered to the recipient, use the Delivery Report feature.
Troubleshoot and analyze your message
For troubleshooting and analytics, use the auto-generated messageId to view the message and its details.
Catch the answer
Once a user selects an option from the list, your webhook that's listening to that event will catch the reply. The message object will tell you which option has been selected and sent as an answer.