In this post, you’ll create a weather app built with Flask to gather accurate weather reports of a location based on city name, state code, and country code. This app will use the Infobip Python SDK and send the info to your phone.
The complete source code for this project is in this GitHub repo, which you can try for yourself.
Before you begin
The following are must-haves to complete this tutorial.
- Understanding of Python and the Flask framework
- Python 3 installed on your development system
- An Infobip account. Sign up for a free trial
- OpenWeatherMap API – create an account for free
Setup and installation
Since we are using the Flask framework for the entire workflow of this tutorial, you need to create a weatherapi-with-python directory in your file system, which will contain all the project files and directories.
To bootstrap this app, run this command in the terminal window, which creates a virtual environment to manage all the dependencies for your project.
mkdir weatherapi-with-python
cd weatherapi-with-python
python3 -m venv .venv
source .venv/bin/activate
The source command activates the environment and shows the name of the activated environment.
(.venv) (base) ☁ weatherapi-with-pythonFlask will handle the application’s client side, allowing users to interact with the app using Python, and it will send notifications to your phone via SMS.
Let’s install the following Python packages within the activated environment to make this happen.
pip install Flask
pip install infobip-api-python-sdk
The Infobip SDK is the Python package responsible for sending SMS messages. It is also effective in other communication channels like WhatsApp, Email, MMS, and so on.
Environment variables
The environment variables cut across different programming languages, which serve as a file to keep secrets and protect them from being leaked when pushing your code to GitHub.
Create a “.env” file within the top level of your working directory and include the OpenWeatherMap API.
OWM_API_KEY="<open-weather-map-api-key>"PS: Replace the value in quotes with yours.
Also, for the safety of your private keys, create a .gitignore file and include the .env file. You can include other files you do not want to share.
Your directory structure will look like this:
weatherapi-with-python/
        .env
        .gitignore
Implementing the weather data retrieval module, weather.py
Before updating the project with code, we will work with two Python files for different purposes.
First, create the weather.py file in the working directory:
weatherapi-with-python/
        .env
        .gitignore
        weather.py
The dependencies for this project will include the following in the requirements.txt:
Flask
requests
python-dotenv
infobip-api-python-sdk
You can run pip install -r requirements.txt to make sure these are all installed.
The updated directory structure will look like this:
weatherapi-with-python/
        .env
        .gitignore
        weather.py
        requirements.txt
Copy-paste this code into weather.py:
import requests
import os
from dotenv import load_dotenv
from dataclasses import dataclass


load_dotenv()
API_KEY = os.environ["OWM_API_KEY"]
OWM_ENDPOINT = "https://api.openweathermap.org/data/2.5/weather"

@dataclass
class WeatherData:
    main: str
    description: str
    latitude: float
    longitude: float
    temperature: int

def get_lat_lon(city_name, state_code, country_code, API_KEY):
    resp = requests.get(f'http://api.openweathermap.org/geo/1.0/direct?q={city_name},{state_code},{country_code}&appid={API_KEY}')
    data = resp.json()
    if data:
        location = data[0]
        return location.get('lat'), location.get('lon')
    else:
        return None, None


def get_current_weather(lat, lon, API_KEY):
    params = {
        "lat": lat,
        "lon": lon,
        "appid": API_KEY,
        "units": "metric"
    }
    resp = requests.get(OWM_ENDPOINT, params=params)
    data = resp.json()
    weather = data["weather"][0]
    main = weather["main"]
    description = weather["description"]
    latitude = float(data["coord"]["lat"])
    longitude = float(data["coord"]["lon"])
    temperature = int(data["main"]["temp"])
    return WeatherData(main, description, temperature, latitude, longitude)


def main(city_name, state_name, country_name):
    lat, lon = get_lat_lon(city_name, state_name, country_name, API_KEY)
    weather_data = get_current_weather(lat, lon, API_KEY)
    return weather_data

if __name__ == "__main__":
    lat, lon = get_lat_lon("Yakutsk", "YA", "RU", API_KEY)
    if lat is not None and lon is not None:
        weather_data = get_current_weather(lat, lon, API_KEY)
        if weather_data is not None:
            print(weather_data)
        else:
            print("Failed to retrieve weather data.")
    else:
        print("Failed to retrieve latitude and longitude.")
We import the various modules – requests, os, dotenv, and dataclasses – using the import statement.
Next is to call load_dotenv() to gain access to the environment variable and define the variables API_KEY and OWM_Endpoint.
The @dataclass decorator creates a structure with data classes to access only the information we need from the OpenWeather API endpoint response objects. That means we define a data class object to store and retrieve the necessary information with their data types mapped to the keys.
The get_lat_lon function takes in the parameters, and within the function, it reads data from the json() objects and returns the latitude and longitude of a particular location.
The get_current_weather function will access the current weather data for any location on earth and return the WeatherData class, accepting the parameters from the data classes defined in the @dataclass decorator.
In the defined main function, we pass the already defined get_lat_lon and get_current_weather function, which will be imported as a module in the app.py file.
Creating the app.py
In the root directory, create the app.py file, the app’s entry point containing the code to send an SMS. The structure of the directory will be as follows:
weatherapi-with-python/
        .env
        .gitignore
        app.py
        weather.py
        requirements.txt
At this point, add these lines of code to the app.py file:
from flask import Flask

app = Flask(__name__)

@app.route(“/”)
def index():
    return “weather app!”
Start the development server with the command flask run, which outputs the port on localhost:5000 and displays the message weather app!.
Creating the layout view
The layout view handles how the page structure looks using HTML elements. Behind the scenes, Flask uses the templates folder to be able to render the page properly.
In the working directory, create a new directory called templates and, inside this folder, add a file called index.html with the following code.
<html lang="en">
<head>
<meta charset="UTF-8" />
<meta name="viewport" content="width=device-width, initial-scale=1.0" />
<meta
name="description"
content="Using the open weather API and Infobip to send reports of the weather at a specific location as SMS" />
<title>Get accurate weather reports from anywhere</title>
<script src="https://cdn.tailwindcss.com"></script>
</head>
<body>
<div class='min-h-screen py-8 flex flex-col overflow-hidden'>
<h1 class="text-3xl font-bold text-center mb-5">Weather App</h1>
<div class="container max-w-7xl mx-auto w-3/4">
<form action="{{url_for("index")}}" method="POST">
<div>
<label for="cityName" class="block text-gray-700 font-bold mb-2"
>City name</label
>
<input
type="text"
id="cityName"
required
name="cityName"
placeholder="city"
class="w-full px-4 py-2 border rounded-lg mb-5 mt-3 text-gray-700 bg-white border-gray-300 appearance-none block leading-normal focus:outline-none" />
</div>
<div>
<label for="stateName" class="block text-gray-700 font-bold mb-2"
>State code</label
>
<input
type="text"
id="stateName"
required
name="stateName"
placeholder="KD"
class="w-full px-4 py-2 border rounded-lg mb-5 mt-3 text-gray-700 bg-white border-gray-300 appearance-none block leading-normal focus:outline-none" />
</div>
<div>
<label for="countryName" class="block text-gray-700 font-bold mb-2"
>Country code</label
>
<input
type="text"
id="countryName"
required
name="countryName"
placeholder="NG"
class="w-full px-4 py-2 border rounded-lg mb-5 mt-3 text-gray-700 bg-white border-gray-300 appearance-none block leading-normal focus:outline-none" />
</div>
<button
type="submit"
class="flex-shrink-0 text-white bg-indigo-500 border-0 py-2 px-8 focus:outline-none hover:bg-indigo-600 rounded text-lg mt-8 sm:mt-0">
SMS weather report
</button>
</form>
</div>
<footer class="mt-auto flex items-center justify-center">
<p>Infobip © 2024. Build by Teri</p>
</footer>
</div>
</body>
</html>
The project directory tree now looks like this:
weatherapi-with-python/
        .env
        .gitignore
        app.py
        weather.py
        requirements.txt
        templates/
                index.html
The <head> section contains the meta description: the web app’s information, title, and Tailwind CSS CDN in the script tag. Tailwind CSS provides utility-first CSS classes within the HTML elements.
The <body> section comprises the HTML <form> tag wrapped around the text input that accepts values from the user and a button that sends a POST request on click.
Next, to handle the request from the index.html, let’s update the app.py file with the render_template() method, which renders a template and request object used to access request data from the input.
Update your app.py file with this line:
from flask import Flask, render_template, request
from weather import main as get_weather
The weather module is from the weather.py file, and the main function with an alias of get_weather.
Also, update the index() function as follows:
@app.route("/", methods=["GET", "POST"])
def index():
    data = None
    degree_sign = u"\N{DEGREE SIGN}"
    if request.method == "POST":
        city_name = request.form.get("cityName")
        state_code = request.form.get("stateName")
        country_code = request.form.get("countryName")
        data = get_weather(city_name, state_code, country_code)
        if city_name and state_code and country_code:
            data = get_weather(city_name, state_code, country_code)
            message = f"Weather for {city_name.title()}(lat: {data.latitude}, lon: {data.longitude}): temperature of {data.temperature}{degree_sign}C with {data.description}"
            print(message)
    return render_template("index.html")
The above code snippets run only when the condition is met for the HTTP method POST request. The index() function queries the OpenWeather API to get the values for the location entered in the input fields. It displays accurate info for latitude, longitude, name of the city, temperature, and the description of the weather in the terminal.
To continually reload the page on file change, enable the debug mode using the --debug option in the terminal:
flask --app app run --debug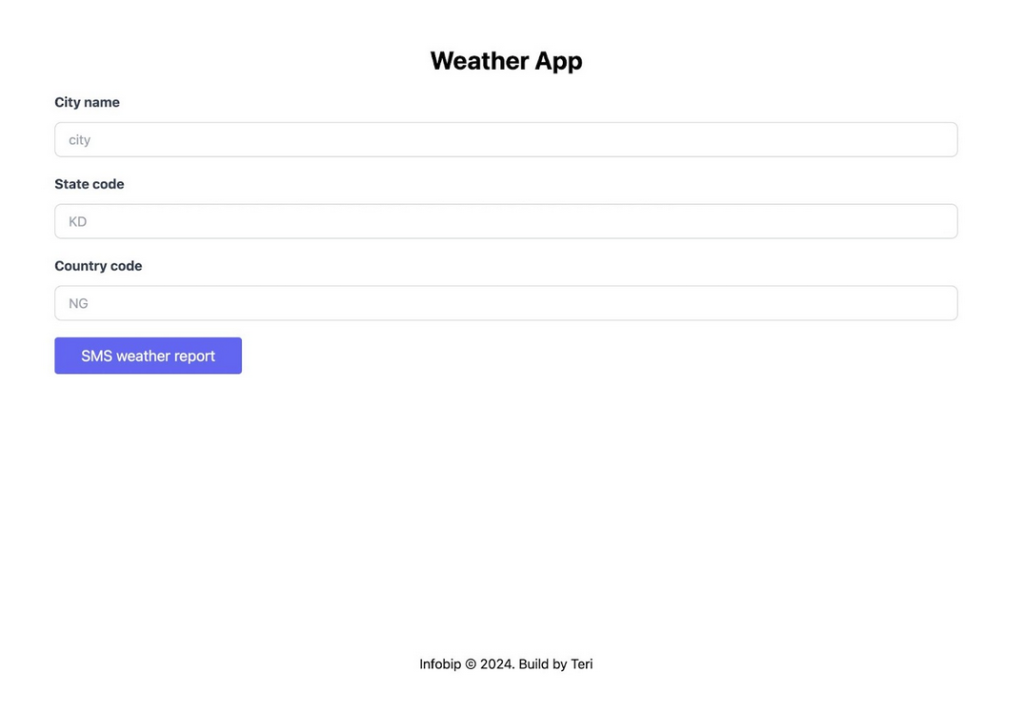
Integrating with Infobip Python SDK for SMS notifications
To use and integrate Infobip into the application, you need the following:
- Infobip API key
- The base URL
- Your phone number you like to send the SMS. If this is a trial account, your verified number for the platform is what is used
All this information can be accessed from your user portal dashboard after logging in to your account.
To learn more, check out the documentation.
Let’s include these three variables from your user portal dashboard in the .env file as shown:
OWM_API_KEY="<open-weather-map-api-key>"
IB_BASE_URL="<your API Base URL>"
IB_API_KEY="<your API Key>"
DESTINATION_NUMBER="<your phone number>"
The Infobip Python SDK uses the first two variables, IB_BASE_URL and IB_API_KEY, under the hood. At the same time, the destination number will be accessed directly in the code using the os.environ, which means accessing the stored environment variables from the `.env` file.
PS: Ensure you use the same naming convention for the Infobip variables in the .env file for the app to function.
Now import these two modules into the app.py file:
from infobip_channels.sms.channel import SMSChannel
import os
Finally, add this function:
def send_sms_from_app(text):
    channel = SMSChannel.from_env()
    sms_response = channel.send_sms_message({
        'messages': [{
            'from': 'Real-time weather info',
            'text': text,
            'destinations': [{
                'to': os.environ['DESTINATION_NUMBER']
            }],
        }]
    })
    print(sms_response)
The send_sms_from_app function accepts a text parameter and sets up the SMS channel from the variables set earlier. After that, the channel uses the object to send the SMS, accepting a message title from the sender and the text, which will be the actual weather data report and the destination number of the recipient.
To validate that the message is sent, we print out a response from the API showing the status code OK of `200` in the terminal.
Now, replace the print(message) in the index function with the send_sms_from_app function, passing the arguments, message:
@app.route("/", methods=["GET", "POST"])
def index():
    data = None
    degree_sign = u"\N{DEGREE SIGN}"
    if request.method == "POST":
        city_name = request.form.get("cityName")
        state_code = request.form.get("stateName")
        country_code = request.form.get("countryName")
        data = get_weather(city_name, state_code, country_code)
        if city_name and state_code and country_code:
            data = get_weather(city_name, state_code, country_code)
            message = f"Weather for {city_name.title()}(lat: {data.latitude}, lon: {data.longitude}): temperature of {data.temperature}{degree_sign}C with {data.description}"
            send_sms_from_app(message)
    return render_template("index.html")
This code snippet sends an instant message to the destination number on click of the button, SMS weather report.
Conclusion
The ability to send reports in real-time makes Infobip a great choice, as it is packed with a rich set of tools that can be expanded to reach a wider audience on mobile devices. If you add more features to this demo app, share it with us on Discord.