Send your first WhatsApp message through Oracle Responsys
The Infobip WhatsApp messaging for Oracle Responsys integration allows you to send promotional and transactional messages directly from Oracle Responsys.
Follow this tutorial to set up and send your first WhatsApp message through Responsys.
Prerequisites
- Infobip account. If you do not have one, you can create a free trial account.
- Oracle Eloqua account.
- WhatsApp setup in Infobip:
Implementation
Step 1: Add Infobip integration to Oracle Responsys [#step-1-add-infobip-integration-to-oracle-implementation]
Go to the Oracle Cloud Marketplace and search for the Infobip WhatsApp messaging app. Click Get App to add the app to your Oracle account.
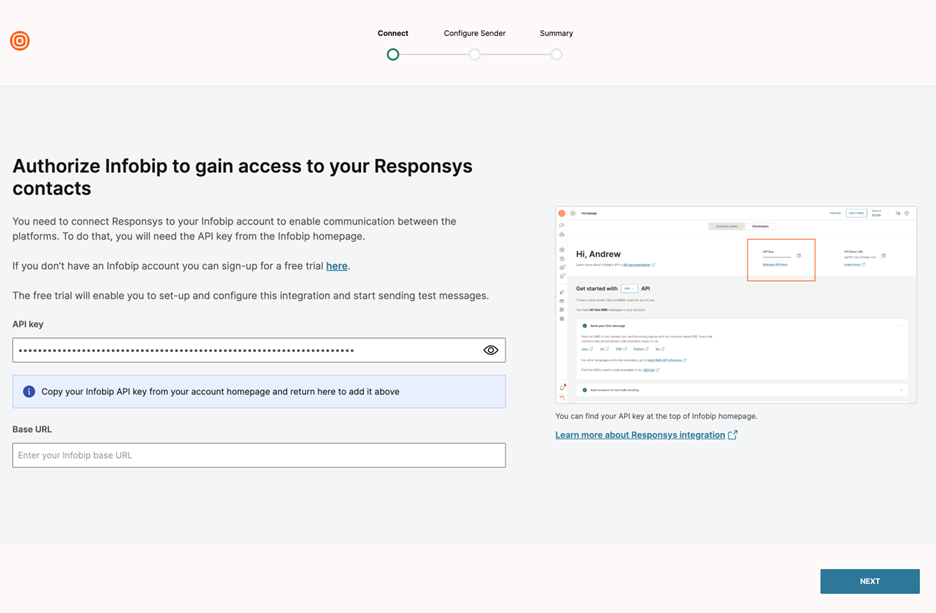
Step 2: Create and enter your API key and base URL [#step-2-create-and-enter-api-key-and-base-url-implementation]
Log in to your Infobip account in a new tab. Copy the API Base URL from the Infobip home page and paste it into the Oracle Responsys integration.
Select Manage API Keys from the Infobip account home page, and then click Create API Key to create a key for your Responsys integration.
Enter a name for this API Key, e.g., Responsys WhatsApp key. Under API Scopes, select the following scopes:
- General:
- inbound-message:read
- message:send
- Channels:
- whatsapp:inbound-message:read
- whatsapp:logs:read
- whatsapp:manage
- whatsapp:message:send
- Platform:
- messages-api:manage
- messages-api:message:send
- numbers:manage
Click Create and then copy the API key. Note that the key will only be available to copy for 2 days. Paste it into the Oracle Responsys integration. Click Next to continue.
Step 3: Enable and configure WhatsApp [#step-3-enable-and-configure-whatsapp-implementation]
Click the Enable WhatsApp toggle to turn it on. Select your default sender from the list and click Next. Review your settings, then click Finish to save the configuration.
Step 4: Create a testing program in Oracle Responsys [#step-4-create-a-testing-program-in-oracle-implementation]
The next step is to set up a program in Oracle Responsys. This program will send a WhatsApp message to numbers stored in the MOBILE_NUMBER_ field in Profile Lists who have opted in.
In Oracle Responsys, go to Program in the top menu. Select Create Program, then give this test program a name, e.g., Test WhatsApp Program. Select a folder to store the program and the contact list you will use for this program. Then click Create.
In the Program Designer, drag the Scheduled filter or view starting event to the canvas. Filter the audience to only include customers who have opted in.
Drag the Infobip Apps element to the canvas. Right-click the element and select Configure app.
After the Configure senders screen opens, select WhatsApp as your channel and click Next. Select your sender, template type, and template from the drop-down lists. If you do not see these listed, you may need to define them in your Infobip account before continuing.
Define your test message in the Body textbox, e.g., This is a test message from Responsys.
Set the Timeout for message status to 10 minutes. Click Submit to save the configuration.
Step 5: Validate and publish to send your test message [#step-5-validate-and-publish-implementation]
Drag the End element to the canvas. Draw lines from the Scheduled filter to the Infobip app, and from the Infobip app to the End element.
Click Validate to ensure the program is set up correctly. Click Test → Promote draft.
Click Test settings and select a proof list → OK. Click Test to send the message to your proof list.