Manage roles
Learn more about user roles, what they are, how they work, and how they intersect with the features enabled on the account.
Roles and features
Roles and features form the foundation of permission management within the Infobip web interface.
- Roles define a set of permissions assigned to users, determining what they can access, view, or modify within the platform. You can think of a role as an official designation that governs user capabilities.
- Features refer to specific functionalities, performance aspects, or attributes of the product. Access to these features is granted based on the user’s assigned role.
By assigning roles to users, administrators control which features are available to each user, ensuring proper access control and system security.
Not every role has all the permissions related to a specific feature. For example, the Analyze manager role can see Accounts and Users (because Reports can be filtered by account and by user), but cannot edit these features.
Predefined roles
A role represents a set of responsibilities typically performed by a user on the Infobip web interface. Roles determine access levels and permissions, ensuring each user has the right capabilities for their tasks.
General roles [#general-roles-predefined-roles]
| Role | Description |
|---|---|
| Account admin | Account access, security, two-factor authentication, password policies, API keys. |
| Analyze manager | Tracks message and channel metrics, creates reports, and finds delivery issues in logs. |
| Campaign manager | Broadcast: Sends messages. Journeys: Creates and designs draft journeys. |
| Flow controller | Launches and stops existing journeys. |
| Finance manager | Adds money to the account balance and oversees messaging cost with access to financial analytics. |
| Customer profile manager | Manages profiles in Customer Profiles, the customer data platform. |
| Channel setup and integrations | Setting up communication channels and third-party integrations. Includes number purchase, email domain configuration, connecting databases, and other preparations required to send or receive calls and messages. |
Conversations roles [#conversations-roles-predefined-roles]
| Role | Description |
|---|---|
| Conversations setup | Establish queues, routes, automations, and other settings needed for Conversations to work. |
| Agent for Conversations | Replies to conversations assigned to them. |
| Analytics for Conversations | Tracking conversation efficiency on dashboards, report scheduling, and exchanging data with other systems. |
| Supervisor for Conversations | Manages all conversations, regardless of assignment. |
| Viewer for Conversations | Views conversations in assigned queues for monitoring or compliance. Does not consume a seat, impact capacity or analytics, or allow replying to conversations. |
Inbox roles [#inbox-roles-predefined-roles]
| Role | Description |
|---|---|
| Inbox setup | Establish queues, routes, automations, and other settings needed for Inbox to work. |
| Agent for Inbox | Replies to conversations assigned to them. |
| Analytics for Inbox | Tracking conversation efficiency on dashboards, report scheduling, and exchanging data with other systems. |
| Supervisor for Inbox | Manages all conversations, regardless of assignment. |
| Viewer for Inbox | Views conversations in assigned queues for monitoring or compliance. Does not consume a seat, impact capacity or analytics, or allow replying to conversations. |
AI Agents roles [#ai-agents-roles-predefined-roles]
| Role | Description |
|---|---|
| AI Agents viewer | Views AI agents and their settings. |
| AI Agents manager | Creates, edits, deletes, tests, and activates AI agents. |
Chatbots roles [#chatbots-roles-predefined-roles]
| Role | Description |
|---|---|
| Chatbot designer | Creates and edits chatbots. Can view all chatbots, their status, and analytics. |
| Chatbot manager | Activates chatbots so they become available to their audience. |
| Chatbots viewer | Monitors chatbots and analytics with view-only access. |
Journeys and Customer Profiles roles [#journeys-and-customer-profiles-roles-predefined-roles]
| Role | Description |
|---|---|
| Journey manager | Creates journeys and manages Broadcast campaigns. |
| Journey publisher | Launches journeys. |
| Customer profile manager | Manages profiles in the Customer Profiles data platform. |
| Content manager | Manages messages for journeys. |
Answers roles [#answers-roles-predefined-roles]
| Role | Description |
|---|---|
| Chatbot designer | Creates and edits chatbots in Answers. Can view all chatbots, their status, and analytics. |
| Chatbot publisher | Activates chatbots in Answers so they become available to their audience. |
| Chatbot (view only) | Monitors chatbots and analytics in Answers with view-only access. |
Knowledge Base roles [#knowledge-base-roles-predefined-roles]
| Role | Description |
|---|---|
| Knowledge base manager | Creates, edits, and publishes the knowledge base. |
| Knowledge base user | Has access to published content in the knowledge base. |
Content roles [#content-roles-predefined-roles]
| Role | Description |
|---|---|
| Campaign approval manager | Checks prepared campaigns and launches them in Broadcast. |
| Campaign content creator | Creates content and prepares audience for Broadcast campaigns but cannot send messages. |
| Content manager | Manages creation and editing of message content with the permission to delete content. |
Custom roles
Custom roles allow for tailored permission sets based on unique organizational needs. However, we recommend using predefined roles whenever possible:
- Predefined roles are automatically updated to support new features and capabilities.
- Custom roles must be updated manually by request, which may introduce delays in accessing the latest functionalities.
Use custom roles only when standard roles do not meet your specific requirements.
View, edit, and add roles
Roles define what users can view or manage within the Infobip web interface. Assign roles to ensure users have access only to the areas relevant to their responsibilities.
To access the list of roles:
- Log in to your Infobip account.
- In the navigation menu, select the Profile icon.
- Go to Account settings → Roles.
You will see two tabs:
- Default: View and manage predefined system roles.
- Custom: View, create, and manage roles tailored to your organization’s needs.
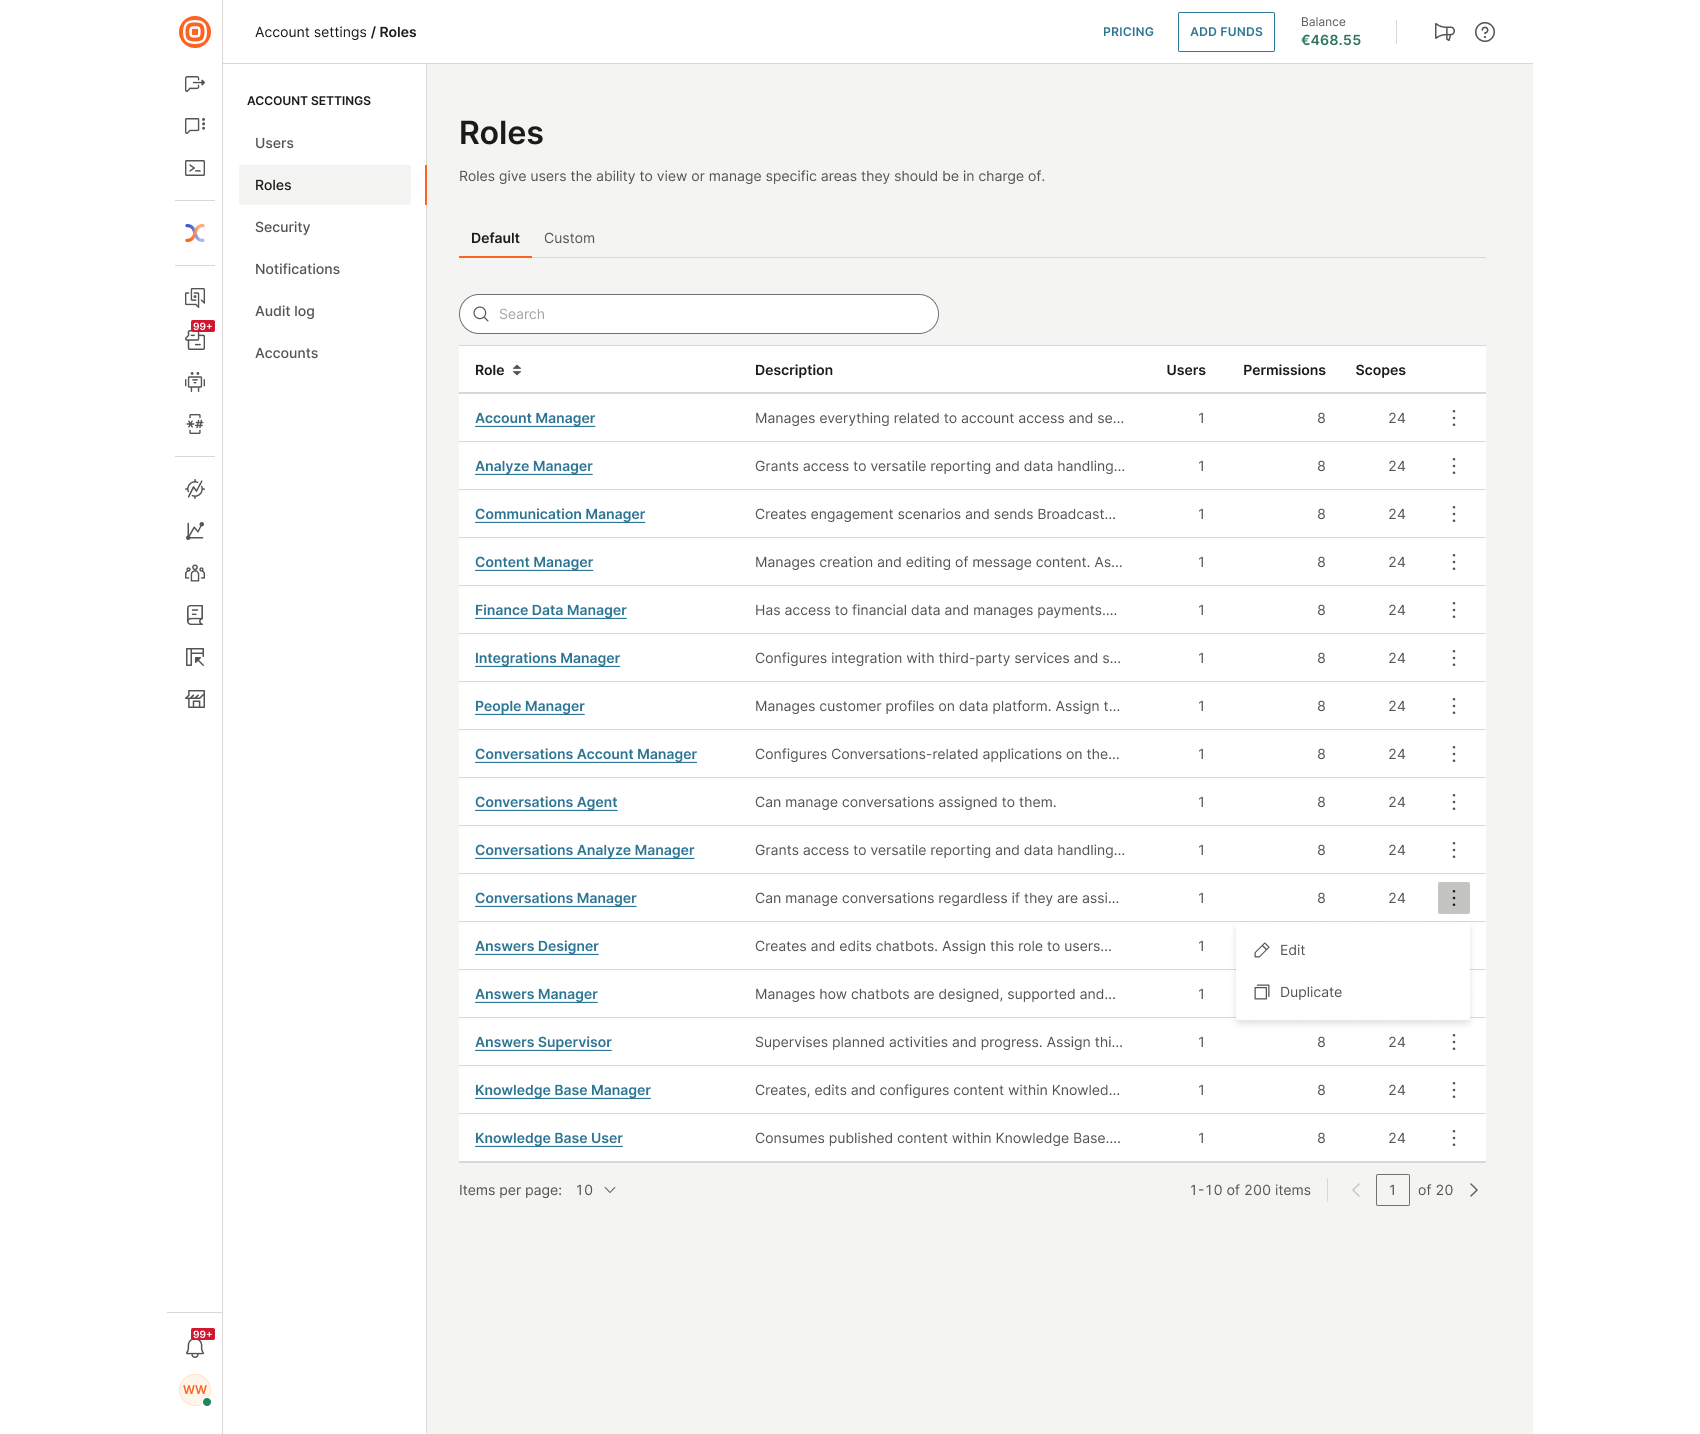
Manage default roles
The Default tab displays all predefined roles, each with the following details:
- Role name
- Description
- Number of users
- Number of permissions
- Number of scopes
Select the three-dot menu next to a role to edit or duplicate it. Default roles can be modified by updating their membership. For example, if you open the Account admin role for editing, you can add users to the role and then select Save to apply the changes.
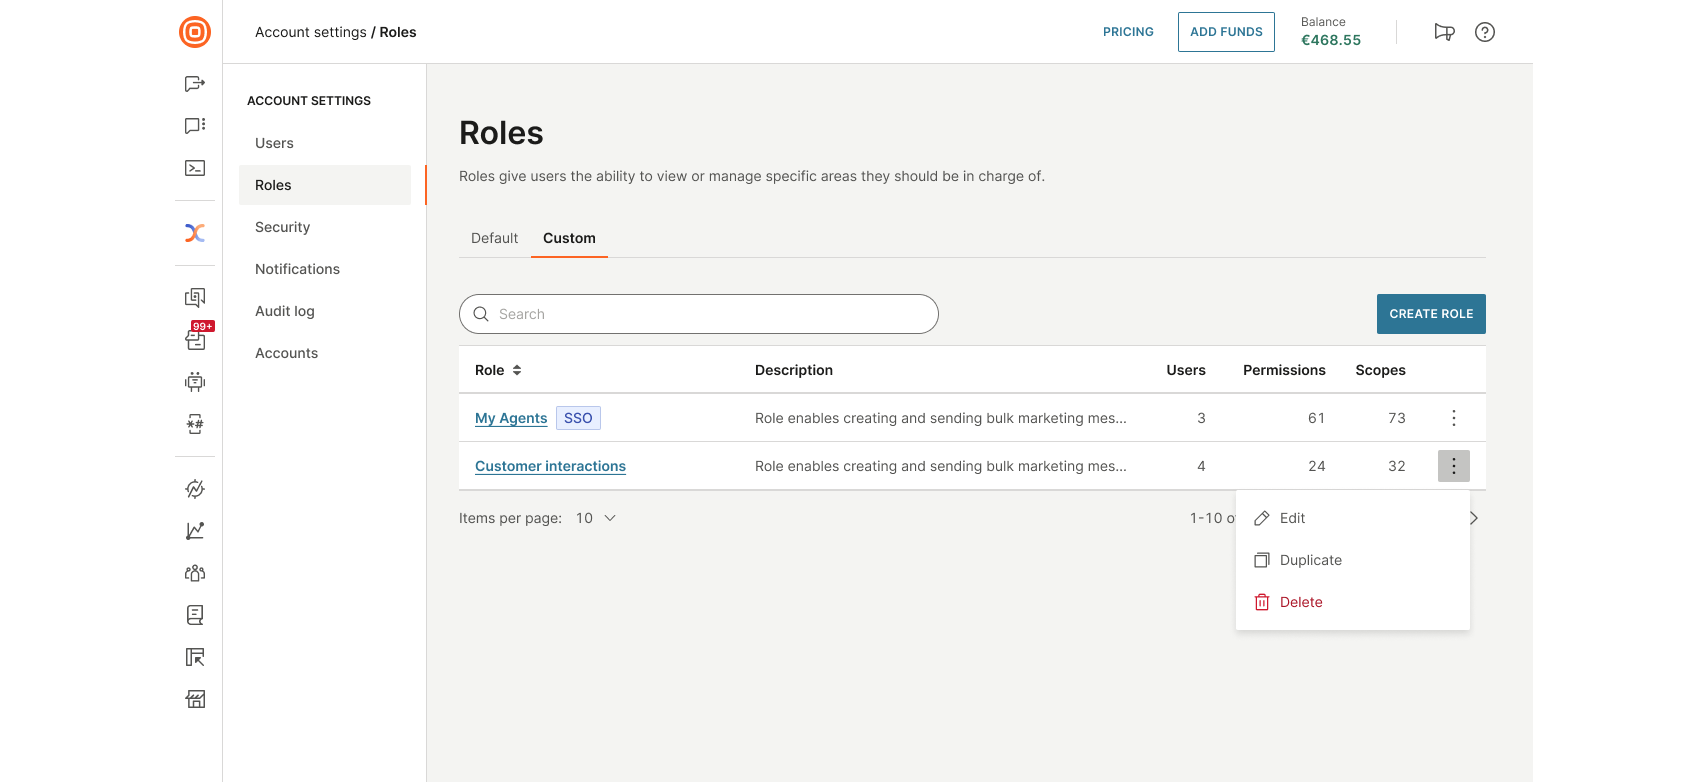
Manage custom roles
In the Custom tab, you can:
- Search for custom roles using the search bar
- View details such as:
- Role name
- Description
- Number of assigned users
- Number of permissions
- Number of scopes
Use the three-dot menu to edit, duplicate, or delete a custom role.
Create a custom role [#create-a-custom-role-manage-custom-roles]
To define a role tailored to your organization’s needs:
- Go to the Custom tab in the Roles section.
- Select the Create Role button.
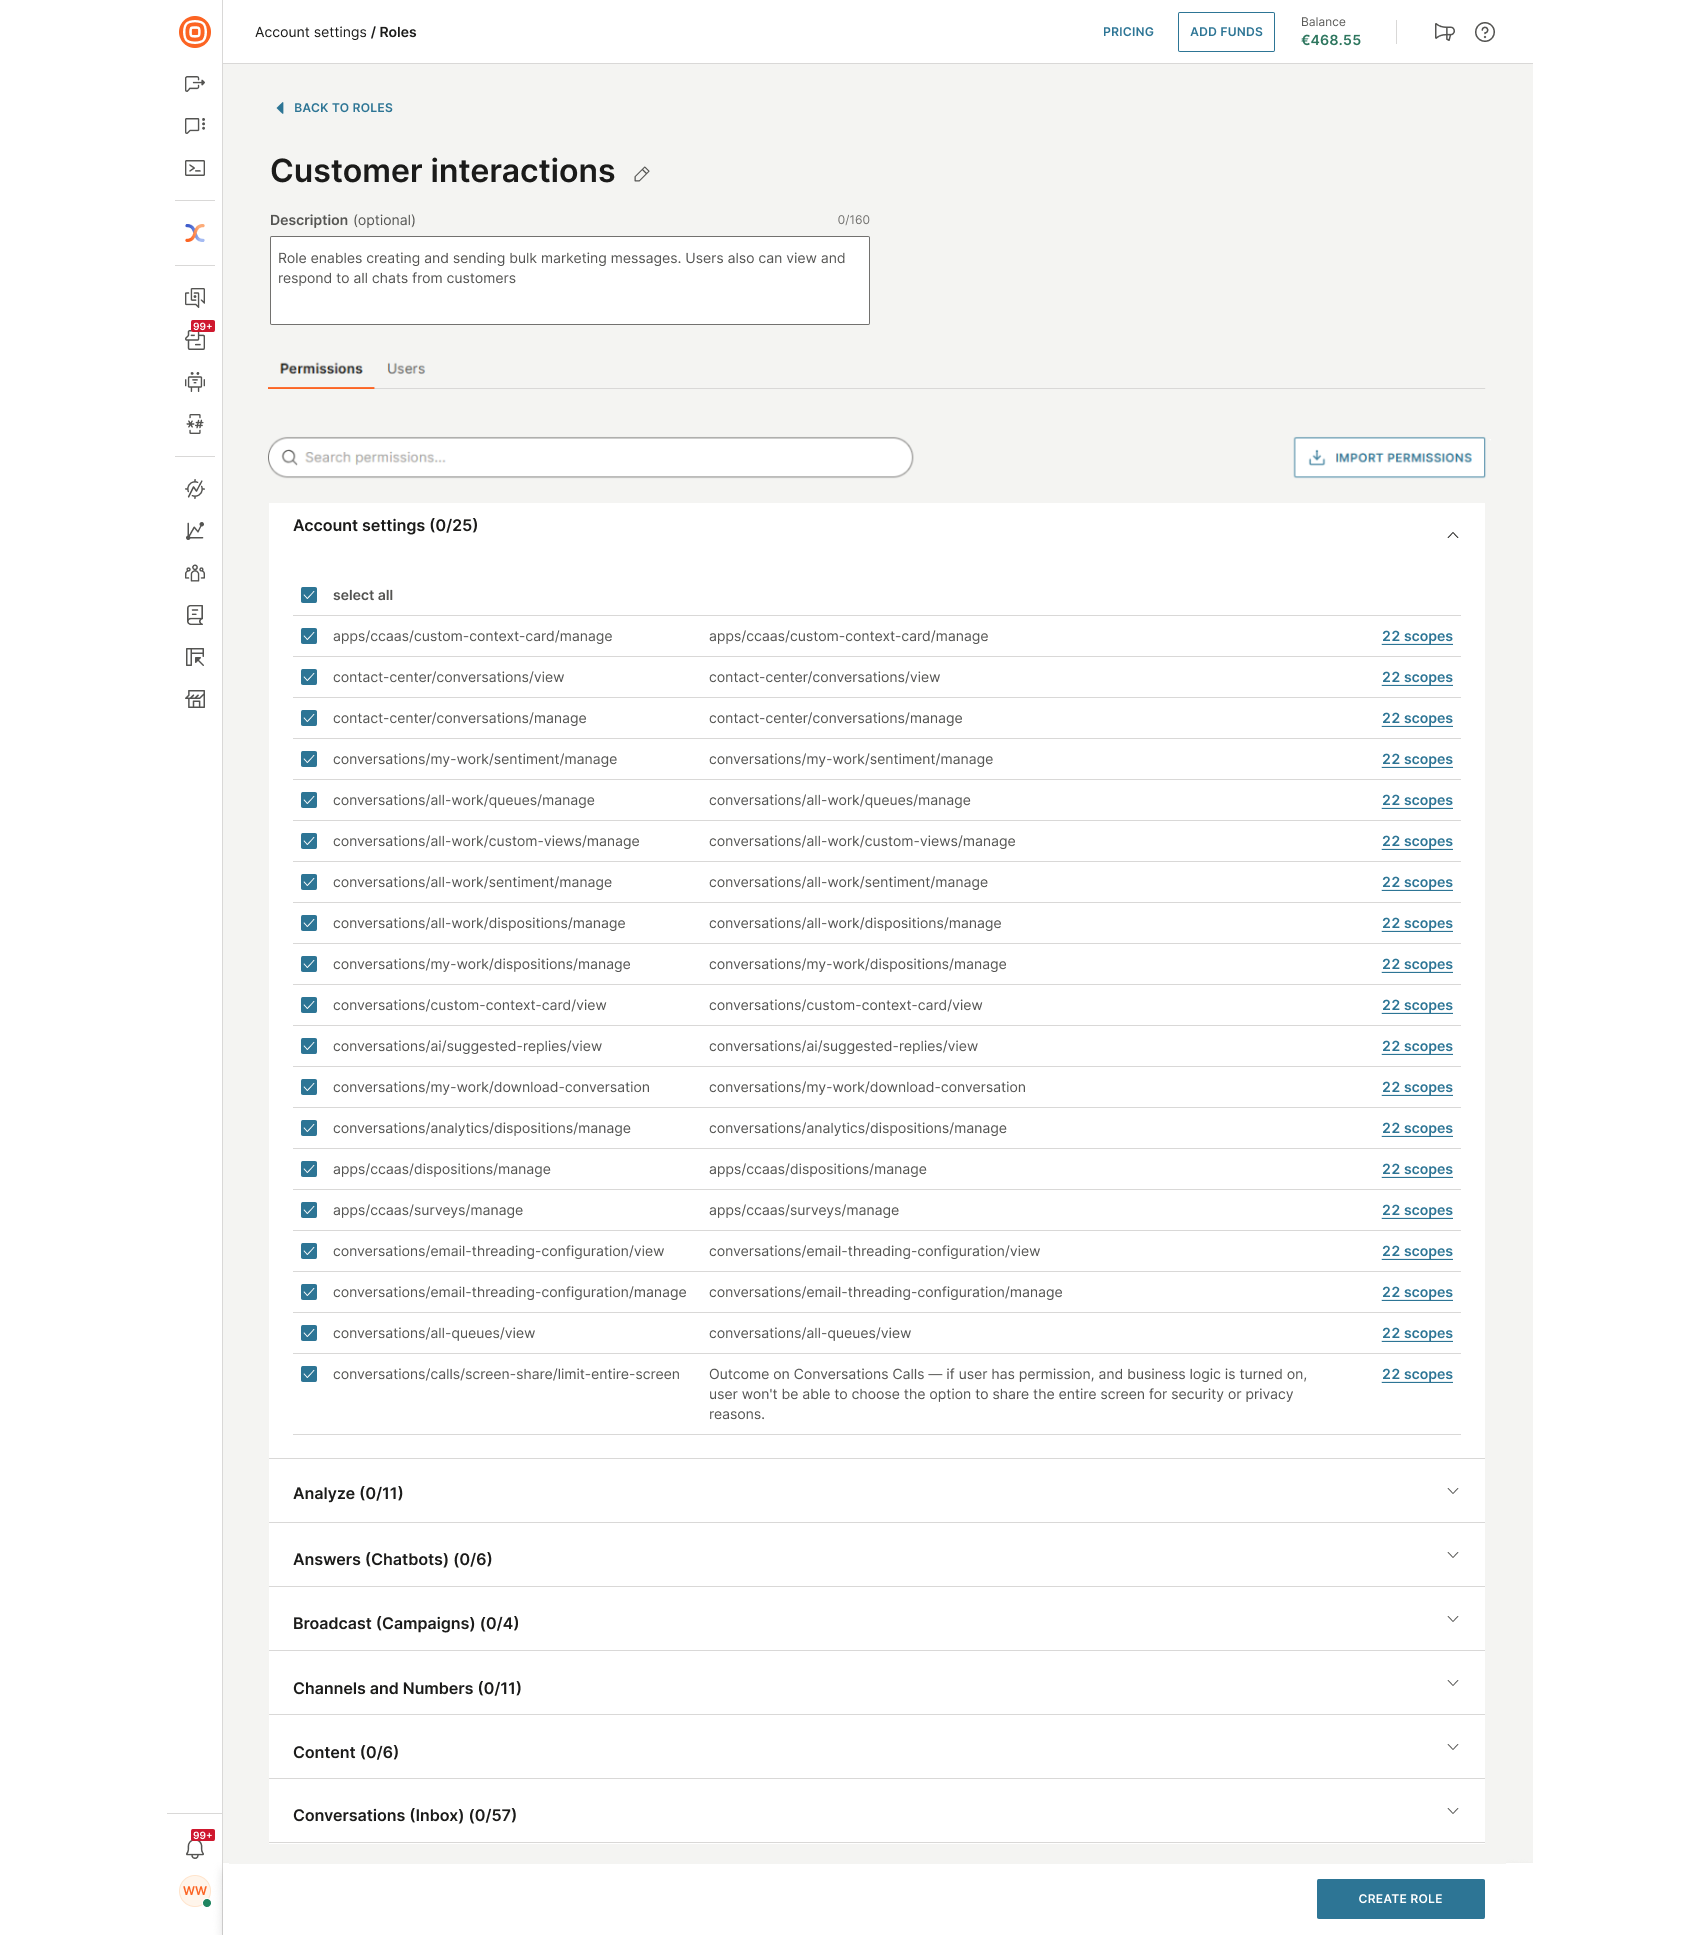
On the Create role page, define the following basic information:
- Role name: Required field
- Role description: Optional field to provide additional context
Assign permissions [#assign-permissions-manage-custom-roles]
In the Permissions tab, you will see all available atomic permissions organized into collapsible sections. Each section includes:
- A short description of what it covers
- A count of permissions selected within that section
You can:
- Use Select all to quickly assign all permissions within a section
- Review each permission individually
- Select the Scopes link next to a permission to open a modal that shows the related scopes and explains which API access the permission provides
Import permissions into a custom role [#import-permissions-into-a-custom-role-manage-custom-roles]
On the Create role page, you can import the full permission set from one or more default roles. Additionally, you can adjust the permission set by adding or removing specific permissions. The same functionality is available when editing existing roles.
Importing permissions adds to your existing selection without removing any permissions you have already configured. Future updates to default roles will not automatically apply to your custom role.
To import permissions:
- In the Permissions tab, select the Import permissions button in the upper-right area of the permissions list.
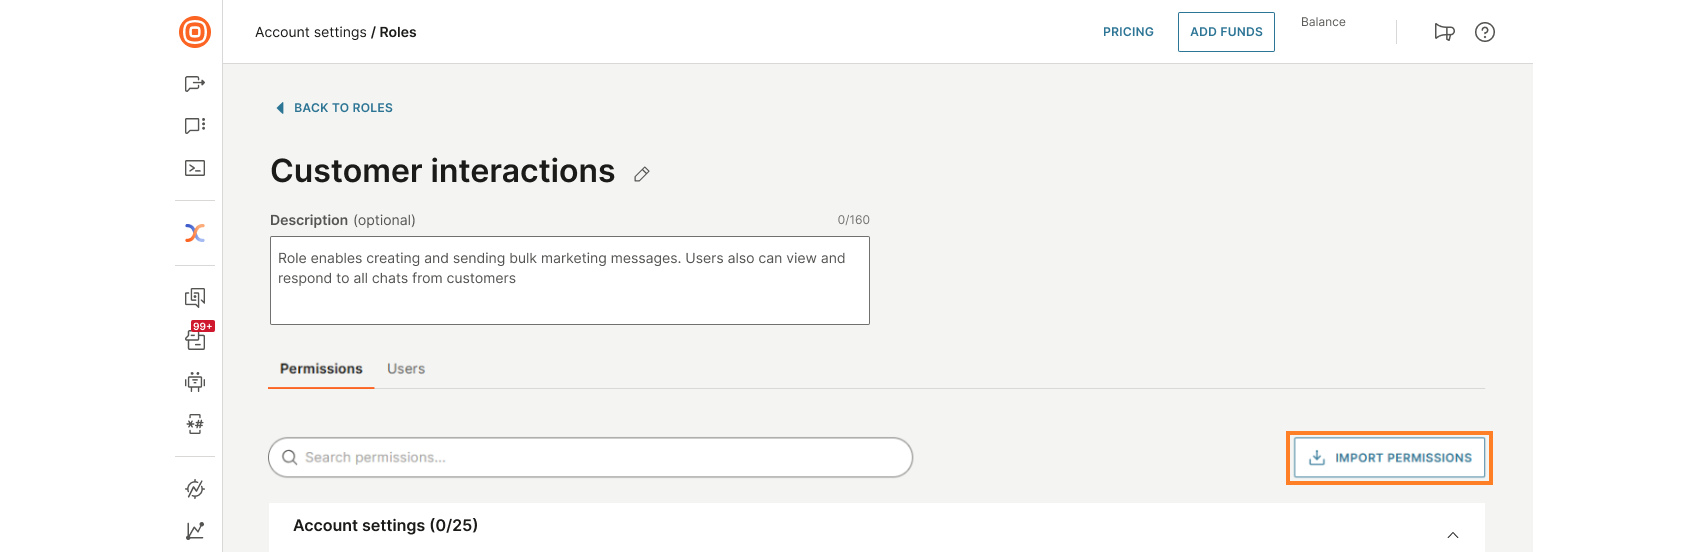
- A dialog opens displaying all available default roles. Review the list and select one or more roles whose permissions you want to import.
- Select Import to add the permissions from the selected roles to your custom role.
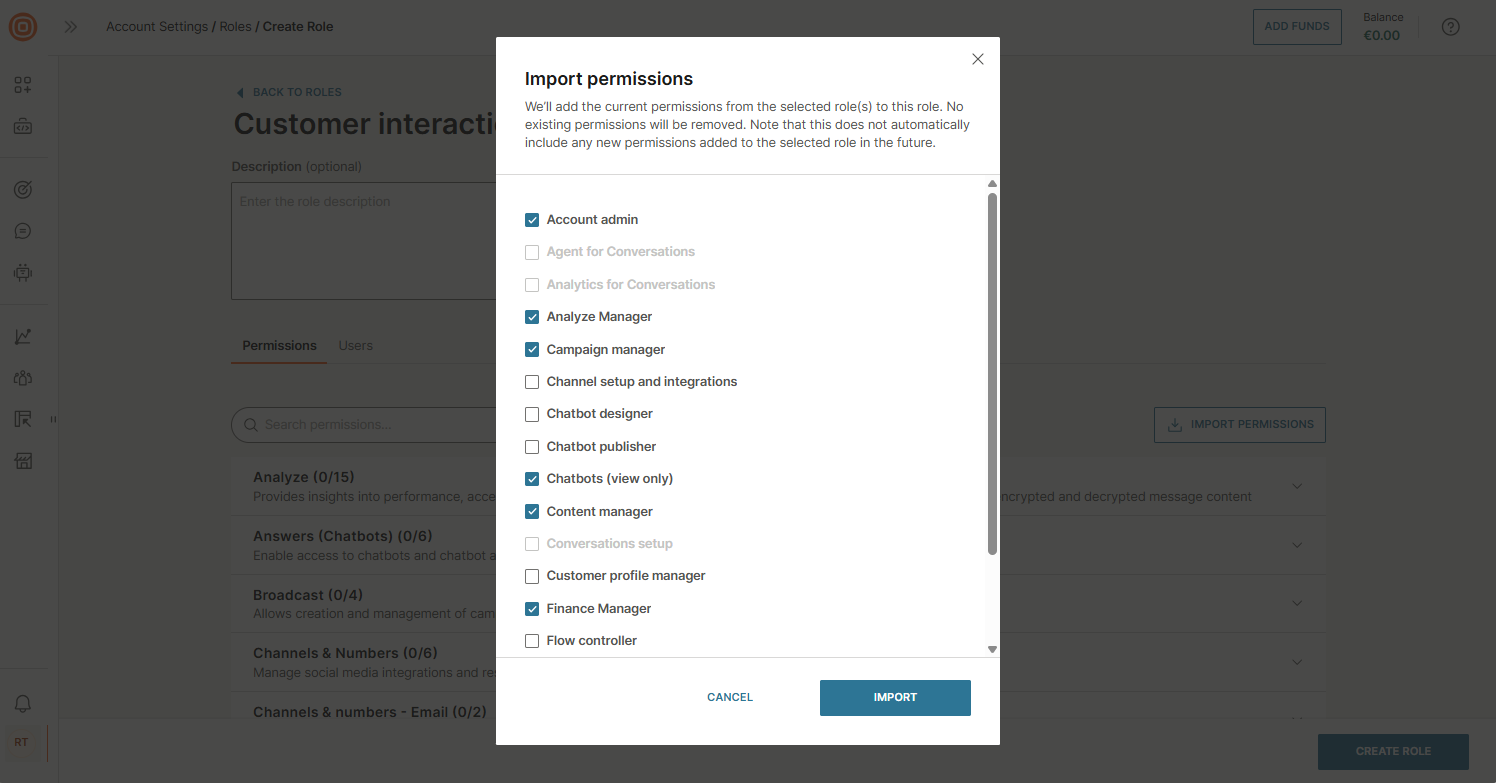
- A confirmation message appears indicating the import was successful.
After importing, the permissions appear in the appropriate sections. You can then add additional permissions, remove unwanted ones, or adjust scopes to match your specific requirements.
When you delete a custom role, all users assigned to that role lose the associated permissions. This cannot be undone.
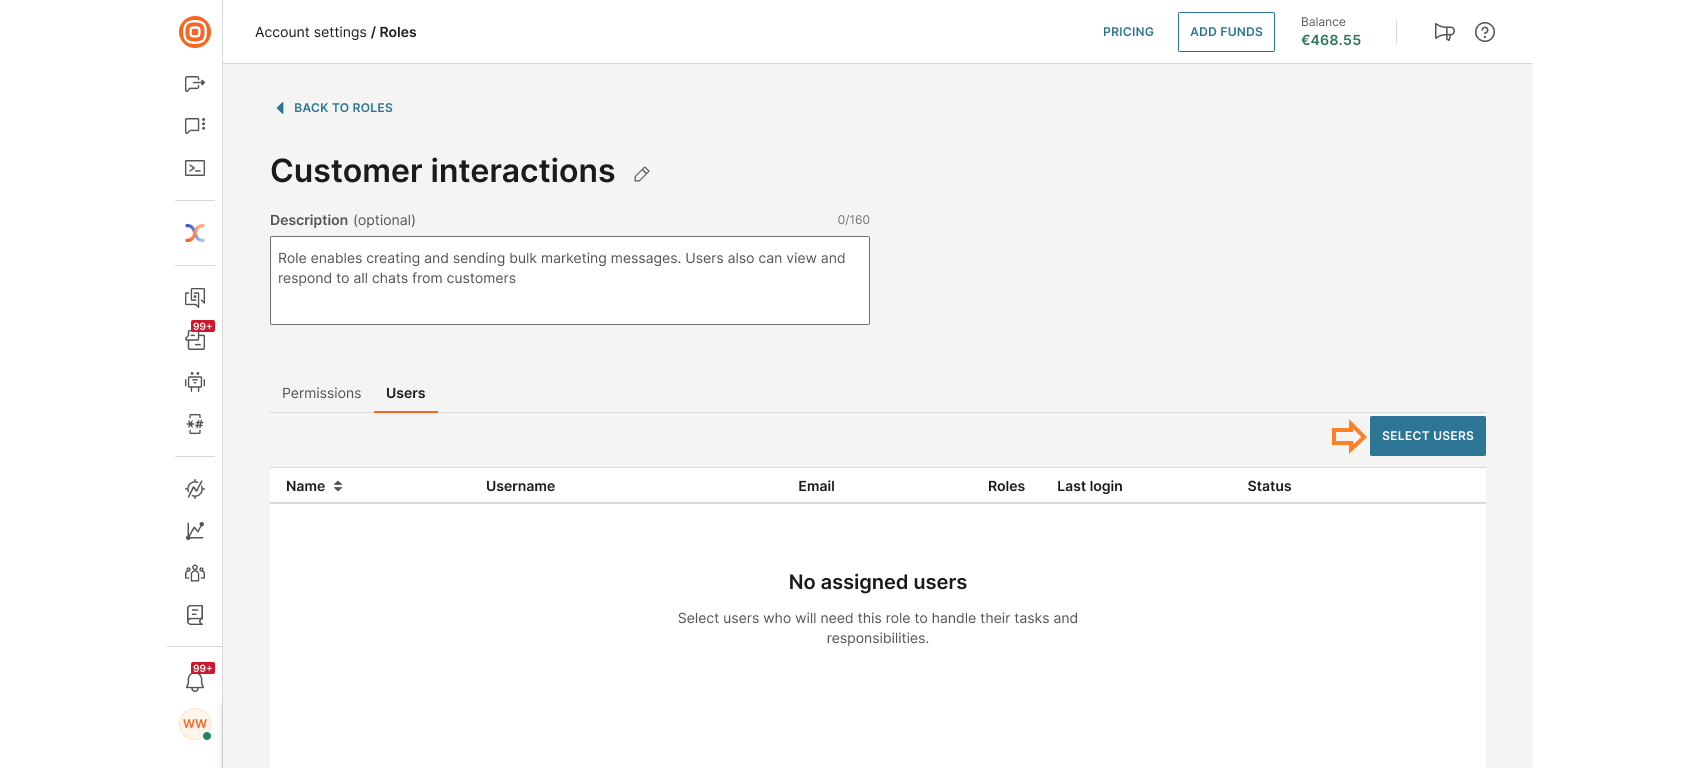
Select users [#select-users-manage-custom-roles]
After configuring permissions, assign the role to specific users who need it for their tasks and responsibilities.
- Go to the Users tab.
- Click the Select users button.
- From the All users sidebar, select one or more users.
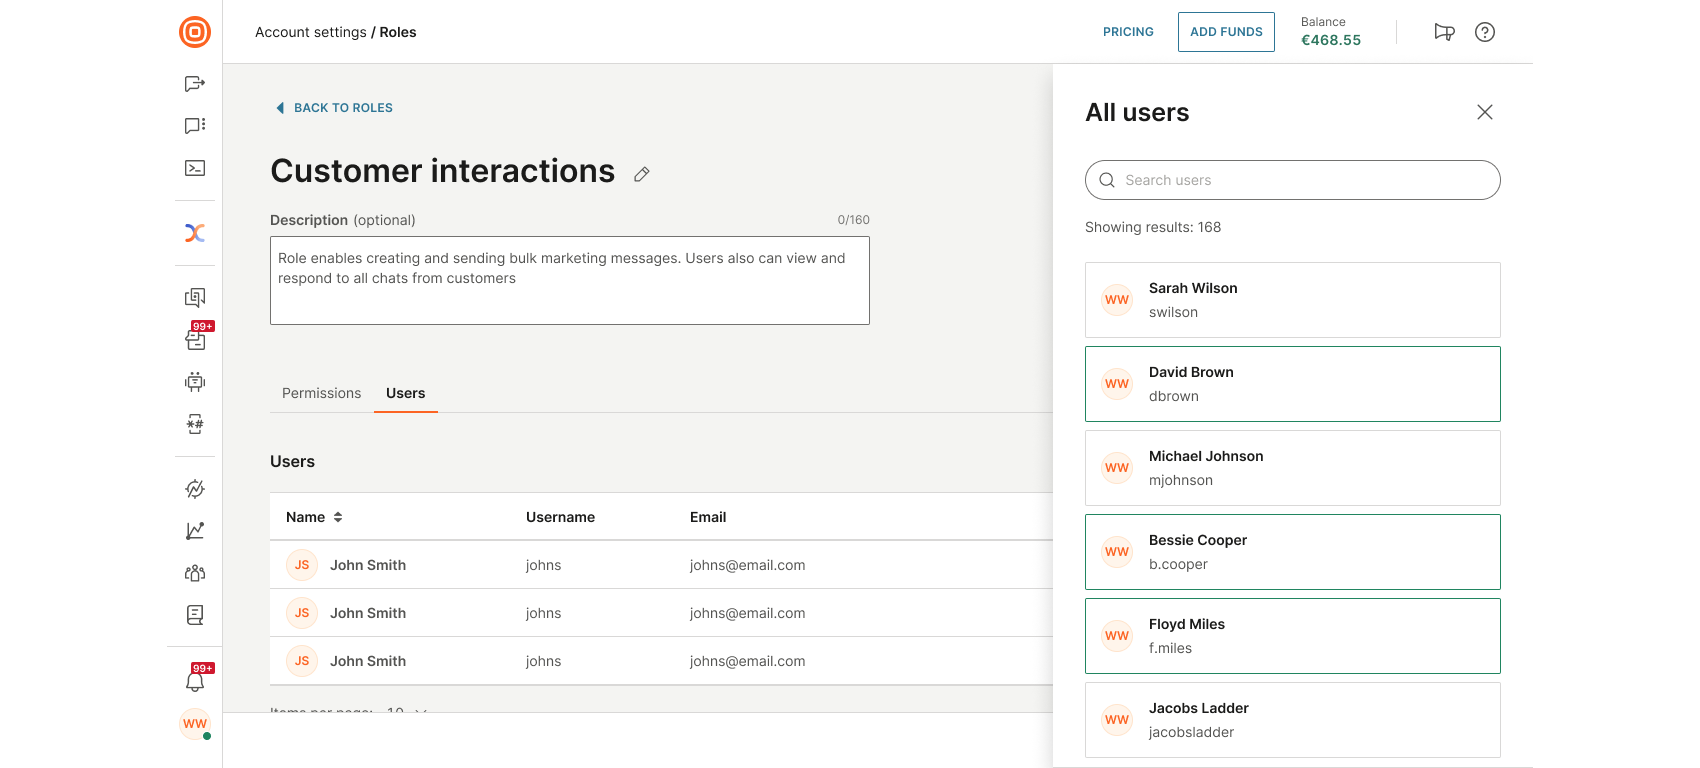
- Once selected, users will appear in the main list. The user list includes:
- Name
- Username
- Last login
- X button to unassign the role from a user
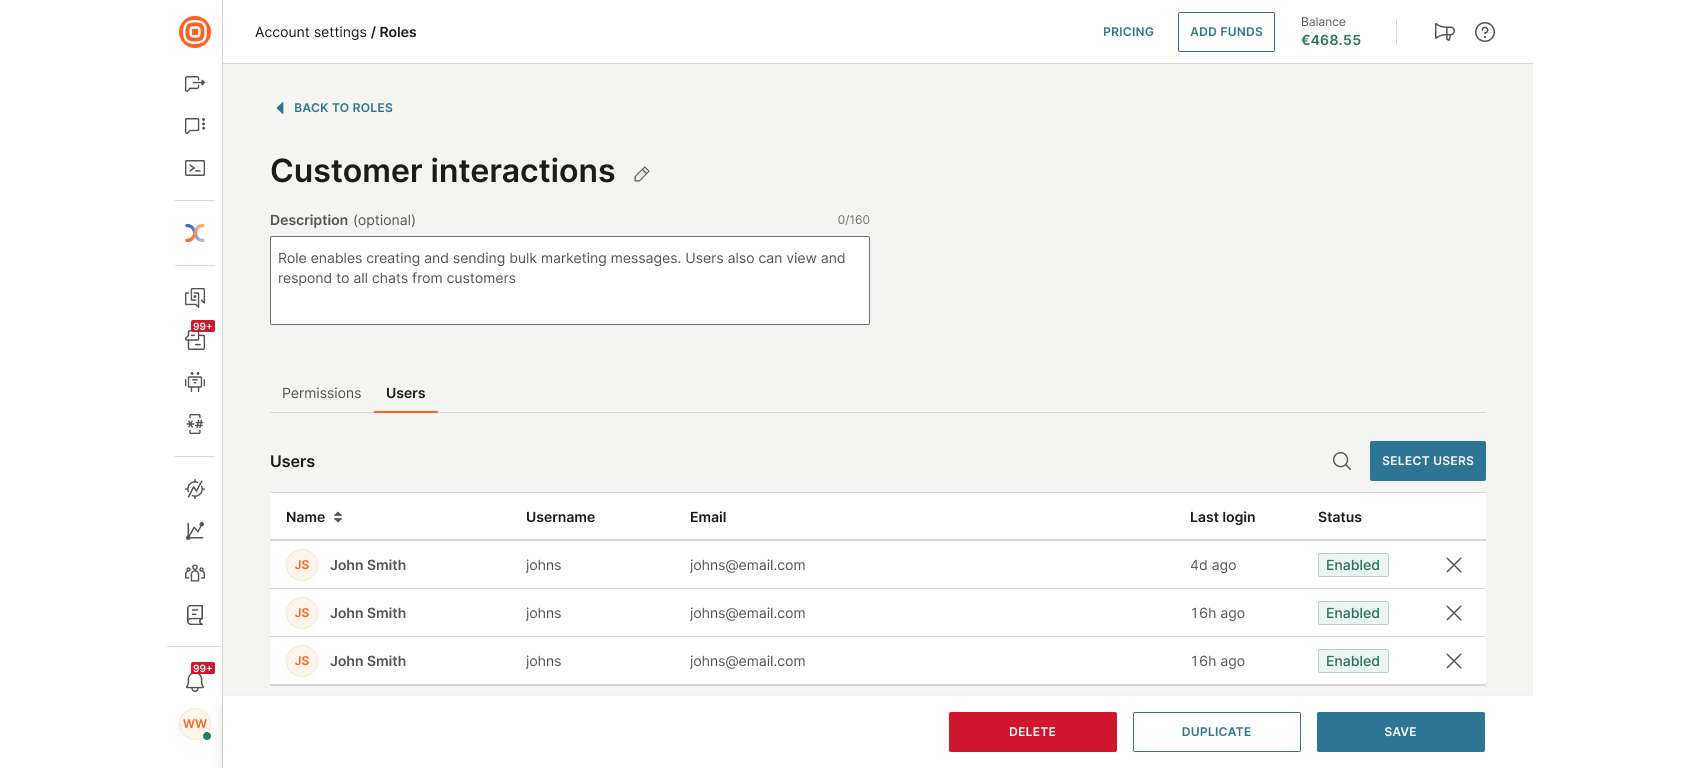
- When you are done assigning users and configuring permissions, select Save to create the role.
If needed, you can also choose to duplicate the role to reuse its configuration elsewhere, or delete it entirely before saving.