Create and send WhatsApp Template messages to end users
To send business communications to end users, you can use either templates or free-form messages.
You can send a free-form message only if end user initiates the communication. You can send these messages only within the messaging window.
To initiate communication or to send messages outside the messaging window, you must use Templates. A WhatsApp template is a preformatted message that is approved by Meta.
This tutorial shows how to create WhatsApp templates and send them to end users. The tutorial uses a Rich media template and a Carousel template for Marketing. You can modify the steps in the tutorial to use other template types.
Products and channels [#products-channels]
Prerequisites [#prerequisites]
-
Infobip account with WhatsApp enabled.
Broadcast is enabled by default with your Infobip account.
If you do not have an account, create a free trial account and select the WhatsApp channel on the welcome screen.
-
WhatsApp phone number that is registered with Infobip. You cannot use Infobip's test phone number.
-
Infobip API key with the
whatsapp:message:sendscope. For more information, refer to API authorization.
Process overview [#process-overview]
This tutorial shows how to send WhatsApp Template messages over the following:
- Over the Infobip web interface through Broadcast.
- Over the WhatsApp API.
Over the Infobip Web interface through Broadcast [#web-interface-process-overview]
-
Create the WhatsApp template: Create either a Rich media template or a Carousel template.
NoteYou cannot use a shared sender to create a WhatsApp template. But the WhatsApp shared sender has a list of predefined templates that you can use for testing purposes. -
Register the template with Meta.
-
Send the template message to end users over Broadcast.
Over the WhatsApp API [#api-process-overview]
-
Create a WhatsApp Carousel template.
NoteYou cannot use a shared sender to create a WhatsApp template. But the WhatsApp shared sender has a list of predefined templates that you can use for testing purposes. -
Register the template with Meta.
-
Send the template message to end users over the WhatsApp API.
Implementation over the Infobip web interface [#implementation-web-interface]
This section shows how to create and send Rich media and Carousel templates over Broadcast.
Create a WhatsApp template [#create-template-web-interface]
-
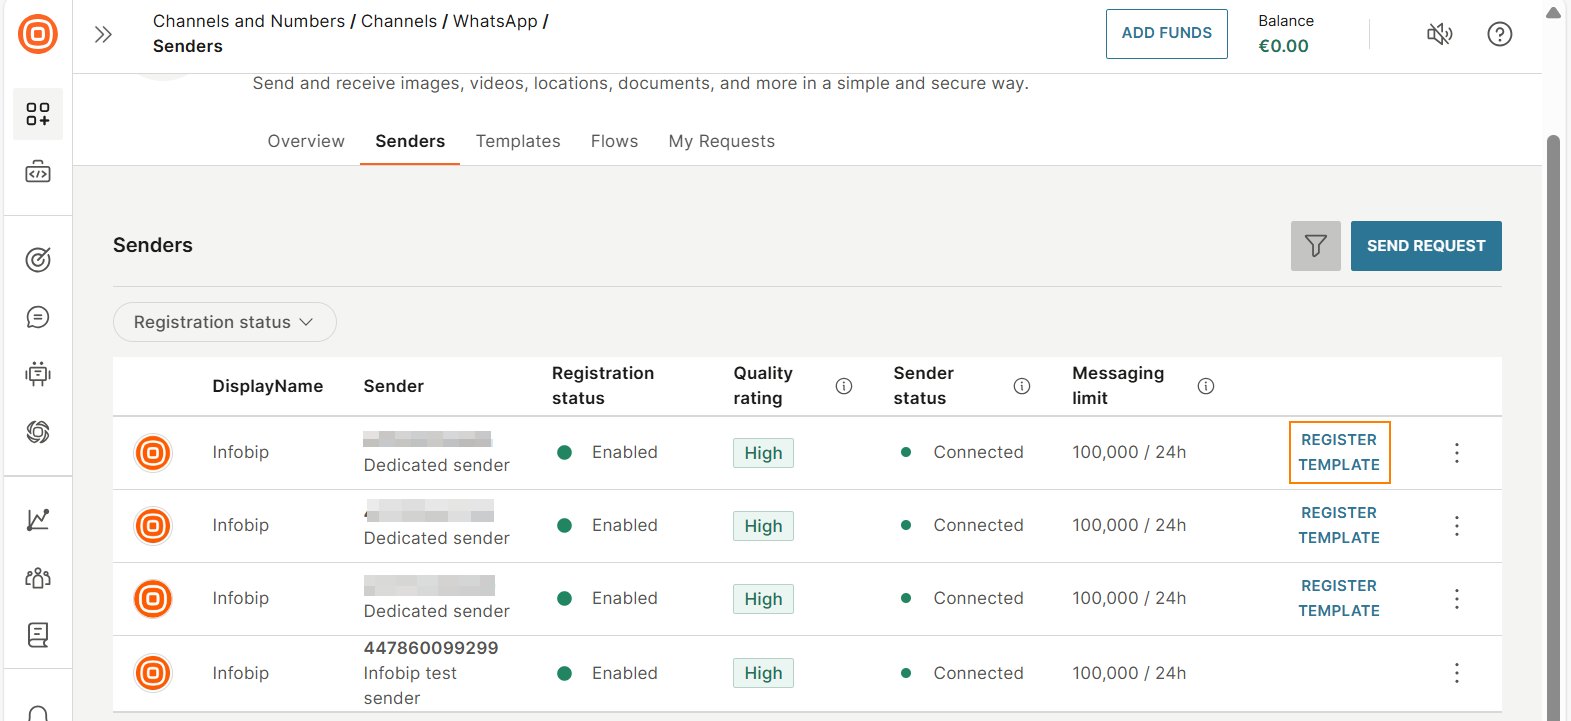
On the Infobip web interface, go to Channels and numbers > Channels > WhatsApp > Senders tab. A list of all WhatsApp senders for your account and their statuses is displayed.
-
Select Register template next to the sender on which you want to register the template.
-
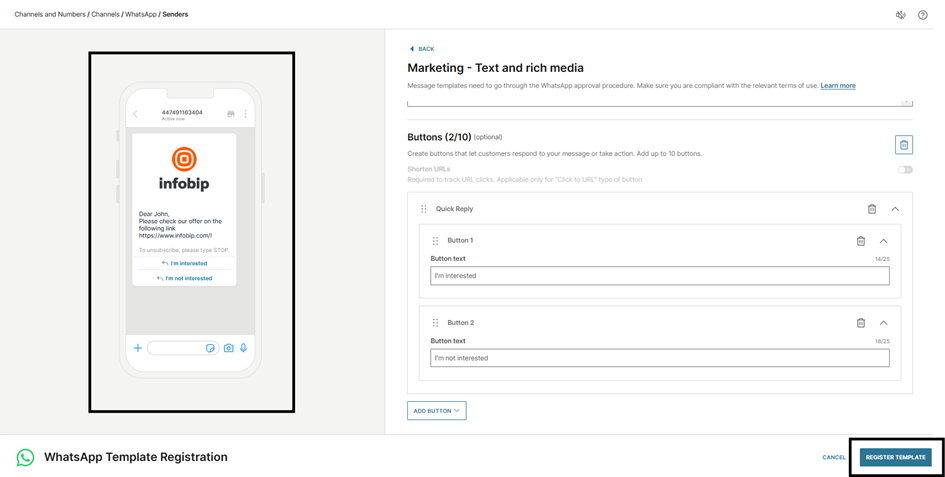
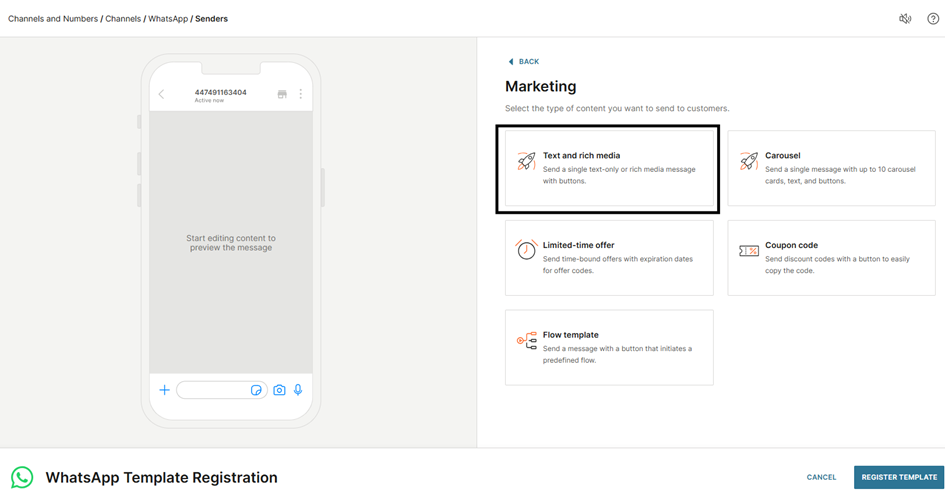
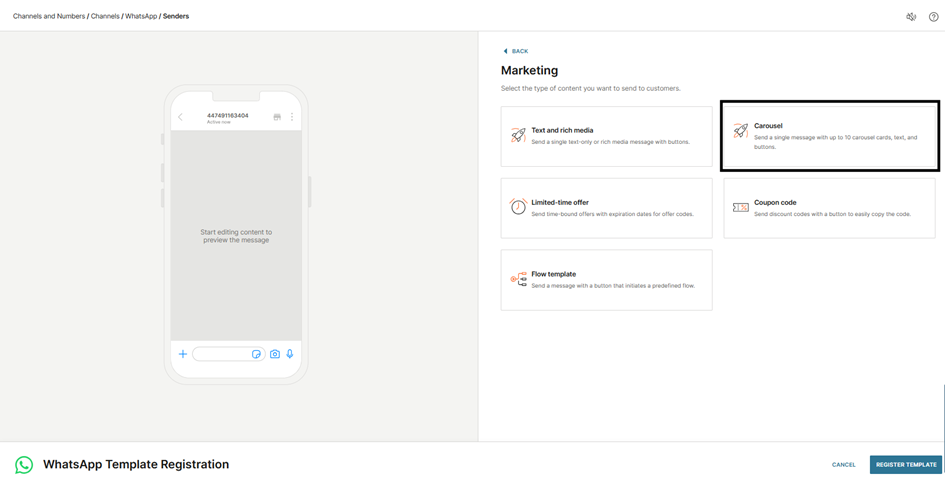
Select the template type that is suitable for your use case. This tutorial shows how to create a Marketing template.
- Marketing
- Utility
- Authentication: These templates are predefined by Meta. You cannot customize the body of the templates.
For more information about each type of template, refer to the Meta documentation.
-
Configure the template.
- Rich media: Refer to Configure the Rich media template.
- Carousel: Refer to Configure the Carousel template.
-
A preview of your template is shown on the left side, displaying how end users will see it. Make sure that it meets your requirements.
-
Select Register template.
The template is sent to Meta for approval. The approval process usually takes only a few minutes but can take a maximum of 24 hours.
After the template is approved, it is ready for sending live traffic.
To check the status of the template, do the following:
- Go to Channels and numbers > Channels > WhatsApp > Senders tab.
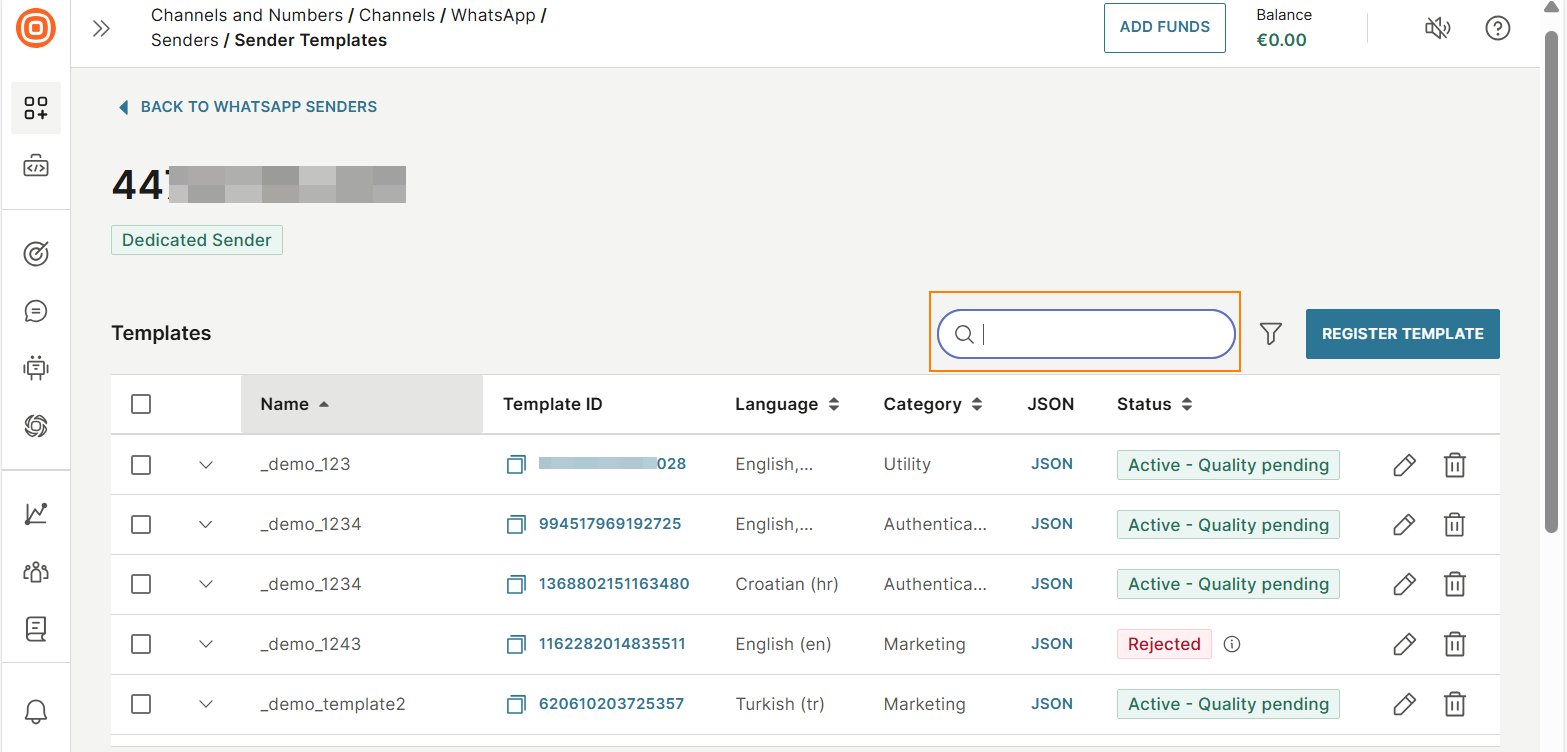
- Select the three dots next to the sender and select Manage templates. A list of all the templates that you submitted is displayed.
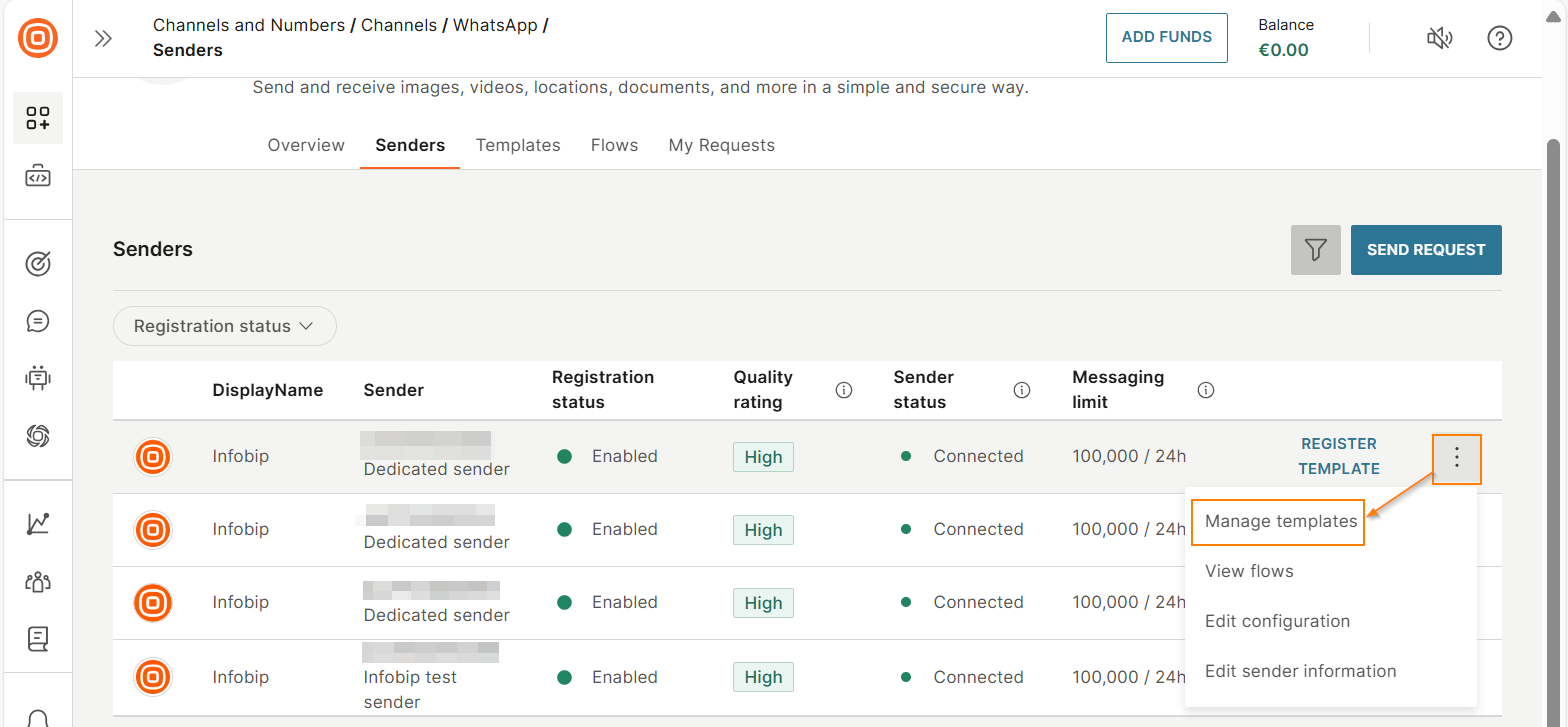
- To find the template you created, enter the template name in the Search field. You can see the status of the template.
Configure the Rich media template [#configure-rich-media-template-web-interface]
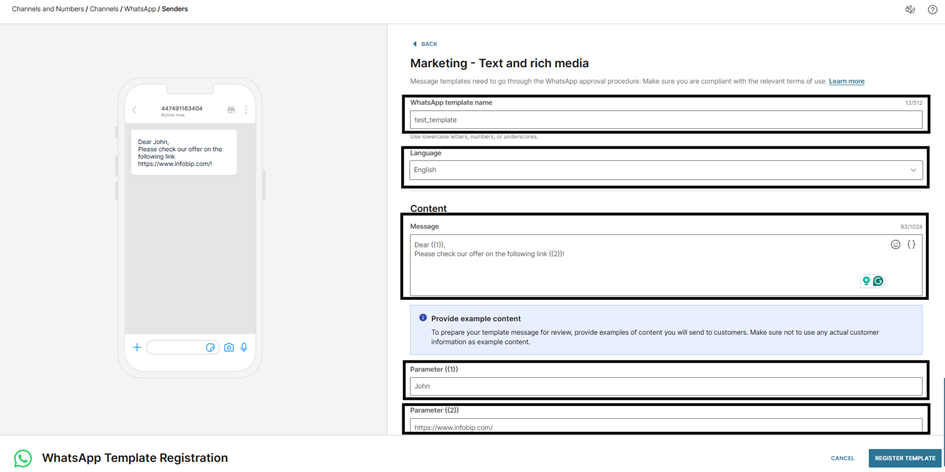
- Select the type of content that you want to send to end users. To create a rich media template, select Text and rich media.
- Complete the following fields in the template:
-
WhatsApp template name: Can contain only lowercase letters and underscore. The name must be unique for each language.
-
Language
-
Content: Add the message that you want to send to end users.
-
(Optional) Parameters: Add placeholders along with their values. Mark them in increasing order. Example: {{1}}, {{2}}, {{3}}.
How placeholders workWhen you add placeholders like {{1}}, {{2}}, etc., these will be filled with actual values when you send the message. For example, if your template says "Hi {{1}}", and you provide "John" as the value, the user will receive "Hi John".

-
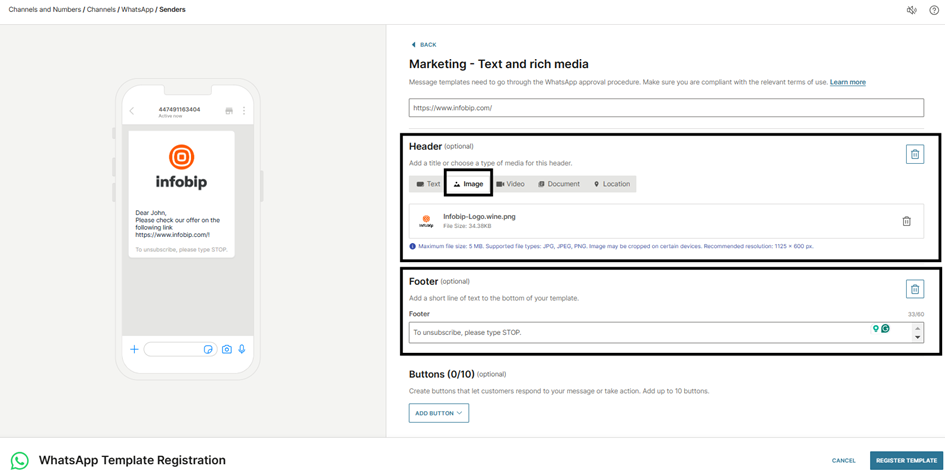
- Add headers, footers, and buttons to create a media template. For information about the supported media formats, refer to the WhatsApp documentation.
-
To add a header, select Add header. Choose one of the following types of headers and provide an example:
- Text
- Image
- Video
- Document
- Location
-
To add a footer, select Add footer. Add the text that you want in the footer.
-
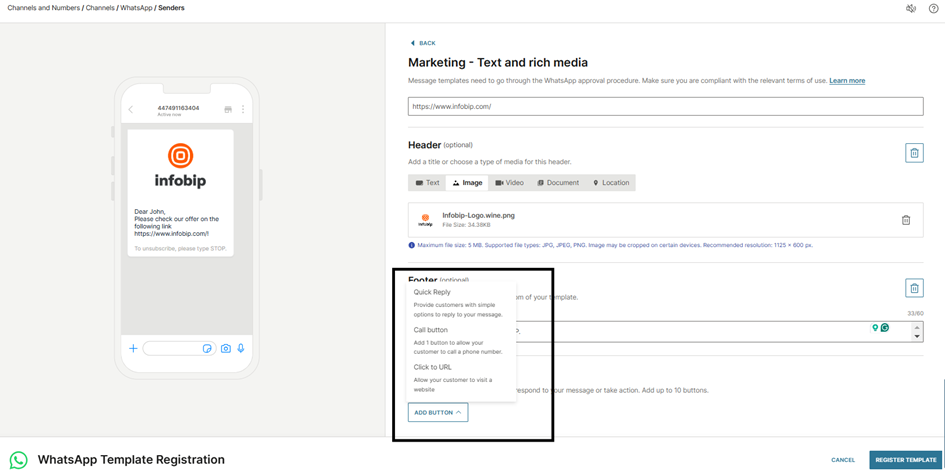
To add buttons, select Add button. A list of the available types of buttons is displayed:
- Quick reply
- Call
- Click to URL
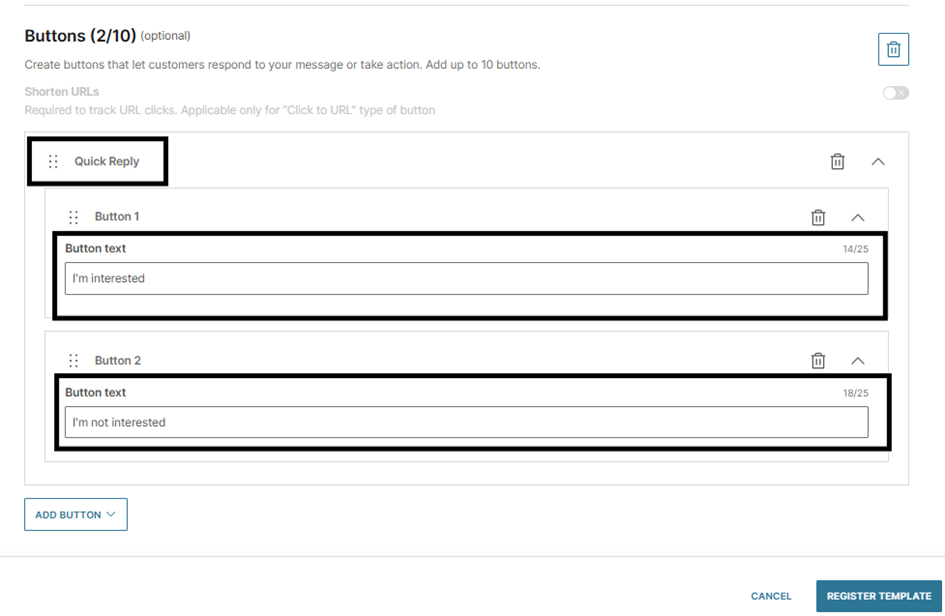
Choose the relevant type depending on your use case. This tutorial uses the Quick reply button.
Configure the fields in the button.
-
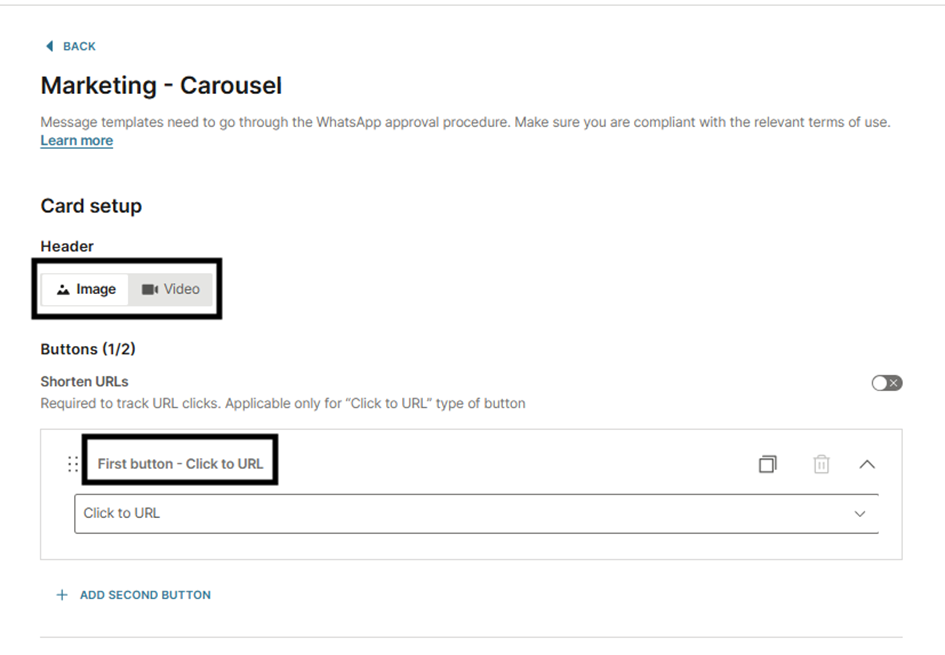
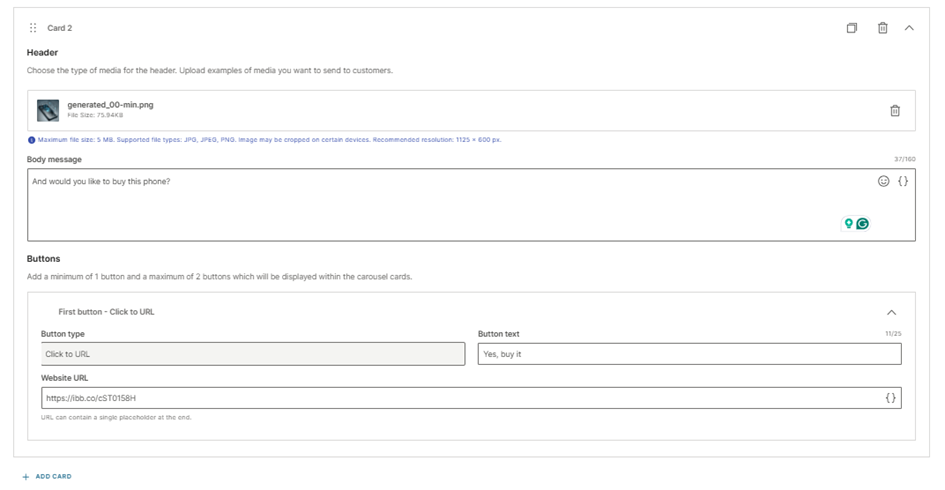
Configure the Carousel template [#configure-carousel-template-web-interface]
-
Select the type of content that you want to send to end users. To create a carousel template, select Carousel.
-
Complete the following fields in the template:
-
WhatsApp template name: Can contain only lowercase letters and underscore. The name must be unique for each language.
-
Language
-
Content: Add the message that you want to send to end users.
-
(Optional) Parameters: Add placeholders along with their values. Mark them in increasing order. Example: {{1}}, {{2}}, {{3}}.
-
-
Add headers and buttons to create a media template. For information about the supported media formats, refer to the WhatsApp documentation.
-
To add a header, choose one of the following types of headers:
- Image
- Video
The header type is applied to all the cards that you create.

-
To add buttons, select Add button. A list of the available types of buttons is displayed:
- Quick reply
- Call
- Click to URL
Choose the relevant type depending on your use case. You can add a maximum of 2 buttons to each card.
The button type is applied to all the cards that you create.
-
-
For each card in the carousel, do the following:
- Select Browse to add header (media) sample.
- Add the body message and button text for the button.
- If you selected click-to-URL button, add the website URL.
You can use either dynamic or static URLs, depending on your use case.
To create a dynamic URL button, add a parameter into your URL for the dynamic part. Example: {{1}}. Add a sample value for the placeholder.
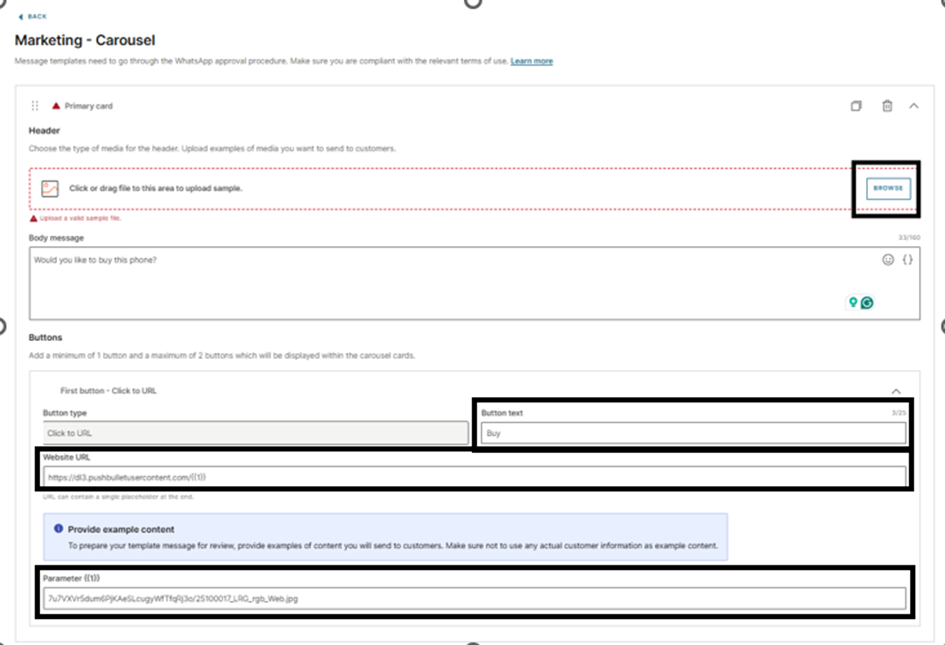
You can add a maximum of 10 cards.
Send the WhatsApp template message over Broadcast [#send-broadcast-web-interface]
-
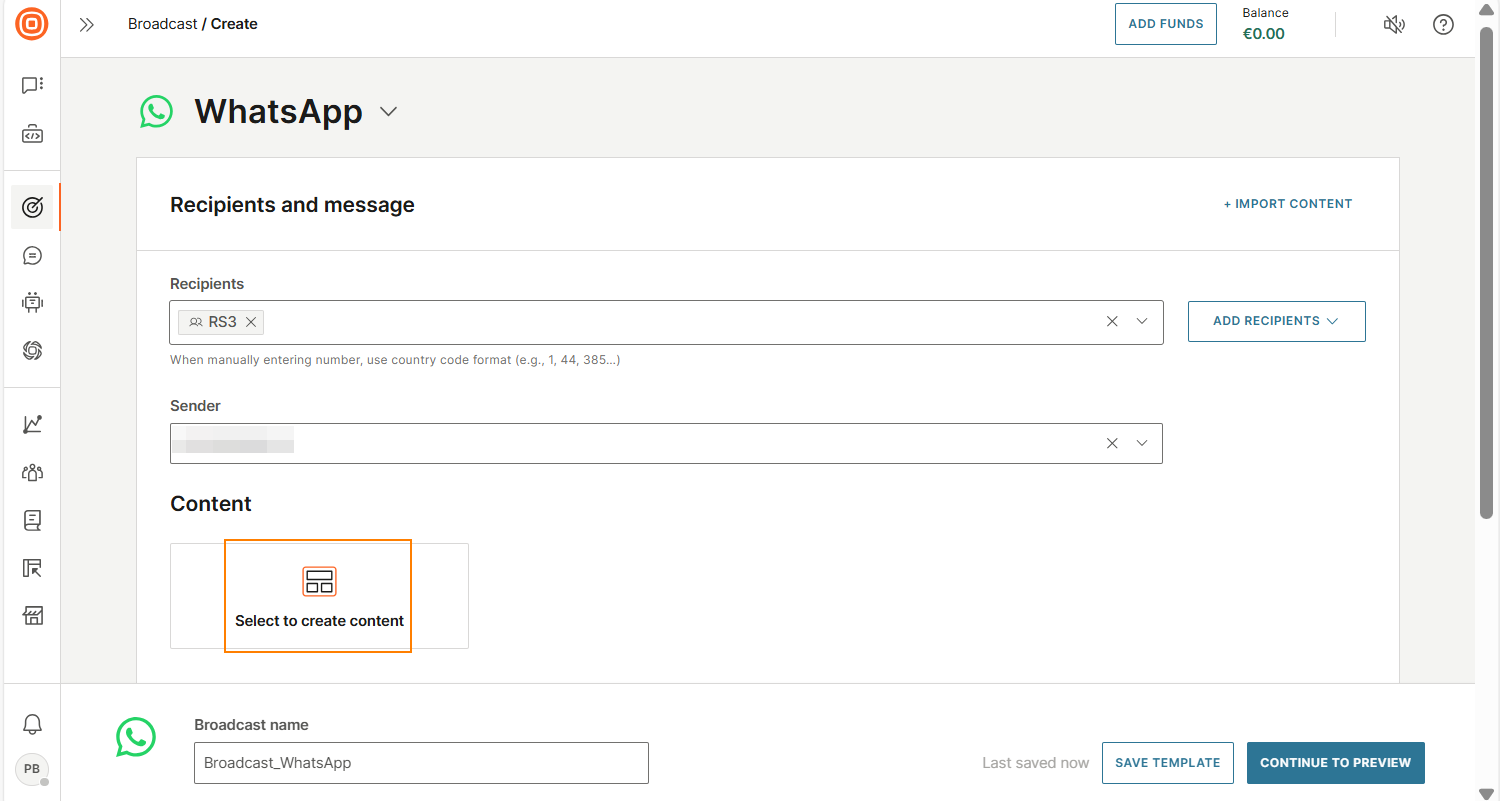
On the Infobip web interface, go to Moments > Broadcasts.
-
Select Create broadcast.
-
Select WhatsApp as the channel.
-
Configure the Recipients and Sender fields.
-
Select Create content to begin designing your message.
-
On the right-hand side, all the templates that use the selected sender are listed. Use Filter and Search to find the template that you created.
-
Select Use next to the template.
-
If your template type is Carousel, follow these steps:
- Enter the image URL.
- Specify the details for the button as applicable. Example: For a dynamic URL button, enter the dynamic part of the URL.
- Enter the details for all the cards in the carousel.
-
If your template type is Rich media, follow these steps:
- Enter the values for placeholders.
- If the template contains media in the header, enter the URL that contains the media.
- (Optional) Add button payload to send additional data when the end user selects a button. This data is displayed in message reports.
-
Configure the other fields in the template.
-
Select Done designing.
-
(Optional) Enable failover to SMS so that if the WhatsApp message is not delivered to the end user, the broadcast will try to send the message over SMS.
- Select Failover to SMS.
- Define the SMS sender and SMS content.
-
Configure the other fields in the broadcast as required.
-
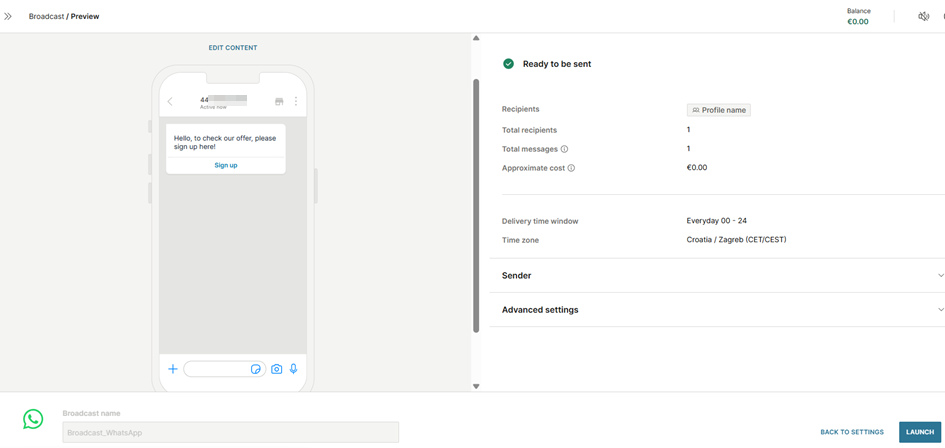
Check all the fields and rename the broadcast if required.
-
Select Continue to preview.
-
Check the preview and make sure that all the information is correct.
-
Select Launch to send the broadcast.
To track the status of the broadcast, go to Moments > Broadcasts.
Implementation over the WhatsApp API [#implementation-api]
This section shows how to create and send a Carousel template over the WhatsApp API.
This section focuses on carousel templates. For Rich media templates via API, the structure is similar. Refer to the API documentation for additional template types.
Create a WhatsApp template [#create-template-api]
Use the Create a WhatsApp template endpoint to create your template.
Example request
Key points
-
After you create a template, Infobip sends it to Meta for validation. To edit the template, follow the editing rules.
-
In the
categoryparameter, specify one of the following template categories:MARKETINGUTILITYAUTHENTICATE
This tutorial uses
MARKETING. The fields in the reference adapt based on your selection. Refer to the API documentation to configure these fields. -
In the
buttonsparameter, specify the button type. This tutorial usesQUICK_REPLY. The fields in the reference adapt based on your selection. Refer to the API documentation to configure these fields. -
For carousel templates, header examples must be direct URLs without placeholders. Body text in carousel cards should not include placeholders unless you provide matching examples.
-
Make sure that your images are downloadable and supported by the API.
Register the WhatsApp template [#register-template-api]
Infobip manages your template registration. During the process, you can edit your template following the editing rules. You can also set up a webhook to get updates about your template registration process.
Send the WhatsApp template message to end users [#send-message-api]
After the template is registered, use the Send WhatsApp Template message API to send the message to end users.
Example request
How placeholders work
When you create a template, the message text is stored at Meta with placeholders ({{1}}, {{2}}, etc.). When sending the message, you only provide the values to fill those placeholders, not the full text.
Example:
Template body text (stored at Meta):
Send request provides values:
User receives:
For carousel templates:
- The main body text and card body texts are stored in the template
- You only provide placeholder values for the main body and media URLs for each card header
- Card body texts cannot have placeholders and are always static
Key points
-
Use the international number formatting when adding a number to the
tofield. For example, for British numbers, the value will look like this:441234567890. -
The
fromfield must match the sender used to create the template. -
Provide placeholder values in the same order as they appear in the template. The first value fills
{{1}}, the second fills{{2}}, etc. -
For carousel templates, provide media URLs for each card's header in the
carousel.cardsarray. The number of cards must match the template definition. -
Card body texts are static and stored in the template. You cannot change them when sending.
-
The
languageparameter must match the language code used when creating the template (e.g.,"en"). -
The media that you add must follow the specifications. Example: size and format.
-
For
QUICK_REPLYbuttons it is mandatory to include a parameter.
You can also refer to other Infobip APIs for WhatsApp.
Track message delivery [#track-delivery-api]
After you send the request, you should receive a WhatsApp message on the device that you have specified in the to field and see a 200 OK response.
The response informs you that the message is successfully queued in the Infobip platform and will be sent to Meta for approval.
To see whether the message was delivered to the recipient, use the Delivery report feature.