Table booking (Brazil)
This tutorial will explore how to set up a table booking system using WhatsApp chatbots. Table booking templates are designed to automate the process of scheduling reservations for restaurants, allowing customers to make bookings seamlessly through WhatsApp and receive booking reminders.
Table booking is available in the following languages, depending on the user language selected on your Infobip account:
- English
- Portuguese
The tutorial is based on the pre-configured table booking template that you can use to test the flow or speed up your configuration.
Features
Efficiency
Automating the booking process saves time for both customers and restaurant staff.
Accessibility
Customers can easily make reservations anytime, anywhere, using their preferred messaging app.
Personalization
Chatbots can collect customer preferences and provide tailored booking options.
WhatsApp test sender setup
During the trial period, Infobip activates a WhatsApp test sender for the account, thereby enabling testing of this specific use case. The sender's number is 447491163223.
After the free trial ends, customers should use their sender and proceed to register templates associated with that sender.
Customer experience
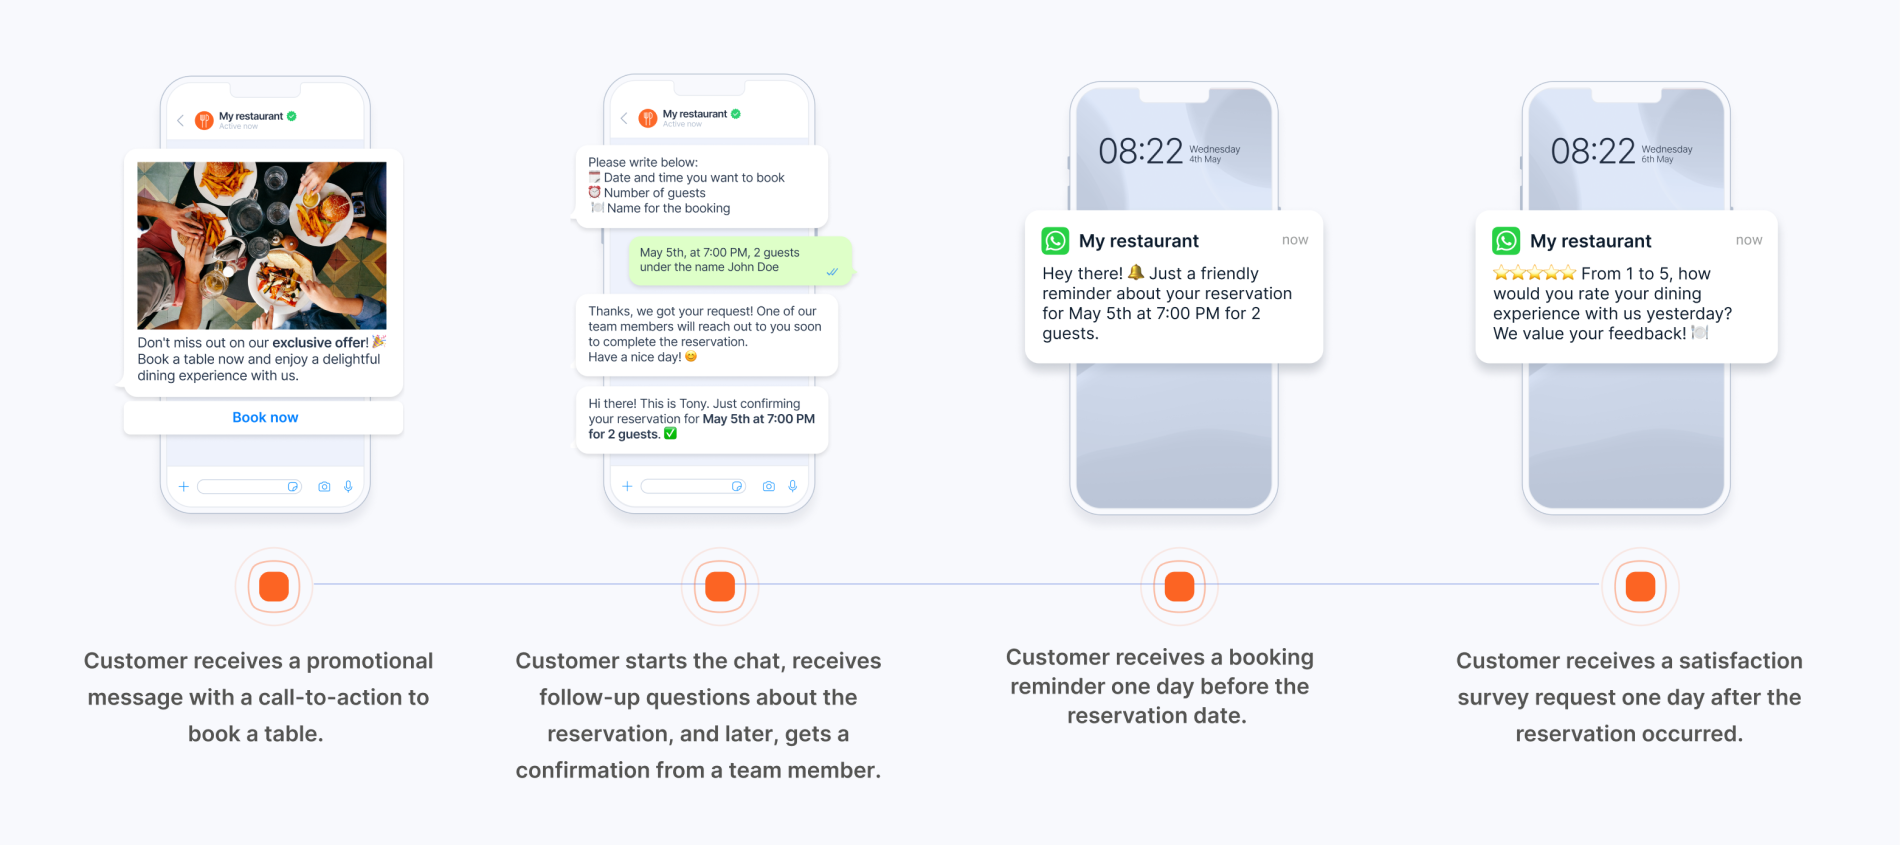
Take a look below to see what the experience will be like for end customers:
- Customer receives a promotional message with a call-to-action to book a table.
- Customer starts the chat and receives a welcome message with an option to make a table reservation.
- Customer selects the option to make a reservation.
- Chatbot responds immediately with the reservation follow-up questions.
- Customer receives reservation confirmation once your team member reviews the request.
- Customer receives a booking reminder one day before the actual reservation.
- Customer receives a satisfaction survey request one day after the appointment/reservation occurred.
Prerequisites
The following items are necessary to get started with table booking:
- Integration setup:
- Ensure you have a WhatsApp Business API account set up and registered with Infobip.
- Register the necessary WhatsApp templates for table booking functionality.
- Infobip products:
- Ensure you have the appropriate products purchased. For the proposed flow, you will need communication automations (Moments), chatbot building tool (Answers), and a shared inbox (Conversations).
- Customer entry points: Provide multiple entry points for customers to initiate the booking process, such as QR codes or website buttons linked to WhatsApp.
Implementation steps
Send promotional message
Steps over the web interface:
- Log in to the Infobip web interface, navigate to the Moments module, and select Create Flow → Start from Scratch.
- Select Predefined Audience and add the audience you want to receive the promo offer.
- Name your campaign.
- Add the Send WhatsApp message element, select the sender, and choose the WhatsApp template content. The template content that you can experiment with is named Collect reservations WA. Click Close when finished.
Collect reservations message template example:
Hi firstName, a special promotion is waiting for you! Reply to this message with username-promo to use the offer!
Another option is using a predefined Flow template Collect reservations WA with a People real time event as a trigger to send a promotional event. The People real time event used to trigger the flow is adding a tag to the Person profile.
To use this template, make sure you have imported your audience and added the tag that will trigger sending promotional messages to your tagged audience.
Set up a chatbot to collect the data
Discover how to set up a chatbot for collecting table booking data. Here is how the pre-configured chatbot works:
- When a customer initiates a chat, the chatbot greets them and presents the option to make a table reservation.
- Upon selecting the reservation option, the chatbot prompts the customer to provide booking details such as date, number of people, name, etc.
- After receiving the necessary information, the chatbot confirms the pre-reservation that restaurant staff need to revisit and confirm the actual date.
Steps over the web interface:
- Log in to the Infobip web interface, navigate to Answers, and look into the Collect reservations bot.
- This bot will collect reservation information and store it in the Person profile with the following custom attributes:
- Preferred_date_time – preferred date and time of the reservation
- Number_of_people – number of people
- Reservation_name – customer name
- All the data stored during the bot session can be revisited in Conversations → All Work → Chatbots (for active sessions) or History (for closed bot sessions).
- To make a booking, your staff needs to enter the Actual_date_time into the Person profile. This attribute is empty until an agent in Conversations enters some value in it. Go to Inbox → All Work → History → open the reservation ticket → open the Customer context card → type in Actual_date_time.
If the customer requires assistance beyond what the chatbot can provide, they can be transferred to a live agent for further support.
Set up confirmation, reminder messages, and feedback collection
In our pre-configured template, automations are set up to improve the customer experience with table booking:
- Once the booking is confirmed by adding the actual date of the reservation, the customer receives a confirmation message with the details of their reservation.
- A reminder message is sent to the customer closer to the reservation date to ensure they do not forget about their booking.
- Feedback survey is sent to the customer one day after the actual reservation.
Steps over the web interface:
- Log in to the Infobip web interface, navigate to Moments, and look into the two pre-configured flows for automated messages:
- Confirmation message WA → Moments flow that sends the WhatsApp template once the agent adds real date and time in Conversations (or directly in CDP) via the Actual_date_time custom attribute.
- Reminder message WA → Moments flow that sends the WhatsApp template one day before the actual reservation is happening.
- Check the third pre-configured flow for collecting customer feedback:
- Feedback message WA → Moments flow that sends the WhatsApp template one day after the reservation to get feedback from the customer.
Collecting feedback
Collecting feedback is set in the following way:
- The booking date is set as an event that will trigger the flow with a condition that checks if the Actual_date_time people custom attribute occurred 1 day ago.
- WhatsApp template message is sent to collect feedback with two button options.
- In the Analyze section, you can later create a report that will provide information on collected feedback.
Collecting feedback message example:
Hi firstName, we would like to hear your feedback! How satisfied were you with your last reservation Actual_date_time?
Additional resources
To learn more about how to set up table booking on the Infobip web interface, refer to the use case (opens in a new tab).