Political use case
Political campaigns using 10DLC in the US may be subject to verification and restrictions to limit who can send out political messaging. When you create a brand for the political use case, in some cases, it may be necessary to go through a vetting process with an external provider.
Many non-profit organizations wish to send political traffic and specific codes qualify for the political use case, including the following:
| Organizations | Qualification for sending political traffic |
|---|---|
| 501(c)(4), 501(c)(5), and 501(c)(6) non-profit organizations | Non-profit organizations with codes 501(c)(4), 501(c)(5), and 501(c)(6) qualify to send political traffic automatically without the need to go through any external vetting. |
| 527 tax-exempt organizations | For 527 organizations, you can create your brands and campaigns using the US Sender Registration app, however, the sending of political traffic is blocked until you have been vetted and verified by Campaign Verify and then obtained an authorization token to confirm that it is qualified. This vetting stage is mandatory for registering political entities and is enforced by the The Campaign Registry. Use the following instructions to complete the steps for setting up the political use case. |
To successfully register your campaign for the political use case, it is critical that you register your brand with all of the correct information.
Create your brand
To start the process for using the political use case, first you need to create your brand. For this task, you use the US Sender Registration app. For more detail on using this app, see US Sender Registration app.
-
In Infobip, go to Channels and Numbers > Tools and Compliance, and then open the US Sender Registration app.
-
Click Create brand.
-
Select the option to register a brand for 10DLC usage, and then click Continue.
-
Complete brand registration with the name and details for your brand.
-
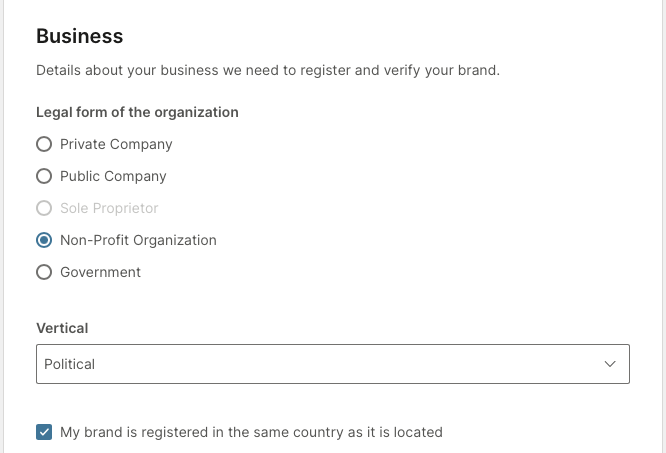
For creating the political use case, you must select the following Business options:
- For the legal form of the organization, select the Non-Profit Organization option.
- For the vertical, select Political from the drop-down list.

-
Click Continue to complete the creation of your brand.
Your brand is then available and shows a status of Registered. You will see an option to Import External Vetting, which is used to enter the authorization token that you must obtain.
Obtain the authorization token
When you register your brand, you need a special authorization token, which is used to unblock the political use case on Infobip.
To enable the political use case, you must follow the steps to verify your brand with Campaign Verify (opens in a new tab) before completing registration. When your brand is fully vetted and verified, you are given the authorization token.
Note that there may be fees associated with the verification process.
For more information about how to complete the verification process, see the Campaign Verify Information for clients (opens in a new tab).
Add authorization token to your brand
Once you have obtained the authorization token in the Campaign Verify process, you then import the token into Infobip so your brand can access the political use case.
To add the authorization token to your brand:
-
In infobip, go to Tools and Compliance and open the US Sender Registration app.
-
Select your brand.
-
Click Import External Vetting.
-
Select Campaign Verify. This is the vetting provider for the political use case.
-
In Authorization Token, enter the token that you obtained when you verified your campaign.
You'll see a message to confirm that the token has been accepted. Your brand details are also updated to display the tax-exempt status.
-
Your brand is now ready for campaign creation using the political use case.
-
Create your campaign using your political brand and select Political from the Use cases drop-down list. Make sure that you have chosen a brand that has been approved for the political use case, otherwise, you see the following error:
