Using 2FA API
Infobip's 2FA API follows the standard One-Time Password (OTP) verification process described in General 2FA (OTP) setup.
Before starting the implementation, review the 2FA setup to ensure that you have everything ready to send OTP traffic.
For detailed documentation on the 2FA API, see:
- 2FA API - the complete API documentation with additional API calls that are not mentioned in the steps below.
- SDKs and tools - SDKs and Postman collections of Infobip's APIs, including the 2FA API.
API workflow
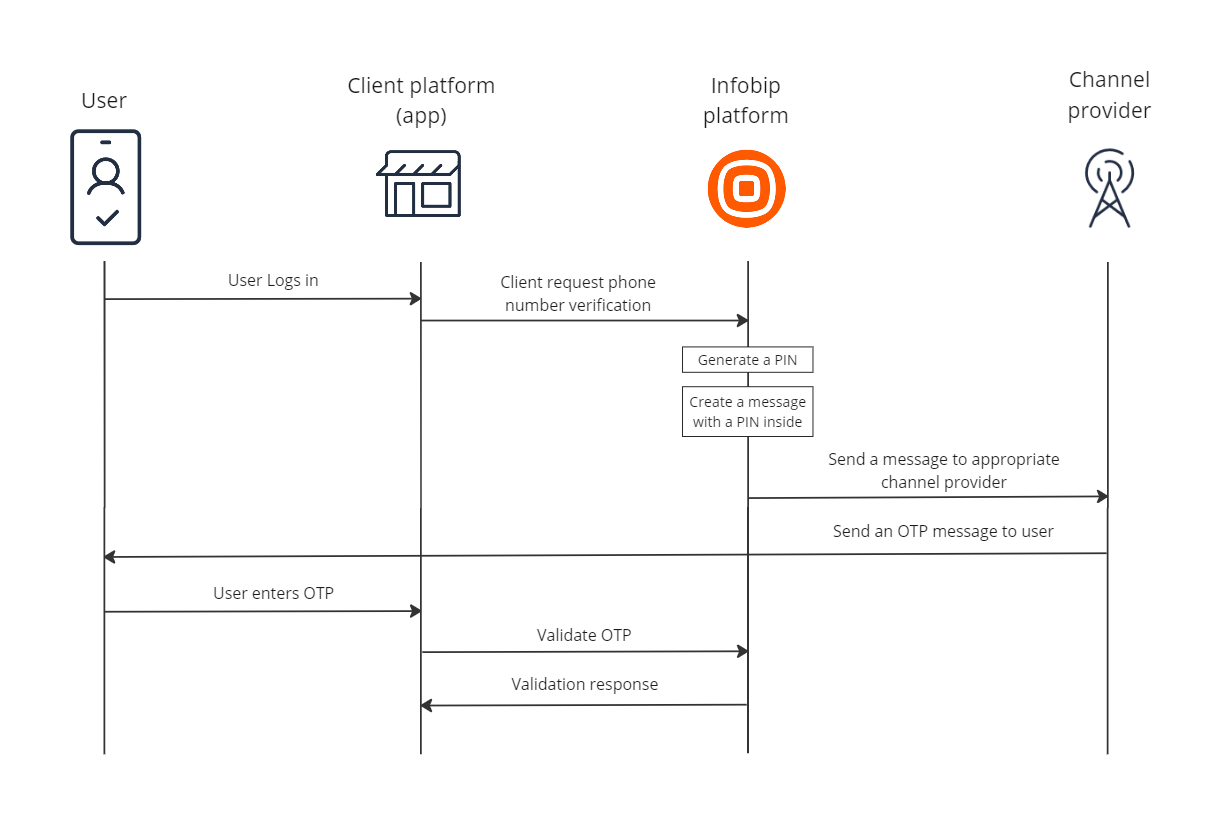
The following diagram shows the workflow for the OTP verification process over the 2FA API.
2FA over SMS API
The following process outlines sending OTPs via SMS. The overall workflow remains the same for Email and Voice channels, with additional channel-specific details incorporated into the application or template configuration.
Application configuration [#application-configuration-2FA-over-SMS-API]
The application represents a set of parameters that configure how 2FA traffic is sent. You can have separate applications for different services. Additionally, you can define separate applications for the same service to address different use cases that require unique configurations.
For instance, one application can be used for 2FA upon user registration and another application can be used for 2FA for changing the password. Separating these cases in different applications allows you to choose different options and behavior for each use case.
Request body example:
When you create your application, you are given an application ID (applicationId) in the response, which you will use later when sending PINs. When you reference an application ID (applicationId), the Infobip system knows what behavior is allowed in that particular use case.
See the 2FA API documentation to learn more about managing applications.
Message templates [#message-templates-2FA-over-SMS-API]
Templates describe the message body with the PIN placeholder that is sent to end users. The PIN placeholder, \{\{pin\}\}, must be in the text of the message. You can configure how the PIN appears, as well as some channel and sender-specific parameters.
You can create multiple message templates within a single application, enabling the same application to be used for various scenarios, such as supporting different languages.
Request body example:
When you create your message template, you are given the message template ID (messageId), which you will use later when sending PINs.
By referencing a message template ID (messageId) the Infobip system generates a PIN, places the PIN in the message template, and finally, sends the message with the PIN to the end user.
Read through the Manage Message Templates API article for more info on how to get all 2FA message templates, create, and update the templates.
Sending OTP messages [#sending-otp-messages-2FA-over-SMS-API]
Once the application and message template are configured, you can begin generating OTPs and sending them to the intended recipients. Ensure you retrieve the application ID and message template ID from the previous steps and include them in the request body.
Request body example:
When the message is sent, the PIN ID (pinId) will be in the response. Make sure that you keep the PIN ID for PIN verification.
See the 2FA API documentation to learn more about how to send PIN over SMS, Voice or Email.
Verifying OTPs [#verifying-otps-2FA-over-SMS-API]
OTP verification involves providing the PIN ID as a query parameter and the user-provided PIN in the request body.
This data is used to match the PIN generated by Infobip with the PIN entered by the user, thereby confirming the OTP and verifying the user's phone number.
Request body example:
The final response contains information about whether the user has been verified or not.
See the 2FA API documentation to learn more about verifying OTPs.