Create and send WhatsApp Flows
Use WhatsApp Flows to create end-to-end custom workflows. These workflows enable the end users to perform tasks, such as filling out forms, without leaving the chat with your business.
This tutorial explains how to create and send WhatsApp Flows to end users.
Products and channels [#products-channels]
Prerequisites [#prerequisites]
-
Infobip account. If you do not have an account, sign up for a free account. For more information, see Create an account.
-
The following products enabled in your Infobip account:
- Answers: To send the WhatsApp Flow through a chatbot.
- WhatsApp: To use the WhatsApp channel for sending the WhatsApp Flow.
Broadcast is enabled by default with your Infobip account.
-
WhatsApp sender that is registered with Infobip.
-
WhatsApp Business account set up and registered with Infobip.
Process overview [#process-overview]
This tutorial shows how to send WhatsApp Flows over the following:
- Over the Infobip web interface through Answers.
- Over the Infobip web interface through Broadcast.
- Over the WhatsApp API.
Over the Infobip Web interface through Answers [#web-interface-process-overview]
- Create the WhatsApp Flow. JSON is created.
- In WhatsApp Manager, create an outline of the WhatsApp Flow.
- In WhatsApp Manager, use the JSON to update the WhatsApp Flow with the components and elements that you created in the Meta Playground.
- Test the WhatsApp Flow in Draft mode.
- Publish the WhatsApp Flow.
- Add the WhatsApp Flow to the Answers chatbot and send it to end users.
Over the Infobip Web interface through Broadcast [#web-interface-process-overview]
- Create the WhatsApp Flow. JSON is created.
- In WhatsApp Manager, create an outline of the WhatsApp Flow.
- In WhatsApp Manager, use the JSON to update the WhatsApp Flow with the components and elements that you created in the Meta Playground.
- Test the WhatsApp Flow in Draft mode.
- Publish the WhatsApp Flow.
- Create and register the WhatsApp Flows template that uses the WhatsApp Flow.
- Create a broadcast that uses the template and send it to end users.
Over the WhatsApp API [#api-process-overview]
- Create the WhatsApp Flow. JSON is created.
- In the WhatsApp API, create an outline of the WhatsApp Flow.
- In the WhatsApp API, use the JSON to update the WhatsApp Flow with the components and elements that you created in the Meta Playground.
- Test the WhatsApp Flow in Draft mode.
- Publish the WhatsApp Flow.
- Send the WhatsApp Flow to end users.
Implementation over the Infobip Web interface [#implementation-web-interface]
Complete the steps in each of the following sections sequentially.
Create a WhatsApp Flow [#web-interface-create-flow]
You can create the WhatsApp Flow either manually or automatically.
Create a WhatsApp Flow automatically using API
EARLY ACCESS
Use the AI Agent for WhatsApp flows API to generate the JSON for the WhatsApp Flow.
-
In the
promptparameter. enter the prompt.Example: Build a static WhatsApp Flow to book a doctor's appointment with city, branch, specialty (dropdown with emojis), and name.
-
Copy the JSON code that is generated.
This feature is in Early access. For information about using this API, contact your Infobip account manager.
Create a WhatsApp Flow manually in Meta Playground [#web-interface-create-flow-meta-playground]
- Go to Meta playground and create a WhatsApp Flow based on your use case.
- To add new screens to the WhatsApp Flow, select Add new.
- To add new components, select Add content.
- Configure the components based on your use case.
- After you finish designing the WhatsApp Flow, JSON is automatically created and is ready to use. Select Copy Flow JSON.

Create an outline of the WhatsApp Flow in WhatsApp Manager [#web-interface-create-flow-whatsapp-manager]
-
Log on to WhatsApp Manager.
-
Go to Business settings > WhatsApp accounts.
-
Filter by WhatsApp business account ID.
-
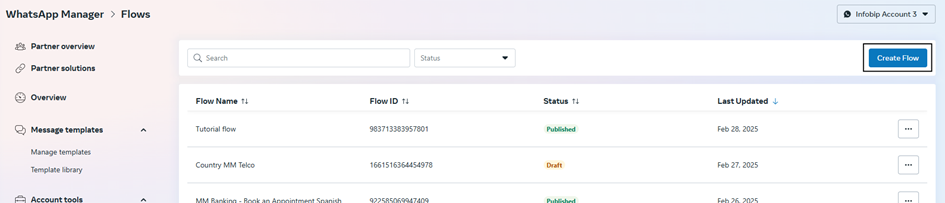
Select WhatsApp Manager > Flows > Create Flow.
-
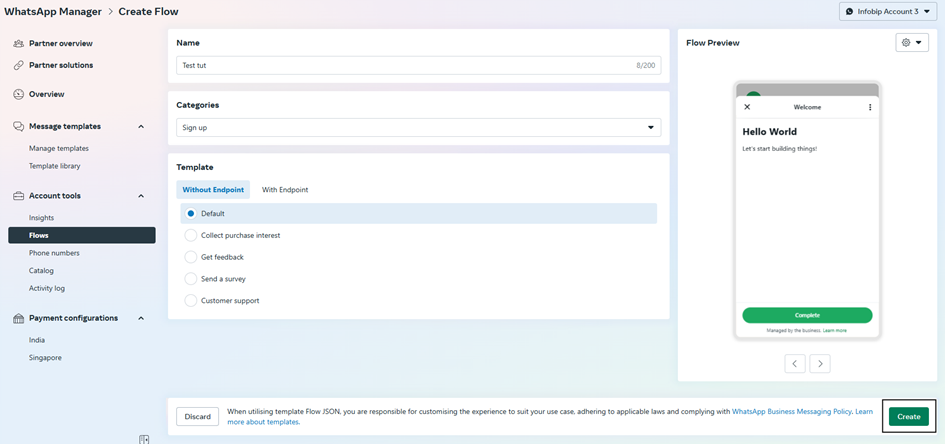
Enter the name of the WhatsApp Flow.
-
Select the category based on your use case.
-
You can create either a static or dynamic WhatsApp Flow. This tutorial shows how to create a static WhatsApp Flow. Select Without endpoint.
NoteTo create a dynamic WhatsApp Flow, select With endpoint.
-
Select Default.
-
Complete all the fields and select Create.
The WhatsApp Flow is created in Draft status.
Configure the WhatsApp Flow in WhatsApp Manager [#web-interface-configure-flow-whatsapp-manager]
Update the WhatsApp Flow so that it contains the components and elements that you created in the Meta Playground. To do this, add the JSON that you copied from the Meta Playground.
Do the following:
-
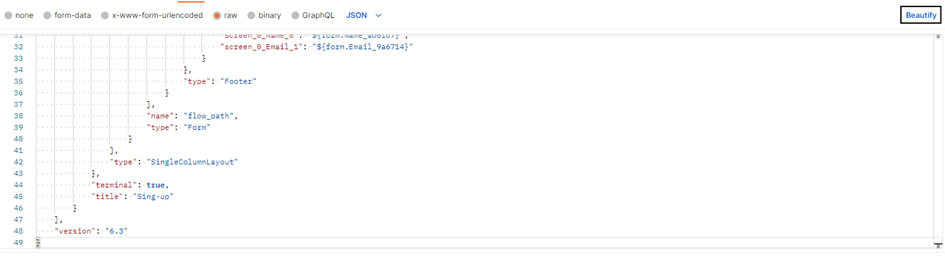
(Optional) To format the JSON, which you copied from the Meta Playground, use a tool such as Postman. In Postman, copy the JSON and select Beautify.
-
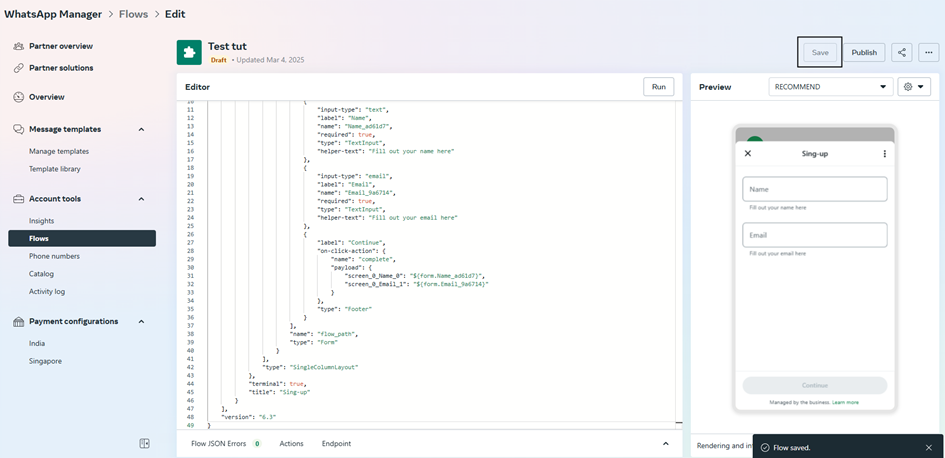
Paste the JSON into the WhatsApp Flow in your WhatsApp Manager.
-
Select Save.
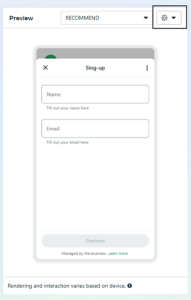
On the right-hand side, you can see the preview of the WhatsApp Flow.
-
To see the WhatsApp Flow in interactive mode, go to Settings > Enable Interactive mode.
-
(Optional) Include complex components that are not available in Meta Playground. To use them, update the JSON in your WhatsApp Manager.
-
Finish designing the WhatsApp Flow.
Test and publish the WhatsApp Flow [#web-interface-test-publish-flow]
-
To test the WhatsApp Flow, add it to either your chatbot or a broadcast and send it. Make sure that you select the Flow status as Draft.
-
To publish the WhatsApp flow, select Publish.
NoteYou cannot edit the WhatsApp Flow after you publish it.
Send the WhatsApp Flow through Answers [#web-interface-send-flow-answers]
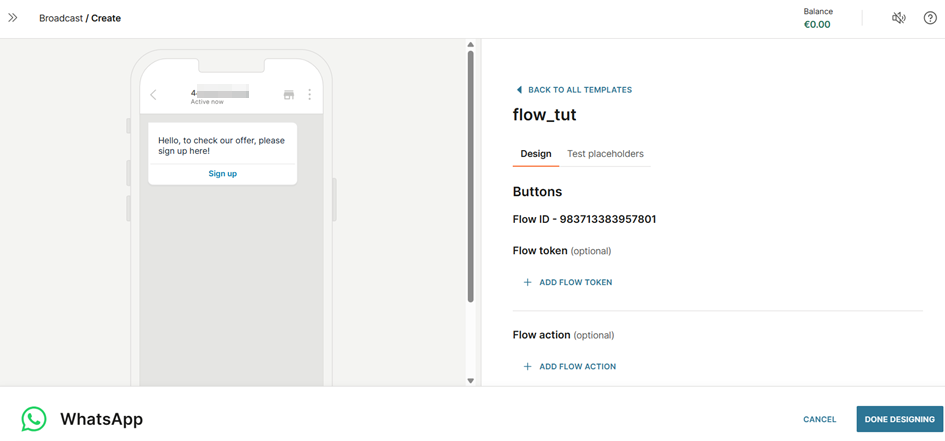
To incorporate WhatsApp Flows into your Answers chatbot, use the WhatsApp Flows element. In this element, you can add a welcome message and a button that they can select to enter the flow.
In the element, configure the following information. You can get this information from the WhatsApp Flow that you created in your WhatsApp Manager.
- Flow ID: Unique ID of the WhatsApp Flow.
- Flow status: Depending on the status of the WhatsApp Flow in WhatsApp Manager, set to either Draft or Published.
- Flow action: Select Navigate for static WhatsApp Flows or Data exchange for dynamic WhatsApp Flows.
- ID of first screen: If the Flow action is Navigate, specify the screen ID that you created for the first screen of the WhatsApp Flow.
- Flow token: Create an identifier for the WhatsApp Flow.
Send the WhatsApp Flow through Broadcast [#web-interface-send-flow-broadcast]
Create and register the WhatsApp Flows template
-
On the Infobip web interface, go to Channels and Numbers > Channels > WhatsApp > Senders tab.
-
Find the sender on which you want to send the WhatsApp Flow to end users.
-
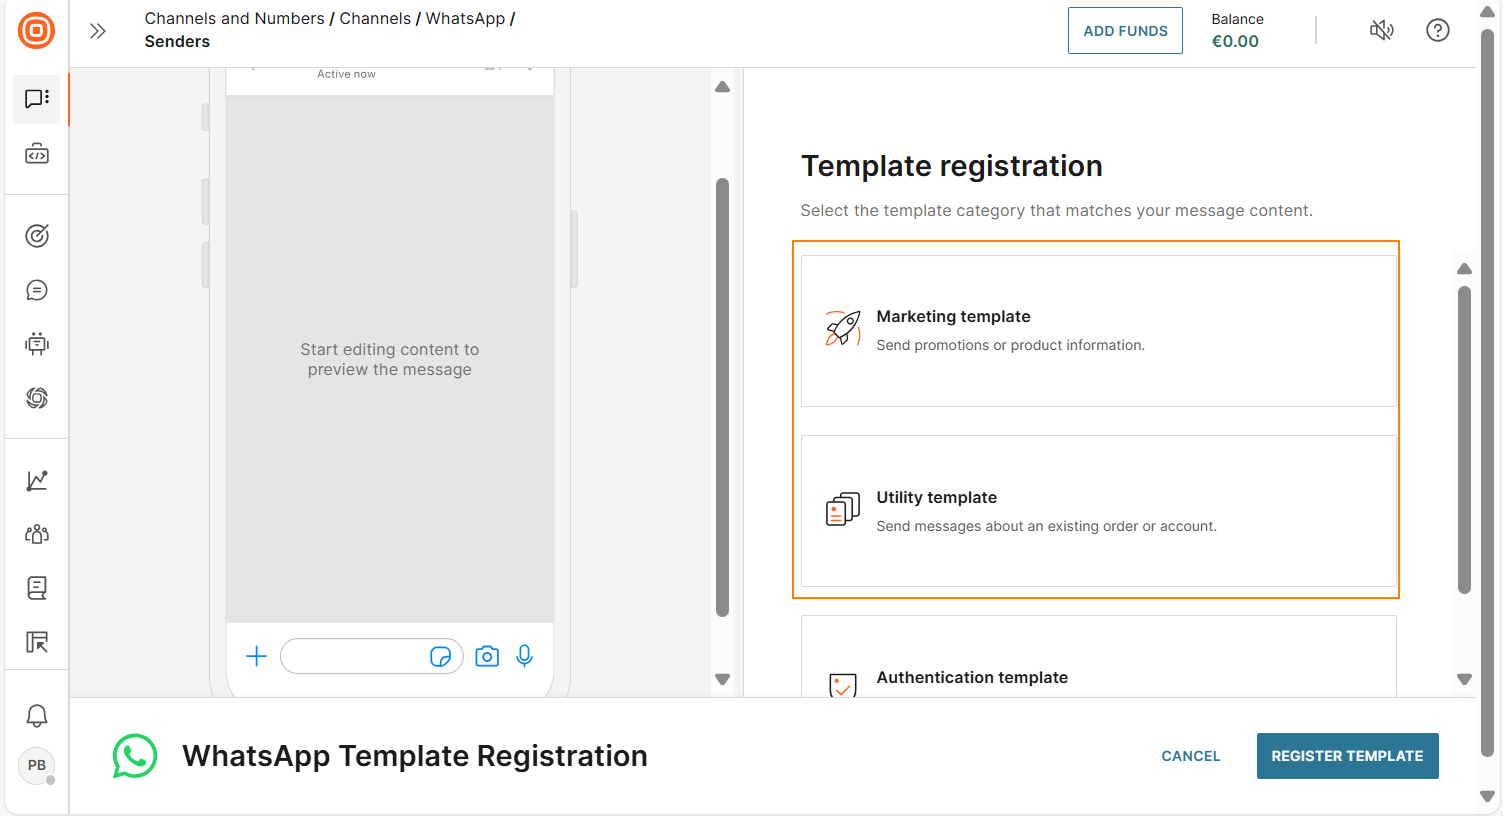
Select Register template.
-
Depending on your use case, select either Marketing template or Utility template.
NoteYou cannot use the Authentication template for WhatsApp Flows.
-
Select Flow template.
-
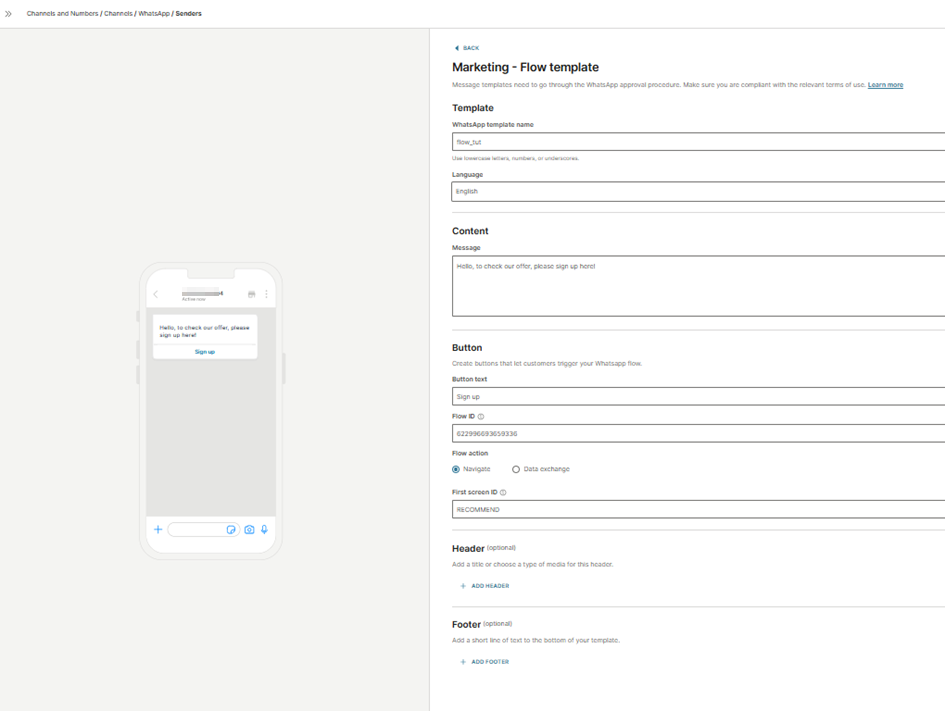
Configure the fields in the template as follows:
-
Add the template name and select a language.
-
In the Content section > Message field, add a welcome message to send to the end user.
-
In the Button section, create a button that end users can click to start the WhatsApp Flow. Add the Button text.
-
For the following fields, use the information from the WhatsApp Flow that you created in your WhatsApp Manager.
- Flow ID: Unique ID of the WhatsApp Flow.
- Flow action: Select Navigate for static WhatsApp Flows or Data exchange for dynamic WhatsApp Flows.
- ID of first screen: If the Flow action is Navigate, specify the screen ID that you created for the first screen of the WhatsApp Flow.
-
Add the Header and Footer as required.
-
-
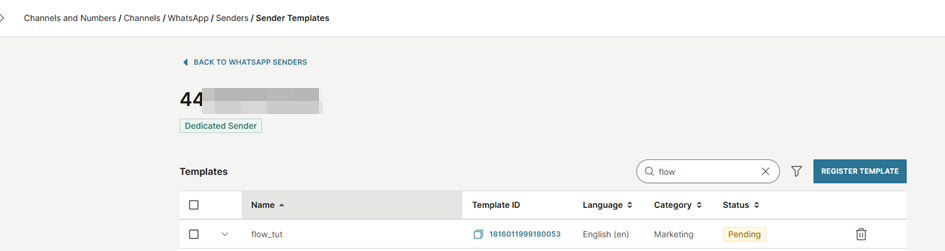
Select Register template. The template is sent to WhatsApp for approval.
The approval process usually takes only a few minutes but can take a maximum of 24 hours.
-
You can view the status of the template in the Templates tab. Filter to find the template that you created.
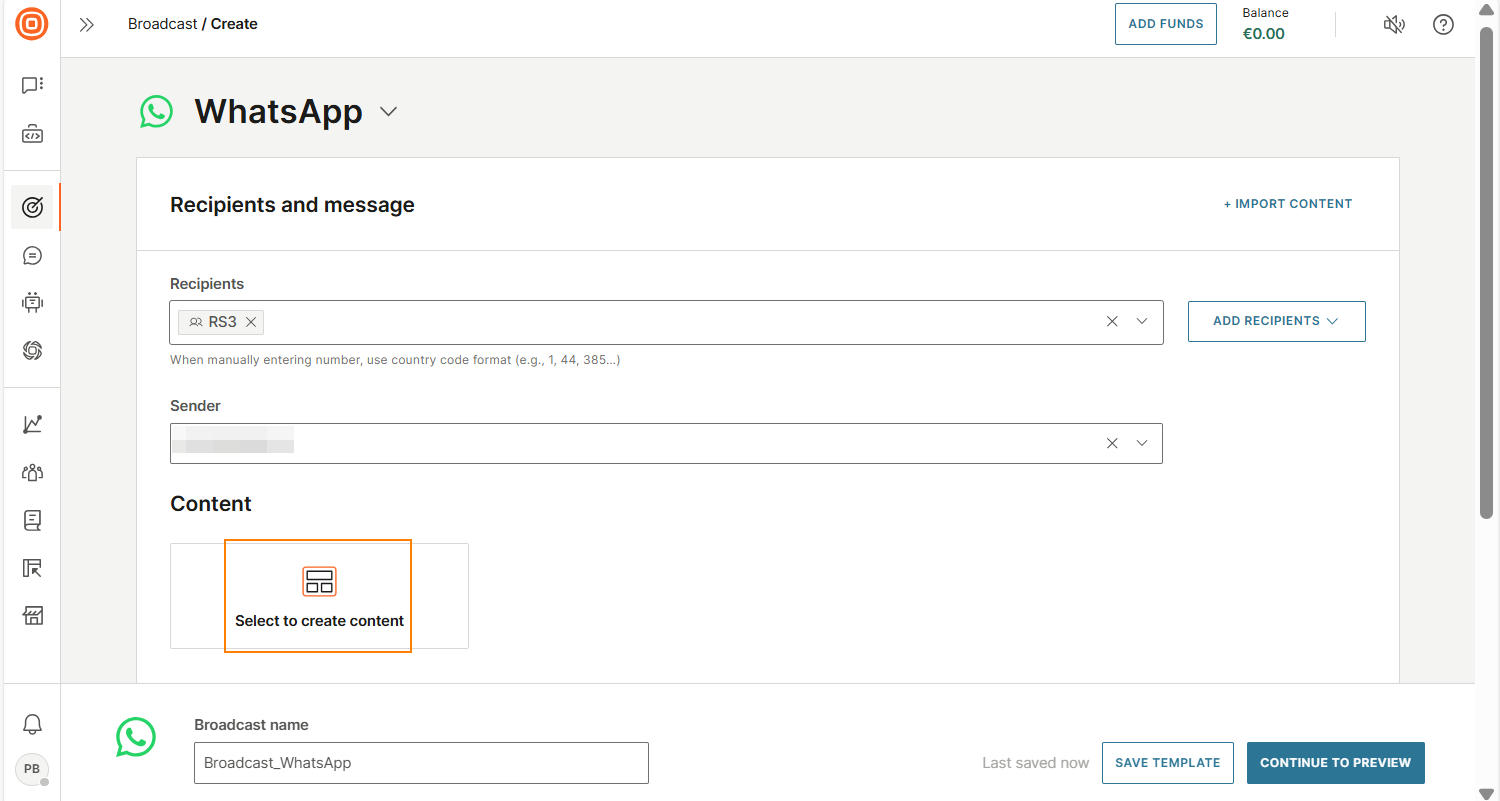
Create a broadcast and send the WhatsApp Flow
-
On the Infobip web interface, go to Moments > Broadcasts.
-
Select Create broadcast.
-
Select WhatsApp as the channel.
-
Configure the Recipients field.
-
In the Sender field, select the sender that you used to register the WhatsApp Flows template.
-
Select to create content.
-
On the right-hand side, all the templates that use the selected sender are listed. Use Filter and Search to find the template that you created.
-
Select Use next to the template.
-
Configure the following fields if required.
- Flow action: Select Navigate for static WhatsApp Flows or Data exchange for dynamic WhatsApp Flows.
- Flow token: Create an identifier for the WhatsApp Flow.
-
Configure the other fields in the template.
-
Select Done designing.
-
(Optional) Enable failover to SMS so that if the WhatsApp message is not delivered to the end user, the broadcast will try to send the message over SMS.
- Select Failover to SMS.
- Define the SMS sender and SMS content.
-
Configure the other fields in the broadcast as required.
-
Check all the fields and rename the broadcast if required.
-
Select Continue to preview.
-
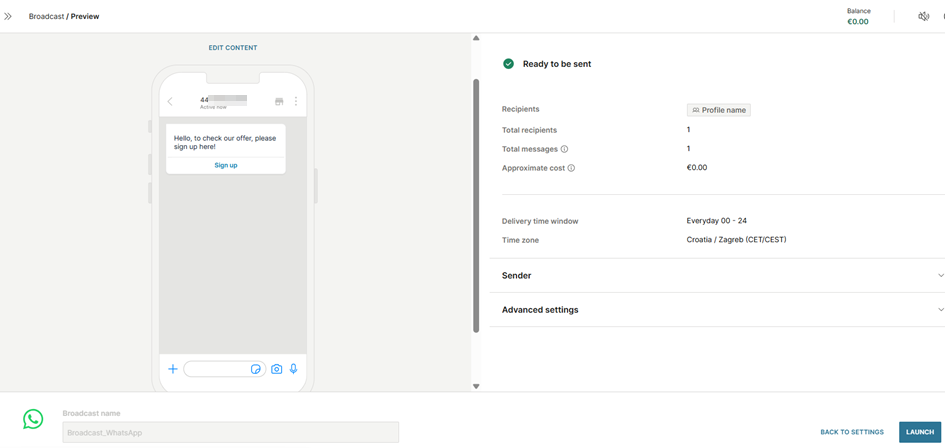
Check the preview and make sure that all the information is correct.
-
Select Launch to send the broadcast.
To track the status of the broadcast, go to Moments > Broadcasts.
Implementation over the WhatsApp API [#implementation-api]
Complete the steps in each of the following sections sequentially.
Create a WhatsApp Flow [#api-create-flow]
You can create the WhatsApp Flow either manually or automatically.
Create a WhatsApp Flow automatically using API
EARLY ACCESS
Use the AI Agent for WhatsApp flows API to generate the JSON for the WhatsApp Flow.
-
In the
promptparameter. enter the prompt.Example: Build a static WhatsApp Flow to book a doctor's appointment with city, branch, specialty (dropdown with emojis), and name.
-
Copy the JSON code that is generated.
This feature is in Early access. For information about using this API, contact your Infobip account manager.
Create a WhatsApp Flow manually in Meta Playground [#api-create-flow-meta-playground]
- Go to Meta playground and create a WhatsApp Flow based on your use case.
- To add new screens to the WhatsApp Flow, select Add new.
- To add new components, select Add content.
- Configure the components based on your use case.
- After you finish designing the WhatsApp Flow, JSON is automatically created and is ready to use. Select Copy Flow JSON.
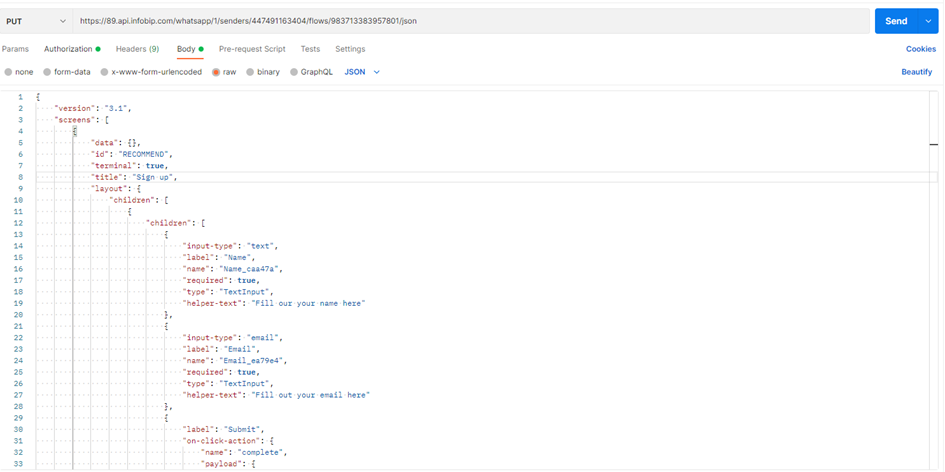
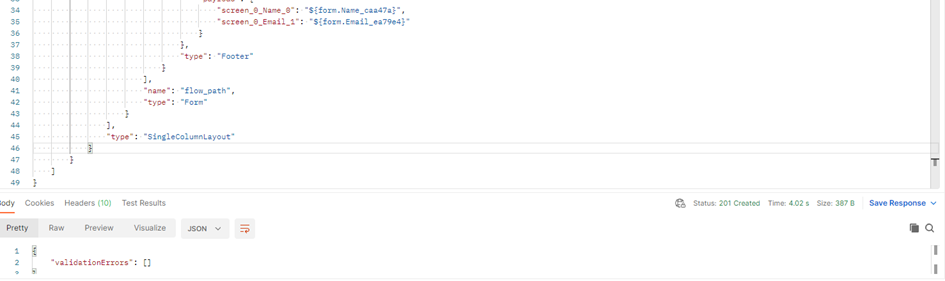
Create and configure the WhatsApp Flow in the API [#api-create-flow-in-api]
-
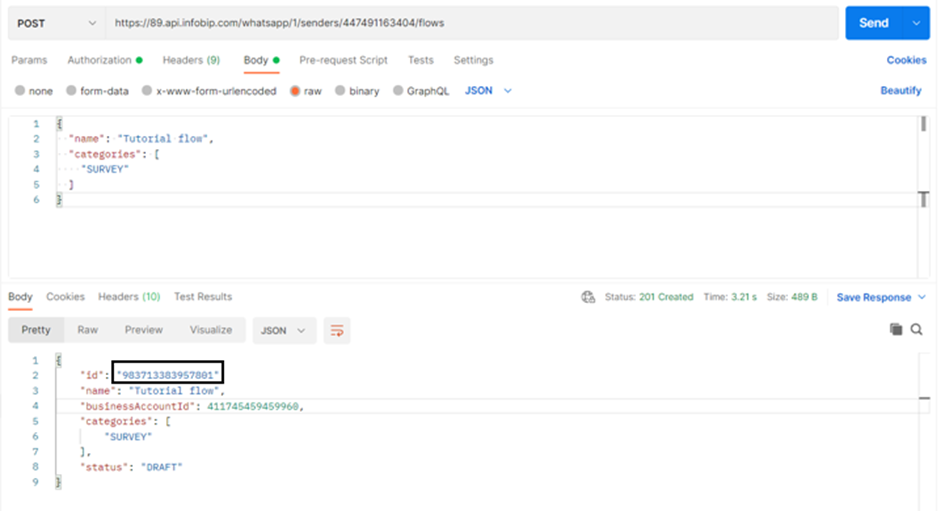
In the WhatsApp API, create an outline of the WhatsApp Flow.
The WhatsApp Flow is created in Draft status. You will receive a WhatsApp Flow ID.
-
Update the WhatsApp Flow so that it contains the components and elements that you created in the Meta Playground. To do this, add the JSON that you copied from the Meta Playground. Include the WhatsApp Flow ID.
-
(Optional) Include complex components that are not available in Meta Playground.
-
Finish designing the WhatsApp Flow.
Test and publish the WhatsApp Flow [#api-test-publish-flow]
-
To test the WhatsApp Flow, send it over the API. Make sure that you select the flowStatus as Draft.
-
Publish the WhatsApp Flow.
NoteYou cannot edit the WhatsApp Flow after you publish it.

Send the WhatsApp Flow over the API [#api-send-flow]
-
In the API to send WhatsApp Flows, update the recipients (to) and sender (from).
-
Set the mode to either Draft or Published.
-
Configure the following information. You can get this information from the WhatsApp Flow that you created.
- flowId: Unique ID of the WhatsApp Flow.
- flowStatus: Depending on the status of the WhatsApp Flow in WhatsApp Manager, set to either Draft or Published.
- flowAction: Specify Navigate for static WhatsApp Flows or Data_Exchange for dynamic WhatsApp Flows.
- screen: If flowAction is Navigate, specify the screen ID that you created for the first screen of the WhatsApp Flow.
- flowToken: Create an identifier for the WhatsApp Flow.