Set up RCS P2A conversation with QR code
Person-to-Application (P2A) conversations enable end users to initiate conversations with your RCS agent by scanning a QR code. This tutorial describes how to set up a complete P2A conversation flow using QR codes, inbound configuration, and Moments flows.
Products and channels [#products-channels]
Prerequisites
- Infobip account. If you do not have one, you can create a free trial account.
- The following enabled in your Infobip account:
- RCS sender registered in testing phase or launched on carriers.
- RCS-enabled device for testing.
Process overview[#process-overview]
This tutorial uses the Infobip web interface, which is the web-based user interface used to configure channels, senders, inbound settings, and Moments flows.
The process is as follows:
- QR code creation
- Inbound configuration setup
- Flow setup on the Infobip web interface
- Testing
Implementation steps [#implementation-steps]
Create QR code [#qr-code-creation]
To create a QR code, you need the Google Agent ID from your RCS sender. You use this ID to create a deep link, which is then encoded into a QR code.
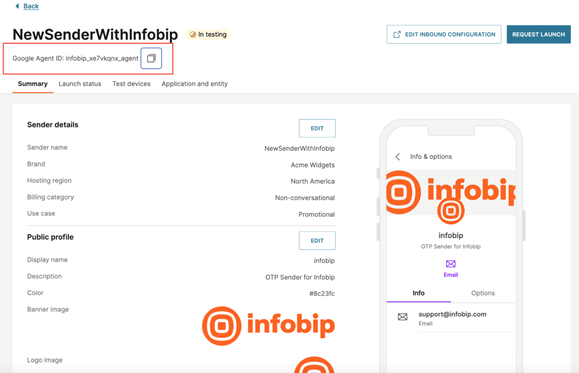
Get Google Agent ID [#get-google-agent-id]
- On the Infobip web interface, go to Channels and numbers > Channels > RCS Business Messaging > Senders.
- Select the required sender.
- Copy the Google Agent ID displayed under the sender name.
Example: infobip_xe7vkqnx_agent
Create a deep link [#create-deep-link]
A deep link is a URL that opens an RCS conversation with your agent when scanned from a QR code.
You can create deep link URLs in one of the following formats, as defined in GSMA RCC.07 v14.0, section 3.6.3.4:
- Format 1: Use only the service ID
- Format 2: Use a phone number and service ID
iOS limitation: Format 2 includes automatic fallback to SMS when the recipient device does not support RCS. This fallback behavior does not occur on iOS devices.
For both formats, you can include a pre-filled message that is delivered as message text when the conversation opens.
For more information, refer to the Google Business Communications documentation.
Example deep link
The following example shows Format 1 with a pre-filled message Hi. Replace infobip_xe7vkqnx_agent with your Google Agent ID from the previous step.
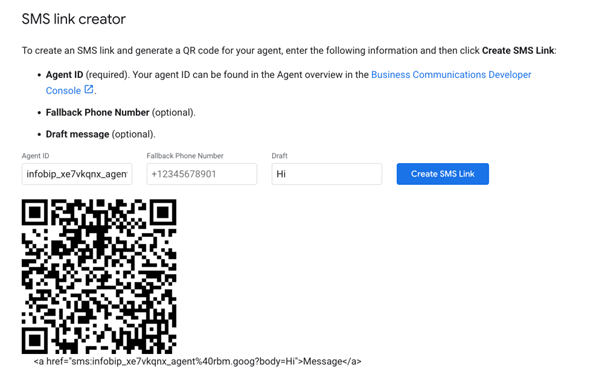
Generate the QR code [#generate-qr-code]
Generate a QR code that encodes the deep link using one of the following tools:
- Google SMS link creator tool
- Any free QR code generator tool available online
Enter the deep link URL into the QR code generator.
After the QR code is generated, proceed with the inbound configuration setup.
Configure inbound settings [#configure-inbound-settings]
Configure the inbound settings for your RCS sender to route incoming messages to Moments.
-
On the Infobip web interface, go to Channels and numbers > Channels > RCS Business Messaging > Senders, select your sender, and select Edit inbound configuration.
-
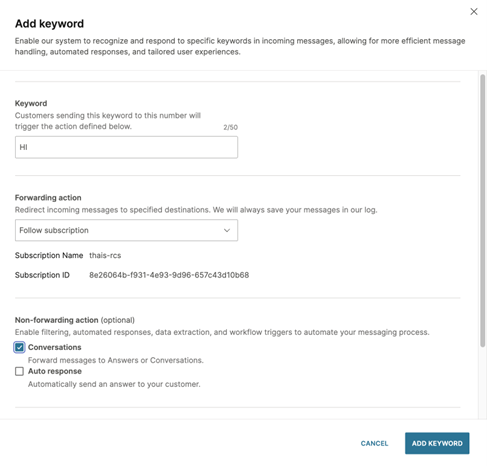
Under Keywords, select Add keyword.
-
Configure the following fields:
-
Keyword:
HIThis value is an example keyword used in this tutorial and corresponds to the keyword specified in the deep link. Keywords in this field must be uppercase. Keyword matching is case-insensitive, soHIwill match incoming messages containingHi,HI, orhi. -
Forwarding action: Select either Follow subscription or Forward to HTTP
-
Non-forwarding action: Select Conversations
-
Application and entities API: If you are using CPaaS X configuration, select the relevant option.
For additional configuration options and detailed field descriptions, refer to the RCS inbound configuration documentation.
-
-
Select Add keyword.
Create the flow in Moments [#flow-setup]
Create a flow in Moments to process incoming RCS messages.
Create a new flow [#create-flow]
- On the Infobip web interface, go to Moments > Flows.
- Select Create flow.
- Select Start from scratch.
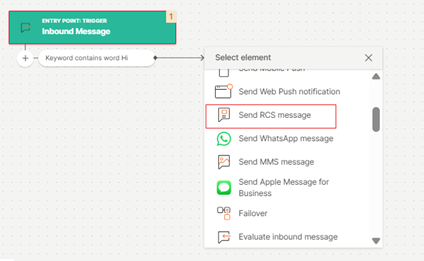
- Select Trigger > Inbound message.
Configure the trigger [#configure-trigger]
A trigger is an event that starts a flow.
In the Inbound message trigger, configure the following:
- In Channels and conditions, select RCS as the channel.
- Select the RCS card to configure it.
- In To recipient, select the RCS sender.
- In Condition, select Message body Contains word
Hi.

The value Hi corresponds to the keyword configured in the inbound settings step.
For more information, see the Moments entry points documentation.
Add response element [#add-response]
The response element defines the message sent by the RCS agent.
- Add Send RCS message as the next element.
- Disable Use messages. This setting is used to send pre-created message templates. When disabled, the message content is configured directly in the flow element.
- In From, select the RCS sender.
- In Message content, select Text.
- Enter the message text.
- Select Validate.
- Select Activate.
The flow is now active.
Testing [#testing]
Test your P2A conversation setup with the steps below:
- If the RCS agent or sender is in testing phase, add the destination phone number as a test device. To add a test device, go to Channels and numbers > Channels > RCS Business Messaging > Senders, select your sender, go to the Test devices tab, and select Add device.
- If the RCS agent is launched on a network, testing is available on supported networks.
Android device [#testing-android]
- Scan the QR code with your mobile device.
- Send the keyword
Hito start the conversation.
iOS [#testing-ios]
-
Scan the QR code with your mobile device.
-
The keyword
Hiis pre-filled in the messaging app. -
Select Send.
Additional resources [#additional-resources]
- Google Business Communications – Start a conversation from an SMS deep link
- Infobip RCS documentation
- Moments – Flow editor documentation
- Moments – Manage flow documentation