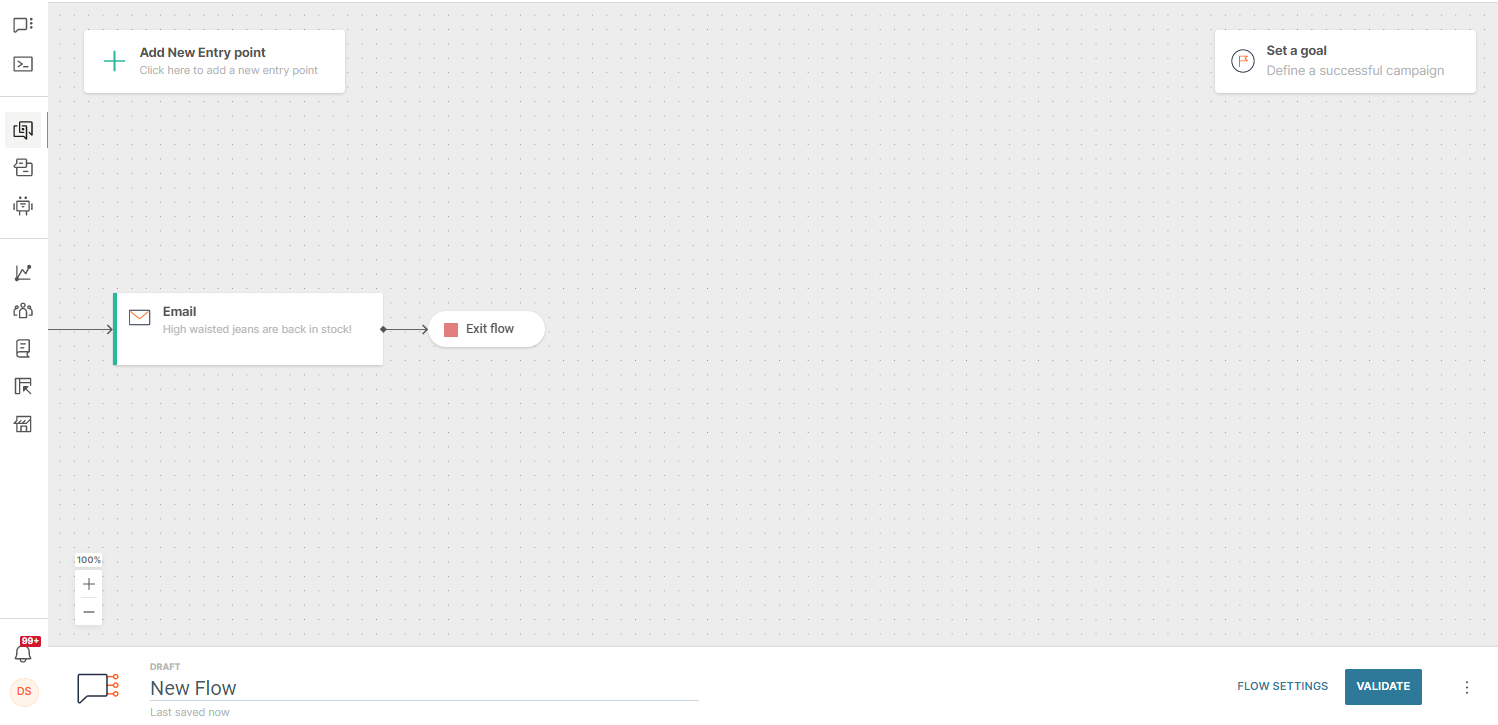
Entry points and exit
A flow entry point is the starting point of a flow. It determines which profiles enter the flow.
There are different types of entry points. Each entry point has specific criteria that must be fulfilled for a profile to enter the flow.
Select an entry point that is relevant to your flow and configure the entry criteria.

Predefined audience [#predefined-audience]
Use this entry point to send communication to all profiles that have a specific tag or are part of a specific segment.
You must define the target audience before you launch the flow. Depending on the type of Predefined audience entry point, you can update the audience while the flow is active.
Predefined audience entry points are of the following types:
To choose the correct entry point for your use case, refer to the Choose a relevant entry point section.
You can add only one Predefined audience entry point to a flow. You can add other entry points multiple times.
One-time [#predefined-audience-one-time]
Use this entry point to send single-shot blast campaigns.
When the flow is launched, it runs only once and includes the predefined audience.
Features
The entry point has the following features.
One-time flow: When the flow is launched, all profiles that meet the criteria are added to the flow. The flow is complete after all the audience exit it.
Example: You added all profiles that have the tag June to the audience and launched the flow. All the profiles that have the June tag at the time the flow is launched enter the flow. While the flow is active, this tag is added to another profile. But this profile is not added to the flow.
Predefine the audience: You must define the criteria for the audience before you launch the flow. You cannot update the criteria after launch, even if the flow is active.
Single flow entry: The selected audience enters the flow only once.
Configure the element
Specify the audience to whom you want to send the communication.
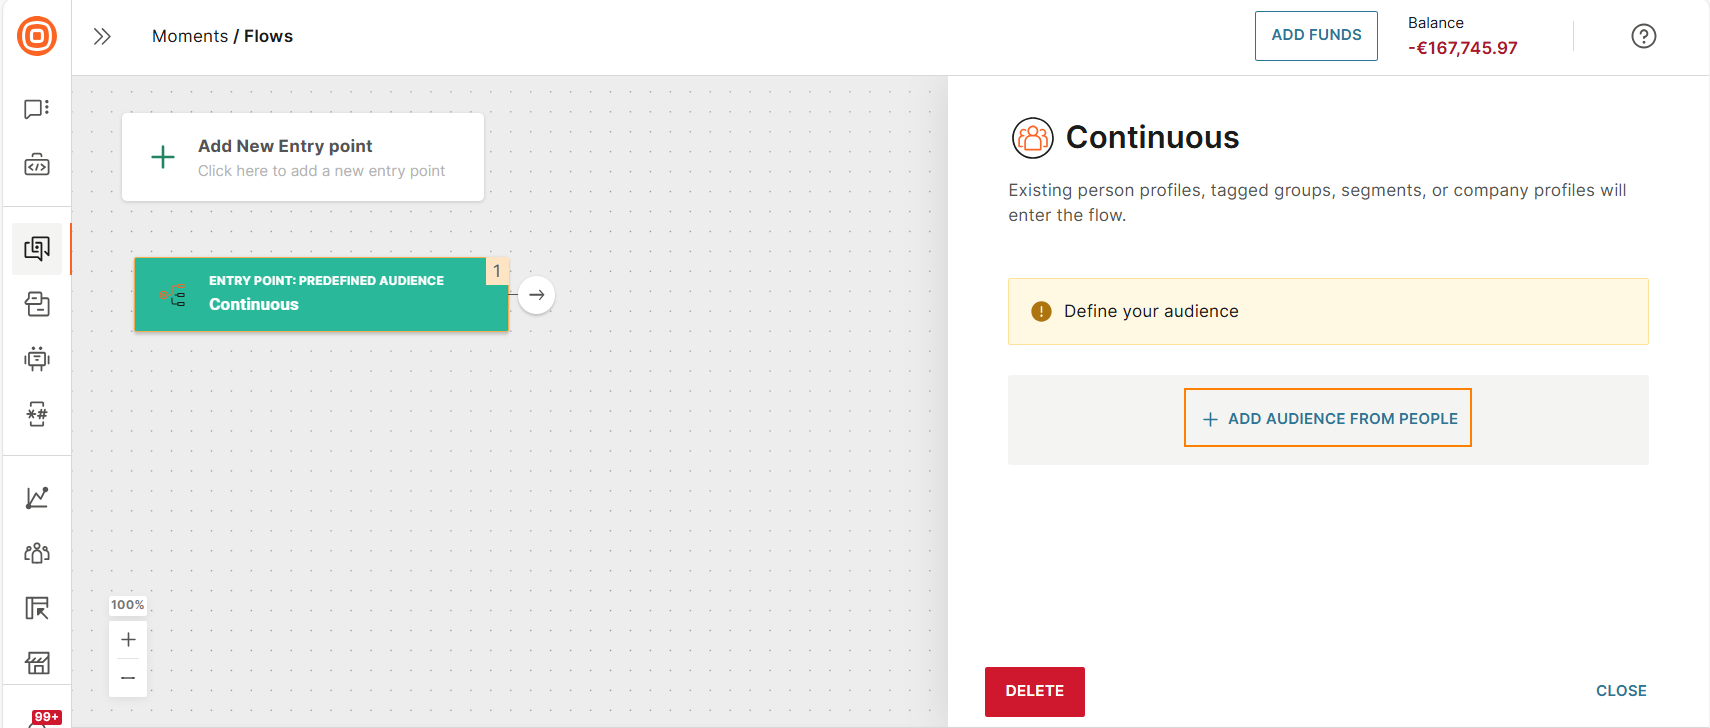
Continuous [#predefined-audience-continuous]
Use this entry point for ongoing, automated campaigns.
When the flow is launched, it runs and includes the predefined audience. After this, the flow runs whenever a new profile meets the audience criteria, while the flow is active.
Features
The entry point has the following features.
Continuous flow: When the flow is launched, all profiles that meet the criteria are added to the flow. After this, if a profile meets the audience criteria while the flow is active, that profile is also automatically added to the flow.
Example: You added all profiles that have the tag June to the audience and launched the flow. All the profiles that have the June tag at the time the flow is launched, enter the flow. While the flow is active, this tag is added to another profile. This profile is also automatically added to the flow.
Predefine the audience: You must define the criteria for the audience before you launch the flow. But you can update the criteria after launch, while the flow is active.
Manually add and remove audience: You can manually add or remove audience after you launch the flow, while the flow is active.
Multiple flow entry: Depending on the entry criteria, the selected audience might enter the flow multiple times.
Exceptions: If a profile is already in the flow, settings such as Frequency capping or Reenter settings might prevent this profile from entering the flow again.
Configure the element
Specify the audience to whom you want to send the communication.
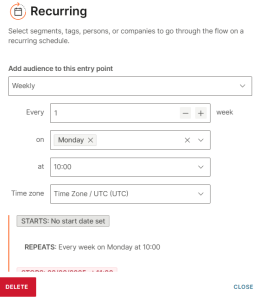
Recurring [#predefined-audience-recurring]
Use this entry point for repetitive campaigns, such as sending monthly newsletters.
The flow runs repeatedly based on the recurrence settings, while the flow is active.
Features
The entry point has the following features.
Recurring flow: The flow runs repeatedly based on the recurrence settings, while the flow is active.
Example: You added all profiles that have the tag June to the audience and launched the flow. At the time of recurrence, all the profiles that have the June tag enter the flow. While the flow is active, this tag is added to another profile. When the flow recurs the next time, this profile is also automatically added to the flow.
Predefine the audience: You must define the criteria for the audience before you launch the flow. But you can update the criteria after launch, while the flow is active.
Manually add and remove audience: You can manually add or remove audience after you launch the flow, while the flow is active.
Multiple flow entry: Depending on the recurrence criteria, the selected audience might enter the flow multiple times.
Example: The same person can receive the weekly newsletter every week.
Exceptions: If a profile is already in the flow, settings such as Frequency capping or Reenter settings might prevent this profile from entering the flow again.
Configure the element
Add audience to this entry point
Define the frequency at which the configured audience enters the flow. Select one of the following repeat options:
- Daily: Example: Reminder about appointments.
- Weekly: Example: Weekly newsletters.
- Monthly: Example: Monthly payment reminders.
- Yearly: Example: Birthday or anniversary wishes.
You can adjust the recurrence to meet your requirements.
Example: You can set a monthly recurrence either for a specific date each month or for a specific weekday, such as the first Wednesday of each month.
Add audience from People
Specify the audience to whom you want to send the communication.
Add audience from People [#predefined-audience-add-audience]
The process and images in this section are for the Continuous element. Follow the same process for the other Predefined audience elements.
- In the configuration pane for the selected Predefined Audience entry point, select Add audience from People.
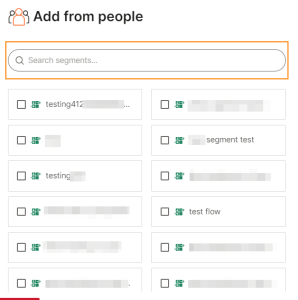
- Select one or more of the following criteria. You can select multiple options of each type. All profiles that match the selected criteria are added to the audience.
- Tags: Adds all profiles that have the tags that you select.
- Audience segments: Adds all profiles that belong to the segments that you select.
- Person profiles: Adds all profiles that you select.
- Companies: Adds all companies that you select.
- To view more items, select View all.
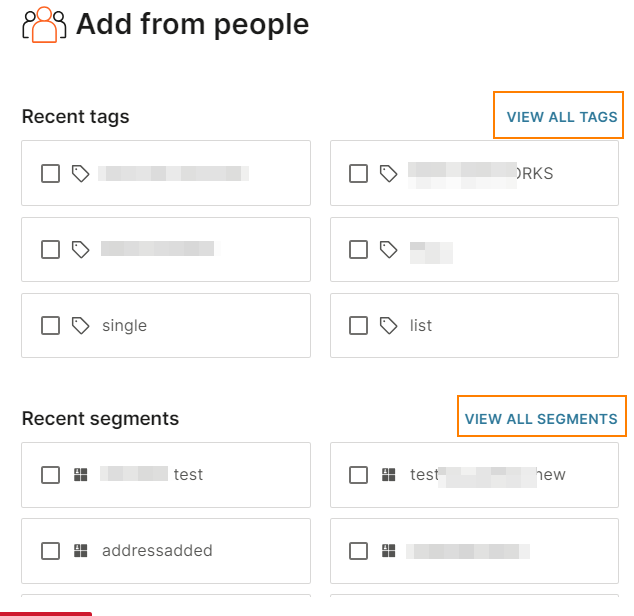
- You can also search for a specific item. After you select View all, you can use the search field.
Choose the relevant entry point [#predefined-audience-choose-entry-point]
Use the following information to choose the entry point relevant to your flow.
| Feature | One-time | Continuous | Recurring |
|---|---|---|---|
| When audience enters the flow | When the flow is launched. | When the flow is launched. After flow launch, whenever the audience meets the predefined criteria. | Based on the specified interval. |
| Multiple flow entries | No A profile enters the flow only once. | Yes | Yes |
| Manually add and remove audience after flow launch | No | Yes | Yes |
| Scenario | Single-short, burst campaigns. Example: Seasonal promotion. | Ongoing, automated campaigns. Example: Appointment reminders. | Repetitive campaigns. Example: Sending weekly newsletters. |
Triggers
Flows can also be triggered by different events and actions. In other words, people who perform some activity that has been defined inside the trigger will enter your Flow. The following guidelines should help you determine which triggers would best serve your business scenario.
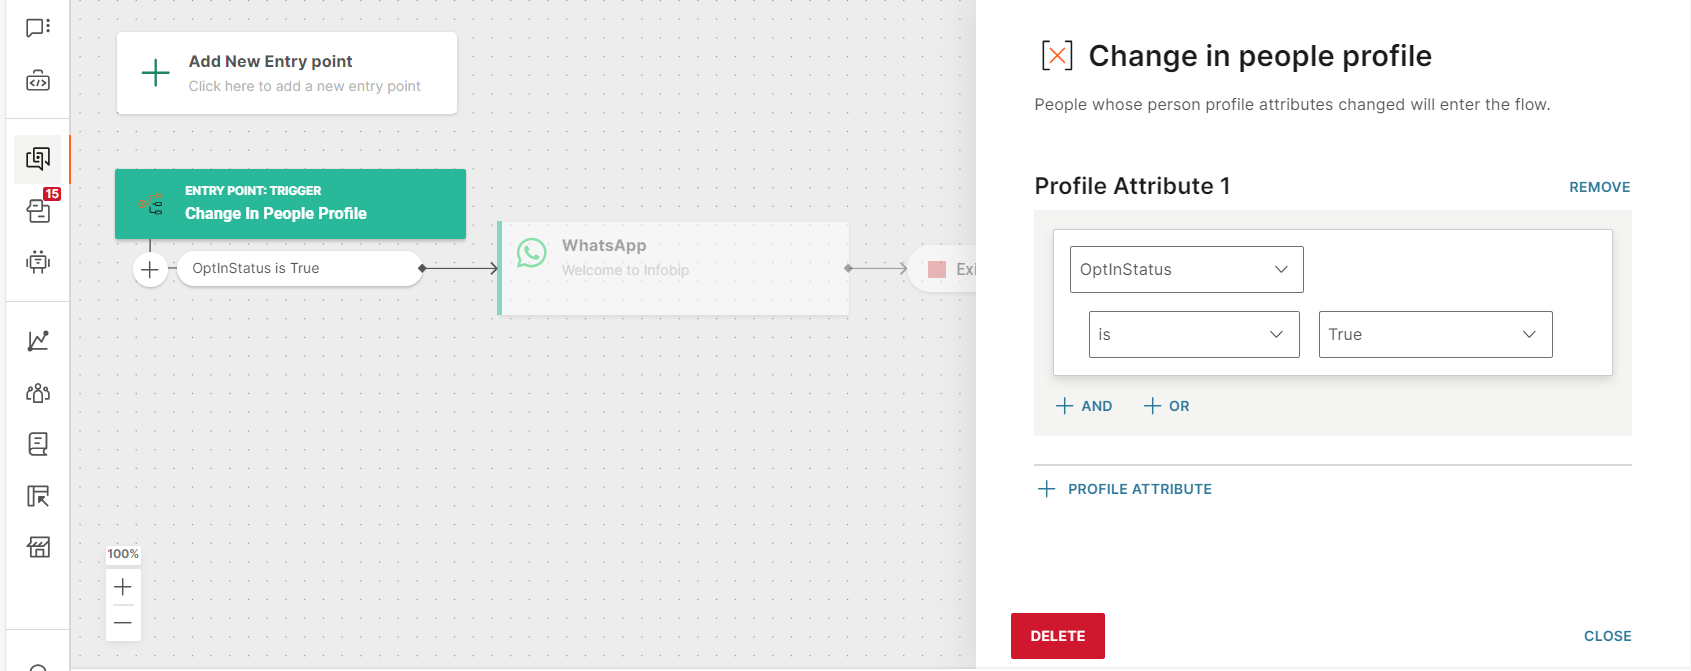
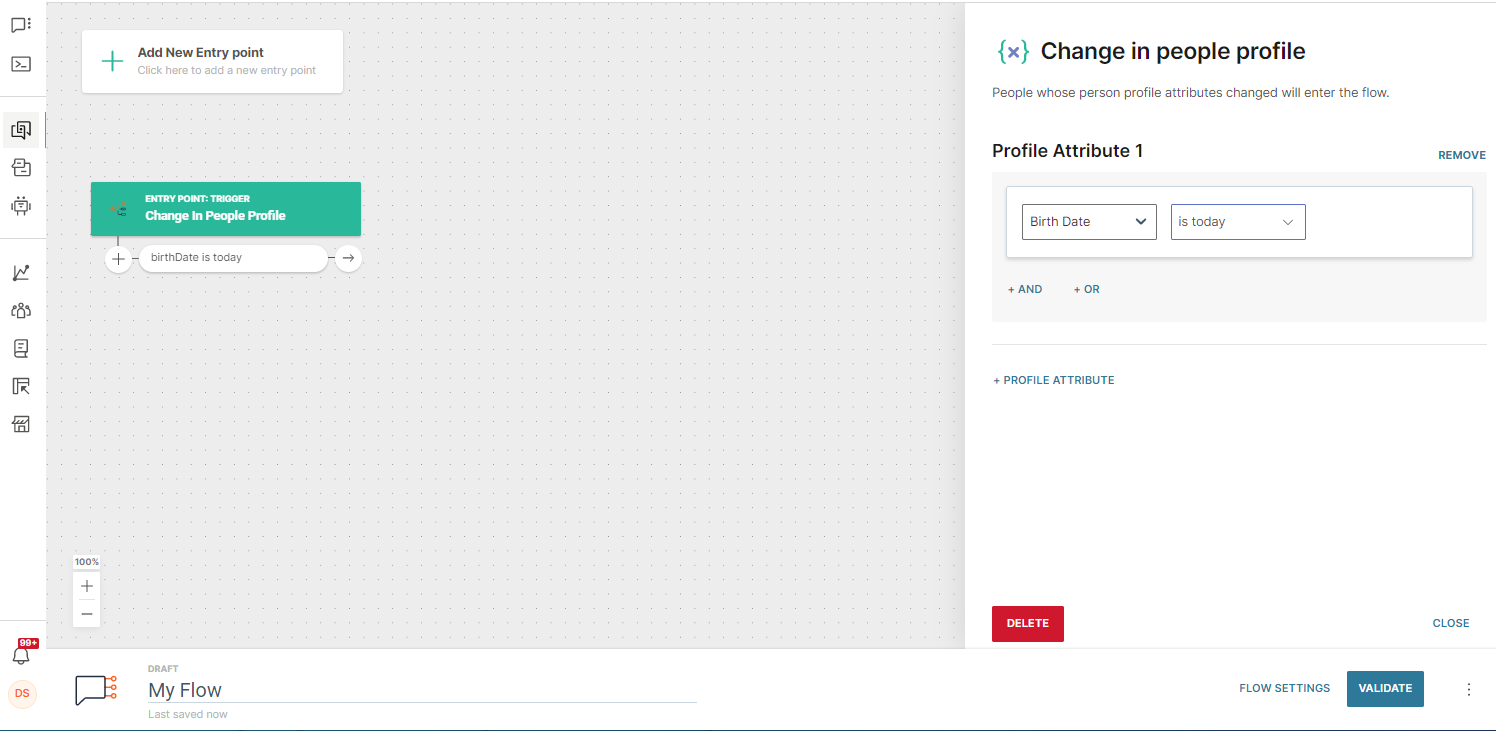
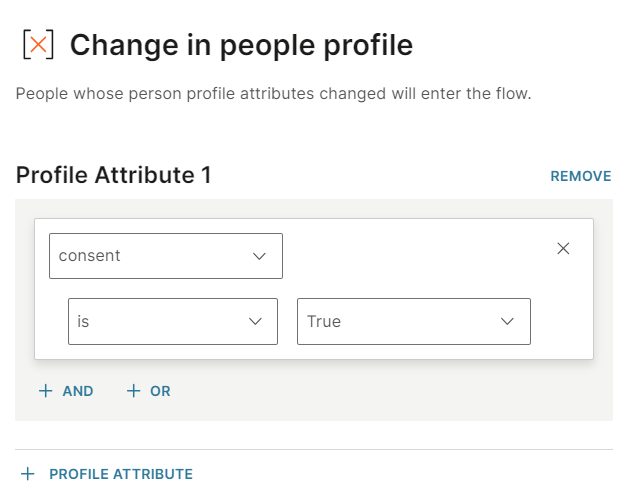
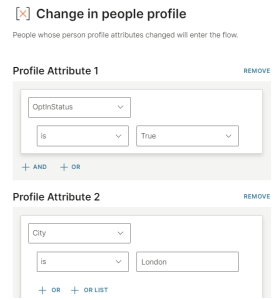
Change in People profile [#change-in-people-profile-triggers]
This entry point is triggered when changes to a person profile meets the conditions that you specify.
Example: You want to send a welcome message to end users who opt in to your communications. In the Change in people profile trigger, specify the condition that the OptInStatus profile attribute must be True. The flow is triggered when the OptInStatus profile attribute for an end user changes to True.
You can also use this trigger to wait for a predetermined period so that the person can enter the communication flow.
Example: You want to send greetings to end users on their birthdays. In the Change in people profile trigger, specify the condition that the BirthDate profile attribute is today.
Configure the trigger
In the trigger, select the person profile attribute, a relevant operator, and the condition value. You can also use flow variables in the condition value.
You can specify multiple criteria in a condition.
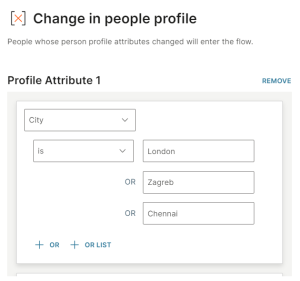
You can specify multiple conditions.
The available operators depend on the data type of the person attribute. The following table lists the operators for each data type. You can also use person profile attributes of the List data type.
| BOOLEAN (True/False) | TEXT | NUMBER (Decimal, Whole) | DATE (Date, Date Time) |
|---|---|---|---|
| is | is | is | is |
| is not | is not | is not | is not |
| is empty | contains | less than | before |
| does not contain | less than or equal | until | |
| starts with | greater than or equal | since | |
| ends with | greater than | after | |
| is empty | is empty | is empty | |
| is not empty | is not empty | is not empty | |
| is today | |||
| will be in | |||
| will be within | |||
| will be more than | |||
| was | |||
| was within | |||
| was more than |
People real-time event [#people-real-time-event-triggers]
Use this entry point to trigger the flow based on events. Example: On your website, track the addToCart event by using Web SDK. Add the event, addToCart, to the People real-time event entry point. When an end user adds an item to the cart on your website, the event is assigned to the end user's profile, and the flow is triggered.
You can then branch your flow based on the events. Example: If the addToCart event happened, send them a follow-up message.
Use this entry point to identify how end users interact with your digital assets such as websites, how they react to your messages, and if there are any changes in their profile information.
For more information about events, refer to the People documentation.
Use cases for the trigger
The following are some examples of using this trigger.
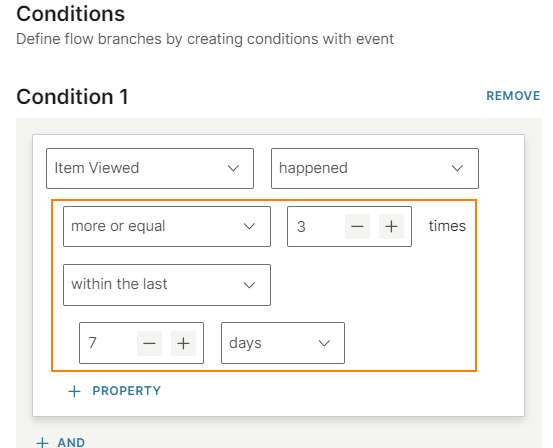
- In abandoned cart campaigns when you want to remind customers that the products that they selected are still in the cart
- Offer a discount to end users who view the same item three or more times within 7 days.
- Other advanced multi-step campaigns.
Configure the trigger
Follow these steps to configure the trigger.
- Define the condition for which flow needs to be triggered.
- (Optional) Save the information in variables.
- (Optional) Include historical data.
To use multiple audience segments and add the customer attributes, refer to the Segment Audience element.
For more information, refer to the following sections.
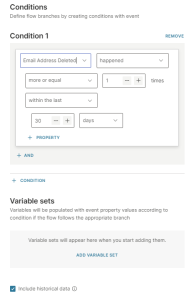
Define the conditions
Define one or more conditions that trigger the flow.
In each condition, do the following.
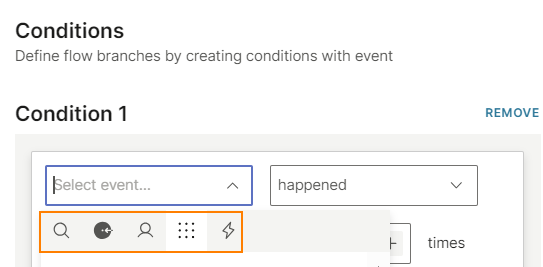
- Select the event.
- Select the operator for the event. You can target either customers who performed the action or those who did not perform the action.
- Define the criteria for the event.
- (Optional) If the event has properties, you can add them to the condition to refine the target audience.
Select the event
Select the event. For more information about events, refer to the Events documentation in People.
Follow these guidelines.
- To select a custom event, you must define the event, along with its properties, in People.
- For channel events, you can also select details about the communications. Example: For the Email link clicked event, select the name of the flow from which the link was sent to the end user.
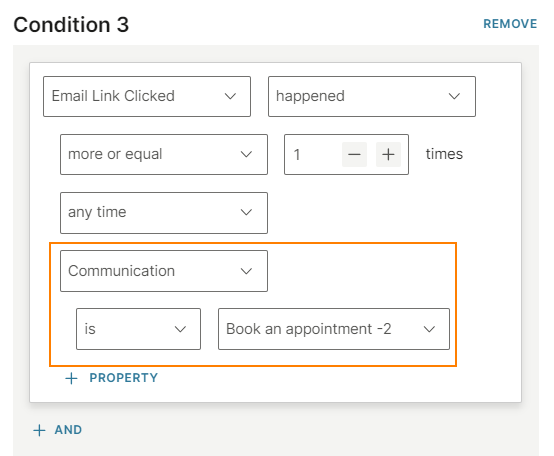
- For Product events, the person entered flow and person exited flow events are available. Use the event property fields to add the following:
- The name of the flow or flow version (communication) where the event occurred.
- The time when the event happened and the number of occurrences.
You can search by event name and filter by event type.
Select the operator
Select which end users you want to target.
-
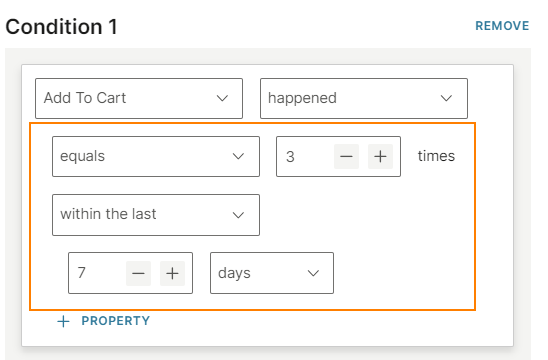
Happened: Targets end users who performed the action. You can set the time and number of occurrences. Example: To trigger the flow and send a communication the third time an event happens within a 7-day period, specify the time as within the last 7 days and the number of occurrences as equals 3 times.
-
Not happened: Targets end users who did not perform the action. Example: An end user did not launch an App after a certain period.
Do not use Not happened condition by itself. Use it only with the Happened condition. This is because while it is possible to trigger a flow when an event occurs, it is not possible to start the flow when an event does not occur.
Example: Start the flow when Event A happened AND Event B did not happen.
Define the criteria for the condition
Each event has specific fields for the criteria. Complete all the fields.
Add event properties to the condition (Optional)
If the event has properties, you can add them to the condition to refine the target audience. Select Property.
Add as many properties as required.
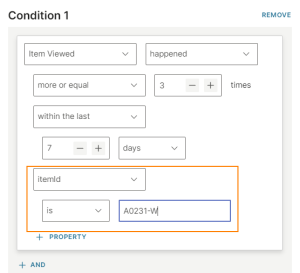
In the example shown in the following image, itemId, which is a property in the Item viewed event, is added as a filter.
Map event properties to flow variables (Optional)
If the event has properties, you can map them to flow variables. You can reuse these variables later in the flow.
Example: In your flow, you use the Wait for an Event element to wait for the end user to book an appointment. The event has properties such as Appointment time and Appointment name. You can save these properties as flow variables. At a later stage in the flow, you can use these variables to send the end user a confirmation message with the appointment details.
Depending on the configuration, the values of the mapped variables could change as the end user moves through the flow.
Example: You flow uses order delivery status as a variable. As the delivery event progresses to the next stage, the delivery status variable changes from Pending to Dispatched.
You can pass list attributes to flows. For more information, refer to the Pass lists in events to flows documentation.
For more information about creating and using variables, refer to the Map event properties to flow variables documentation.
Include historical data (Optional)
If you select this option, events that happened before the start of the flow are included.
If all the events in the conditions already happened before the flow started, the person does not enter the flow. However, if the flow is recurrent, the person enters the flow only if these events happen again.
Inbound Message [#inbound-message-triggers]
This entry point triggers the flow when an end user sends a specific keyword to the number that you configure. Depending on the channel, the end user can send the keyword in different ways such as the message body, button text, or button payload.
Use this entry point to create a dynamic audience based on conditions that you specify.
You can add multiple Inbound message entry points to a flow.
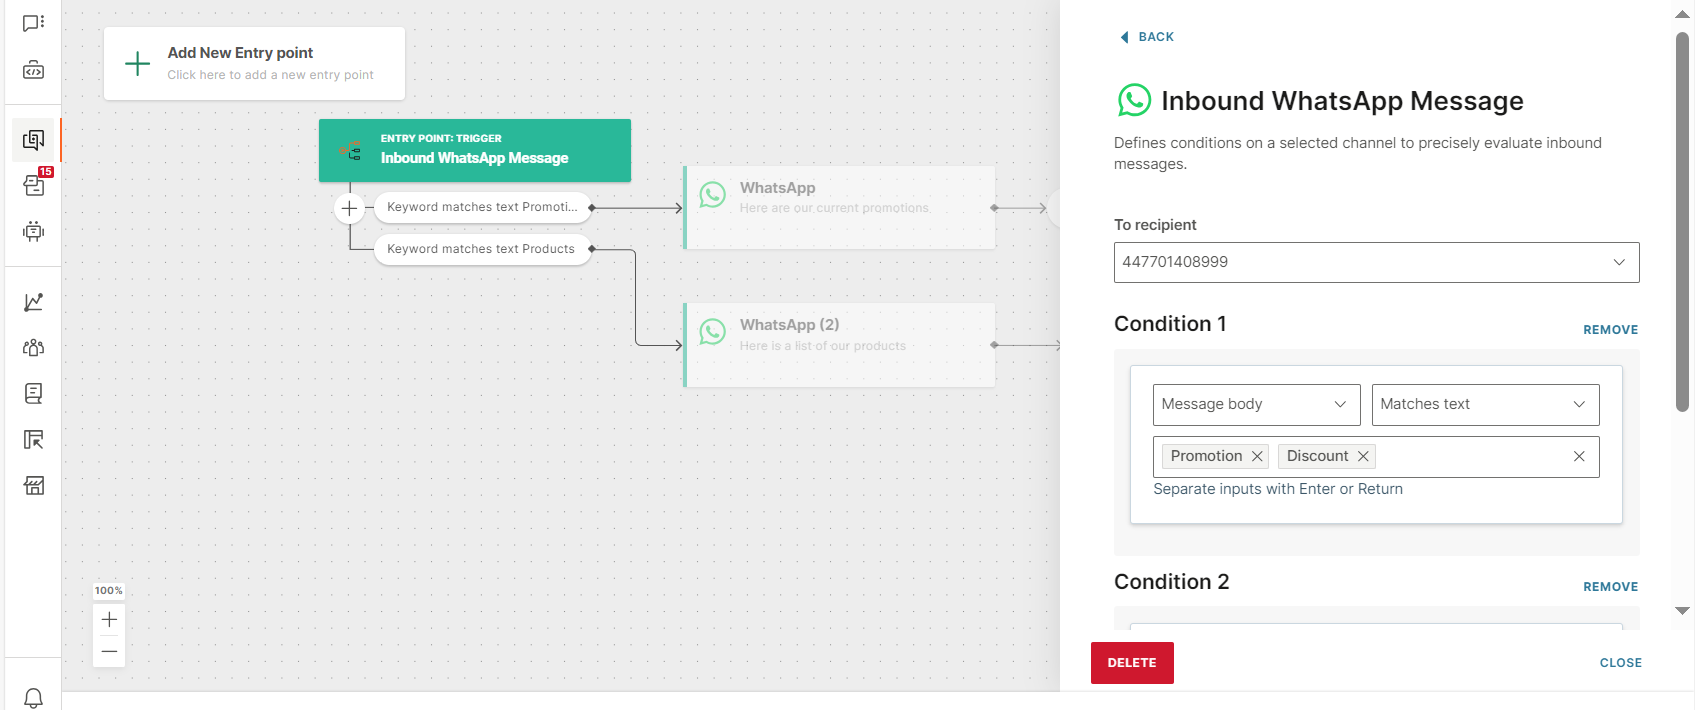
Configure the trigger
Follow these steps to configure the trigger.
- Select the channel for which you want to create the trigger.
- Select the recipient.
- Define conditions to compare the end user's message with the value that you specify. If the condition is fulfilled, the flow is triggered.
- (Optional) Save the inbound message information in variables.
For more information, refer to the detailed instructions below.
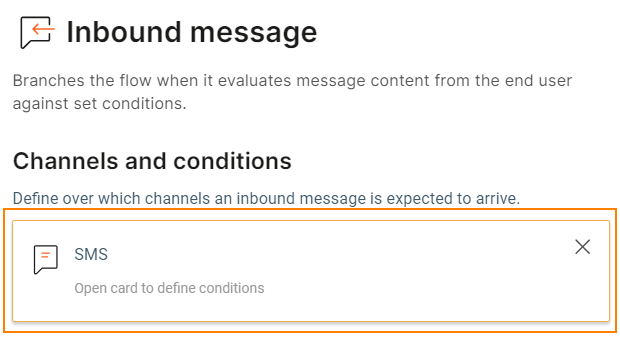
Select the channel
In the Channels and conditions section, select the channel for which you want to create the trigger. Communication with the end user happens through the selected channel.
The default channel is SMS. To use a different channel, delete the existing channel and select the required one.
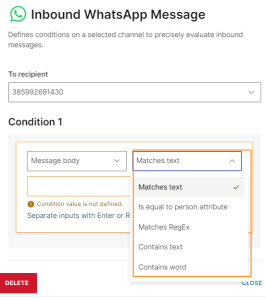
Select the recipient
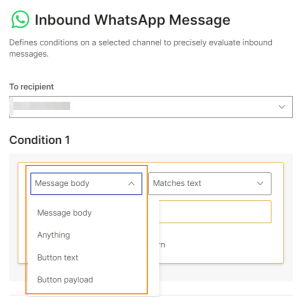
Select the channel name to open the card. In the To recipient section, select the recipient.

Define conditions for the inbound message
Define conditions to compare the end user's message with the value that you specify. If the condition is fulfilled, the flow is triggered.
You can specify multiple conditions within the entry point.
You can set conditions for the following:
- Message body: Compares the body of the message against the condition value.
- Anything: Use this option so that end users enter the flow even if their message contains something that is not included in the conditions. Exact matches have a higher priority over Anything. Example: You have two flows that are waiting for a message from the same end user. In one flow, the condition is to match the exact word yes. In the other flow, the condition is Anything. The end user responds yes. In this case, the flow that matches the exact keyword is triggered.
- Button text (WhatsApp only): When the end user selects a button to respond, this condition compares the button text against the condition value.
- Button Payload (WhatsApp only): When the end user selects a button to respond, this condition compares the button payload against the condition value.
Use the following operators in the conditions.
- Is equal to person attribute - checks whether the message body contains the person attribute that you select. The case is ignored when comparing the value.
- Matches text - checks whether the end user's response matches the condition value exactly. The condition is fulfilled if the end user's response contains only the condition value and nothing else. You can specify multiple condition values. Example: Condition value: time End user's response: time. The condition is fulfilled. End user's response: timezone, time!!, what is the time? The condition is not fulfilled because the response contains additional characters that are not part of the condition value. The case is ignored when comparing the value.
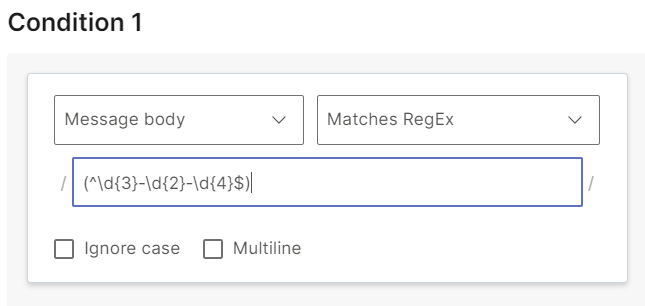
- Matches RegEx - checks whether the message body contains a regular expression pattern that you define.
Ignore case (Optional): Specify whether to ignore the case when evaluating the condition.
Multiline (Optional): Use this option when you want to match the message body against multiple lines of text. The validation is successful if any of the lines match.
- Contains text - checks whether the message body contains the keyword that you specify in the condition value. You can specify a group of characters, such as a symbol or keyword, in the condition value. You can specify multiple condition values. Example: Condition value: time End user's response: time, timeframe, 3times, time!!, what is the time? The condition is fulfilled because the message contains the keyword. The case is ignored when comparing the value.
- Contains word - checks whether the message body contains the exact word that you specify in the condition value. The word in the message body can have symbols or spaces before or after the word, but must not contain digits or other letters. Example: Condition value: time End user's response: time. The condition is fulfilled because the message contains the exact word. End user's response: time!!, what is the time? The condition is fulfilled because the message contains the exact word with either symbols or spaces before or after the word. End user's response: times, timeframe, timezone, 3times. The condition is not fulfilled because the word in the message contains additional characters that are not part of the condition value. The case is ignored when comparing the value. You can specify multiple condition values. The system follows the above order to process inbound messages. So, if a condition that has a higher priority is fulfilled, the flow takes the action for that condition and ignores the other conditions.
You can reuse keywords across multiple active flows. Example: Use common keywords such as Yes or No in multiple flows. In cases where 2 or more flows are waiting for the same inbound keyword from the end user at the same time, the end user's input is forwarded to one of these flows randomly.
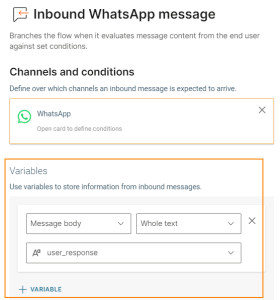
Save inbound message information in variables
You can also define variables to capture and store inbound message information.
Define the data that you want to capture from the inbound message. You can capture the following information.
- Message body
- Recipient
- Sender
- Message ID
- Gateway ID
You can save either the whole or part of the information.
- Whole text: Save the whole of the information.
- RegExp parse variable: Use a regular expression to capture a specific keyword in the message content.
For more information, refer to Flow Variables.
Start incoming call [#start-incoming-call-triggers]
When end users call your phone number, you can add them to the flow by using the Start incoming call entry point. This element starts an inbound IVR call session.
For more information about using this element, refer to the IVR documentation.
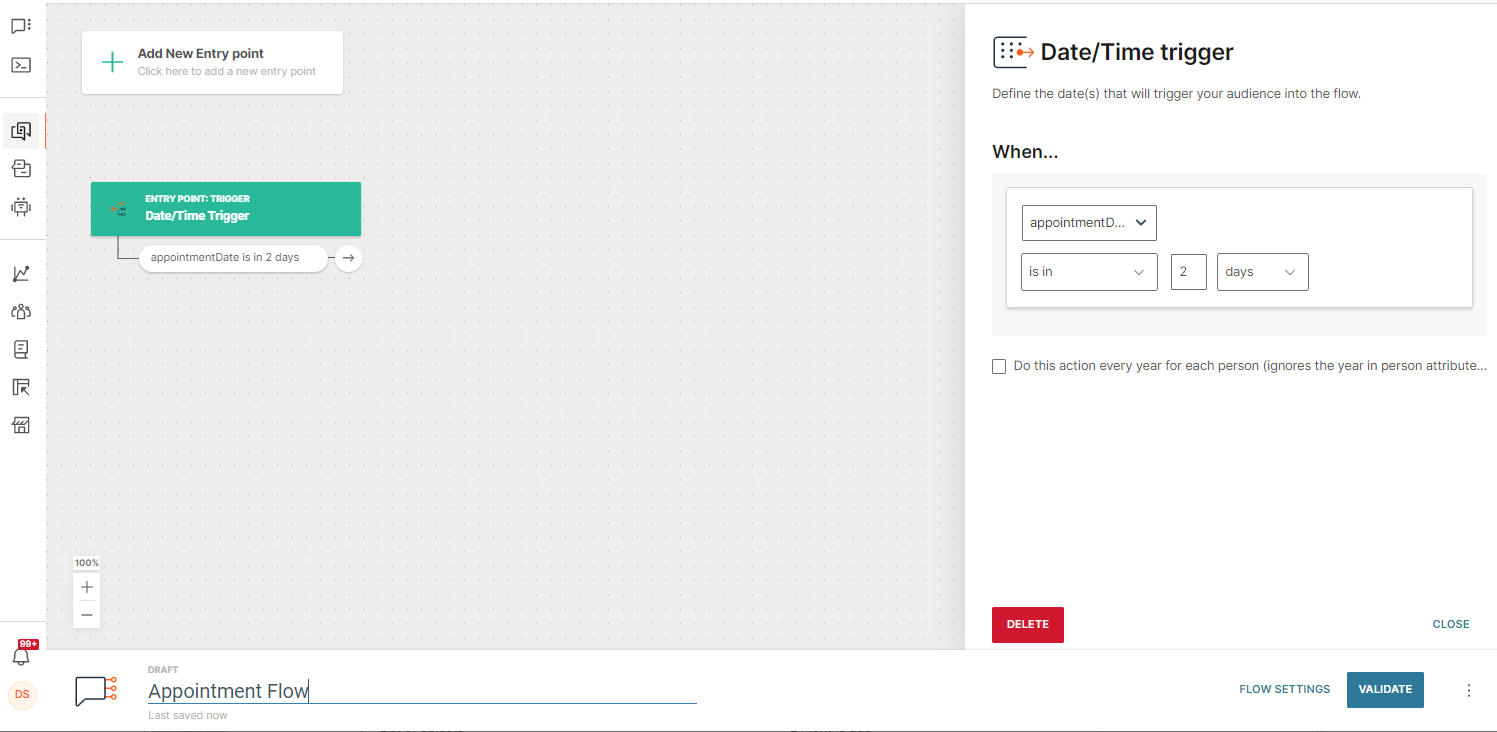
Date or Time [#date-or-time-triggers]
Use the Date or Time trigger for time-sensitive communication. The trigger uses the date or time information that is stored in the Person profile in People.
This trigger uses the UTC time zone.
For messaging campaigns where timing is key, you can also use the Wait for a Date flow element.
Prerequisites
The following are prerequisites to using the trigger.
- User profile must be present in People.
- The profile must have a custom attribute that contains either date or date and time. Use this attribute in the trigger.
Create the custom attribute
Create a custom attribute in People. Example: You want to remind end users about their appointment. Create the AppointmentDateTime custom attribute.
Add the attribute to the Person profile and update the attribute value. To do so, use manual import in People in the Infobip web interface, or use the People API, Web SDK, or Mobile SDK.
You can now use this attribute in the trigger.
Configure the trigger
In the trigger, select the custom attribute, a relevant operator, and the condition value.
(Optional) You can repeat the action every year. Select Do this action every year for each person. This option ignores the year in the custom attribute.
Operators in the trigger
You can use the following operators in the condition.
Is in: Send a message a specific period before the date/time set in the custom attribute. You can set the period in hours or days.
Example: The Person profile has the trial expiry details in the AppointmentDateTime custom attribute. You want to remind the end user 4 hours before the appointment. Use the following condition:
AppointmentDateTime is in 4 hours
The end user enters the flow when the current date/time is 4 hours before the one set in the AppointmentDateTime attribute.
Was: Send a message a specific period after the date/time set in the custom attribute. You can set the period in hours or days.
Example: The Person profile has the TrialExpiryDate custom attribute. You want to include the end user in the flow 1 day after the expiry date. Use the following condition:
TrialExpiryDate was 1 day ago
Is today: Send a message on the date set in the custom attribute.
Example: The Person profile has the DueDate custom attribute. Use the following condition:
DueDate is today
Is tomorrow: Send a message 1 day before the date set in the custom attribute.
Was yesterday: Send a message 1 day after the date set in the custom attribute.
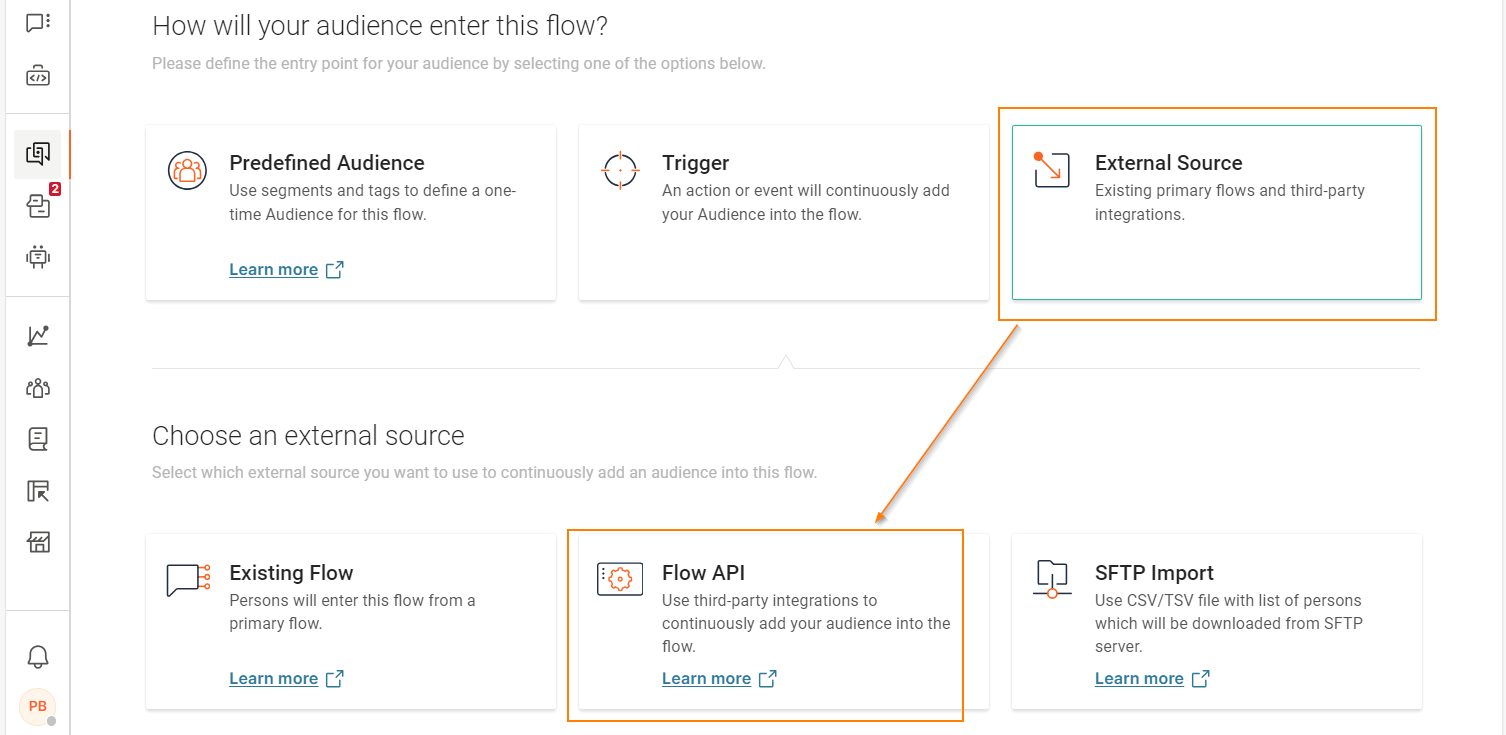
External source
Add people to your communication from external sources, such as via Flow API, via an Existing Flow, or using SFTP Import.
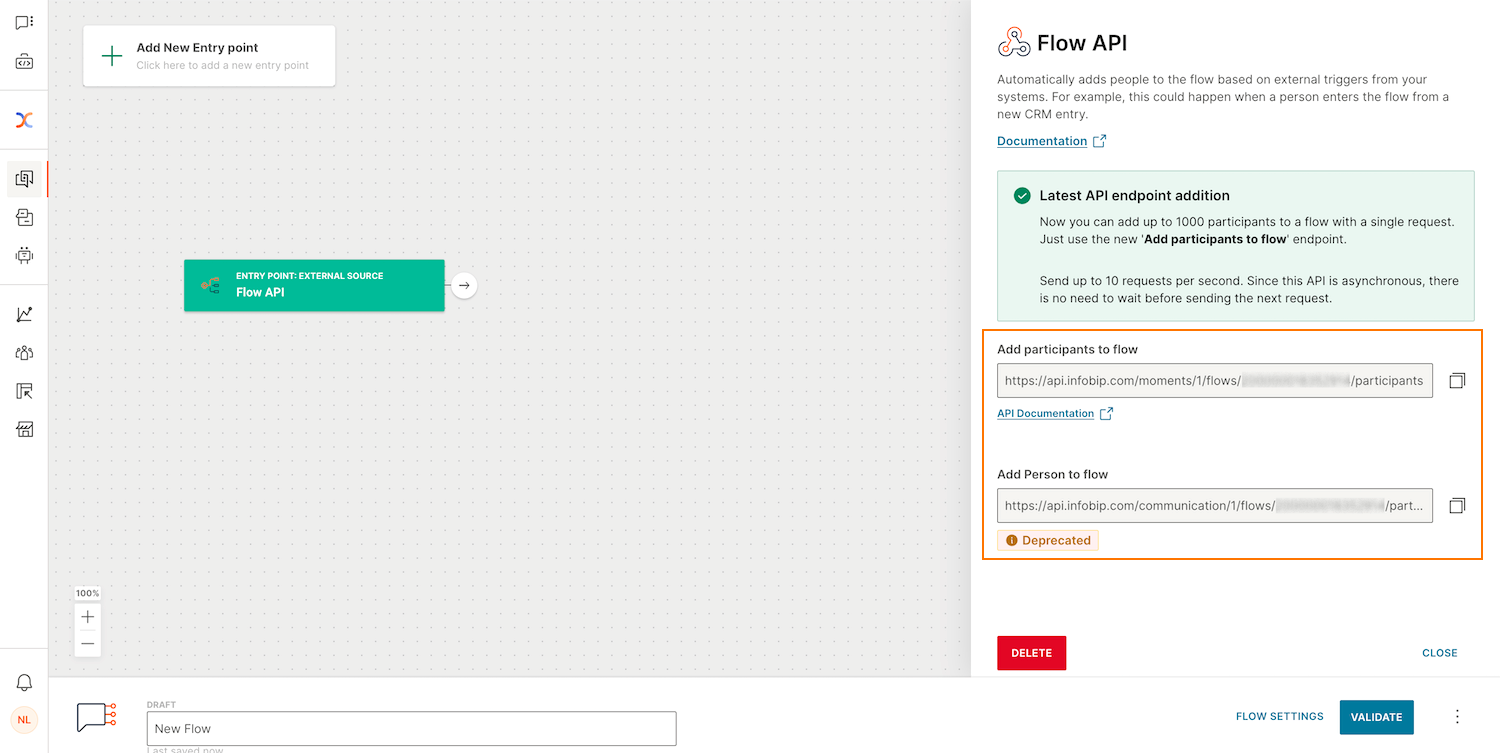
Flow API [#flow-api-external-source]
Flow API sends data from external systems, such as a web page or a CRM system, to the flow that you created on the Infobip web interface. Use this entry point to automatically add people to the flow based on external triggers. Example: An end user submits a form on your web page or there is a new entry in your CRM system. Thus, you can automate processes such as welcome messages, lead nurturing, and reminders.
You can even transfer variables over Flow API. When you create a variable in Flow, it is available to use in the Flow API trigger.
To create a flow with Flow API as the entry point, do the following:
-
On the Infobip web interface, go to Moments > Flows.
-
Select Create flow.
-
Select Start from scratch.
-
Select External source > Flow API.
The entry point contains a unique URL where the end users’ data will be sent.
-
To automatically add participants to the flow, do one of the following:
- Use the Add participants to flow endpoint to add a maximum of 1,000 participants to the flow asynchronously in a single request.
- Use the Add person to flow (deprecated) endpoint to add 1 participant to the flow in a single request.
-
Configure the rest of the flow as required.
-
Launch the flow.
NoteThe Add person to flow endpoint has been deprecated. When you create a new flow, use the Add participants to flow endpoint instead.
When the flow receives the data from the external systems, it does the following:
- Updates existing profiles in People.
- Creates new person profiles in People.
- Adds these persons to the communication.
For technical information about the integration, refer to the API Developer Hub.
Existing Flow [#existing-flow-external-source]
Use the Existing Flow entry point in conjunction with Add to Flow to build powerful modular flows. This entry point serves as the first step where users join the flow from a different active flow. Flows that have the Add to Flow element can be selected when you create a Flow with this entry point.
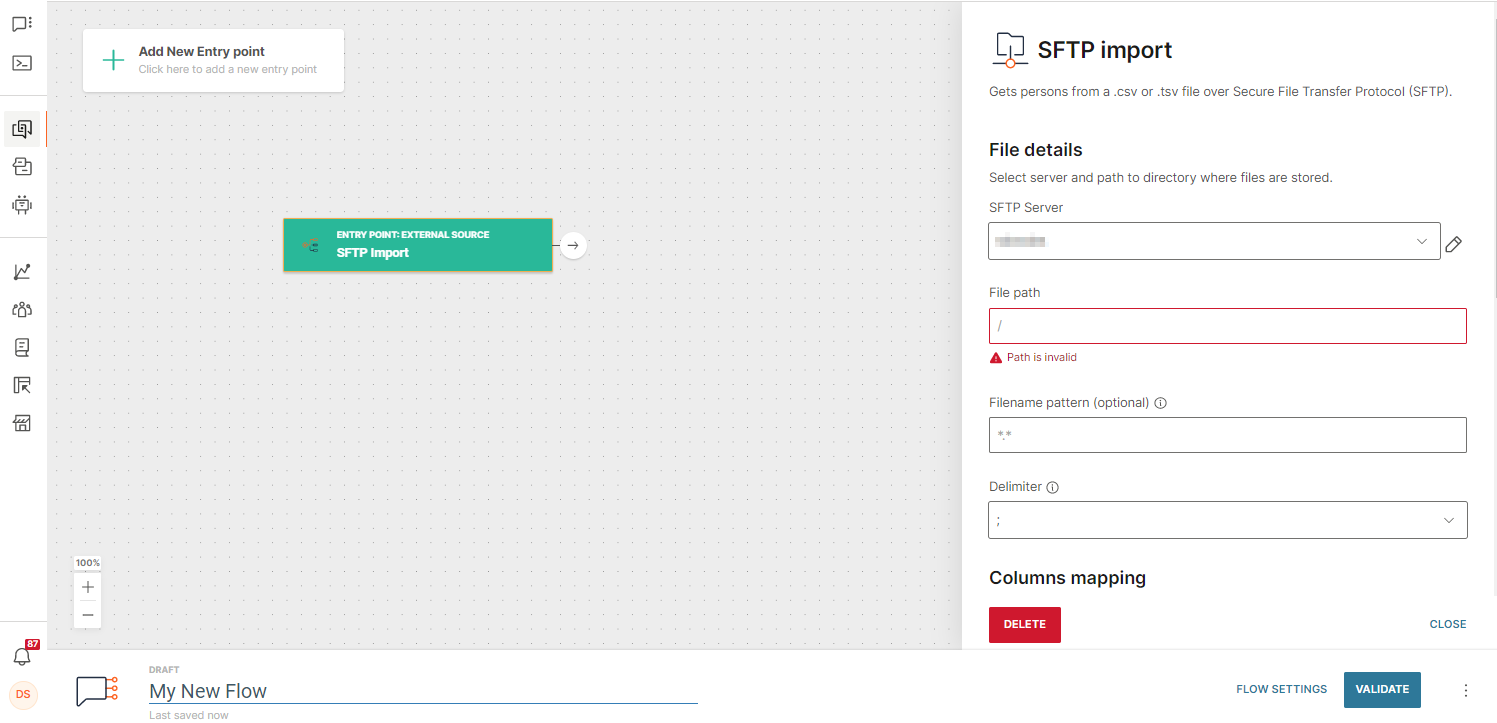
SFTP Import [#sftp-import-external-source]
The SFTP Import entry point is available if you would like to import csv or tsv data into Moments from your remote external server using secure file transfer protocol (SFTP). This is a useful approach when connecting to an external source via Flow API is not an option for you.
Once a connection between Moments and your server is established, the SFTP connector will check the target folder on your server every 10 minutes. Any new files that you add to the folder since the last check will be added to the target flow. Old or existing files in your server that have already been processed by the connector will not be modified, deleted, or moved from the folder.
Infobip will never change the data in any way. As the csv or tsv data is hosted on your server, you always have full control of your data.
Select External Source then SFTP Import entry point when you create your flow. Define how the file should be processed in the entry point sidebar menu.
| OPTION | DESCRIPTION |
|---|---|
| SFTP Server | Select from an existing server that you use for sftp connection or create a new sftp connection to the server where you host your files for upload. When you select Create New SFTP Connection, you should provide your server address, port, and authentication information. Test to verify that the connection has been successful, and activate it when you are ready to go. |
| File path | Set the path to the file or files on the SFTP server to fetch. Use separate folders to organize files by flow or department. Use an absolute path (starting with /) to read files from the root directory. Use a relative path (starting without /) to read files from the SFTP user's home directory. |
| Filename pattern (optional) | Set an optional filename pattern to extract files that only follow a naming convention or pattern and inject them to Flow. We use the following symbols: - Wildcard asterisk * masks the sequence of symbols. For example, *.csv will fetch all .csv files - Question mark (?) to mask one symbol. For example, J???Data.csv will fetch both - JuneData.csv and JulyData.csv files |
| Delimiter | Select the delimiter that will be used to split values in the files. The delimiter you choose must match the delimiter used in your file. ; (semicolon) | (pipe) Tab Custom (any character max. one) , (comma) |
| Column Mapping | Map the file columns to the exact Attributes / Variables in Flow because the system does not automatically know how the file is structured. Ensure that the values you enter here exactly match the column names in the file, and also check that any data types match too. The system will not be able to correctly 'read' mismatched data types. For example, if you were to use Date Time data type with a Date field you may see errors when you upload a file. The following sections are available: - Contact information: It is mandatory to have at least one column for contact information (phone number/email address). The maximum limit for contact information columns is two - One column for a phone number and one column for an email address. If the contact information of an entry in the csv is incorrect, then the entry will be marked as invalid and will not be processed. In scenarios where both a correct phone number and an email address are provided in the entry, then the entry will be processed by the connector and marked as valid in SFTP Import performance reporting. If one piece of contact information is valid and the other is invalid then the entry will be marked as invalid by the system and not processed. However, if one piece of contact information is valid but the other piece of contact information is empty (no contact information provided), then the whole entry will be counted as valid and it will be processed by the system. You can see the SFTP Import performance data including valid and invalid entries in the SFTP Import reporting tab of View Flow Performance. - Person attributes: Standard/Custom attributes that will be used in Flow for personalization/segmentation. All attributes used here should be created in People before import. - Variables: Used if you do not want to retain this info in People (session-based data). Variables used here should be created in Moments before import. |
Example import schedule [#example-import-schedule-external-source]
Jane uploads File_A to Folder1 at 12:00 (at this moment Folder1 only contains this file). The SFTP connector checks the folder at 12:01 and sends the data from File_A into the target flow in Moments. At 12:02, Jane uploads File_B to Folder1 (Folder 1 now contains File_A and File_B). The SFTP connector checks the folder again at 12:03 and sends the data from File_B into the target flow (as File_A has already been processed in an earlier run).
New users created via SFTP Import will be marked with a unique identifier in People to show how they entered the system. This data can then be filtered to allow you to track these users in the system.
If a user duplicates a flow containing the SFTP Import entry point, all files that were originally uploaded in the original flow will be uploaded to the new flow starting with the earliest file uploaded.
Upload history is not retained in the duplication process, so the new flow has no record of what happened in the original flow. When the new flow is activated, all file data will be added again. Depending on the purpose of the flow, this may cause unexpected results. This is a risk as the warning message below explains.
For data consistency purposes, do not process the same file over SFTP Import in multiple flows. While it is technically possible to reuse/import the same file multiple times, it is recommended that you follow a one file, one flow policy.
If you do process the same file in multiple flows, you may see different data outputs depending on which flow runs first.
Manage SFTP server connection [#manage-sftp-server-connection-external-source]
Manage the connection to your SFTP server by opening the SFTP Import entry point and navigating to the SFTP Server field.
From there you can create a new connection or edit an existing connection by selecting the server from the dropdown list and clicking the pencil icon to expand the edit connection popup.
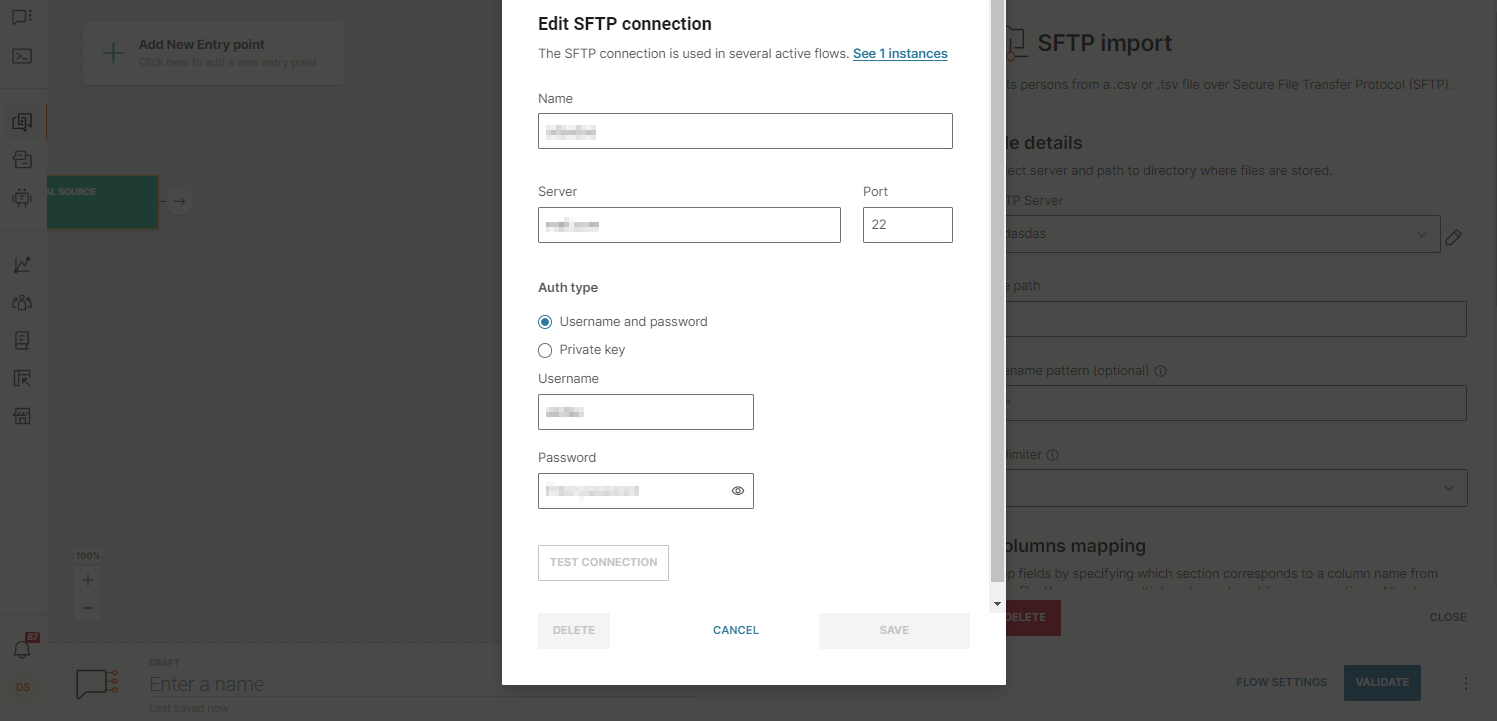
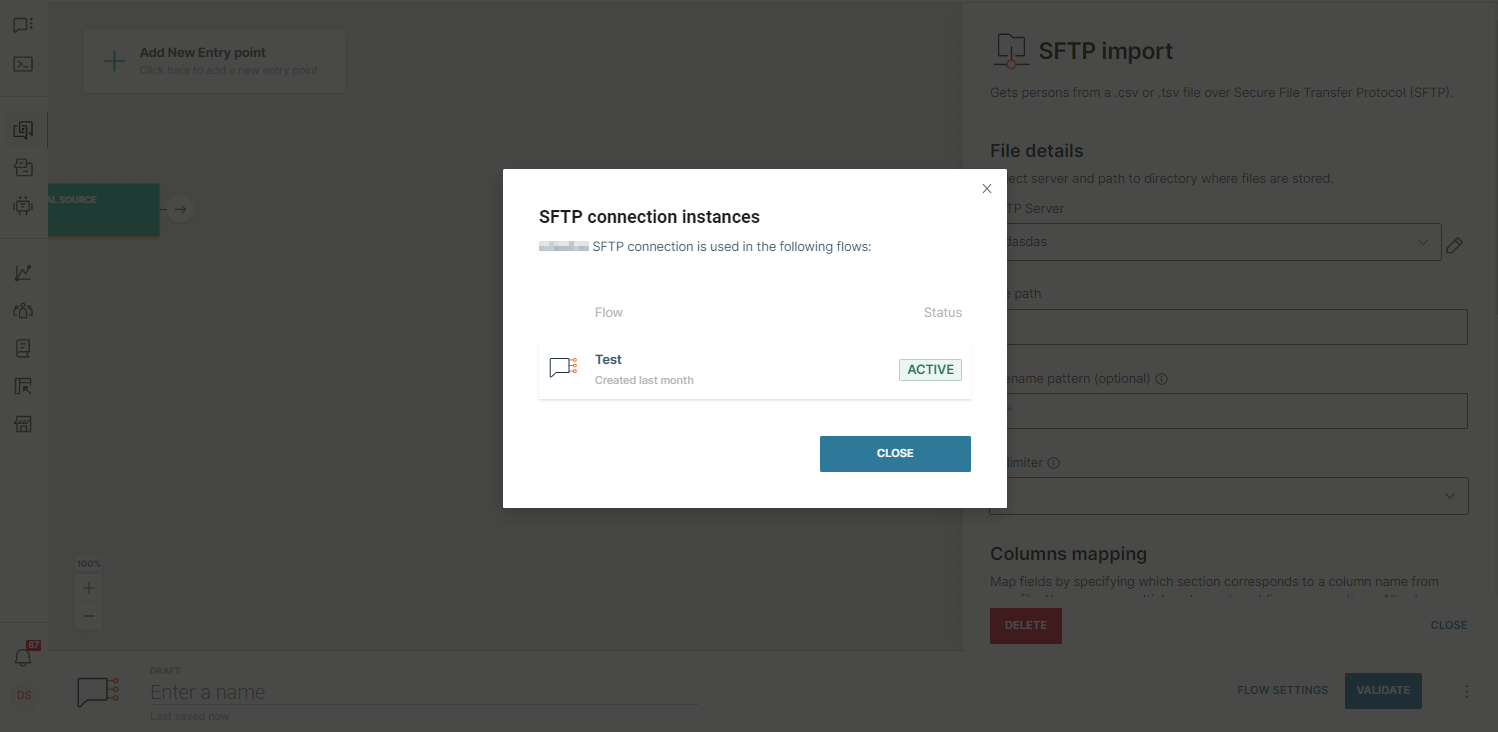
In edit mode, you will see the number of flows that are using the connection. To ensure data integrity, you will not be able to save any edits you make to the server until all flows using this connection are finished. Click the See n instances button to view which flows use the connection.
If no flows are connected to the specific connection, then you can edit the connection as you need. Remember to test the connection to make sure everything works properly.
If you no longer use a server and want to delete the connection, then you can also do so in edit mode. You can only delete connections that are not connected to any active flows.
Manage flow versions [#manage-flow-versions-external-source]
To make changes to an existing or active flow that uses the SFTP Import entry point, you can create a new version of the flow.
When you launch the new flow version, any unprocessed records in the original flow version are forwarded to the new flow version.
Exit
When the flow is ready, the next step is Validation. Once you click Validate, if there are no errors reported, the Exit element will appear automatically after each unconnected element in the Flow. When it comes to IVR flows, the exit element will finish an active call. So, if you decide to validate the communication while the call is still ongoing, it will end.
Exit also helps calculate how many customers from a specific communication branch finished the flow.