Manage Data
With the customer information safely stored and updated in People, you can start using features that will let you design various communication flows based on people's needs, interests, and activities.
Attributes
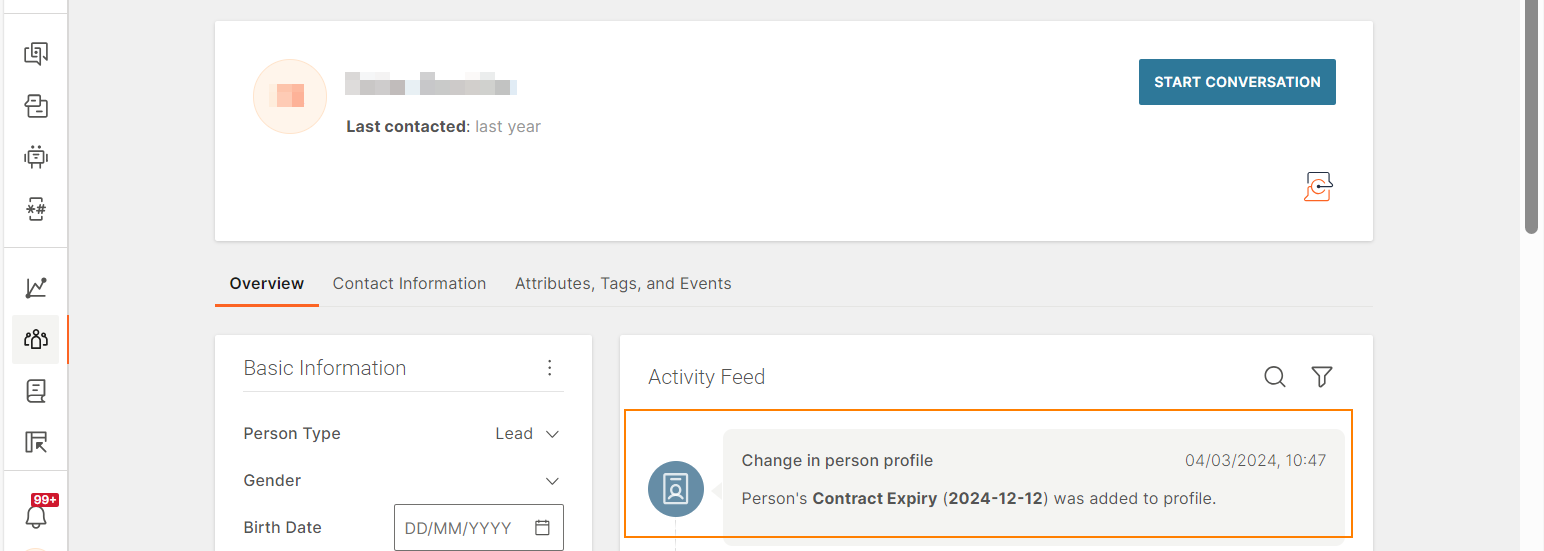
Each person profile includes information that will come in handy when you are targeting specific audiences. These "attributes" are split into three groups: standard, custom, and system-generated.
Standard [#standard-attributes]
The standard fields are predefined and can be accessed by the Infobip API and web interface users. They include some basic profile information that varies base on whether the profile belongs to a person or company.
Custom [#custom-attributes]
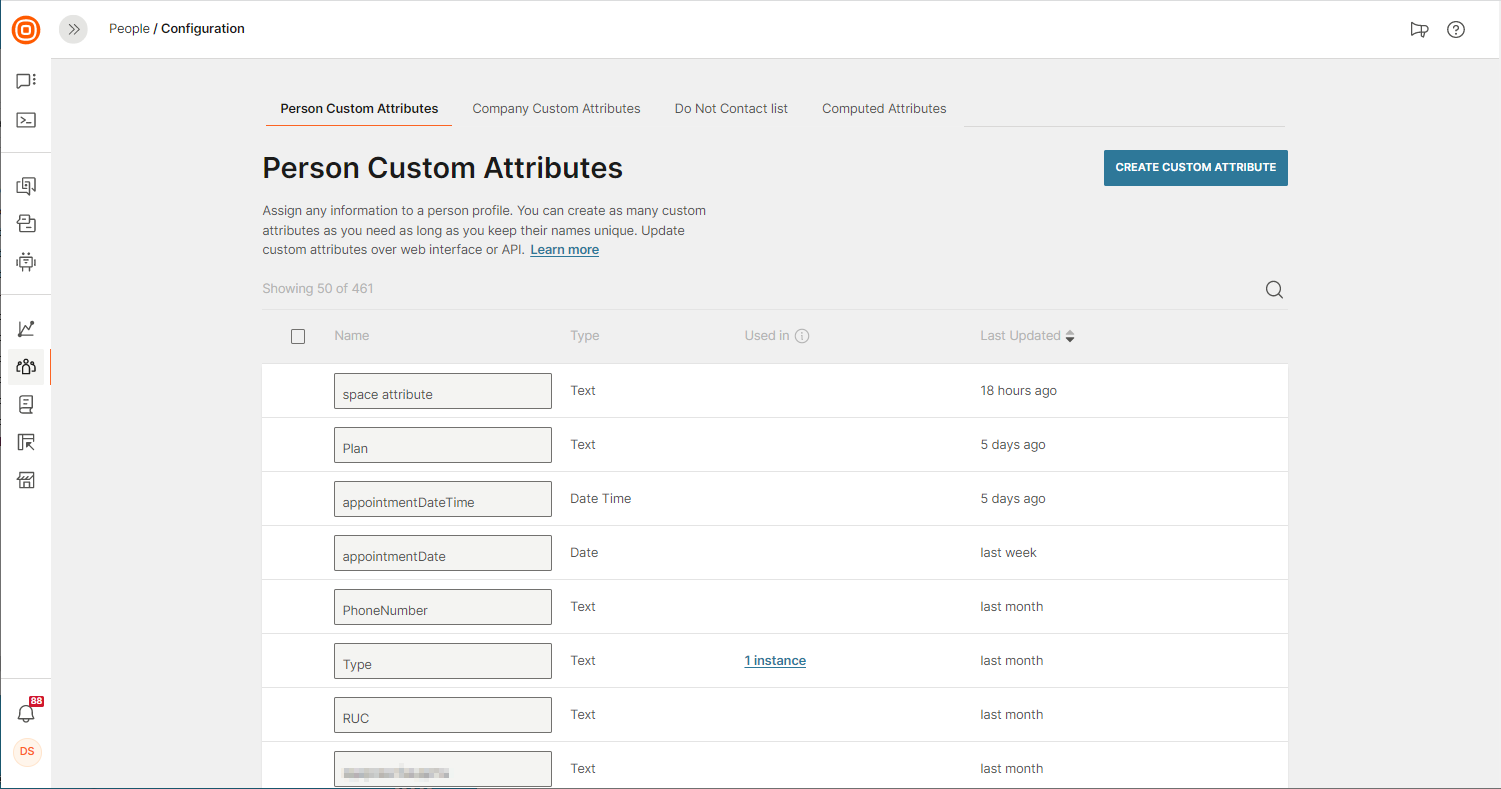
Configured per account and given a custom name, these types of attributes provide more specific information related to your customers.
Using custom fields, you can assign any information that is not available out-of-the-box in the standard fields. It could be a contract ending date, subscription, payment due, or some other data you need to be able to create the desired communication scenario.
The custom attribute names have to be unique.
To create a new custom attribute, go to the People module on our web interface, and then Configuration > Custom Attributes > Create Custom Attribute.
Select one of the data types: text, decimal number, whole number, true/false, date, date time. Once the type is selected, it cannot be changed.
This attribute is now visible on the profile page and can be used for communication campaigns.
It is possible to add a new custom field “on the fly” when importing your data to People. On the list on the mapping screen, select Add New Field.
You can also create and manage custom attributes via People API. Use one of the following methods:
- Create a custom attribute
- Get a single custom attribute
- Get a list of custom attributes
- Update custom attribute:
• Update Person - updates the new field, erases other fields if you have not specified them.
• Partial Update - only updates one specific field in a person's profile. - Delete a custom attribute
Computed Attributes
Computed attributes enable you to make your data go even further. Computed attributes look like regular profile attributes, and also work in a similar way, to offer richer options for audience targeting and segmentation in Moments flow campaigns and communication personalization.
There are 3 types of computed attributes. Use custom formulas to make calculations against different People profile data, Event aggregates to make calculations against event data, and use profile scoring to evaluate profiles according to fit and behavior criteria.
Computed attributes will automatically update as the profile data in your People instance changes. This way you can always trust that the data is current and accurate.
You can manage your computed attributes from the Configuration tab in People. Select the Computed Attributes tab to access the computed attributes dashboard where you can make your changes.
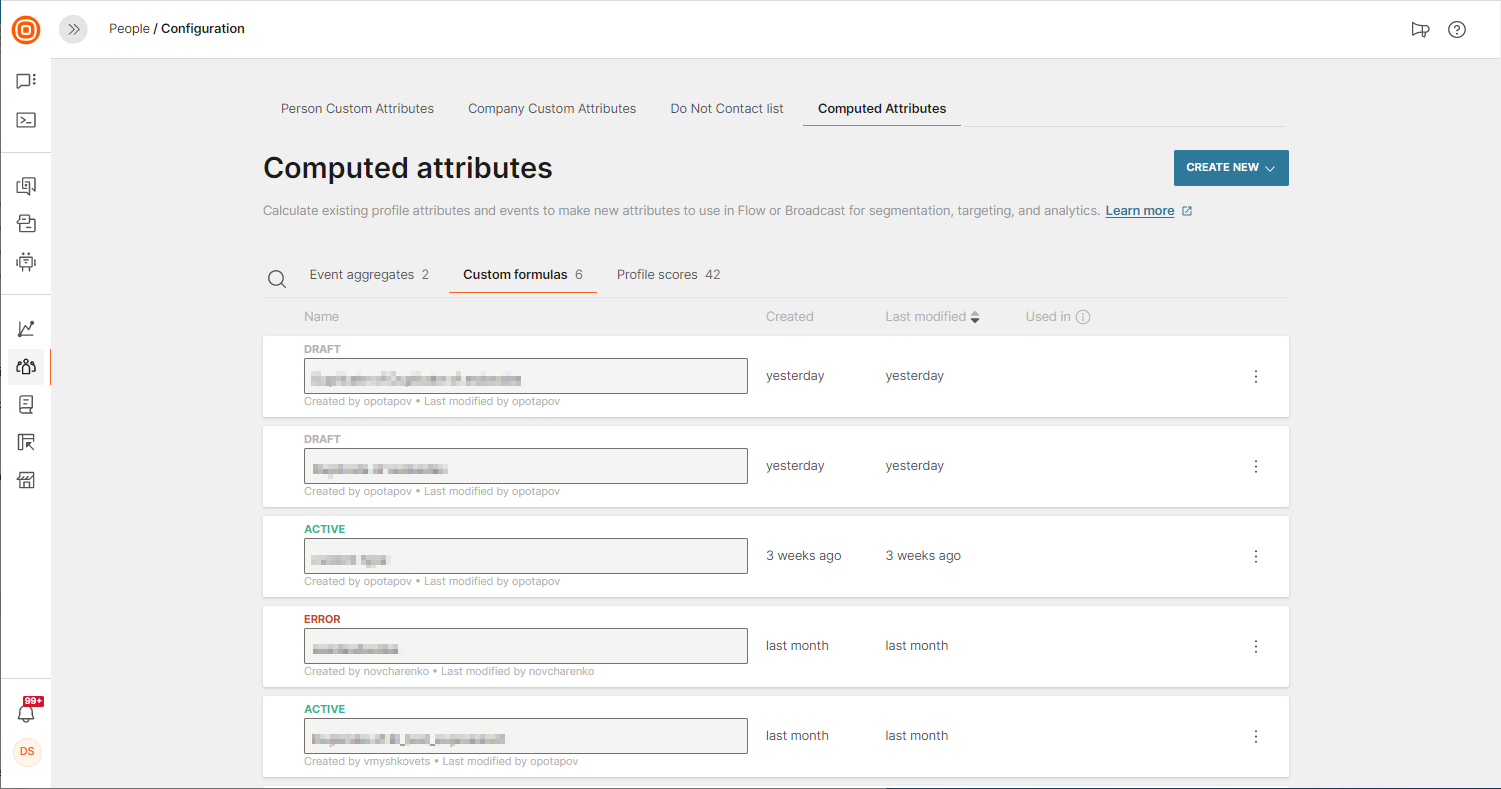
Computed Attributes Lifecycle [#computed-attributes-lifecycle-computed-attributes]
While computed attributes look and work similar to regular profile attributes in most scenarios, they are complex data types that involve specific steps to manage their lifecycle. During draft you can build, refine and test the computed attribute as many times as you need to ensure that the data output is correct for your requirements.
When you are satisfied with your draft, activate the computed attribute to start the processing phase. The computed attribute will be calculated and applied to every profile in People. This can take some time if you have many profiles in your instance. When processing is complete the computed attribute will be active.
Once active, computed attributes will automatically update as the profile data in your People instance changes.
Every time a computed attribute is calculated, a new timestamp is applied to a person profile for the update. Keep that in mind if you are triggering your Flow based on when profiles are last updated (Modified At).
Active computed attributes are not editable. If you wish to make edits you can duplicate a computed attribute and make edits to the newly created draft duplicate.
You can delete draft attributes without any issue. However, to ensure data stability, it is not possible to delete computed attributes that are being used in other computed attributes or active flows.
You can check the computed attributes area to see where every computed attribute is being used. Inactive computed attributes can be deleted but remember to always check before you delete as the deletion process is permanent and cannot be undone.
Custom Formulas [#custom-formulas-computed-attributes]
Custom formulas (formerly known as Expressions) are a type of computed attribute that you can use to make profile attributes even more powerful. You can automatically calculate values based on standard and custom profile attributes in order to provide an additional way of engaging your audience and provide service in a more personalized way.
This is possible using Expression Language. The expression language in its base form comprises one or more constants, attributes, functions and operators in a formula that outputs an expression value. This value can then be stored as an a custom attribute in a person profile.
As an example, you could use an a custom formula to calculate the conversion rate of an email campaign if you are capturing emails sent and emails clicked data. The formula would look something like this:
round(100*(email_link_clicks/emails_sent),0)
If the value of any attribute in a custom formula is empty (i.e. not defined) then the expression will return an empty value for the profile.
To create a custom formula navigate to People > Configuration, then in the Computed Attributes tab click Create New > Custom Formula.
You can build your formula by typing in attribute names, functions, and operators in the formula builder. The formula builder will offer auto-suggestions of available functions and attributes as you type. You can also use the Add Function and Add Attribute pickers. A dropdown list of available functions and attributes will open where you can make your selection and construct the formula. Choose from standard, custom and active computed attributes (Profile Scoring and Event Aggregates).
If you make a mistake you will see an error message and be able to make the fix.
Also please take a look at the Expression Language Reference section for a more detailed description and examples for all available Functions and Operators.
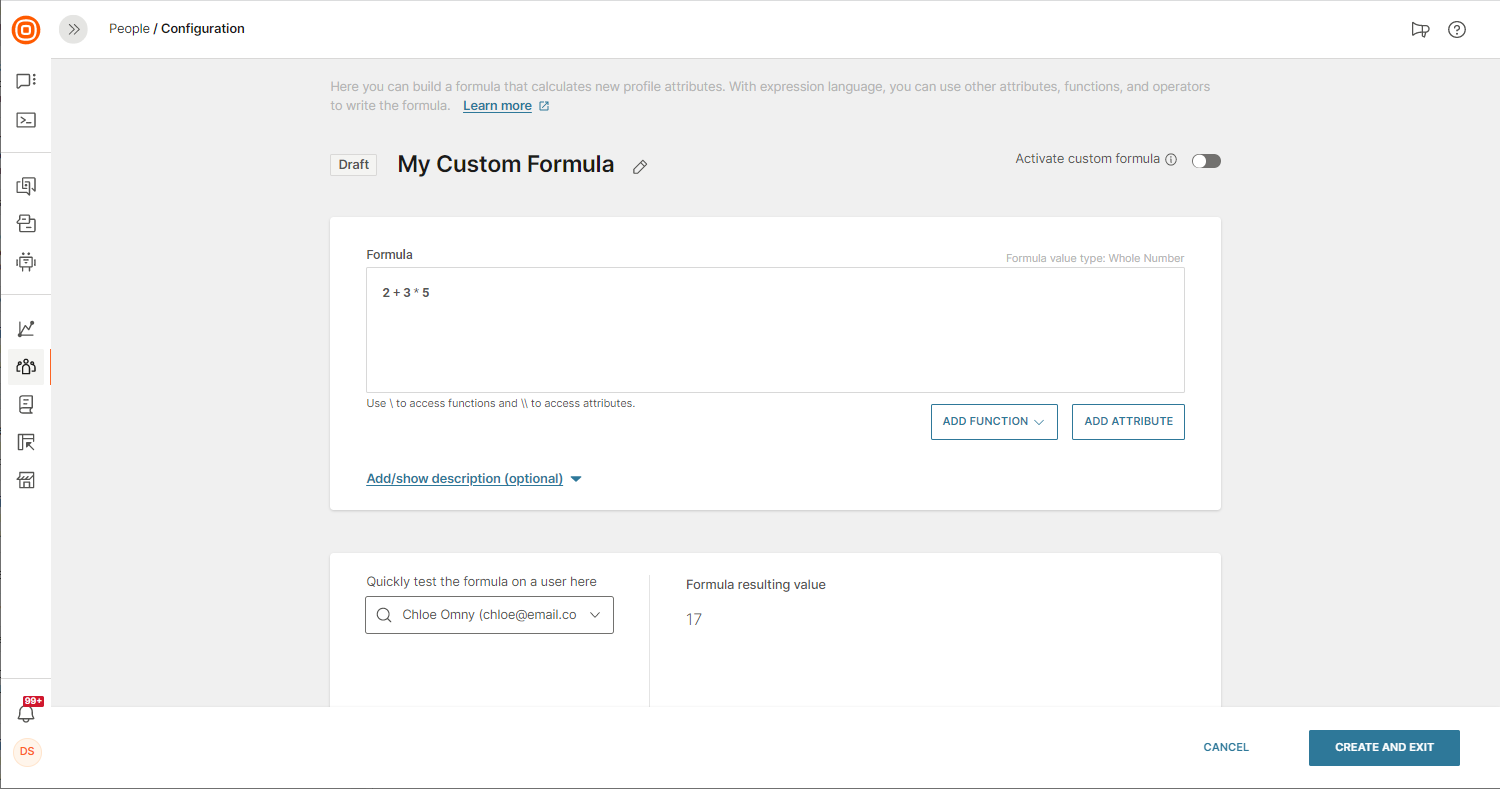
You can test your formula at any time in the creation process. Choose the profile that you wish to test your expression against and then get instant results as you construct and test your custom formula.
Click Create and Exit when you first create your custom formula to save it as a draft. In draft, the custom formula is not active and it will not be visible in person profiles, You can edit your custom formula as many times as you need when it is in draft. When you want to save your draft edits click Save and Exit.
When you are happy with the formula you can toggle Activate Custom Formula to start the activation process to add the custom attribute to all profiles in People. During processing the formula is calculated for the whole audience. A % progress bar helps you track processing progress in the dashboard. Once complete the custom formula is visible in an attribute across all profiles.
It is best practice to wait until the custom formula is fully active before you use it. If you attempt to use the computed attribute while it is processing you may find that segments and filters using the custom formula may be missing profiles.
You cannot edit active or processing custom formulas. This means that you will need to duplicate the formula you wish to edit and then make your changes to the new version. Once you have tested and verified that your new changes are working as expected the formula will be processed again. When it is active you can then discard the old custom formula.
Remember to always check before you delete a computed attribute because deleted computed attributes cannot be restored and will be deleted permanently.
Profile Scoring [#profile-scoring-computed-attributes]
Profile scoring can help you gain more actionable insights from your leads and customer data. A Profile score is a number assigned to a profile so that you can compare and order profiles by multiple criteria using a single score. There are plenty of use cases for scoring profiles, the most popular are lead scoring, credit scoring, and behavior scoring to name a few.
How does it work? [#how-does-it-work-computed-attributes]
We have implemented rule-based scoring so that you can turn your domain knowledge into a simple set of rules around the criteria you apply to your audience. Each rule has scoring points assigned to it. The running total of all rules applicable to a single profile is called a profile score. The output is always an integer value.
What can be scored:
- You can create rules for standard, custom, and active computed attributes to work out how a profile fits your 'ideal customer'.
- To cover the behavioral part you can create rules regarding customer interactions, be it standard events (channel, product events, or changes to profile) or custom events.
Any rule can be assigned a positive and negative number of score points to provide you with even more flexibility.
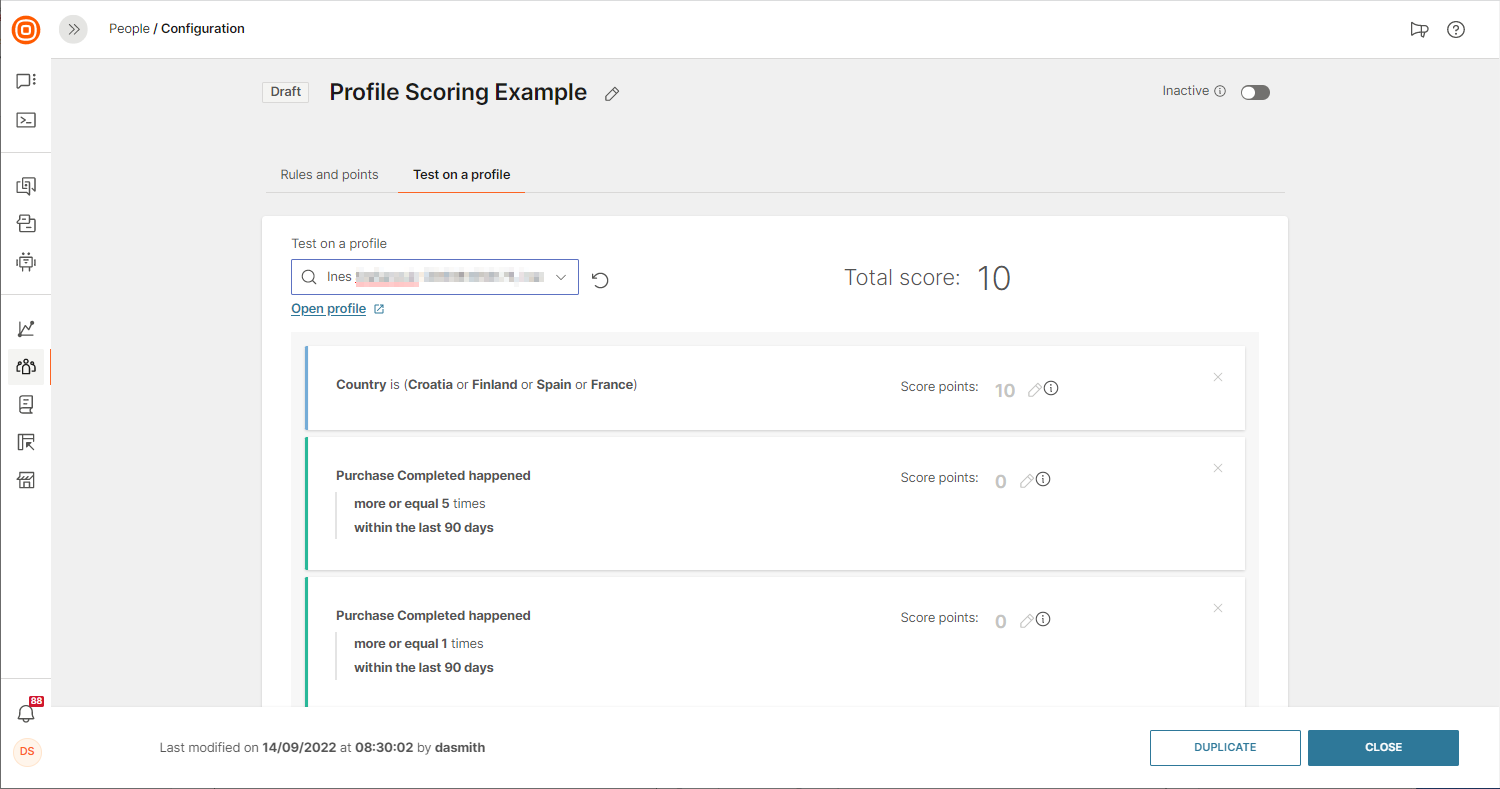
Let's start simple example using a single criterion, Region. Assume that the audience from Region1 spends more than the audience of other regions. From this information alone, you can create a trivial model with a single rule:
If Region is Region1, assign 50 score points
If we stop building the rule now, all profiles from Region1 will have a profile score of 50 and the rest will have 0.
However, for this example let's continue expanding the rule. Imagine there is another region, called Region2. Region2 spends a lot, but it spends less than Region1. With this information, you can then formulate a second rule based on this information.
If Region is Region1, assign 50 score points
If Region is Region2, assign 25 score points
Now you have two rules that split your audience into 3 segments by Region criteria. Profiles from Region1 get a score of 50, Region2 gets 25, and the rest get 0. The same logic applies to other criteria.
Behavioral scoring gives you the option to create rules regarding the engagement of a profile - the more a profile is engaged, the higher the chance for it to proceed down the funnel.
Differentiating your resources by impact/value also increases the model quality. For instance, a user visiting the home page of your website is not as valuable as them visiting the pricing page. Additional conditions can be applied for event counts and timeframe, as well as specific properties of the event.
Again, let's start simple and look at some rules we can create around this using the PageView event of People Events:
If PageView happened within the last 90 days, and URL is https://www.example.com, assign 5 score points
If PageView happened within the last 90 days, and URL is https://www.example.com/pricing, assign 10 score points
When you are ready, just activate the model and see it applied to all profiles in your People database. The score will automatically update as attributes in the model change or new events occur.
Also, for event rules that use a sliding time window like 'within the last X days,' we recalculate daily. This covers cases when no events occur within the specified timeframe and the score should be decreased.
Configuration Steps
Before creating your model please ensure that you have configured and/or enabled all events you want to use in your scoring model.
-
Create a model, People > Configuration and select Computed Attributes, click Create New, and select Profile Scoring. The newly created model is in a draft state meaning that it is not currently applied to profiles and thus no corresponding attributes have been created.

-
Click Add Rule to create rules for all of your criteria. You can add rules for standard, custom, and active computed attributes (custom formula and event aggregates) and events. For event rules the following operands are supported:
- Occurrence - 'happened'
- Frequency - 'equal to X times', less than X times', 'less or equal X times', 'more or equal X times', 'more than X times',
- Recency - 'any time', 'within the last X minutes/hours/days', 'before the last X minutes/hours/days' , 'between the last X and Y minutes/hours/days'
- Event properties (such as payload) use the same operands as event properties in the segment editor

-
Test the model on a user. The model will be immediately applied to the selected profile. If any changes occur to the user profile after the model has been applied to the user, you should click the refresh icon to refresh the profile data or reapply the model by selecting the profile again.
-
When your model is ready, toggle to activate it. Once active, the model enters a processing state where it makes calculations for all existing profiles. As it is being calculated, a corresponding computed attributed is created for the model with the same name as the scoring model. New profiles get scored automatically right after creation, the profile score will be visible inside the computed attribute on the profile card of a profile.
NOTEModels can't be modified or deleted after activation unless you disable them first. You can still review the model in view-only mode and test it against the profile if needed when it is in an active or processing state.
-
See the results and start using them in People segments and custom formulas, as well as find them integrated in Moments and Answers.
To modify or delete the model, it should first be disabled to put the model into a disabled state. When a model is disabled, profiles that already contain a score will see that the score does not update for new events or changes. Profiles that are created after a model is disabled will not have a corresponding computed attribute containing a score.
When a model is deleted the corresponding computed attribute will be wiped out from all profiles. Deletion is permanent so to ensure data stability you can not delete a profile scoring model if the profile scoring computed attribute is in use in a Flow, or as part of another custom formula or event aggregate computed attribute. See computed attributes to learn more.
Profile Scoring Best practices [#profile-scoring-best-practices-computed-attributes]
Below are some best practice recommendations to consider when you are defining your profile scoring rules.
Additionally, take a look at the Lead Scoring in People tutorial to see an example of profile scoring in action.
- There are different opinions on whether to split your score on profile fit and behavioral score or have a single score that encompasses both profile and behavioral data. This totally depends on your particular use-case, we simply give you a possibility to do both and let you choose what suits you the best.
- We recommend you add rules sequentially for each criterion, one-by-one.
- The typical recommendation for the profile fit is 4-6 criteria, with the number of rules depending on granularity you are looking to achieve and maintain.
- Behavioral criteria also vary depending on the engagements you use, but typically would include clicks on links in your campaigns, form submissions, and web activity (such as page views, gated content downloads, and cart interactions, etc.)
- When you decide to replace a model it is better to disable and not delete the old one straightaway. That way you can compare and analyze results.
Event Aggregates [#event-aggregates-computed-attributes]
Event aggregates are a type of computed attribute that are calculated from profile event data. They help to calculate aggregated information such as:
- What is the total value of orders the customer makes in order to establish customer lifetime value (LTV)?
- How many total purchases has the customer made?
- How many times has the customer visited a specific page in last 30 days?
- What is the average customer purchase when using loyalty points for a purchase?
- How many emails has the customer received from us in the last 14 days?
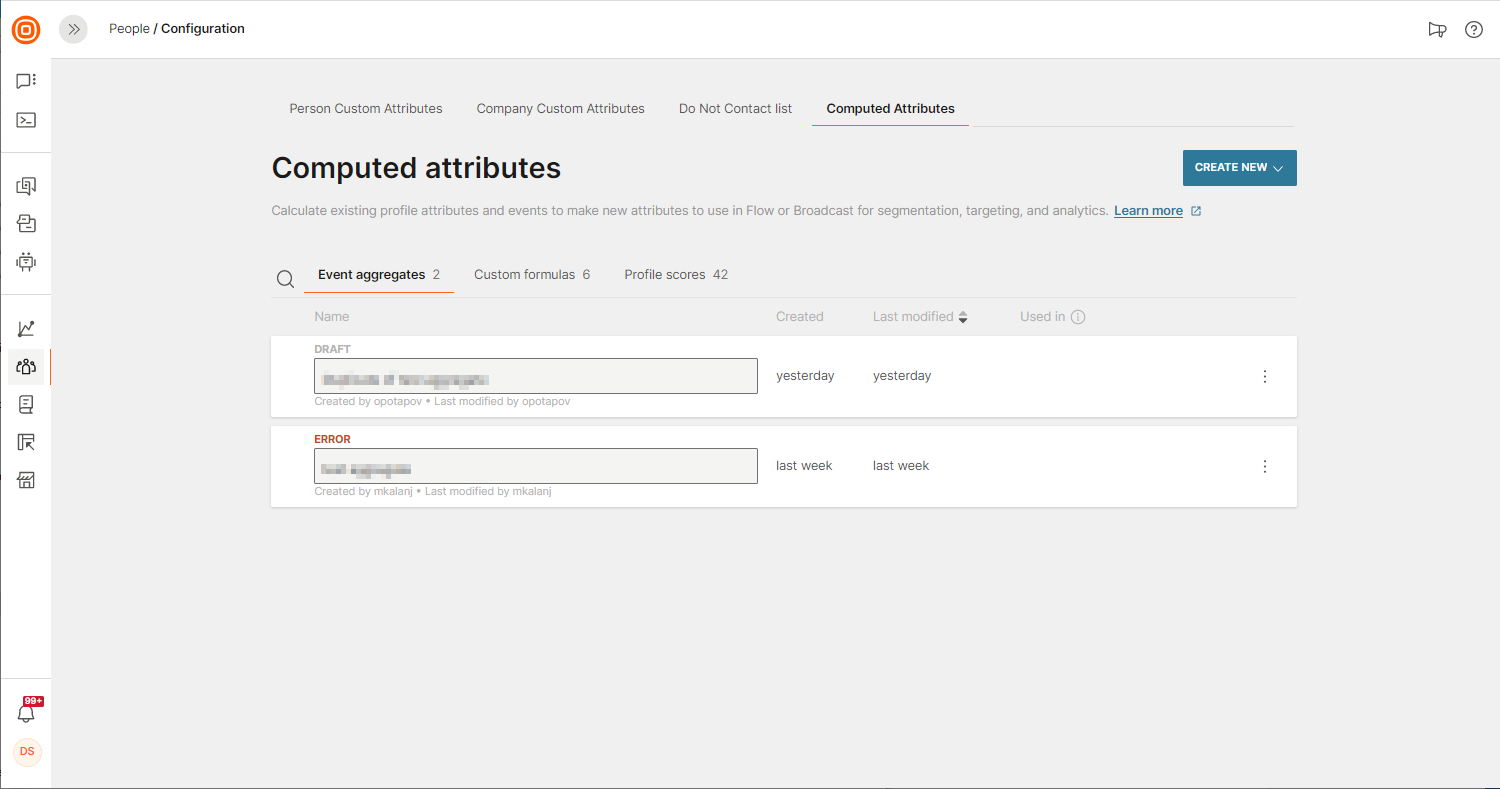
To create an event aggregate, go to the Configuration tab in People. Select Computed attributesand click Create New > Event Aggregate.
Define your Event Aggregate [#define-your-event-aggregate-computed-attributes]
Event aggregates are made up of the following component parts:
- An aggregating function used to make the calculation
- An event AND event property. For example, if you want to calculate the average value of the Order Value property in Checkout Completed event. The Count function takes no property as it calculated on the number of event instances.
- Optional event property filters. For example, if you only want to calculate the sum of purchases that were paid for with a credit card (Payment Method is Card).
- An optional selector to exclude the first or last matching event from aggregation. For example, you can choose to Exclude first from your aggregate that counts the number of repeat purchases.
- A time period to filter events during a chosen period of time.
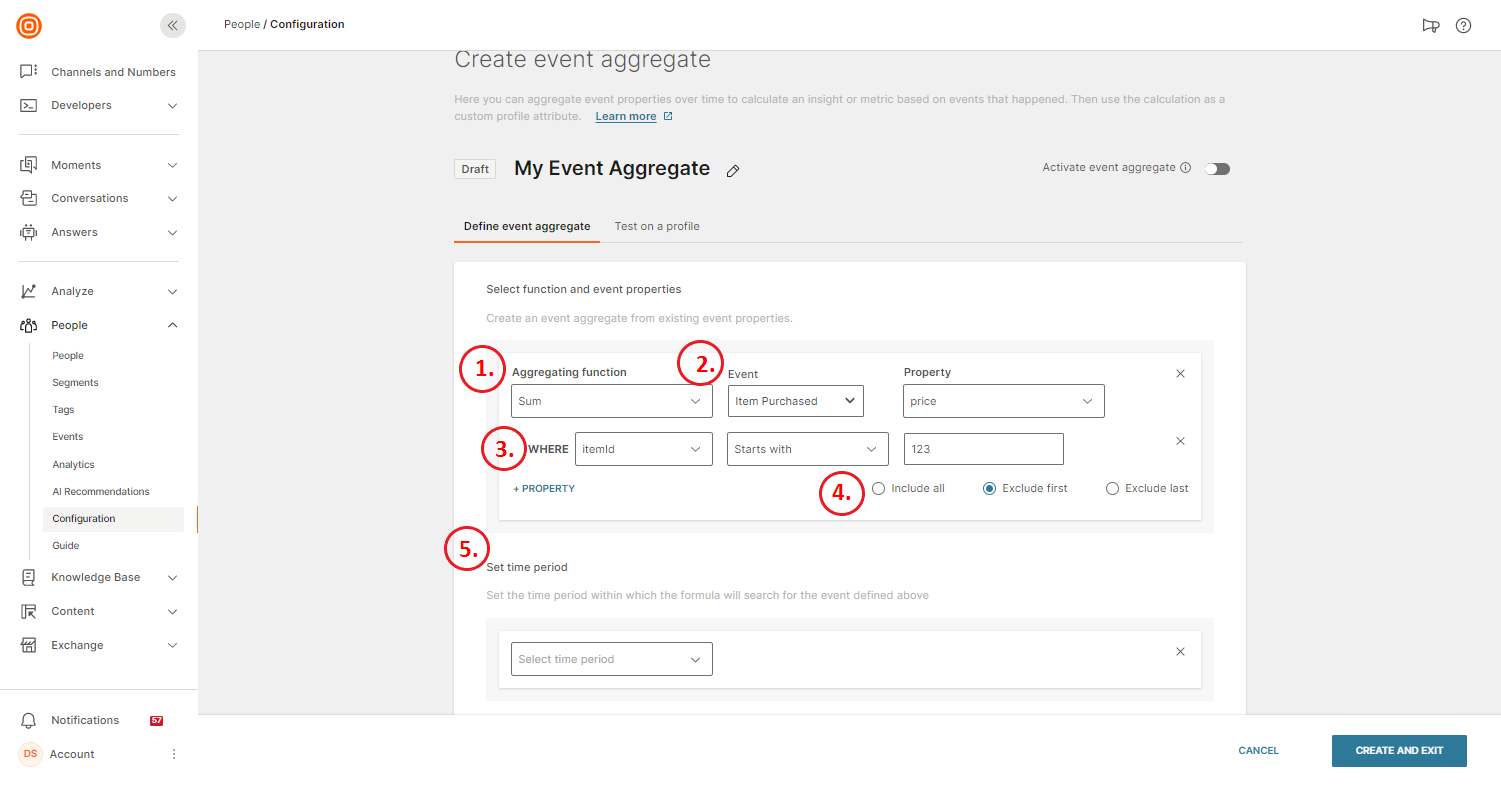
Create the event aggregate by choosing an aggregating function and selecting the event and event properties you wish to calculate, then define the time period within which the events occurred. Your event aggregate will calculated for all events in the chosen time period.
Give the attribute a name and then test your calculation on a person profile.
Aggregating Functions [#aggregating-functions-computed-attributes]
Select from the following aggregating functions:
| Parameter | Description |
|---|---|
| Count | Use Count to track the number of occurrences of an event. |
| Sum | Use Sum to get the sum of values for an event property. For example, the total price for multiple Item Purchased events |
| Min | Use Min to store the smallest value of an event property. For example, minimal Price value in Item Purchased eventsMin can also store the earliest time value from the standard Event Time event property or a custom datetime property event. |
| Max | Use Max to store the largest value of an event property. For example, maximum Rating value in App Rated eventsMax also stores the latest time value from the standard Event Time event property or a custom datetime property event. |
| Average | Use Average to store the average of values for an event property. |
| Count Distinct*EARLY ACCESS | Use Count Distinct to count the number of events with unique values in a selected event property. For example, unique purchases in Item Purchased events |
| First | Use First to find the value of a property of the first event that happens. For example, Item in the first Item Purchased event. |
| Last | Use Last to find the value of a property of the last event that happens. For example, Item in the last Item Viewed event. |
| Exists | Use Exists as a flag to track if an event happened or not. Result returns true if the profile contains the chosen event. |
| Most Common*EARLY ACCESS | Use Most Common to track the most common (frequent) property value of an event. |
| * This functionality is in Early Access stage. If you need this functionality, contact your Infobip account manager. | |
Set Time Period [#set-time-period-computed-attributes]
| Time Period | Description |
|---|---|
| Lifetime | All event occurrences |
| Last 7 days | All events from last 7 full days, but not including events that occurred today |
| Last 14 days | All events from last 14 full days, but not including events that occurred today |
| Last 30 days | All events from last 30 full days, but not including events that occurred today |
| Last 60 days | All events from last 60 full days, but not including events that occurred today |
| Last 90 days | All events from last 90 full days, but not including events that occurred today |
| 24 hours | 24 hours before current time |
| Custom Period | All event occurrences since a chosen date, or all event occurrences starting from n days before today. |
Test your Event Aggregate [#test-your-event-aggregate-computed-attributes]
You can test your event aggregate on a user at any time in the creation process. Choose the user that you wish to test your event aggregate against and then get instant results as you construct and test your formula.

Click Create and Exit when you first create your event aggregate to save it as a draft. In Draft, the event aggregate is not active and it will not be visible in person profiles, You can edit this attribute as many times as you need when it is in Draft. When you want to save your draft edits click Save and Exit.
Toggle Activate Event aggregate attribute when you are happy with the calculation. It will start processing against profiles in your People instance.
Your event aggregate will only be active once it has processed against all profiles. If you wish to adapt an active event aggregate you can deactivate it, make your changes, and then reactivate it again.
The lifecycle of event aggregates is the same as other computed attributes. Head over to the computed attributes section to learn more.
Lists
Sometimes when you send messages to customers, you want to include “a set of information” such as a list with insurance policies, upcoming payments, or items they've left in the shopping cart. So, what do you do then? An automatic campaign using customer attributes called Lists would be the best way forward.
The lists, available to Moments users, are stored per customer. Depending on the communication you want to create, you can send separate messages to the same customer about each of the stored items and mention all the objects from the stored list or just the first few.
If, for example, one person has more than one loan and you need to notify them about the approaching payment date for just one of the loans, this is where the Lists will come in handy. Keep in mind that aPerson Profile represents one real person and all the data related to this person is stored within the same profile – different loans, information about different lines in the family cell phone plan where this person is a primary subscriber, etc.
Head over to Lists to learn how to use lists in your communication, and personalize your content with them.
How to
Mask sensitive data in attributes [#mask-sensitive-data]
EARLY ACCESS
This feature is in Early access. For more information, contact your Infobip account manager.
You can protect sensitive information such as credit card or bank account number by masking the attributes in which the data is stored.
The values of masked attributes are displayed as asterisks (*) to all users and in all locations where they are displayed. The following are examples of such locations:
- People
- Persons page: Profile attributes (contact information fields)
- Within a profile: Profile attributes
- Activity feed: Profile and event attributes
- Do not contact list: Profile attributes (contact information fields)
- Other Infobip solutions. Example: Conversations
- External solutions. Example: Helpdesk agents
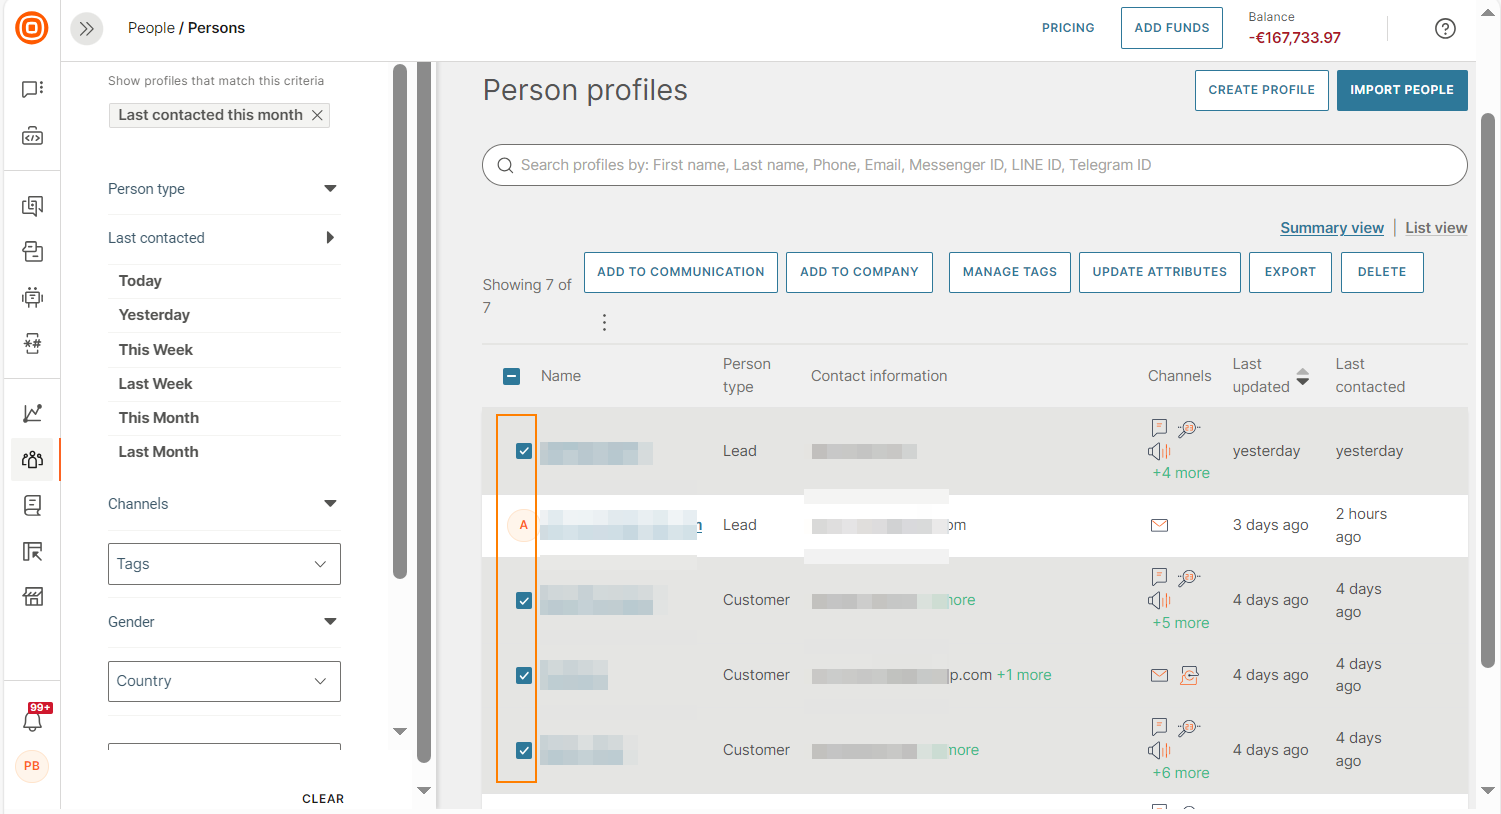
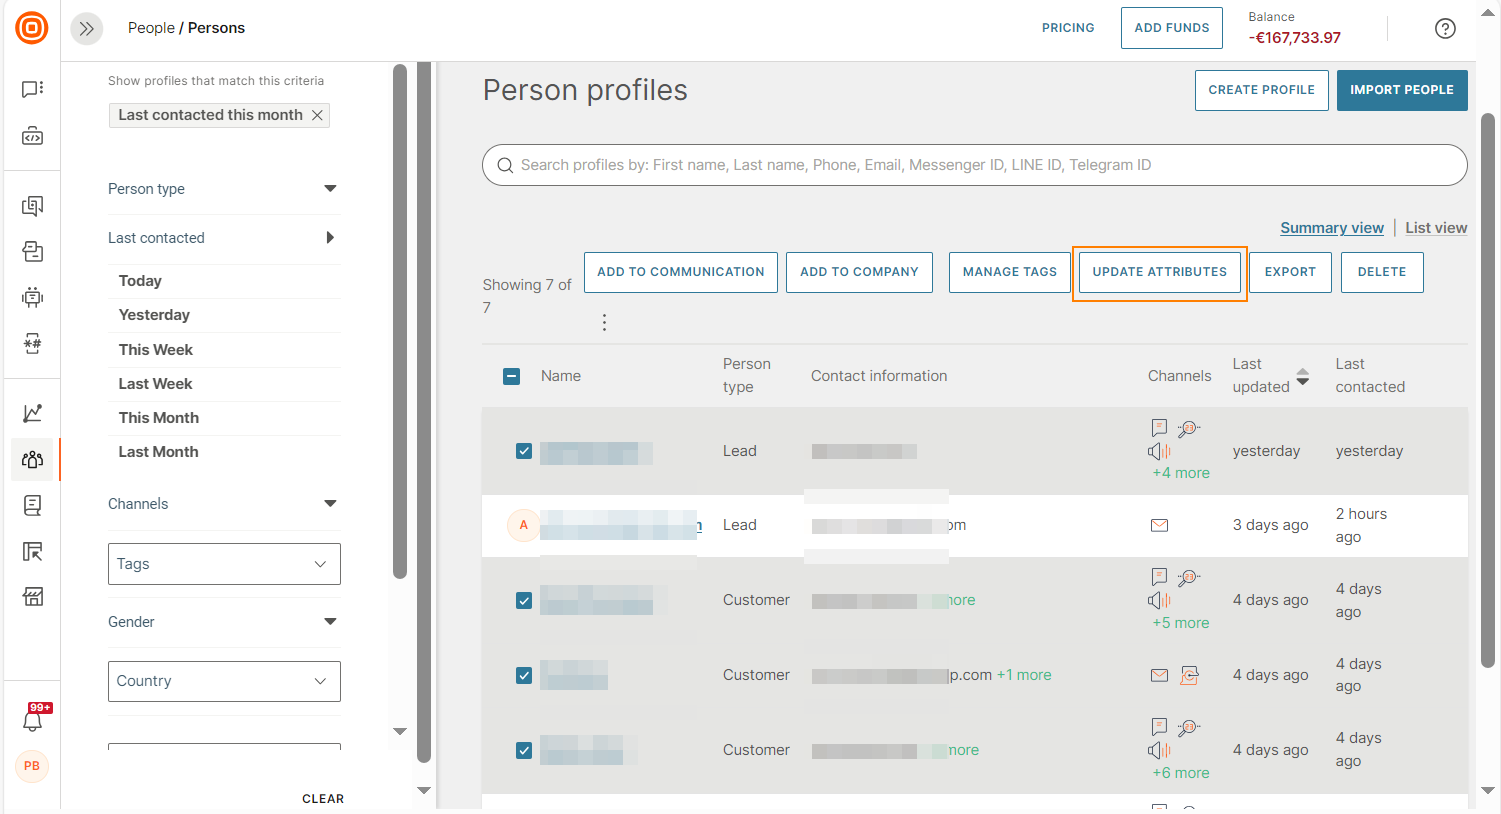
Bulk update attributes for multiple profiles [#bulk-update-attributes-for-multiple-profiles-how-to]
You can update standard and custom attributes in bulk for multiple profiles.
Example: Select the segment of customers living in London and update the country to England. The country field is updated for all the profiles in that segment.
You can do the following:
- Update the values of existing attributes.
- Reset attributes to a blank value.
Follow these steps:
-
In People, go to Persons.
-
Use search and filter options to get a filtered list of profiles.
-
Select the profiles for which you want to update the attributes.
-
Select Update attributes.
-
Do one or more of the following:
- To update an attribute with a new value, select the attribute, select with value, and specify the new value.
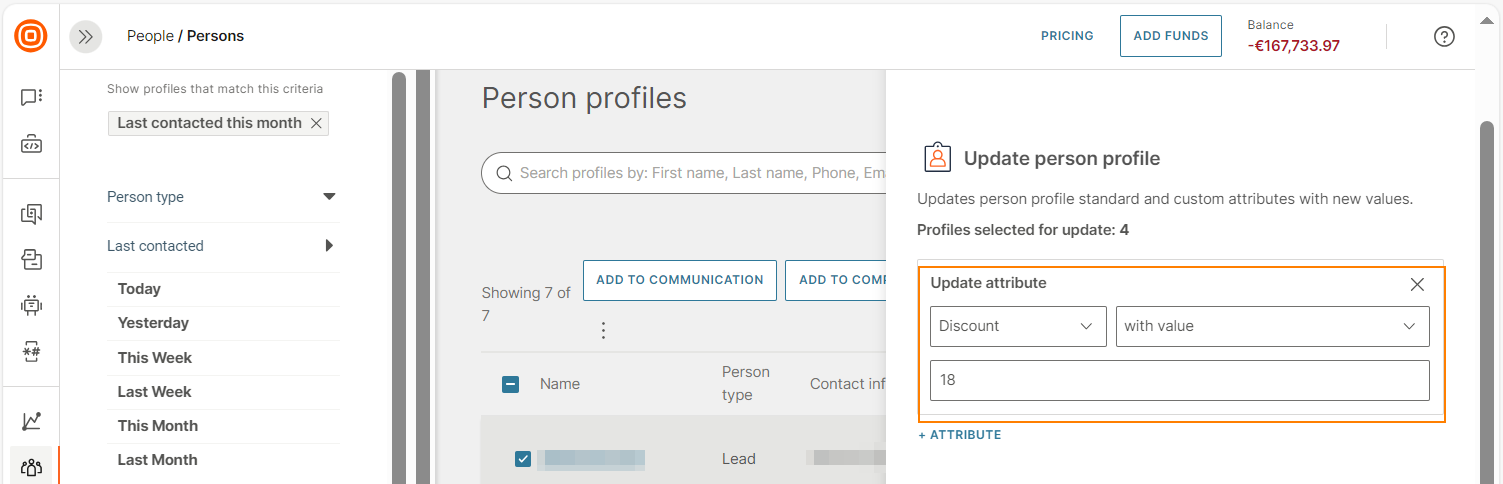
- To reset an attribute to a blank value, select the attribute and select to empty.
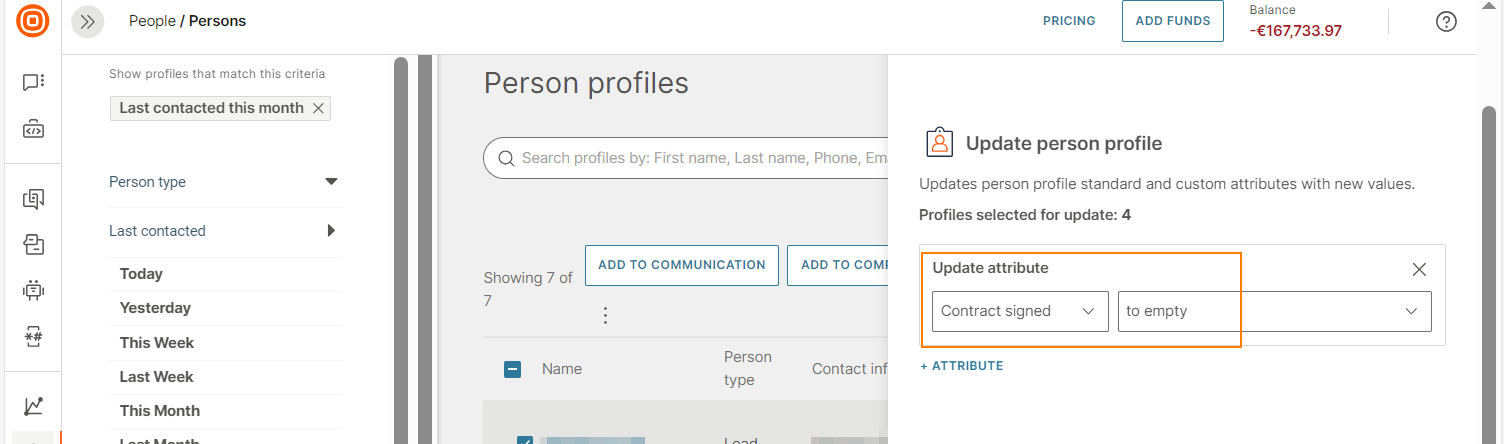
- To update multiple attributes, select Attribute and configure the changes to each attribute.
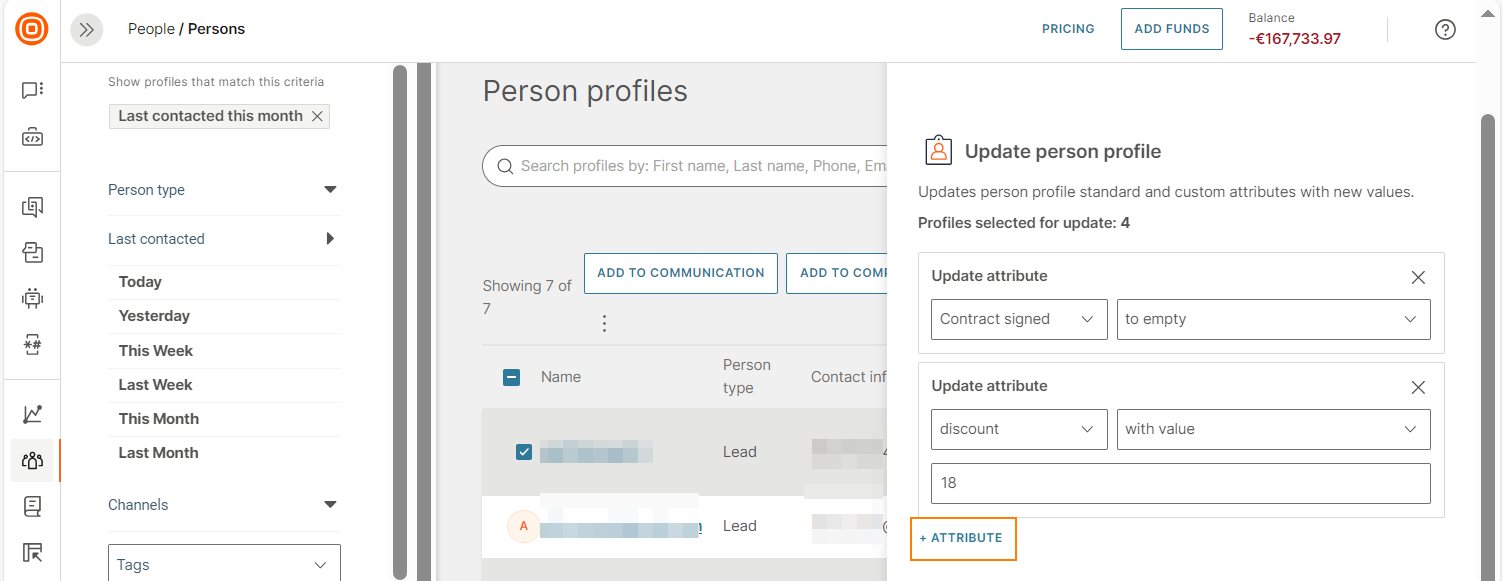
-
Select Update. You can view the progress of the changes.

You get a notification when the changes are complete.
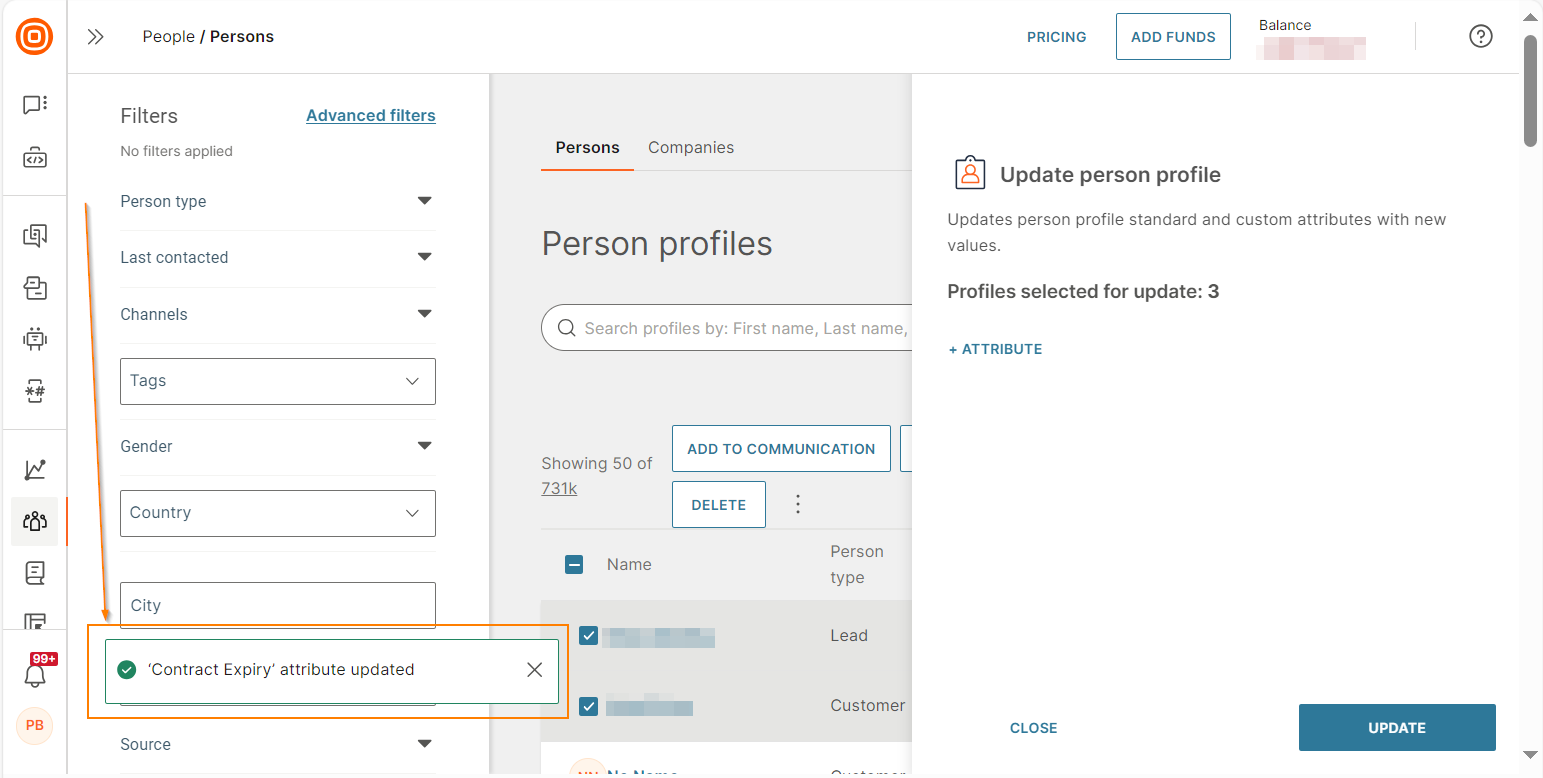
The changes are applied to all the selected profiles.