Manage customer data using Lists
When you interact with your customers, you may want to include a set or grouping of information for a person, such as a list of insurance policies, loans or payment accounts, doctor appointments, or sometimes even different items of the same structure, such as items in a shopping cart. This can be done by creating Lists (technically known as List attributes) to group the information.
Lists are a type of custom attribute that represents a group of items that you define, and store per customer in their person profile.
Depending on your communication scenario, you can send separate messages to the same customer about a single item, just a few items, or all items in the list.
For example, if your customer has more than one loan and you want to notify them of an upcoming payment date for one of the loans, then lists will help you achieve that. This is much more efficient than creating separate custom attributes for each loan or account that your customers may have.
List attributes can be created using the People web interface in your browser or using the People API, and then add and modify list item data from a number of sources including the People web interface, API, WebSDK, or Mobile SDK depending on your particular requirements.
You can then use lists in Flow to do things like remind customers about items left in their cart, upcoming doctor appointments, or various other scenarios.
You can even segment your audience, trigger your Flows using list data, and personalize your message content with list data.
Read on to learn how lists are structured, or click one of the links above to jump right in.
List structure
Lists can be a complex topic as they have a different structure than a traditional custom attribute that contains a single piece of data.
Take a look below to learn about each part of a list and what it does:
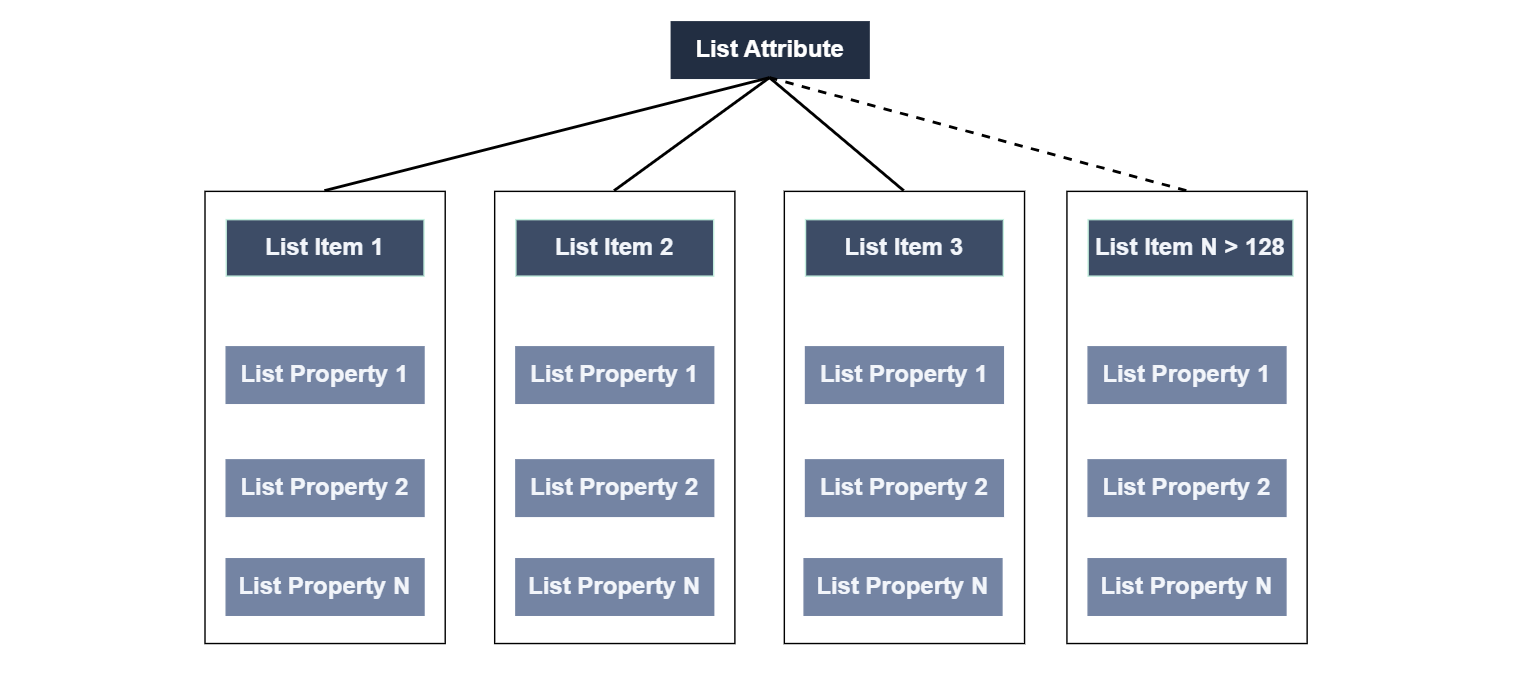
List attribute (often simply known as List) - A type of custom attribute that consists of a defined and constant set of fields known as list properties. Think of list attributes as the container that stores items of information, such as doctors' appointments, financial products, insurance policies, and items left in a shopping cart, and list properties related to each item.
List properties - Each specific field in a list attribute is called a list property. These fields contain information that you can use in your communications. Example: You have a list attribute called Doctors appointment. The list properties for this list attribute could be Doctor Name, Appointment Date, and Cost of visit. When you create a list attribute, you must also define the list properties. After you save a list, you cannot edit existing list properties, but you can add new properties.
List items (sometimes known as objects) - List items are unique items that can be created inside a list attribute at a person profile level. For example, imagine a list attribute called 'Doctors Appointment'. The doctors' appointment list contains items, like appointment 1, appointment 2, appointment 3, and so on. These are list items. Each list item can have list properties that are different, like doctor name, appointment date, and cost. etc. Every customer is unique so naturally, every customer will have a different number of doctors' appointments. Unlike list attributes and list properties that cannot be modified at a system level, list items can be modified as a customer evolves and the data changes.
A list attribute can contain a maximum limit of 128 list items per person profile.
Here are some applicable use cases for lists:
- Store the cart items so you can later send an email that includes these items
- Remind customers about several expiring banking products
- Renewal of an insurance policy for each family member that is stored in one profile
- Manage several loyalty cards per person
Create List attribute
Create lists using either the People web interface or the People API.
For information about lists in People, refer to the Lists documentation.
You can add a maximum of 128 properties to a list attribute.
You cannot reorder the properties in the list attribute. So, if the order of the properties is important, make sure that you add them in the required order.
After you save a list attribute, you cannot rename the list attribute, rename list properties, change data types for list properties, or remove properties from the list attribute. So, save the list attribute only when you are sure that the contents are exactly as required.
You can add properties even after you save the list attribute.
Using the web interface [#using-the-web-interface-create-list-attribute]
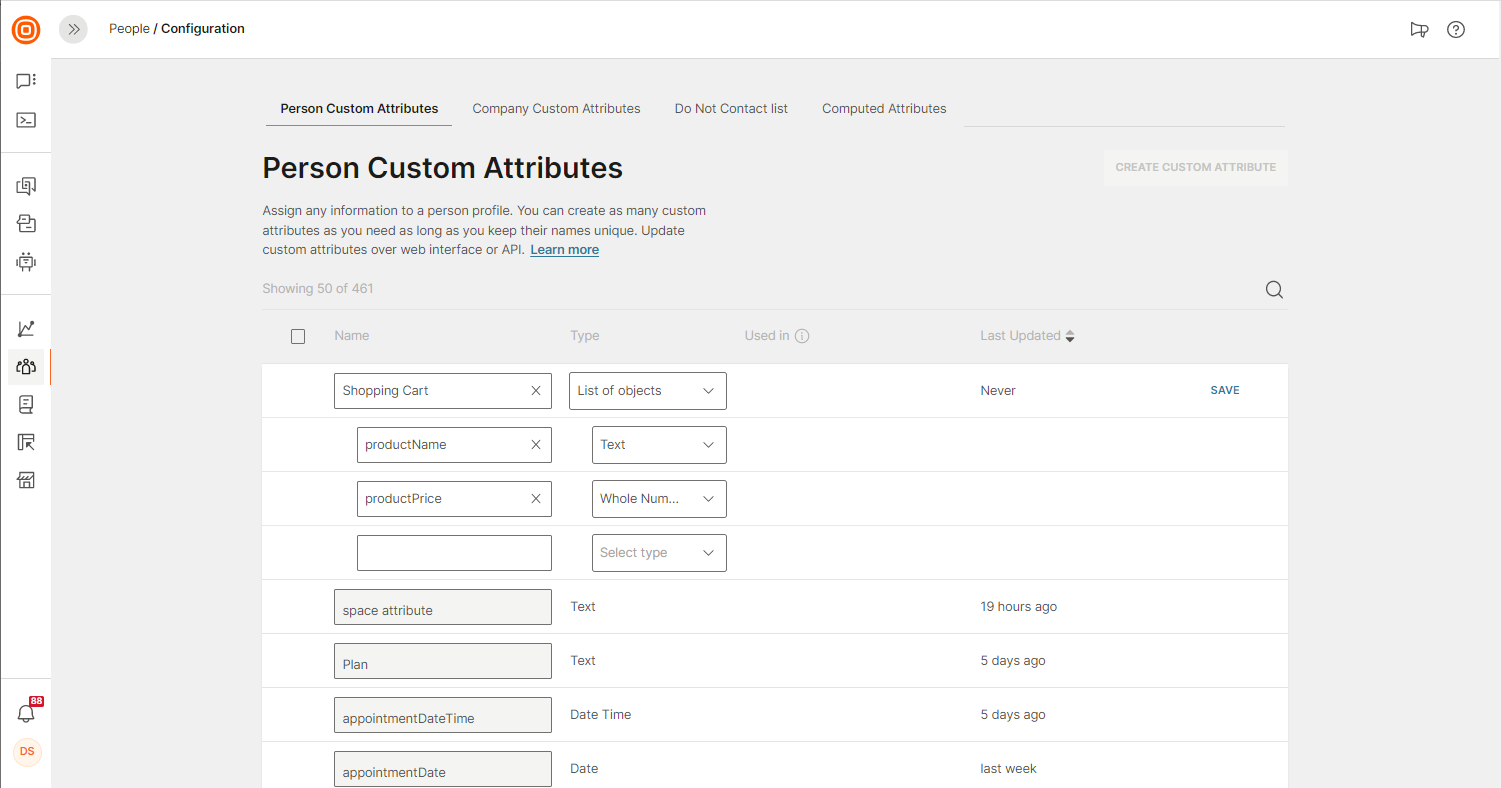
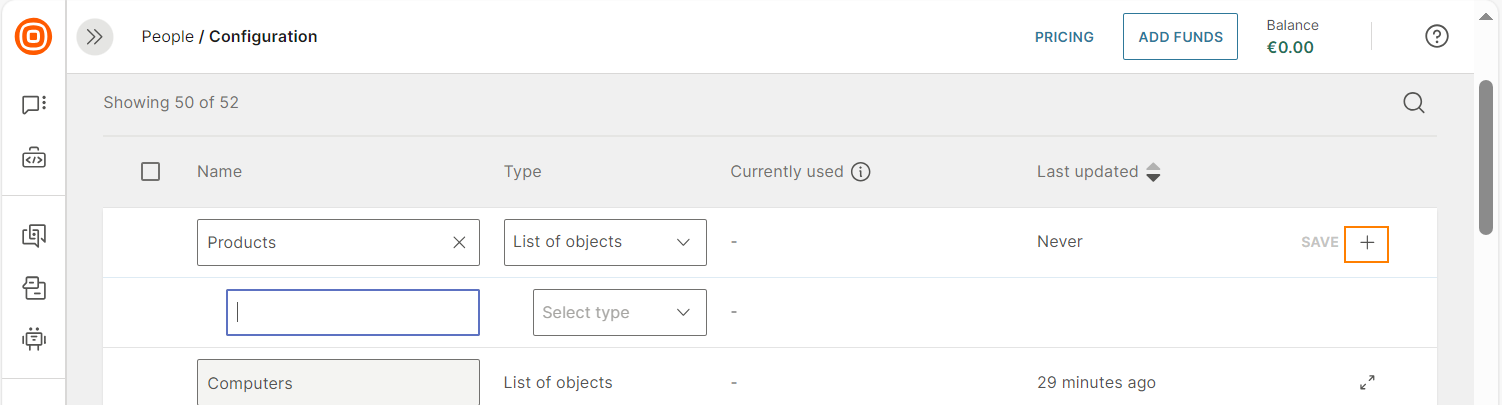
- On the Infobip web interface, go to People> Configuration > Create Custom Attribute.
- Enter a name for the list attribute.
- In the Type field, select List of objects.
- An empty list property is created by default. To add more list properties, select the add icon.
- Add the following information for each list property.
- Enter the name of the list property.
- Select one of the following types - Text, Decimal, Whole Number, True/False, Date, and Date Time.
- Select Save.
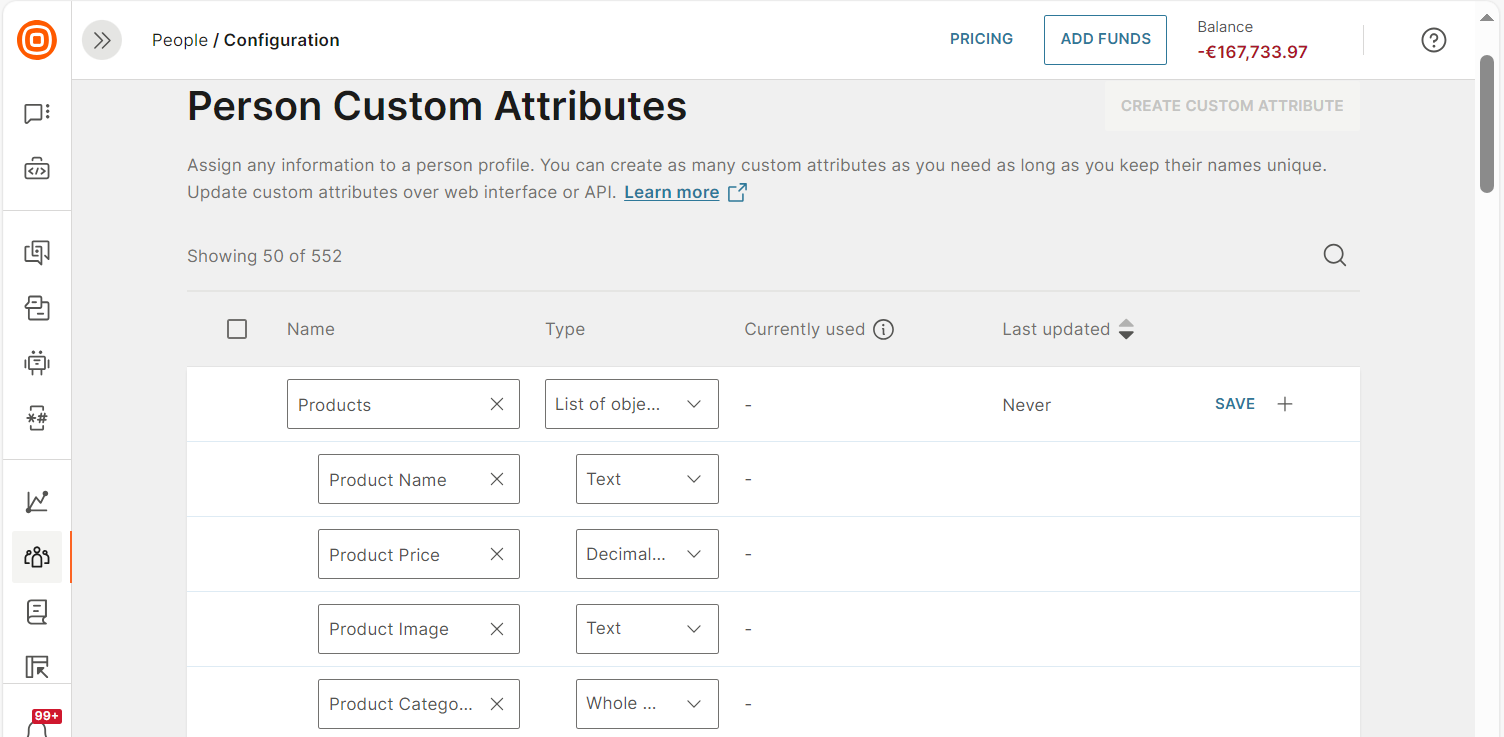
Example: For the abandoned cart scenario, the list consists of items left in the cart. The properties that you might want to add for these items are as follows:
- Product name
- Product price
- Product image. In this example, this property is of type Text. When you add data to this property for a profile, you can add the URL for the image.
- Product category
Using People API [#using-the-people-api-create-list-attribute]
Use the Create a custom attribute API endpoint to create list attributes.
Add properties to existing List attribute [#list-attributes-add-property]
To add a property to an existing list attribute, do the following.
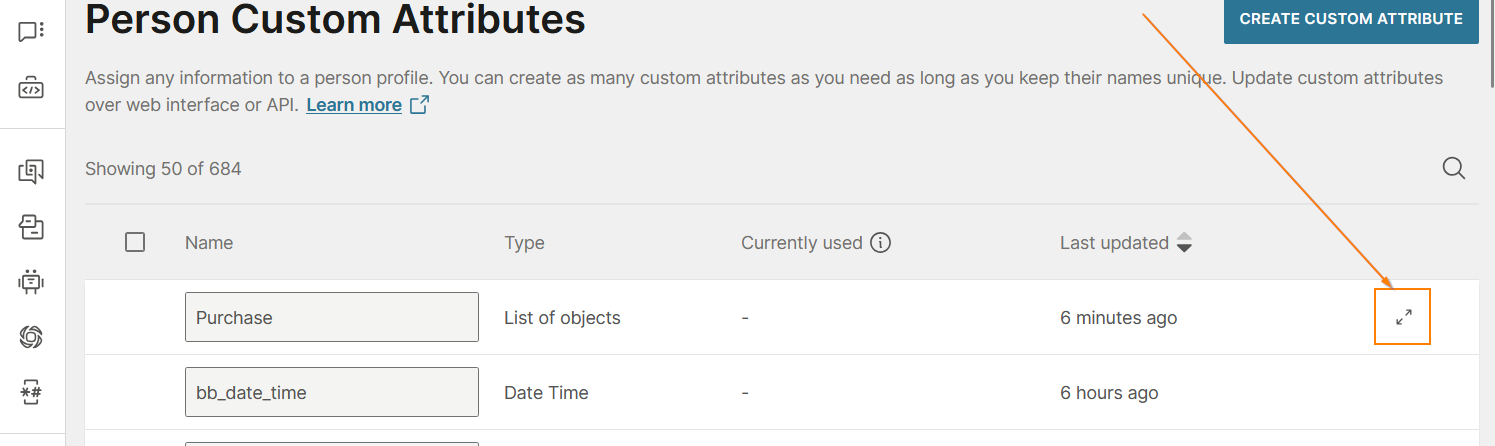
- On the Infobip web interface, go to People > Configuration > Person Custom Attributes.
- Find the list attribute for which you want to add a property.
- Select the Expand icon next to the list attribute.
- Select the + icon to create a property.
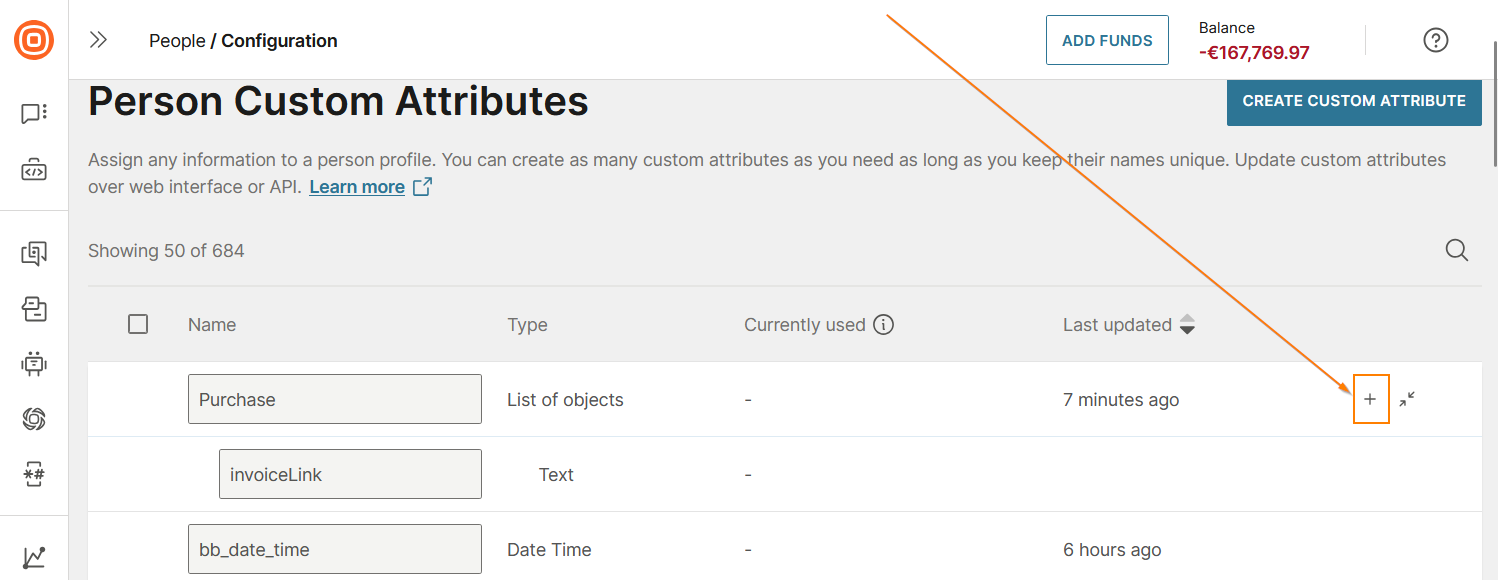
- Configure the property.
- Select Save.
Filter List items [#filter-list-items]
You can control how filtering rules are applied to list items.
Use the following options.
- for any item (default): The profile is included if any item in the list matches the segment rules.
- for all items: The profile is included only if all items in the list match the segment rules.
Example:
You have a list, Interests. To match people who are not interested in Hiking, use the following rule:
Interests for all items.
In the properties, select Activity is not Hiking.

You can apply the filters in the following situations when you use list items.
- Creating a segment
- Searching for profiles
Add and modify List data
As soon as you have created your list, it will be ready immediately to start adding list items. This can be done in a number of ways:
Think of this stage as the step where you can add list items to a customer profile, edit list items in a customer profile, and delete items from a customer profile. This is useful for scenarios like, when your customer contracts an additional product, or they add/remove items from their shopping cart.
Remember, you can add, edit, or delete items from your list at this stage, but you cannot adapt the list itself, or any of its list properties. If you want to amend your list or list properties, you will need to create a new list with your new, desired structure. See Create list to learn how to do this.
People web interface [#people-web-interface-add-and-modify-list-data]
You can add new or edit existing list items by navigating to a person profile in People, selecting the Attributes, Tags, and Events tab, and adapting a list attribute directly in the profile. You will see all lists for your account, even if the list is empty and does not contain any list items.
Add List item [#add-list-item-add-and-modify-list-data]
Read on to learn how to add an item to your list. It is possible to add up to 128 items to a single list per person profile.
If you want to add multiple list items for many person profiles in a single job then consider using API, the appendToList() method of the People WebSDK, or import list data.
Depending on the Flows that you have configured for your account, creating a list item may trigger a Flow to start.
To add a list item in People:
-
Go to People> Person profiles and filter for the person profile you would like to edit. Open the person profile.
-
Select Attributes, Tags, and Events tab and scroll down to the list you would like to add a list item to.
-
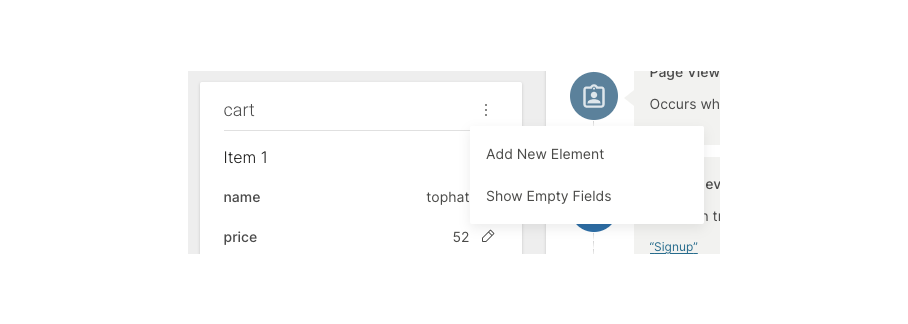
Click ... and Add New Element
-
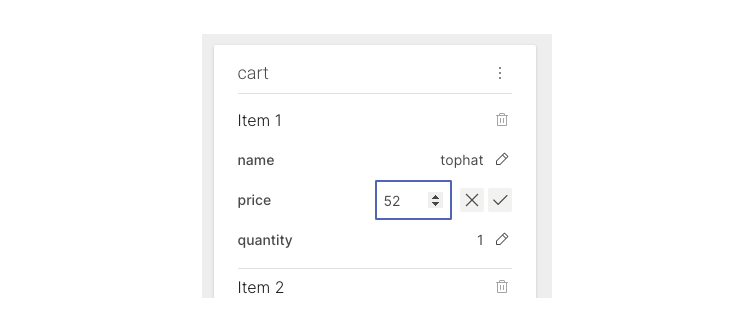
Populate the list properties with data. The data will be saved automatically.
You do not immediately need to populate every list property for an item. Empty list properties will be hidden on the person profile until the field is populated. Click Show Empty Fields to see the empty fields.
Edit List item [#edit-list-item-add-and-modify-list-data]
From time to time, it is likely that you will need to edit list items for person profiles. This can be done for individual profiles from within Infobip, or if you want to edit list items for multiple person profiles or in bulk then consider using API or import list data.
Depending on the Flows that you have configured for your account, editing a list item may trigger a Flow to start.
- Go to People> Person profiles and filter for the person profile you would like to edit. Open the person profile.
- Select Attributes, Tags, and Events tab and scroll down to the list item you would like to edit.
- Click ... and Show Empty Fields to see any empty list properties.
- Update the list item properties as required. Your edits will be saved immediately.
If you delete data for a list item property so it is empty it will return to a hidden state. This is not the same as deleting a list item. See Delete List item below to learn more.
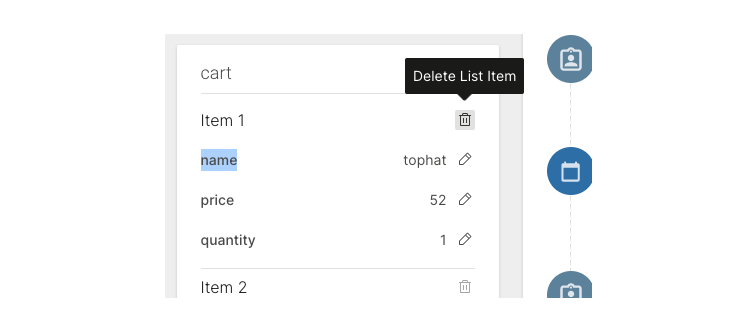
Delete List item [#delete-list-item-add-and-modify-list-data]
Read on to learn how to delete an entire list item and its list item properties for a person profile. Remember deletion of list items is permanent and any data contained in the list item properties will be lost.
- Go to People> Person profiles and filter for the person profile you would like to edit. Open the person profile.
- Select Attributes, Tags, and Events tab and scroll down to the list item you would like to delete.
- Click the trash bin icon next to the item you want to delete.
- Click Delete to confirm you are happy to delete the list item
People API [#people-api-add-and-modify-list-data]
Leverage the People API to handle a number of management tasks related to Lists.
Depending on the Flows that you have configured for your account, adding and editing a list item using API may trigger a Flow to start. Before you edit a list item check your Flows and pause any that may be triggered in this way.
Add
To avoid errors keep in mind that the item you want to add should match the list that you have created on our web interface. Note that any API method that is used to update custom attributes can be used to add lists.
Enumerate
- Get list item(s) by item ID
- Get all items in a list[] (Get List)
Update
Delete
- Delete list items by item ID
- Delete all items in a list (Delete List)
Mobile SDK [#mobile-sdk-add-and-modify-list-data]
Configure the Mobile SDK to work with lists when the scenario is more complex and you want to go beyond the simplicity of creating lists on the web interface.
Learn more about how to set this up:
Plugins for Frameworks
JS SDK [#js-sdk-add-and-modify-list-data]
With the People Web SDK, you can overwrite the list content (all list items) or append new list items from your website. The Update Person method will let you set the list or erase it.
Sign in to the web interface and go to the Web SDK Library on the Events page in People.
Once you are done integrating the Web SDK with your web page, you can use one of the following methods to work with list attributes:
- pe.updatePerson()- set or erase the list
- pe.appendItemToList()- add a new item to list
For more information about the Web SDK methods refer to https://github.com/infobip/people-web-sdk#update-profile-information
See the example below on how to overwrite the contents of a list attribute called 'ShopperCart'.
Import Lists
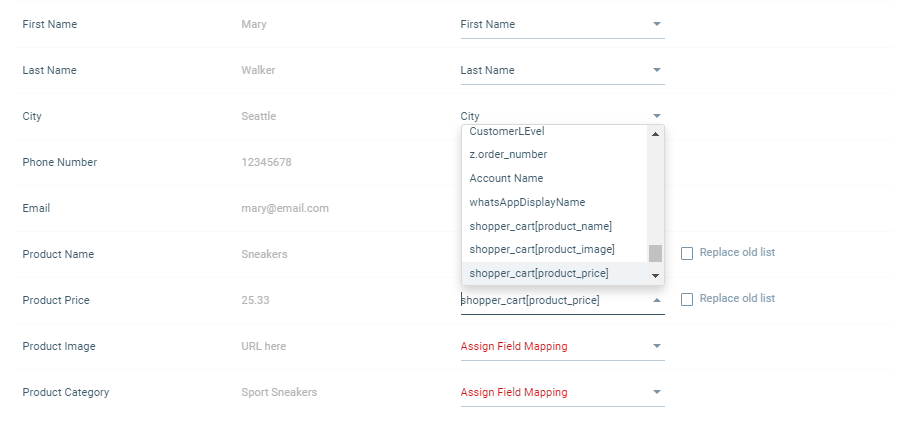
If you already have a file with customer information and lists, with all list properties defined, import it to People.
The file can be up to 15MB, and we support .csv, .xls, .xsls, .txt or .zip (the 15MB size limitation applies to an uncompressed file inside the zip, not the zipped file itself).
The example we are showing here involves the standard customer information, plus lists with properties that include the product name, price, image, and category.

Organize the list in your file and configure the list on the Configuration page in People so that the two match.
In People, navigate to Person profiles and click Import to import your list. Assign fields: look for the name of the list you created and select the objects from that list. Next to each field, a checkbox will appear that allows you to replace the list that's already stored in People.
The list will become visible inside the person's profile, on the Attributes, Tags, and Events page.
Lists in Flow
You can use Lists in your Flows to construct powerful campaigns. Trigger Flows when a single list item changes in a person profile, schedule notifications based on item data, or even segment audience based on a list attribute.
This gives you many additional possible configurations for your Flow. For example, you could start a Flow that notifies a customer as soon an agreement list item is set to active. Or perhaps start a Flow to notify an insurance agent about the status of multiple customer policies.
Trigger Flows with List attributes [#trigger-flows-with-list-attributes-lists-in-flow]
You can use lists to trigger flows by using the following entry points:
Flows are triggered when list item properties fully match conditions that you define in the entry point filters. When these conditions are met, the list items enter a target state.
Date/Time trigger [#date-time-trigger-lists-in-flow]
Use the Date/Time trigger to work as a scheduler for Lists. The Date / Time trigger can aggregate data based on a date or time related property. This enables you to create Flows like collect all ACTIVE doctors appointments created 3 days ago and then send the 3 doctors appointments in one email to remind the customer, as a simple example.
All list items that match the defined filter for a person profile will be aggregated and then be injected into an automatically created variable that can then be used in other parts of your Flow.
- Go to Moments > Flows.
- Click Create Flow > Start from Scratch.
- Select Date or Time trigger.
- Choose the list attribute that will trigger the Flow. As a first step, you will only be able to select from date-based list item properties because the property will be used to define how often the aggregated set will be created.
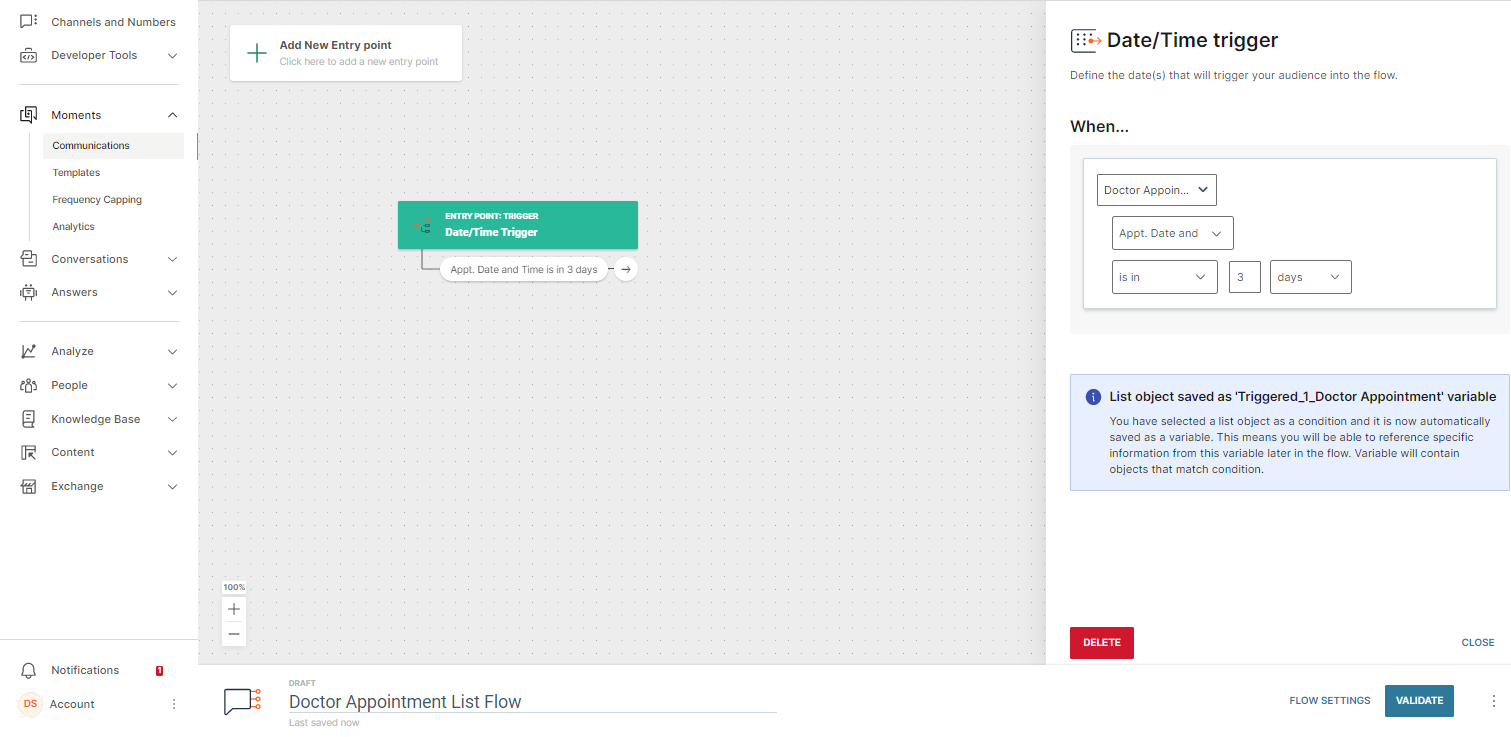
- (Optional) If you wish to filter by additional properties, then add list attribute properties to the data subset filtering field. You can select from all available list item properties in this field. This additional filter works as an AND condition to combine the attribute chosen in step 4 and any additional item properties you want to filter by, in order to define the target state of items to be collected into the variable.

- After you have finished creating the filter for your use case, all list items per persona that match this combined filter will be collected automatically in a bespoke list variable with the naming convention matched_ListItem_%listName%. This variable is not editable and cannot be deleted, however you can change the variable names in Flow settings.
- Continue building your flow by adding elements depending our your use case. Take a look at Manage Flow to learn more about creating a Flow.
Change in People profile [#change-in-people-profile-lists-in-flow]
Use the Change in People profile trigger as an item-based trigger for Lists. This means that the Flow will be triggered each time one of the List items for a persona hits a target state (such as created or changed). For example, trigger the Flow when a doctor's appointment (stored as a list item) is created.
Because we are triggering a Flow based on list items and one person can have multiple list items, then we could potentially face a situation where 2 or more list items trigger the Flow at the same time for the same person. For example, if 2 doctors' appointments are created for a person at almost the identical time.
Because a person can only be in an active Flow at any one time, the system will allow the first action that hits the target state to trigger the Flow (by timestamp), but it will discard/ignore the additional actions that hit the target state until the person leaves the active Flow in order to avoid data conflict issues.
Use the Date/Time trigger if you expect that several items will change at the same time and each item is important to be communicated.
To use the Change in People profile entry point to trigger a Flow with Lists:
- Go to Moments > Flows.
- Click Create Flow > Start from Scratch.
- Select Change in People Profile trigger.
- Select a List attribute and set the conditions for list item properties to define the desired target state.
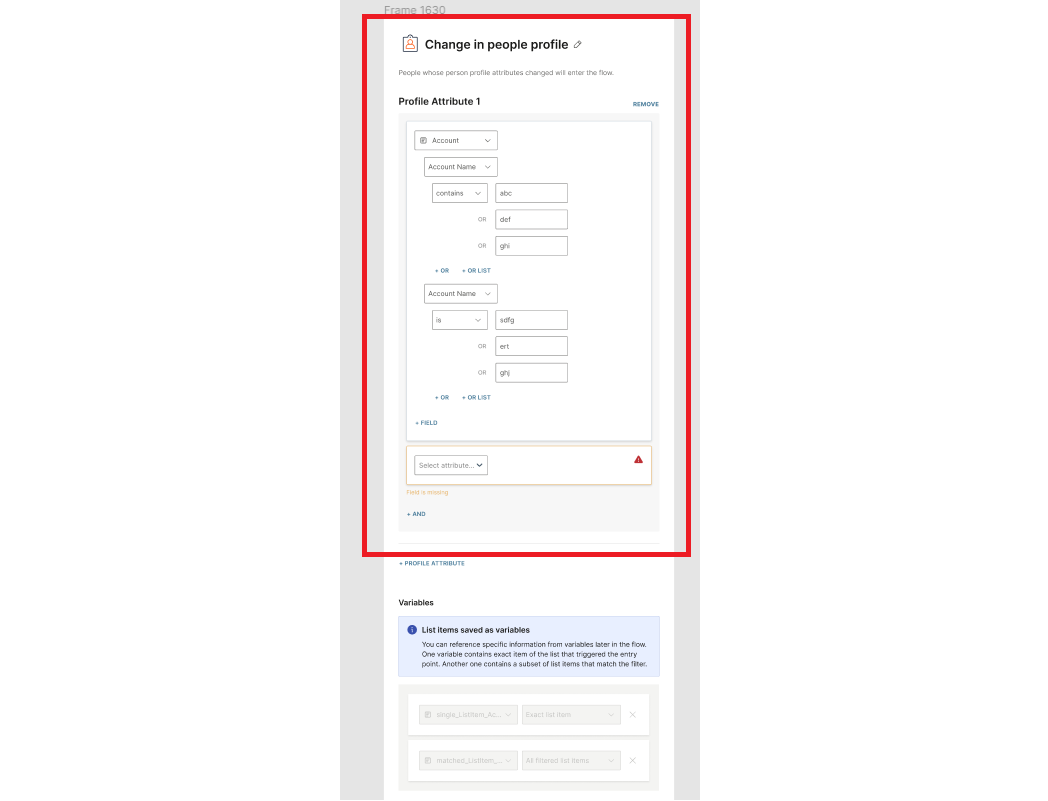
- After you have finished creating the filter for your use case, all list items per persona that match this filter will be collected automatically in a bespoke list variable. This variable will have a unique naming convention: matched_Lisitem_%listName%(the variable contains all items per persona that match this filter), or single_ListItem_%listName% (this variable contains information about the exact list item that triggered the Flow). It is designed to contain information about only 1 item for better personalization and possible segmentation at a later stage. This variable is not editable and cannot be deleted, however, you can change the variable names in Flow settings
- Continue building your flow by adding elements depending our your use case. Take a look at Manage Flow to learn more about creating a Flow.
List item precedence
There is an order of precedence when flows are triggered with list attributes that use standard or custom attributes. As you know, a flow is triggered when all conditions match, but there are rare situations where a change to a standard or custom attribute may suddenly cause there to be multiple matching list items that could trigger a flow. So how does the system know which list item will enter the flow first?
When the standard or custom attribute changes and all conditions are met, then the system will run the flow with the list item that last triggered the Flow.
As a basic example, imagine you want to trigger a flow with some complex conditions like list attribute AND custom (or standard) attribute. The person only enters the flow when both are matched. For example, Doctors appointment (the list attribute part) happening tomorrow and City (the custom attribute part) is Rome.
The next day, we create a doctor's appointment list item and the city is Paris. We then immediately create another doctor's appointment for the same day and the city is Paris. We now have two appointments but the flow has not been triggered because all conditions are not met.
Suddenly the person moves to Rome so now all flow conditions are met. The second doctor's appointment we created will enter the flow first because the system deems it more recent and therefore more relevant than the first, older appointment.
Pass Lists in events to flows [#pass-list-attributes-to-flow-lists-in-flow]
You can pass list attributes from an event to a flow. To do so, map the list in the event payload to a flow variable. When the flow is triggered by the event, the list from the event payload is copied to the flow variable.
You can map event properties of type List in the People real-time event entry point and the Wait for an event element.
For more information about mapping event properties to flow variables, refer to the Flow variables documentation.
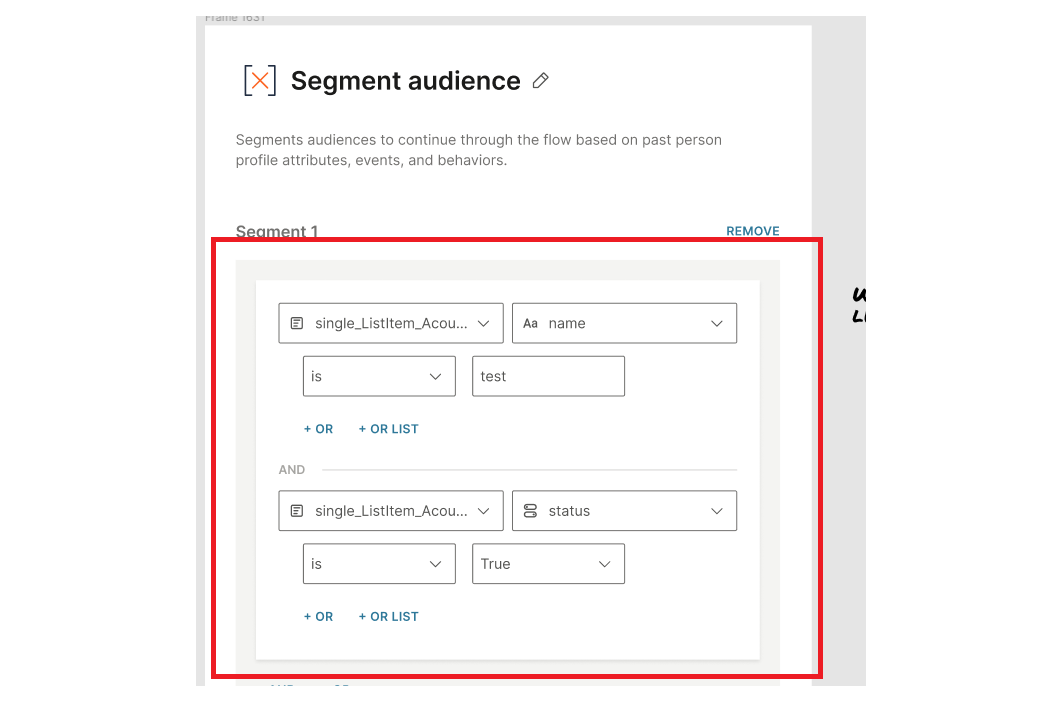
Segment audience with List attributes [#segment-audience-with-list-attributes-lists-in-flow]
When you segment your audience, you create segments based on attributes and events in order to then do many things, such as send a message to customers who have spent a certain amount of money on your products or services but have not made a purchase in the past several months.
Using Lists with Segment Audience is more complex because a single person could have multiple list items all in different states. For example, a person may have 2 agreements, where Agreement Status is ACTIVE for one agreement, and EXPIRED for the other. If we were to try and segment our audience by Agreement Status then we would face a situation where the same person is in 2 separate segments. This does not work.
To overcome this challenge with Lists, we switch from person-based segmentation to item-based segmentation.
You can segment your audience based on single list item variables (for example, those with the naming convention singleListItem%listName%).
These variables are automatically created when you use a List to trigger a Flow using the Change in People profile element that contains only one item that actually triggered the Flow.
This way you will avoid situations where a person may have items in different segments and ensure that you have a single piece of data that can then be used in your Flows.
Personalize messages using Lists
Lists can be included in messages sent via Broadcast (Email, SMS, Push, WhatsApp) or Flow (all channels).
We have provided some guidance to show how you can use lists when you personalize your messages for SMS and Email. However, the principle is the same for all channels.
Send Lists in messages [#send-lists-in-messages-personalize-messages-using-lists]
Using lists in messages can help you provide very targeted messaging directly to your users. To show how this works, we will use an abandoned cart scenario where you want to remind a customer about the items awaiting them.
Keep in mind that the prerequisite for sending a list inside a message is to have the cart information stored as a list attribute in Person Profiles and to have the communication channel enabled.
Lists in SMS [#lists-in-sms-personalize-messages-using-lists]
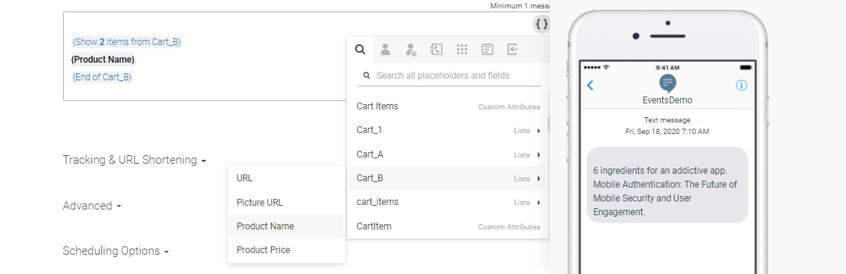
Scenario 1: Show the first two items from the cart, and one field describing the items
- Go to Moments > Create Broadcast and select to send an SMS message.
- Click the curly brackets icon, and from the drop-down menu select the list you created for this campaign – in this case, Cart B.
- Next, type in the number of items you want to appear in the message. For this scenario, 2 items.
- Select the field(s) from the list you want to include. For example, the Product Name.
- Add characters and/or whitespace to separate the fields on the list. Otherwise, they will be joined together.
- Click Analyze. A preview of the message will be displayed. If you like what you see, Launch the message, or go back to the editor to make changes.
Summary:
Content Window Cart items in the message: 2 Cart field to be displayed inside the message: Product Name
Preview Screen Name of item 1: 6 ingredients for an addictive app Name of item 2: Mobile Authentication; The Future of Mobile Security and User Engagement
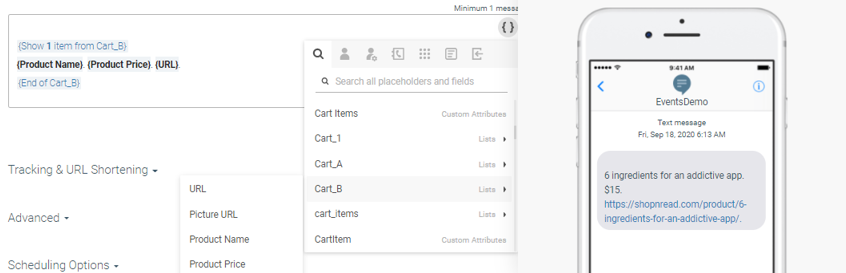
Scenario 2: Show only the first item with several fields describing it
This example is about what the final result will be when you select the first item from the list, including fields describing the item, such as Product Name, Price, and URL.
Content Window Cart items in the message: 1 Cart fields to be displayed inside the message: Product Name, Product Price, URL
Preview Screen
Item name: 6 ingredients for an addictive app
Item Price: $15
Item URL: http://shopnread.com/product/6-ingredients-for-an-addictive-app
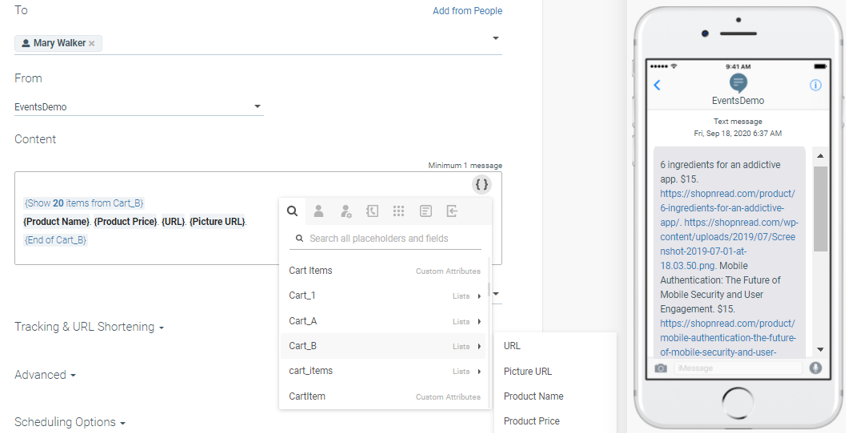
Scenario 3: The cart has fewer items than the number set in the editor
Now we would want 20 items to be listed in the SMS message, so we type in the number in the editor. If the customer has a fewer number of items, they will see only those items together with the fields we selected – Product Name, Price, URL, Picture URL.
Content Window Cart items in the message: 20 Cart fields to be displayed inside the message: Product Name, Product Price, URL, Picture URL
Preview Screen
Item name (displaying fewer than expected 20): 6 ingredients for an addictive app, Mobile Authentication; The Future of Mobile Security and User Engagement
Item Price: $15, $15
Item URL: http://shopnread.com/product/6-ingredients-for-an-addictive-app
Picture URL: https://shopnread.com/wp-content/uploads/2019/07/screenshot-2019-07-01-at-18.03.50.png
Personalize email using Lists [#personalize-email-using-lists-personalize-messages-using-lists]
You can use lists in a number of ways when creating your email communications. This is possible using our powerful email editor.
Learn how to use lists with certain elements of the email editor.
Repeat content in text block [#repeat-content-in-text-block-personalize-messages-using-lists]
Use the text content block of the email editor to build content that is highly personalized for your target audience.
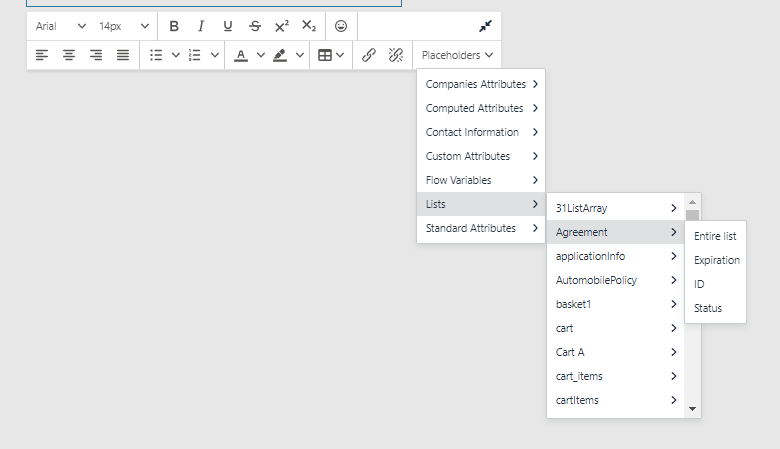
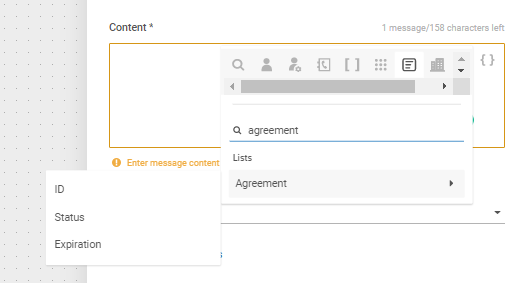
- Add the text box to the custom email editor.
- Click Placeholders> Lists.
- If you would like to use list variables in your email personalization then select Placeholders> Flow Variables, and choose the list variable you want to use.
- Select the list that you want to add.
- Choose 'Entire List' to add the whole list to the text element, or select a single list property. The list will be added to the text box as code.
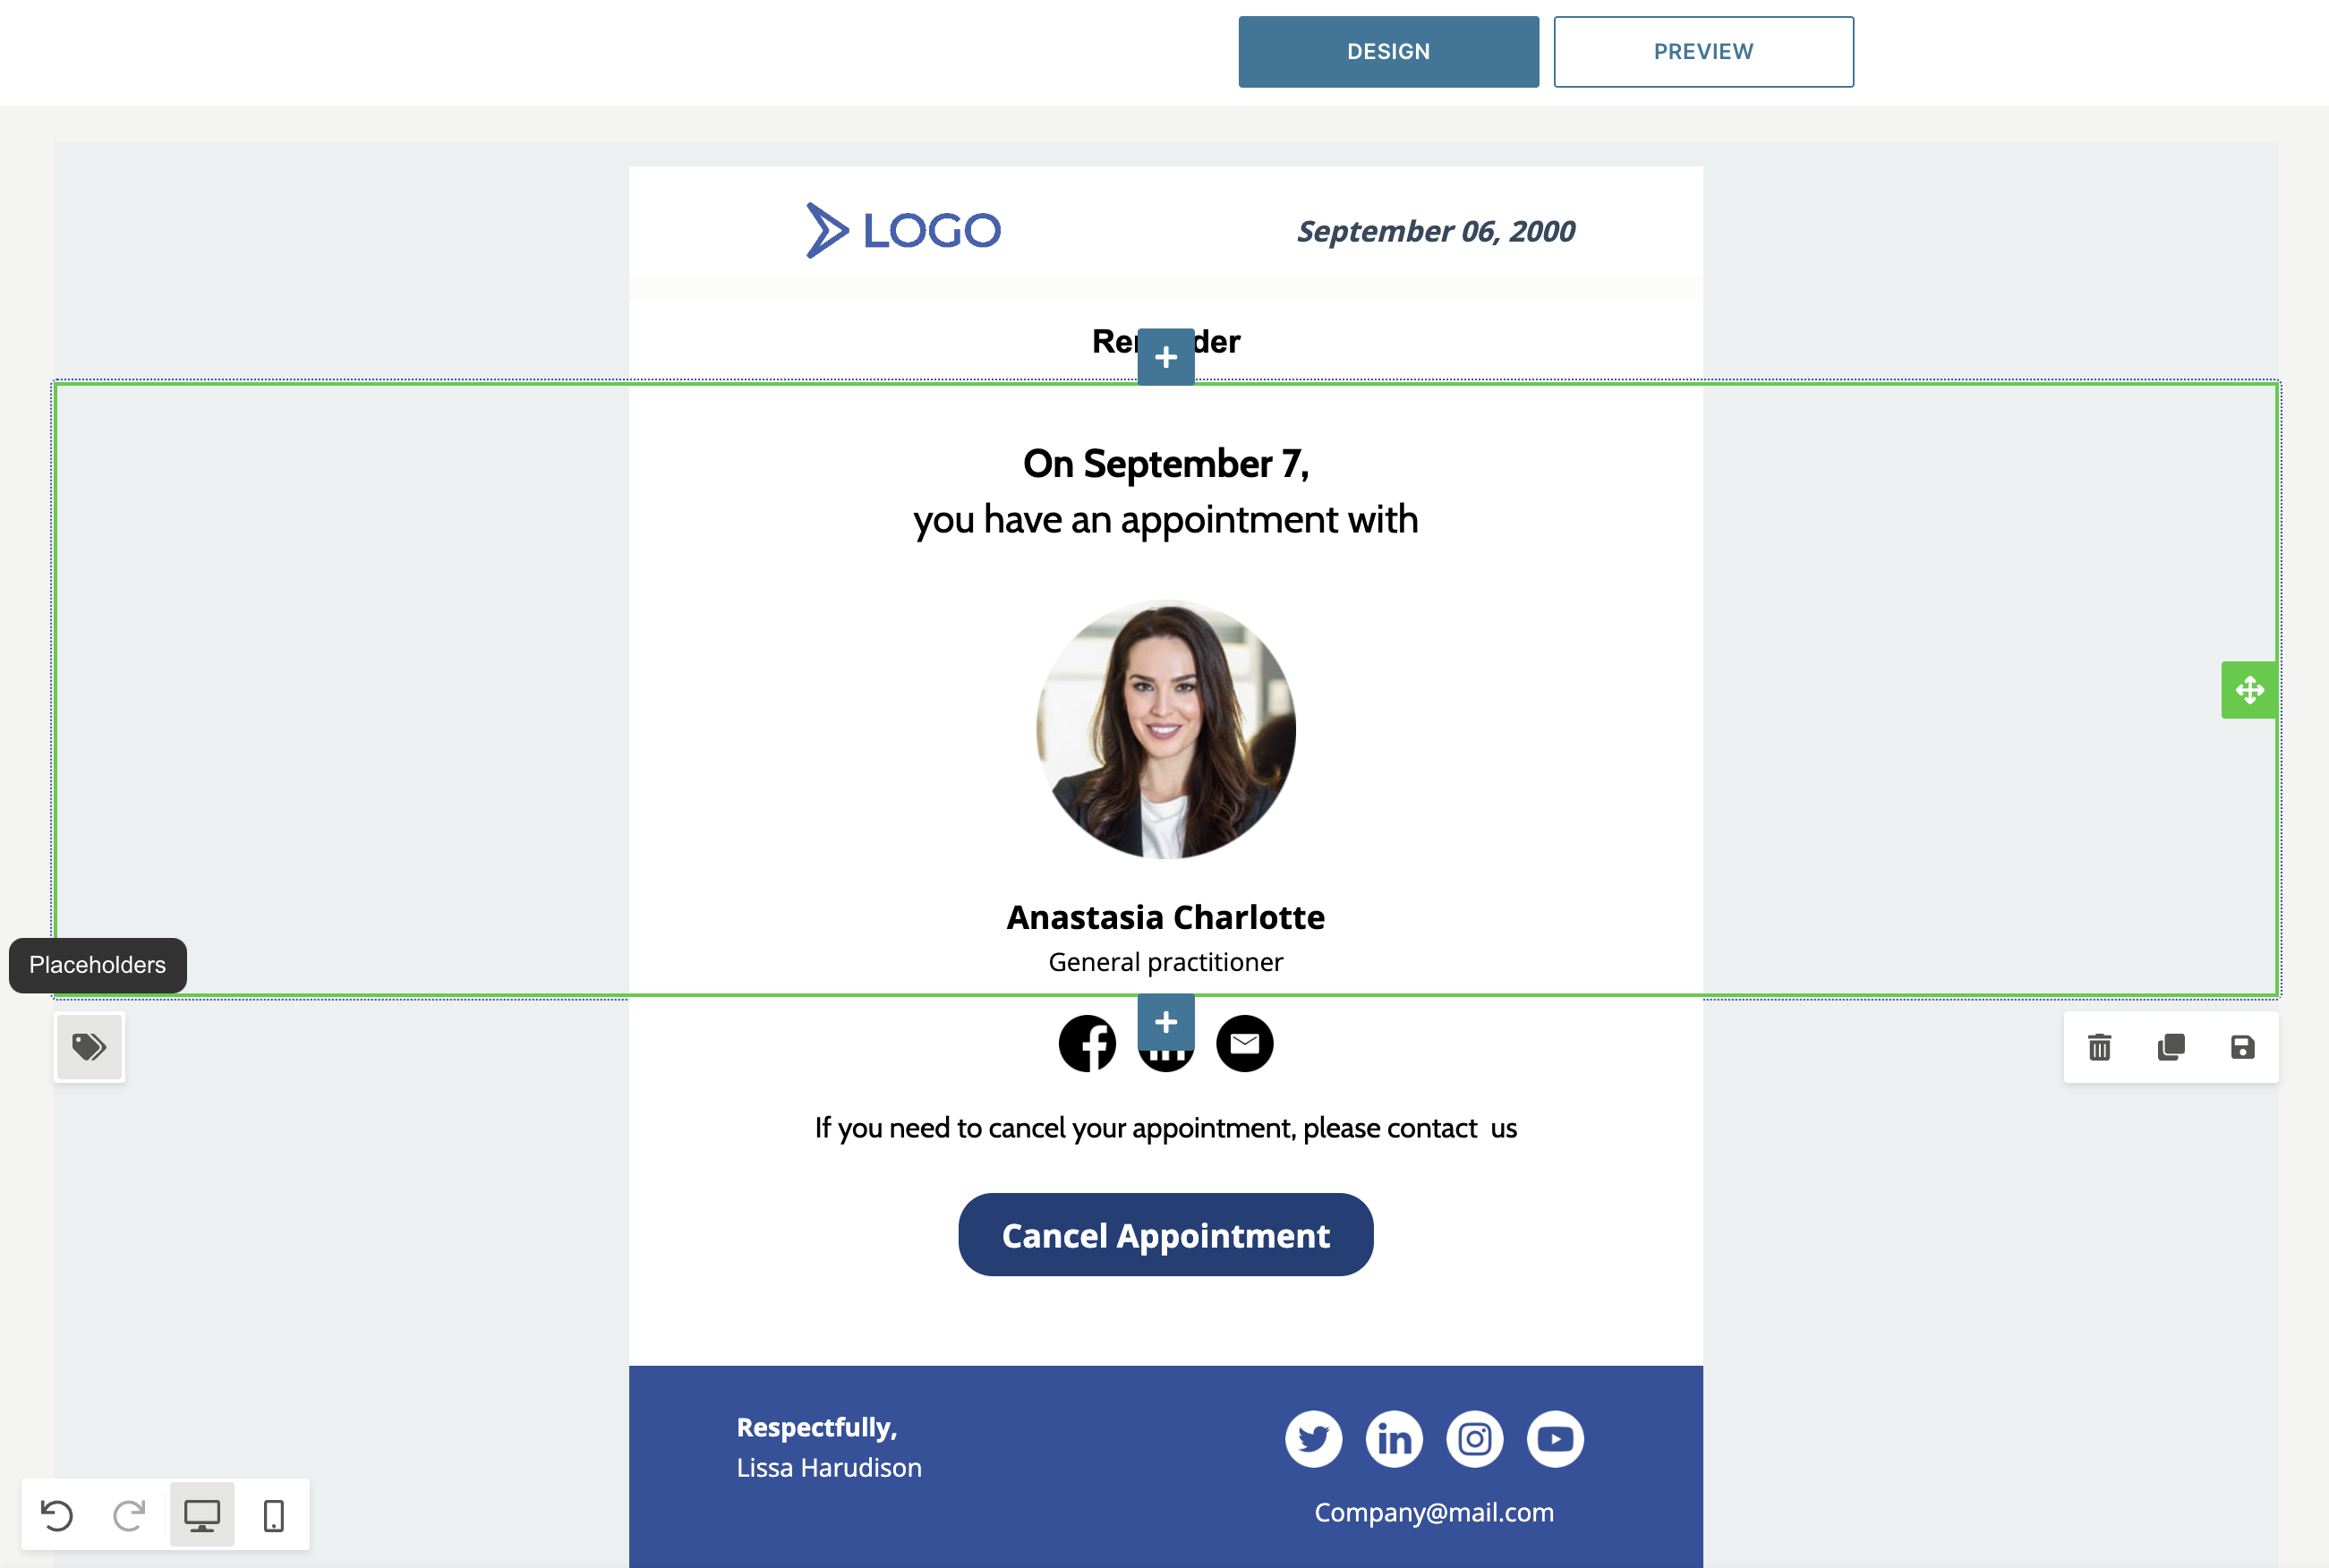
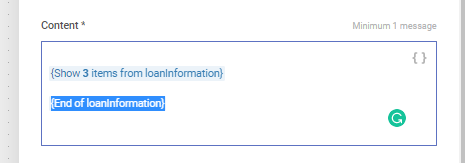
This is an example of a list in the text box and corresponding description:

Limit - Defines how many items will be shown. The limit is set to 3 by default. You can edit this number if you would like to show more items. If the recipient persona has fewer items than specified then they will see all items that they have. If the persona has more items then some items will be discarded.
Properties - All list item properties that we will display on the email are shown within {{[XXX]}}. You can remove some of the properties if you do not want to show them in the communication.
Delimiter - The default delimiter between properties is ",". This can be adapted if needed.
All items will be shown as a concatenated string of data specified above. (meaning if there is more than 1 item then it will be concatenated as the same text block with chosen delimiter).
Order of items - items will be shown in random order.
Repeat content block [#repeat-content-block-personalize-messages-using-lists]
When you create engaging layouts for your email communication, you can add data pulled directly from list attributes to the rows of your email message. This is done using placeholders.
To use lists inside of the content layout:
- Add rows to your email template (or directly to your email message) and style it as desired for your communication
- Select the row where you would like to add list attribute content.
- Click the Repeat icon in the bottom left of the row selector window.
- Select your list attribute in Repeat for. You can choose to additionally filter and sort items to be shown. Use the Maximum amount counter to limit amount of items in your message. You will see all available list properties under the Available placeholders section.
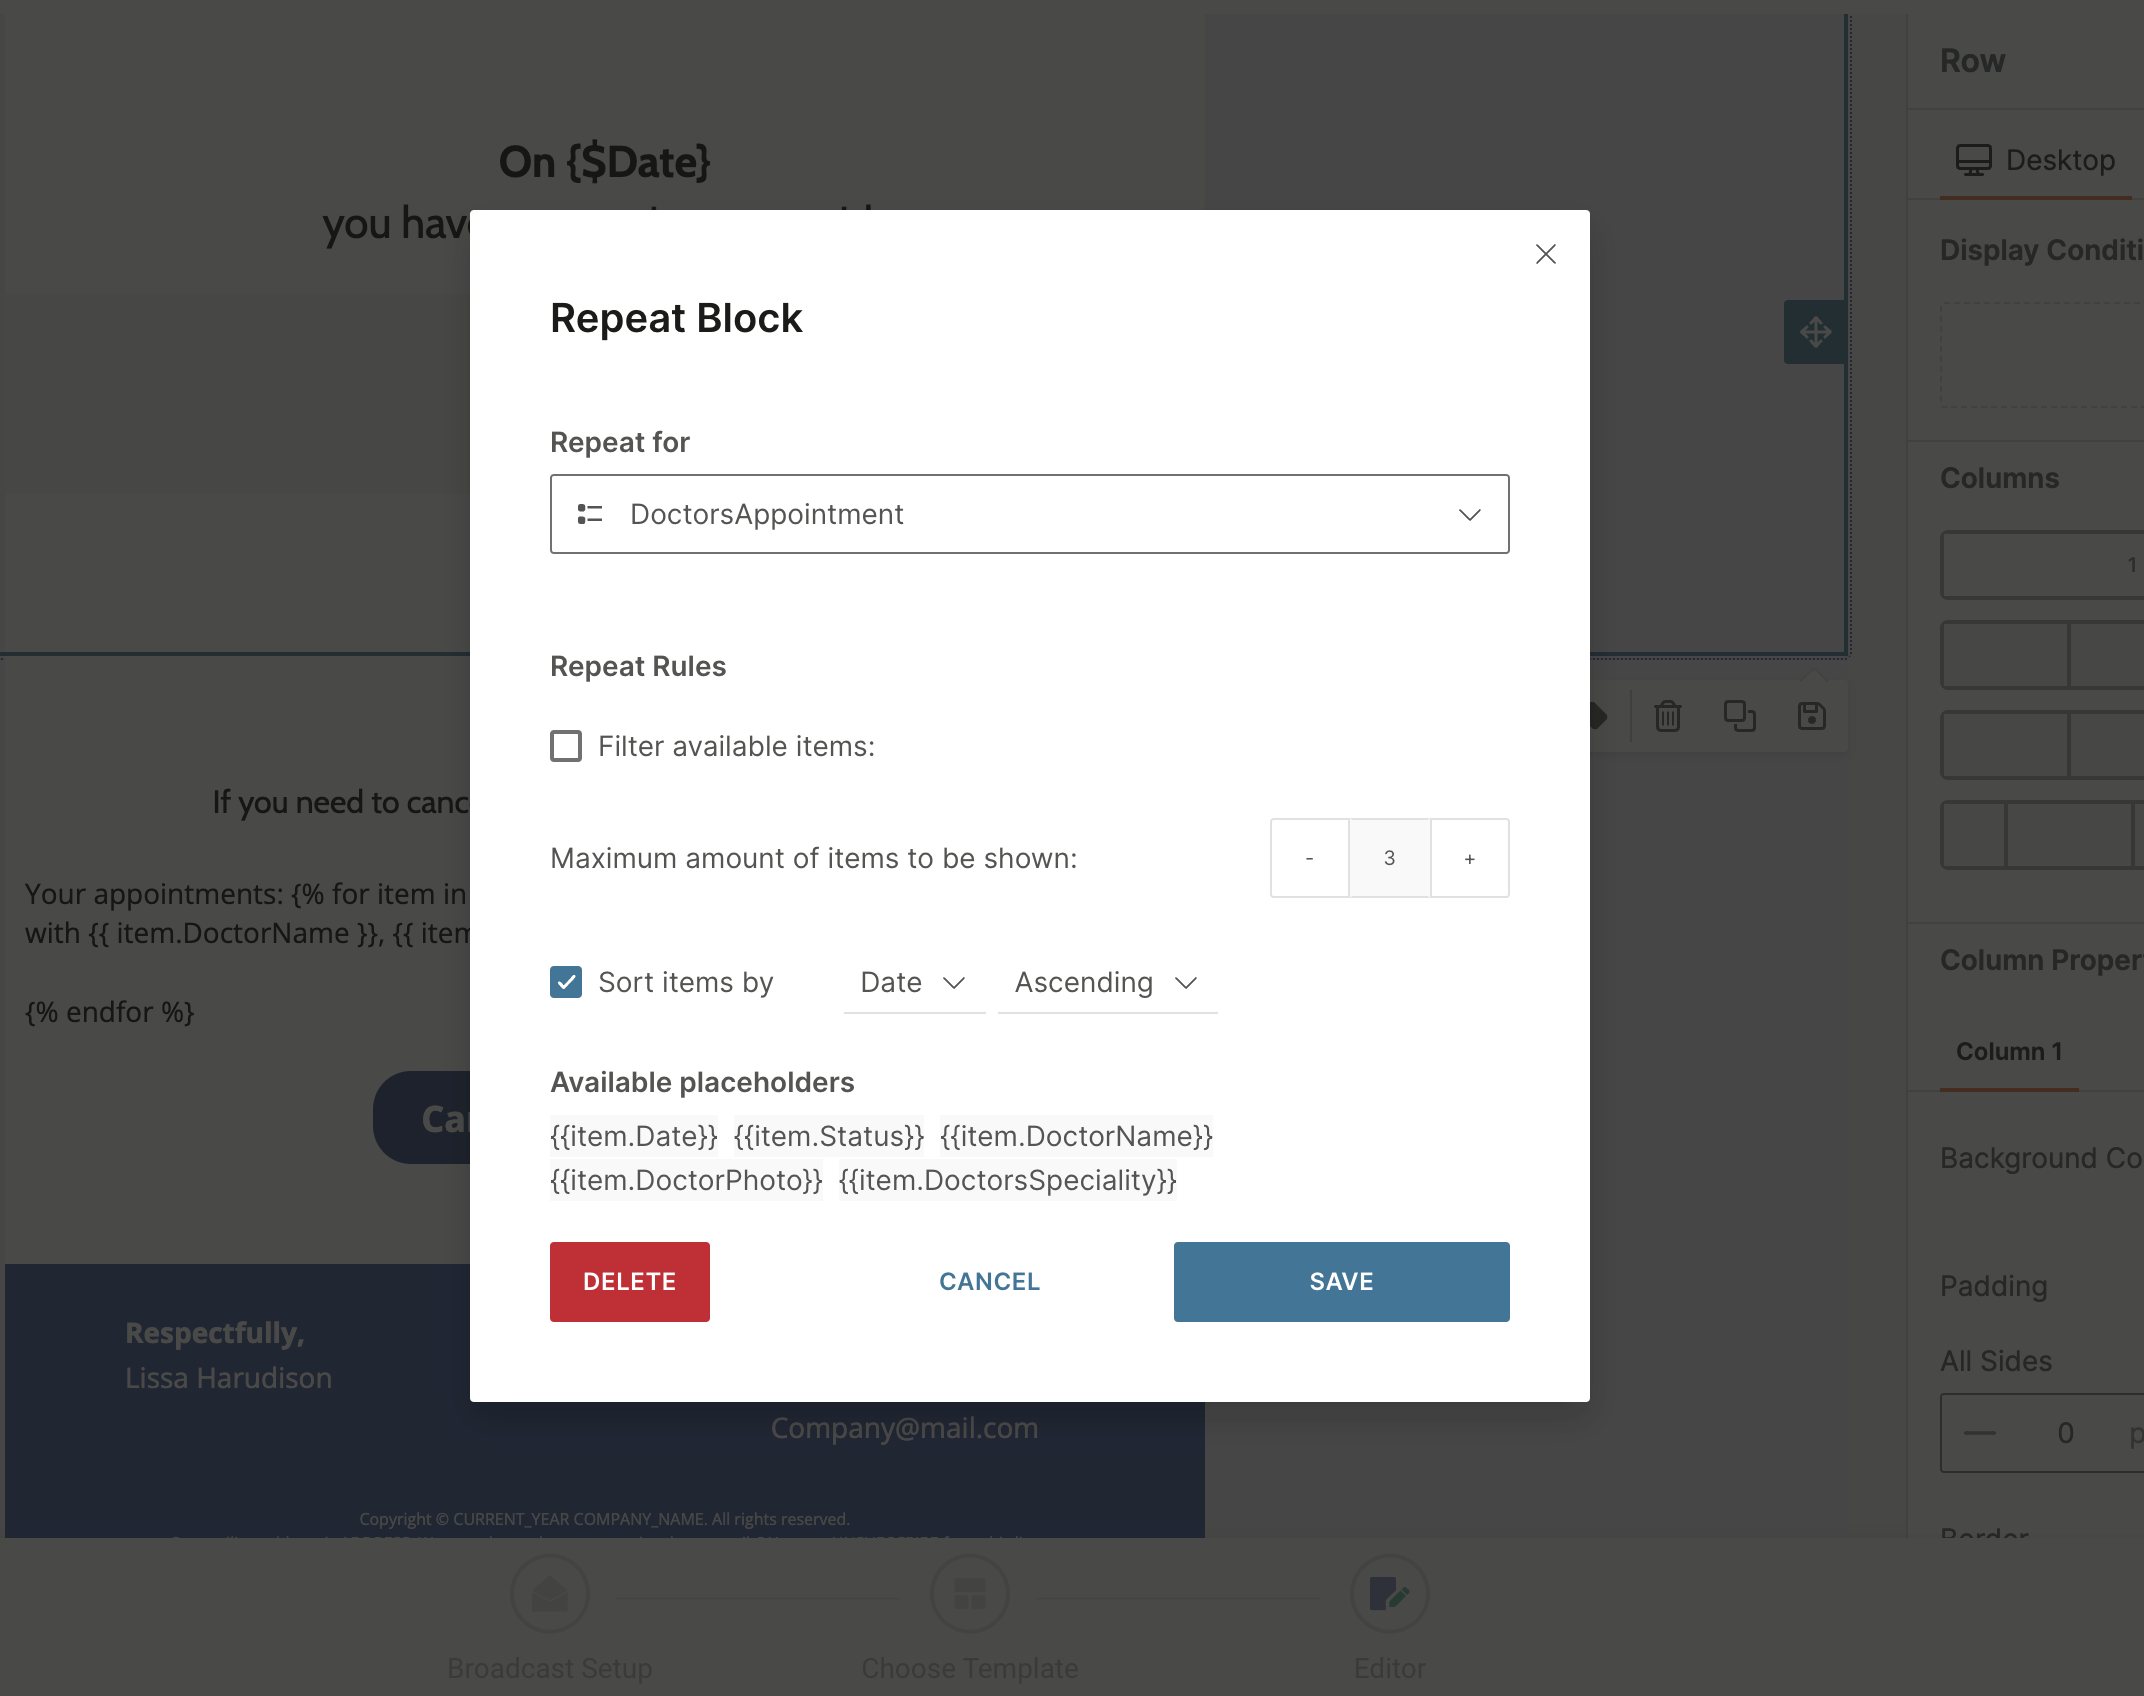
- Add placeholders (your list properties) to your content as you build your communication.
If the recipient of the email has multiple list items, then the row will be repeated for each matched item.
You can also use List Variables with Rows. Simply follow the above example and on step 4, select the list variable as a placeholder rather than a list attribute.
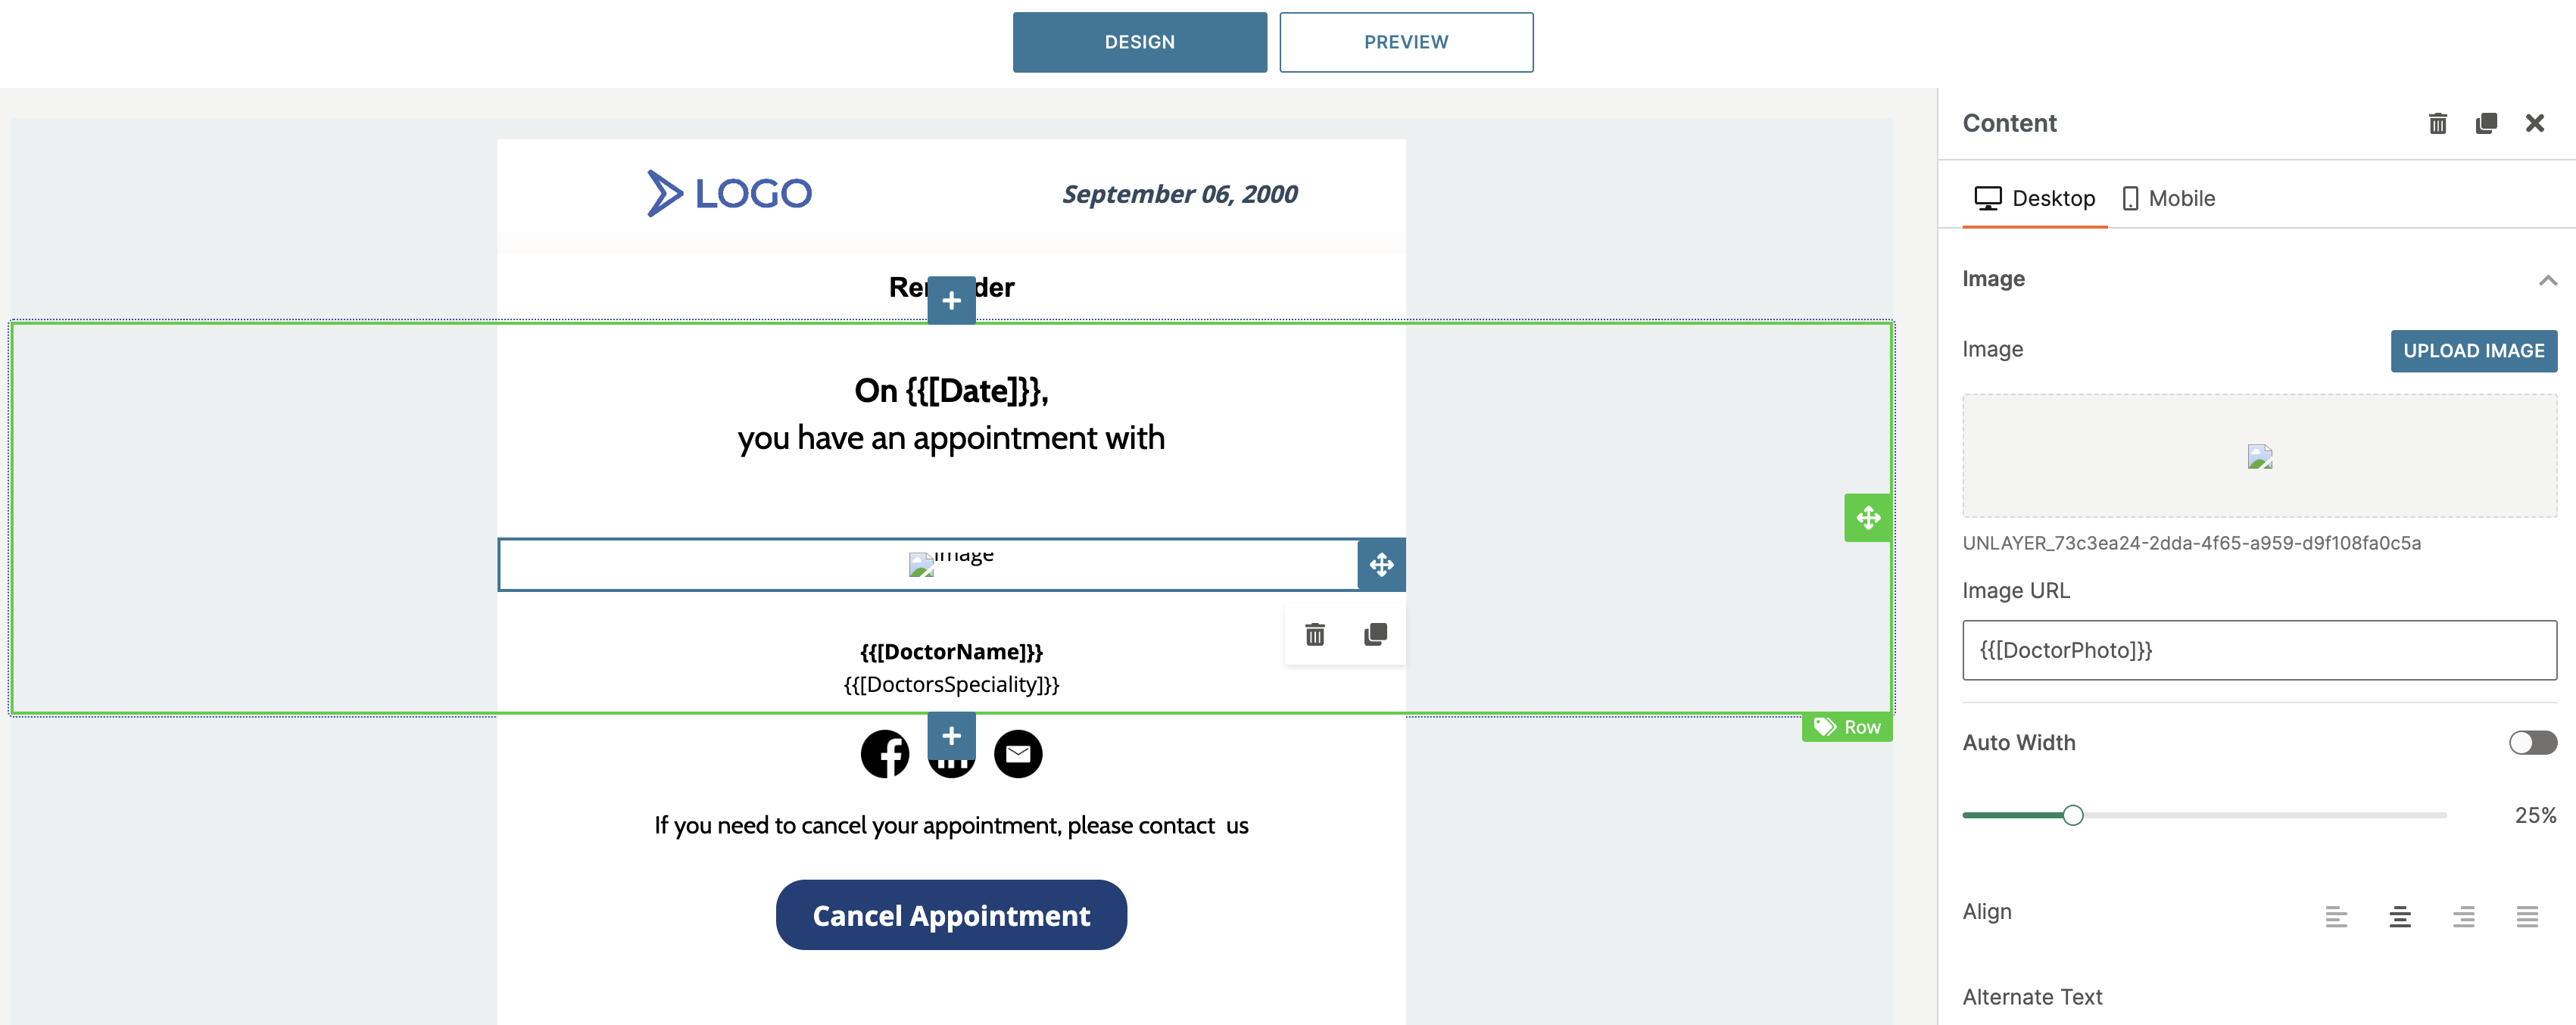
Other elements [#other-elements-personalize-messages-using-lists]
Adding list attributes to your content can be done in the same way that you add other custom attributes to your communication.
Simply, pick a list attribute in the content editor and select if you want to see the entire list or a single list property.
Once you have added the list attribute to your content, change the number in the code to adjust the number of list items displayed:
List variables [#list-variables-personalize-messages-using-lists]
For further extensibility, you can personalize your message content using List Variables. List Variables are created when you trigger a Flow with Lists.
If you want to use list variables in your communication, then select Placeholder > Flow Variables when editing your content and select the list variable you want to include in your communication. The list variables will look like this:
- Lisitem%listName% (variable created when a list is used with Date / Time trigger)
- matchedLisitem%listName% (the variable contains all items per persona that match this filter - Change in people profile trigger),
- singleListItem%listName% (this variable contains information about the exact list item that triggered the Flow - Change in people profile trigger)
Head over to Flow Variables to learn more about using variables in your flow.