Manage Flow
The Flow tool is our visual communication builder that helps you reach the right audience at just the right time and using the right channel.
How do you do that?
By adding the behavior-based audience segments in Flow and designing a communication triggered by events such as purchases and user registration or the way customers interact with your messages. Choose the channels they prefer, but also combine different channels to make sure your message reaches them. You can go for email or SMS messages, talk to them via WhatsApp or Viber, or answer their calls in IVR. All is possible in Flow!
On this page, we explore the basics involved in managing such communication:
• Building a flow
• Editing
• Duplicating
• Deleting
• Settings
• Performance
Create
The following is a quick guide that shows what are the options for starting a flow, what templates or individual flow elements (for example, channels like SMS, Email, Viber, WhatsApp, and others.) you can use, and how to launch the communication.
Start from Scratch [#start-from-scratch-create]
To create a new flow, do the following.
- On the On the Infobip web interface, go to Moments > Flows.
- Select Create flow.
- Select Start from Scratch.
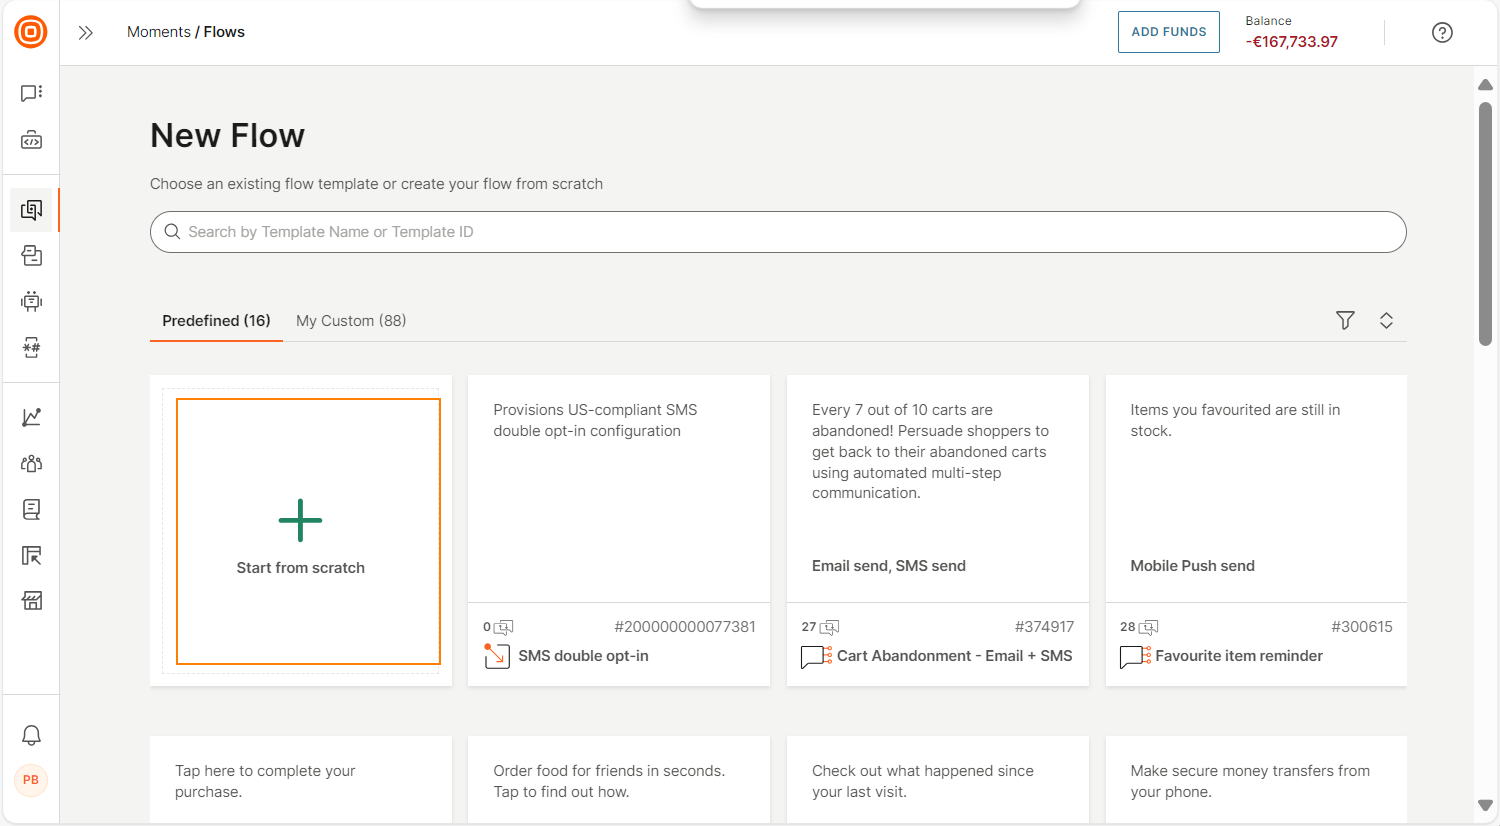
Start from Scratch takes you to the page where you need to decide which starting point to use for your correspondence.
Use a Template [#use-a-template-create]
The flows you create can be saved as custom templates for future use. But, you can also turn to the predefined ones if they fit your needs. For example, you might want to use the existing templates to send a welcome message, appointment reminder, cart abandonment reminder, and more.
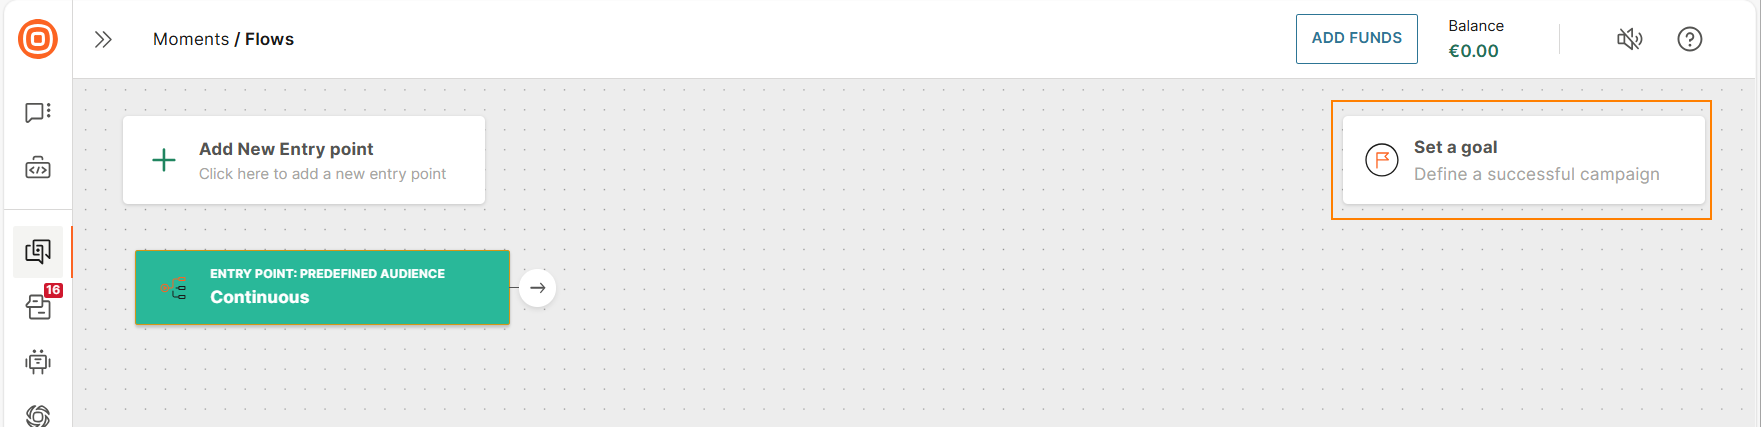
Build [#build-create]
Complete the initial steps that we have already described, and you will land on a page where you can select a communication starter: entry point. Read instructions for each of them and select the one that best serves your planned communication.
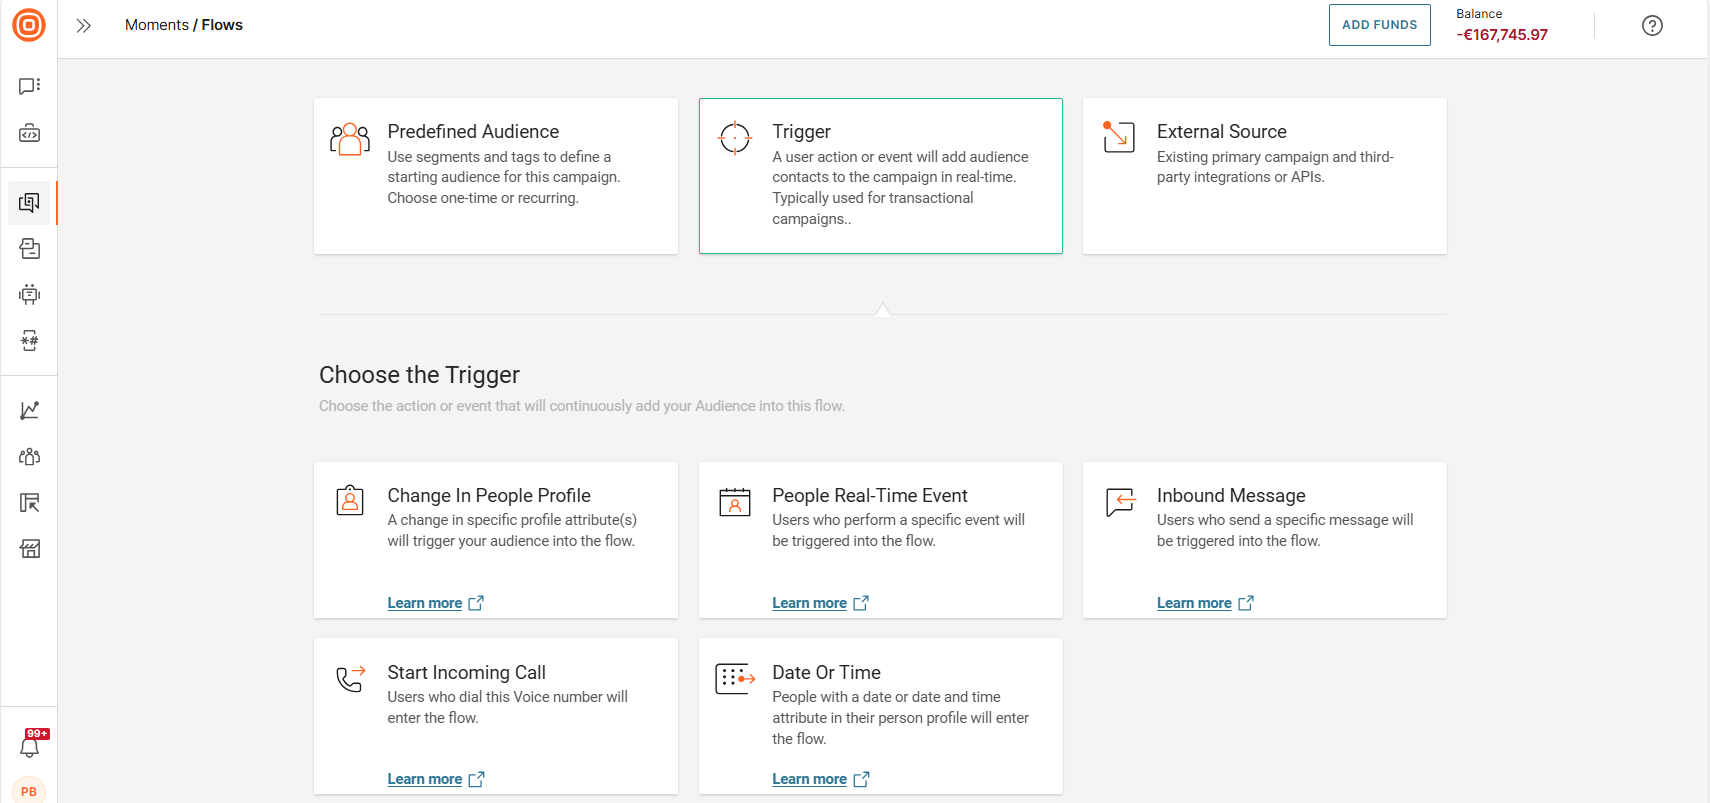
The selected entry point will take you straight to the Flow canvas.
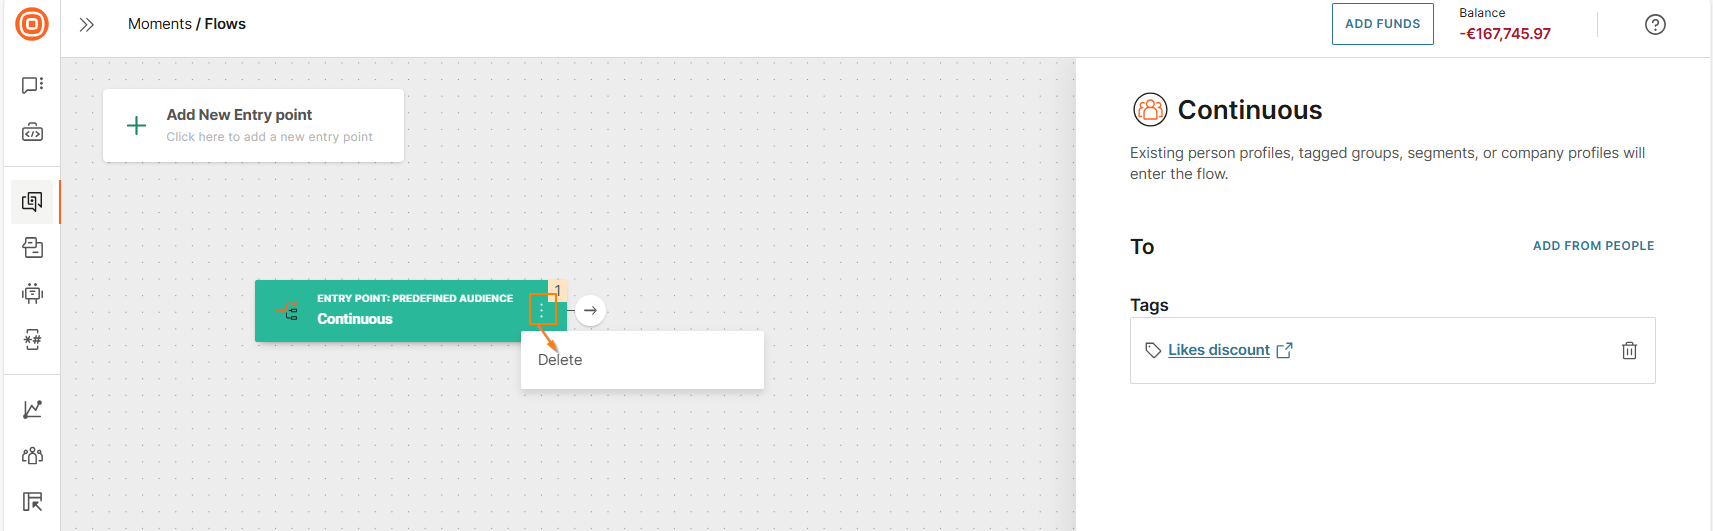
If you change your mind, delete it right there and add a new entry point. Each one of them comes with a set of accompanying features visible in the side panel that will help prompt your communication in the right direction.
Remember to give a name to your communication. Next, you could add a channel to send a message to customers.
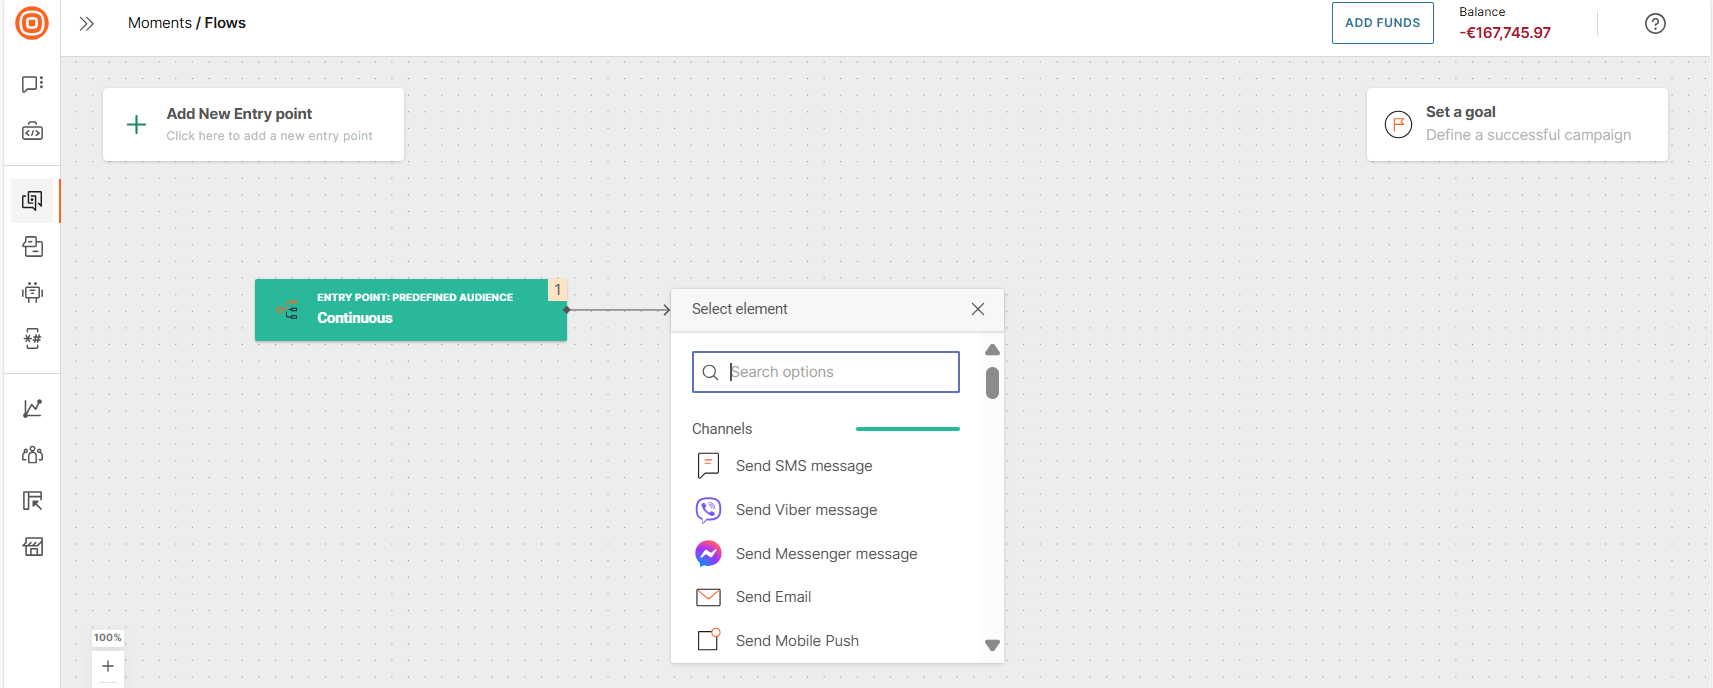
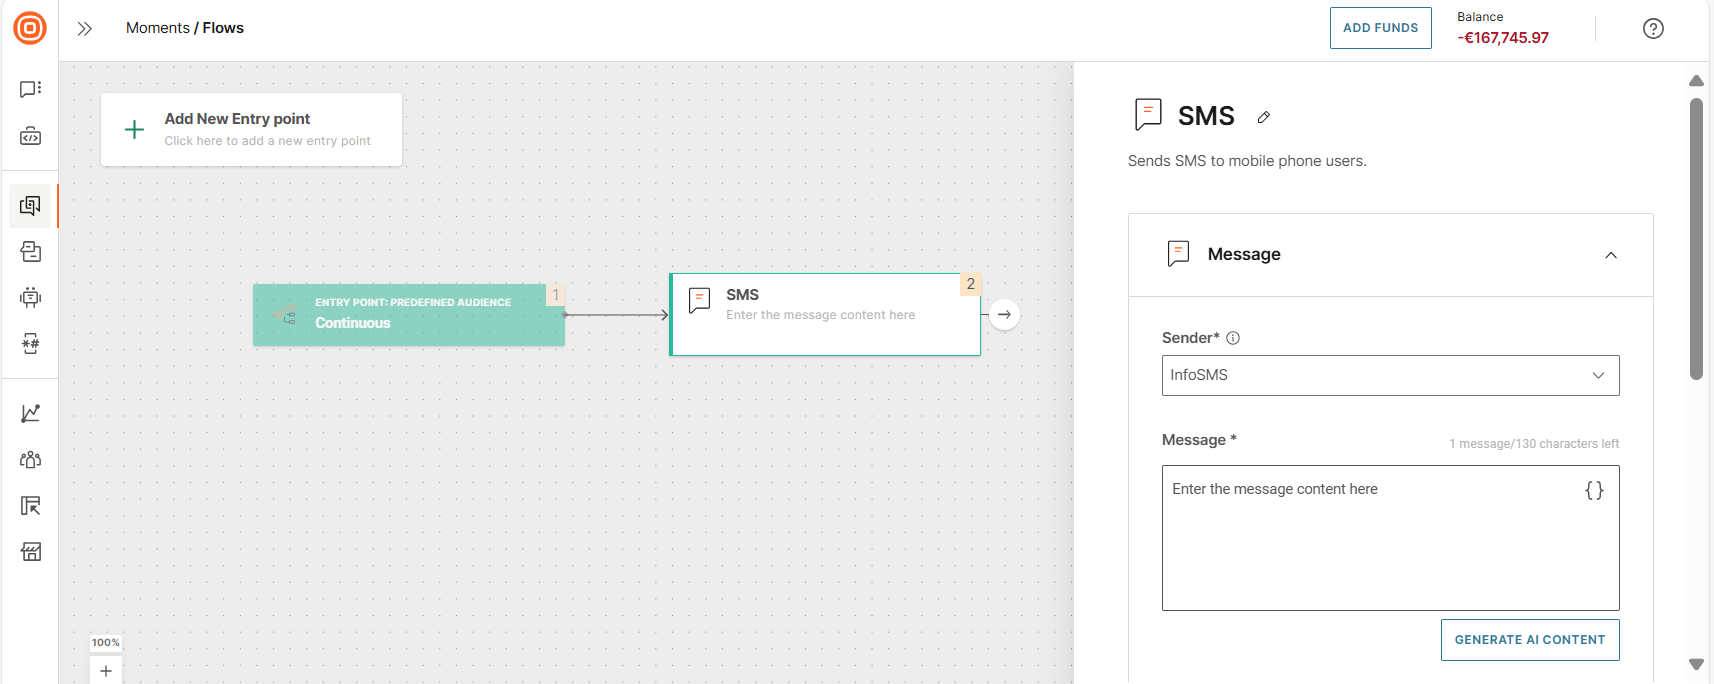
Say you would like to use SMS:
- Click the three-dot menu to add it to the flow.
- Give the SMS element a name: This action is important when you are planning to track how customers react to your message. Then, later on in the flow, you could send another message to the recipients by referring to this specific SMS. Or, you could even add it to an entirely new flow or flow version. Renaming is available for all channel elements available in Moments and for the failover element.
- Enter the sender and content.
- Scroll down to check out other options, such as scheduling your messages.
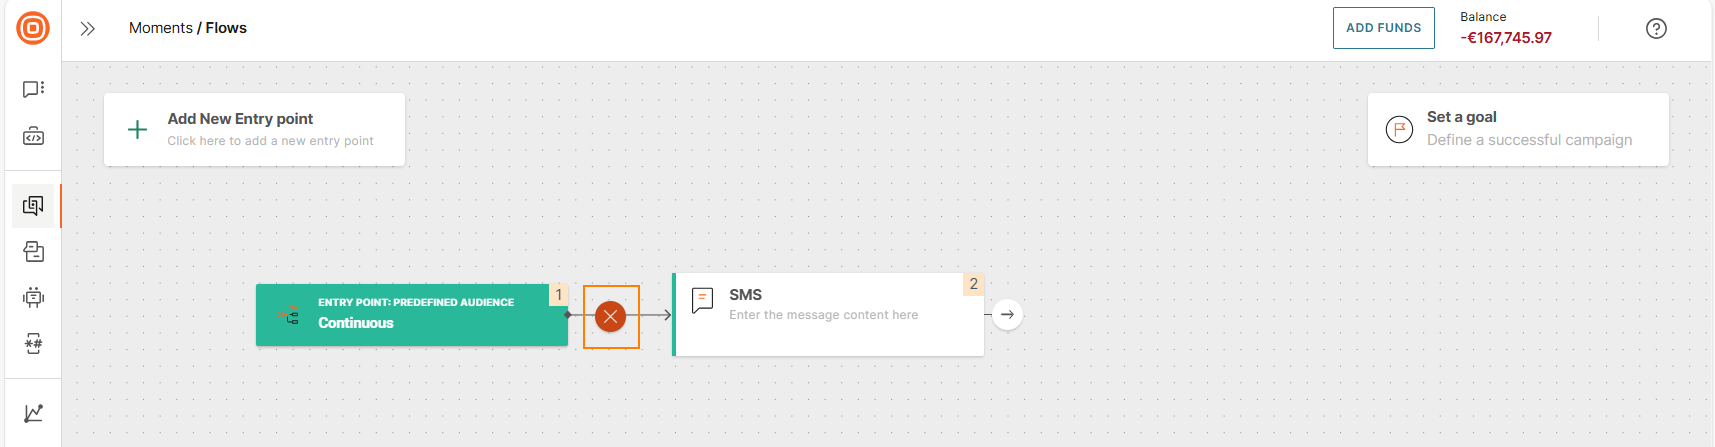
The channel you just added can be unselected if you want to use some other element: First, click the arrow and then the red dot that will appear.
Use different combinations of channel elements, functions, and IVR actions to organize perfect communication.
Additional Options
Find settings at the bottom of the Flow and think which ones would be applicable to your use case:
- How many times one person can enter one flow
- Communication goals that will be tracked and analyzed
- Setting the time zone and sending time
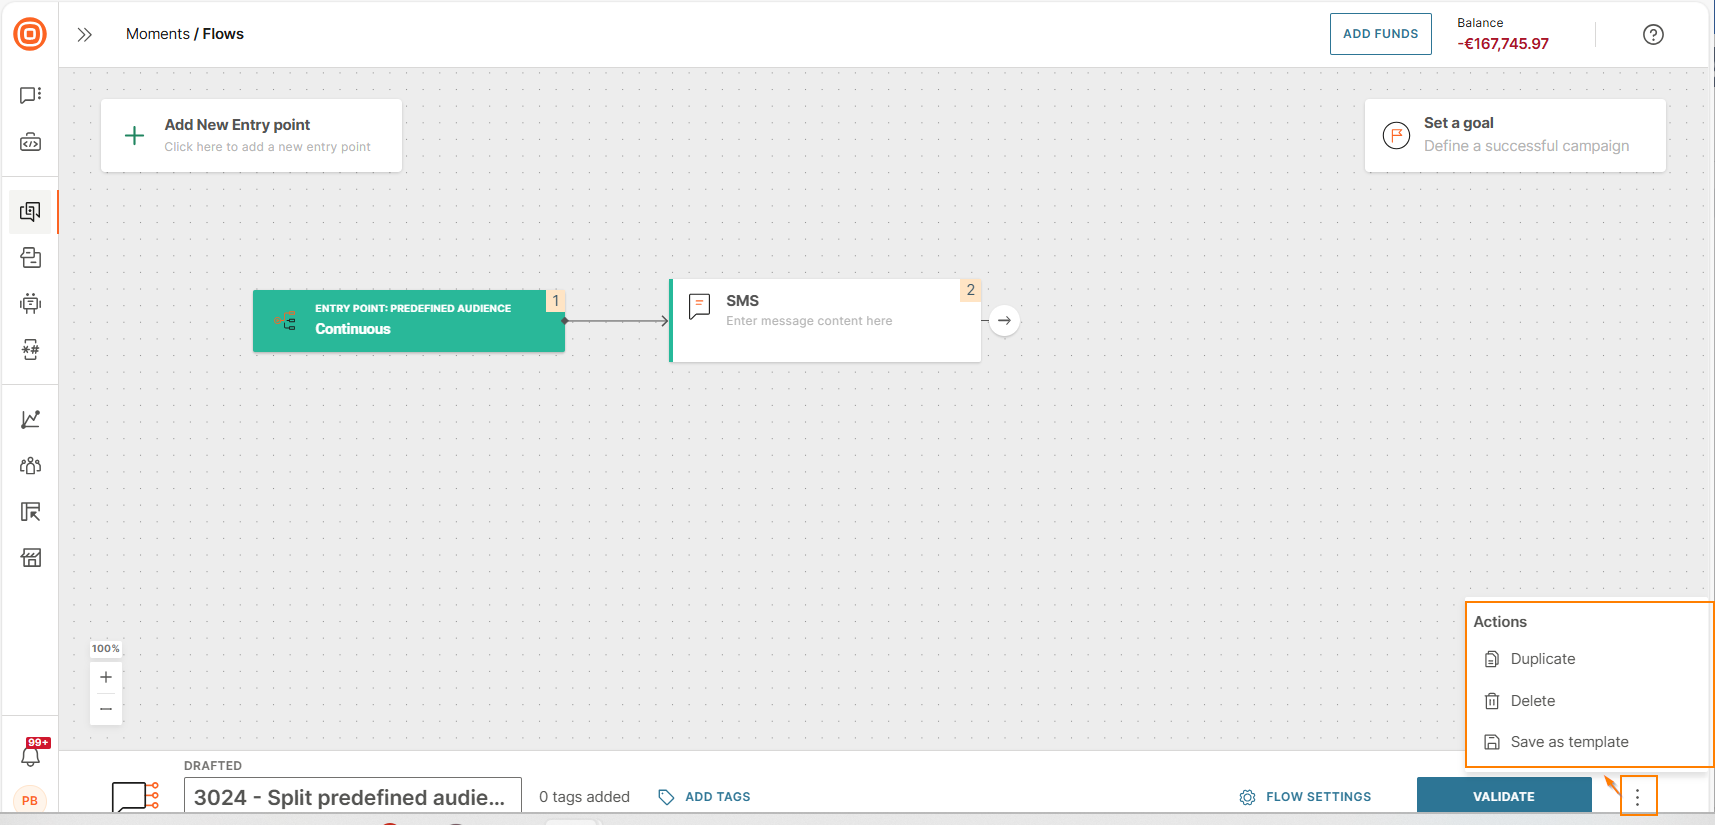
In addition, use the three dots menu if you want to do any of the following: save this specific communication for future use and make it available on the templates page, duplicate the flow, or delete it if you believe you won`t need it anymore.
Before adding a customized event, you need to set it up in People.
Validate [#validate-create]
If something is missing, such as required information inside the channel elements (subject, sender, etc.), the name of the flow, or any conditions (events, attributes, keywords, or similar) and their values, a notification will appear alerting you about what needs to be done.
The exit element will be automatically added to the final flow for each of your branches; you don`t have to add it manually.
Launch [#launch-create]
After you have validated the flow and made any corrections, a lift-off page is displayed. On this page, you can check if everything is ready to launch the flow.
The image in this section is an example of what you can see on this page. You can see the following information.
- Who will enter this flow. In this example, it is the people who added items to their cart.
- What to do if you do not want your customers to enter this flow more than once
- Footer options and how to change them
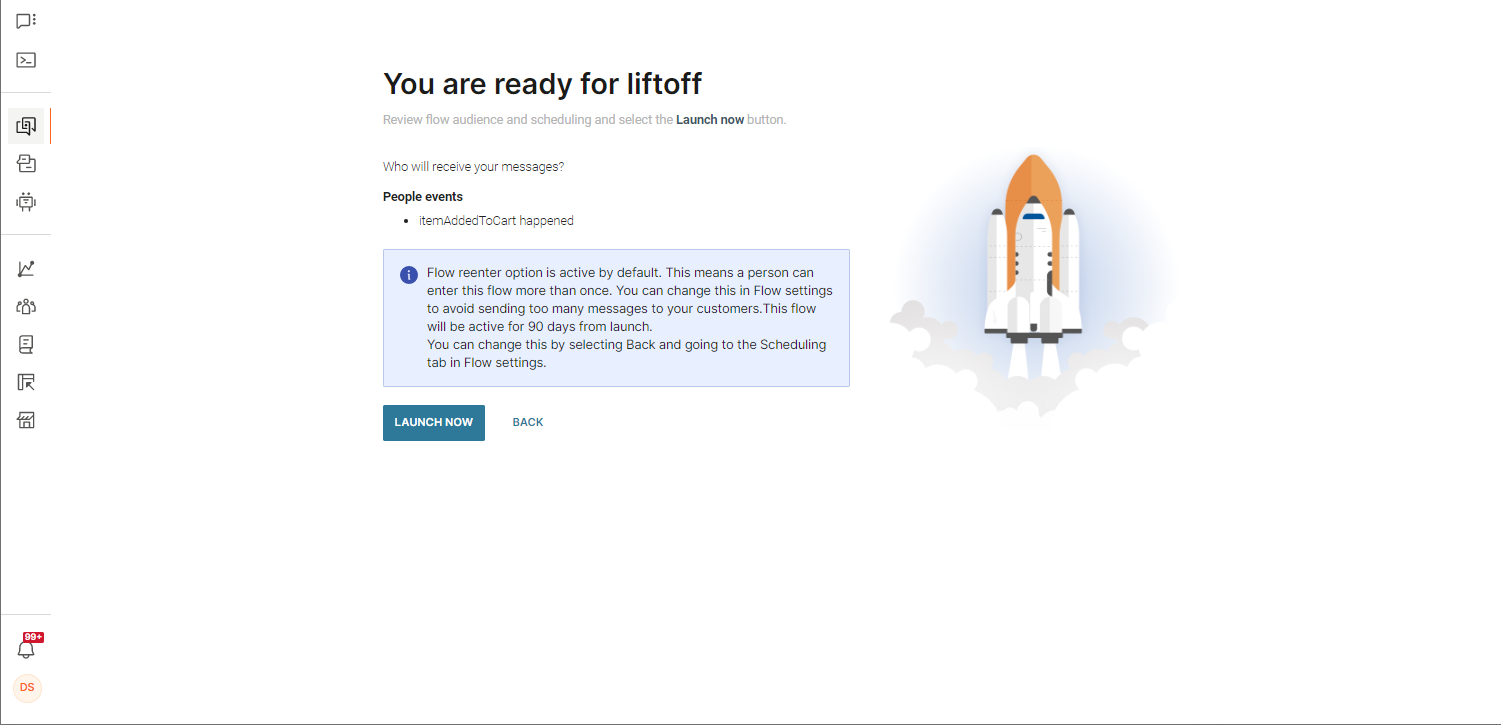
Launch the communication immediately
If you have no further changes to make and want to launch the communication immediately, select Launch now.
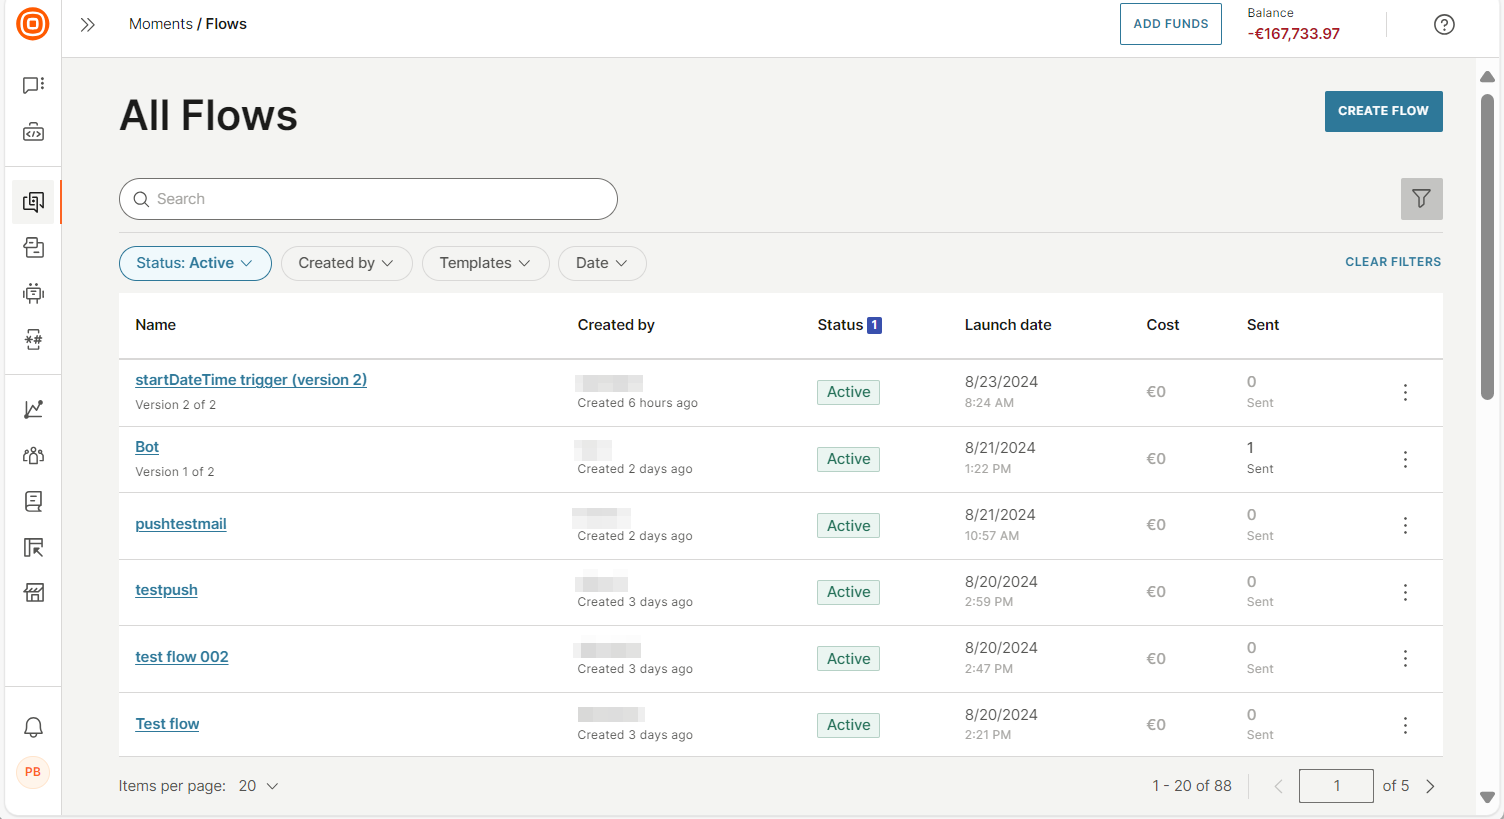
You will be taken back to the All flows page.
The flow that you launched has an Active status. Select the flow name if you want to view the flow.
Launch the communication later
If you do not want to activate the communication immediately, you can configure the launch date. Do the following.
- Exit the Launch page. Do not select Launch now.
- Use the Schedule flow start field in the Scheduling section to set up the time and date for the flow to launch.
The flow now has a Scheduled status.
Add or remove audience in an active flow
You can add or remove audience in an active flow in the following ways:
- From the profiles section in People.
- When importing profiles in People.
- Update an existing active flow using the Flow editor in Moments and save the changes in the same version.
Guidelines [#guidelines-add-remove-audience]
The following guidelines apply.
- You can add or remove profiles only for the Continuous entry point.
- Before profiles are added to the flow, it checks the Frequency cap (reenter) settings. If a profile that was already in the flow is added again, the reenter settings apply to the profile.
Example: A profile is part of both Segment_A and Segment_B. The profile was already in the flow because the flow includes Segment_A. Now, Segment_B is also added to the flow.- If reenter is disabled: The profile does not enter the flow for a second time.
- If reenter is enabled: The profile enters the flow for a second time.
- When you add audience by using the Flow editor in Moments, the profiles enter the flow immediately after you save the changes.
- When you add audience through People, the profiles are added to the flow without the need to save these changes in the flow.
- If you remove a tag or segment from the flow, any profiles associated with this tag or segment that are already in the flow are not affected and will complete the flow.
Add audience by using the flow editor [#add-audience-using-the-flow-editor-add-or-remove-audience-in-an-active-flow]
-
On the Infobip Infobip web interface, go to Moments > Flows.
-
Do one of the following.
-
In the All flows list, select the three dots next to the flow that you want to update and select Add audience to flow.
-
Open the flow that you want to update and go to the Continuous element.

-
-
Add the audience in the Continuous element.
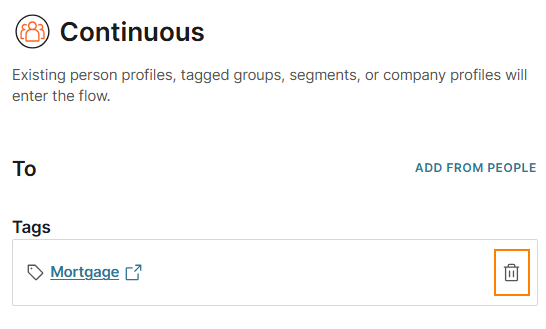
Remove audience by using the flow editor [#remove-audience-using-the-flow-editor-add-or-remove-audience-in-an-active-flow]
- On the Infobip web interface, go to Moments > Flows.
- Open the flow that you want to update and go to the Continuous element.
- Select the Delete icon next to a specific audience to remove it from the flow.
Edit an active flow
To edit an active flow, you can do one of the following:
- Edit an existing flow version: Use this option if you want to continue the current flow but want to change its goal or schedule, or update the audience.
- Create a new flow version: Use this option if you want to add or remove elements, reorder elements, or edit the settings of elements.
Edit an existing flow version [#edit-an-existing-flow-version-edit-an-active-flow]
You can update the following.
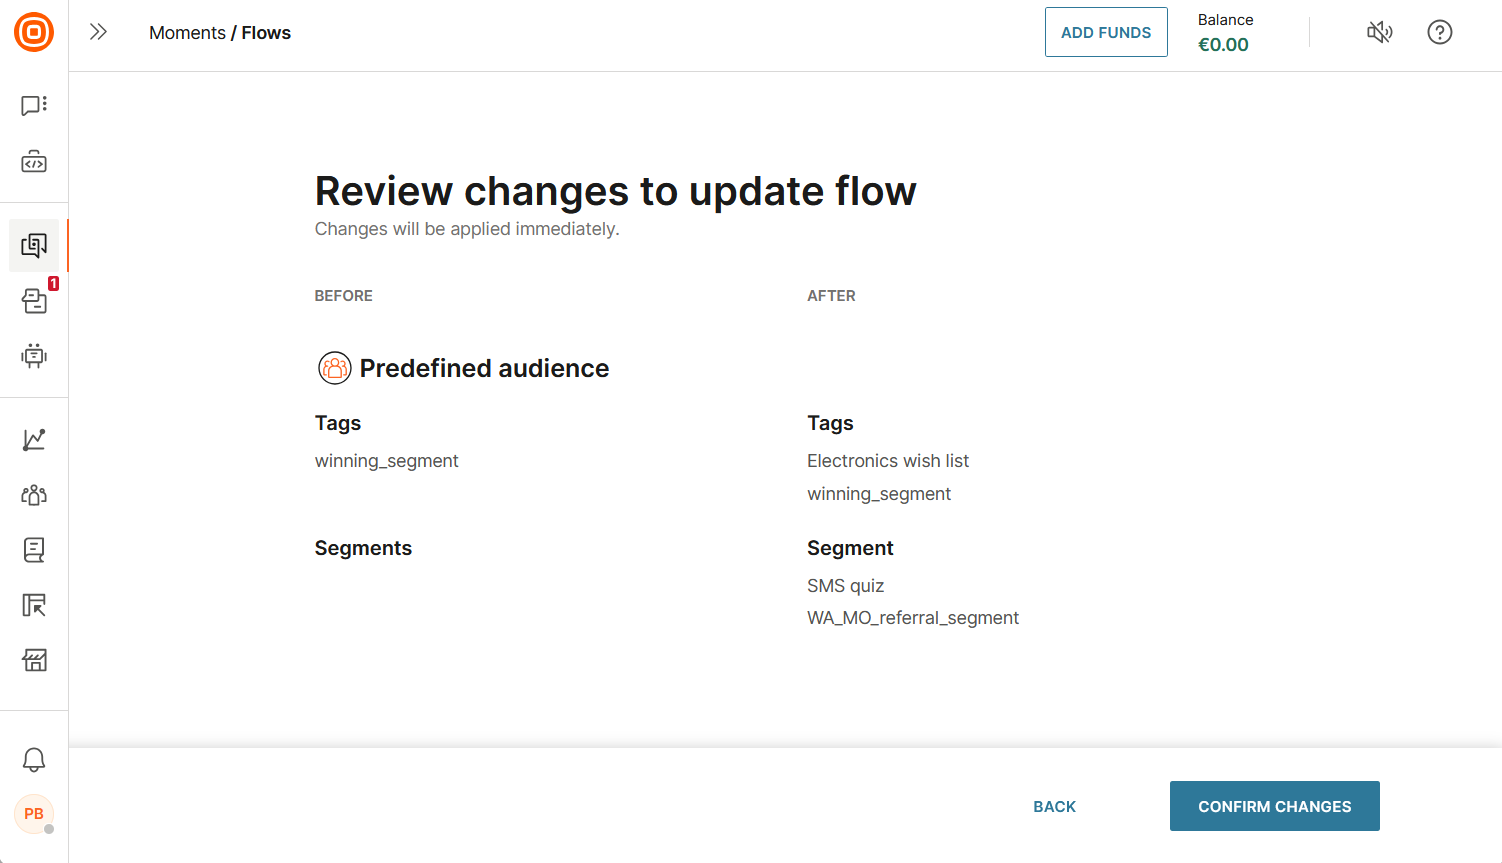
To modify the flow, do the following.
- Open the flow in the flow editor.
- Make the required changes.
- Select Save changes.
- On the review screen, make sure that the changes are as required.
- Select Confirm changes.
Any updated settings are applied to the flow. Any newly added profiles enter the flow immediately in real time.
Create a new flow version [#create-a-new-flow-version-edit-an-active-flow]
After the flow has been launched, you might want to adjust the message content that you are sending to your users, add one more communication block, or even change the goal of the entire communication. To allow for all this, we have Flow versions.
Versions are helpful in the following situations:
- If you need to make a minor change to the running flow. Example: A spelling error in the message.
To update a message that was created in the Messages section of the web interface, refer to the Messages documentation. - If you want to make a minor change that will apply to all the new person profiles that will enter the communication flow.
When you are ready to change the running flow, click Edit Flow > Create New Version.
You can create only one draft version of a flow.
If the flow uses the One-Time entry point, you cannot create a new flow version. However, you can duplicate the flow.
You can create a new flow version if the flow uses other entry points.
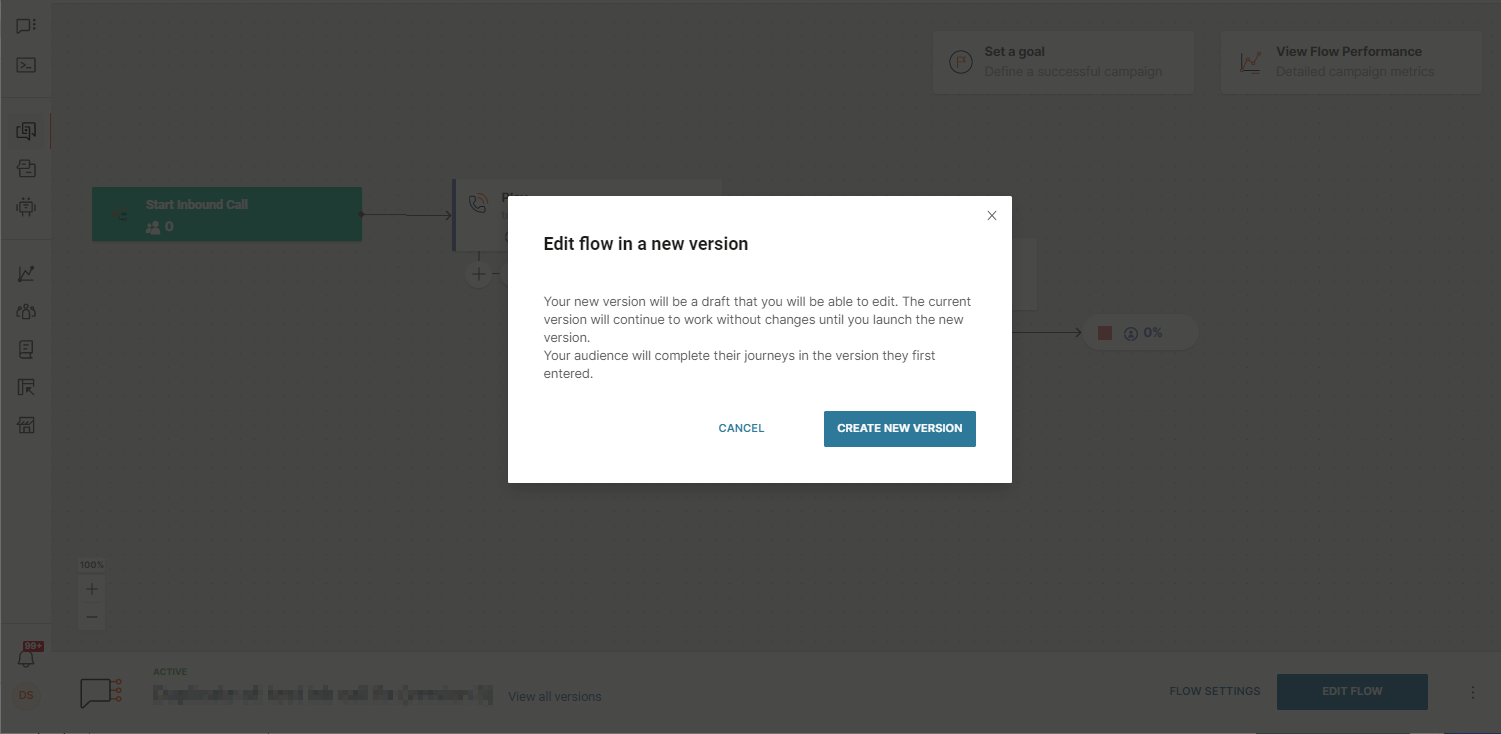
The changes to the Flow will not be applied until you Validate and Launch the new version. The new version will show as a draft, and the old one will be active.
And you don`t have to worry, the old one will keep running until there are no people inside it. It will appear on the flow list as a communication with the finishing status, and that means that there are still some customers inside it. They will complete their customer journey without interruptions.
If you modified the scheduling options in the new version – changed dates or set up flow as indefinite – these will be applied to all versions.
Meanwhile, the new persons who match all the conditions for entering your communication will become part of the new flow as soon as it has been launched.
The flow entry point that you used to start the original communication will remain. If you try to remove it, you will get a message stating that it cannot be deleted.
Go ahead, update the new version of the flow with desired changes, and then Validate and Launch it.
Manage Versions [#manage-versions-edit-an-active-flow]
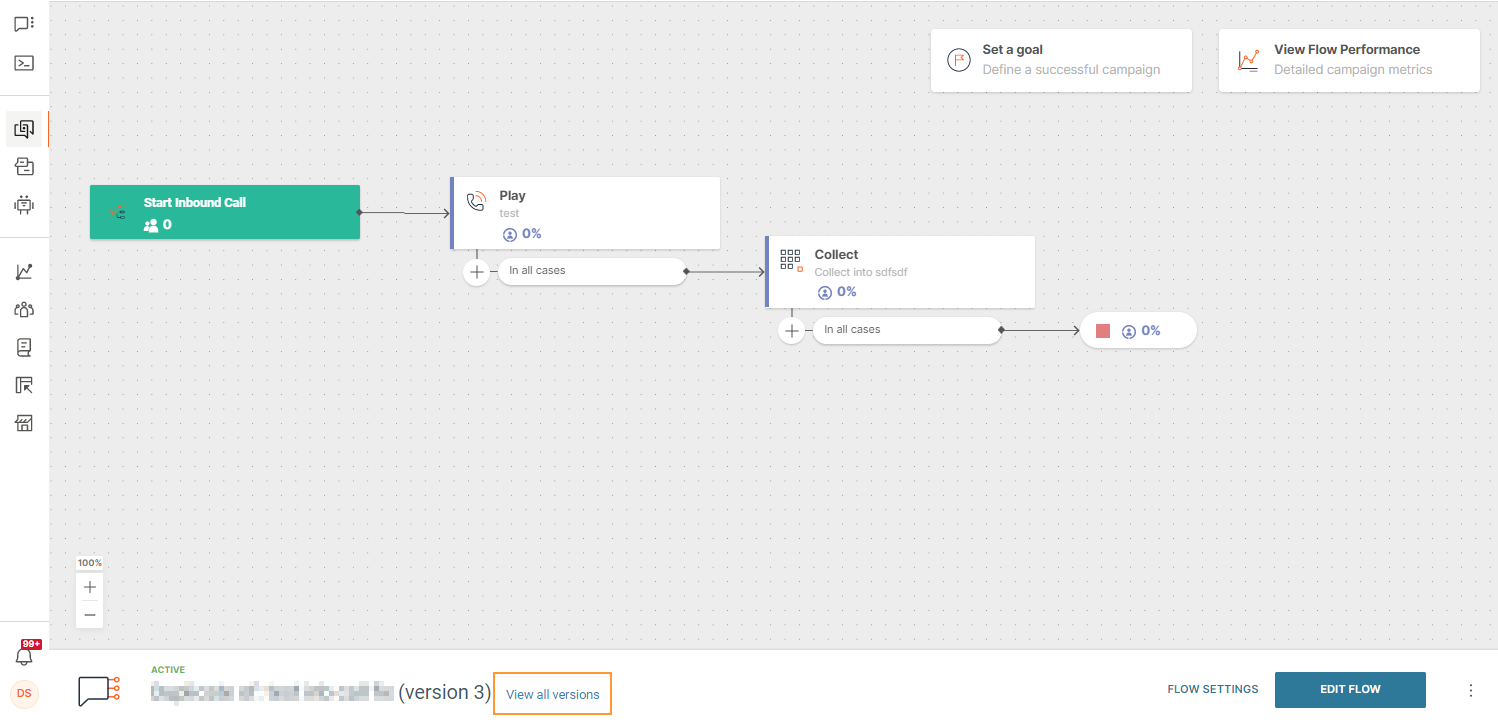
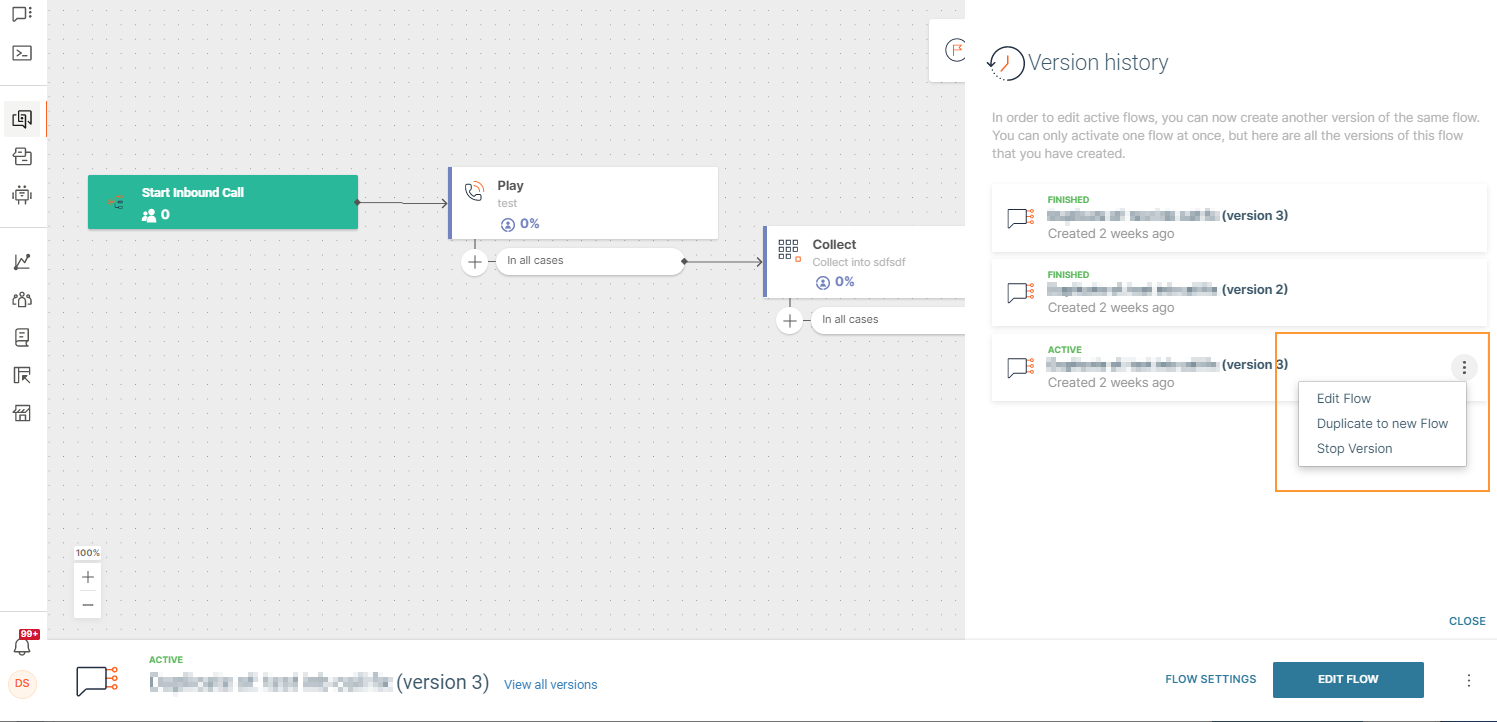
Sometimes you need to take a look at information about different versions, and you can do that inside any active flow version by clicking View all versions.
The history side panel will appear with an overview of the versions you have. You can see which one is still active, coming to an end, or completed. There is also information about when was each version created.
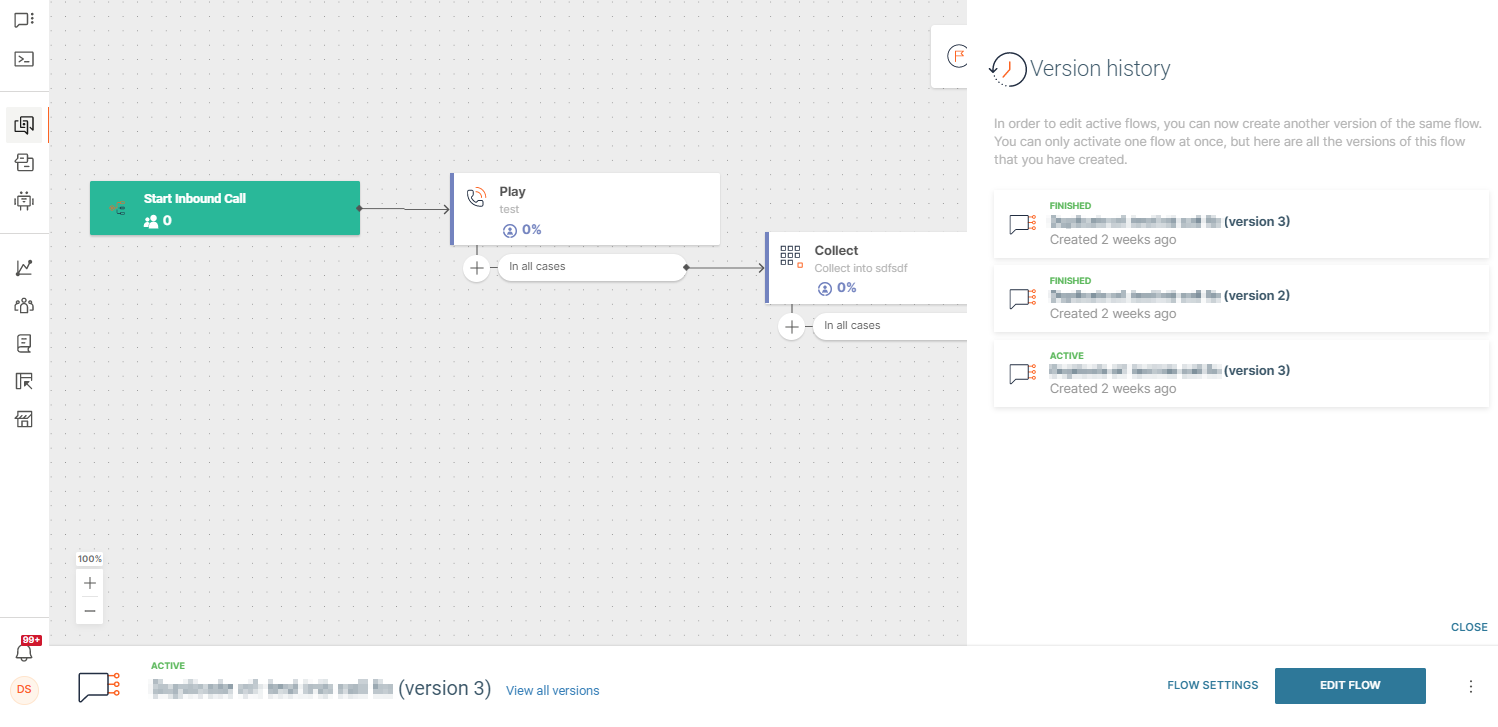
The three dots menu on each card allows you to do the following:
- Edit the entire flow through this version
- Duplicate it to create a new draft flow based on this version
- Stop an active version
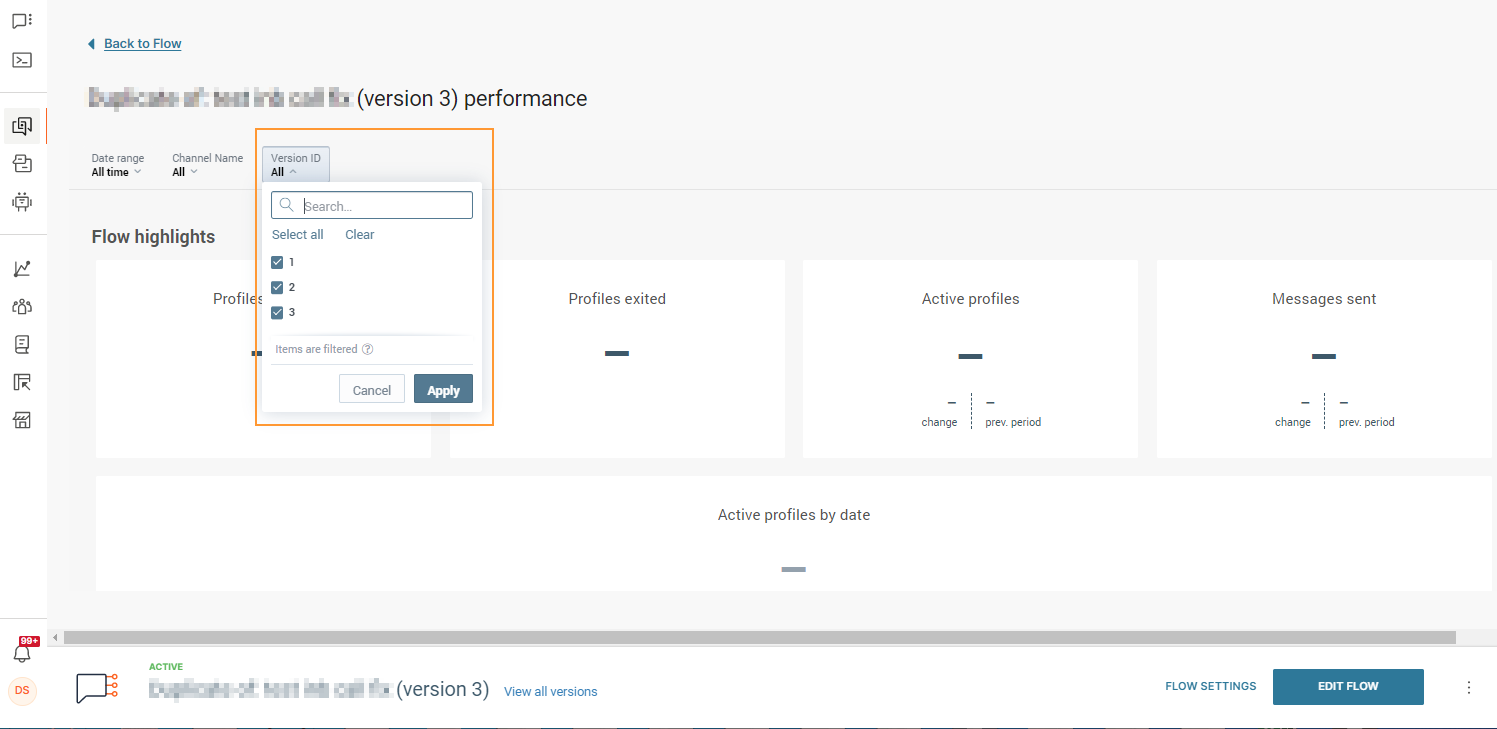
Version Performance [#version-performance-edit-an-active-flow]
To check out how different versions are performing and organize your communication accordingly, switch between them.
- Open any active flow version.
- Click Flow Performance in the upper right corner and then select metrics for all versions or for any specific version.
Duplicate Flow or Create New Version? [#duplicate-flow-or-create-new-version-edit-an-active-flow]
To help you decide what would be the best solution for you, we created a table with a quick explanation of the main characteristics related to Duplicate Flow and Flow Version.
| Duplicate | New Version |
| New flow is created. The same people enter the original flow and the duplicate one at the same time. Separate performance statistics. Both flows can run at the same time. | Same flow on the All flows page. Joint performance statistics for all Flow versions. Only one version can be active at a time. People who participated in the older Flow version are allowed to finish the journey in that version. People who participated in older versions will enter new ones only if the Flow Reenter feature has not been disabled. If you need this functionality, use Duplicate Flow. |
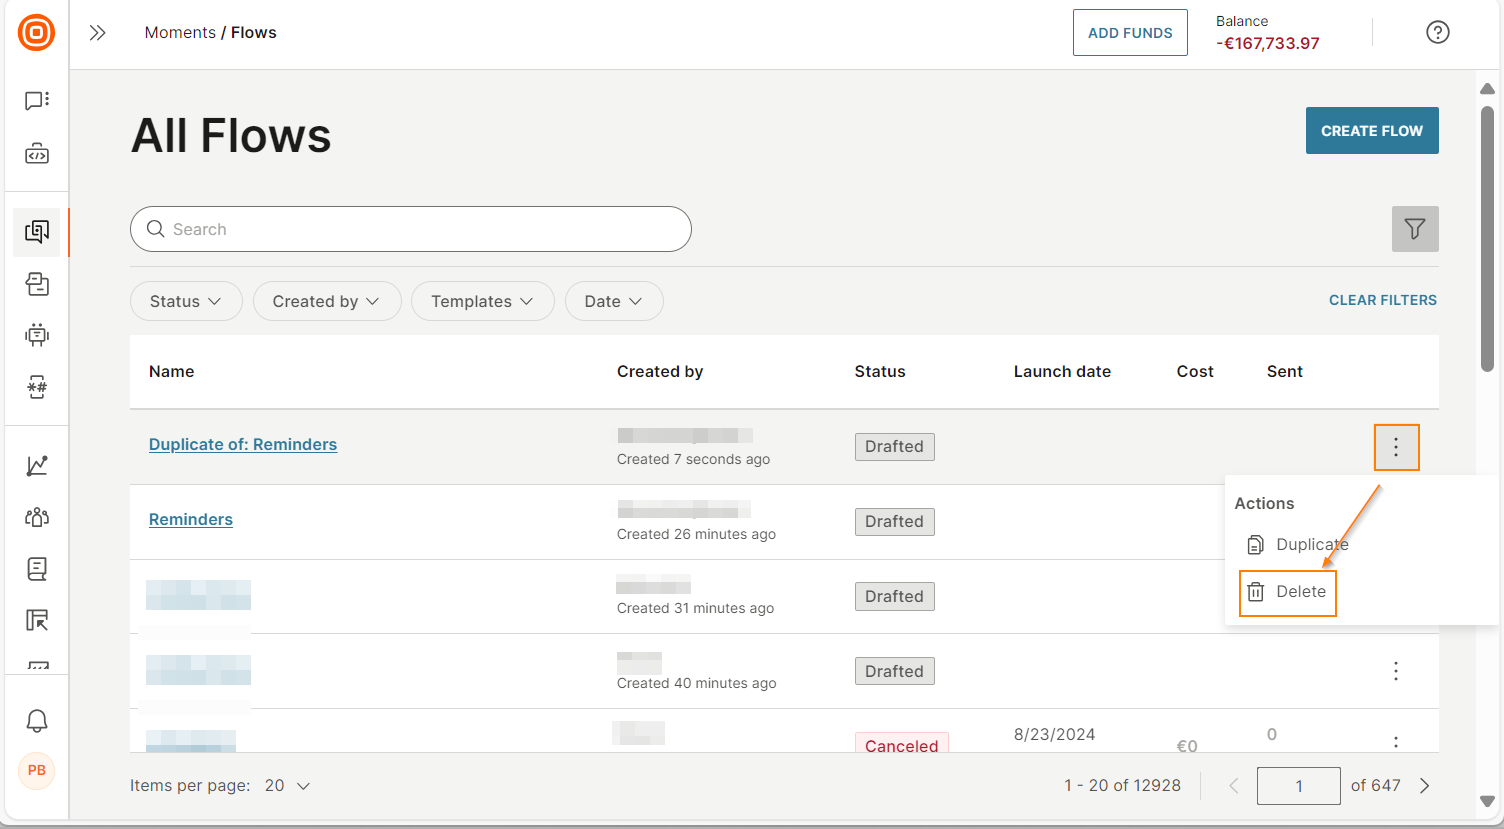
Besides all the other possibilities that we covered in this section, you can go to the All flows page in Moments, click the three dots menu, and duplicate the last active flow or delete a draft version.
Duplicate a flow
In some cases, you might want to see what a flow would look like with different parameters but do not want to modify the flow. In such cases, you can duplicate the flow and make changes to the duplicate.
Example: You want to see what the flow might look like with an additional element or with a different communication channel.
You can duplicate a flow regardless of its status.
You can create an unlimited number of duplicate flows.
If the flow uses the Inbound SMS entry point, you cannot duplicate the flow. This is because the same inbound number cannot be used in multiple flows.
What happens when you duplicate a flow? [#why-use-duplicate-flow-duplicate]
When you duplicate a flow, the following happens.
- A copy of the flow is created, the same as the original one.
- The people who are already in the first flow will also enter the duplicate flow.
- The people who just became a part of this communication will enter both flows.
- Both flows have separate metrics.
Duplicate the flow
Before creating a duplicate, check which building blocks you are using in your original flow. Example: The original flow has an event such as purchase completed, form filled out, or song is played. When you duplicate the flow, the end user related to this event is automatically sent to both flows.
To duplicate a flow, do the following.
- On the Infobip web interface, go to Moments > Flows.
- Select the three dots next to the flow that you want to duplicate and select Duplicate.
Copy flows between accounts [#copy-flow-between-accounts]
You can copy flows from one account to another. Example: You can copy a flow from a staging account to a production account.
Information that is copied
The following information is copied:
- Flow structure, including all the flow elements
- Flow settings
- Messages from the Messages section that are used in the flow elements
The following information is not copied:
- Account-specific information. Example: Sender
- People-related information. Example: Tags and segments
Copy the flows
To copy the flows, do the following:
- Export the flows from the source account - Generate and copy the flow token.
- Import the flows to the target account - Use the flow token that you copied.
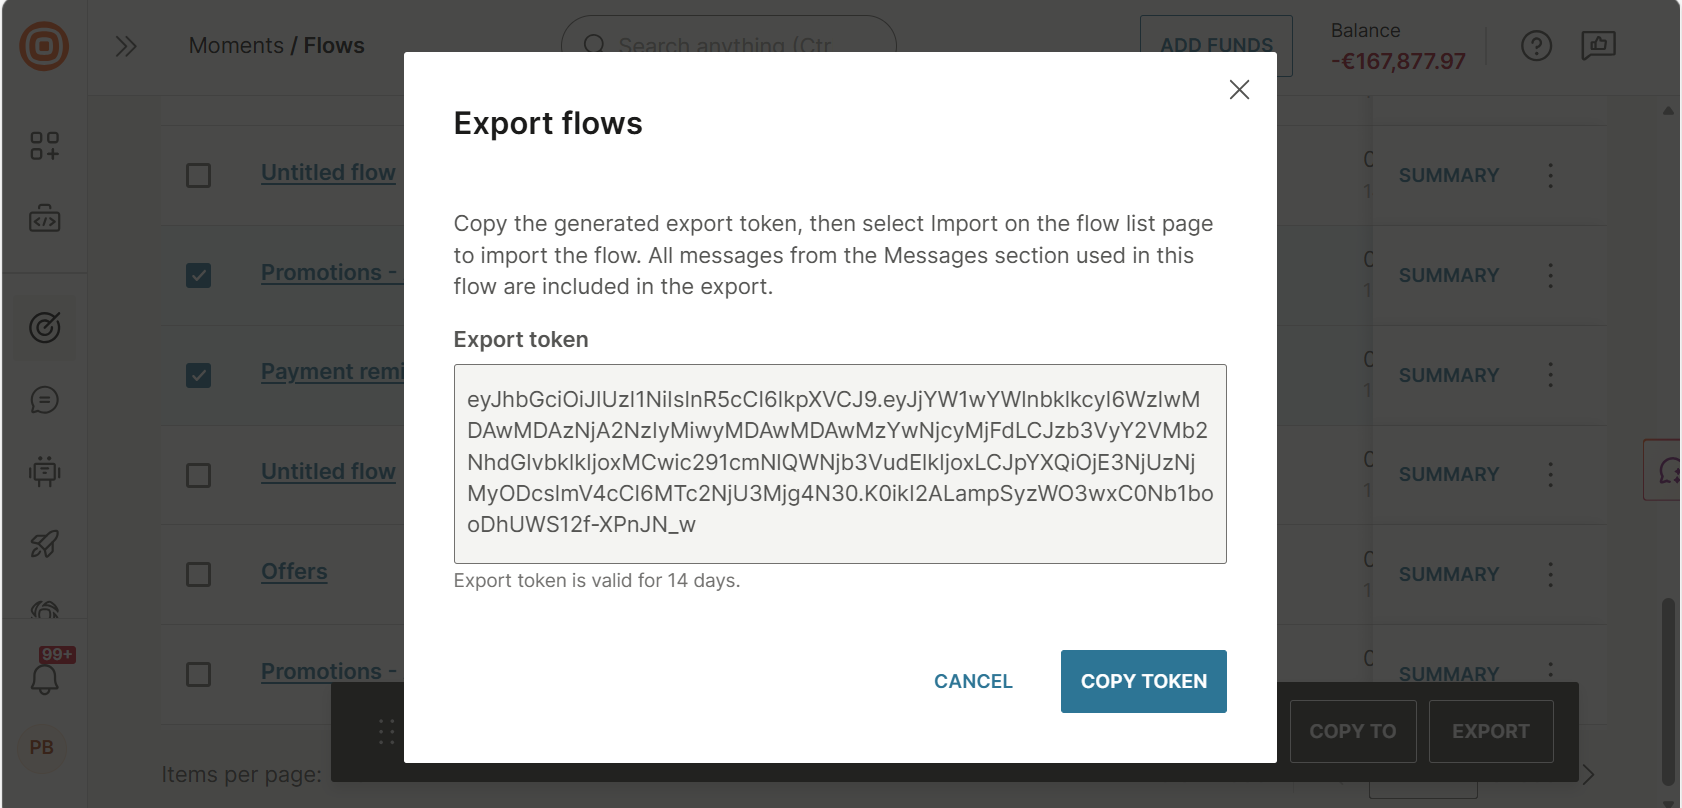
Export flows from the source account
-
On the On the Infobip web interface, go to the account from which you want to copy flows.
-
Go to Moments > Flows.
-
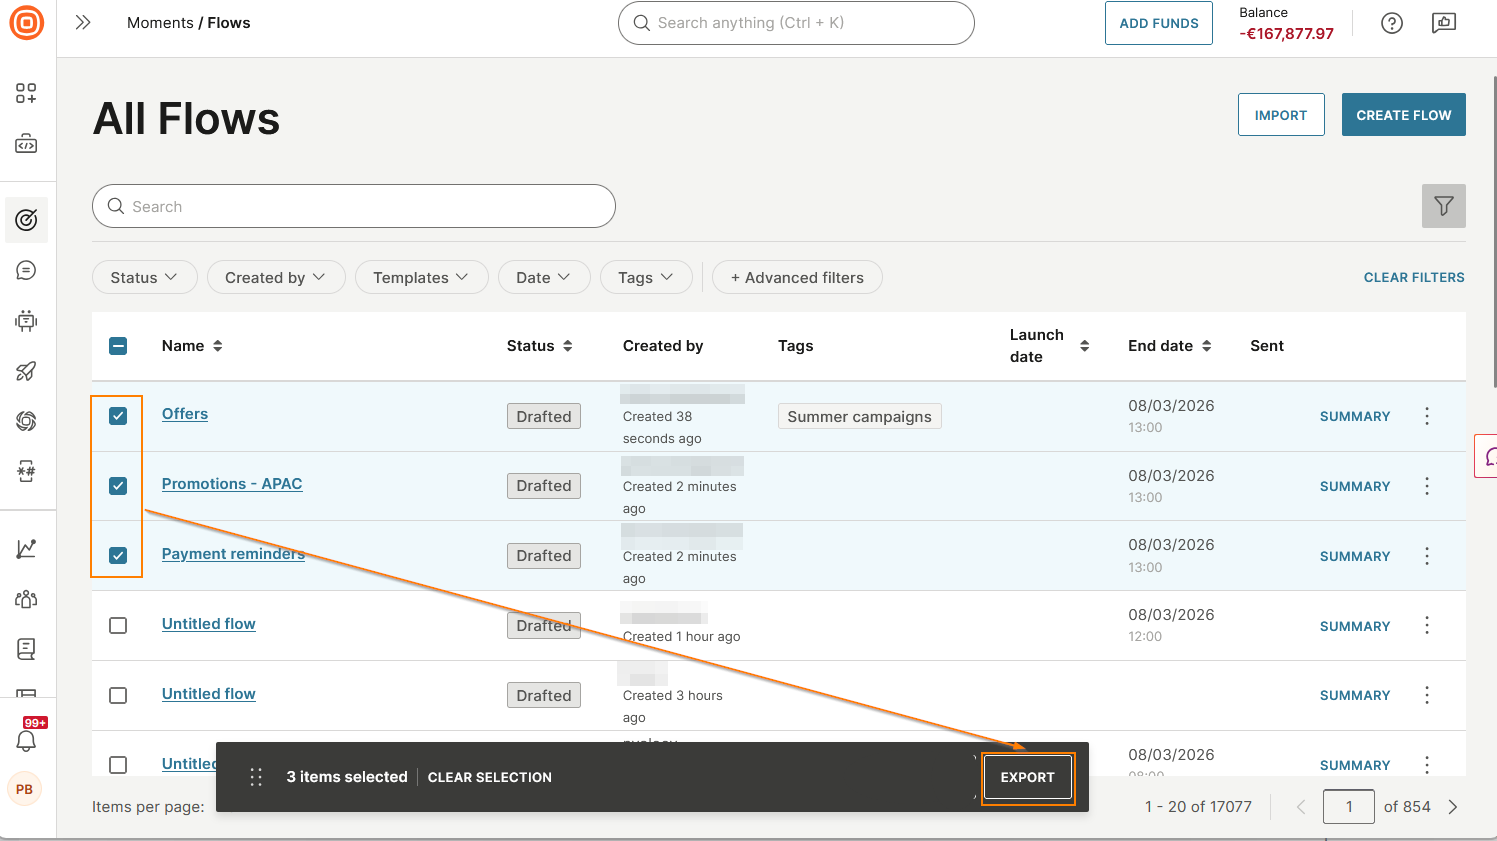
Select one or more flows that you want to copy.
NoteYou can select a maximum of 20 flows.
You can copy a flow regardless of its status.
-
Select Export.
-
In the Export campaigns window, an Export token is automatically generated. Select Copy token.
NoteThe token is valid for 14 days.
Import flows into the target account
-
On the On the Infobip web interface, go to the account into which you want to copy flows.
-
Go to Moments > Flows.
-
Select Import.
-
In the Import flow window > Export token field, enter the token that you copied during the export process.
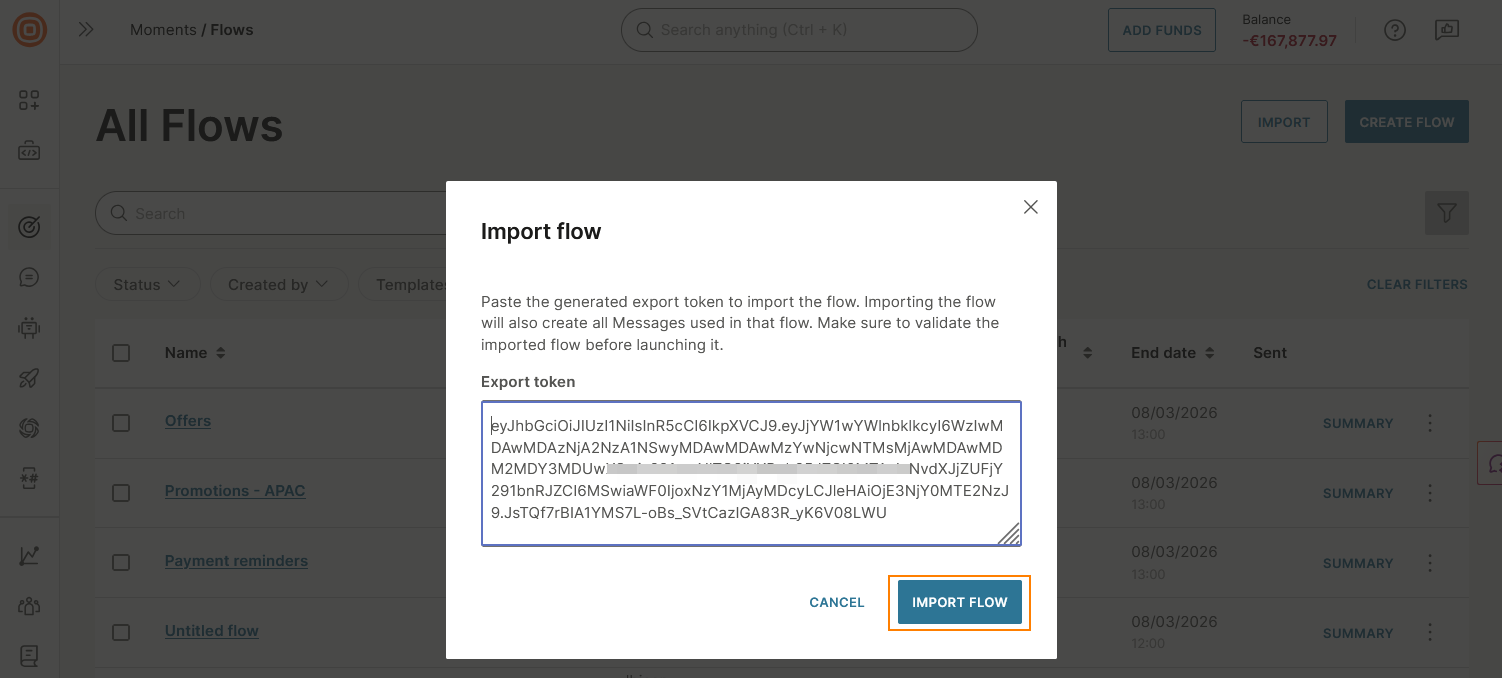
-
Select Import flow.
The imported flows are now listed in Draft status on the All flows page.
Settings
Want to select a goal that will help you track and modify your communication? Plus, it would be really helpful to be able to select the best time for reaching out as well as set the message frequency? This article will quickly guide you through all that: how to understand and use goals, variables, scheduling, and flow frequency cap.
Frequency [#frequency-settings]
To avoid both overwhelming your customers and not reaching out enough, think about the number of messages that would be the most suitable for each of your communication campaigns. For example, for campaigns based on customer actions (Events), you can decide how often customers should enter your communication flow.
Take the welcome sequence scenario as an example. The welcome sequence is triggered when you want to welcome and quickly onboard your newly registered user, and it should only happen once per person. Although you probably don`t want to send multiple registration events for the same person, mistakes can happen. To remain in full control of your automated communication, use the Frequency Cap inside the Flow Settings.
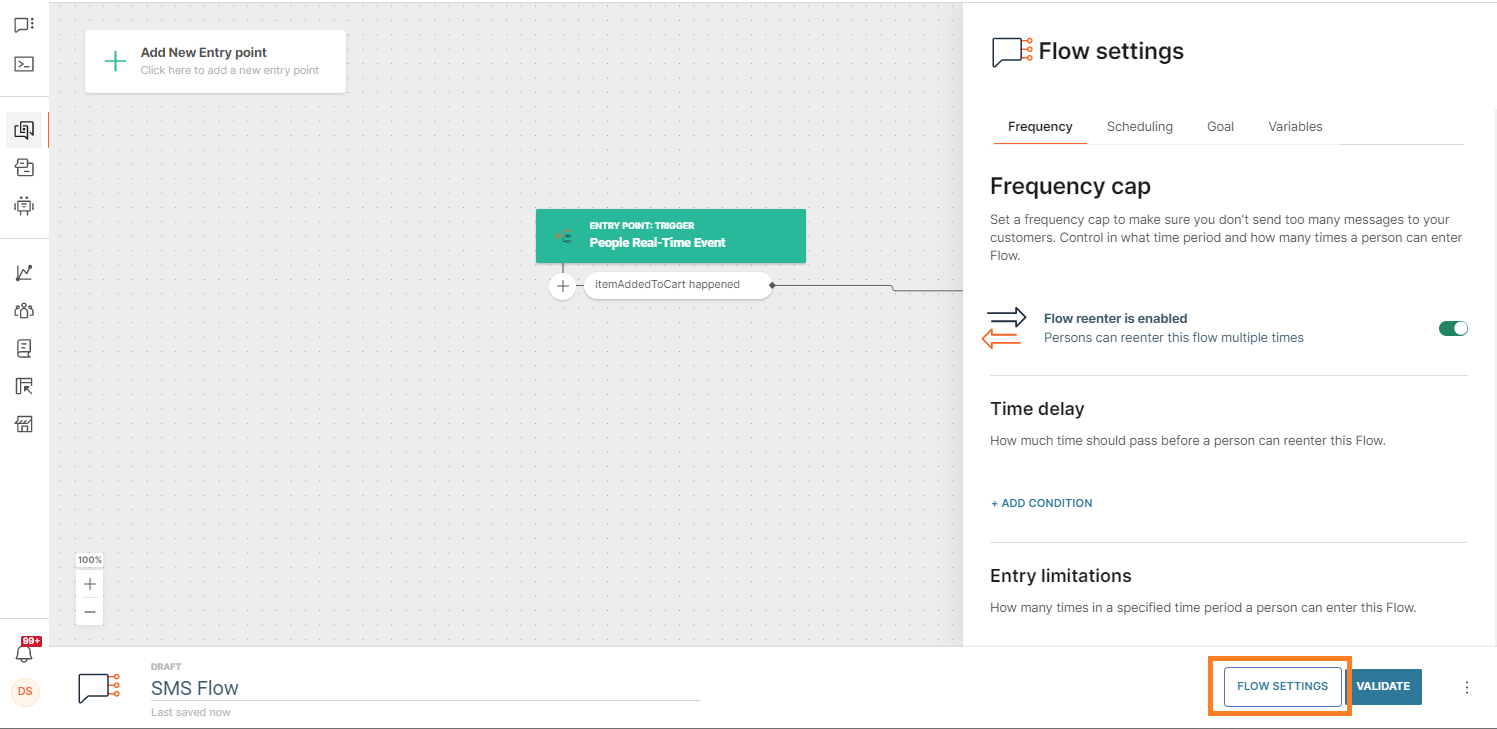
There are three controls in Flow Settings:
- Flow reenter is enabled –Specify whether the flow should be recurrent (a person can enter it multiple times) or non-recurrent (each person enters it only once). This feature is enabled by default.
- Time Delay – Decide how much time should pass before a person becomes eligible to re-enter the flow after exiting. Keep in mind that only one Time Delay can be set.
- Entry Limitations – Set the limit for the same person to re-enter the flow during any given time period; for instance, 2 times within one week. You can set multiple Entry Limitations - it could be something like 1 per hour or 24 in one day.
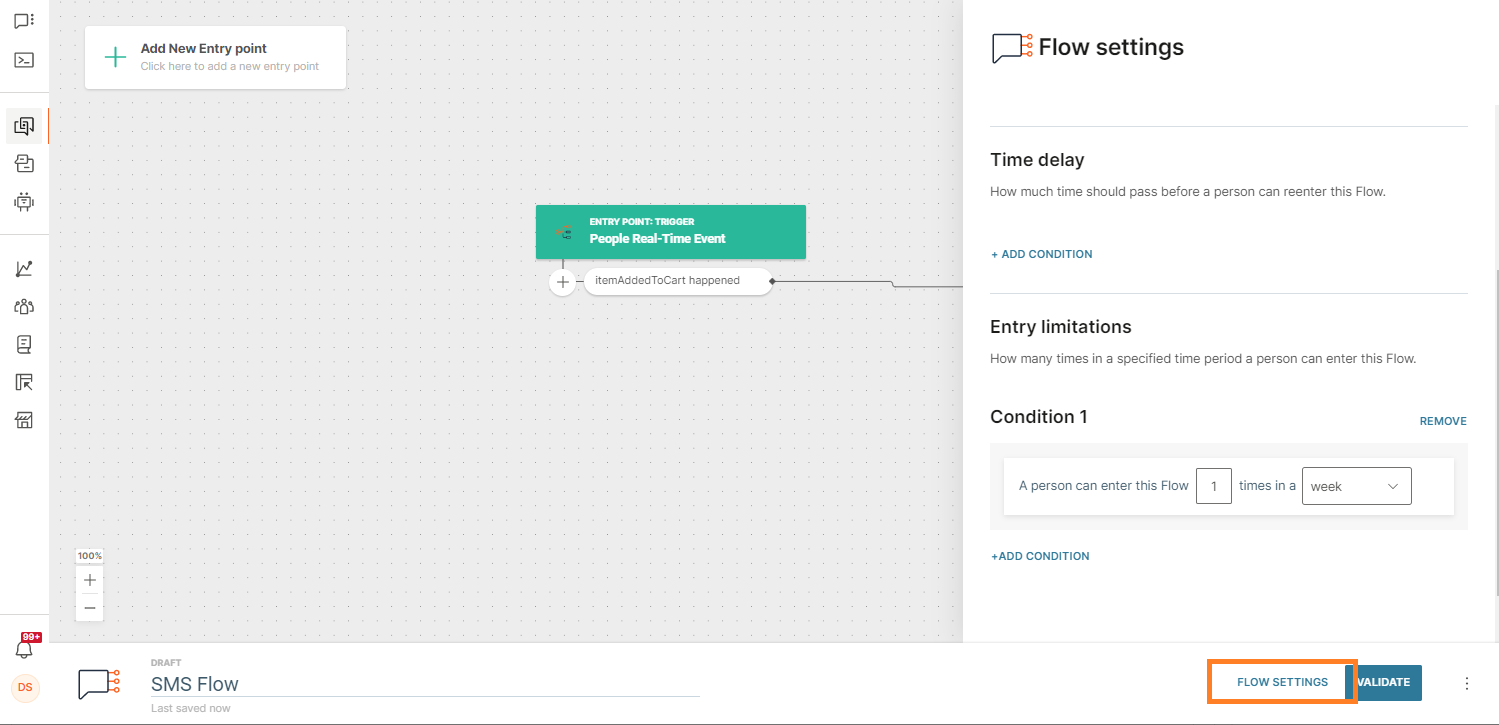
If a person becomes eligible for the entry trigger (Registration), but the Time Delay and/or Entry Limitations prevent them from entering the flow, the trigger will not push this person into the flow.
With the re-entry enabled, but without any time delay and entry limitations, a person will be eligible to return to the flow right after exiting if they match the conditions.
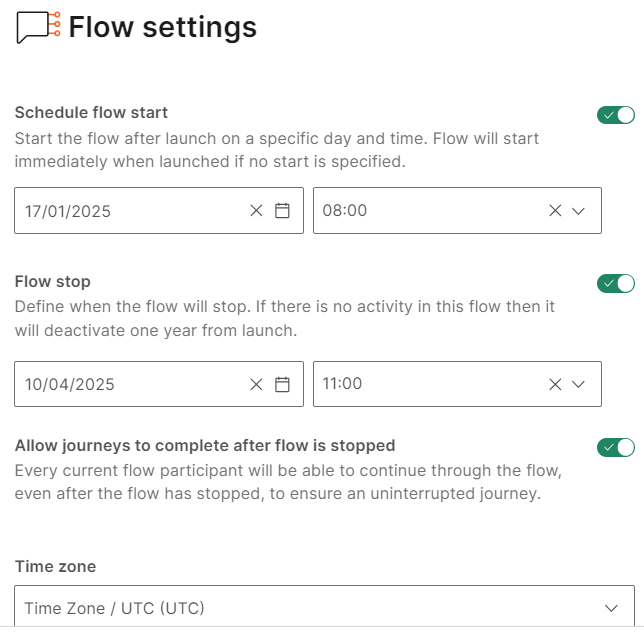
Scheduling [#scheduling-settings]
Use the Scheduling tab to set the start date and time for your flow.
Schedule flow start
Schedule the flow to automatically launch on a specific date and time. For more information, refer to the Launch > Launch the communication later documentation.
If you do not specify a start date and time, the flow starts immediately when you select Launch now. For more information, refer to the Launch > Launch the communication immediately documentation.
Flow stop
Define the date and time when the flow should stop automatically. By default, this field is enabled, with a stop date of 90 days from the date the flow was created.
When the flow stops, its status changes to Finished.
If you do not configure a stop date and time, the following happens.
- If there is no activity in the flow for a period of one year from the last activity, it automatically stops.
- If there is activity in the flow, it runs indefinitely.
For flows that have the One-time entry point, the flow cannot continue indefinitely. This is because all the audience enter the flow at the same time. So, audience cannot be added to the flow later.
Allow journeys to complete after flow is stopped
If you enable this field, the participants who are currently in the flow complete the flow, even after the flow stops. This ensures that end users' journeys are not interrupted. During this time, the flow has the Finishing status. No new persons can enter the flow.
After all end users complete their journey, the flow status changes to Finished.
Time zone
Specify the time zone for the flow.
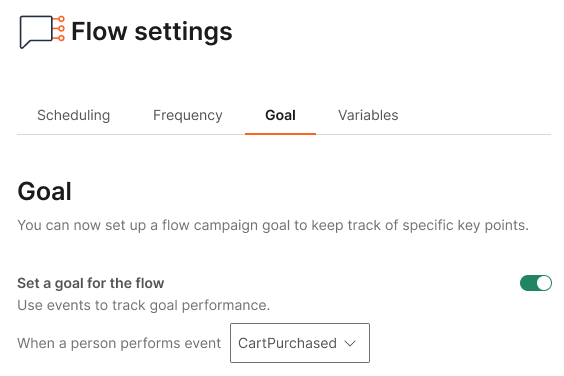
Goals [#goals-settings]
Often, the purpose of a flow campaign is not only to deliver messages but also to achieve a specific goal. Example: To increase purchases. The Goal setting enables you to set a tracked event as the goal of the flow.
After a flow is launched, the goal performance provides information about the overall number of end users who reached a specific point of their customer journey. The goal performance also shows the percentage of end users who took the necessary actions to help you achieve your goal.
Example
You want to sell a specific number of a brand of shoes. Use the PurchaseFinished event as your goal. The event shows how many end users saw your message and how many purchased the item. This helps you track the campaign and identify how close you are to achieving your goal.
Set a goal
You can set the goal either before or after launching the flow.
-
Do one of the following in your flow.
-
Select Set a goal.
-
Go to Flow settings > Goal tab.
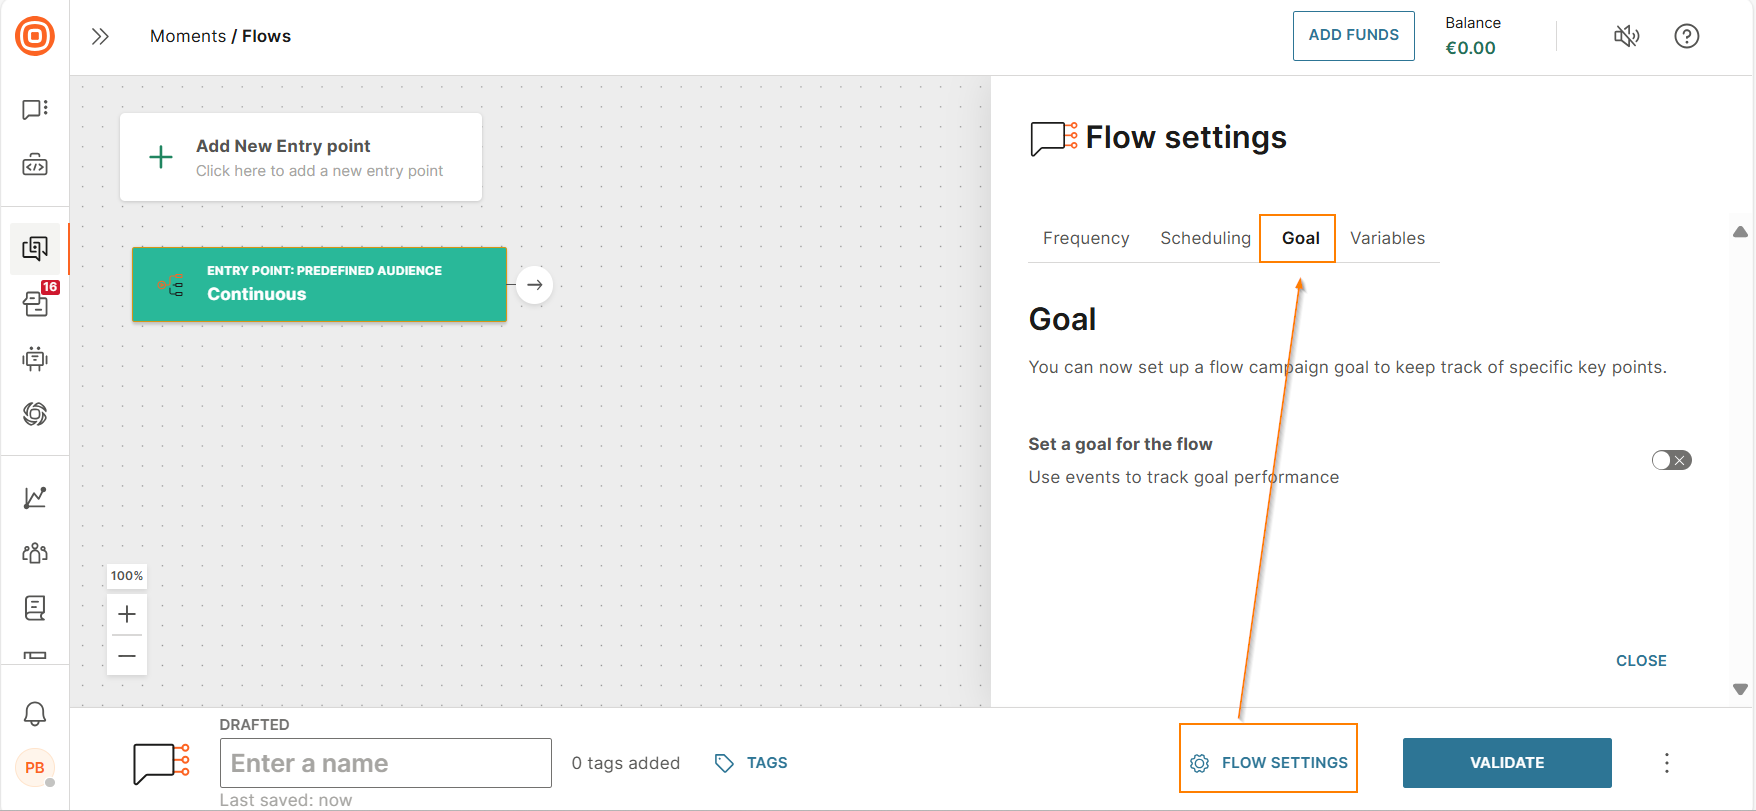
-
-
Enable Set a goal for the flow.
-
Select a relevant event. Example: CartPurchased.
View the goal performance
To view the performance of the goal, select View flow performance in your flow.
The following image shows an example of the information that you can see about the goal.
Flow Variables [#flow-variables-settings]
A flow variable is a placeholder that stores temporary session data inside a flow.
The following are examples of how you can use flow variables.
- Use variables to transfer values from one flow element to another.
- Use variables as placeholders to personalize messages.
- Use variables to give the requested information to end users.
Example: For an online booking scenario, you use appointment time as a flow variable. When you initiate the flow, this variable has temporary information. If the appointment time changes, this variable is updated. Use the variable when you send the end user confirmations and reminders of the journey.
For more information about how to use flow variables, refer to the How to use variables in the flow section.
Types of flow variables
| Data type of flow variable | Description |
|---|---|
| True/False | Use for properties that contain one of only two values - True or False. |
| Text | Use for properties that are in text format. Example: productName and productDescription. |
| Decimal number | Use for properties that are in a decimal number format. Example: productPrice. |
| Whole number | Use for properties that are in a whole number format. Example: productQuantity. |
| Date | Use for properties that contain date values. The Date variable is checked only at the beginning of each day. So, if you use a Date variable but the condition is in hours, the result might not be as expected. To trigger the flow at a specific time, use a Date Time variable. The Date Time variable is checked every few minutes. |
| Date Time | Use for properties that contain date and time values. |
| List | Use to create a list. Example: Create a cartItems variable of type List. In this variable, add details such as item name, item ID, quantity, and price. You can create only one property of List data type in an event. You can create flow variables of List data type only when mapping event properties in the People real-time event trigger and the Wait for an event element. You cannot create flow variables of List data type in the flow settings. |
| File | Use to upload a file. The file can have a maximum size of 20 MB. |
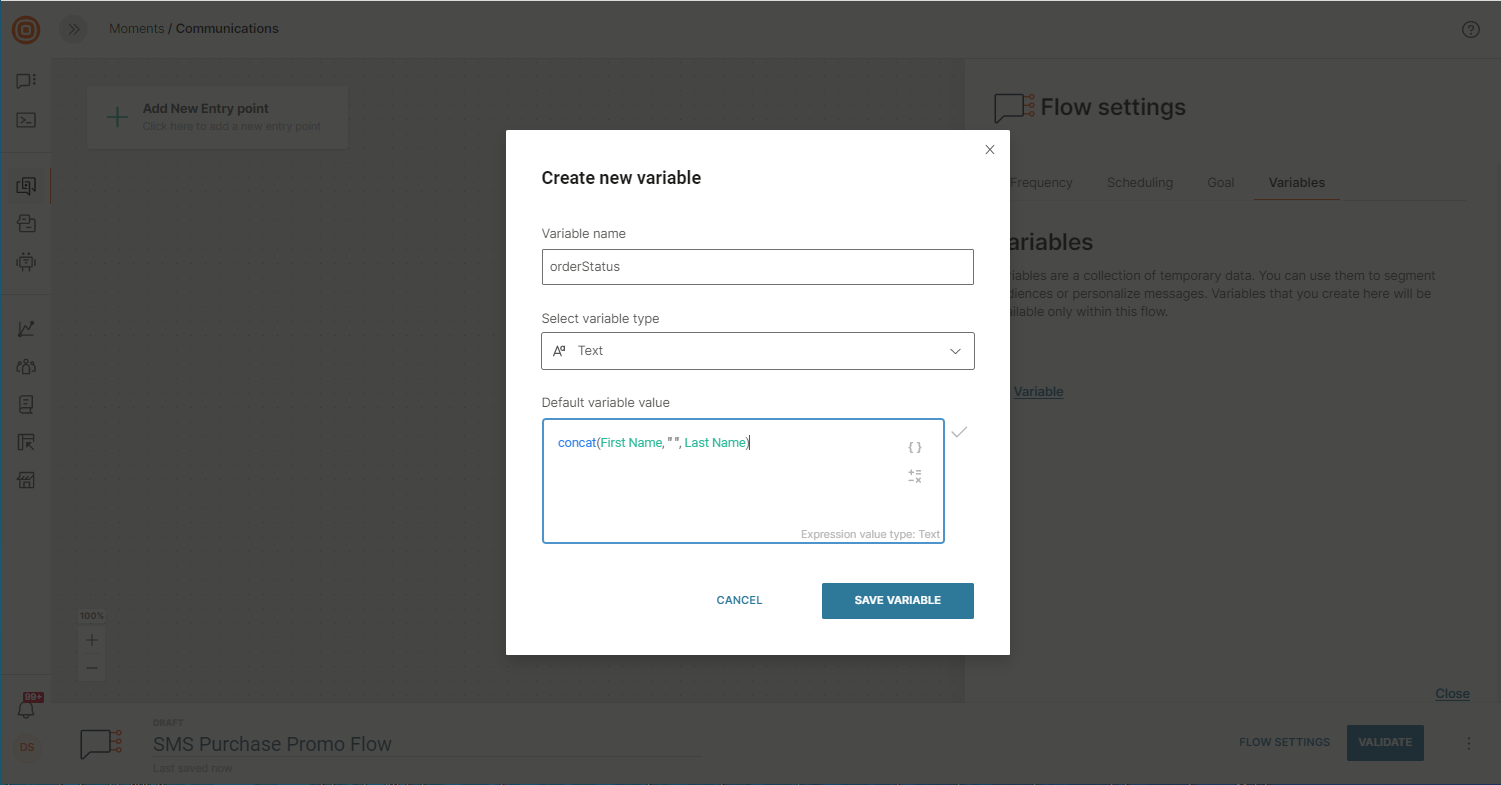
Create a flow variable from the flow settings
- In a draft flow, select Flow settings > Variables > Variable.
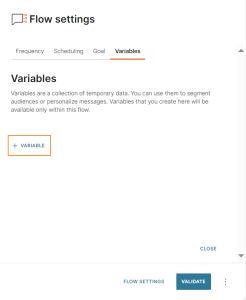
- Enter the Variable name.
- Select the Variable type. For more information, refer to the Types of flow variables documentation.
- (Optional) Specify the default value of the variable. You can either use a static value or enter a formula.

- Select Save variable.
You can now use this variable in flow elements that support variables.
Create a flow variable when mapping an event property
In elements that support variables, you can create a new flow variable when you map an event property to the flow variable. Refer to the Map flow variables to event properties documentation.
Map event properties to flow variables
You can save the value of an event property in a flow variable.
If an element that supports variables, do the following.
-
In the Variable sets section of the element, select Variable.

-
In the Event property field, select a field in the event. You can select Event name, Event time, Event date, Event ID, and all properties in the event.
-
In the Variable field, select a corresponding flow variable.
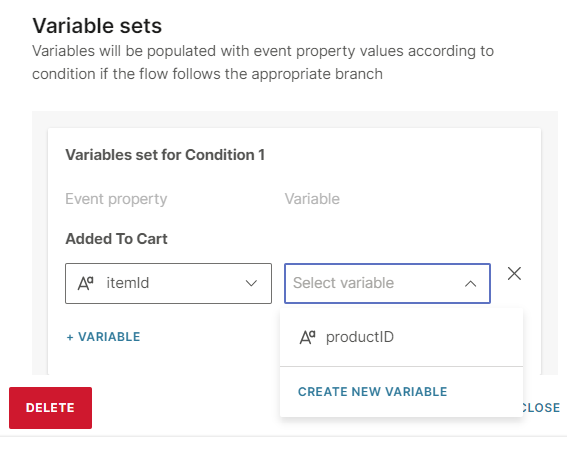
To create a new flow variable, follow these steps.
-
In the Variable field, select Create new variable.

-
Enter the Variable name.
-
Select the Variable type. For more information, refer to the Types of flow variables section of the documentation.
Note- You can select only the same data type as the event property.
- You can select List data type for a flow variable only in the People real-time event trigger and the Wait for an event element.
-
(Optional) Specify the default value of the variable. You can either use a static value or enter a formula.
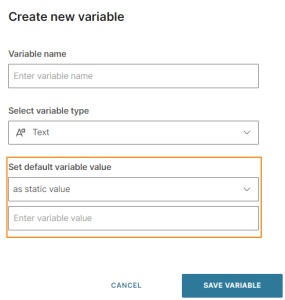
-
Select Save variable.
-
Assign Values to Variables [#assign-values-for-variables-settings]
You can assign values to variables in many ways. The following table shows examples of how to save information in variables.
| Example | Flow element |
|---|---|
| Store sender, receiver, and message content from inbound messages as variables. | Evaluate Inbound Message |
| Call responses from the third-party systems then use them in later steps in the flow. | Call API |
| Use Flow API to receive data from third-party systems as variables. | Flow API |
| Collect IVR responses as variables. | Collect |
| Set variable values from a catalog item. | Catalog Lookup |
| Save information from Standard and Custom events as variables in a flow. | Wait for an Event People real-time event trigger |
How to use variables in the flow [#use-variables-settings]
You can use flow variables in all elements that support placeholders.
The following table shows examples of how to use variables and the flow element that you can use to do so.
| Scenario | Description | Flow element |
|---|---|---|
| Audience segmentation | Use variables to split your audience based on attributes and their behavior. | Segment audience |
| Personalization | Use variables to personalize your flow in Send elements, IVR elements, and Call API elements if you want to add variables to external systems | Send elements Play (IVR) Call API |
| Save variables in People profile | Save the the variable in a People profile | Update person profile |
| Store recipient information | Use variables to define recipient information with the Notify Internal Business Recipients element. This is useful if you have dynamic recipient information such as store manager phone number which might be different depending on the store location. | Notify internal recipients |
For more information, refer to the Personalize using placeholders documentation.
Update a variable [#update-variable-settings]
To update a variable to reflect a change in the flow, use the Update variable element.
Example: The Order Status variable changes from ordered to dispatched.
Use formulae and expressions in variables [#expressions-in-variables-settings]
Use expressions to do the following:
-
Specify default values for variables. You can do this in the Flow settings.
-
Update variables in an element.
-
For advanced scenarios, use expression language with variables. Some benefits of using expression language are as follows.
- Make calculations. Example: Count how many times an end user received a voucher.
- Calculate time difference. Example: Check delayed orders and escalate the issue automatically.
NoteBy default, the function now() returns DateTime in UTC. All other time functions use the time zone of your account.
-
Concatenate unique URLs from variables and attributes. You can use these URLs in reporting or sending a feedback request URL to an end user.
Transfer Variables [#transfer-variables-settings]
When you want to send end users from one flow to another, you can transfer variables between these flows. For more information, refer to the Add to Flow documentation.
Delete
If you do not need a flow, you can delete it. Do the following.
- On the Infobip web interface, go to Moments > Flows.
- For the flow that you want to delete, select the three dots and select Delete.
You can delete only flows that are in Draft status.
Performance
Active or finished flows include helpful data that you can use to improve current and future communications.
Flow summary [#flow-summary-performance]
View a summary of the flow.
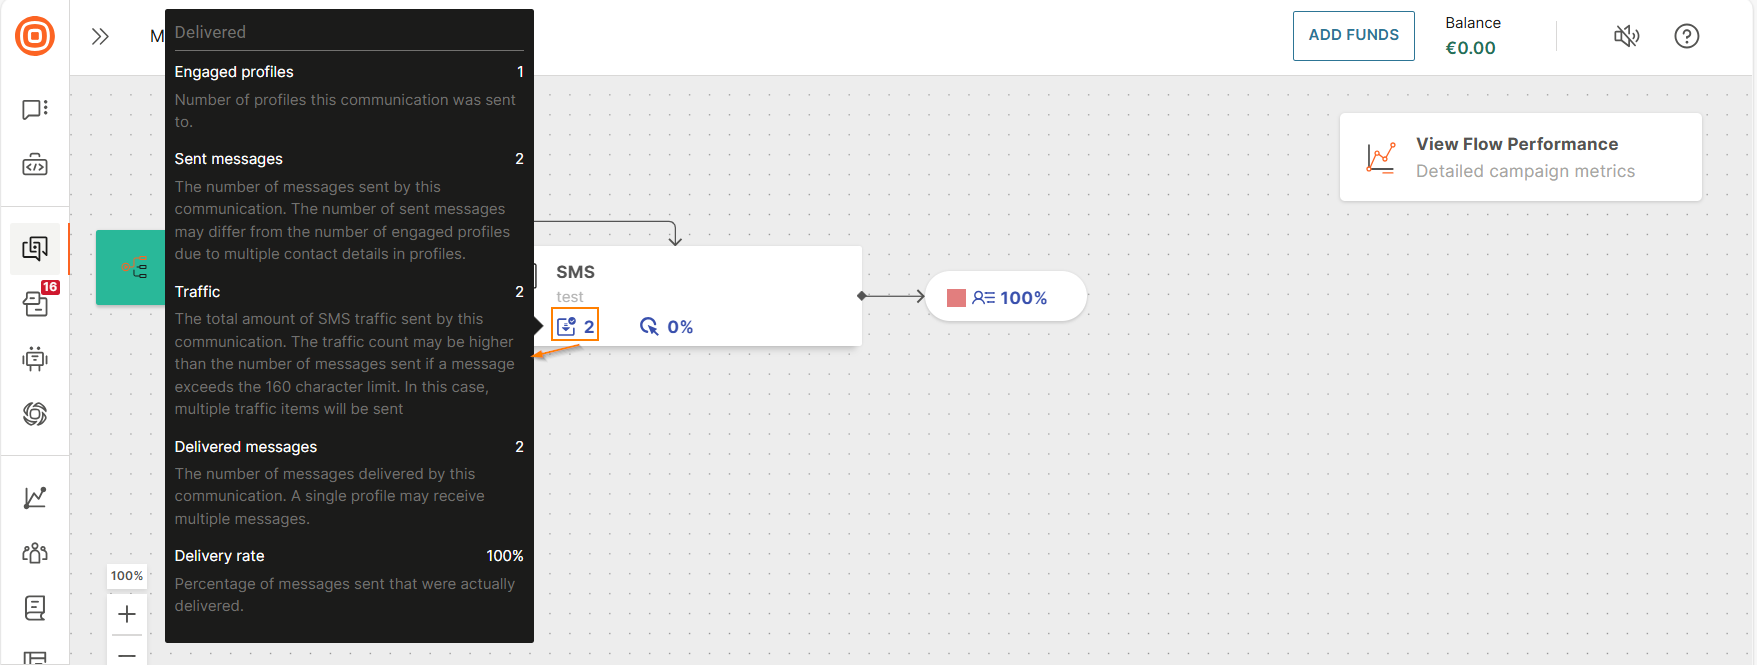
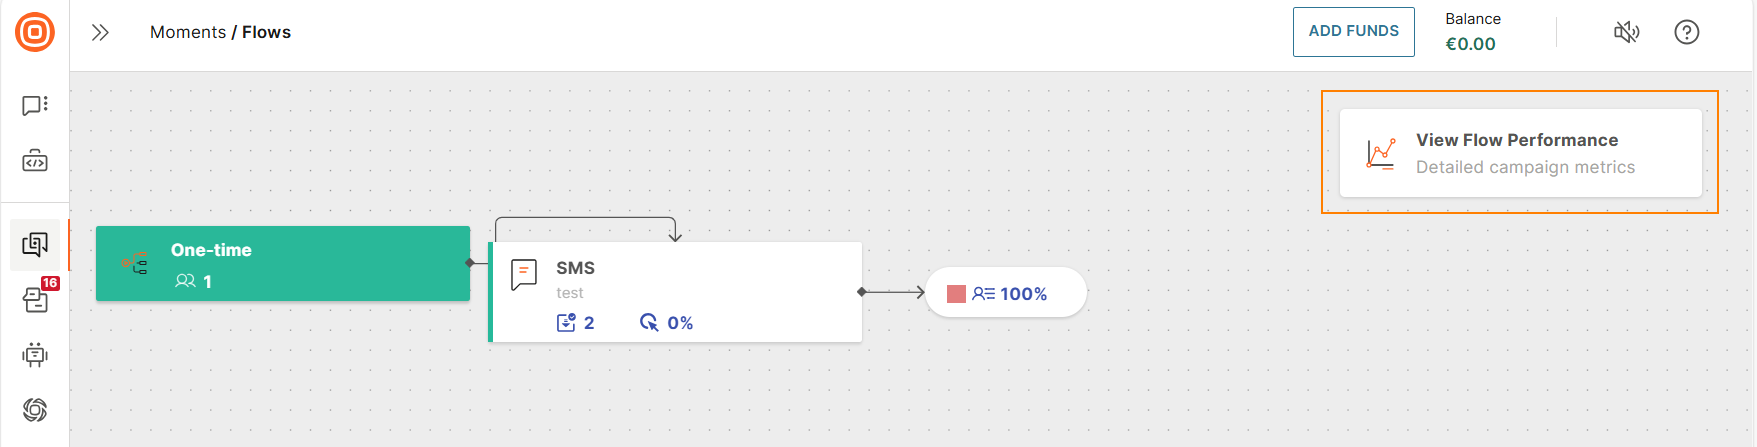
Flow element metrics [#flow-metrics-performance]
You can view metrics for individual flow elements. Example: You can see the number of end users who entered a flow through a specific entry point.
Each element has different metrics.
To view these metrics, hover over one of the metric indicators in the element. Each indicator shows different metrics. The following image shows the metrics for the Delivered indicator in the SMS element.
Campaign performance [#overall-metrics-performance]
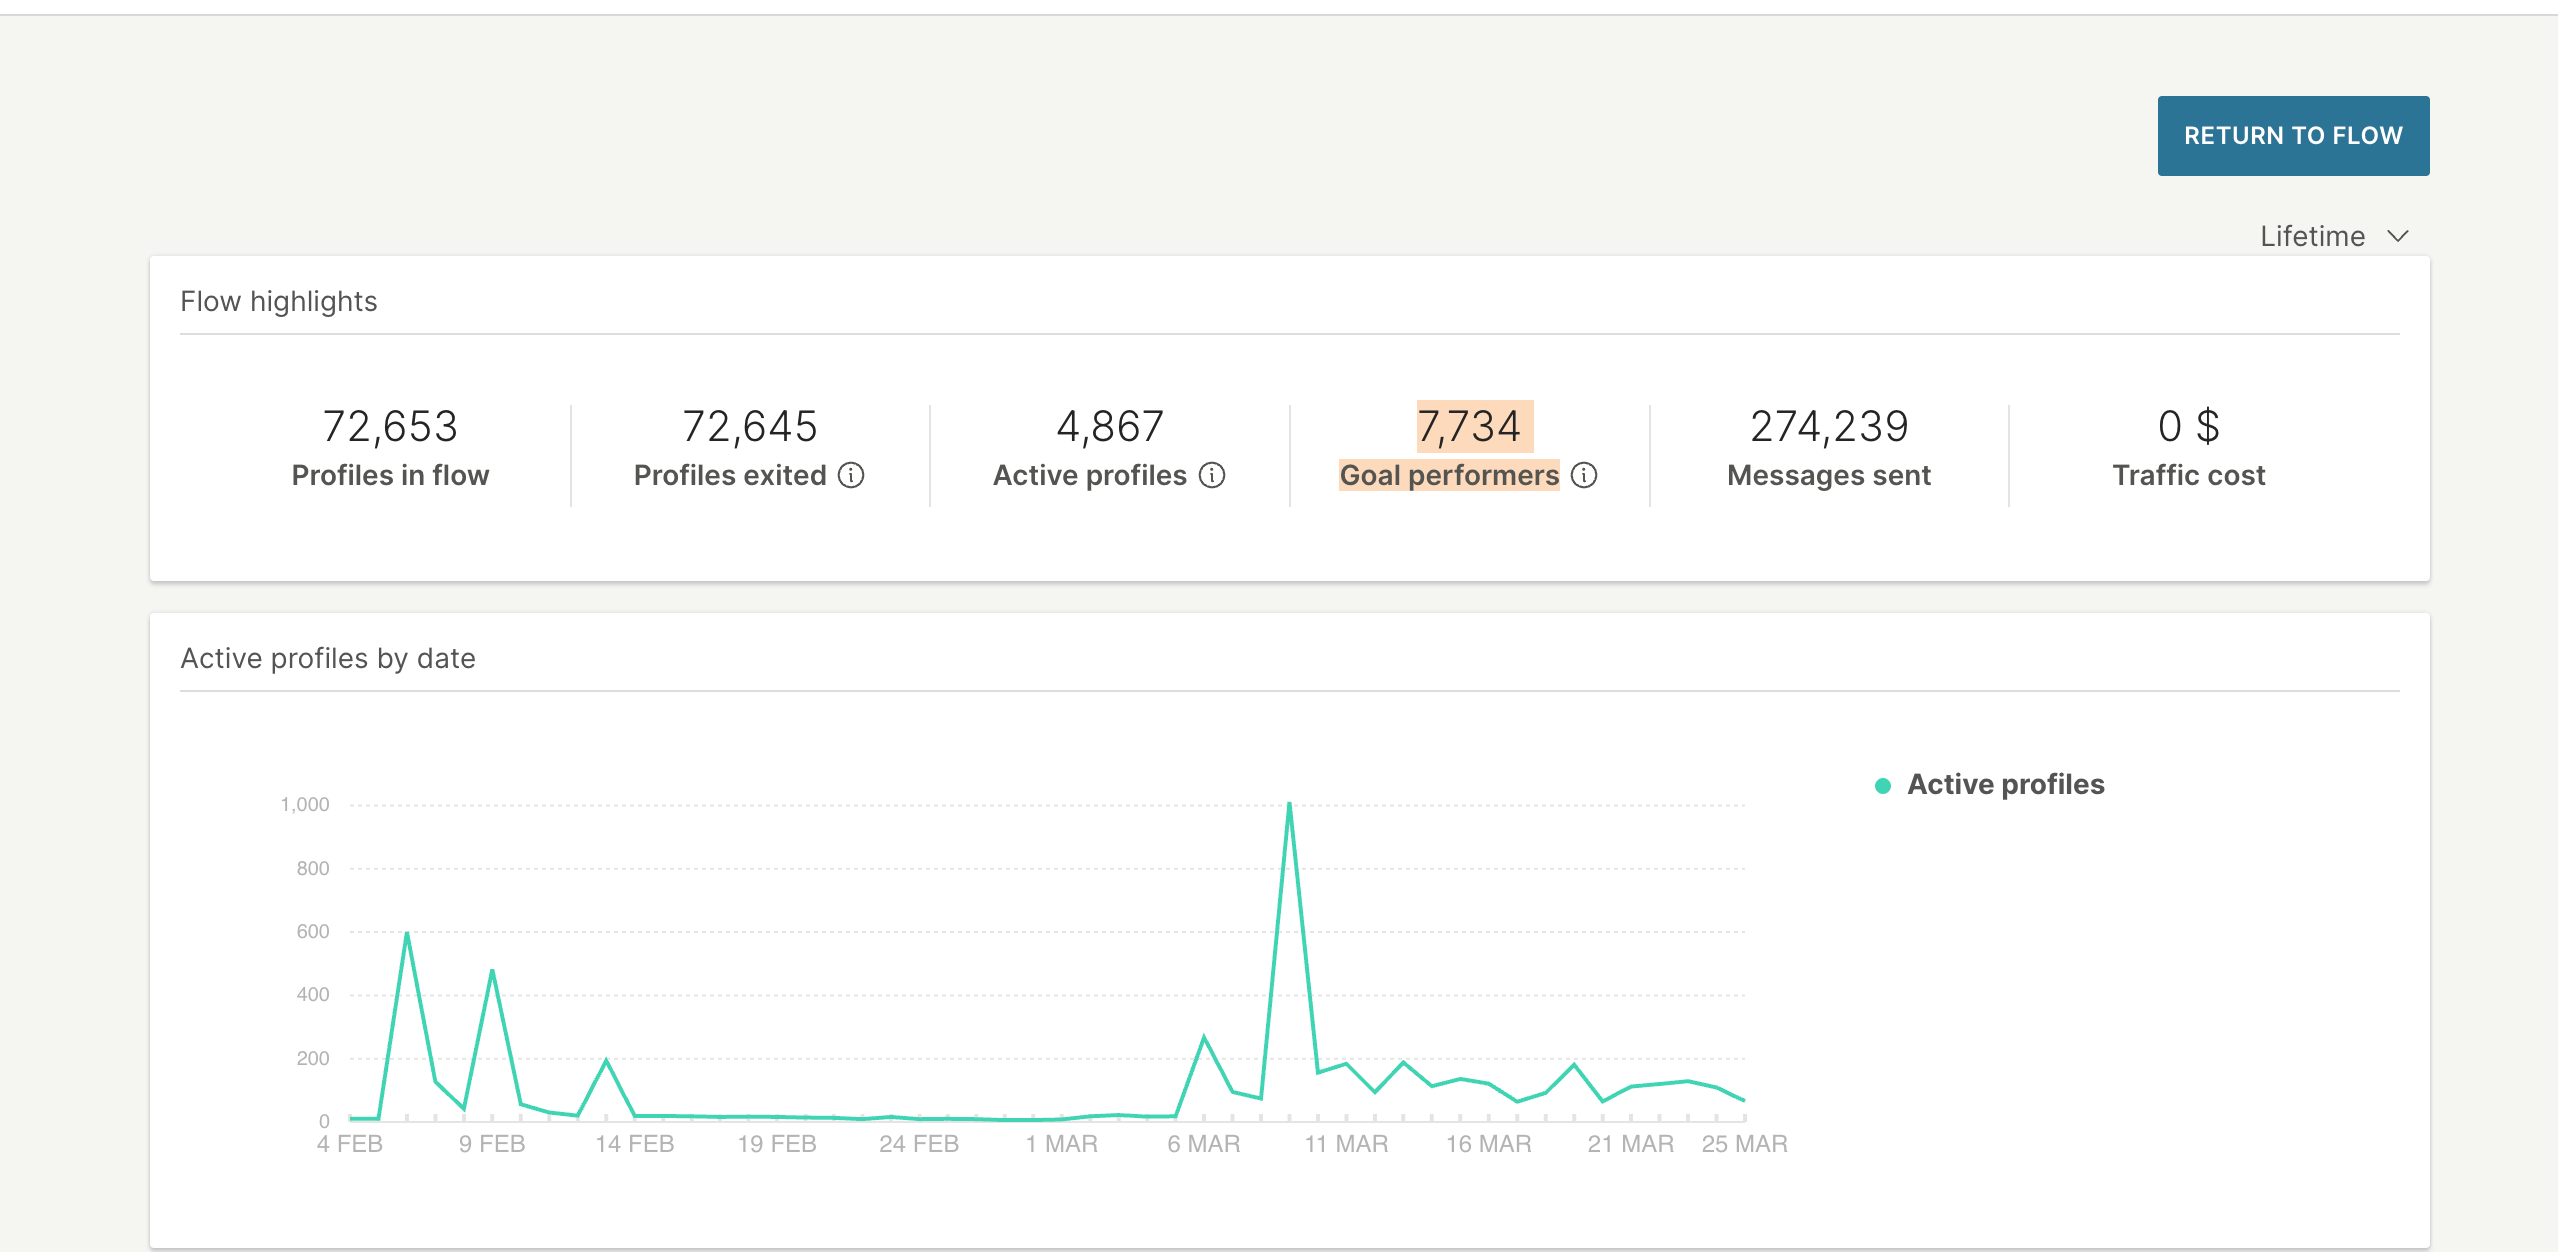
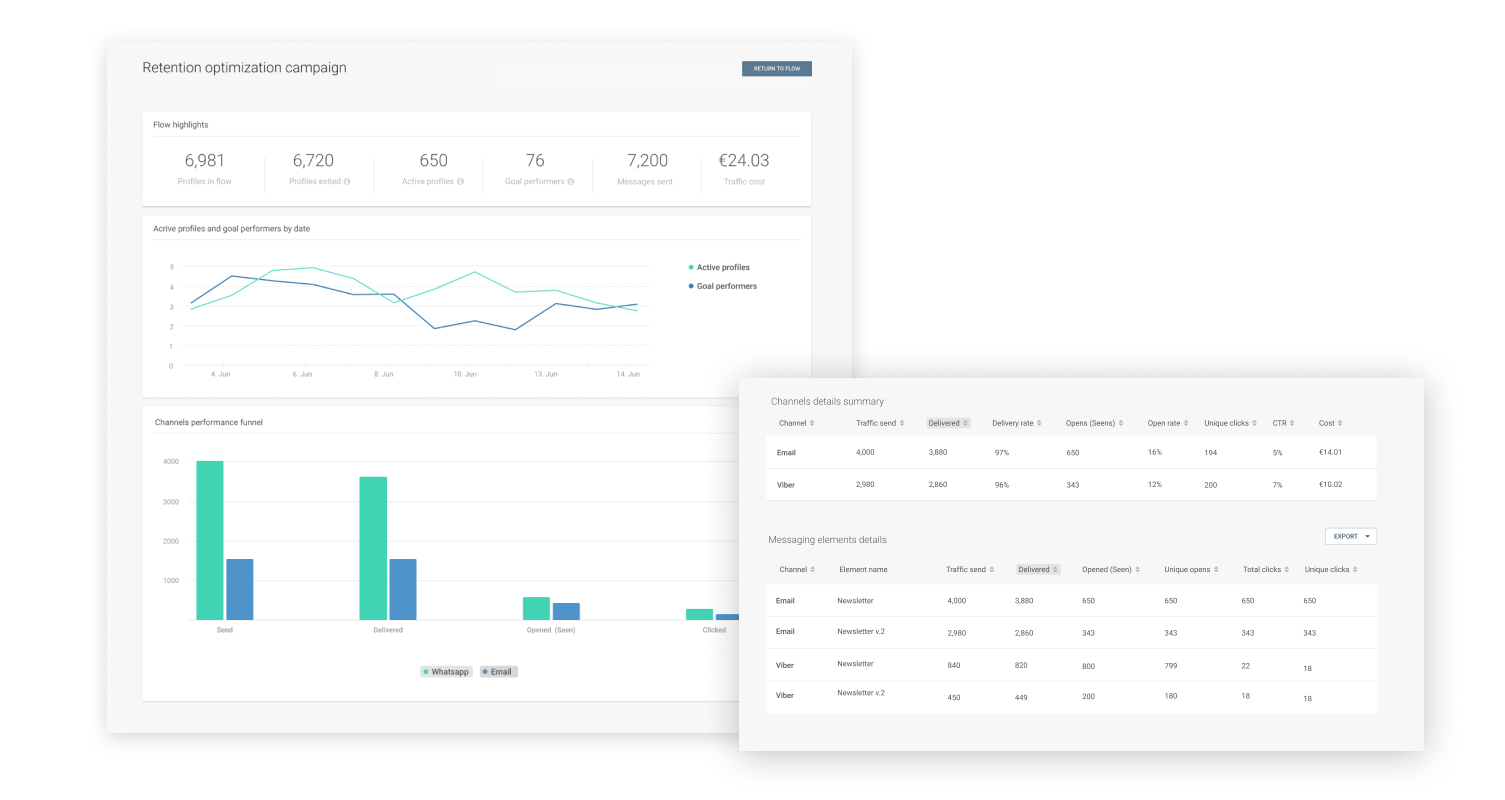
This section shows how to view the performance of your flow. You can see the flow highlights and additional information related to your communication campaign.
To view these metrics, select View flow performance in the flow and go to the Campaign performance tab.
You can view the following information.
| Performance Metric | Description |
|---|---|
| Profiles in flow | The number of unique end users who entered the flow. This metric helps you see the audience reached by your campaign within a specific time range. |
| Profiles exited | The number of people who exited the flow at an exit point. This metric helps you to see all end user journeys that are complete and did not exit early. It provides insight into how effective your flow is and if end users react to your flow as expected. Example: Your flow reaches 7,000 end users, but only 1,500 end users exit the flow. You could review your existing flow and optimize future flows so more people exit it in the way that you want. In flows where there is no goal, this is an important metric to measure success. |
| Active profiles | The number of people that entered a flow, received the communication, and then performed an event such as message view, message opened, or link clicked. This metric enables you to measure audience activity and gives you the opportunity to view which channel or specific message had the most impact on the end user. |
| Goal performers | The number of people who entered a flow and performed the target event at least once. This metric is the absolute measure of success for your flow. |
| Messages sent | The sum of all messages sent within the flow for all channels. To view a breakdown by channels, look at the Channel details section in the Flow performance page. |
| Traffic Cost | The total cost of send traffic for the flow. |
The traffic data for the overall number of sent messages includes the following:
- Data for each channel that is in the flow. Example: Email, SMS, Viber.
- Data for non-send elements that are in the flow. Example: Wait for an Event
If a flow has a specific goal, the performance analytics include the data related to the goal. Example: If the goal is for the ItemPurchased event, the performance analytics include the total number of purchases.
IVR insights
This section shows the performance of IVR sessions. To view the insights, select View flow performance in the flow and go to the IVR insights tab.
For more information, refer to the Analytics documentation.
Performance of channels [#report-per-channel-performance]
Channel metrics
To view the performance of channels, refer to the Analyze section. You can view individual and overall channel metrics.
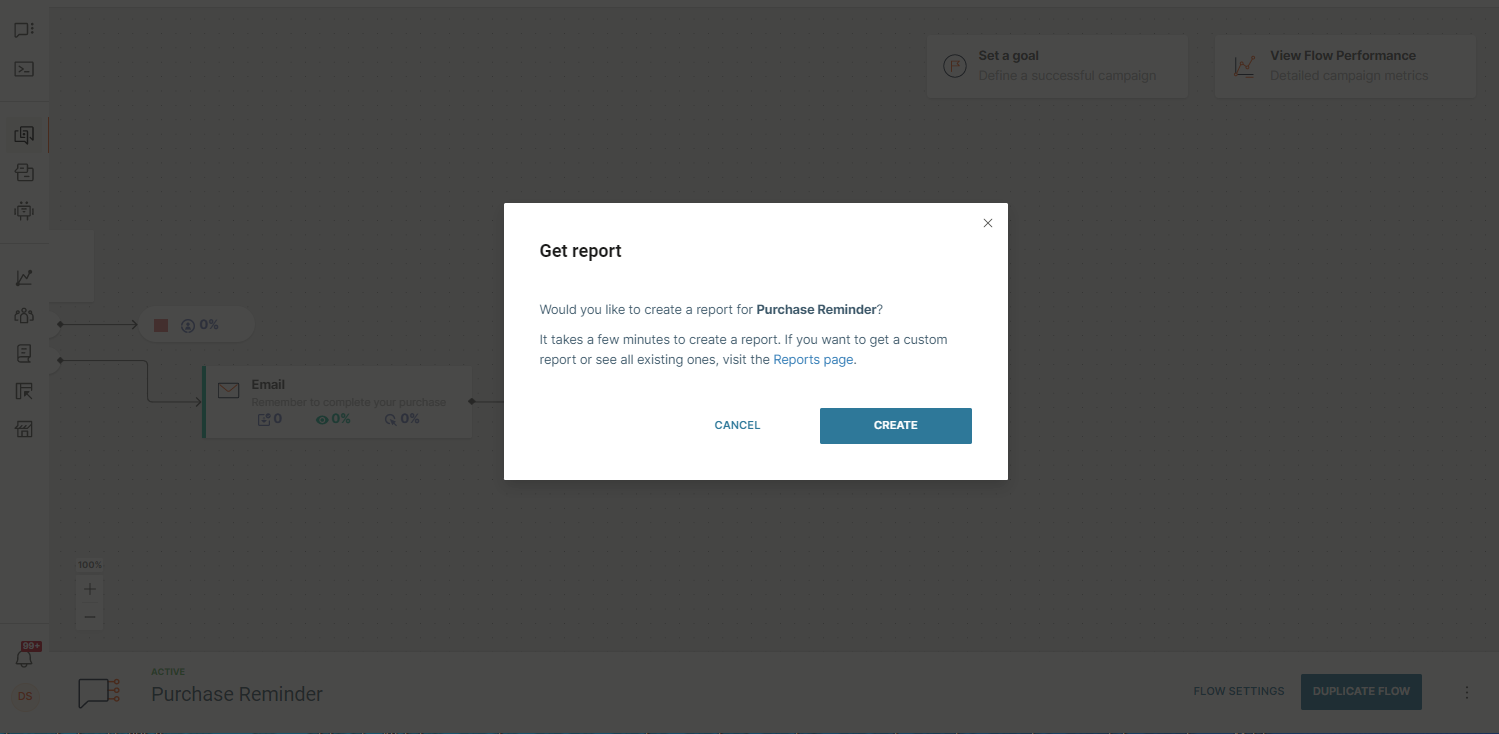
Generate reports for your flow
To generate a detailed report for the channels in your flow, select the three dots menu inside the flow > Get report > Create. The report is sent to your email address. To create custom reports, on the Infobip web interface, go to Analyze > Reports.
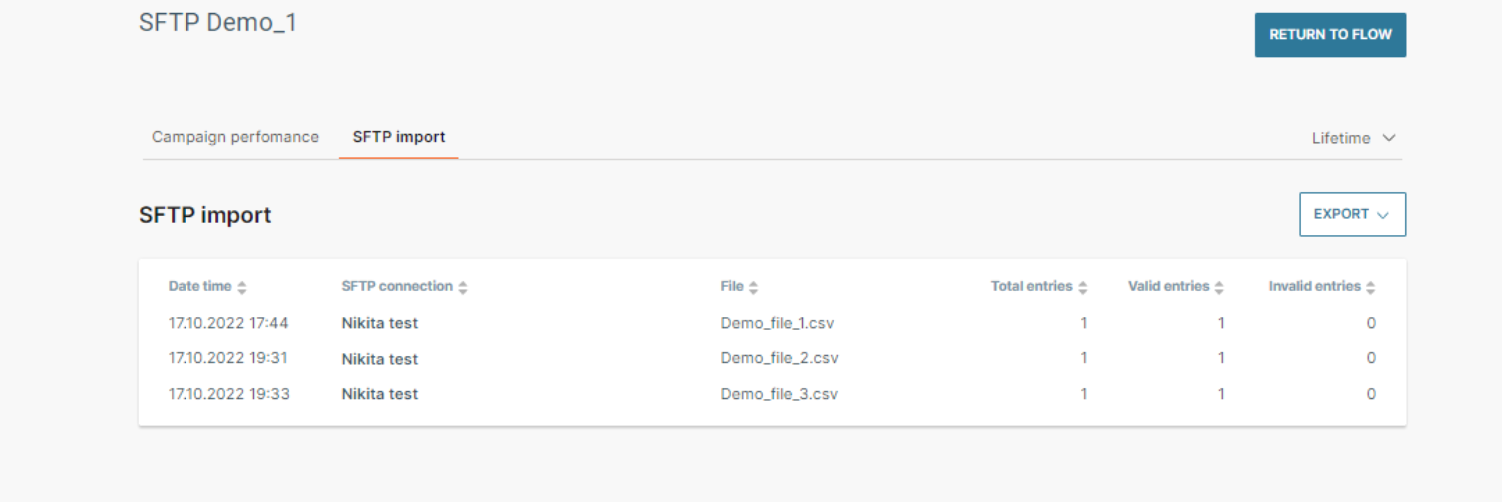
SFTP import [#sftp-import-performance]
If you use the SFTP Import entry point in your flow, you can view the performance of your imported data. This entry point ensures that new files are processed correctly when they are uploaded to the system from your SFTP server, and that the entries in the uploaded file are being added to your flow without error.
In the flow editor, select View flow performance > SFTP Import tab to see the import performance. You can see the following data:
| Column | Description |
|---|---|
| Date time | A timestamp of when the file is fetched from your SFTP server. |
| SFTP connection | The name of the SFTP connection used. If there are connection errors when trying to fetch the file, the errors are displayed. |
| File | The name of the file that is fetched from your SFTP server. |
| Total entries | The total number of entries in the .csv file that is uploaded from your SFTP server. |
| Valid entries | The total number of entries in the file that were successfully added to flow. |
| Invalid entries | The total number of entries in the file that were not added to the flow. You might see invalid entries for the following reasons: - For imports that contain only one type of contact information (phone number or email address): If the contact information is empty or invalid, an error is displayed. - For imports that contain both types of contact information (phone number and email address): - Both types of contact information are invalid: Error is displayed. - One type of contact information is valid and the other is invalid: Error is displayed. - One type of contact information is valid and the other is empty: Valid - no error. If there are many invalid entries in your file, review your file and correct any data issues. |
You can also export the SFTP import performance data. Select Export to export the data as a .csv file.
Monthly engaged persons consumption report [#monthly-engaged-persons-consumption-report-performance]
Moments usage is measured in terms of Monthly Engaged Persons (MEP). A single MEP represents a unique person profile who enters one or more Moments flows at least once during a single month.
A profile is counted as an MEP regardless of the number of times they enter flows or whether any message was sent to the end user.
A person enters a flow when they meet the defined entry conditions for the flow. Example: Belonging to a segment, triggering an event, or being added through SFTP file import.
How to use MEP reports
Use the MEP consumption report to view statistics about engaged profiles in your account. This helps you track subscription charges for engaged profiles each month. The report includes the date and time of engagement, and MEP by campaign.
How MEP is calculated
Each unique person profile that enters a flow during a month is counted as MEP for that month.
The following table shows the actions taken by end users that count as an MEP. If multiple actions apply to the same end user, only one MEP is counted for that end user.
| Action | MEP count |
|---|---|
| An end user entered 1 flow multiple times in a month. | Counted as 1 MEP. |
| An end user entered multiple flows in a month. | Counted as 1 MEP. |
| An end user entered multiple flows and received messages through different channels in each flow. Example: An end user entered a flow and received an SMS message. In the same month, the end user entered a different flow and received an Email message. | Counted as 1 MEP. |
| An end user entered the flow but did not receive the message. | Counted as 1 MEP. The MEP only depends on whether the end user entered the flow. It does not depend on whether the end user received the message or performed an action. |
| An end user entered a flow that does not contain Send elements. Example: The flow is used to update a person profile. | Counted as 1 MEP. The MEP only depends on whether the end user entered the flow. It does not depend on the elements within the flow. |
| An end user did not enter any flows during the month, but received a message that was sent over either API or Broadcast. | Not included in MEP count. |
View MEP consumption metrics
You can view MEP consumption metrics in the following ways:
- Create MEP consumption report.
- Use the MEP consumption dashboard to view your engaged profiles.
For more information, refer to the following sections.
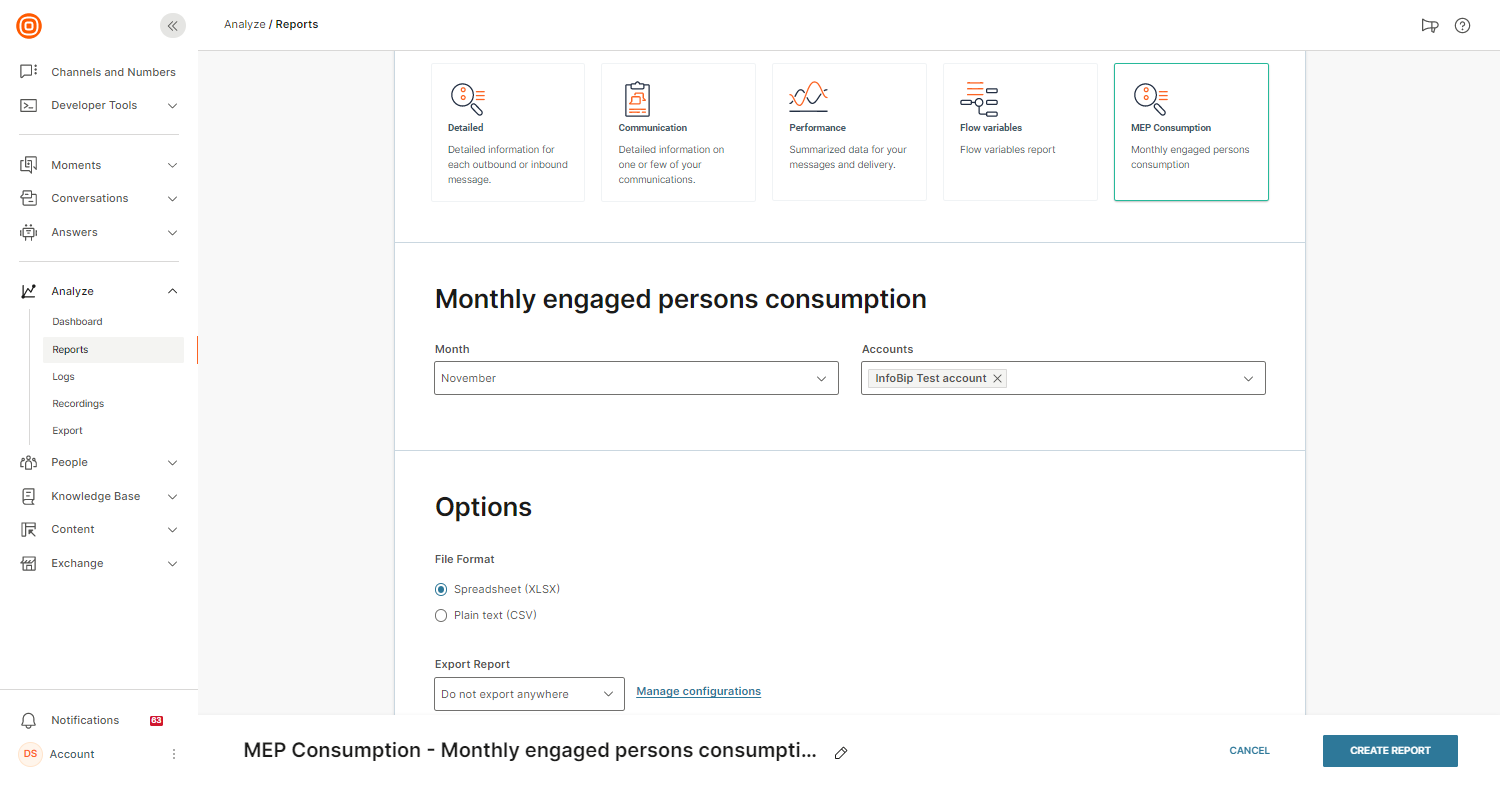
Create MEP consumption report
-
On the Infobip web interface, go to Analyze > Reports > Create Report.
-
Select MEP Consumption.
-
Name the report.
-
Select the Month for which you want the report. You can select from the last 3 months.
-
Select Accounts to view all your accounts or filter the report by sub-account.
-
Select the format in which you want to export the report. Available formats are .xlsx and .csv.
NoteIf you have a large amount of MEPs (more than 10,000) select .csv format.
-
Select Create report.
A report of the data is generated. The following information will be included in your report:
- Person ID
- Engaged At
- Billed At
- Campaign ID
- Campaign Name
View MEP consumption dashboard
View the dashboard
To access the MEP consumption dashboard for your account, on the Infobip web interface, go to Moments > Analytics > MEP consumption tab.
This feature is only available to users with the Analyze manager or Communication manager role in your account. Contact your Account Manager if you believe you should have access to this report.
By default, the dashboard shows data for the current month. You can view data for up to three previous months. The dashboard shows data up to the current date. Example: If you view the dashboard on the 10th of the month, you will see the MEP statistics only up to the 10th.
The dashboard contains the following information:
Current subscription amount
Shows the current subscription plan that is applied to your account.
MEP consumption
Shows total MEP consumption for all your accounts.
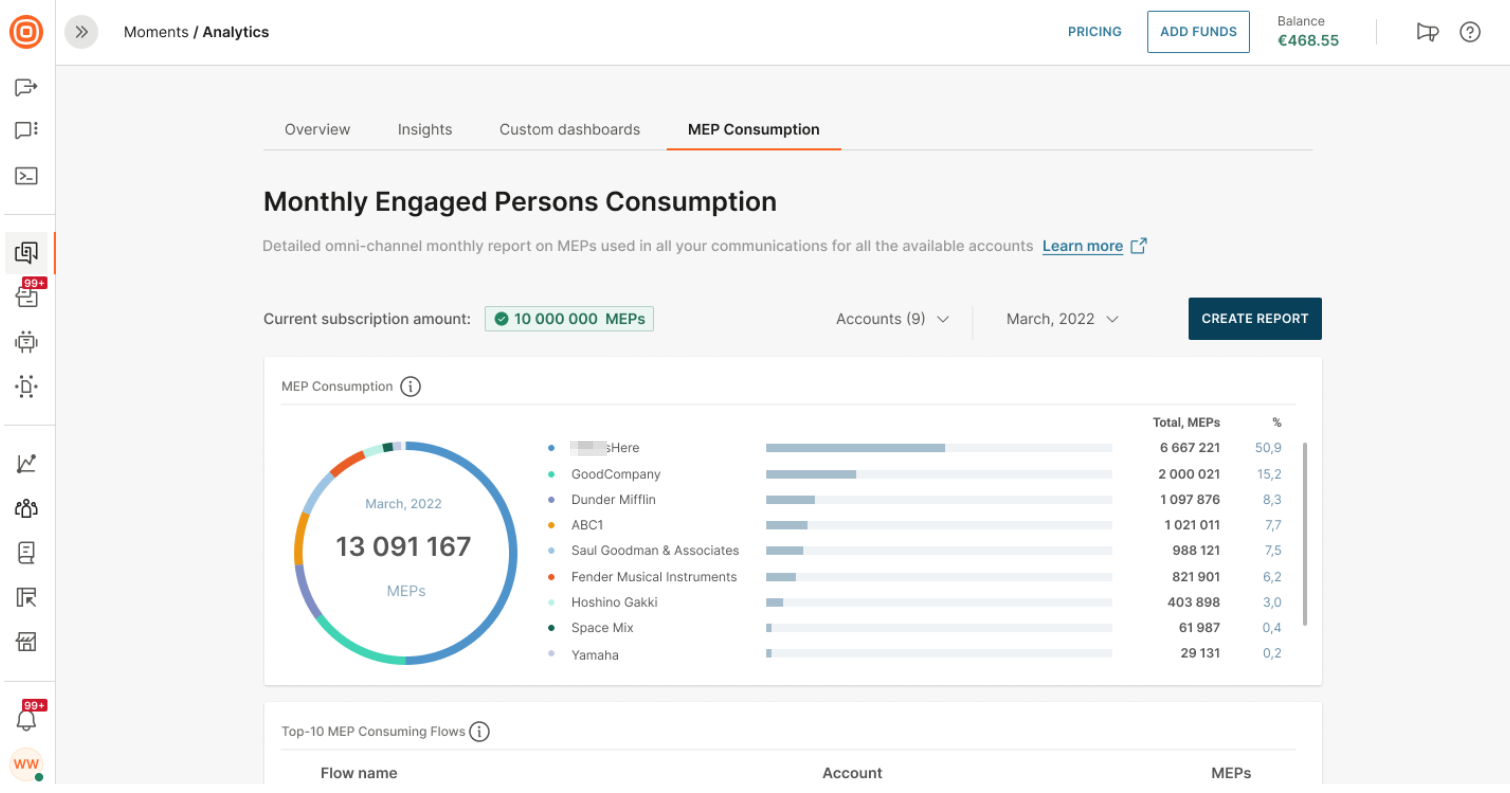
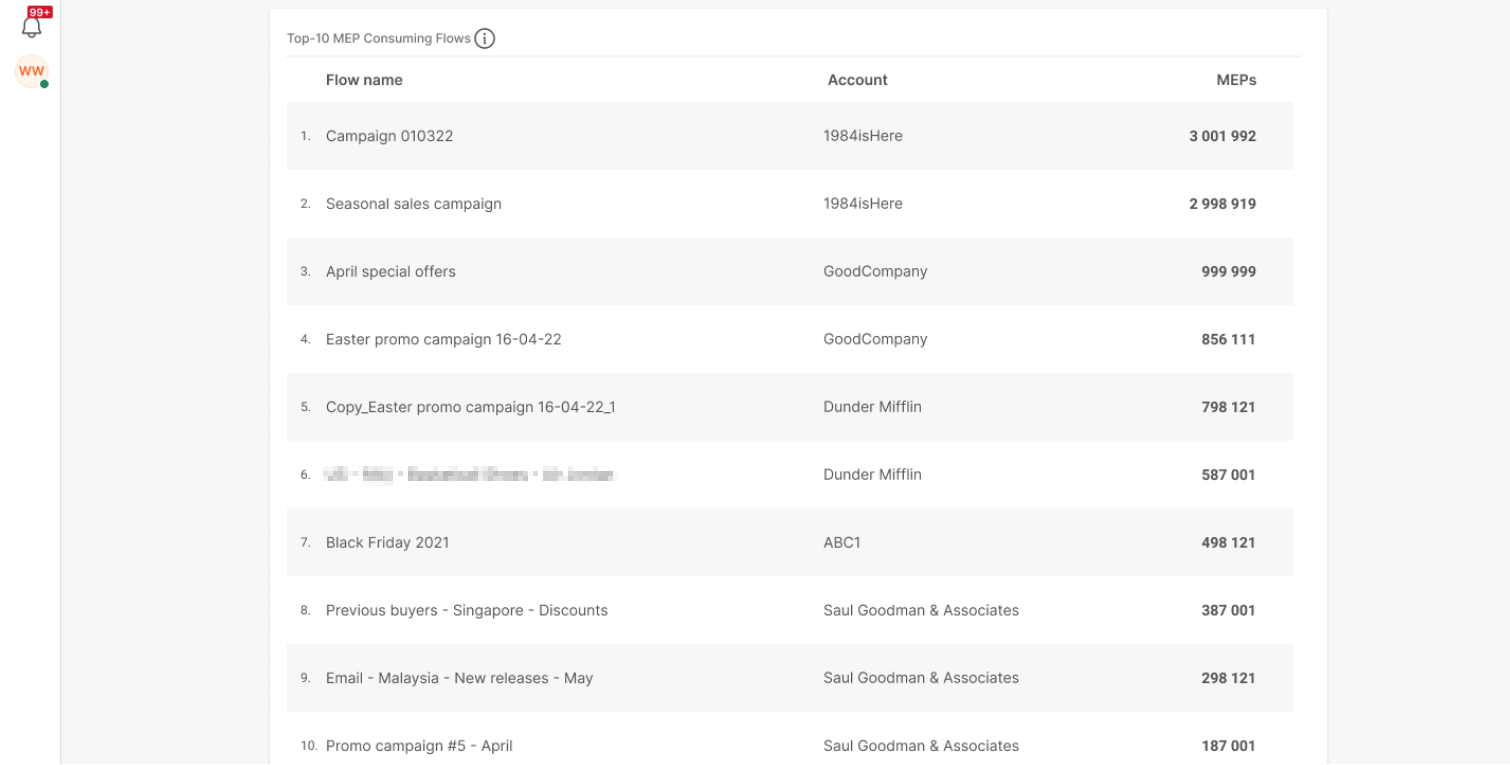
Top 10 MEP consuming flows
Shows a table view of the top 10 flows by MEP consumption.
Generate a report
- Select Create report.
- To view the generated report, go to Analyze > Reports.
Advanced analytics
EARLY ACCESS
Early Access for Advanced Analytics is available only to customers who meet specific criteria. For more information about the early access program, contact your Infobip account manager.