Create and Synchronize Profiles
The types of person profiles are key in deciding which synchronization method to use: Leads and Customers are profiles reflecting a person's status in the customer journey, while Company is a group profile that includes members of the same company. Anonymous visitors are not defined as having people profiles however if you have deployed Web SDK on a website you will be able to track anonymous visitor activity before they are converted to leads and customers.
To start creating any profile type, you need an Infobip account, and your existing customer information should be ready to get imported to People or integrated using APIs, SDKs, or external platforms.
Your current data setup and business goals will help you decide how you want to connect to our platform. For example, use JS SDK to connect your website to People: this will let you "record" user actions and send relevant messages or offer the right service. Or, you could integrate your Salesforce or Microsoft Dynamics 365 account with People and send targeted messages.
This section will be your quick guide on how to add profiles and align them between People and other Infobip solutions and external systems.
Create and Update
A good place to get familiar with People would be to build a profile manually on the Infobip web interface, and then we will get to more practical ways: adding profiles via People API and SDKs, and using them with different internal and external solutions. Browse through all the options and go for those that match your business needs.
Keep in mind that, when creating a new profile from API, you will be able to select its type: Lead or Customer. If the type is not specified, it will be recorded as a Customer profile.
Note that JS Web SDK can track events and update profile attributes for Leads; updating the Customer type is restricted.
In addition, don't use the following characters inside the the First Name, Last Name, Middle Name and Nickname fields: & < > " / \ \n \r : ( ) { } = ; #
This rule applies to the creation and editing of profiles.
Web Interface [#web-interface-create-and-update]
Sign in to the web interface, go to the People module and decide if you want to create a People profile or Company profile.
Create a Lead or Customer [#-create-a-lead-or-customer-create-and-update]
To manually add a person's profile, follow these steps:
-
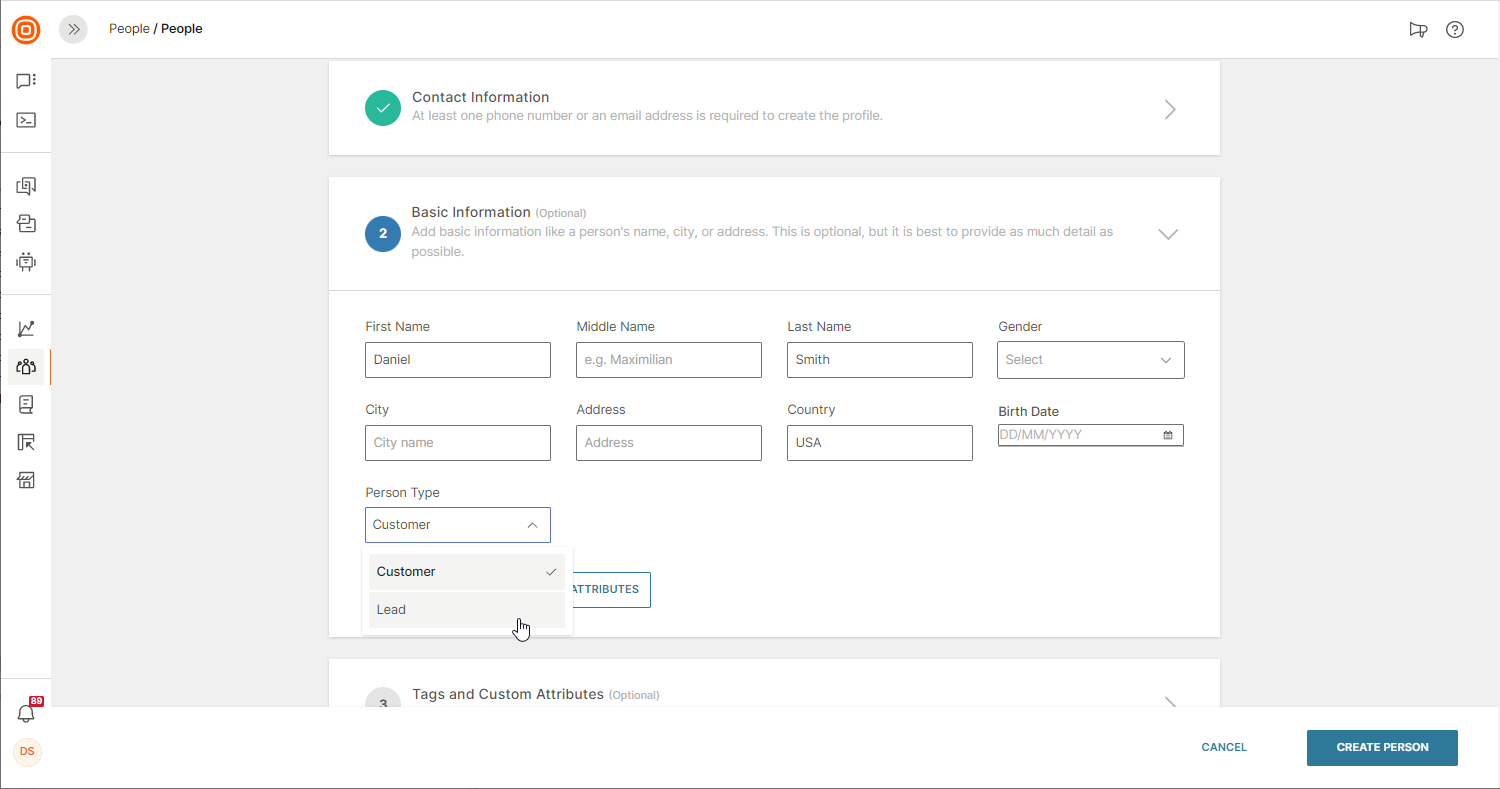
Contact Information - enter email or phone number.
-
Basic Information - enter your first and last name, address, and other optional information. Remember to select the type: Customer or Lead.
-
Finally, add any tags or custom attributes that you want linked to this profile.
-
Click Create Person.
-
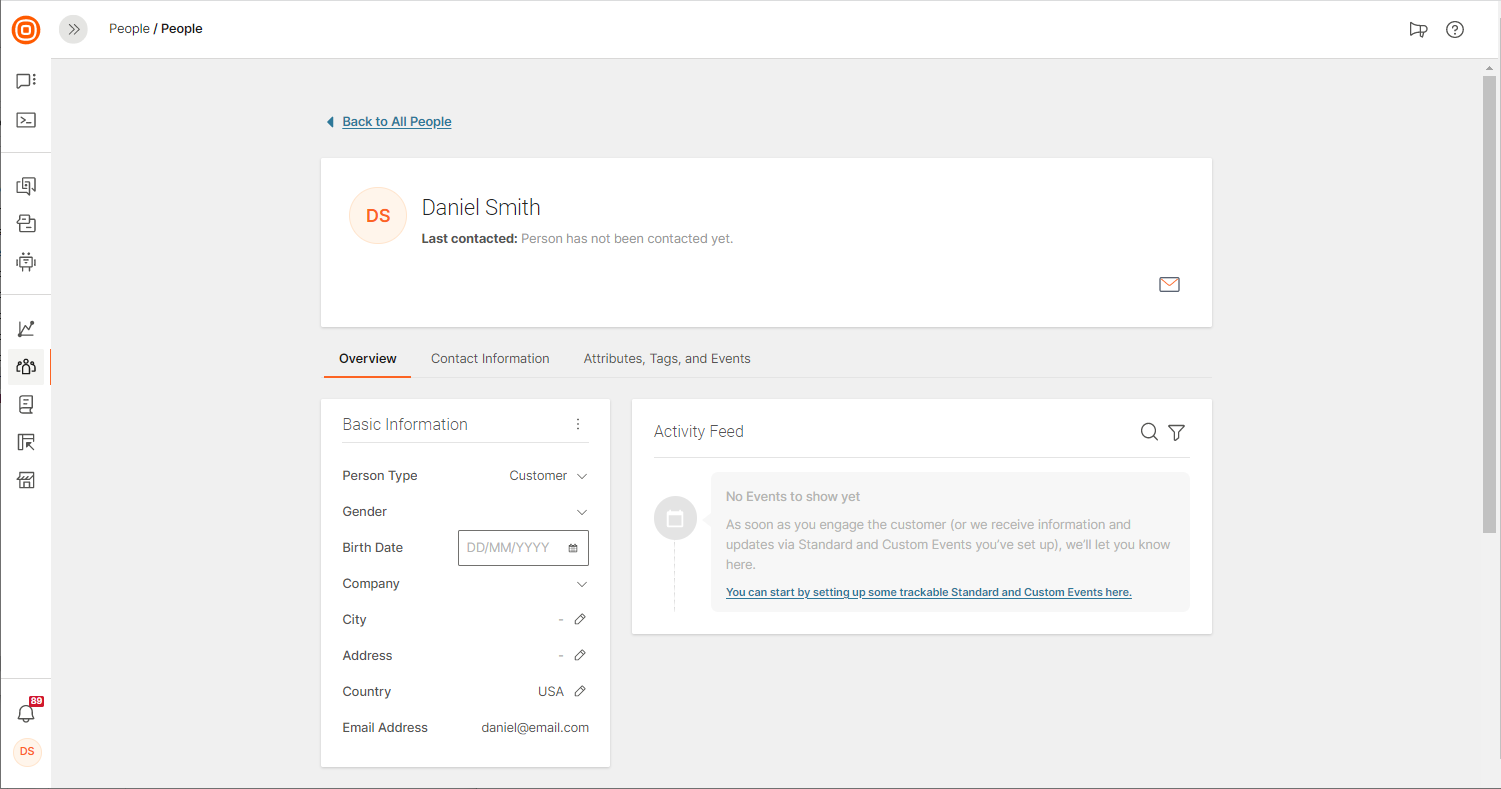
You will be redirected to the newly created profile.
Create Company Profile [#create-company-profile-create-and-update]
On the main page in the People module, click Create Company to enter the company name and domain. Basic information and any relevant tags and custom attributes are optional, but it is best to add as much information as possible. This will add to the relevance of your communication with businesses.

Each company page has two sections: Overview and People.
API [#api-create-and-update]
The Infobip People API connects your website, CRM, or app to our data platform. You can do basic CRUD (Create, Read, Update, Delete) operations and, in some cases, more advanced operations over the following objects in People:
- Profiles
- Companies
- Tags
- Custom attributes
- Contact information: Push
- Events
For more information about these operations, refer to the People API documentation.
To start using these objects, follow the steps, including getting your API key, in the Infobip API documentation. Next, learn how to manage your audience. .
Web SDK [#web-sdk-create-and-update]
Web SDK is a JavaScript library that Infobip provides to enable you to integrate your website with People. The Web SDK enables progressive customer profiling by:
- Tracking activity of both anonymous and known visitors on your website (sessions, pages viewed, custom site actions that you define)
- Converting anonymous visitors to new Leads or matching to existing Lead profiles as they fill out a web form or subscribe to a newsletter and merging their entire pre-identification website activity to the identified profile.
- Matching anonymous visitors to existing Customer profiles as they log into their site account and merging their pre-login session events into the Customer profile timeline.
- Updating Lead profiles with information collected from identified users on the website.
If you have Google Tag Manager integrated in your website, you can add the People Web SDK to the Google Tag Manager. So, you can manage the SDK and your other tracking tags in the same interface.
To get started with the Web SDK, refer to the People Web SDK Github documentation.
Mobile SDK [#mobile-sdk-create-and-update]
Mobile SDK covers Leads and Customers. A few scenarios apply to this method:
-When the user installs an app and opens it, an empty Lead profile will be created. Check out the following quick start guides:
Plugins guide for Frameworks
-When the user logs in, and Infobip confirms this is a real Lead profile using the data from the 3rd system, this is what happens:
- If the Lead does not exist in People, a Customer profile will be created, together with the provided contact information.
- If the Lead profile exists, it will be deleted based on the matching email address or phone number. A new Customer will be created using the push registration (PushReg ID), and all provided information will be included.
- If the Customer profile exists, PushReg ID is moved from Lead to Customer profile. The Lead is deleted.
The Users and Installations documentation will help you set up everything:
Plugins guide for Frameworks
-When the user logs out, the app is disconnected from the existing Customer profile and a new, empty Lead is created.
Auto-profile management through internal integrations [#profile-internal-integrations]
External systems might be connected to Infobip products. Example: A web page can have a call-to-WhatsApp button that starts a session with an Answers chatbot. When end users interact with such external systems, profiles are automatically created or updated in People.
Moments: Collect leads and nurture them to customers via Flow, our two-way communication tool, or use Broadcast for one-way communication. Information acquired during that communication will be automatically updated in People.
When an inbound SMS message is received over Flow and the person's profile doesn't exist, a Lead will be created in most cases. If a Lead or Customer profile does exist, it will be used in Flow.
Answers: Save Answers product events such as the start or end of a chatbot session to Person profiles in People. When an end user starts a session with your chatbot, the following happens.
- If a profile exists for the end user, the events are added to the profile.
- If a profile does not exist, a new profile of type Customer is automatically created in People. The product events are then added to this profile.
This feature is enabled by default for new Answers customers.
If you are an existing customer and want to activate this functionality, you must enable the required Answers Product events in People and acknowledge profile auto-provisioning.
Conversations: Save Conversations product events, such as the start or end of a session, to Person profiles in People. When an end user starts a session in Conversations, the following happens.
- If a profile exists for the end user, the events are added to the profile.
- If a profile does not exist, a new profile of type Customer is automatically created in People. The product events are then added to this profile.
This feature is enabled by default for new Conversations customers.
If you are an existing Conversations customer and want to activate this functionality, you must enable the required Conversations Product events in People and acknowledge profile auto-provisioning.
Forms: When an end user submits a form on your website, the following happens:
- If a profile exists for the end user, specific processing rules are applied to the profile.
- If a profile does not exist, a new profile of type Lead is automatically created in People.
Import
Instead of manually creating each profile, your existing data for Leads, Customers, and Companies can be transferred to People using Files or API. These are the main import rules:
- By default, we import Leads if the type is not specified.
- User can specify a type that will be used during the import.
Lead Profiles [#lead-profiles-import]
Check if the profile of the type Lead already exists:
- If it doesn't, a new Lead or Customer is created.
- If there is a duplicate profile: choose to make no changes or rewrite the current profile. Lead will be updated; if the Customer profile is being created, only empty fields are filled.
Customer Profiles [#customer-profiles-import]
If the CRM integration with the People module is possible, check whether the profile can be created using our web interface or API. If it can, a new lead or customer is created. If not, see if the profile exists on the People platform:
- If the profile doesn't exist, a new Lead or Customer is created.
- If there is a duplicate profile, choose to make no changes or rewrite the current Lead or Customer profile. The Lead profile will be promoted to Customer, and the Customer profile will be updated.
Use Files [#use-files-import]
Prepare the file [#prepare-the-file-import]
The file must follow these specifications:
-
Supported file format: .csv, .xls, .xslx, .txt, or .zip
NoteIf there are issues when importing .xlsx files that contain Kanji text, convert the file to either .xls or .csv format.
-
Maximum file size: 25 MB
- For all file formats other than .zip files, if the file size exceeds the maximum file size, try compressing it into a .zip file.
-
Zip file: The .zip file should contain only 1 compressed file. If you add more than 1 file, only the first file is used to create the profiles, and the other files are ignored.
-
Contact information: The file must have at least 1 column for phone number, email, or external person ID mapping.
-
Maximum contacts: You can add a maximum of 100 contacts (phone numbers and/or email addresses) for a profile. If the limit is exceeded, the import fails.
-
Multiple contacts for the same profile: To import a profile that has multiple email addresses or phone numbers, use separate rows for each contact information.
You can add a maximum of 20 additional contacts of either type. Records that exceed this limit are marked as invalid during the file analysis and skipped during import.
In the following example, the same profile has multiple phone numbers and email addresses.
ID First Name Last Name Phone Number Email 5366 John Doe 18004444444 j.doe@gmail.com 5366 John Doe 12136210002 john_d@contoso.com
Import the file [#import-the-file-import]
To import the file, follow these steps:
-
On the Infobip web interface, go to Persons > Import people.
-
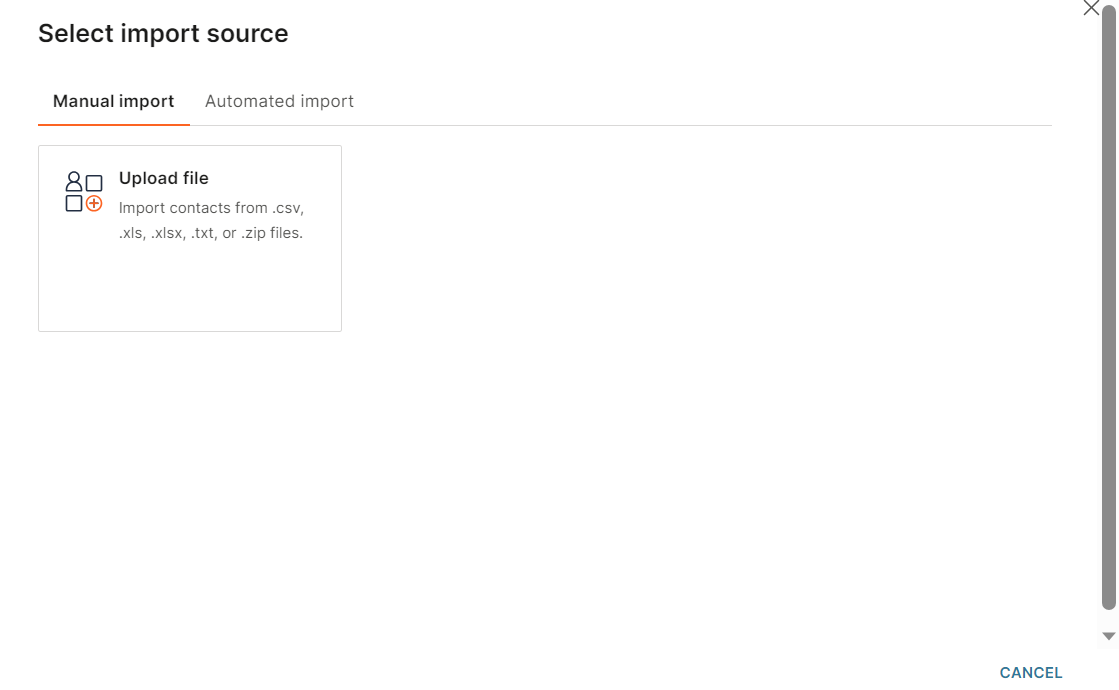
In the Manual import tab, select Upload file.
-
Select a file from your system.
-
Select Next.
-
(Optional) To skip a row, select the row number in the Skip rows field.
The rows before the specified row are ignored during the import.
-
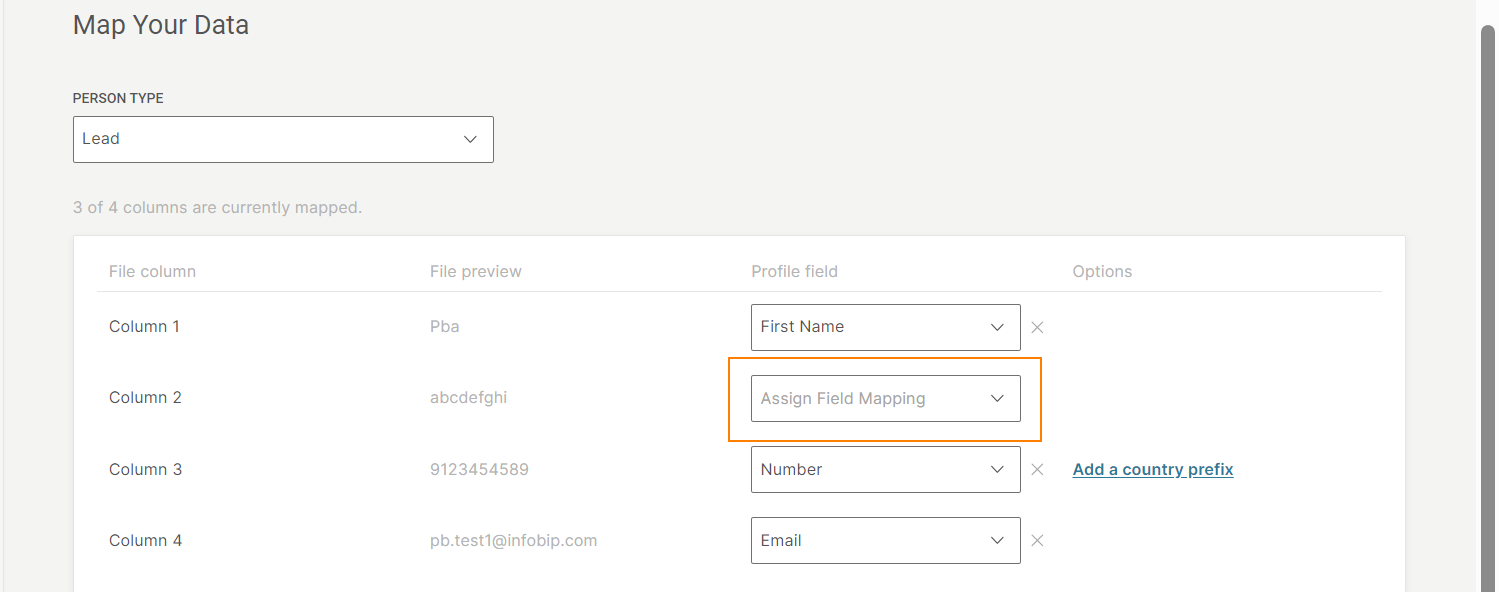
In the Person type field, choose whether the profile is for a Customer or a Lead.
This field is applied only to new profiles and not to existing profiles.
-
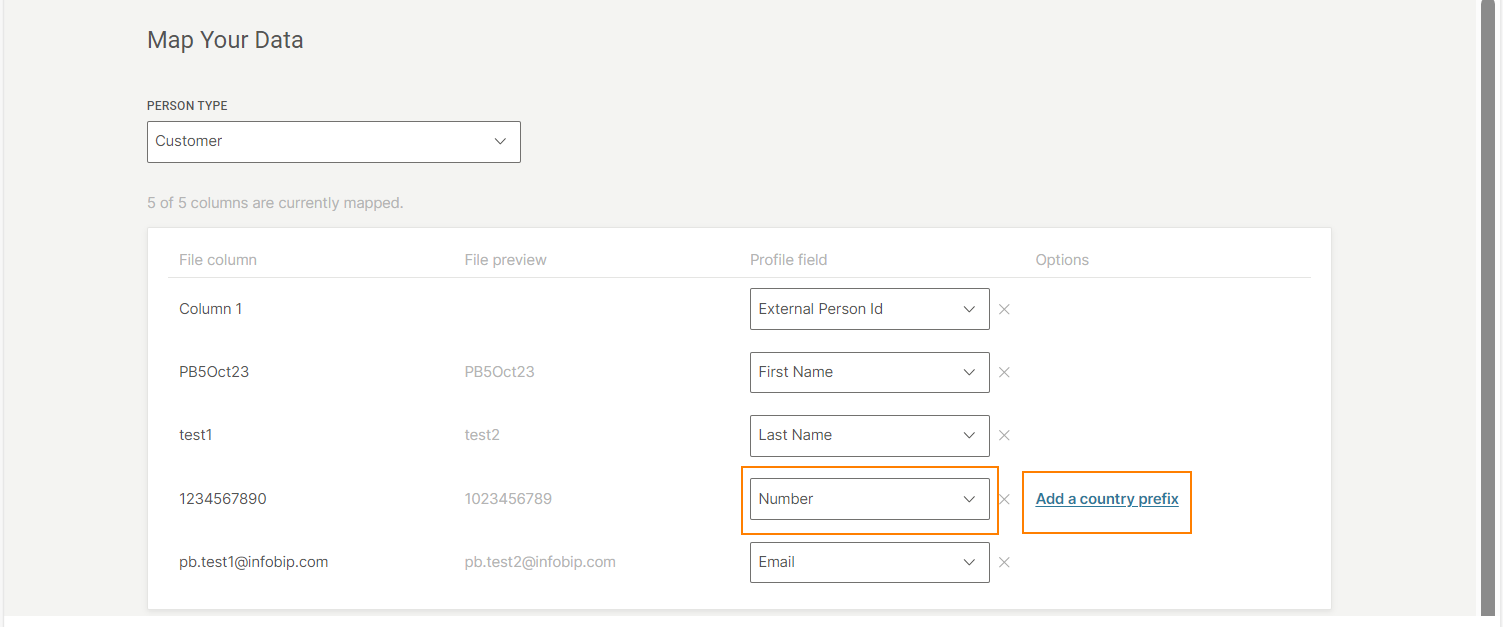
In the Map your data section, map each column in the file to fields in People. For each column, choose the relevant Profile field.
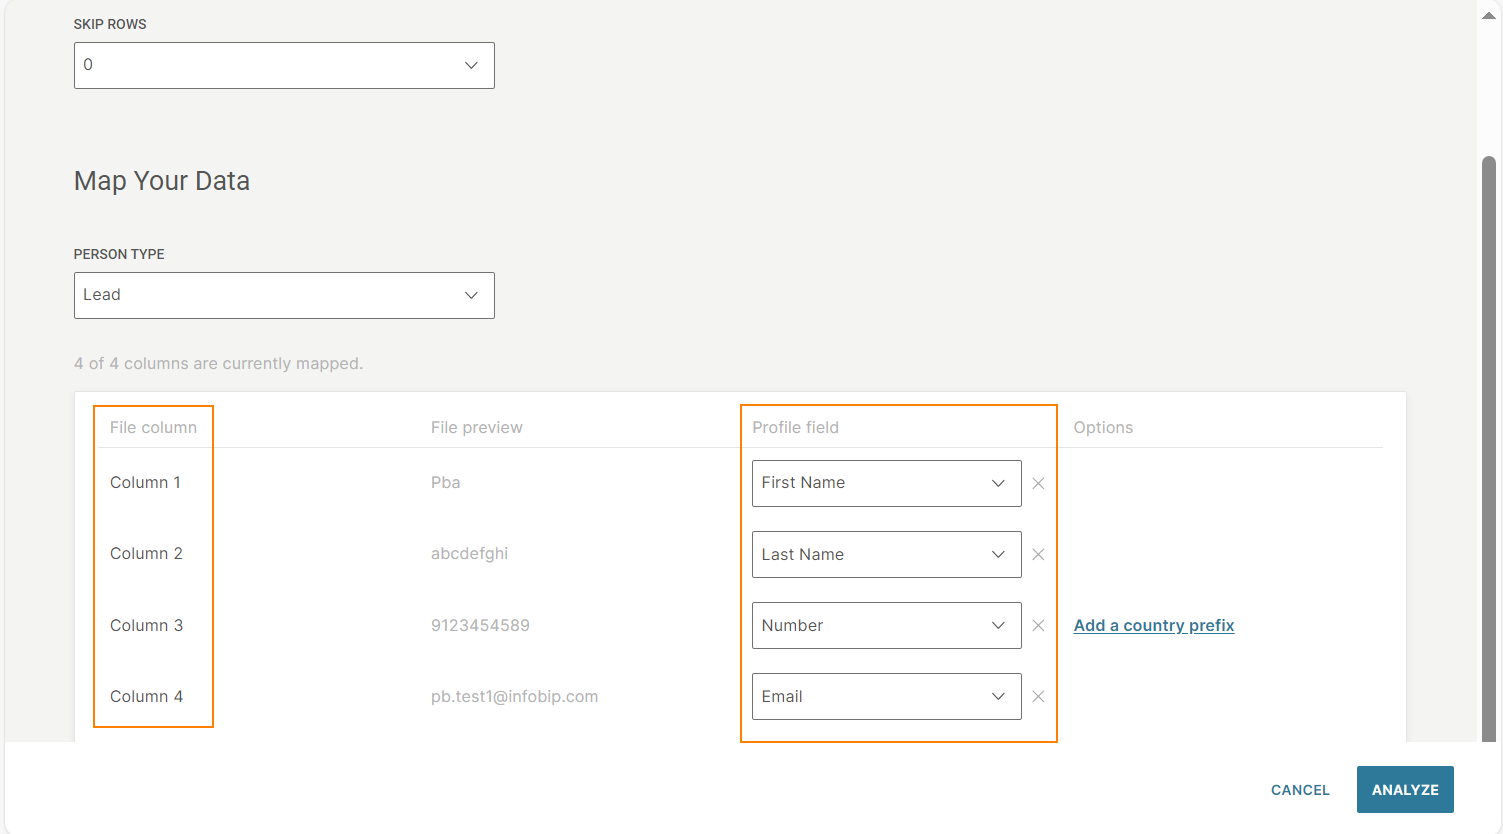
Follow these guidelines:
-
You must map at least 1 column as a number or external person ID. Otherwise, the data will not be imported from your file.
-
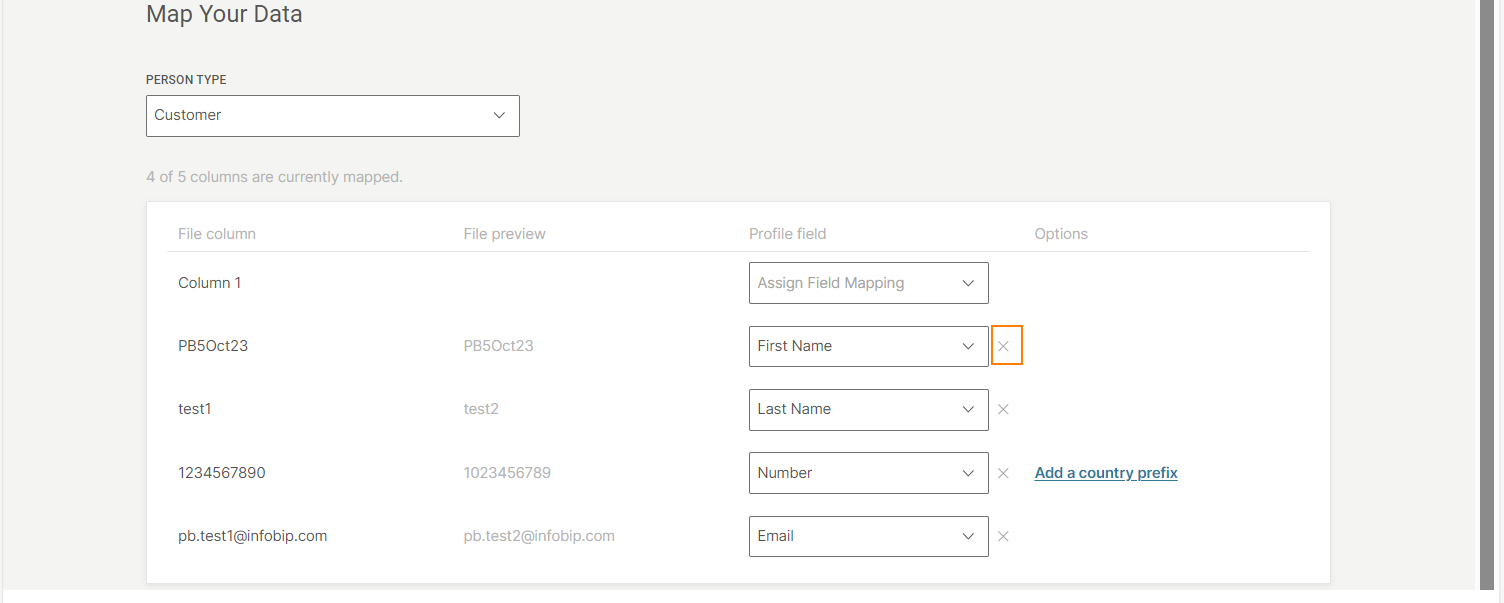
You can map only 1 column to each profile field. If you map multiple columns to the same profile field, the most recent selection is saved.
Example: If you map Column 1 as Number and then Column 2 as Number, the profile field selection for Column 1 is reset. The profile field selection for Column 2 is Number.
-
To skip a column in the file, do not choose an option in the Profile field.
The system does not import these columns.
Example: To skip Column 2, leave the corresponding profile field blank.
-
(Optional) If you select Number in the Profile field, you can add the country prefix for the phone number.
In the Options field, select Add a country prefix and choose the country from the list.
To modify your selection, select another country from the list.
To discard your selection, select Unset from the list.
-
To undo the mapping for a specific column, select the undo option.
-
If you select Birth date in the Profile field, choose the date format from the list in the Options field.
-
If you select Tags in the Profile field, choose the tag delimiter from the list in the Options field.
-
-
Select Analyze.
-
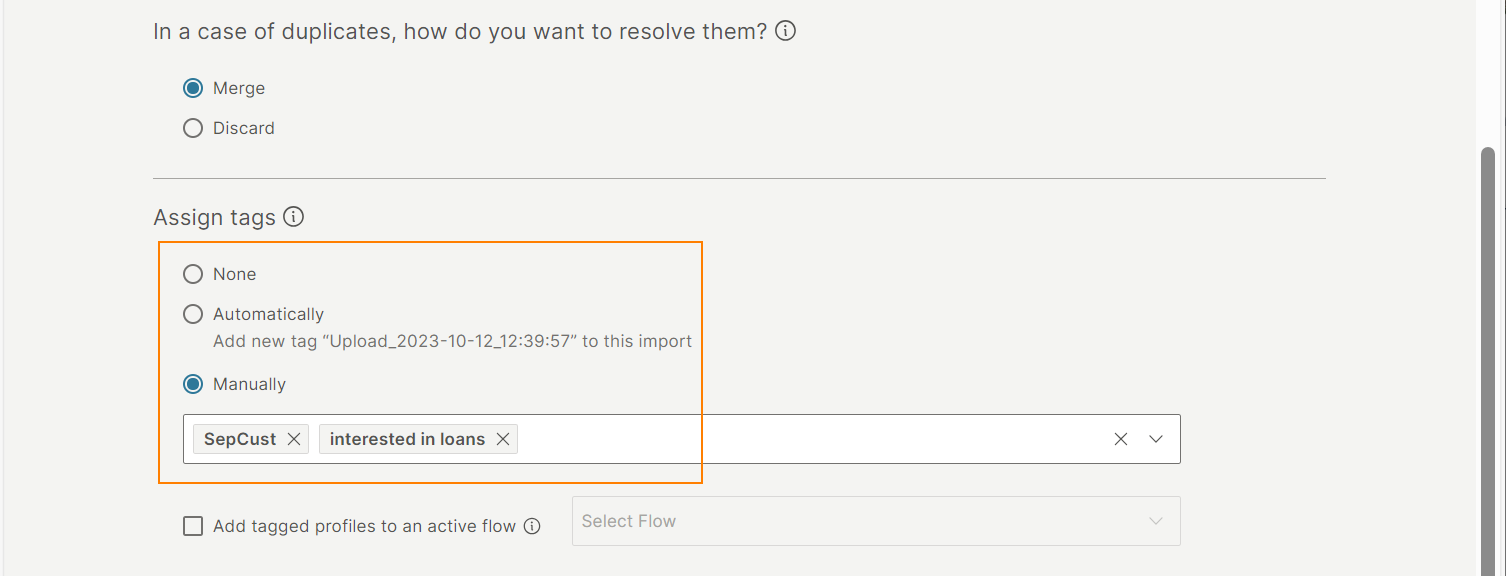
Select what to do when any records in the file contain one or more unique identifiers (email, phone number, or external ID) that match existing profiles in People.
- Discard – Do not import the records into People.
- Merge – Merge the records into the matching profile in People. Merge rules are applied by considering the profile in People as the Primary profile.
NoteYou cannot have more than 100 contacts (phone numbers and/or email addresses) for a single profile in People. If the limit is exceeded, the import fails.
-
Assign tags to track the profiles that were imported. Select one of the following options:
- None - Tags are not applied to the imported profiles.
- Automatically- A default system tag is applied to the imported profiles.
- Manually - Either create new tags or select existing tags to apply to the imported profiles. You can add more than one tag.
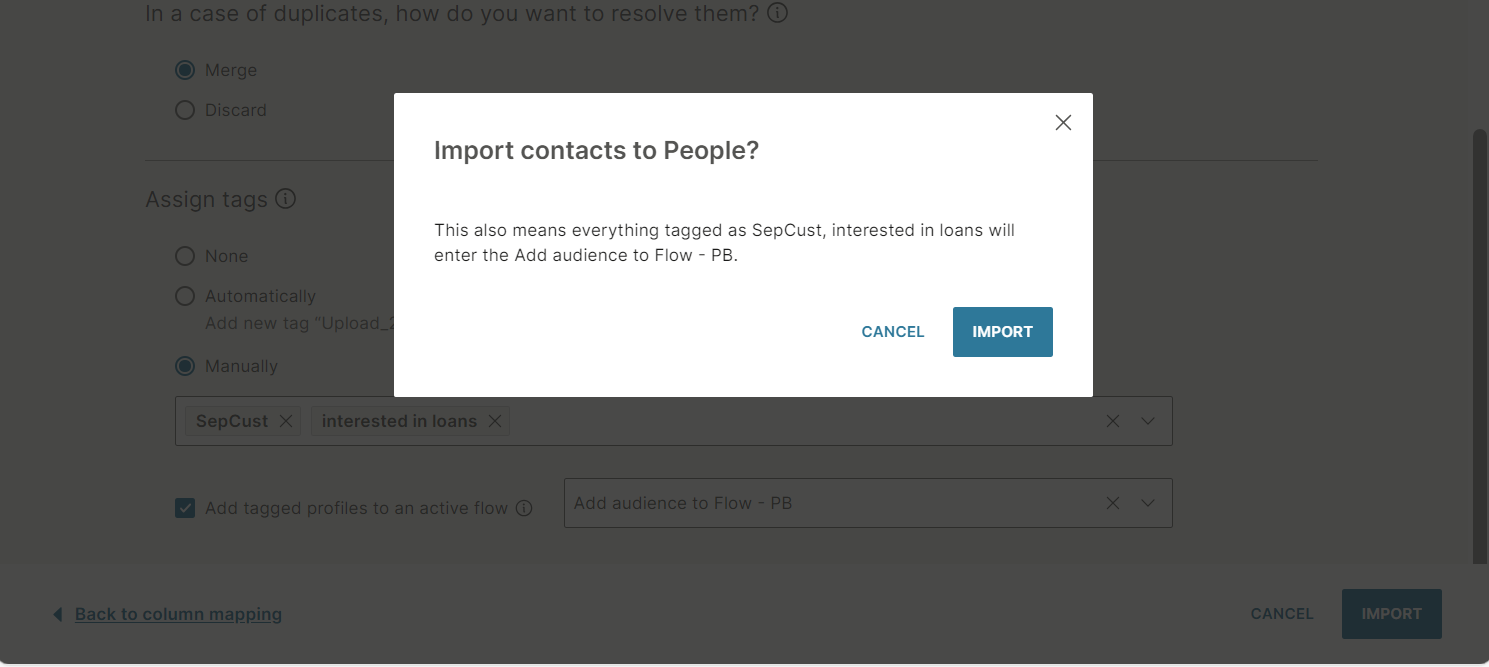
-
To include the tagged profiles in an existing active flow, enable Add tagged profiles to an active flow. Select the required flow from the list. The following happens:
- All tags that you specify in the Assign tags section are added to the Predefined Audience entry point of the selected flow.
- All profiles that contain these tags enter the flow.
- If the tags are assigned to profiles after the import, these profiles enter the flow.
- If you specify an existing tag, all profiles that contain these tags enter the flow, even if the profiles are not part of the import file.
This field is applicable only if you assign tags either manually or automatically.

-
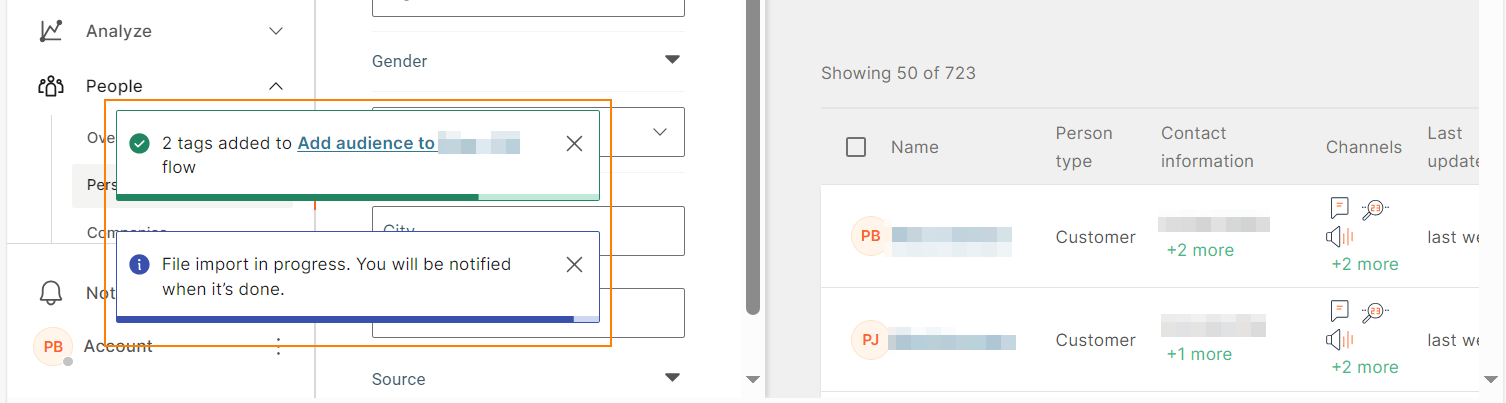
Select Import.
-
On the confirmation screen, select Import.
The import time depends on the amount of data in your file. You will get a notification when the profiles are added to People.
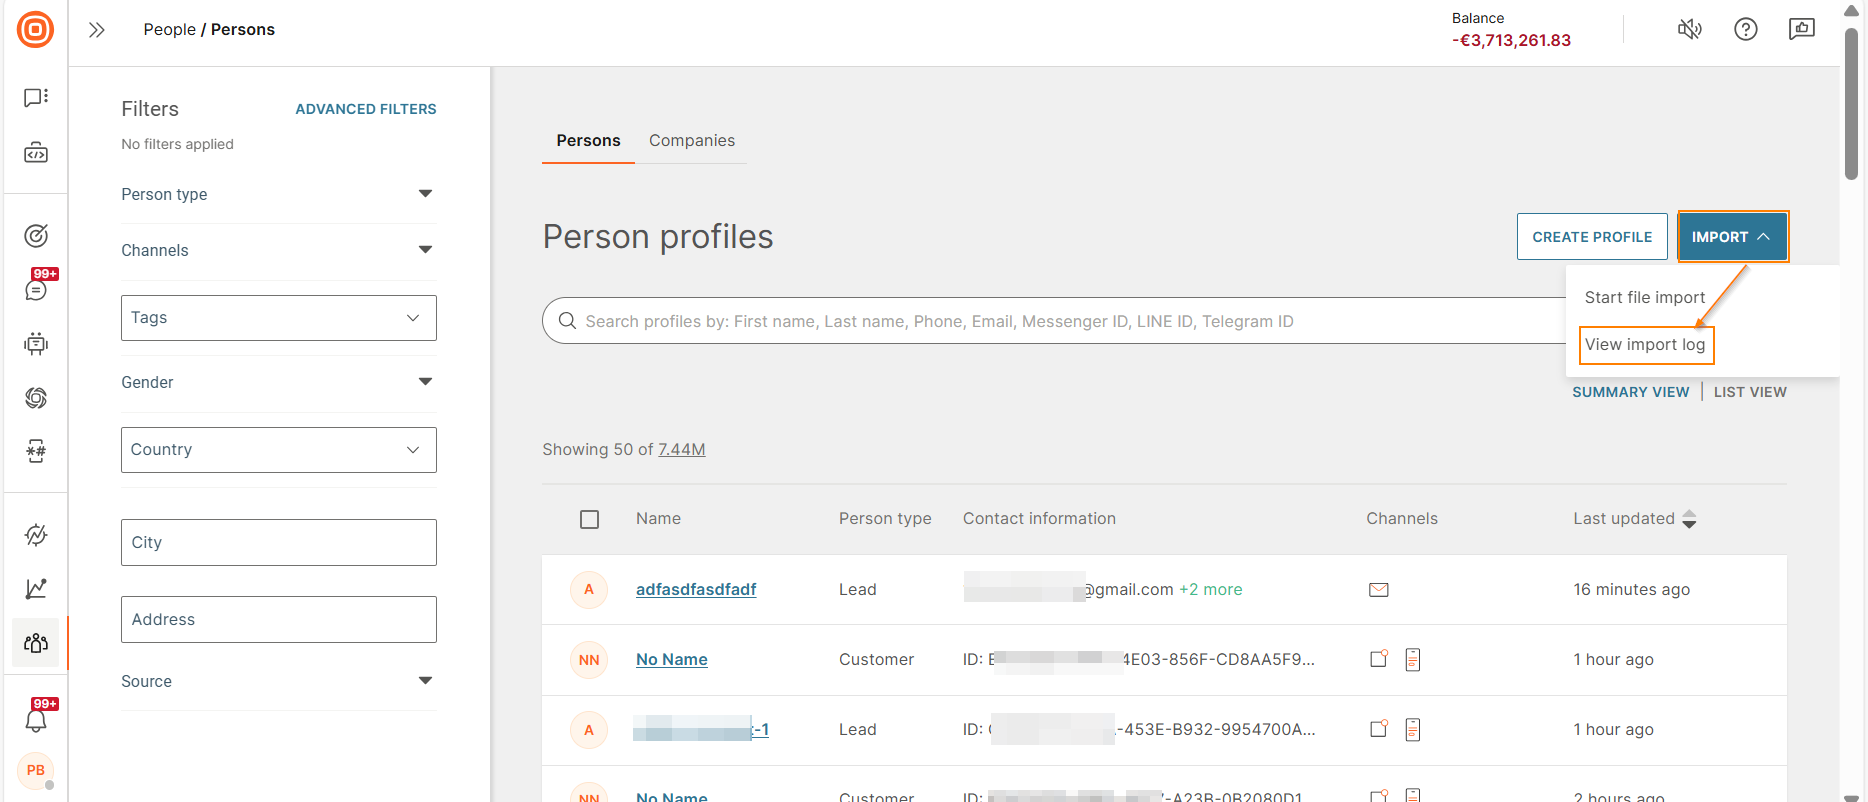
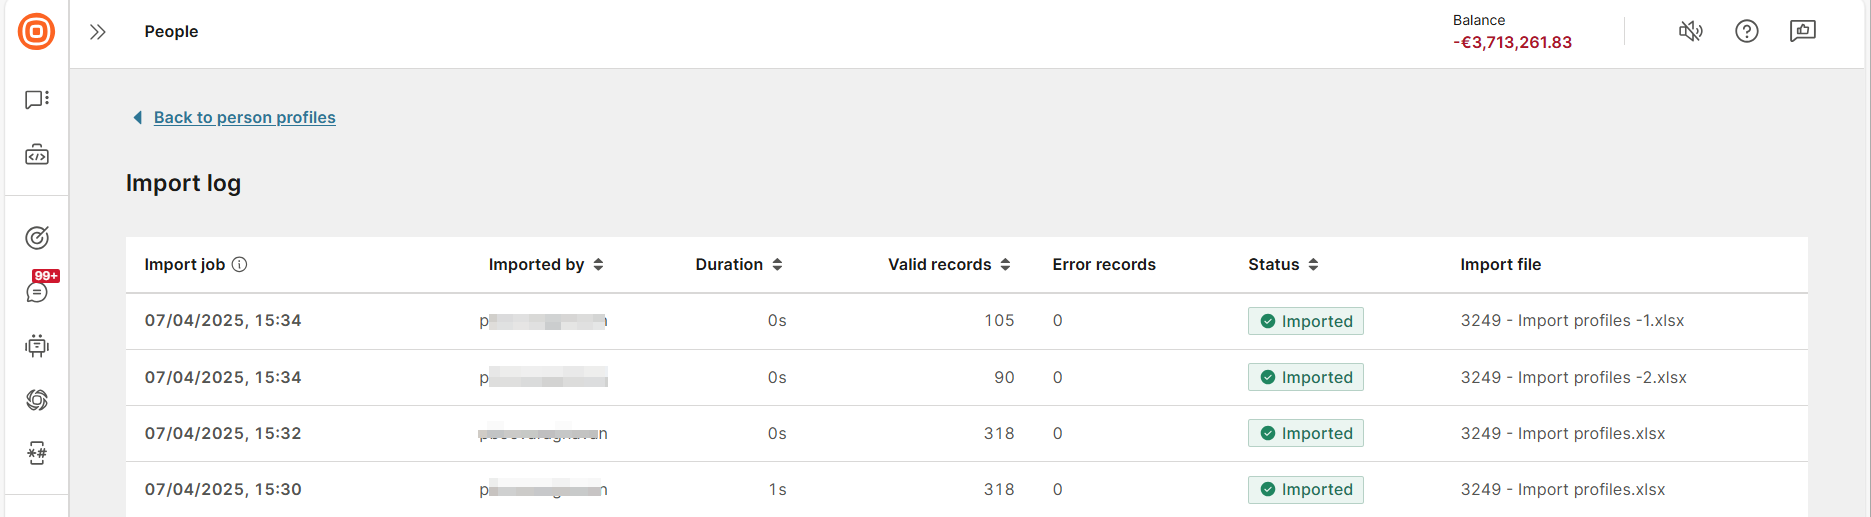
View import log
To view the details about the import, select Import > View import log on the Person profiles page.
You can view the following information:
- Import job: Timestamp indicating when the import was completed.
- Imported by: Person who created the import.
- Duration: Time taken to complete the import.
- Valid records: Number of records that were successfully imported.
- Error records: Number of records that contained errors and were not imported.
- Status: Status of the import.
- Import file: The file that was imported.
Use API [#use-api-import]
Choose to use People API if you want to completely eliminate the need for manual import of audience information to the customer data platform. Generate your API key, and then go over the instructions about how to manage audiences.
Resolve and merge duplicate profiles [#merge-duplicate]
People collects, unifies, and manages end user information from multiple sources. This might result in multiple profiles being created in People for the same end user. To create a single customer view, People uses merge rules that resolve conflicts and unify attributes into a single primary profile.
Merge rules [#merge-rules]
People identifies one of the profiles as primary and merges relevant data from the duplicate profiles into it.
The following rules apply for the merge process:
-
Identify the primary profile by Date created: The profile with the earliest creation date is the primary profile.
-
Fill in missing attributes in the primary profile: If the primary profile has empty attributes, they are filled by using data from the other profiles that are being merged.
-
Resolve conflicting attributes: Some standard and custom attributes support only one value. Example: First name, last name, address, country, date of birth, and external ID.
So, if multiple profiles have different values for the same attribute, the following rules apply:
- The profiles are of different types: If the profiles are of different types (Lead and Customer), data from the Customer profile is used in the Primary profile, regardless of which profile was modified more recently.
- The profiles are of the same type: If the profiles are of the same type (Lead or Customer), the data from the most recently modified profile is used in the primary profile.
- Exceptions: The primary profile's creation attributes are unchanged. Example: Date created, Source, and Created by.
-
Combine attributes that support multiple values: Attributes such as phone number, tags, and email support multiple values. When profiles are merged, values for each attribute from all profiles are added to the primary profile.
This includes the following:
- All contact information. Example: Phone numbers, Email addresses, and RCS ID.
- Activity feed
- Tags
-
Conversations are saved only for primary profile: Only the conversations that are linked to the primary profile are saved.
-
Update Date modified: The Date modified attribute of the primary profile changes to the date the profiles were merged.
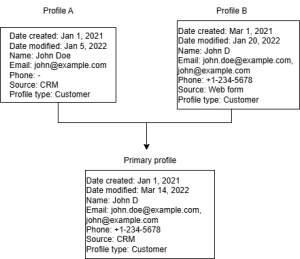
Example
Profiles A and B have a common identifier, the email address. So, these profiles need to be merged.
Before merge
| Profile attribute | Profile A | Profile B | Issue |
|---|---|---|---|
| Date created | Jan 1, 2021 | Mar 1, 2021 | |
| Date modified | Jan 5, 2022 | Jan 20, 2022 | |
| Name | John Doe | John D | Conflict in name |
| john@example.com | john@example.com john.doe@example.com | Profile A has one email address. Profile B has two email addresses | |
| Phone | No value | +1-234-5678 | Phone number is missing in Profile A |
| Source | CRM | Web form |
Merge process and result
The merge rules are applied on these profiles as follows:
| Merge rule applied | Details | Resulting value in primary profile |
|---|---|---|
| Identify primary profile by Date created | Profile A has the earliest creation date | Profile A is the Primary profile |
| Fill in missing attributes in the primary profile | Phone number in Profile A is missing. So, phone number from Profile B is used for the primary profile. Phone number: +1-234-5678 | Phone number: +1-234-5678 |
| Resolve conflicting attributes based on the latest Date modified | Name: Profile B was modified last. So, the name from profile B is used. Name: John D | Name: John D |
| Combine attributes that support multiple values | The email addresses from Profiles A and B are combined into the primary profile. | Email: john.doe@example.com john@example.com |
| Attributes that are not changed in primary profile | Date created and source are not changed. | Date created: Jan 1, 2021 Source: CRM |
| Update Date modified | The Date modified attribute in the primary profile changes to the date the profiles were merged. Date modified: Mar 14, 2022 | Date modified: Mar 14, 2022 |
The following image shows the profiles before and after merge:
Ways to merge profiles [#merge-profiles-ways]
You can merge profiles by using one of the following ways:
-
Automatic merge (through API call)
- Triggered programmatically when profiles are identified as duplicates.
- Profiles are combined according to the merge rules.
- No human intervention is required.
-
Semi-automatic merge (when importing profiles)
- When importing data, People identifies potential duplicates.
- You can decide whether to merge or discard conflicting profiles.
- If you decide to merge, the profiles are combined according to the merge rules.
-
Manual merge (from the Infobip web interface)
- You can merge only two profiles.
- Manually select the profiles in People on the Infobip web interface.
- Manually select the attribute values that you want to merge.
Merge profiles manually [#merge-manually]
If there are duplicate profiles in People, you can merge them manually. Do the following:
-
Go to the Persons page.
-
Use filters to list the profiles that you want to merge.
-
Do one of the following:
- Select a profile and then search for the duplicate one in the right-hand panel.
- Select the profiles that you want to merge.
NoteYou can merge only two profiles.
-
Select Merge.
-
In the right-hand panel, decide the information to keep in the merged profile.
- For single-value attributes, only conflicting attributes are displayed.
- You must select at least one contact information attribute.
- If an attribute exists only in one of the profiles, it is automatically added to the merged profile. To view these attributes, select Show more.
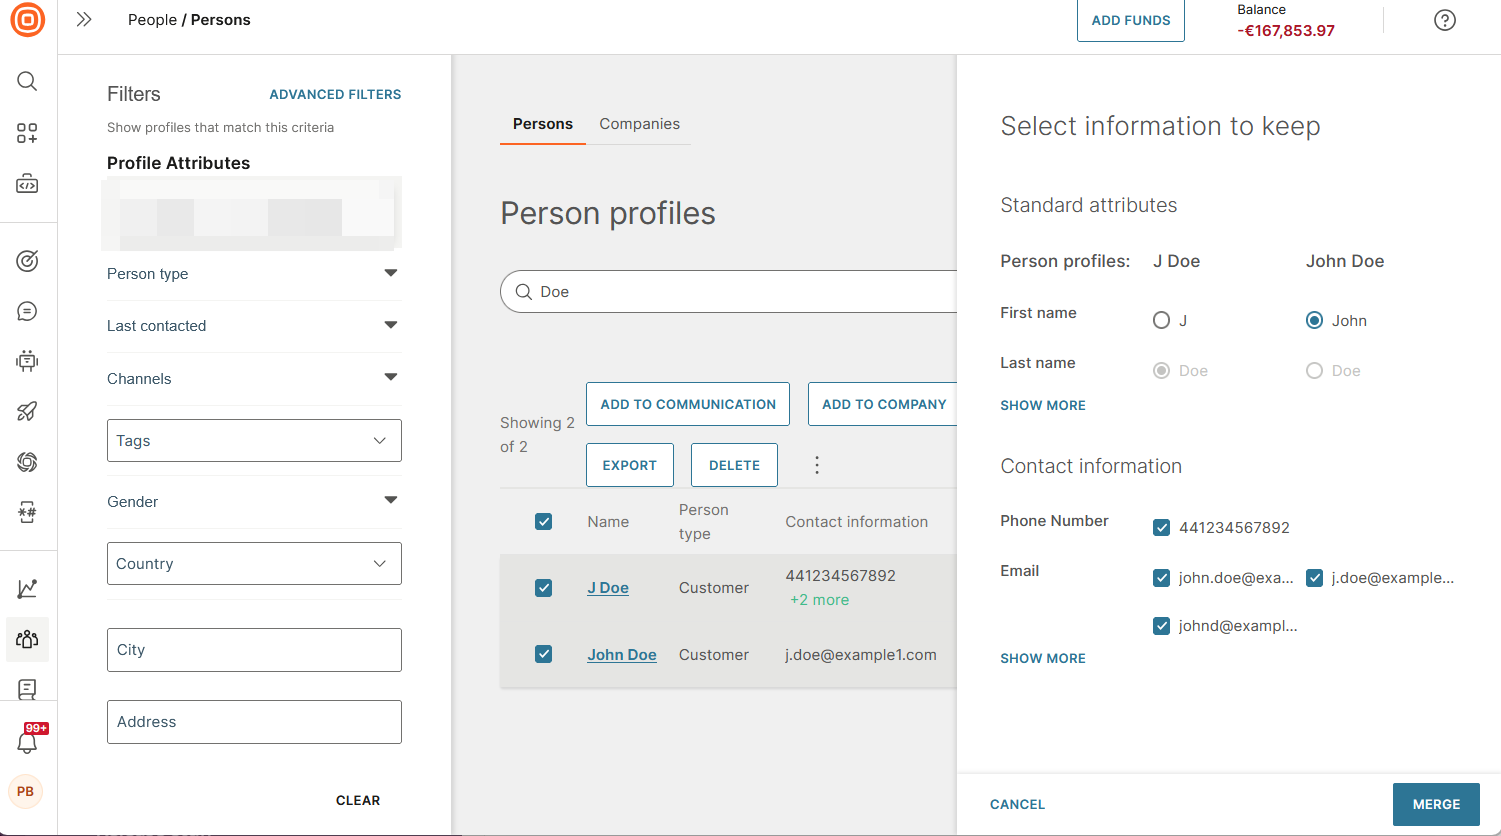
-
Select Merge.
Synchronize
Keep the information between your platform and ours continuously flowing and updating via external integration options or API.
API [#api-synchronize]
Our API documentation will guide you through the set-up. For starters, an API key is available through the Infobip API page, and for further instructions about how to manage audiences, explore the People section in our customer engagement documentation.
External Integrations [#external-integrations-synchronize]
External integrations support all types of profiles availableon our data platform. When mapping data, check that the fields match (Lead-to-Lead and Customer-to-Customer). This will be additionally explained in the integration articles for the two types of integration that we currently offer:
Export
You can export person profiles into a file.
Export profiles [#export-profiles-export]
To export profiles for Facebook custom audience, refer to the Export profiles for Facebook custom audience documentation.
For other use cases, you can export profiles as a .csv file. Do the following:
-
Go to Persons.
-
Select the profiles that you want to export.
NoteProfiles that do not have any data in the attributes or destination are not exported. So, the number of selected profiles might be different from the number of profiles in the exported file.
-
Select Export.

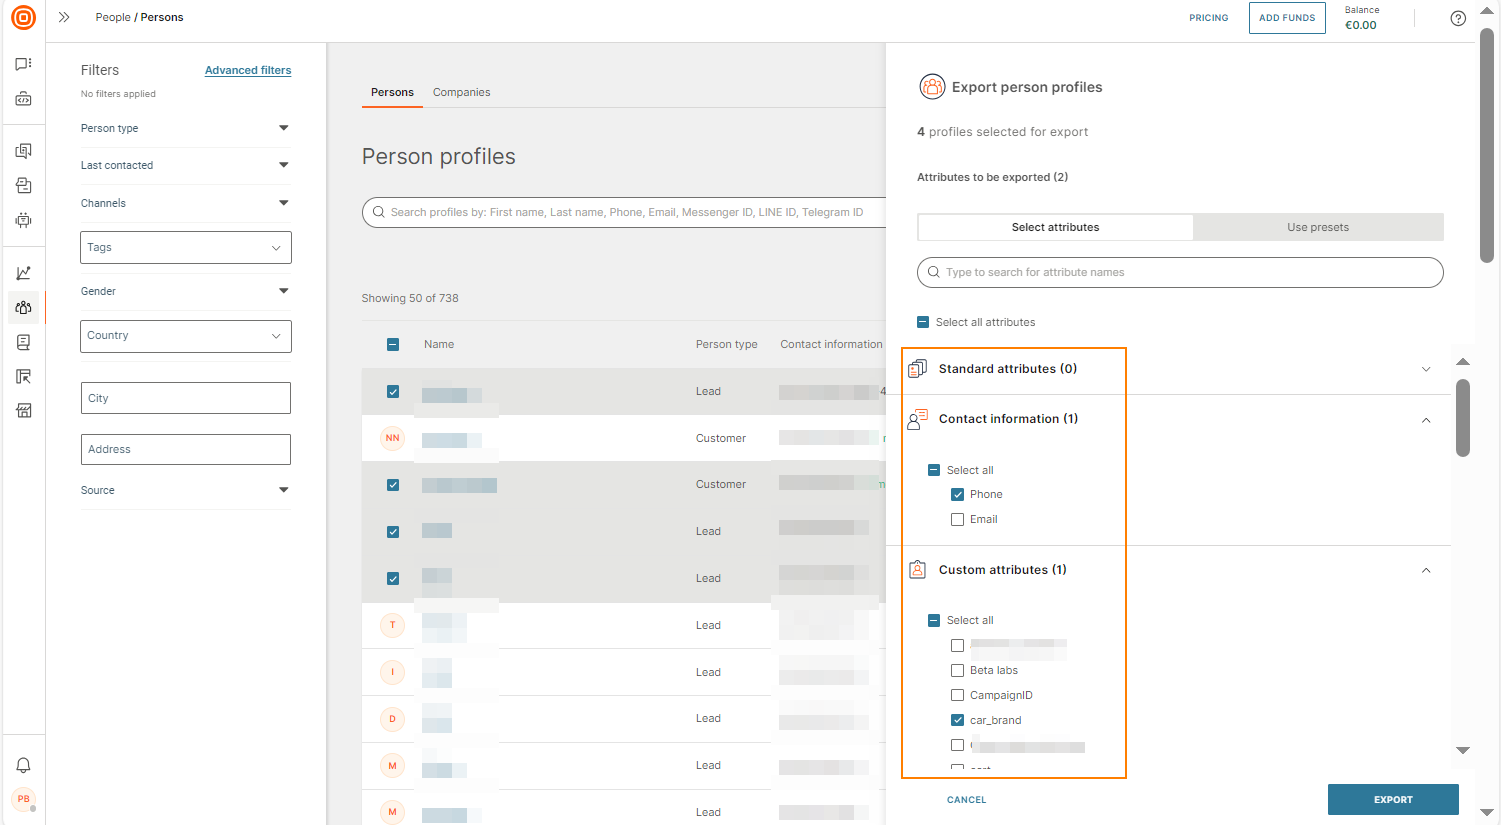
-
In the Export person profiles window > Select attributes tab, select the fields that you want to export for the profiles. You can select standard attributes, contact information, and custom attributes. You can use the search bar in the Export person profiles
 Note
NoteDate and time attributes are exported in ISO 8601 format.
-
Date: yyyy-MM-dd. Example: 2023-02-23
-
Date and Time (in UTC): yyyy-MM-dd'T'HH:mm:ss.SSS. Example: 2023-02-23T10:17:07.000
-
-
Select Export.
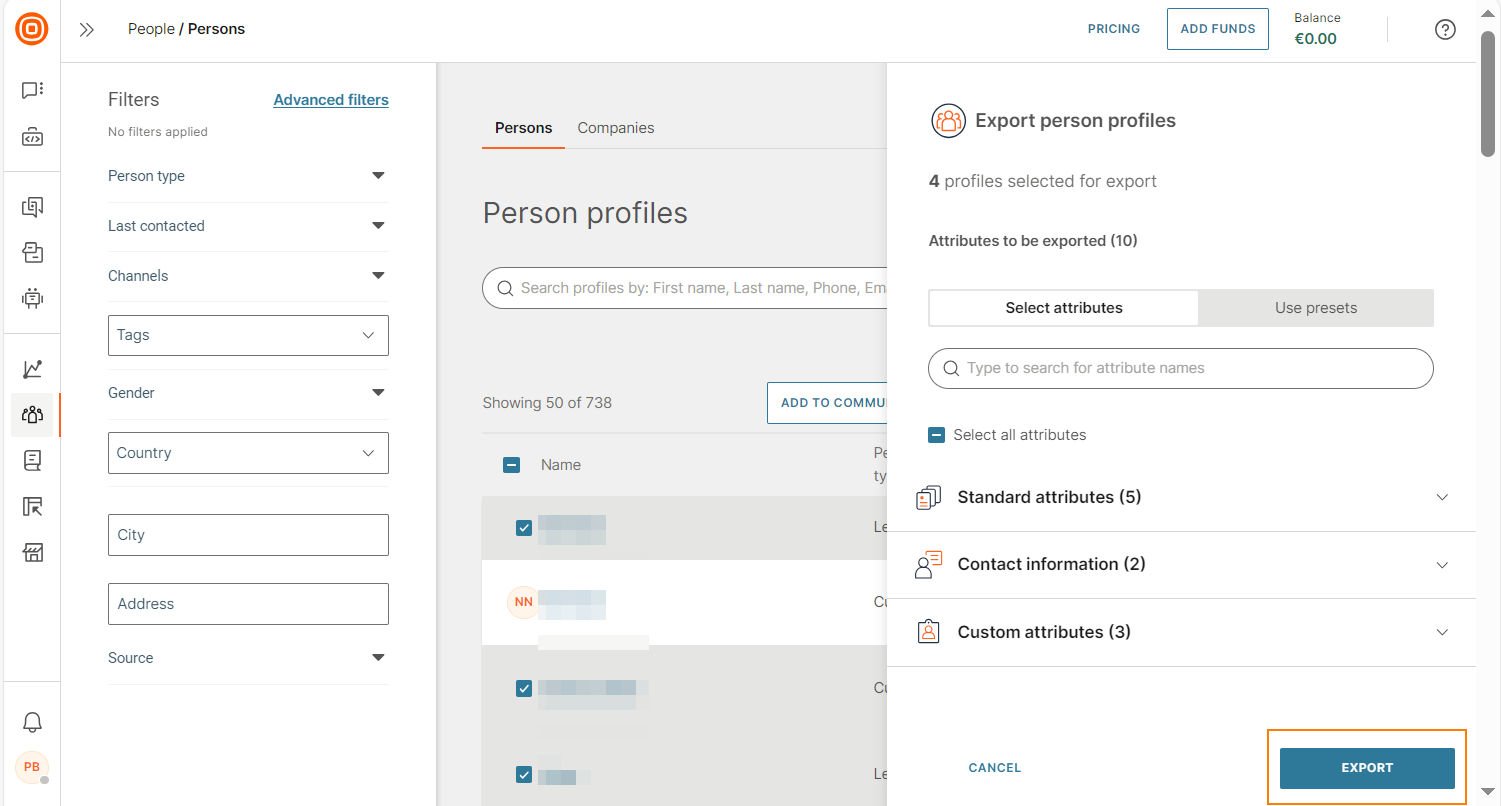
The export starts immediately.
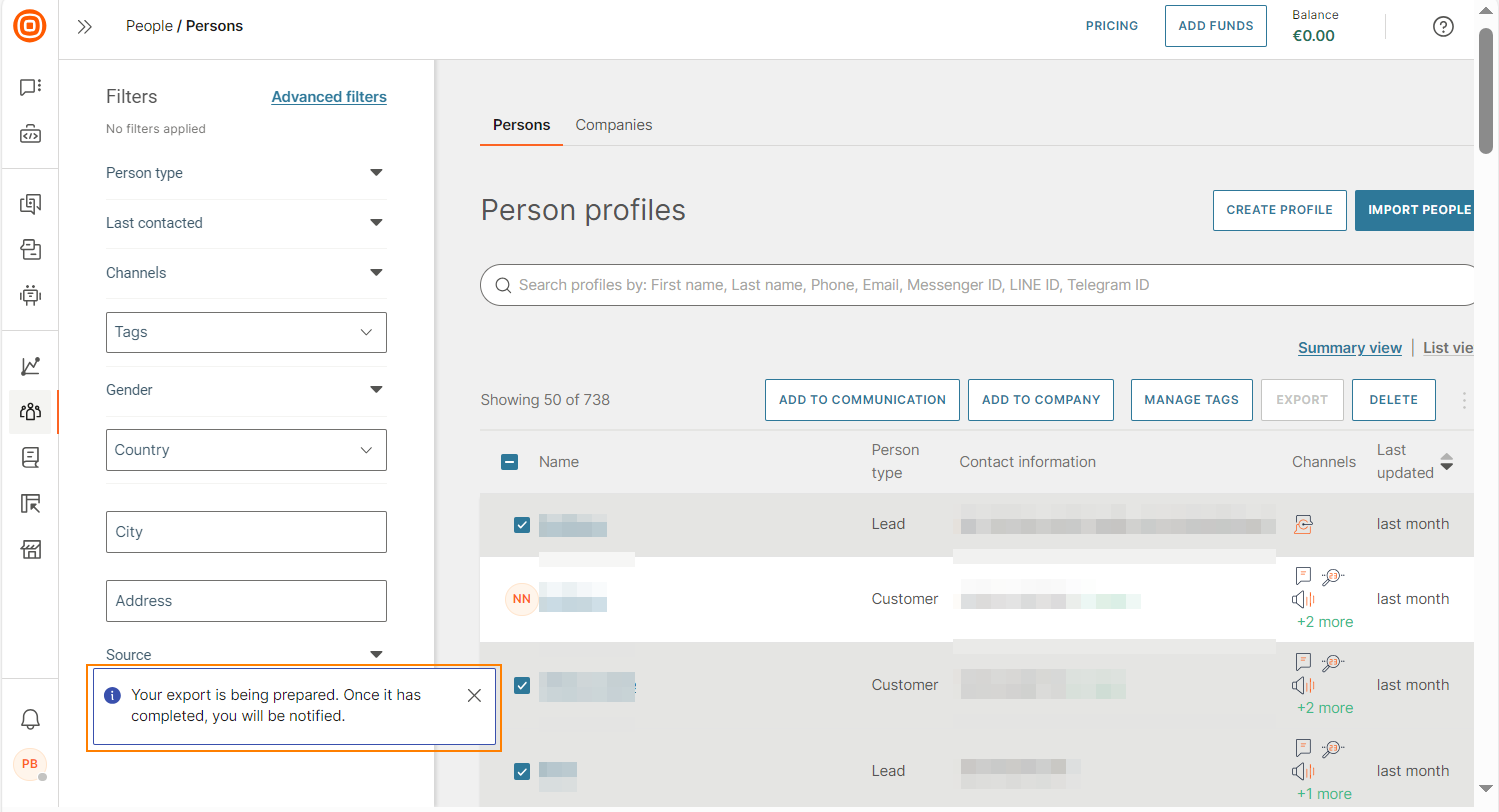
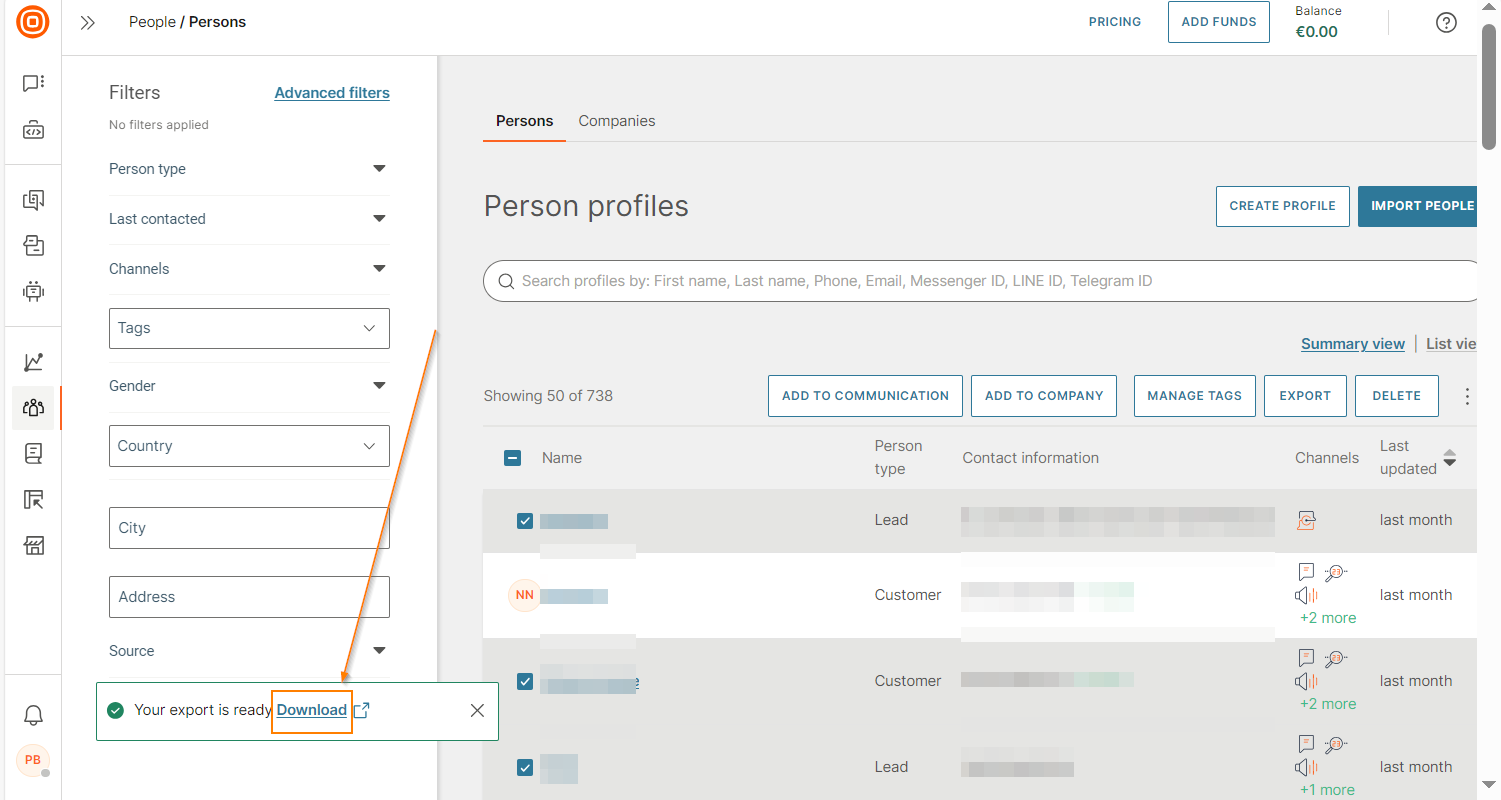
When the export is complete, select Download to save the file.
 Note
NoteThe attribute selection is stored in the browser. So, when you run a new export again, the same attributes are selected. However, if you access the Infobip web interface from a different device or browser, you must select the attributes again.
Export profiles for Facebook custom audience [#export-profiles-for-facebook-custom-audience-export]
Use customer data from People to create custom audiences in Facebook. You can then send these customers relevant ads from your Meta platform. For more information about custom audiences in Facebook, refer to the Meta documentation.
Use the Facebook custom audience preset in People to export a list of customer profiles as a .csv file that contains the correct set of attributes in the correct format for Facebook. You do not need to manually select attributes or convert attribute values into the required format. Use this export file to create a Customer list custom audience in Facebook.
Export the file [#export-the-file-export]
Do the following:
-
Go to Persons.
-
Select the profiles that you want to export.
NoteProfiles that do not have any data in the attributes or destination are not exported. So, the number of selected profiles might be different from the number of profiles in the exported file.
-
Select Export.
-
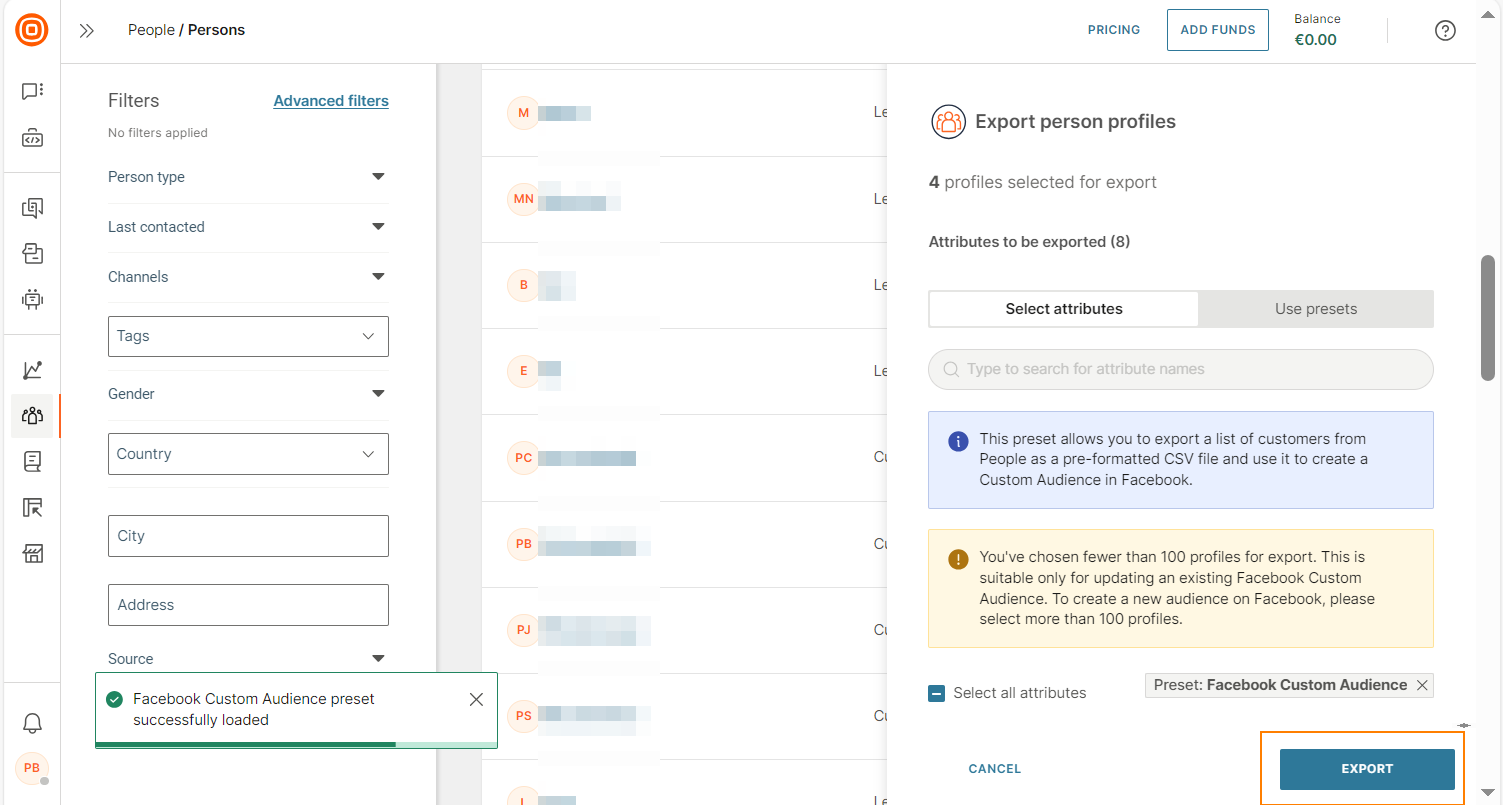
In the Export person profiles window > Use presets tab, select Facebook Custom Audience.
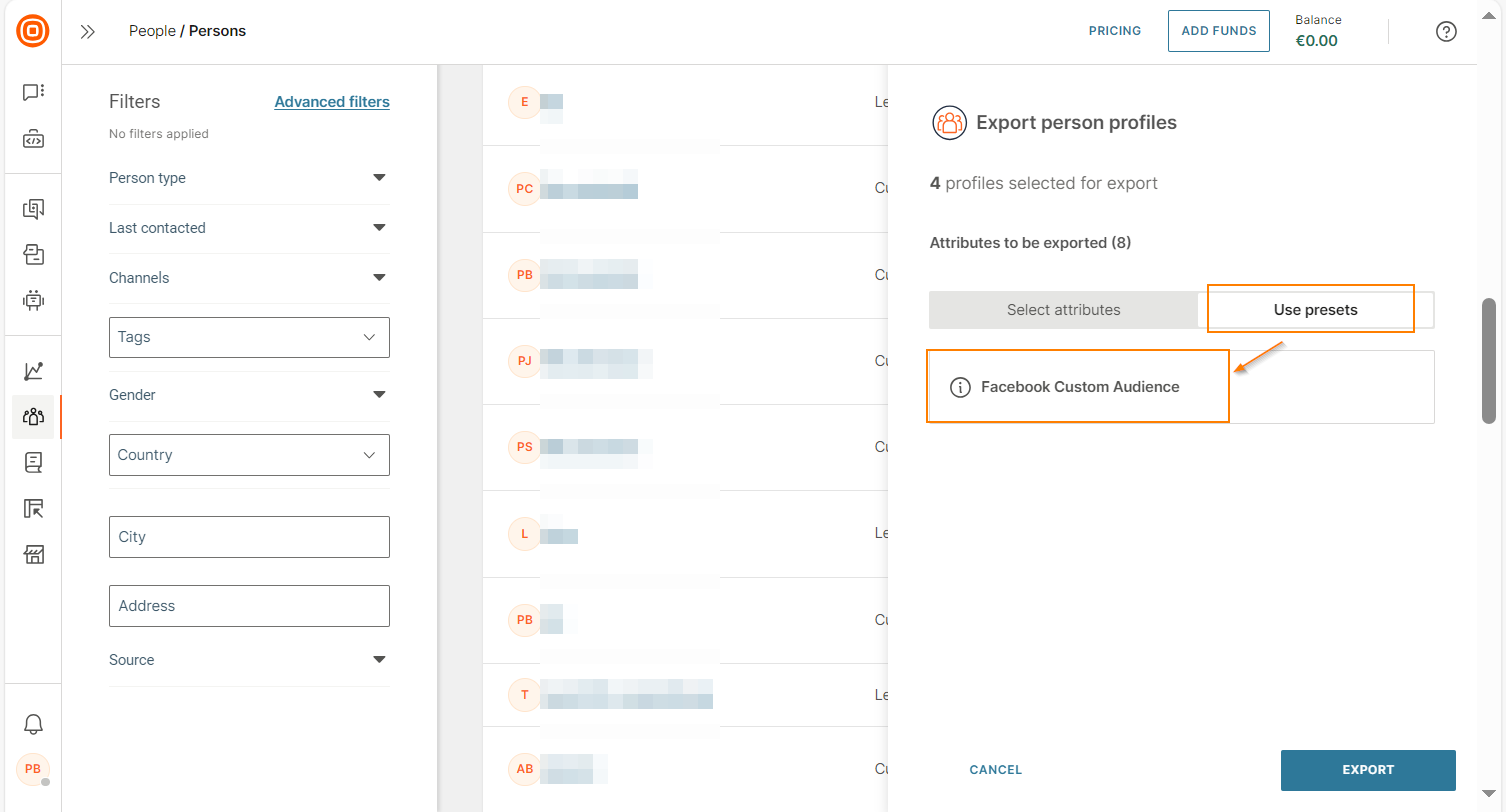
-
Select Export.
The export starts immediately.
When the export is complete, select Download to save the file.
NoteIn Facebook, the maximum number of profiles that can be imported at a time is 10,000. So, if you export more than 10,000 profiles from People, the profiles are exported as a zip file that contains multiple .csv files, each containing a maximum of 10,000 profiles.
Guidelines [#guidelines-export]
For the data to be exported in the correct format and without errors, follow these guidelines.
- The Country field is in one of the following formats:
- Valid country name in English.
- Two-letter ISO country code without any spaces before or after the code. Example: For India, the code is IN.
- The data in the following fields must not contain a comma.
- First name
- Last name
- City
- Country