Flow Elements
This page covers all the elements in Flow that you can use to build a personalized conversation, including starting points, channels, and different functions. Find out more about each communication block and get a better picture of how they might serve your needs.
Entry Points
Selecting an entry point is your first stop on the way to create a personalized communication flow. These are all the starting points currently available on the Infobip web interface:
• Predefined Audience
• Trigger
o Change In People Profile
o People Real-Time Event
o Inbound Message
o Date or Time
o Inbound Call
• External Source
o Existing Flow
o Flow API
o SFTP Import
The next step, after you have decided which entry point to use, would be to define the mandatory parameter values. For example, if you have selected Predefined Audience as the flow starter, in the side panel that appears when you click that entry point, select individual persons, audience segments, or people with a tag or attribute that you have previously created in the People module.
Predefined Audience
When starting communication with the Predefined Audience entry point, a scenario described in the previous section, you can specify the audience segments, persons, or tags stored on the People platform.
IMPORTANT
Predefined Audience element can be defined only once per flow. Other elements can be added multiple times on the flow canvas.
Triggers
Flows can also be triggered by different events and actions. In other words, people who perform some activity that has been defined inside the trigger will enter your Flow. The following guidelines should help you determine which triggers would best serve your business scenario.
Change In People Profile
With this entry point, it is possible to use multiple operators to compare data with the values that users enter before they become a part of the Flow. These operators depend on the type of the people attribute value that is being compared. The following operators are available:
BOOLEAN | TEXT | NUMBER | DATE |
---|---|---|---|
|
|
|
|
|
|
|
|
|
|
|
|
|
|
|
|
|
|
|
|
|
|
|
|
|
|
|
|
|
|
||
|
|||
|
|||
|
|||
|
|||
|
|||
|
|||
|
Change In People Profile is the best choice when you want to wait a predetermined amount of time for a change in a specific person attribute so that this person can enter the communication flow. For instance, with Change in People Profile you can set up a Happy Birthday flow by choosing Birth Date is today.
People Real-Time Event
Record how customers interact with different interfaces, how they react to your messages, and if there are any changes in their profile information. Use these "events" to branch the communication accordingly.
The events available in the People Real-Time Event trigger are split into 4 groups:
External events - activity coming from other platforms such as websites and apps: purchases completed, forms filled, pages visited, etc. These events, along with any properties you want to include, need to be defined in the People module.
IMPORTANT
All custom events, along with their properties, are defined in the People module.
People events – changes in profile information like an updated location or additional email address. There are standard person attributes and the ones that you can define yourself.
Channel Events – interaction within a specific channel. In the side panel, select an event from some previous communication like "email link clicked," the name of that specific flow or flow version and of the Send Email element, as well as the link from the email message.
NOTE
When using Wait for an Event element, you will be able to include the names of the send elements and events from the current flow.
This feature is available for active and drafted communications, but not for the finished ones.
Product Events – they happen within Infobip products. The Moments product events include "person entered flow" and "person exited flow" events. Use the event property fields to add the following:
- The name of the flow or flow version (communication) where the event occurred.
- The time period when the event happened and the number of occurrences
Each event group includes "happened" and "not happened" filters. Decide which one to use based on the communication that you want to build: whether you want to target customers because they performed or didn`t perform some action.
For a more enriched experience you can also use variables with the People Real-Time event trigger. You can set variables in any of the 4 trigger groups described above and then as the customer moves through the Flow, the variables can be changed subject to your requirements. For example, if you are using order delivery status as a variable in your flow and an item changes from Pending to Dispatched. Take a look at Flow Variables for more details.
The People Real-Time Event trigger is key in the abandoned cart campaigns when you want to remind customers that their favorite products are still awaiting them, or in other advanced multi-step campaigns.
If you want to use several audience segments at once and add the customer attributes to the mix, visit the article on the Segment Audience element.
Inbound Message
Opt for this entry point when triggering a Flow for all the end users who send a specific keyword to the number you have set up. In this way, you are creating a dynamic audience based on different conditions when you don’t know who exactly should be included in your communication. For all channels, you can store Anything or the Message body as conditions. If you select the WhatsApp channel you can also create conditions from Button Text and Button Payload.
In situations where you wish to capture where end users enter a flow based on a more defined set of keywords you can select from a number of operators to search the message body for a keyword:
- is equal to keyword - define the exact keyword you are searching for
- Is equal to person attribute - define the person attribute you are searching for
- Contains any - you can define a list of words that you want to find in the message body text
- Matches RegEx - search the message body text against a standard regular expression pattern
To cover cases where end users enter the flow regardless of the keyword they send, select Anything. You can have multiple flows using the same number and waiting for the end user's message. If this is the case and you have one flow with the exact keyword, such as Start, and another one with Anything (on the same number), the exact keyword will be used to trigger the flow. The reason is that the exact keywords have a higher priority than Anything. The same logic is applied to the Evaluate Inbound Message element.
At this entry point, you can also capture and store inbound message information. Use variables when you configure this entry point to define the data you want to collect from the inbound message. You can store sender and receiver information and message content as a variable. For each of these fields, the whole text response can be captured. Alternatively, you may want to only capture a specific keyword inside the message content via regular expression. To do this choose the regex option when creating the variable. See Flow Variables for more information.
NOTE
Multiple Inbound Message entry points can be added to a flow.
Inbound Call
The users who call your number will be included in the flow if you have selected Inbound Call as the starting point. The flow will be triggered when they call the number that you have set inside the Inbound Call side-panel.
IMPORTANT NOTES
To use the Inbound call entry point you need to activate a voice channel! Contact your account manager for more information regarding the voice channel activation. Also, keep in mind that to be able to change the inbound IVR scenario used with a Voice number, you have to stop the current flow campaign on that number, and then start building a new one.
Another very important piece of information when using Inbound Call would be that the end user is charged by their mobile or landline operator. In some cases, you will also be charged for inbound traffic coming to a Voice number, but that depends on the market. Also, if an IVR has a Forward call element forwarding the current call to some other phone number(s), you pay for that outbound leg of the call.
Date or Time
If planning a time-sensitive communication, your best starter will be the Date or Time trigger. It relies on information stored in the customer profile inside the People module.
So, besides having the user profile in People, what are other requirements? You will need to create a custom attribute that consists of either date or date and time. Let`s say you want to remind clients of an appointment – you can create ‘appointmentDateTime’ attribute and then build the communication around it.
In People module, go to Configuration > Create Custom Attribute.
The data related to this attribute can be populated via People API, Web SDK, Mobile SDK, or manual import on the People page on our web interface.
You will now be able to use this attribute as a communication trigger.
Several options are available to help you design a well-timed communication:
IS IN – use this condition to send communication hours or days before the date/time you have set as a custom attribute inside the person profile.
For example, with “AppointmentDateTime is in 4 hours,” your customer will enter the Flow when the current date/time is 4 hours before the one set in the TrialExpiryDateTime attribute.
WAS - the amount of time after the set date/time has been reached. So, you would set “TrialExpiryDate was 1 day ago” to include the customer in the flow one day after the date set in the TrialExpiryDate custom attribute.
IS TODAY - use it when you want to send the communication on the date set in the custom attribute: “DueDate is today.”
IS TOMORROW – send a message one day before the date set in the custom attribute.
WAS YESTERDAY – send a message one day after the date set in the custom attribute.
For any messaging campaign where timing is key, you can also use the Wait for a Date Flow element.
External Source
Add people to your communication from external sources, such as via Flow API, via an Existing Flow, or using SFTP Import.
Flow API
Add people to your communication based on external triggers. Flow API lets you send data from your system, like a webpage or a CRM, to the flow that you created on the Infobip web interface. This is a neat way to automate welcome messages, lead nurturing, different types of reminders, etc. You can even transfer variables over Flow API. When you create your variable in Flow it will be available to be used in the Flow API trigger.
To use this option, build communication with the Flow API as the entry point. Within this starting point, you will receive a unique URL where the end users’ data will be sent. The moment the Flow receives the data, it will create a person profile in the People module and add this person to the communication. Technical details of the integration can be found on our API Developer Hub.
Learn how to send automated welcome messages using Flow API.
Existing Flow
Use the Existing Flow entry point in conjunction with Add to Flow to build powerful modular flows. This entry point serves as the first step where users join the flow from a different active flow. Flows that have the Add to Flow element can be selected when you create a Flow with this entry point.
SFTP Import
The SFTP Import entry point is available if you would like to import csv or tsv data into Moments from your remote external server using secure file transfer protocol (SFTP). This is a useful approach when connecting to an external source via Flow API is not an option for you.
Once a connection between Moments and your server is established, the SFTP connector will check the target folder on your server every 3 minutes. Any new files that you add to the folder since the last check will be added to the target flow. Old or existing files in your server that have already been processed by the connector will not be modified, deleted or moved from the folder. Infobip will never change the data in any way. As the csv or tsv data is hosted on your server, you always have full control of your data.
Select External Source then SFTP Import entry point when you create your flow. Define how the file should be processed in the entry point sidebar menu.
OPTION | DESCRIPTION |
---|---|
SFTP Server |
Select from an existing server that you use for sftp connection or create a new sftp connection to a server where you host your files for upload. When you select Create New SFTP Connection you should provide your server address, port and authentication information. Test to verify the connection has been successful and activate it when you are ready to go. |
File path | Set the path to the file(s) on the SFTP server that you want to fetch. Applicable if you have different folders for different Flows, or are using different folders for different departmental data. |
Filename pattern (optional) |
Set an optional filename pattern to extract files that only follow a naming convention or pattern and inject them to Flow. We use 2 symbols: Wildcard asterisk (*) masks the sequence of symbols. For example, *.csv will fetch all csv files Question mark (?) to mask one exact symbol. For example, J???Data.csv will fetch both - JuneData.csv and JulyData.csv files |
Delimiter |
Select the delimiter that will be used to split values in the files. The delimiter you choose must match the delimiter used in your file. ; (semicolon), | (pipe), Tab, Custom (any character max. one), , (comma) |
Column Mapping |
Map the file columns to the exact Attributes / Variables in Flow because the system does not automatically know how the file is structured. Ensure that the values you enter here exactly match the column names in the file, and also check that any data types match too. The system will not be able to correctly 'read' mismatched data types. For example, if you were to use Date Time data type with a Date field you may see errors when you upload a file. 3 sections are available: Contact information: It is mandatory to have at least one column for contact information (phone number/email address). The maximum limit for contact information columns is two. One column for a phone number and one column for an email address. If the contact information of an entry in the csv is incorrect then the entry will be marked as invalid and will not be processed. You can see the SFTP Import performance data including valid and invalid entries in the SFTP Import reporting tab of View Flow Performance. See SFTP Import (LINK TO SFTP Reporting section) to learn more. Person attributes: Standard/Custom attributes that will be used in Flow for personalization/segmentation. All attributes used here should be created in People before import. Variables: Used if the user doesn't want to retain this info in People (session-based data). Variables used here should be created in Moments before import. |
Example Import Schedule
Jane uploads File_A to Folder1 at 12:00 (at this moment Folder1 only contains this file). The SFTP connector checks the folder at 12:01 and sends the data from File_A into the target flow in Moments. At 12:02, Jane uploads File_B to Folder1 (Folder 1 now contains File_A and File_B). The SFTP connector checks the folder again at 12:03 and sends the data from File_B into the target flow (as File_A has already been processed in an earlier run).
New users created via SFTP Import will be marked with a unique identifier in People to show how they entered the system. This data can then be filtered to allow you to track these users in the system.
If a user duplicates a flow containing the SFTP Import entry point, all files that were originally uploaded in the original flow will be uploaded to the new flow starting with the earliest file uploaded.
Upload history is not retained in the duplication process, so the new flow has no record of what happened in the original flow. When the new flow is activated, all file data will be added again. Depending on the purpose of the flow, this may cause unexpected results. This is a risk as the warning message below explains.
WARNING
For data consistency purposes, do not process the same file over SFTP Import in multiple flows. While it is technically possible to reuse/import the same file multiple times, it is recommended that you follow a one file, one flow policy.
If you do process the same file in multiple flows you may see different data outputs depending on which flow runs first.
Manage SFTP Server Connection
Manage the connection to your SFTP server by opening the SFTP Import entry point, and navigating to the SFTP Server field.
From there you can create a new connection, or edit an existing connection by selecting the server from the dropdown list and clicking the pencil icon to expand the edit connection popup.
In edit mode, you will see the number of flows that are using the connection. To ensure data integrity, you will not be able to save any edits you make to the server until all flows using this connection are finished. Click the See n instances button to view which flows use the connection.
If no flows are connected to the specific connection, then you can edit the connection as you need. Remember to test the connection to make sure everything works properly.
NOTE
If you no longer use a server and want to delete the connection then you can also do so in edit mode. You can only delete connections that are not connected to any active flows.
Channels
All channels available in Moments have to be configured before adding them to the communication that you are building. For more information, check out the individual channel pages.
Besides all their specific features, channels also share a number of the same options:
- Personalization using placeholders
- Delivery time and Message sending speed
- Data payload
- Validity period
To check communication traffic reports, visit Analyze and explore the channel statistics. Another possibility is to generate a report with more detailed information.
SMS
If you would like to reach out to customers via SMS, first add the sender, think about the content for the message, and make use of the placeholders (curly brackets icon) to further personalize the message. Also, define the special characters.
For an even better-tailored communication, set the following advanced possibilities:
• Track URL Clicks – if you want to discover which campaign links were clicked on, how many times, and by whom.
• Shorten URLs – to convert your long URLs to short and attractive ones that your customers will be more likely to click on.
INFO
The DLT toggle available at the top of the side panel is applicable to the India region only.
In Flow, you can also receive an SMS message from your customers and evaluate their response to continue informed communication. Additionally, if you wish to notify internal business units as part of your communication, say if you would like to notify a store manager or staff member when a customer has responded then see Notify Internal Recipients.
MMS
Create engaging multimedia messages with MMS and add them to your flow. Add the sender information and then provide your rich media content in the side panel. Use multiple media formats including audio, video, image, text, application, and vCard files in your message, just ensure that the message file size is within the recommended limit for your mobile network operator.
See MMS message types to learn more.
Viber
Send important notifications or create engaging offers that include buttons and pictures. After selecting the sender and entering your content in the element`s side panel, check out the rich content possibilities.
If the message is promotional, select the matching check box in the side panel.
When Viber is your channel of choice, maybe consider adding a failover to another channel from the Infobip portfolio to ensure that your message gets delivered.
Messenger
Use Messenger inside the Flow to converse with the customers regardless of their location, and provide support or a response to their inquiries.
When you start creating communication that includes this channel, select an entry point that is the best match for your scenario. Once you add the Send Facebook Message element to the communication flow, fill in the required fields and, in the element`s side panel, add the content types: Text, Buttons (so customers can quickly select the options offered in the message), and/or Image.
Check out our Getting Started guide for Messenger.
With email, you can design a simple two-way messaging campaign via Flow, or use it for a multichannel communication strategy.
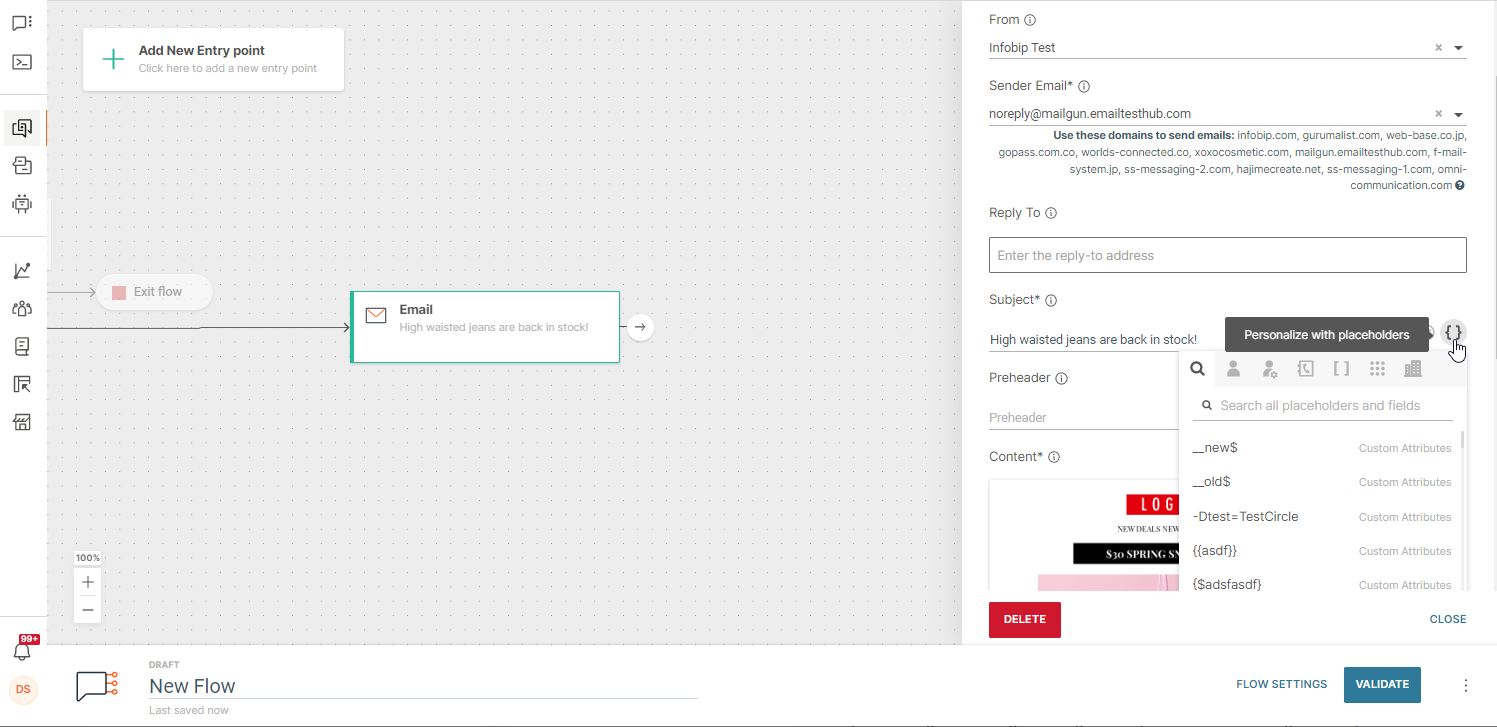
Besides the basics: sender name, sender email, reply-to address, subject, and the preheader that will be displayed next to the subject, you can use the placeholders next to the subject and preheader. They will add to the personalization. Supported placeholders are, for instance, the first name, address, subscription, and any other custom values.
The Email Editor is where you create custom content for customers and provides an easy-to-use way of working with HTML versions of your emails.
If it suits your communication scenario, add an attachment. This could be any document, image, or audio/video file.
You can also track who opened and clicked your email. These events are logged for the reporting purposes. Tracking is set by default, but you can exclude it.
Mobile Push
User behavior inside a mobile app and an automated communication based on that behavior, are key to customer engagement. With mobile push in Flow, you will be able to build a variety of very specific customer journeys.
The panel that opens when you click the Send Push element that you are adding to the communication flow will prompt you to define whether your use case requires notifications for the users who are inside or outside of the app. Or, you can send both message types.
If you would like to notify internal business units as part of your communication flow i.e. notify a store manager or staff member when a customer has responded then see Notify Internal Recipients.
Push and In-App Notification Features
For both Push Notification and In-App types, include the title and message. Go for richer and more intuitive content by adding an image and custom payload.
The Push Notification has an on-tap action where you can set what happens when the user taps the screen:
Just below the On-Tap Action field, you will be offered the possibility to include the in-app message type together with the push notification.
If using In-App, these are the actions available to you:
Primary Button
• Button text - Open.
• Action - select between the app home screen, open URL within a web view, page in the mobile app, or open URL.
Dismiss Button
• Button text - Cancel.
Finally, delivery options for both notification types are similar to those of other channels, except that in MaM you can also select geographic areas.
With WhatsApp Business over Flow, you will be able to communicate with your audience using a predefined message template that has been approved by WhatsApp, or you could send a free-form message within 24 hours from the moment the customer sent a message to your business.
Free-Form Messages
To send a free-form text message, choose type: Text, Image, Audio, Document, Location, Video. Fill in the required fields and consider personalizing each message with previously defined variables.
Check out which advanced options you might need for your selected message type.
Message Templates
Message templates are the message formats that have been registered and approved by the service provider. WhatsApp requires businesses to use message templates in business communication to avoid inappropriate usage and ensure message quality for their customers.
Template example:
Hello {{1}}, your access code to {{2}} is {{3}}. If you didn`t initiate this request, kindly ignore this notification. Thank you.
The brackets with numbers are called parameters and they are the only parts of message templates that can be changed after approval. That gives you the possibility to use the same message template several times and adjust it according to your needs.
Once the template has been approved, create your communication and insert the following:
- From – select your registered phone number
- Type – select Template
- Template – select the name of the template you want to send
- Language code – select the language you want to send your message in (only predefined languages apply)
Now you can preview the message.
The template contains placeholders and the preview window is used for placeholder mapping. In other words: placeholders include variables that are stored on the People data platform, such as first name, city, etc, and they can be modified, while the rest of the text remains unchanged.
If you choose Media Templates, you can add an image, document, video, or location.
Web Push Notifications
After configuring a web push notification, use Flow to talk to audiences on your selected web pages:
- Decide on a communication trigger in the Moments module. For example, use People Real-Time Event. The notification will be sent based on the defined event, such as Item Added to Cart.
- Add the Send Web Push Notification block. To create the notification, fill in the required fields, think about the content you want to include, and browse through other options that could be helpful for your use case.
RCS
Deliver important notifications, engage customers with promo offers, or provide support using rich and interactive communication designed in our visual builder.
With RCS, you can send the following message types:
• Text
• File
• Card
• Carousel
Each type has its set of mandatory fields and other features:
Text | File | Card | Carousel |
From | From | From | From |
Content | URL | Orientation | Card Width |
Suggestions | Suggestions | Alignment | Cards (Title, Description, Media, Suggestions) |
Card Content (Title, Media, Suggestions) |
|||
Suggestions that are present inside every message type allow for interaction with end users, and they involve these actions: reply, open URL, request location, or dial phone.
The postback data field in suggestions helps collect the information from customers and save it for future use.
LINE
With LINE you can send customized LINE messages as part of a Flow.
When you start creating a communication including this channel, select an entry point that best matches your needs. Once you add the Send LINE Message element to the communication flow, fill in the sender field and select what kind of message you want to send in the side panel: Text, Image, or Rich Card (to create content rich messages containing images, titles, content, and buttons).
The Design Editor will open where you can construct your LINE message with text, buttons, and an image depending on the level of customization you need for your LINE message. You can even include an optional quick reply text and/or button in the Design Editor too.
LINE is also a supported channel with the Evaluate Inbound Message element so you can branch your Flow based on the LINE message that the user sends to you.
Channel Options
When you add any channel available in Moments to your communication and click on it, a side panel will open with a variety of options that you can use to further customize your correspondence. These include scheduling, URL shortening, send-time optimization, message validity, and more.
Validity Period
The sent messages have a specific period during which the system will try to deliver them, regardless of the channel. For example, if you want to send a communication to your audience and some users have their cell phones turned off, the system will periodically try to deliver the message until the validity period passes.
The default and maximum validity period is 48 hours, and it does not need to be set for each communication.
If you want to set a shorter period, use the advanced section in the side panel of the channel you are using. You can choose hours or minutes.
Sending Speed and Delivery Time
Each send element (elements containing messages: SMS, Email, Viber, etc.) inside the Flow, including Start Call and Call API, can have its own Message Sending Speed. For example, if you’re sending a promo campaign and the goal is for your customers to place orders through your call center, this can cause backups and long call wait times. To avoid such a scenario, send messages at the speed that your call center can handle comfortably.
Enter the specific number of messages you want to send within minutes, hours, or days. For instance, you might want to send 1000 in one day. Once you set that limit and we receive the first message, the 24-hour count starts regardless of when the daily limit has been met - in the first few hours or later. After the 24-hour period, another 1000 messages will go out. The same rule applies to hours.
Using the Delivery time window, set the exact time and timezone for your communication.
Send-Time Optimization
NOTE
The following STO content is being moved and will soon be deprecated from this article. Please see Send-Time Optimization for the full article.
Pick the best time to send out communication to customers and increase the click and open rates. This feature works based on the history of a person`s interactions with messages: whether they opened the message or clicked a URL inside it. Infobip automatically tracks the history of opens and clicks for the sent messages and optimizes the sending time based on these metrics. But keep in mind that every channel has its own specifics.
These are different options per Channel that can be used with Send-Time Optimization (STO):
SMS
- Click Rate
- Open Rate
- Click Rate
Voice
- Phone Pickup Rate
Push
- Open Rate
- Open Rate
Remember to select Track Clicks when creating the messages so that this data can be used in optimization.
IMPORTANT NOTE
You can use STO only after you have sent your first 5 campaigns.
STO in Broadcast
The example below shows what Send-Time Optimization looks like inside Broadcast when sending an SMS message. Once you create a broadcast and select SMS as your preferred channel, scroll down to find STO in the Scheduling Options section.
When STO is scheduled for any of the channels available in Broadcast, this one-way communication tool will pick the best sending time within the next 24h.
However, if it's important to you to send a message during a specific timeframe, but you still want to use STO, set the Delivery Time Window too. Broadcast will try to find the best sending time. If it doesn`t find it until the beginning of the Delivery Time Window, the message will go out then.
STO in Flow
When adding a send element (SMS, Email, Voice, Push, or WhatsApp) in Flow, you can activate Send Time Optimization. Steps are similar to those in Broadcast. Add the channel you want to use, click on it, and then click Advanced Options in the side panel. Enable Send Time Optimization.
If you want to use the Delivery Time Window as well, go for it, and the maximum amount of time before sending a message will also be taken into account.
Campaign Analytics With STO
After you launch your Flow or Broadcast, the metrics will appear as soon as we start receiving the data related to the sent messages.
Analytics for any communication with STO consist of three groups of data:
- Optimized Messages - sent using STO. Both Broadcast and Flow will automatically include the customers for whom there is enough information to use STO, and the communication will be split into 2 groups: optimized messages (90%) and control messages (10%).
- Control Messages - sent without STO at the scheduled time. The control group is automatically included at the campaign launch or within the scheduled delivery time window. The control group helps identify whether STO worked better than regular scheduling.
- Non-Optimized Messages - regular scheduling. The rest of the recipients, for whom there is not enough data to use STO, are marked as “Non-Optimized Messages.” They are sent based on regular scheduling.
The image above does not contain any actual data; it is only meant to give you an idea of what the results page in Broadcast looks like.
Get More From STO
If you want to have an even more precise Send-Time Optimization, you can opt to exchange the STO data with other Infobip clients. No personal data will be shared. You will be exchanging only the information about which channels were used and when did the customer activity occur. The attained data can only be used for STO purposes. Once you opt out, all your aggregate data will be deleted from the shared pool.
To enable pooling, click your account icon > Settings > My Account.
Data Payload
All the channels in Flow have this feature available as placeholders. Select multiple data that you would want to add, and this data will become a part of the message reports.
The Push channel has MSISDN (cell phone number) already set as the data payload due to the technical implementation of Mobile App Messaging.
URL Shortening and Tracking
Links that we include in promotional messages, instructions, or notifications, are often long and could look messy. The research has shown that customers don’t like to click on long URLs with a lot of parameters. They find them untrustworthy or consider them spam.
If you are using SMS, Viber, or WhatsApp as a channel, always consider the message length and characters. If the URL is long, what was meant to be sent as one SMS message can be sent as two or even more, and generate additional costs.
Tracking URL clicks will be another welcome addition and help you understand how customers react to your messages. Both shortening URLs and tracking clicks can be selected in the channel`s Advanced Options.
Channel Metrics
To quickly get the message data directly from Flow, hover over the channel element to see delivery numbers, click rates, opens, and more. The metrics availability depends on the channel in question.
The following delivery and click rate metrics are available:
- Message send - Number of messages sent by this element
- Total delivered - Number of engagements delivered by this element. A single person can receive multiple engagements.
- Delivery rate - Percent of sent messages that were actually delivered.
- Total opens - Number of engagements that were opened for this element
- Open rate - Percent of delivered engagements that were actively opened by recipients
- Unique opens - Number of unique people who opened the engagement at least once.
- Click through rate (CTR) - Percent of delivered messages that resulted in a clicked link.
- Total clicks - Number of links clicked.
- Unique clicks - Total number of unique people who clicked a link at least once.
SMS | RCS | CHAT APPS |
PUSH (Mobile App Messaging) |
LINE | MMS | ||
---|---|---|---|---|---|---|---|
TRAFFIC DELIVERY METRICS | |||||||
Message Send | YES | YES | YES | YES | YES | YES | YES |
Total Delivered | YES | YES | NO | YES | YES | NO | YES |
Delivery Rate | YES | YES | NO | YES | YES | NO | YES |
OPENS | |||||||
Total Opens | YES | YES | NO | YES | YES (Total Seen) |
NO | YES |
Open Rate | YES | NO | NO | YES | YES (Seen Rate) |
NO | NO |
Unique Opens | YES | NO | NO | YES | YES (Unique Seen) |
NO | NO |
CLICKS | |||||||
Total Clicks | YES | YES | NO | YES | YES | YES | NO |
CTR | YES | YES | NO | YES | YES | NO | NO |
Unique Clicks | YES | YES | NO | YES | YES | YES | NO |
IVR Elements
Your IVR (Interactive Voice Response) channel can consist of an endless number of different IVR (and non-IVR) actions. IVR actions available over Flow are the following:
• Start Call
• Play
• Collect
• Forward Call
• Record Voicemail
• Hang Up
NOTE
Your outbound IVR should always start with the Start Call action. For inbound calls, Start Call action will not be used.
Start Call
When adding the Start Call element to your IVR flow, the first step is to select the sender/caller ID (your business Voice number).
If you include the Machine Answered condition in this step of the communication and don`t want to continue the call if that happens, add the Hang Up element.
Use the advanced options to set the Record Call action and the following options:
• Validity Period
• Retry Period
• Data Payload
• Callback URL
(The Callback URL is your platform URL where the delivery reports will be pushed.
Check out our Developers Hub for the delivery reports format.)
Play
Add the Play element, fill out all the necessary fields, and choose the audio source: text-to-speech message or audio file. These two come with their specific functionalities, but, for both, you can set up the duration of pause to add additional silence before the audio file has been played, and conditions that will help you further branch your flow.
Text to Speech
Text content can be up to 1400 characters long. Once you enter the message text, the language is automatically detected. You can also select the voice that will be used for the message.
To hear your message before sending it, click the audio preview button.
Audio File
For the audio file, select the source:
- File upload - prerecorded file from your computer
- File URL - publicly accessible URL location of your audio file
- Voicemail - select it from the list of the files created using the record action
Collect
The Collect element is added to the flow to get the response from your customers who will be communicating using the digits on their phones.
Define the following:
• Variable name - this is where the Flow will keep your customer inputs.
• Maximum input length - defines the number of inputs the customer is expected to enter when interacting with the IVR menu.
• Input waiting time - the number of seconds the IVR will wait for the customer to press the first key.
The # key cannot be collected; it is reserved for the user input termination. The IVR platform automatically stops reading the end user`s input after receiving #, and it does not store it.
If you want response codes to show in the IVR (Voice) reports, these are the options:
• Always show (default): Response codes will always appear in the reports and logs.
• Show masked: Response codes will show in reports and logs as a masked value (xxxx).
• Don’t show: Response codes will not show in reports and logs.
You can use the conditions in the Collect element to branch the IVR flow based on the response code received from the user or based on the user`s hang up action.
If you use the Collect element after the Play element then you have a few options depending on how you wish to collect the choice from the user:
- You can force the user to listen to the whole message in the Play element and only collect number choice after that. Choose the Audio played completely condition in the Play element to do this.
- If you want allow the user to make a choice before the audio has played completely then DO NOT choose the Audio played completely option.
Forward Call
Before forwarding the call to one or more phone numbers, you will need to fill in the following fields:
• From – Caller ID that will be used on the call-receiving side. Voice can only use numeric senders and the call delivery depends on the CLI route.
• To – One or more phone numbers to forward the call to.
When the call is forwarded to more than one phone number, you could have parallel calls to all of them (until one gets picked up) or sequential calling. For the sequential dialing, set up how long do you want the ringing to last before we move to another number in the sequence.
The conditions for this element that you can use to continue designing the flow are answered, no answer, busy, error.
Important
The Forward call element must be the last IVR action in your IVR flow, no other IVR actions can follow it, but you might use other non-IVR actions after or start a new call.
Record Voicemail
This element in IVR flow records a part of the call. For example, it could serve to record a customer opinion, get customer feedback, or leave a voice message. First, you will need to take care of the following:
• The name of the recorded file
• Maximum recording duration measured in seconds
• Maximum silence duration that IVR will wait for before stopping the recording
• Define the digits that will end the recording
• Select the beep sound check box if you want the tone played at the start of the recording
Audio files that are recorded using the Recorded Voicemail element can be retrieved on the Recordings page on our web interface.
After you add the Record Voicemail action, the only way to branch the call is with the Hang Up condition.
Download the Voice IVR audio file.
Hang Up
The Hang Up action is used to end the call. After you add it to the flow, use non–IVR actions only or start a new call.
Non-IVR Actions
Make even more flexible flows and improve communication with your end users with other elements that you can combine with the IVR ones.
During an IVR communication, you can do practically anything – for example, you can send SMS or Push confirmations or update profiles based on customers` input. In addition, all the segmentation possibilities that the People data platform offers will help you plan and deliver relevant messages through the Voice channel.
These are actions available to use with IVR:
• Send elements
• Failover
• Segment Audience
• Update Person Profile
• Add or Remove Tag
• Add or Remove from Do Not Contact List
• Call API
• Start Conversation
The “wait for” elements (Wait for an Event, Wait for Change in People Profile, Wait for a Date) and Split Audience can be used before or after the call, but as a part of a separate flow.
Functions
The elements in Flow that help you plan and direct your messages the way you want are called functions. They let you wait for events such as purchases to send a relevant message or have a failover channel in case the customer does not check the messages on the first one that you used.
Failover
Secure the message delivery by setting up backup channels. This means that if you send a message over one channel and it`s not delivered, another channel of your choice will be automatically used after a defined time. There is no limit on channels that can be used in failover.
When designing your campaign, remember that there is a validity period during which the platform will try to deliver the message over one specific channel. The default value is 48 hours. Also, make sure that all the recipients have all the required destinations set in their profiles.
To use this feature, add the Failover element to the flow you are designing and set up the channels.
Evaluate Inbound Message
Branch the flow based on the message the end user sent to you. For example, if the customer replies with “yes”, send them an SMS message; if the customer replies ”no”, don’t send them any more messages. The default output of the element is “If no response until the end of flow.”
This element is often used to create interactive flows where customers respond with the keywords that have been validated.
Like with the Inbound Message entry point you can define conditions to precisely evaluate inbound messages. You can set conditions on Anything, Message body, and for WhatsApp you can set conditions against the Button text and Button Payload.
There are also 4 operators that will help you to capture the exact part of the message body you wish to search. These operators are:
- is equal to keyword - define the exact keyword you are searching for
- Is equal to person attribute - define the person attribute you are searching for
- Contains any - you can define a list of words that you want to find in the message body text
- Matches RegEx - search the message body text against a standard regular expression pattern
The Anything condition can be used to cover cases where the customer replies with something that you did not cover in your communication flow. You can have multiple flows using the same number and waiting for the end user's response to it. If such a situation occurs, and you have one flow with the exact keyword such as “yes”, and another one with "Anything" (to the same number), then the exact keyword will be paired. The exact keywords have a higher priority than “Anything.” This same logic is applied to the Inbound Message entry point.
It is also possible to create variables using the Evaluate Inbound Message function. This gives you additional control to store sender, receiver and message content if the customer replies with something that was not originally covered in the communication flow.
Evaluate Email Event
The Evaluate Email Event element enables you to branch the flow based on different customer actions.
IMPORTANT NOTE
For new flows or new versions of flows, this element is no longer available. Instead, use the Wait for an Event block, which includes the improved functionalities from the Evaluate Email Event element and more.
So, let`s say you are sending a newsletter and want to send another message to the people who opened the email. You would set the status "email seen" in the side panel that appears when you click the Evaluate Event block. The default output of this element is "if no action until the end of flow." This way you can branch the flow for the users that have clicked the link and for the ones that haven`t done that.
Segment Audience
Split your audience based on attributes and behavior. If, for instance, you want to send different messages to people belonging to different age groups who recently checked out your web page, this is exactly what the Segment Audience element is for.
Attributes and events that you need for segmentation are selected in the element`s side panel.
Available attributes:
- Standard - basic, predefined customer information
- Custom - customer information that you define yourself in the People module
- Contact Information - email address, phone number, and other channels available for contacting this customer
- Channel Specific - showing when the customer was contacted last time
- Computed attributes - customer information created from computed attributes
Operators per attribute:
BOOLEAN | TEXT | NUMBER | DATE |
---|---|---|---|
|
|
|
|
|
|
|
|
|
|
|
|
|
|
|
|
|
|
|
|
|
|
|
|
|
|
|
|
|
|
||
|
|||
|
|||
|
|||
|
|||
|
|||
|
|||
|
To get an idea how attributes work, select a custom attribute "age" and operator "less or equal" inside the Segment Audience side panel.
The types of events to be combined with attributes are as follows:
- External - actions on other platforms like websites and apps
- People - changes in profile information
- Channel - interaction with messages
- Product events - information about when a person entered or exited the communication flow
Visit the People Real-Time Event article to learn more about each type and then think about how to include them in your future communication campaigns. (The Wait for an Event trigger and element are used when you want to base your communication on events only, while the Segment Audience element allows you to use both attributes and events.)
So, if you were to send a message to two different age groups (attribute) who viewed your webpage (external event), the final setup would look like this:
Based on the set attributes and events, send different messages to different audience segments using any of the available channels.
Wait for an Event
The Wait for an Event block collects data about the way customers interact with the interface or messages, or if there are changes in their profile information. It behaves almost the same when it`s used as the Flow trigger and Flow element. However, when you add it to the communication as an element, you also have to define the waiting period - how long you want to wait for a specific reaction from the customer, and select if events should be included from the start of the Flow.
By default, Wait for an Event will only consider events as soon as a user arrives at this element in a Flow. However, if you wish to wait for an event that occurs earlier in the Flow then select the Include events from the entrance of the flow checkbox.
One reason for activating the 'Include events from the entrance of the flow' checkbox is to avoid situations where a user gets stuck in a Flow waiting for an event that may have already occurred due to how the Flow has been implemented.
For example, a marketer building a funnel to track emails using the Wait for an Event element that waits for 3 events, Email sent, then Email opened, then Email Link Clicked, each with a waiting period of 2 days. The marketer may find that a person gets stuck waiting at the Event Opened event for an unexpected reason, such as the email client blocking the Email opened event for privacy reasons. So in 2 days when it comes to the Email Clicked event, the person may find that the event has already passed and cannot move forward in the Flow. If 'Include events from the entrance of the flow' is enabled then the past events will be considered and the person will move forward in the Flow as expected.
Events tracked through the Wait for an Event element are grouped into 4 categories: external, people, channel, and product events. For more on each of these, check out the article in the trigger section.
When adding the Wait for an Event block to the communication, configure the following:
- What event the flow should wait for. Some events are predefined, some have to be configured.
- How long the flow should wait for the event: set up the number of minutes, hours, days in the element`s side panel. By default, indefinite time is selected. If you want to use it, note that it will be dependent on the flow`s own schedule. The time limit for flow is 90 days if there has been no activity in at least one of the flow elements.
- What happens if the event occurs during the waiting period. Add an element (for example, an SMS message) that would be the next step in the flow.
- What happens if the event doesn’t occur during the waiting period. Add the next element in the flow.
The Wait for an Event element is helpful in the abandoned cart campaigns and other advanced multi-step campaigns.
To further personalize the user journey and provide a more enriched experience you can also save incoming event data and properties as variables in the Wait for an Event function and then reuse them later in the Flow.
For example, imagine you are creating a Flow and using Wait for an Event to wait for the user to book an appointment with a specialist. You may also be interested to store other properties like Appointment Time and Specialist Name at the same time. You can save Appointment Time and Specialist Name as variables and then use these variables to send the user a confirmation message with all appointment details at a later stage in the Flow so the user won't forget.
Check out the Flow Variables section to learn more.
Wait for Change in People Profile
When you want to wait a predetermined amount of time for a change in a specific attribute of a person who entered the Flow after an event happened, opt for the element called Wait for Change in People Profile.
This is what you will need to configure:
- The change in attribute the flow should wait for
- How long the Flow should wait for that change
- What happens if the change occurs during the waiting period
- What happens if the change doesn’t occur during the waiting period
- This element will be helpful in more advanced automation campaigns.
Wait for a Date
To continue your communication before, on, or after a specific date/time from a person`s profile, add the Wait for a Date element.
What you need to do beforehand is add this "profile information" as a custom attribute using our People platform.
There are several options available inside this element:
IS IN – use this condition to continue communication hours or days before the date/time you have set as a custom attribute inside the person profile.
For example, with “TrialExpiryDateTime is in 4 hours,” the customer will reach the next step in the flow when the current date/time is 4 hours before the one set in the TrialExpiryDateTime attribute.
WAS – the amount of time that has passed after the set date/time had been reached. For instance, you would set “TrialExpiryDate was 1 day ago” to get the customer to the next step in the communication one day after the date set in the TrialExpiryDate custom attribute.
IS TODAY – use it when you want the customer to get to the next step in communication on the very date set in the custom attribute (“DueDate is today”).
IS TOMORROW – the customer will reach the next step in the Flow one day before the date set in the custom attribute.
WAS YESTERDAY – the customer will reach the next step in the Flow one day after the date set in the custom attribute.
DO THIS ACTION EVERY YEAR – select this check box if you want to perform this same action every year for each person (ignores the year in the person attribute and makes it a recurring action).
You can also start a communication based on a specific date or time.
Pause
This is the element that delays your communication flow for a specific amount of time. For example, you send one message from the flow and you want to wait before sending another one. What you need to do is select Pause and then select the type of pause and its duration along with a time unit – seconds, minutes, hours, days.
There are 3 types of pause you can select from:
- Pause until a day and/or time - This will pause until the day or time milestone is hit. For example, Pause until Monday at 13:00.
- Pause for a period of time - This is useful if you want to set a generic waiting period that will start counting after the user comes into contact with the Pause element in the Flow. Choose from seconds, minutes, hours, and days. For example, Pause for 3 days until 13:00.
- Pause until an exact date and time - This is useful for planning user communications to remind users about an event that will happen at a known time. For example, sending a message before a holiday or appointment. Such as pause until 30th November at 13:00.
When the time specified for the pause passes, the next element (for instance, an SMS message) in the communication flow will be triggered.
The Pause element can also be used with all the `Evaluate` elements available in the Flow.
Update Person Profile
To update and save values for the customer standard or custom data attributes that are stored in the People module, use the Update Person Profile element.
Select Update Person Profile and then, in the right side panel, select the attribute you want to update and how you want the attribute to be updated. You can choose to update the person profile with a value, set it to empty (i.e. erase), or apply a formula to the attribute.
- If you select with value, then the user can add a static value, or select a different attribute from People or a variable using the curly brackets.
- If you select with formula, the expression editor will open you can define your formula using expression language.
- If you set to empty, then the data in the person profile attribute will be set to empty.
Any data that customers provide related to the plan will be saved on the People platform to help you in future communication campaigns.
Add or Remove Tag
If you want to mark customers based on their actions, use tags so that they can be included in any future communication based on these tags.
Flow supports two tag related elements:
-
Add tag
-
Remove tag
To get a better idea about how to apply this feature, check out how tags can be used for feedback.
Add or Remove from Do Not Contact List
If you want to give customers an opportunity to opt out from communication, use the Add to Do Not Contact list element. All customers that come to this element can be excluded from all your communication, regardless of the channel, or you can be more specific and enable the opt out option only for the cell number destinations or email. The customers who are blocklisted only on one of these destinations can be removed from the blocklist with the Remove from Do Not Contact list element.
Split Audience
Divide your audiences and get more precise metrics about how they react to your content. The Split Audience element is especially useful when you want to do the following:
• Perform simple experiments such as testing two versions of the same Email message as shown in the image below.
• Create more advanced experiments that involve testing which channel (Email, SMS, Push, etc.) works best.
Notify Internal Recipients
Sometimes it is important to send an email or SMS notification to internal business units as part of a flow. Perhaps you would like to notify store managers, staff, or a physical store when a customer has started the process of returning an item. Maybe you would like to send a confirmation email to a physical store with an action reminder or even notify an employee that they do not have the authorization to do a particular operation. All this can be done with the Notify Internal Recipients element.
This element is different from the send Email or SMS channels because here you set the exact recipient of the message and choose the channel in the element rather than defining it in the entry point when the flow begins.
When you add this element to your flow you choose if you would like to send SMS or Email and then compose your message in the message editor. You can define your recipient through manual input of the phone number / email address.
You can define your recipient through manual input of the phone number, email address or using Flow Variables if you have dynamic recipients. For example, if the phone number of the store manager is different depending on what store the customer visits.
NOTE
Each variable can only contain one destination phone number or email address
Track Performance
If you would like to track the performance of non-customer related communications that are generated using the Notify Internal Recipients element you can do so by hovering over the element in a flow. On hover you will be able to track total engagements for this element. Other performance metrics are coming soon.
Update Variable
Use the Update variable function to update the value of any Flow variables you have predefined. If you have multiple variables defined in your flow you can choose to update only a single variable or multiple variables at the same time. This is particularly useful if you need your session information like order status to be dynamic and adapt as the flow progresses i.e. from ordered to dispatched or canceled.
You can even make your variables go even further by using them with expression language. To set an expression inside the Update variable element, click the pencil icon next to the variable value field. See expression language to learn more.
NOTE
Update Variable functionality is not available for use with IVR Flows (Voice call sessions).
Integrations
Use integration elements in Flow to connect to external platforms.
Start a Conversation
This element is helpful if you want to direct customers to live agents or for similar scenarios. In the side panel, select a tag (create it on the spot or use the existing one) that tells the agent what the conversation will be about. For example, a data verification tag would mean that the agent will need to verify the customer`s information.
Add to Flow
The Add to Flow element should be used when you would like to send your user to a different 'secondary' flow. This is a very powerful element that contributes to the creation of modular flows which can help you split very complex flows into smaller, more manageable flows. To learn more, we've captured all the benefits of modular flows, when to use them, and also provided some examples in the Benefits of Modular Flows section of docs.
NOTE
There is a limit of 100 elements per Flow so if your Flow has more than this number will not be able to add more elements and should split your Flows using Modular Flows.
The Add to Flow element can be used at any position in a flow. If you use the Add to Flow element just before the exit element the user will end the current flow and be moved to another flow that you define. Whereas if you add the element at another step in the flow (that isn't the last step) then the user will continue the journey in both flows.
IMPORTANT
Before you use the Add to Flow element make sure that you have created all the flows that you would like to connect and that they have the appropriate Existing Flow entry point. Then when you add the element to your flow you will then be able to choose from all flows that are available to be used.
Variables and variable values can also be passed from your flow to a chosen flow using the Add to Flow element. By doing so you can ensure that as a user passes between flows any corresponding placeholder data will be passed too.
As good practice it is advisable to also include a failover branch at 'In all other cases' in the Add to Flow element. This way if it is not possible for the user to be transferred to the secondary flow (for instance, if the secondary flow is set to draft or has been canceled) then the user will still be able to continue on their journey.
Secondary Flow Participants
By default, any person passing through the Add to Flow element will also enter the secondary flow. They will participate in both primary and secondary flows until they exit from the flow.
You can also configure the element to so that another user can pass through the flow based on their contact information. To do so toggle to add another participant when you are adding your Add to Flow element. You can then define the primary contact information (phone number or email) to use for this participant that matches a flow variable, or a standard/custom attribute of the person who is currently in the Flow
If the participant exists in People then the flow will be started for the person as identified by their contact information and any mentioned attributes in the flow will be updated. If the person does not exist in People then a person profile will be created for them and an attribute value will be assigned to the profile.
A good use case for using the secondary flow participant functionality could be for a referral program to get the client to share the contact information of friends or family to receive benefits. As an example, you would ask the client to share the email of a friend over messenger. Then you would parse the email from the inbound message and saving the value into a variable.
You can then use the Add to Flow element to start a flow for another person with contact information and email extracted from the variable. This is a great way to enhance your reach, just always ensure that there is opt-in confirmation from the friend or family member in order to meet data requirements for your region.
Call API
Call API will allow interaction between an external system, such as a website or a CRM, and Flow in real time. This is a step in the Flow builder which lets you to request information from your third-party system or database and save responses to flow variables to personalize and steer communication in the flow depending on that data.
In the side panel of this Flow element, you can set up the following: Request, Response, and Scheduling.
Request
The Call API request has the following parameters that should be set:
HTTP(S) URL – URL of the third-party system with which the flow wants to communicate. Be sure to specify the correct URL to the service that will receive or send the data that flow requires.
METHOD – defines the method that will be used to call API. These are POST, GET, PUT, and DELETE. Each of these is used for different use cases. Responses can be saved to variables (explained below):
POST – API that is called should do something with the provided request. Often POST is used to create a new entity or update an existing one on the third-party side.
GET – used to retrieve information from the called API.
PUT – used to store something on the third-party side.
DELETE – used to remove something on the third-party side.
PATCH – used to apply a partial modification to something.
HEADER – Data that will be sent along with the URL. Data can be entered in KEY-VALUE formats, such as username: user1 and password.
BODY – Data that will be sent along with the URL. Data can be entered in KEY-VALUE format, such as name: Tom, or external user ID or in JSON format, for example {'name': 'Tom'}. Currently, two types of BODY are supported: JSON and URL Encoded Form. Default data entered by the user will be sent as JSON. To send it as URL Encoded Form data, you have to add a header with the name. Content-type and value: application/x-www-form-urlencoded
To authorize every call, you'll probably need to provide a username and a password in HEADER, and in BODY you should pass the EXTERNAL ID for each user stored in the People module so a third-party system knows which end user's data should be stored or fetched.
Headers are empty by default. Most of the web frameworks and services require a content-type header in the request to process it properly. For example, if you are trying to send a JSON, you should add a header with the name. Content type and value: application/json
Response
These are the parameters that need to be set for the Response:
WAIT UNTIL RESPONSE IS RECEIVED – select this check box and the next step in the Flow will be activated only after the response has been received. Select how long to wait for a response. The default value is one hour.
RESPONSE HEADER VARIABLE - allows the server to pass additional information about the response which cannot be placed in the Status-Line. The header fields provide information about the server and further access to the resource identified by the Request-URI.
RESPONSE BODY VARIABLE – the called API data received from the external system can be saved to a flow variable and used in the rest of the flow. To save data to the variables you will need to do the following: Enter a JSON path expression such as $ loyalty_points. A path must point to a single value; if the value is an array or object, it will be considered an error and NULL will be set to this variable.
Handle Error Codes
The flow can be branched based on whether the response has been received or not, and based on the error code. Use Conditions to specify how you want to treat the response codes.
The code types:
On success – Exit: “In case of 2XX error”. Requires no action and it is being handled through the prior conditions.
On error - Exit: "In case of any error."
All client error codes - Exit: "In case of 4XX error."
Server error codes - Exit: “In case of 5XX error.”
Scheduling
The options shown in this section will help streamline the data exchange. To start scheduling, enable the following features in the Scheduling tab:
Delivery Time window
• Select the start time for data delivery
• Select end time for data delivery
• Select the time zone
Define Message Sending Speed
• Enter the number of messages you want delivered within a specific time period
• Select per minute, per hour, or per day
Exit
When the flow is ready, the next step is Validation. Once you click Validate, if there are no errors to be reported, the Exit element will appear automatically after each unconnected element in the Flow. When it comes to IVR flows, the exit element will finish an active call. So, if you decide to validate the communication while the call is still ongoing, it will end.
Exit also helps calculate how many customers from a specific communication branch finished the flow.
Personalization with Placeholders
No matter which communication channel is being used, there are placeholders to help you with personalization.
Once you start creating your messages, the curly bracket (placeholder) icon will be available inside the content panel; if you are sending an email, you will find it in the subject field.
Click the icon to see the menu with the available placeholder attributes. All Infobip users have access to the following ones:
- Standard attributes
- Custom attributes
- Contact information
- Variable names
- Channel specific attributes
- Computed attributes
NOTE
When you are working with DateTime attributes and variables the date output will be in the format '2021-12-15T14:24:00Z'. This often causes challenges when you want to use dateTime attributes in your message or Voice IVR flows.
Use the formatDateTime function in expression language to change the format and ensure that it is presented in a user friendly and appropriate way for your user.
You can select any number of placeholders when sending personalized messages.