Analyze
Reports

Reports

Reports offer a wide range of detailed information, from a list of messages to aggregated statistics. Use filtering and advanced options to obtain information about the quality, performance, and efficiency of your communication with end users. You can also share reports with other people.
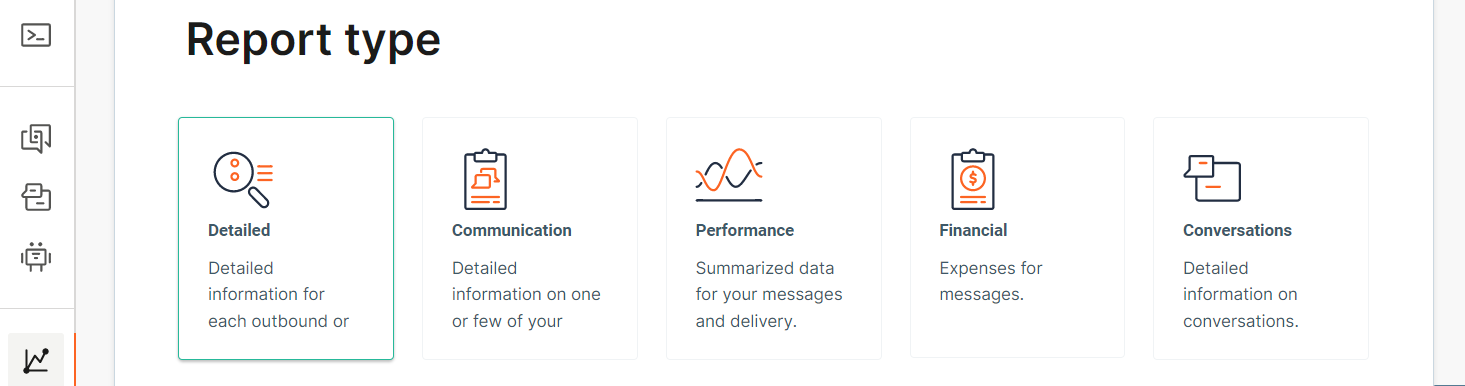
Reports are of the following types:

  • Detailed: detailed information about sent or received messages
  • Communication: detailed information on one or more of your communications
  • Performance: summarized data about messages and delivery
  • Financial: detailed view of traffic expenses
  • Conversations: detailed information about conversations with end users

Detailed report

Detailed report provides you with information about sent or received messages.

To create a Detailed report, follow these steps:

  1. Navigate to Analyze > Reports.

  2. Click Create Report.

  3. In the Report type section, select Detailed.

  4. In the Detailed Report Content > Channels and Services section, select the channels that you want to track. By default, all channels are selected. To track a specific channel, deselect the ones you do not need. You can also use the None and All options to select channels.

  5. In the Recurrence and Date Range section, choose the following:

    • whether the report is one-time or recurring
    • date range for the report
  6. In the Filters section, choose the following.

    • Whether the report must be generated by Send time or Done time
    • the status of the report. Example: Delivered, undeliverable

    Click View Additional Filters for more options.

  7. In the Options section, choose the following:

    • File format: Available formats are .xlsx and .csv
    • Unique reports: whether you need unique reports. You can obtain unique reports for each account, sender, user, or title.
    • Columns: whether the report must contain all columns or columns that you specify
    • Direct link: whether you want to share a link to your report. Anyone who has the link can download the report. The link is valid until the report status changes to Expired.
    • Recipients: recipients to whom you want to send the report
  8. Click Create Report.

After the report is generated, download the report, or view it within the web interface. For more information, refer to the Download or View Report Data from the Web Interface documentation.

Dashboard detailed report
Note

If your SMS API request contains a callbackData field with JSON, its data will be parsed and displayed in SECTIONNAME as separate columns. You can add any metadata, such as which department is sending the message, your own account ID, etc.

Communication report

The Communication report offers detailed information about selected communications.

To create a Communication report, follow these steps:

  1. Navigate to Analyze > Reports.

  2. Click Create Report.

  3. In the Report type section, select Communication.

  4. In the Communication Report Content section, select the accounts and templates that you want to track. If you do not choose specific accounts or templates, the report is report is generated for all accounts and templates.

  5. In the Communications section, select one or more communications that you want to track. If you do not see your communications in the list, click View Additional Communications.

  6. In the Options section, choose the following:

    • File format: Available formats are .xlsx and .csv
    • Unique reports: whether you need unique reports. You can obtain unique reports for each account, sender, user, or title.
    • Columns: whether the report must contain all columns or columns that you specify
    • Direct link: whether you want to share a link to your report. Anyone who has the link can download the report. The link is valid until the report status changes to Expired.
    • Recipients: recipients to whom you want to send the report
  7. Click Create Report.

Create Communication report

After the report is generated, download the report, or view it within the web interface. For more information, refer to the Download or View Report Data from the Web Interface documentation.

Performance report

The Performance report provides detailed information about the performance of selected communications and/or channels.

To create a Performance report, follow these steps:

  1. Navigate to Analyze > Reports.

  2. Click Create Report.

  3. In the Report type section, select Performance.

  4. In the Performance Report Content > Metrics section, select the type of performance that you want to track. Example: Delivery rate by country and Traffic by channel.

  5. In the Channels and Services section, select the channels that you want to track. By default, all channels are selected. To track a specific channel, deselect the ones you do not need. You can also use the None and All options to select channels.

  6. In the Recurrence and Date Range section, choose the following:

    • whether the report is one-time or recurring
    • date range for the report
  7. In the Filters section, choose the status of the report. Example: Delivered, undeliverable. Click View Additional Filters for more options.

  8. In the Options section, choose the following:

    • File format: Available formats are .xlsx and .csv
    • Direct link: whether you want to share a link to your report. Anyone who has the link can download the report. The link is valid until the report status changes to Expired.
    • Recipients: recipients to whom you want to send the report
  9. Click Create Report.

Create Performance report

After the report is generated, download the report, or view it within the web interface. For more information, refer to the Download or View Report Data from the Web Interface documentation.

Financial report

The financial report offers detailed expense information about the chosen communications.

To create the Financial report, follow these steps:

  1. Navigate to Analyze > Reports.

  2. Click Create Report.

  3. In the Report type section, select Financial.

  4. In the Financial Report ContentMetrics section, select the type of expense that you want to track. Example: Expenses by country and Expenses by channel.

  5. In the Channels and Services section, select the channels that you want to track. By default, all channels are selected. To track a specific channel, deselect the ones you do not need. You can also use the None and All options to select channels.

  6. In the Recurrence and Date Range section, choose the following:

    • whether the report is one-time or recurring
    • date range for the report
  7. In the Filters section, choose the status of the report. Example: Delivered, undeliverable. Click View Additional Filters for more options.

  8. In the Options section, choose the following:

    • File format: Available formats are .xlsx and .csv
    • Direct link: whether you want to share a link to your report. Anyone who has the link can download the report. The link is valid until the report status changes to Expired.
    • Recipients: recipients to whom you want to send the report
  9. Click Create Report.

After the report is generated, download the report, or view it within the web interface. For more information, refer to the Download or View Report Data from the Web Interface documentation.

Dashboard detailed report

Conversations report

The Conversations report provides you with the information about the chatbot's conversations with end users.

To create a Conversations report, follow these steps:

  1. Navigate to Analyze > Reports.

  2. Click Create Report.

  3. In the Report type section, select Conversations.

  4. In the Conversations Report ContentMetrics section, select the type of metrics that you want to track. Example: Channels and Surveys.

  5. In the Channels and Services section, select the channels that you want to track. By default, all channels are selected. To track a specific channel, deselect the ones you do not need. You can also use the None and All options to select channels.

  6. In the Recurrence and Date Range section, choose the following:

    • whether the report is one-time or recurring
    • date range for the report
  7. In the Filters section, choose the status of the report. Example: Open, waiting. Click View Additional Filters for more options.

  8. In the Options section, choose the following:

    • File format: Available formats are .xlsx and .csv
    • Direct link: whether you want to share a link to your report. Anyone who has the link can download the report. The link is valid until the report status changes to Expired.
    • Recipients: recipients to whom you want to send the report
  9. Click Create Report.

After the report is generated, download the report, or view it within the web interface. For more information, refer to the Download or View Report Data from the Web Interface documentation.

Dashboard detailed report

Statuses of reports

Your report requests have one of the following statuses:

  • Pending: After you request a report and while the report is being generated
  • Active: After the report is generated and is available for download/view
  • Expired: After 72 hours from the time the report is generated. The report is not available for download anymore. If you need the data again, click the three dots against the expired report and click Clone.
  • Failed: Happens in rare cases when inconsistency errors or issues with data sources are identified when generating the report. When this issue occurs, clone the report, and request it again. If that does not work, contact Support (opens in a new tab).
  • Stopped: A recurring report might be automatically put on hold and show this status when:
    • Last 2 monthly reports were not downloaded or viewed
    • Last 4 weekly reports were not downloaded or viewed
    • Last 14 daily reports were not downloaded or viewed

Download or view report data from the web interface

In addition to downloading a report, you can view the report within the web interface.

  1. Navigate to Analyze > Reports.
  2. In the list of reports, identify the report that you want to view.
  3. Click the eye icon.
All reports view

The page includes all the information that the downloaded report contains. Example: report name, formatted table with data, report attributes such as the date when it was created, filters applied, date period, and other information.

Recurring reports and report sharing

You can avoid manually creating reports from scratch by setting up recurring reports. When creating a report, choose the report range, frequency, and the day and time that you want the reports delivered.

Report options - recurring reports

You can also share reports with other people. When creating a report, complete one or more of the following:

  • Direct link: Choose whether you want to share a link to your report. Anyone who has the link can download the report. The link is valid until the report status changes to Expired.
  • Recipients: Enter the email addresses of the recipients to whom you want to send the report

Export report

You may want to export reports to your systems so that you can consolidate, enrich, and compare data; and dig into it for insights. You can exchange data between Infobip's systems and your systems by using the Export option.

After you configure the Export option, each time a report is generated, the report is automatically uploaded to the configured destination. The export takes place even for scheduled recurring reports.

For more information, refer to the Data export documentation.

Need assistance

Explore Infobip tutorials

Encountering issues

Contact our support

What's new? Check out

Release notes

Unsure about a term? See

Glossary

Research panel

Help shape the future of our products
Service Terms & ConditionsPrivacy policyTerms of use