Moments (draft)
Every moment in communication is a part of a bigger setup with different types of starters, triggers, activities, and goals. Now imagine all of these magically placed together within one Flow! The following paragraphs and images are a sort of insight into the blocks you can use to create your ideal scenario for communication with customers via different channels, based on their actions and profile changes.
Flow Entry Points
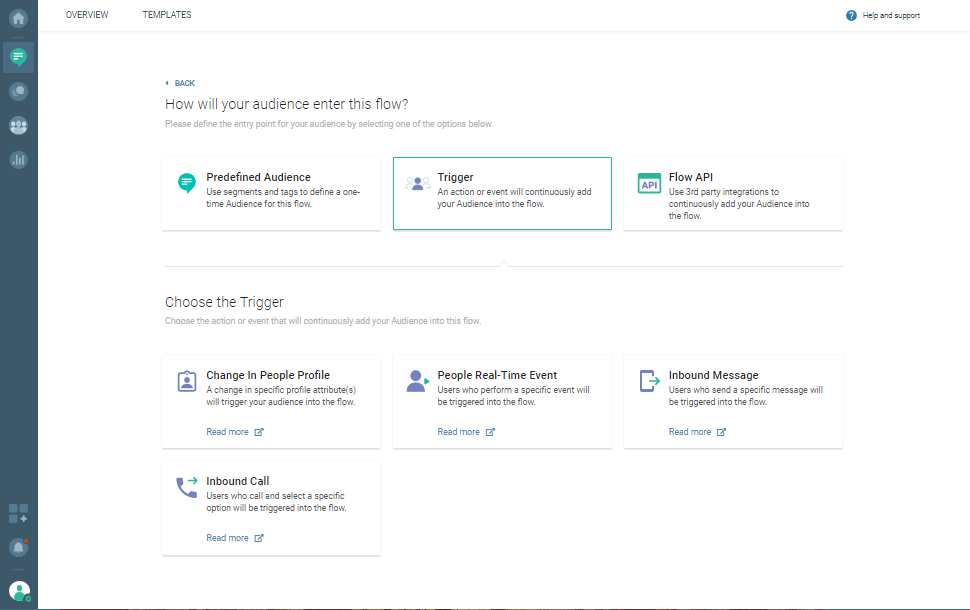
Selecting an entry point is your first stop on the way to create a personalized communication flow. These are all the starting points available on the Infobip web interface:
- Predefined Audience
- Trigger
- Change In People Profile
- People Real-Time Event
- Inbound Message
- Inbound Call
- Flow API
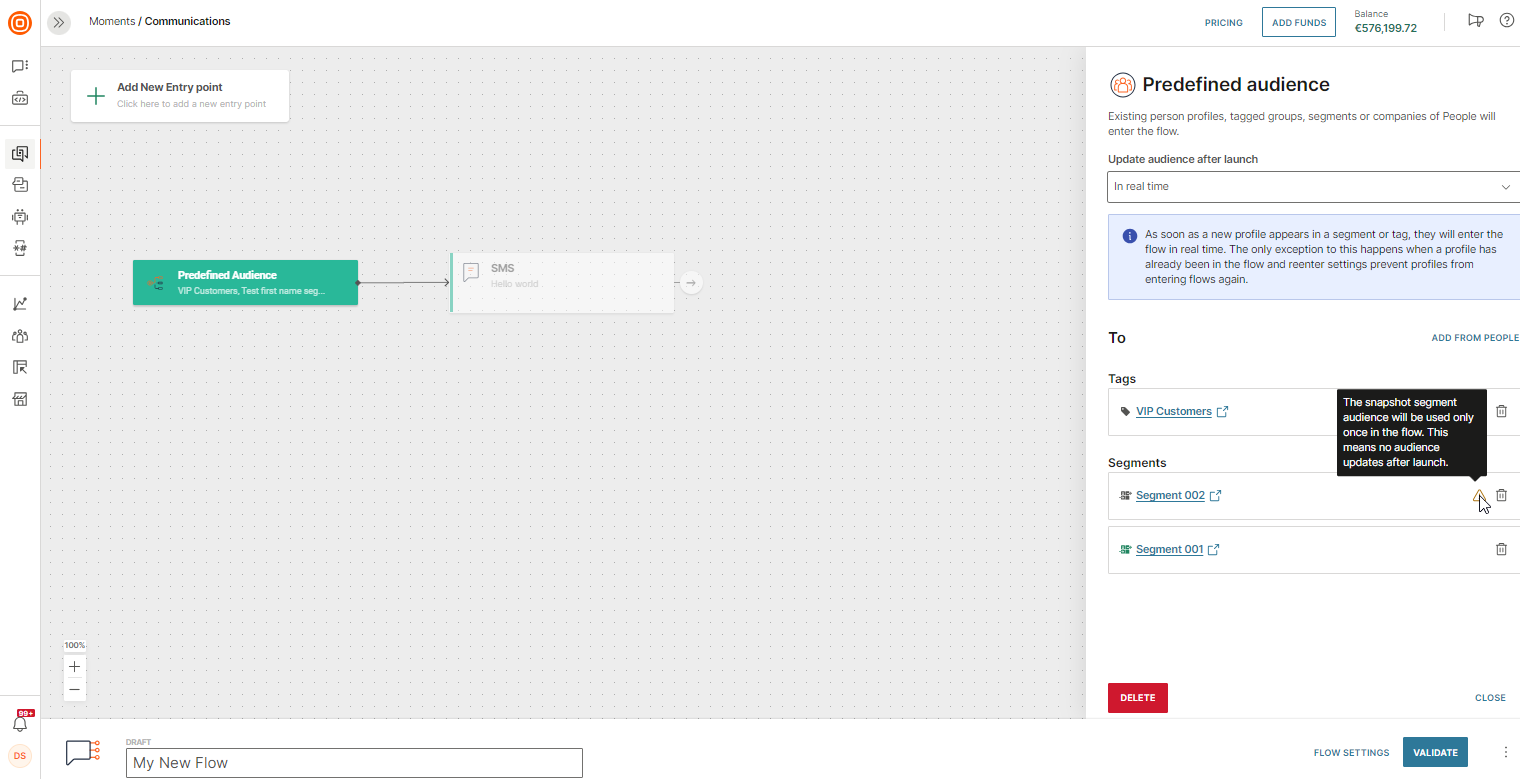
The next step, after you have decided which entry point to use, would be to define the mandatory parameter values. For example, if you have selected Predefined Audience as the entry point for your communication, on the side panel that will appear when you click that entry point, select the persons with a Tag or Attribute (e.g., FirstName) that you have previously created in the People module.
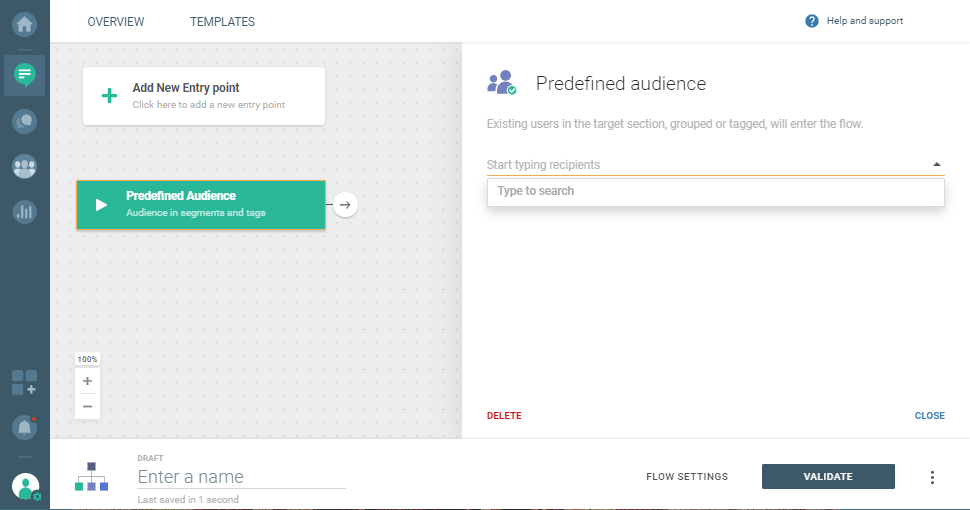
Predefined Audience
When starting communication with the Predefined Audience entry point, a scenario described at the beginning of this article, you can specify the audience segments, persons, or tags previously defined in People.
IMPORTANT
Predefined Audience element can be defined only ONCE per flow. Other elements can be added multiple times on the flow canvas.
Triggers
Flows can also be triggered by different events and actions. In other words, people who perform some activity that has been defined in the trigger will enter your flow. The following paragraphs should help you determine which triggers would best serve your business scenario.
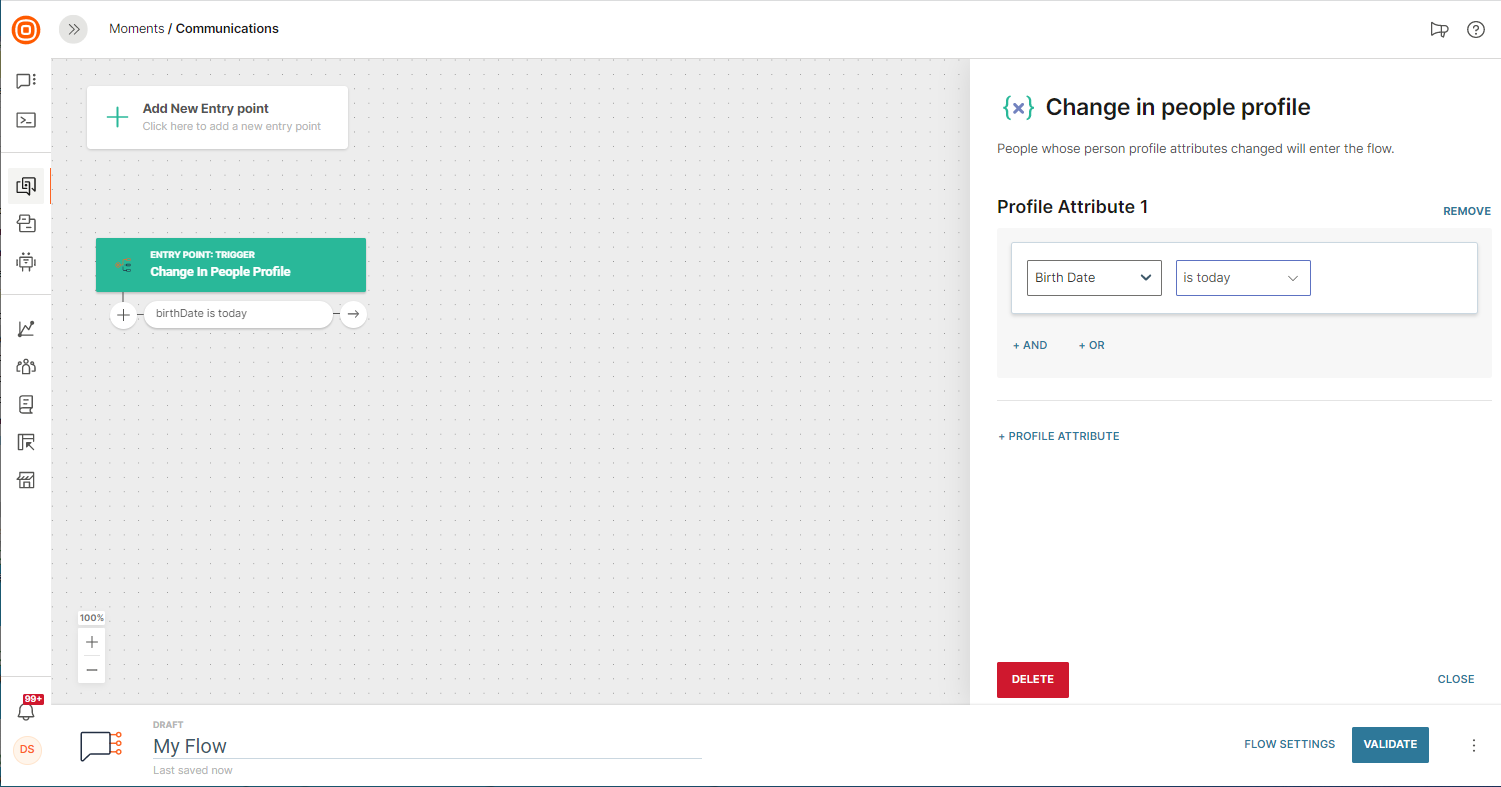
Change In People Profile
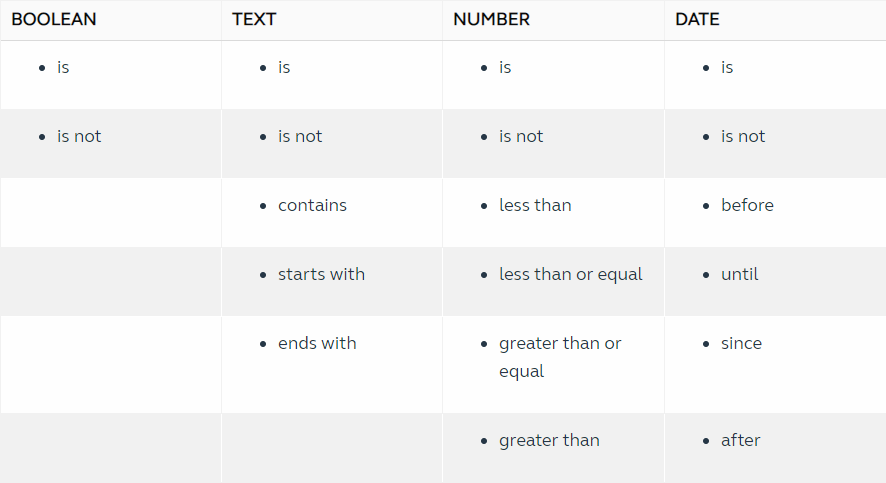
With this entry point, it is possible to use multiple operators to compare data with the values that users enter before they become a part of the flow. These operators depend on the type of the people attribute value that is being compared. The following operators are available:
Change In People Profile is the best choice when you want to wait a predetermined amount of time for a change in a specific person attribute so that this person can enter the communication flow. For instance, with Change in People Profile you can set up a Happy Birthday flow by choosing Birth Date is today.
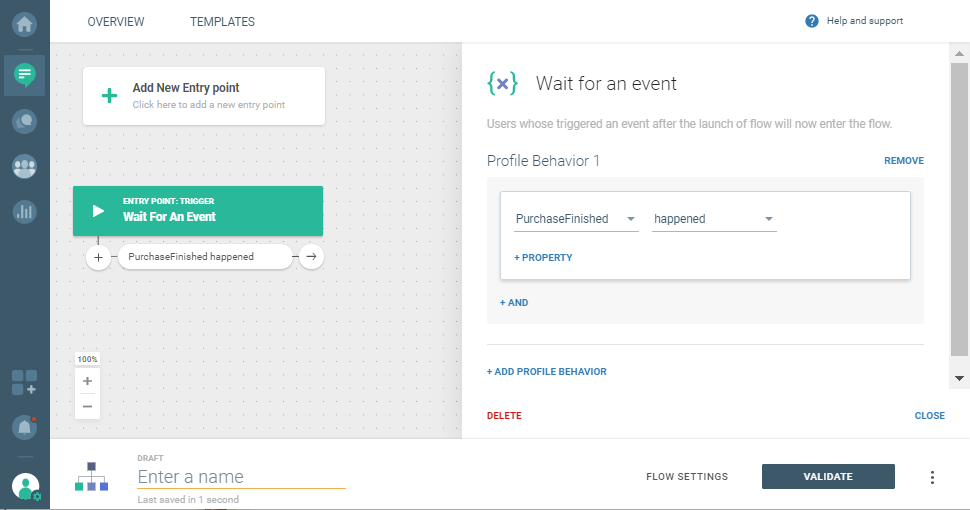
People Real-Time Event
This trigger has been designed to record a certain event or a combination of events that will happen to end users. You will need to configure what event the flow should wait for. It could be a PurchaseFinished event or any other user activity that your communication will be based on.
People Real-Time Event is key in the abandoned cart campaigns when you want to remind users that their favorite products are still awaiting them or in other advanced multi-step campaigns.
Inbound Message
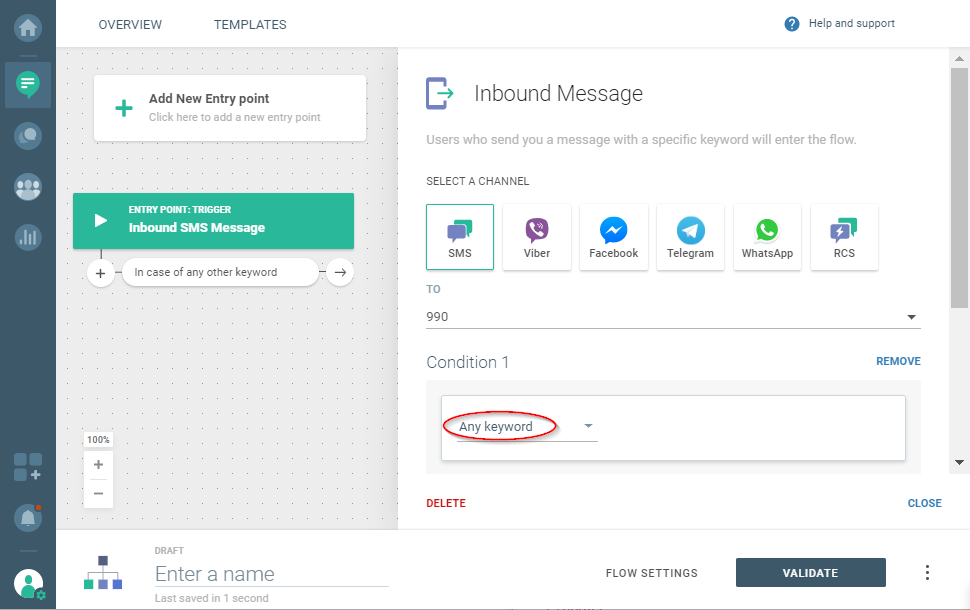
Opt for this entry point when triggering a flow for all the end users who send a specific keyword to the number you have set up. This enables you to create a dynamic audience when you don’t know who exactly should be included in your communication.
To cover cases where end users enter the flow regardless of the keyword they sent, select Any keyword (as shown in the screenshot below). You can have multiple flows using the same number and waiting for the end user's message. If this is the case and you have one flow with the exact keyword such as Start and another one with Any keyword (on the same number), the exact keyword will be used to trigger the flow. The reason is that the exact keywords have a higher priority than Any keyword. The same logic is applied to the Evaluate Inbound Message element.
INFO
Multiple Inbound Message entry points can be added to a flow.
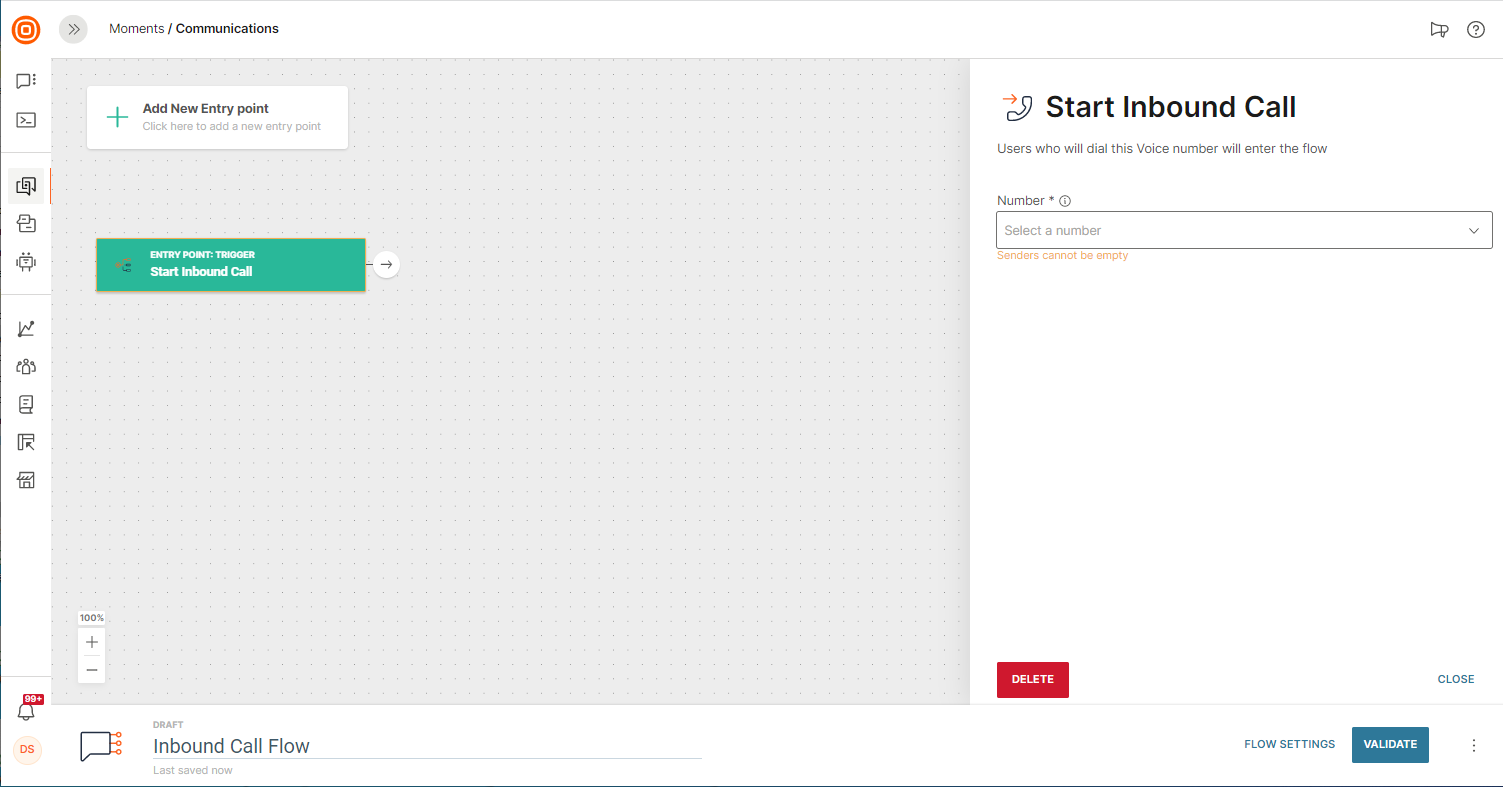
Inbound Call
The users who call your number will be included in the flow if you have selected Inbound Call as the entry point. The flow will be triggered when they call the number that you have defined inside the entry point.
IMPORTANT NOTES
To use the Inbound call entry point you need to activate a voice channel! Contact your account manager for more information regarding the voice channel activation.
Keep in mind that to be able to change the inbound IVR scenario used on a Voice number, you have to stop the current flow campaign on that number, and then start building a new one.
Another very important information when using Inbound Call is that the end user is charged by their mobile or landline operator. In some cases, you will also be charged for inbound traffic coming to a Voice number, but that depends on the market. Also, if an IVR has a Forward call element forwarding the current call to some other phone number(s), you pay for that outbound leg of the call.
INFO
While you can use non-IVR elements after the Inbound Call entry point, note that in most cases you need to create an IVR flow that covers your use case.
Flow API
Add people to the flow based on external triggers. Flow API lets you send data from your system, like a webpage or a CRM, to the flow that you created on the Infobip web interface. This is a neat way to automate welcome messages, lead nurturing, different types of reminders, etc.
To use this option, create a flow with a Flow API entry point. Within this starting point, you will receive a unique URL where the end users’ data will be sent. The moment the flow receives the data, it will create a person profile in the People module and add this person to the flow. Technical details of the integration can be found on our API Developer Hub.
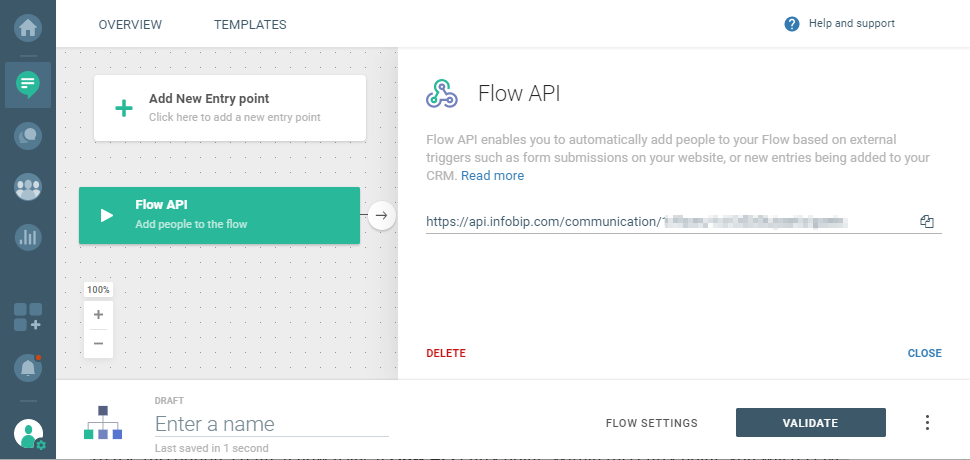
Learn how to send automated welcome messages using Flow API.
Flow Elements
The elements that belong to Flow but are available only to the Moments users are meant to provide a flexible solution for your communication with customers. Browse through to find out which of these building blocks would best serve your business scenario.
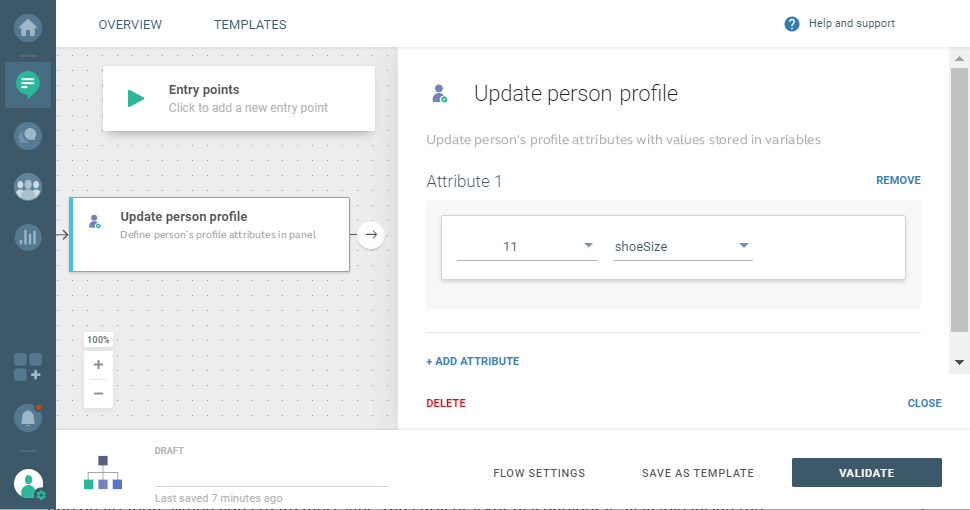
Update Person
To update a person`s attributes, standard and/or custom, that are stored in the People module, use the Update Person element. Fill out the parameters and choose which person attribute will be updated with new values. Based on that update, you can later decide how to continue the communication flow.
For example, if you want to get some information, say your customer`s shoe size, you could send an SMS with that question and once the customer responds, the number will be stored inside the shoeSize variable that was previously set up in People.
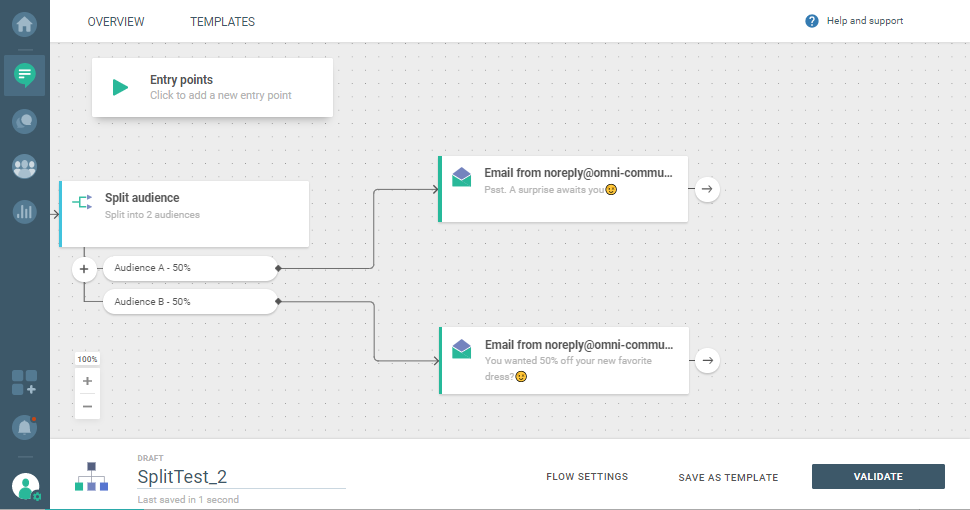
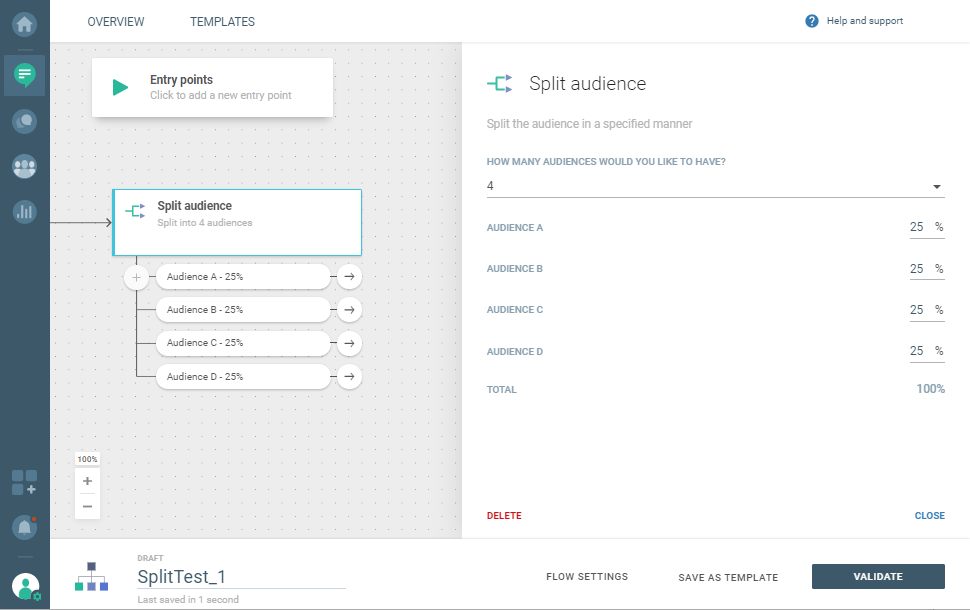
Split Audience
This element lets you divide your audiences and get more precise metrics about how they react to your content. Split audience is especially useful when you want to do the following:
- Perform simple experiments such as testing two versions of the same SMS message.
- Create more advanced experiments that involve testing which channel (Email, SMS, Push, etc.) works best.
In the scenario below, we will specify how many branches we want to include in testing and what percentage of the audience should go to each branch. We will also include channel testing.
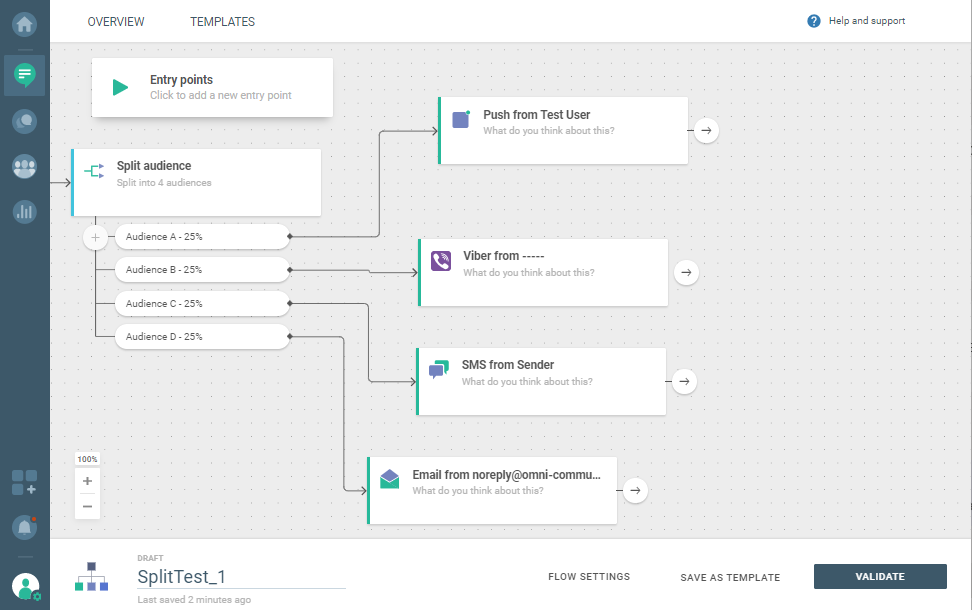
The Split audience element has even more to offer, as described in A/B Testing.
Advanced Options
Read short descriptions of new options that will prove useful when you are getting ready to send messages to customers. Besides additional possibilities inside the Flow Settings, there are also features that will provide a great insight into your communication campaign`s performance.
Entry Frequency Capping
To avoid both overwhelming your customers and not reaching out enough, think about the number of messages that is most suitable for each of your communication campaigns. When creating one such campaign based on customer actions (Events), you can decide how often customers should enter your flow.
Take the welcome sequence scenario as an example. The welcome sequence is triggered when you want to welcome and quickly onboard your newly registered user, and it should only happen once per person. Although you probably don`t want to send multiple registration events for the same person, mistakes can happen. To remain in full control of your automated communication, use the Frequency cap inside the FLOW SETTINGS.
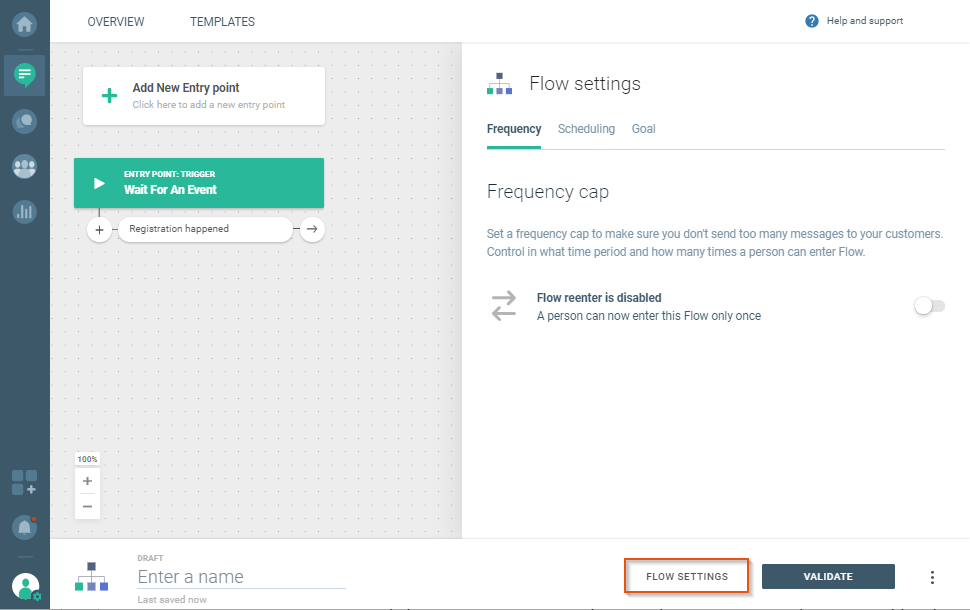
There are 3 controls in Flow settings:
Flow reenter is enabled. Specify whether the flow should be recurrent (a person can enter it multiple times) or non-recurrent (each person enters it only once). This feature is enabled by default.
Time Delay. Decide how much time should pass before a person becomes eligible to re-enter the flow after exiting. Keep in mind that only one Time Delay can be set.
Entry Limitations. Set the limit for the same person to re-enter the flow during any given time period (e.g., not more than two times within a week). You can set multiple Entry Limitations (e.g., not more than 1 per hour and not more than 24 in one day).
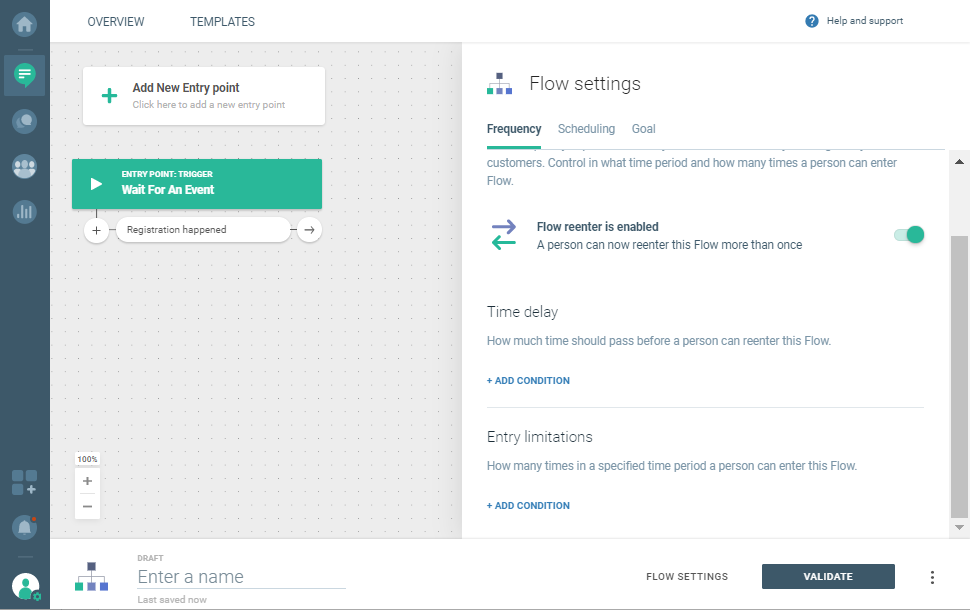
If a person becomes eligible for the entry trigger (in this case the entry trigger is Registration), but the Time delay and/or Entry limitations prohibit that person from entering the flow, the existing information related to the entry trigger will also be ignored in the future.
When you set Flow reenter is enabled and don’t set Time Delay and Entry Limitations, a person will be eligible to re-enter the flow right after exiting, that is if they match the condition for re-entry.
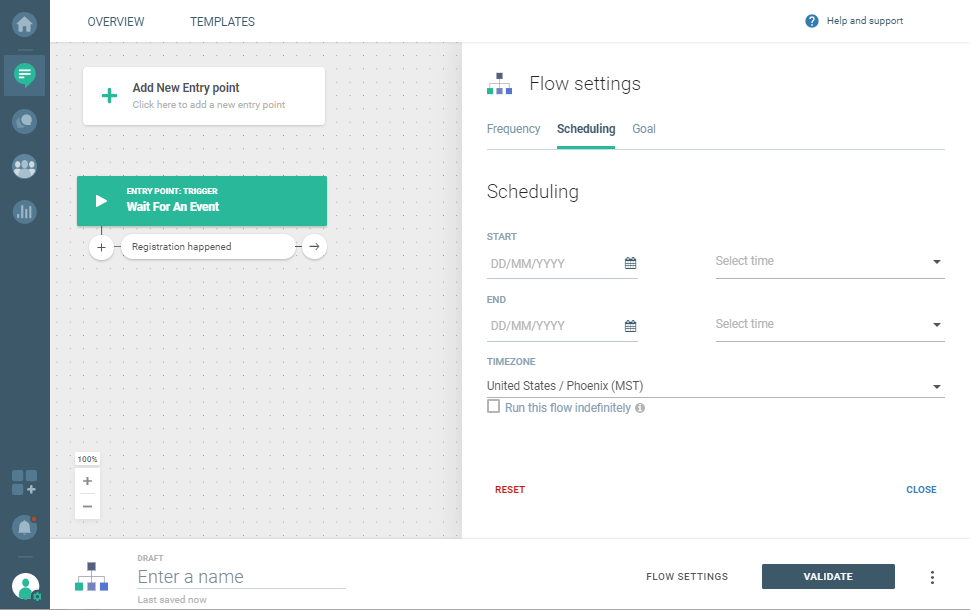
Scheduling Options
Every Flow communication can be scheduled. The scheduling options are available inside the flow, under FLOW SETTINGS.
This is where you can set the start date and time for your flow, as well as an end date and time depending on the audience you want to reach and the timeframe you have set for your campaign.
Never-Ending Flow
Every communication can be prescheduled. Inside the Flow, scheduling options are available on the bottom right. You can set up a start time and date for your flow, as well as an end date and time.
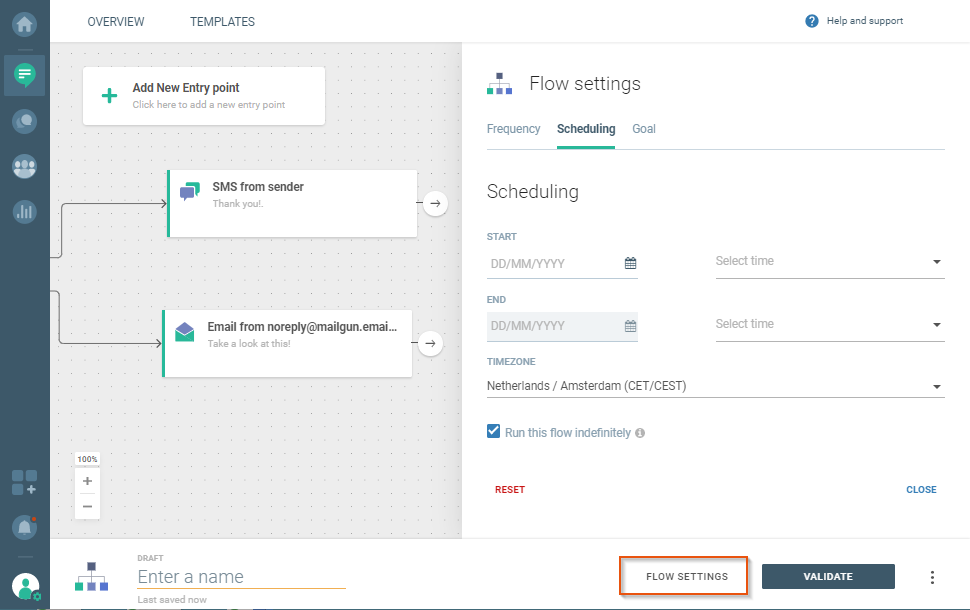
Select FLOW SETTINGS > Run this flow indefinitely and the flow won't be automatically stopped 90 days after the launch. The flows set to run indefinitely will stop only if no flow element was triggered for 90 days.
Flows with the One-time audience starting point can`t last indefinitely due to the nature of this entry point – all the audience enters at once and there is no option for someone to be added to the flow at a later time.
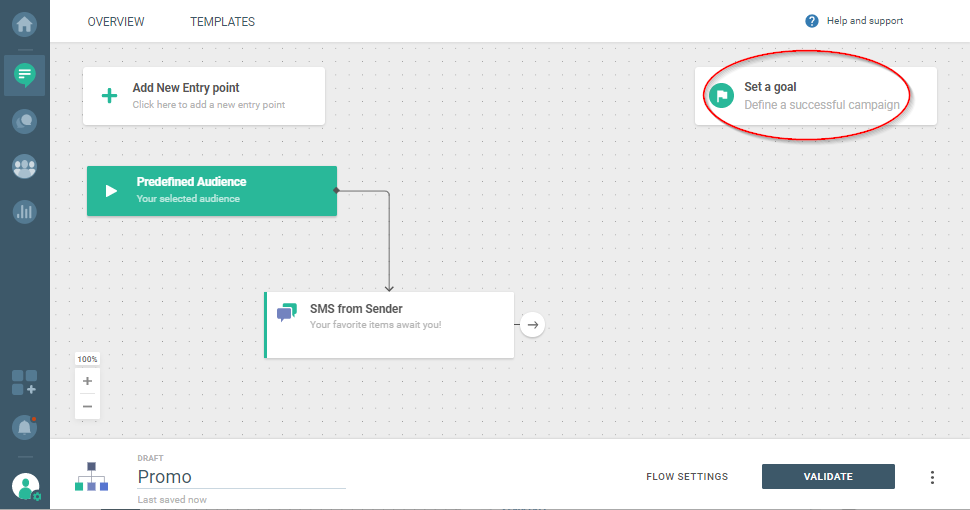
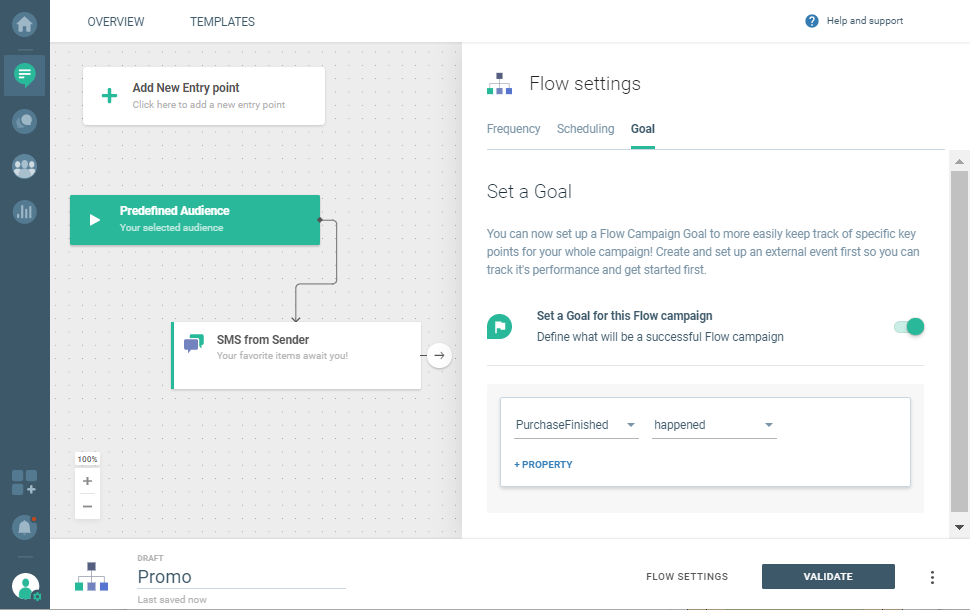
Goals
The purpose of communication is often much more than to simply deliver messages. Many times it involves goals such as an increase in purchases, and this is why we have introduced the possibility to set any tracked event as the (custom) goal of the flow.
A goal can be set before and after the communication flow has been launched. It will get you information about an overall amount of end users reached at the specific point of their customer journey and the percentage of end users who acted in a way that will help you achieve your set goal.
Let`s say that you want to sell a certain number of a specific brand of shoes. Once you have created your Flow and selected your starting point and communication channel, click Set a goal.
PurchaseFinished becomes your goal. You will see how many people saw your message, plus how many bought the item. This helps track your communication and how close you are to achieving your goal.
Most of the Flow elements will have the following metrics available:
- Total Engagements – a value consisting of all end users that reached a specific element in the flow. Those that reach the same element multiple times will also be represented in this value.
- Unique Users Engaged – a value consisting of all end users that reached a specific element in your flow. Those that reach the same element multiple times will not be counted.
- Number of Messages Sent From a Flow Element (if the purpose of the element is to send messages, start a call, or trigger a Call API) – a value consisting of an overall number of messages sent from a Flow element. If some messages are broken down into two or more, like in the case of long SMS messages, they will be counted too, and they could sometimes be larger in number than the Unique Users Engaged.
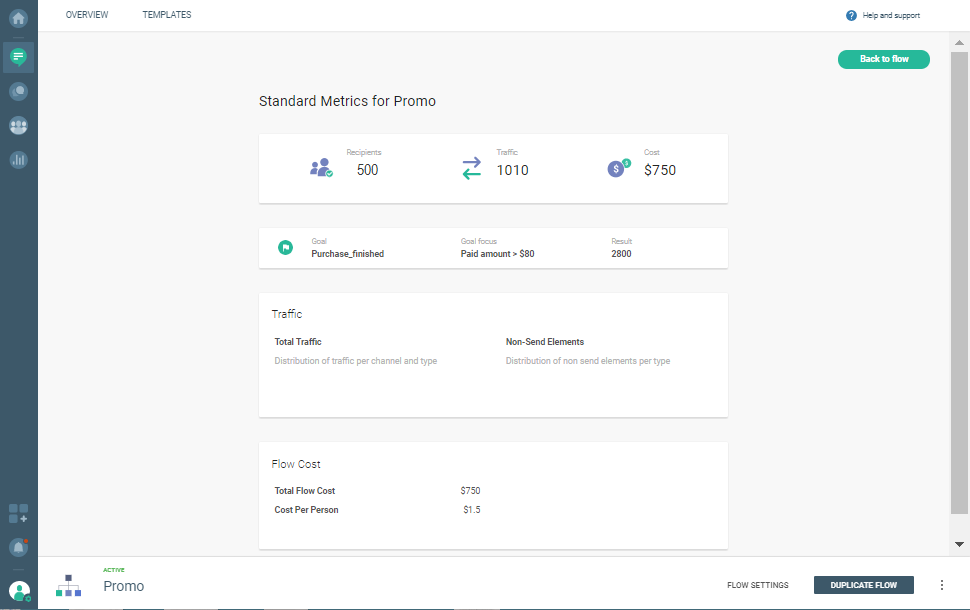
Detailed Flow Analytics
You are interested in the data about your communication campaign? Get there in a jiffy via the Communicate module on the Infobip web interface. Click the campaign in question and the View Flow Performance element.
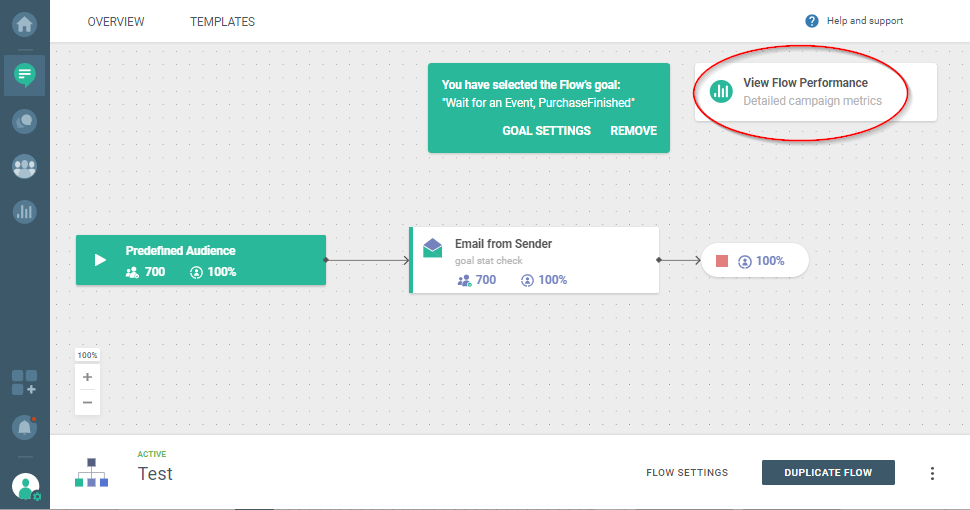
The overall analytics for Flow has three main categories:
- Total number of recipients
- Amount of sent messages
- Cost of the flow
A/B Testing
Inside the Flow, you have an option to split your audience in proportions of your choice to test how they react to your content or what is the best time to send communication. Separate branches for each subset audience will be created (as seen in the image below), and from there you can go ahead and select channels and actions that will best serve your desired testing scenario.
1. Split the audience for testing.
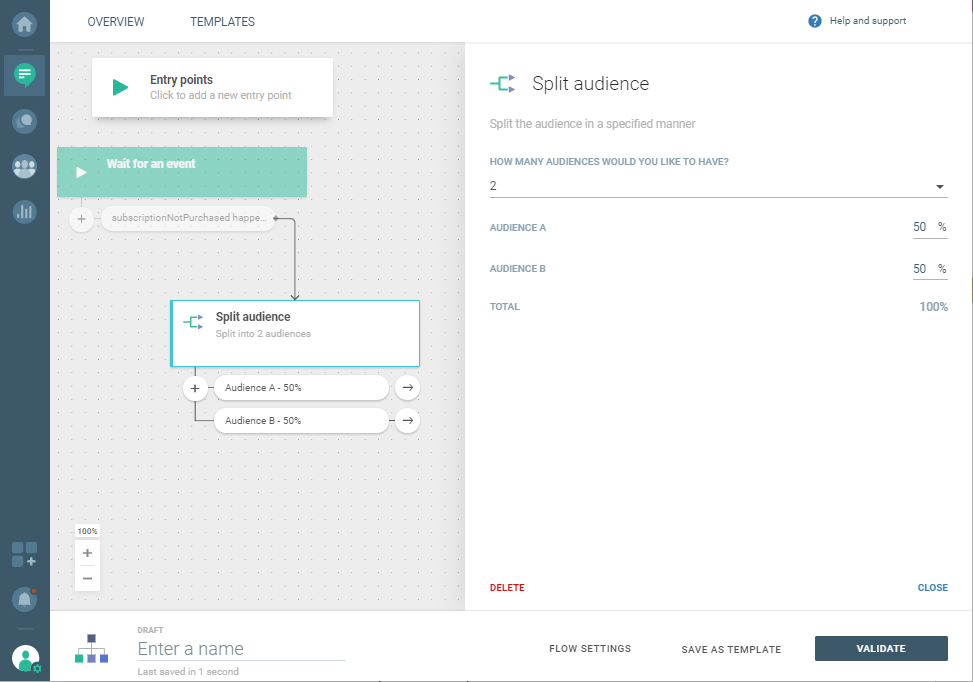
2. Select channels.

A/B testing in Flow is very effective when you want to compare the results that you get from different channels. If you have decided to include the chat app(s) as a communication channel, we recommend using the failover feature because parts of the audience might not have the app in question installed on their devices.
Set Up A/B Test in Flow
Performing experiments in Flow allows you to test different channels and sending times, or simply to create branches of a randomly split audience.
Test Sending Time
- In the Communicate module on the Infobip web interface click CREATE FLOW > Start from Scratch and select any entry point (One-time audience, People real-time event, or other).
- Select Split audience, specify how many test audiences do you want, and their share in the total audience.
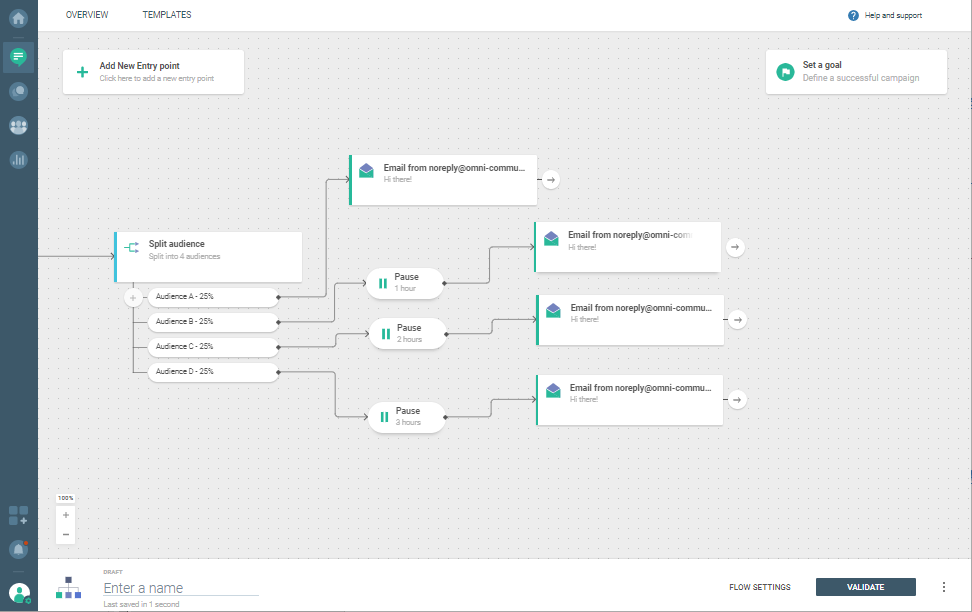
Now you will have the audience branches with people randomly being assigned to those branches. So, say you would like to figure out the best sending time for your email - this is what you would need to do:
a) Add the Send Email element to the first branch. To set up tracking for both opens and clicks,
scroll down to Advanced Options.
b) For the second branch, add a 1-hour Pause, and then the same email as in step two.
c) Repeat the previous step 2 more times, each time incrementing the pause duration by one hour.
Test Content
You want to make sure you have the subject line (Email) or content (all other channels) that will be read by the intended audience? A great use case would be to create two branches for testing (20% each), and the winning content will go to the rest of your audience. This remaining 60% you should tag with notReceived.
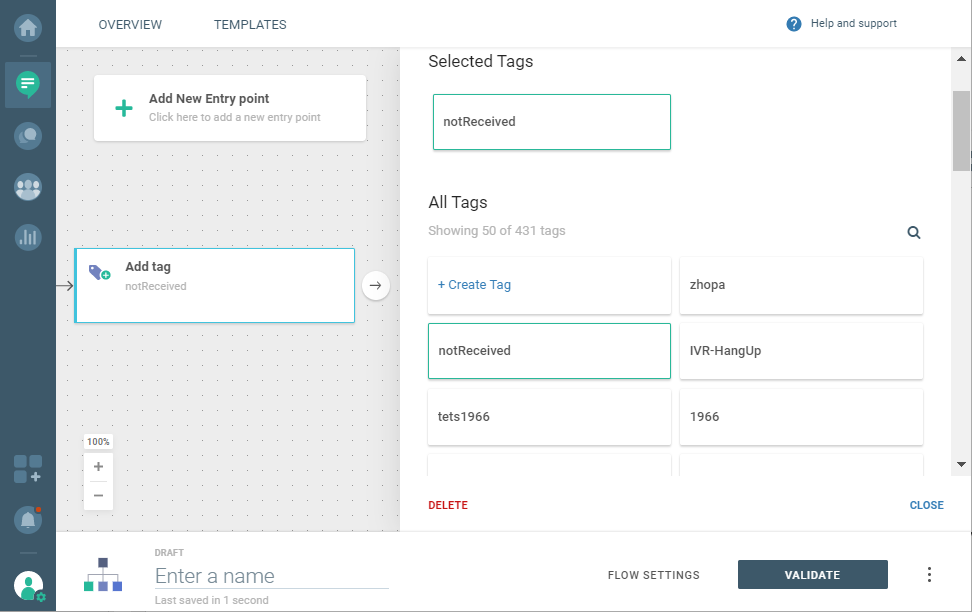
After you have launched your flow, go back to the Communicate module at any time, and hover over the email elements to check the data. When you determine which subject line works, it will be time to send the message to the remaining audience in Broadcast, with the help of the tag you created.
In Communicate, select CREATE BROADCAST and change the communication channel to Email. Next, select the notReceived tag as the recipient, and create content to be sent using the winning subject line.
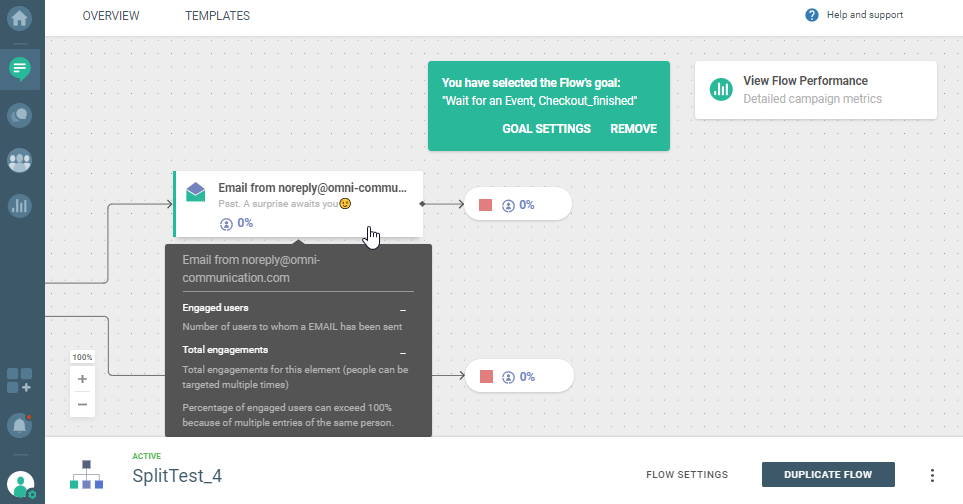
Check A/B Test Result
As mentioned in the use case described earlier, the performance data appears once you hover over the channel you used for a specific testing campaign (SMS, Email, Voice, Chat Apps, etc.). To see the relevant information, you will first need to go back to the Communicate module and select the campaign in question.
Available Channels
You can A/B-test using all the channels available in Flow: SMS, Email, Push, Voice, Chat Apps (WhatsApp, Viber, Telegram, Line, VK Messenger, Facebook Messenger).
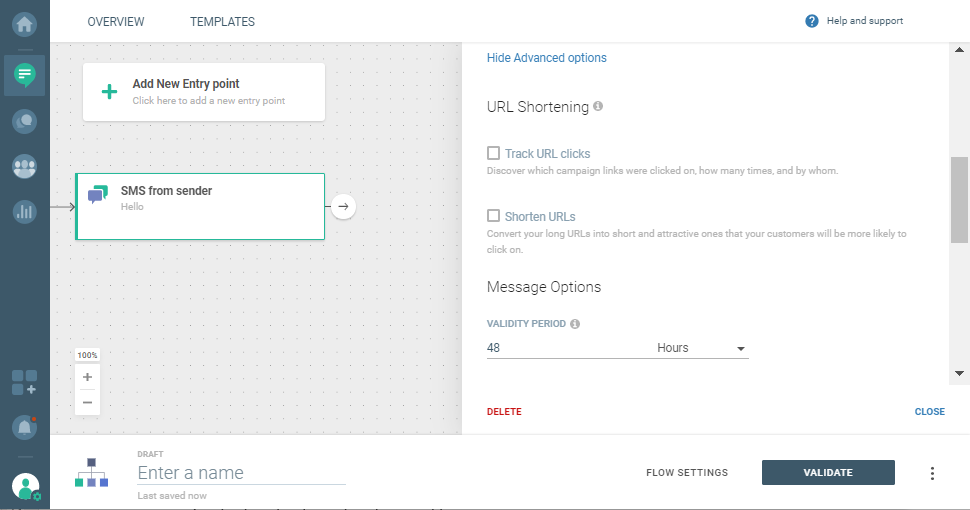
Given that certain channels, such as SMS, don’t have any default metrics, the messages can be optimized with the URL shortener that tracks click rates.