Applications and entities
In CPaaS X, applications and entities are modular building blocks that Infobip clients can configure using the Infobip API to meet their business needs. These structures support a more flexible and scalable approach to messaging and reporting.
Applications and entities are designed to be flexible in managing configurations and resources. While similar in configuration options, they represent different "actors" or "objects" in your system.
Depending on your requirements, you can use applications and entities separately or together.
You can associate applications and entities with resources that you own, allowing you to define your business assets (environment, customers, resources) on the Infobip platform without managing the complexity of CPaaS execution.
Continue reading to learn more about applications and entities, or start creating them using the API or web interface.
Applications
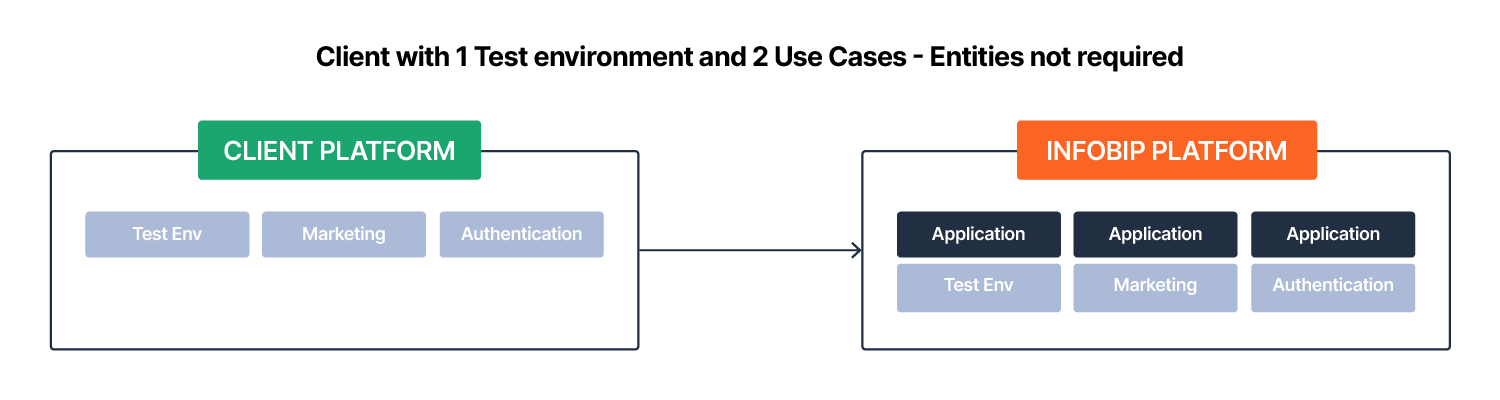
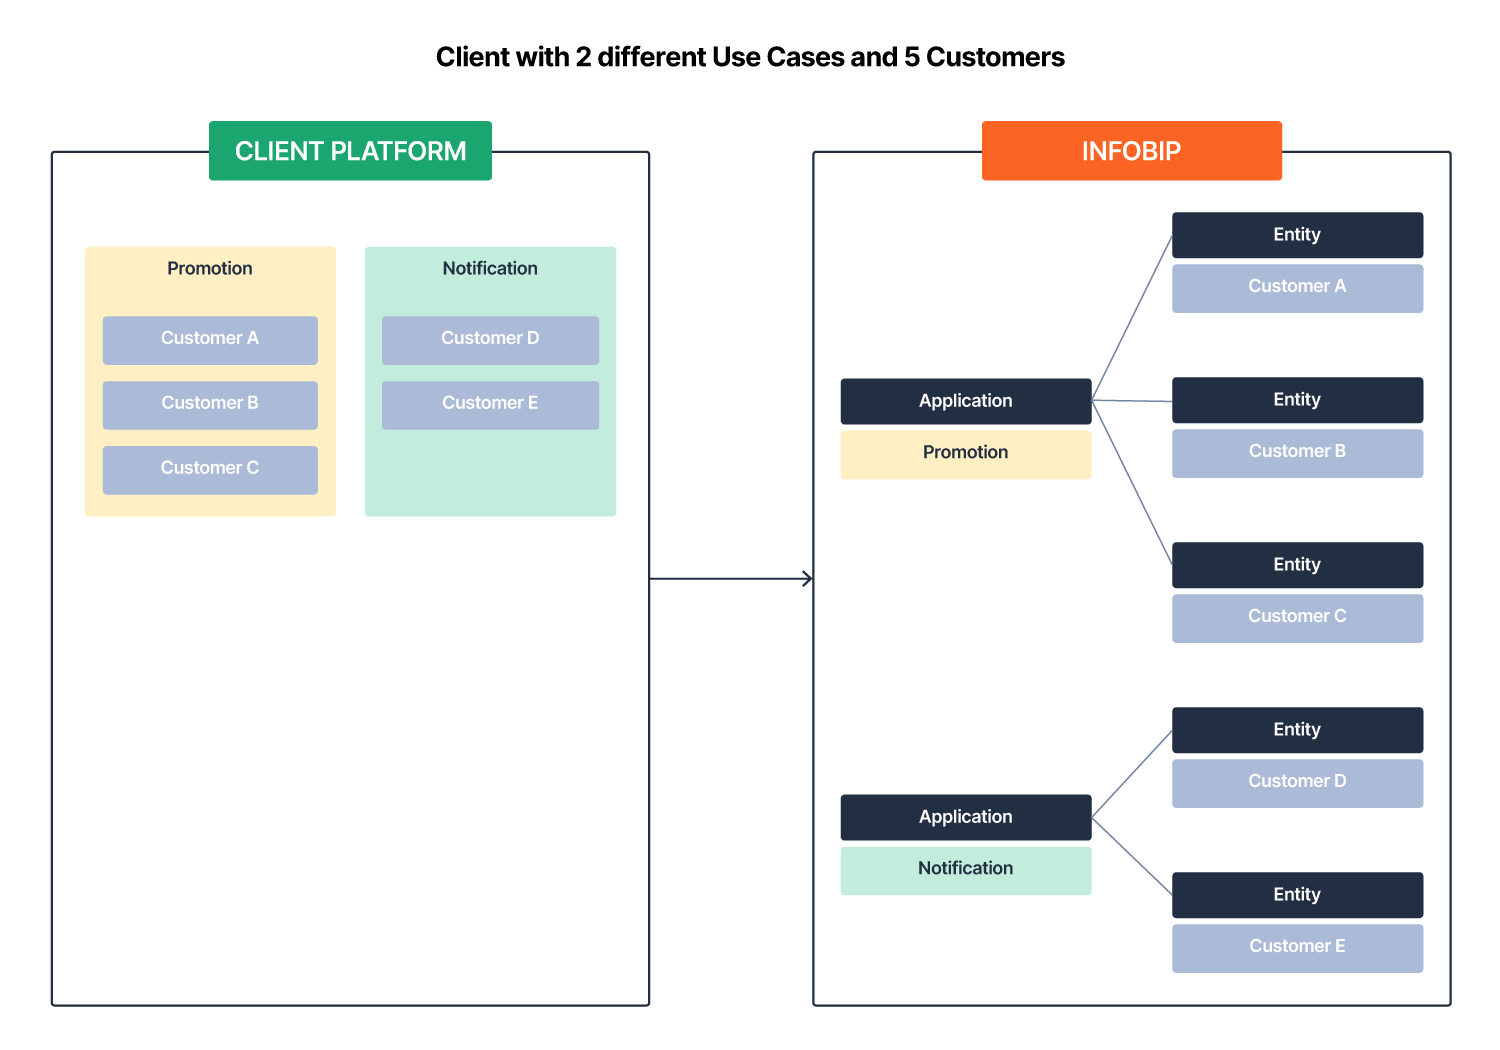
Applications represent system objects like environments or use cases on the Infobip platform. For instance, a production and test environment can be represented by separate applications, each with its own configuration.
Similarly, you can create applications for different use cases, such as marketing and transactional messaging, each with unique configurations. You could represent these by two other applications (or more, depending on how many use cases you support). This allows you to manage various needs without complicating your account structure.
Applications can be used independently or together with entities and resources.
For every application, you can define and assign a unique applicationID identifier, giving you complete control over sending, managing, and reporting on your messaging or calls. This includes determining the notifications and reports you want to receive and how Infobip manages sender resources and sender strategies.
For technical reasons, a default application is created automatically when an account is set up on the Infobip platform. While you do not need to use the default application explicitly, it will appear in the list of applications when requested through the API and in the Applications and entities section of the web interface.
Entities
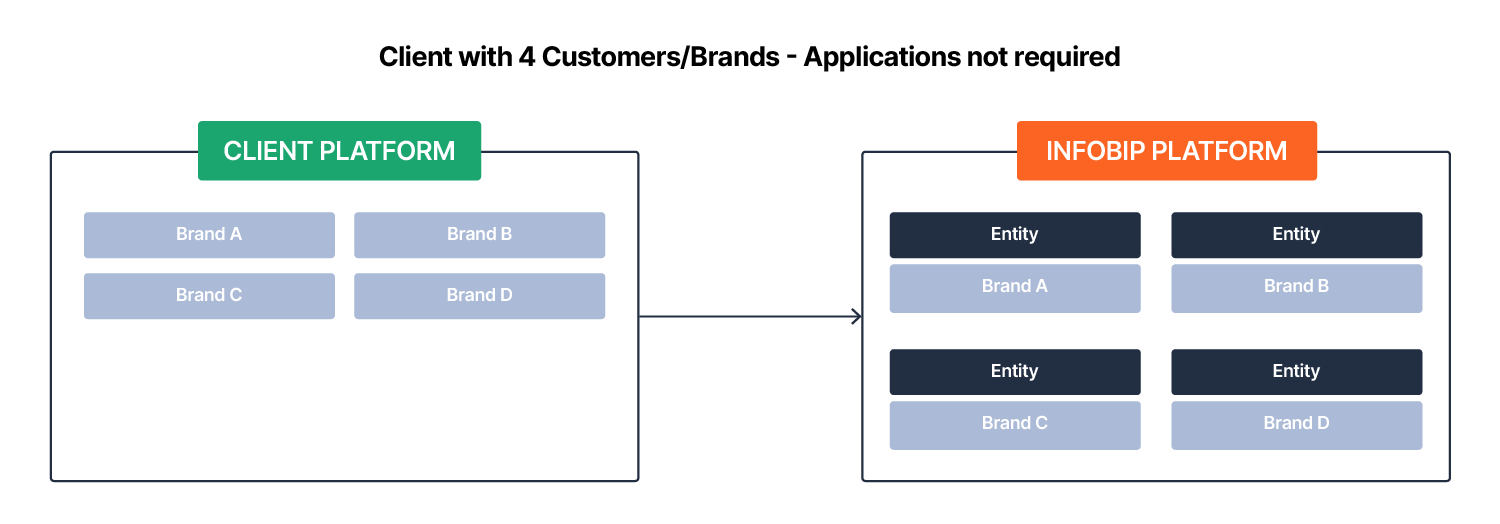
An entity on the Infobip platform represents a distinct object in your system. For example, you can use entities to track customer activity or consumption on the Infobip platform. Managing traffic and billing for tens, hundreds, or thousands of customers can be challenging, and entities provide a way to reconcile this data efficiently. Similarly, entities can represent cost centers, allowing you to track traffic and costs for each.
For every entity, you can define and assign a unique entityID identifier, giving you complete control over sending, managing, and reporting on your messaging or calls. This includes determining the notifications and reports you want to receive and how Infobip manages sender resources.
Entities can be used as stand-alone objects or in combination with applications and resources.
Examples
Here are examples of how applications and entities can be used together.
-
A client uses applications for two different use cases and an entity to track customer activity.
-
A client defines applications for different environments and entities to track different cost centers.

To get started with creating an application and entity configuration, refer to the Application and entity API for more information.
Manage applications and entities
You can create, manage, and delete applications and entities using either the API or directly on the Infobip web interface.
Create applications and entities [#create-applications-and-entities-manage-applications-and-entities]
API
Create and manage your applications and entities using the API. The Application and entity API provides all the information needed to create and manage applications and entities for your specific use case using the requests below.
API | Information | Request |
|---|---|---|
| Create application | Creates an application associated with the specified |
|
| Create entity | Creates an entity associated with the specified |
|
Any changes you make using the API will automatically be visible in Infobip system.
For technical reasons, a default application is created automatically when an account is set up on the Infobip platform. While you do not need to use the default application explicitly, it will appear in the list of applications when requested through the API and in the Applications and entities section of the web interface.
Web interface
You can also create applications and/or entities directly through the Infobip web interface by following the steps below:
-
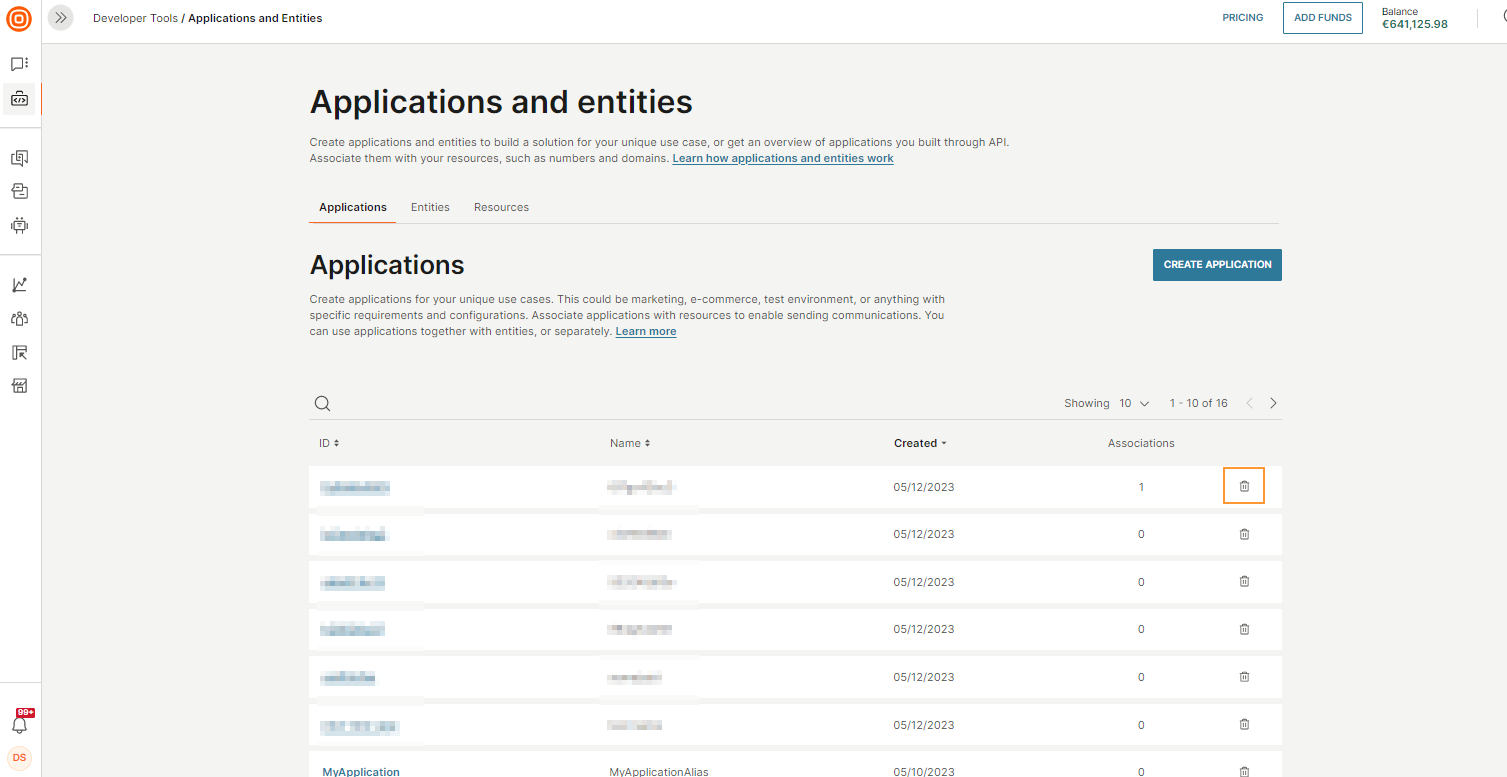
In the web interface, navigate to Developer tools > Applications and entities to access the relevant area.
-
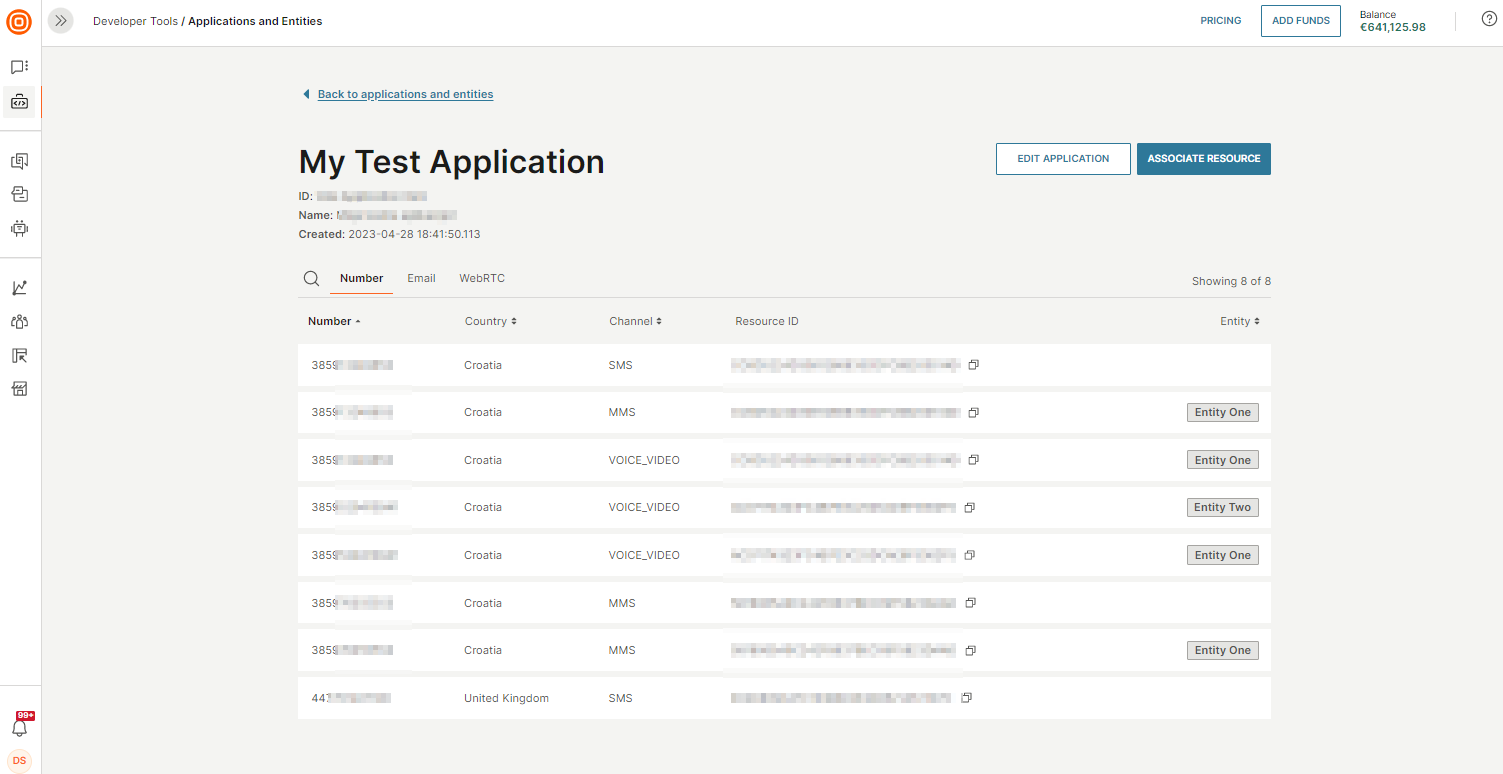
In the Applications and entities section, you will see all active applications, entities, and their associated resources.
NoteThis view includes any applications and entities you have created using the API.
-
Toggle between the Application and Entities tabs and select Create application (or Create entity). Set the ID (this cannot be changed later) and optionally add an alias.
-
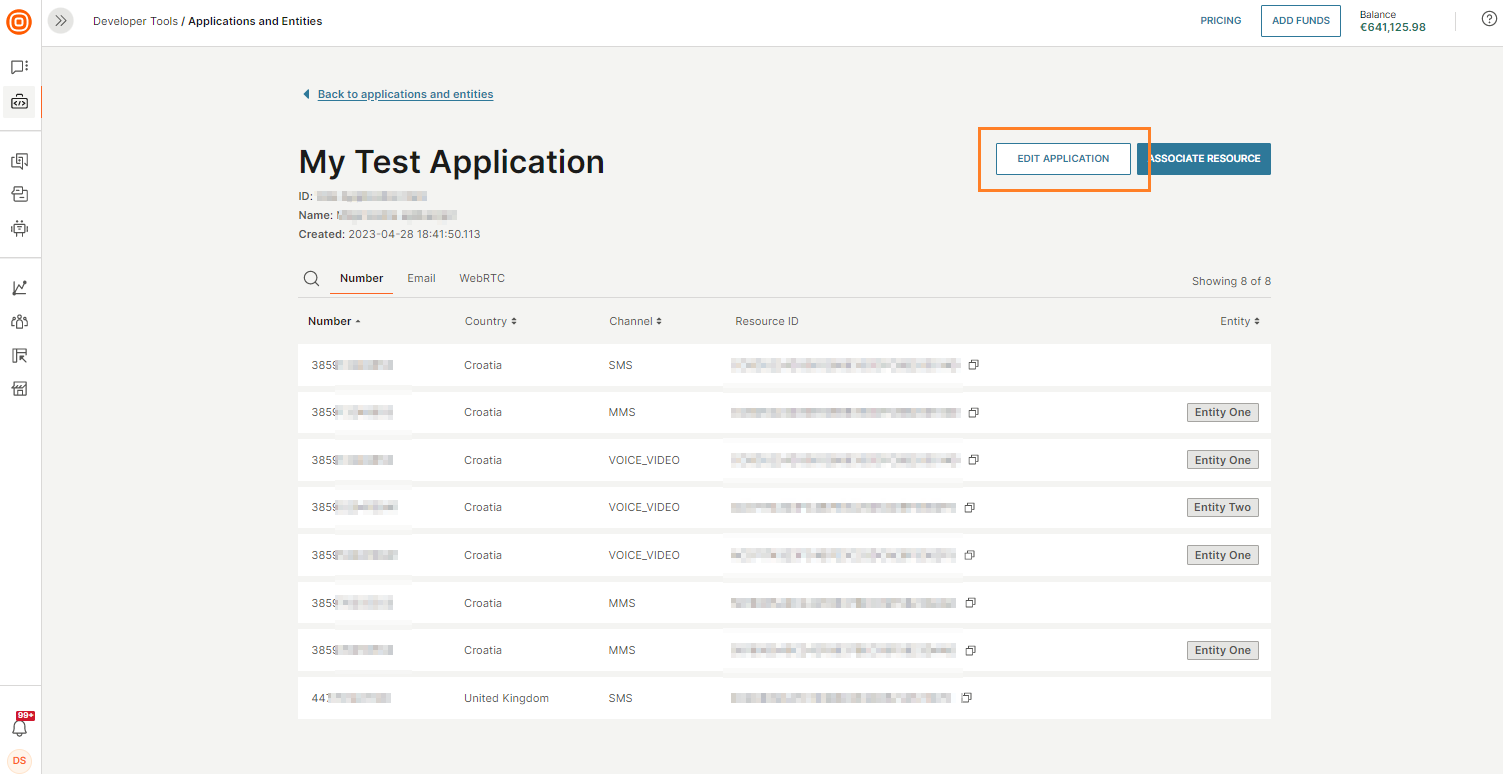
Once created, your application or entity will be visible in the Applications and entities area, and you can begin linking entities and resources for your specific use case. The example below shows an application with two entities and associated resources.
Associate resources to applications and entities
After creating applications and entities, you can explicitly associate them with a resource if required by your use case.
You can associate a resource with applications and entities together or separately.
To use specific features such as sending strategies or functions like inbound messages or calls, you must explicitly associate a resource with an application and/or entity. It is also possible to implicitly associate a resource in any send request that supports applicationID or entityID, provided the application or entity has been created. Implicitly associating a resource means that reports for that request will include the applicationID and/or entityID.
Modify applications and entities [#modify-applications-and-entities-manage-applications-and-entities]
Applications and entities have limited editing capabilities due to their integration with CPaaS X. You can modify the alias of an application and/or entity, but the ID cannot be changed. Any changes will be immediately reflected in the system.
API
To modify your applications or entities, use the following API requests:
API | Information | Request |
|---|---|---|
| Modify application | Modifies the resource |
|
| Modify entity | Modifies the resource |
|
Web interface
-
In the web interface, navigate to Applications and entities.
-
Select Edit application (or Edit entity).
Delete applications and entities [#delete-applications-and-entities-manage-applications-and-entities]
If you want to delete an application and/or entity, be mindful of the following:
- Deleting an application and/or entity will also remove any linked configurations, such as resource associations, sending strategies, and subscriptions.
- If you delete an application and/or entity that has associated resources (for example, a number or domain), the association will be removed. You can re-apply these resources to a new application and/or entity when needed.
If a configuration (for example, resource association, sending strategy, or subscription) is linked to an application/entity pair and only one part of the pair is deleted, then the whole configuration will be deleted.
Additionally, deleting an application or entity associated with a resource used for inbound traffic will affect the inbound traffic Infobip sends to you. It will no longer be associated with the application and/or entity, and the messages will no longer include the applicationID and/or entityID identifier.
Before deleting an application or entity, review all linked resources and configurations. For full control, manually delete any configurations and de-associate resources before proceeding.
API
To delete an application or entity, use the following API requests:
API | Information | Request |
|---|---|---|
| Delete application | Deletes an application associated with the specified |
|
| Delete entity | Deletes an entity associated with the specified |
|
Web interface
-
In the web interface, navigate to Applications and entities.
-
Next to the item you want to delete, select the recycle bin icon
 .
.
API keys with applications and entities
API keys can be linked to an application, entity, or an application/entity pair for enhanced security. When an API key is linked, it can only be used for specific endpoints (such as sending, reporting, and logs). This provides additional separation and protection for traffic-related requests and prevents access to management APIs like Numbers or Applications and entities. It also ensures that only the traffic linked to that specific application or entity is affected if a traffic-related API key is compromised. Remediation efforts, such as revoking the compromised API key, only need to be applied to the subset of traffic associated with that key. This isolates the issue and prevents widespread disruption.
You can also configure API keys with either broad or restricted access based on your environment setup. For example, if you have separate applications for test and production environments, you can create and assign a unique API key to each application. The production API can be strictly controlled, while the testing API can be given broader permissions.
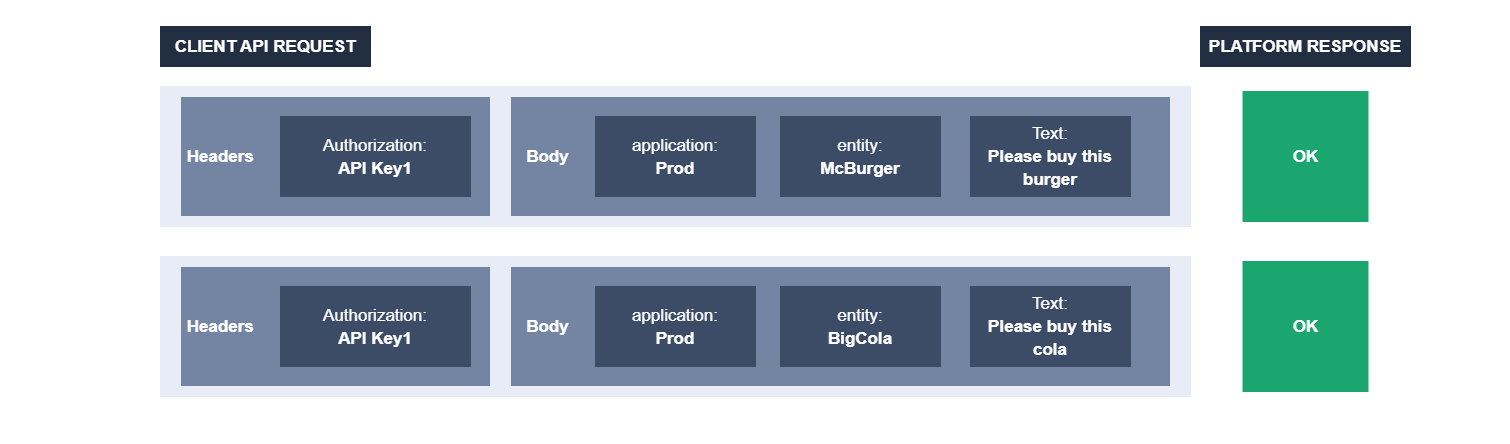
Standard, unlinked API key in a request with application and entity
API key restriction [#api-key-restriction-api-keys-with-application-and-entity]
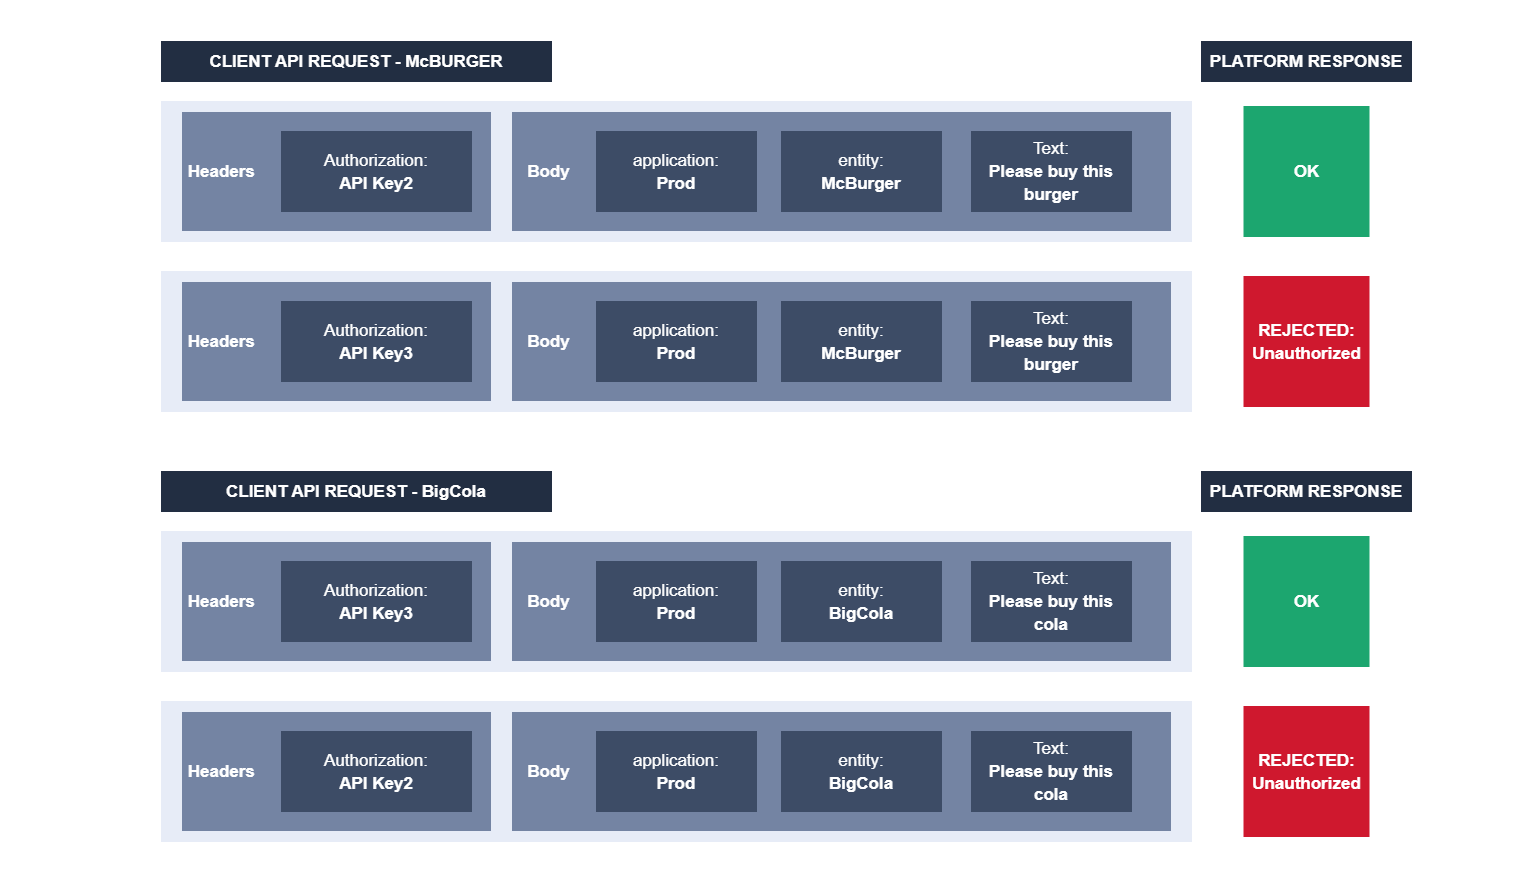
You can restrict API keys to specific applications or entities, ensuring that access is controlled at the application or entity level.

For example, if you attempt to use API Key2 with the "BigCola" entity or API Key3 with the "McBurger" entity, you will receive an unauthorized access response. However, API Key1 can still be used in both requests as it serves as the primary API key with access to all public endpoints.
API keys endpoints list [#api-keys-endpoints-list-api-keys-with-application-and-entity]
Below are the lists of endpoints where authorization is supported for API keys linked to applications or entities.
Expand the list for each solution.