What are subscriptions
In CPaaS X, subscriptions define the rules that determine which events should trigger a notification and where that notification should be sent. Subscriptions help you to monitor communication activity across channels and products by specifying conditions and delivery targets.
Each subscription includes:
- Category and event types: Define which types of event will trigger the notification for the selected category.
- Notification profile: Specifies where notifications should be sent (webhook URL) and how they should be delivered. If authentication is required, an authentication setting can be applied to the profile.
- (Optional) Filters: Used to narrow the scope of matching events. You can filter by application, entity, user, or resource.
- (Optional) Authentication settings and certificates: Provide webhook security. Authentication settings define how the system authenticates when sending notifications. These settings are optional and only needed if your webhook requires authentication.
You can create subscriptions, notification profiles, authentication settings, and certificates either using the Subscriptions API or in the Infobip web interface, under Developer Tools > Subscription Management.
Events and notifications
Every call or message sent through a communication channels (such as SMS, WhatsApp, RCS, or Email) can trigger one or more events. These events represent changes in message status or user actions, such as:
- Delivery: A message is successfully delivered (
DELIVERY) - Click: A user clicks a link (
CLICK) - Inbound message: A user replies to your message (
INBOUND_MESSAGE) - Identity change: A status update, such as
IDENTITY_CHANGEon WhatsApp
Notifications are HTTP requests sent to your webhook when these events occur. They enable your systems to react to real-time activity across channels.
Some event are not tied to specific messages. For example:
- Changes in campaign or sender status
- Updates from tools like Number lookup or Mobile identity
- External API triggers in Moments
To receive event notifications, at least one subscription must be defined per channel. You can create multiple subscriptions if you want to route different event types to different webhooks.
For a comprehensive list of available events per category, refer to Event subscriptions.

Channels and categories
Subscriptions are organized by categories, which define the source or type of events.
Categories include:
| Channels | Numbers and senders | Tools |
|---|---|---|
| Apple Messages for Business Facebook Messenger Kakao – Alim Kakao Brand Messaging LINE Mobile push RCS SMS MMS TikTok Viber Zalo Voice and WebRTC Open Channel | Registration Mobile identity Number lookup | Blocklist AgentOS / Customer engagement |
Each category offers its own list of supported events. See Event subscriptions for the full reference.
Subscription filters and scopes
Subscriptions can include optional filters to limit their scope. Supported filter types include:
- Users
- Entity
- Application
- Resources: A sender name, number, domain, or other identifier. For outbound traffic, the resource filter matches the sender. For inbound traffic, it matches the destination.
A subscription defines the criteria for sending a notification. This can be general or highly specific. For example, you can configure your subscription to send notifications for specific events or based on other criteria such as applications or entities. If you want to create a subscription that applies to an entire channel and all events, leave the filtering options empty.
Each subscription must include a notification profile, which defines where notifications are sent and which settings to use. For example, a profile can include your webhook URL and details about the expected content. You can also apply authentication settings to define how system should authenticate when delivering notifications, though this is optional.
You can either define the notification profile and authentication settings in full or reference an existing setup by its ID.
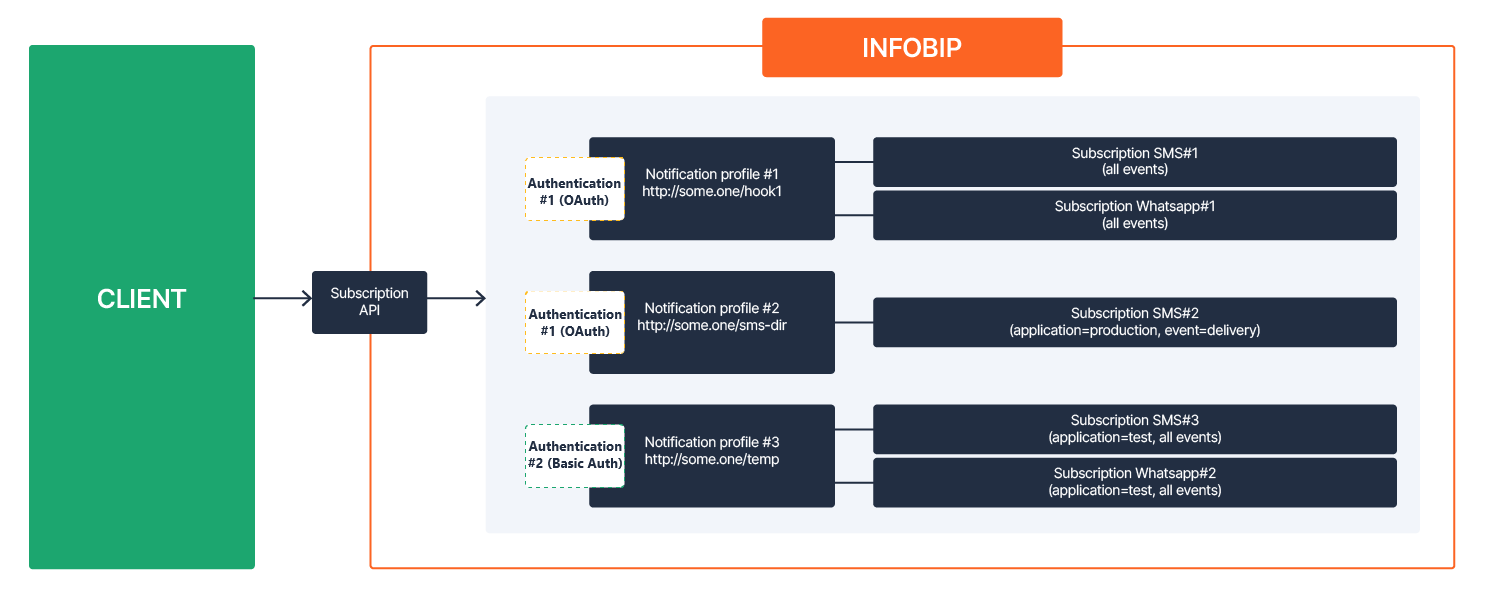
Here is an example of how authentication settings can be reused across multiple notification profiles and how those profiles link to subscriptions:
If no filters are used, the subscription applies to all events in the selected category and channel.
When creating a subscription, you can configure both the notification profile and authentication settings in the same request. Alternatively, you can create them separately and reuse them. We recommend using at least basic authentication to protect your webhook endpoint.
It is also important to create a subscription for each channel from which you want to receive notifications.
You can manage notification profiles separately from subscriptions, and authentication settings separately from profiles. This flexibility allows you to create these objects individually and then reuse them by referencing their IDs when creating new subscriptions.
Each subscription must be unique. You cannot create two subscriptions with the same:
- Channel
- Event type
- Filter values
If you attempt to create a duplicate, the system will return a validation error. This ensures:
- No event triggers multiple identical subscriptions
- Your notification logic remains clear and easy to troubleshoot
A single event will never trigger multiple identical subscriptions.
Best practices for filter use
You can apply filters such as application (applicationId) or entity (entityId) to control which events trigger a subscription. Use them to fine-tune your event coverage, avoid redundant or ambiguous configurations.
Define event coverage
- Use filters to specify how broad or narrow your subscription should be. For example, setting an
applicationIdtargets only that application's events. Leaving filter empty includes all events in the selected category and channel. This flexibility helps you tailor subscriptions to your exact needs.
Ensure subscription uniqueness
- Each subscription must be distinct. If you create two subscriptions with the same channel, event types, and filter values, the system will reject the second one. This prevents duplicate processing and keeps your configuration organized.
Match criteria
- A subscription is triggered only when all filter criteria match an incoming event. For example, if you use
applicationId=AppBandentityId=Template123, the subscription only matches events from that application and entity. This precise targeting ensures you receive only relevant updates.
One event, one subscription
- Each event matches only one subscription. This ensures consistent delivery, avoids duplicate processing, and makes troubleshooting easier.
By defining the scope of your subscriptions, you can focus only on the relevant events and maintain a transparent notification system. Whether you narrow your view to a single entity or broaden it to encompass an entire channel, these guidelines help ensure that your subscriptions deliver the right information at the right time.
Subscriptions hierarchy
Subscriptions are part of a system of interconnected components:
- A category/channel can have multiple subscriptions.
- Each subscription must include a notification profile.
- A notification profile can include authentication settings.
- A certificate can be added to a notification profile to enable mTLS (mutual TLS).

Changes to one component can affect others. For example:
- You cannot delete a certificate if it is still assigned to an active profile.
- You cannot delete a notifications if it is linked to an active subscription. The request will result in an error.
Understanding this hierarchy helps avoid configuration errors and unexpected behavior.
The following example shows how deletion rules work based on the hierarchy between a subscription, notification profiles, and authentication settings. You can only delete a component if it is not currently linked to another.
Full SMS subscription setup:
- 1 subscription
- 1 notification profile
- 1 authentication setting
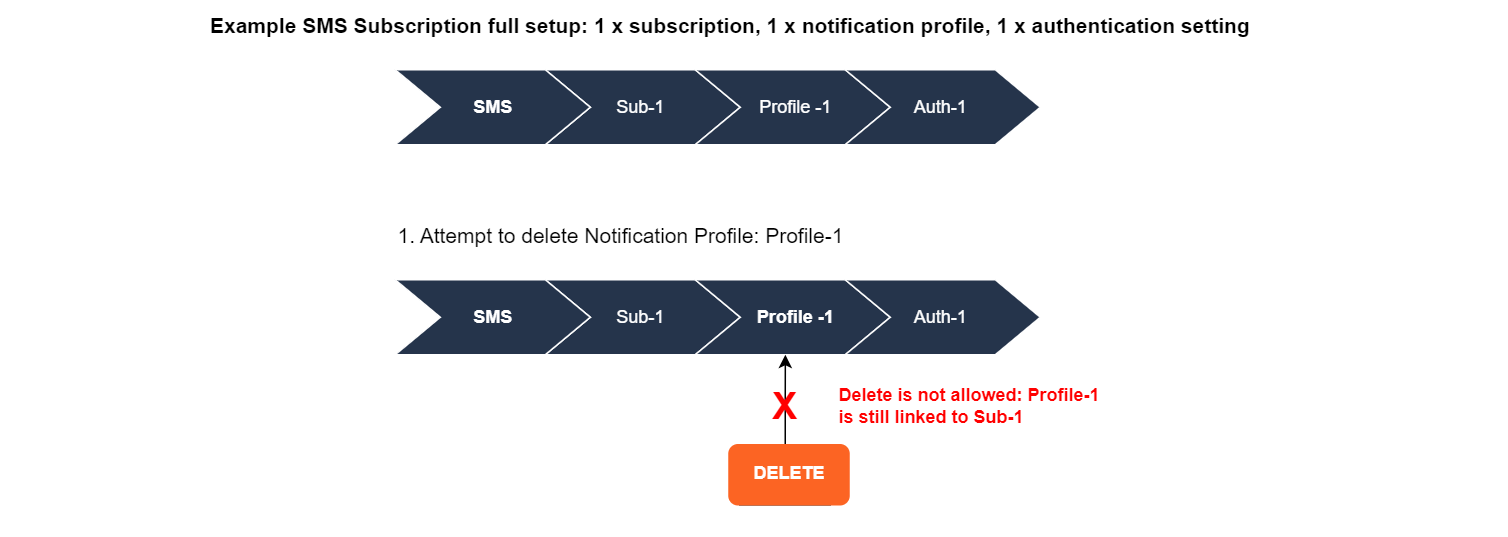
You cannot delete the notification profile because it is still linked to the active subscription.

You cannot delete the authentication setting because it is still linked to the notification profile.
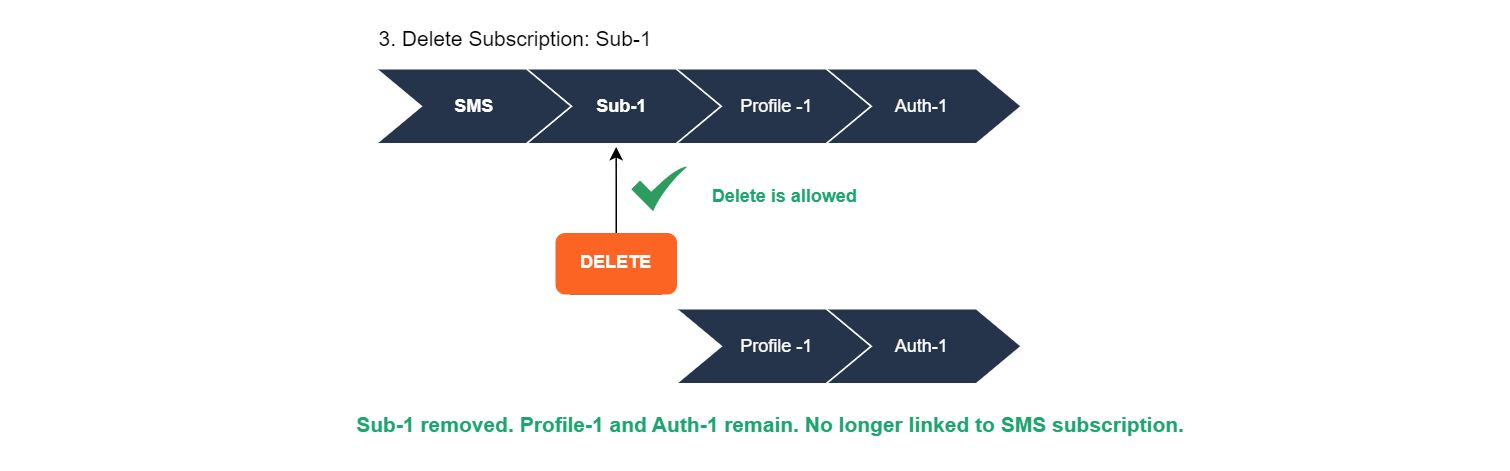
You can delete the entire subscription. The notification profile and authentication setting remain, but are no longer linked to the deleted SMS subscription.

At this stage, you still cannot delete the authentication setting because it is linked to the notification profile.
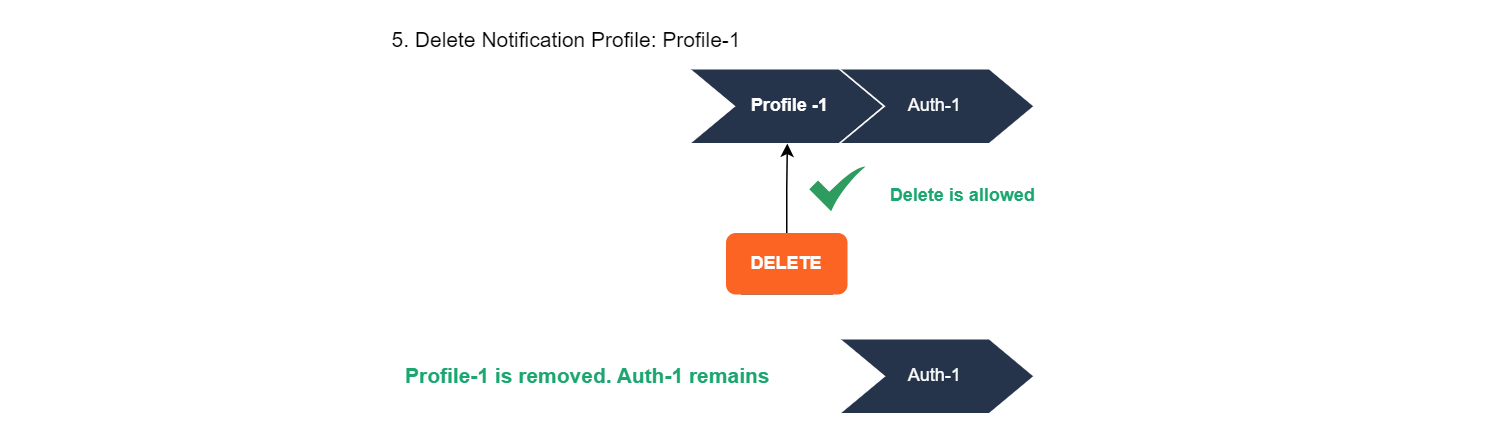
You can now delete the notification profile. The authentication setting remains.

You can now delete the authentication setting.
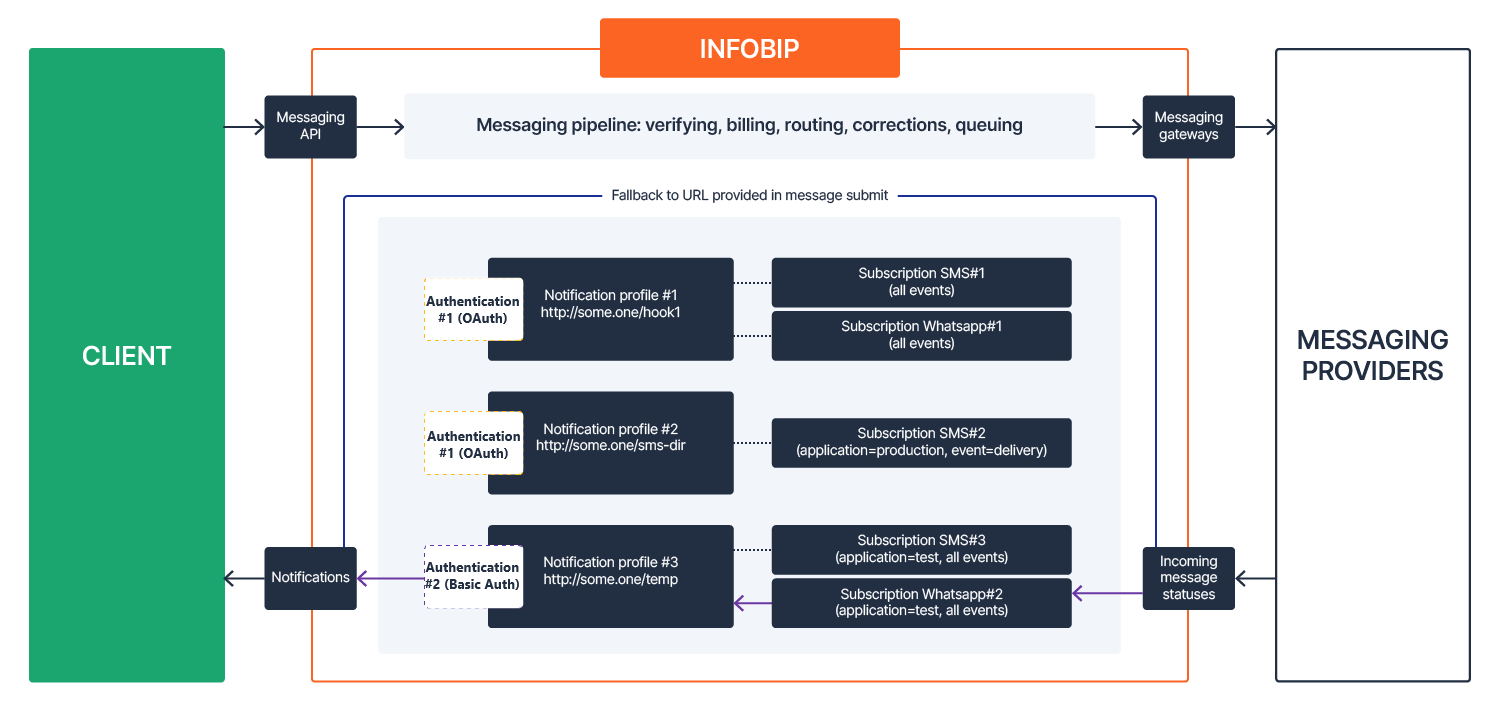
Setting webhook URL in message submit requests
You can define a webhook URL directly in a message submit request using fields like NotifyURL or TrackingURL. This provides a fast way to receive basic event notifications without configuring a subscription.
However, setting a webhook URL in the message request overrides any configured subscriptions for that message.
This approach offers a quick solution for receiving notifications without setting up subscriptions. It is best suited for fallback cases or fast testing scenarios where granular control is not required.
If you plan to use subscriptions, avoid setting URLs in the message requests. When a webhook URL is provided in the message payload, it overrides all configured subscription logic.
The example below shows the difference between setting webhook URL directly in a message request and configuring them through web interface or Subscriptions API. In this case, a message with a webhook URL defined in the request will bypass subscriptions entirely, even if they exist.