Set up your domain
Setting up your domain is the first step to sending professional Email messages with Infobip. Domain setup helps you build trust with your recipients, improve deliverability, and access advanced email features.
Domain strategy
A strong domain strategy helps maintain high email deliverability. Your sender reputation depends on both your domain and IP address, so careful planning is important.
Use separate subdomains for each type of email traffic. Reserve your main domain (for example, company.com) for internal or corporate communication. Subdomains help you isolate different types of email activity and protect your main domain's reputation.
For example:
- Marketing:
mkt.company.com - Transactional:
trk.company.com - Support:
help.company.com
Using dedicated subdomains improves deliverability, supports better reputation management, and helps spam filters process DNS lookups more efficiently. This approach also makes it easier to identify and resolve reputation or spam issues related to specific types of email activity.
Outbound domain configuration
Outbound domains are used for sending email messages, while inbound and outbound domains are managed separately.
To send email messages through Infobip, you need to register your domain.
Benefits of registering your domain
- Improve deliverability: Increase the chances that your messages reach the inbox instead of the spam folder.
- Track engagement: Enable open and click tracking to measure how recipients interact with your messages.
- Manage unsubscribes: Use built-in tools to handle unsubscribe requests and maintain compliance.
- Control your reputation: Protect and manage your domain reputation for consistent email delivery.
- Enable inbound processing: Receive and process replies or incoming messages directly to your domain.
email.yourcompany.com) instead of your primary domain to isolate email activity. This protects your root domain's reputation and simplifies deliverability troubleshooting.Add an outbound domain [#add-an-outbound-domain-outbound-domain-configuration]
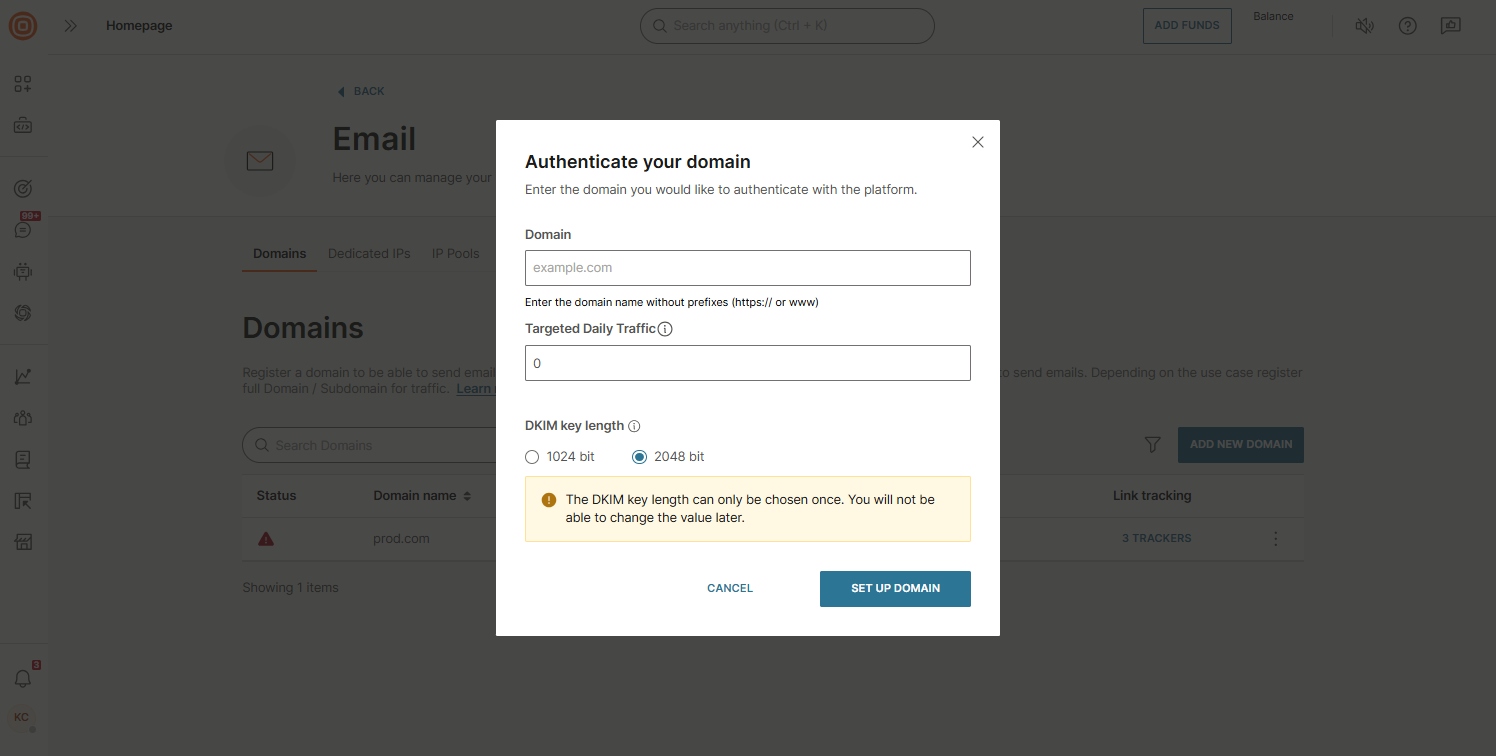
- Go to Channels and Numbers → Channels → Email → Outbound Email.
- In the Domains tab, select Add new domain.
- Enter the required information:
- Domain: Enter your domain name without prefixes.
- Targeted daily traffic: Specify your expected daily traffic volume. This value helps trigger domain warmup. When the limit is reached, the warmup process starts. During warmup, you can send only one campaign at a time. This applies only to web interface senders.
- DKIM key length: Select 1024 or 2048 bits. DKIM (DomainKeys Identified Mail) verifies sender authenticity. A longer key provides stronger protection. This setting is permanent and cannot be changed later.
- Select Set up domain to submit the form. You will receive DNS records to add to your domain provider.
Verify your outbound domain [#verify-your-outbound-domain-outbound-domain-configuration]
After you register your domain, you must verify it before you can send email messages. Verification confirms that you own the domain and enables features, such as SPF ↗ and DKIM authentication ↗, tracking, and inbound reply handling.
After you submit your domain, Infobip generates DNS records that you need to add to your domain's DNS settings. These records confirm domain ownership and enable email features.
DNS changes may take up to 48 hours to propagate, depending on your DNS provider. You can monitor the status of each record in the domain configuration panel. When all required records are verified, your domain status changes to active.
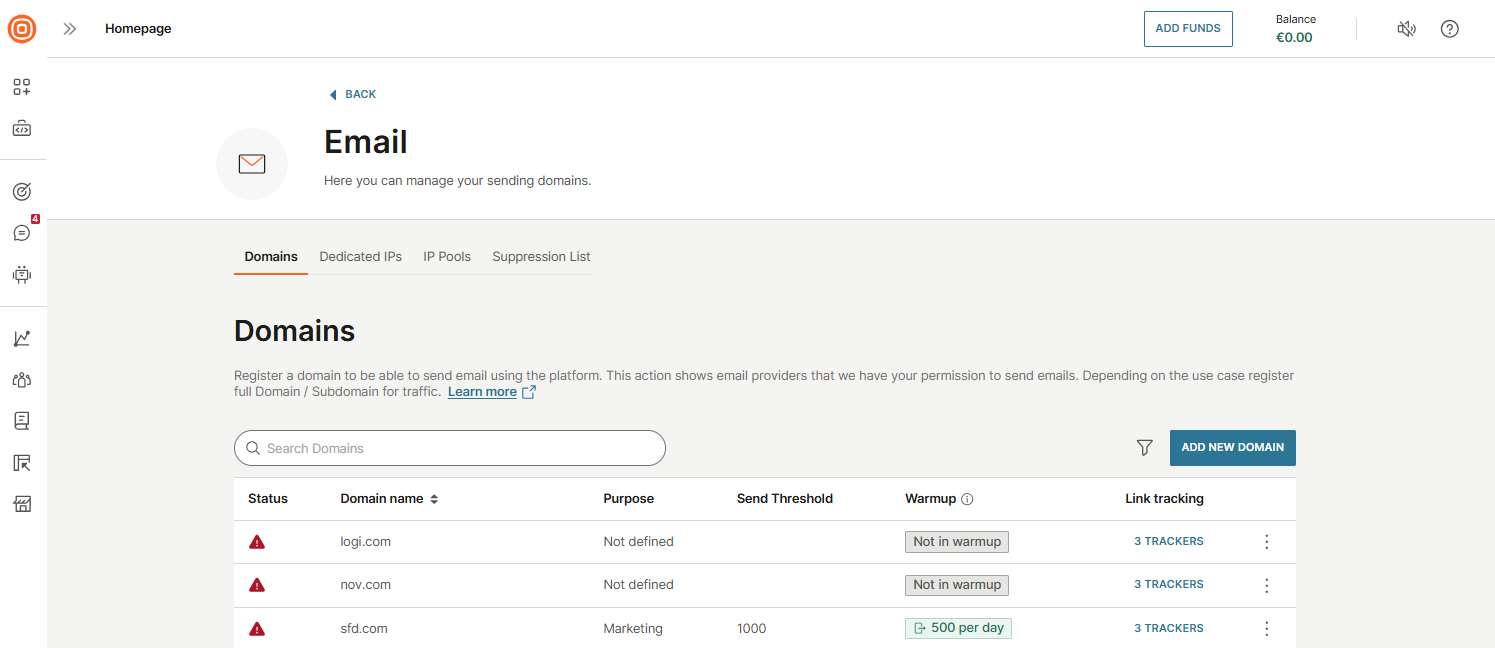
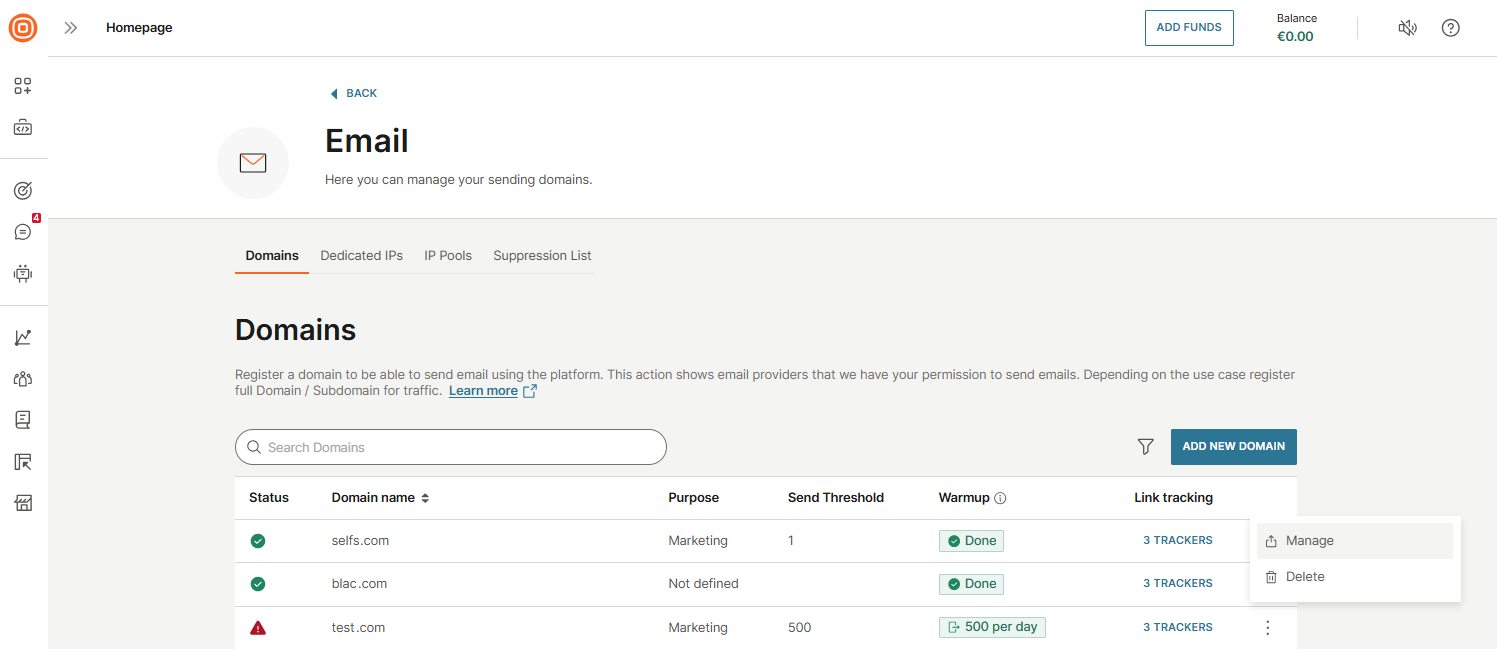
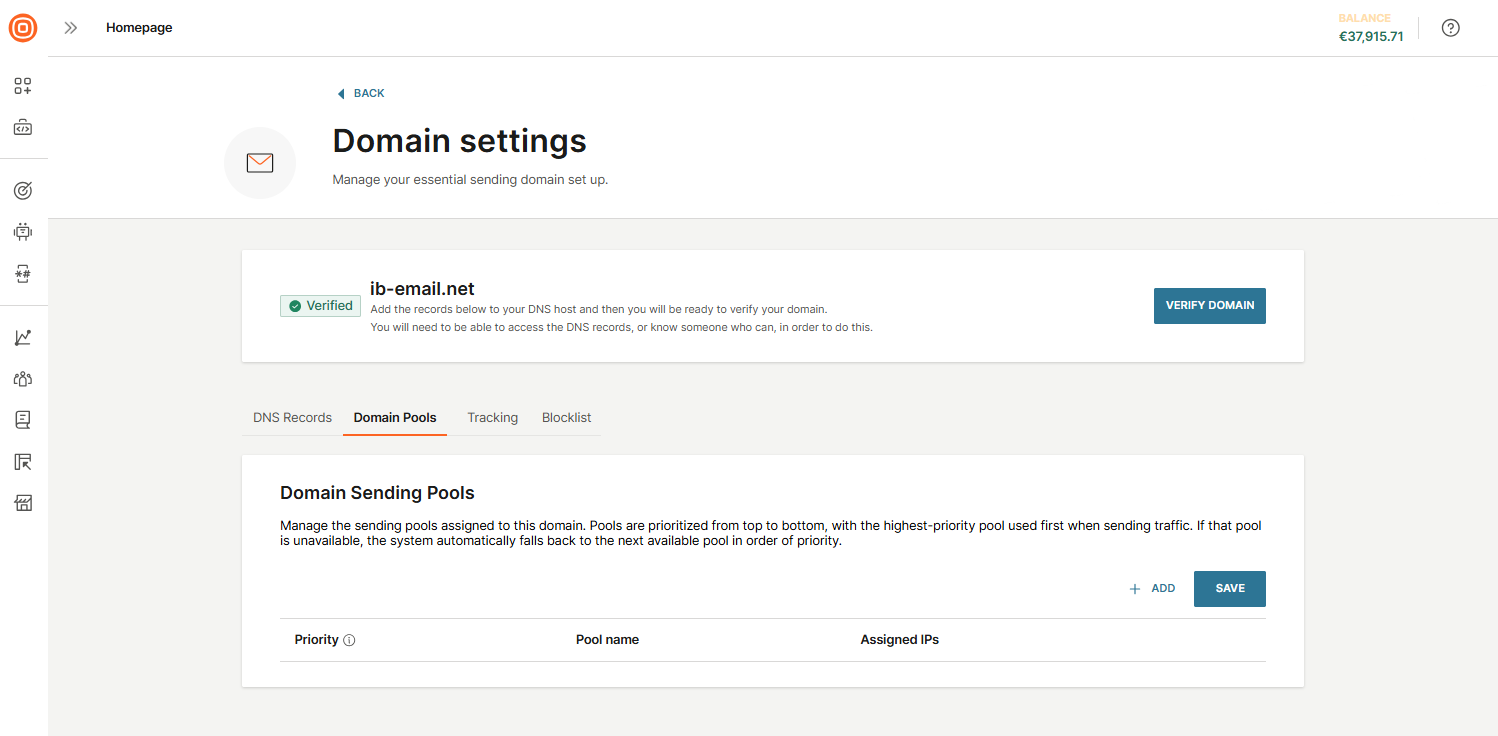
Manage outbound domains [#manage-outbound-domains-outbound-domain-configuration]
After your domain is verified, you can manage its settings to match your Email use case. Select the three-dot menu next to your domain to access the following options:
- Manage - Open the domain configuration page.
- Delete - Remove the domain.
To configure your domain:
- Select the three-dot menu next to your verified domain and choose Manage.
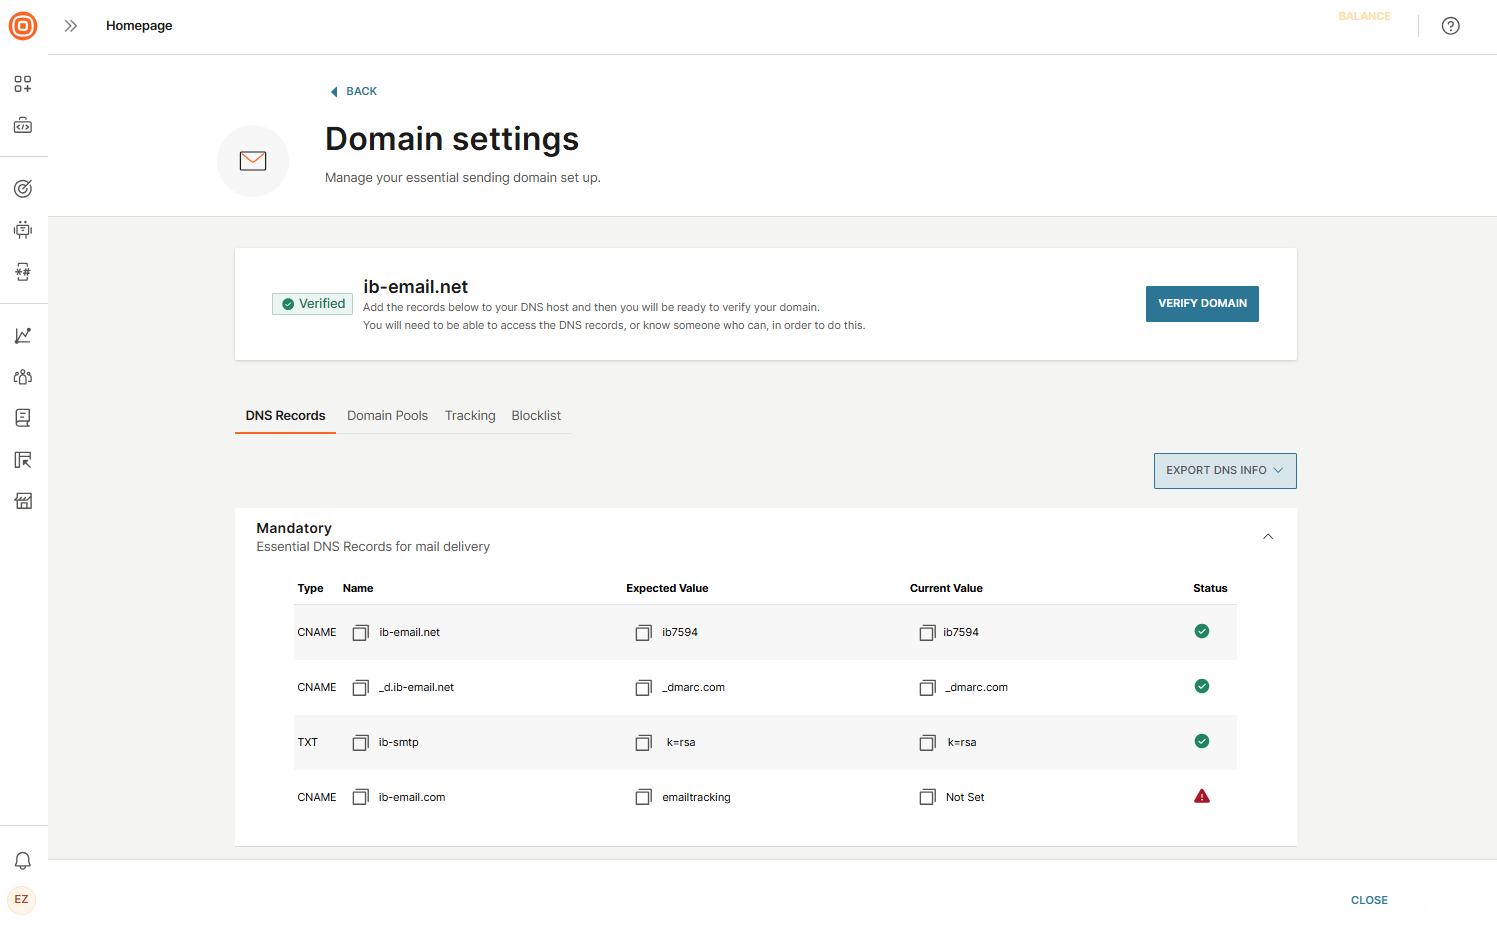
- Review and update the following options:
- DNS records: View the DNS records needed for domain verification. If your domain is not yet verified, copy these records and add them to your DNS host. When the records propagate, your domain will be ready to send email messages.
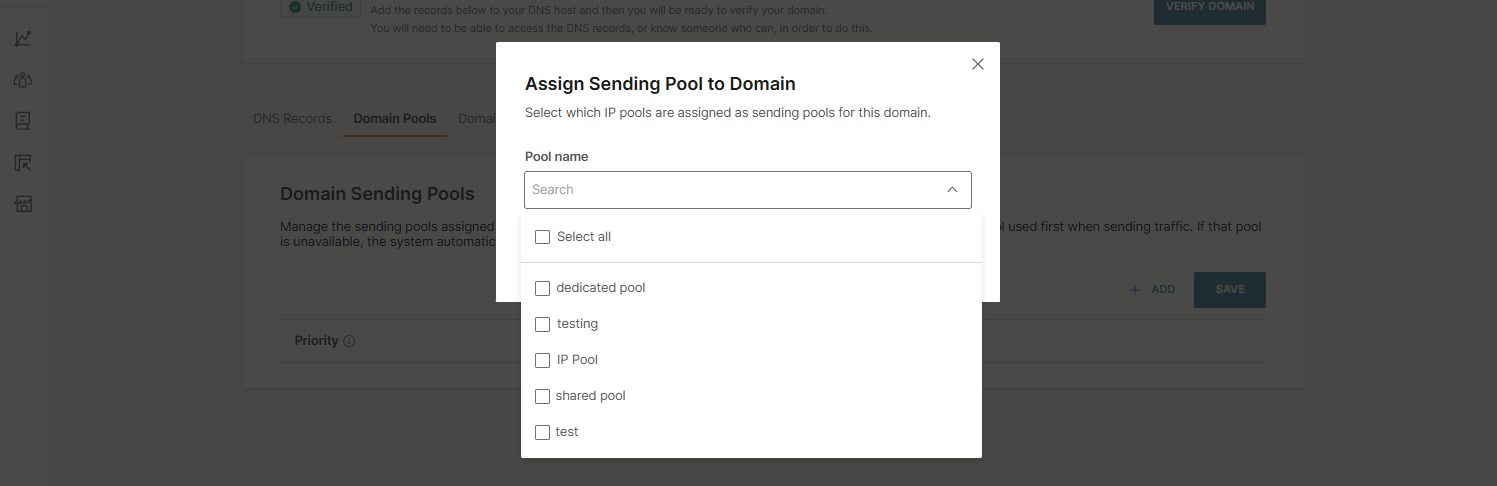
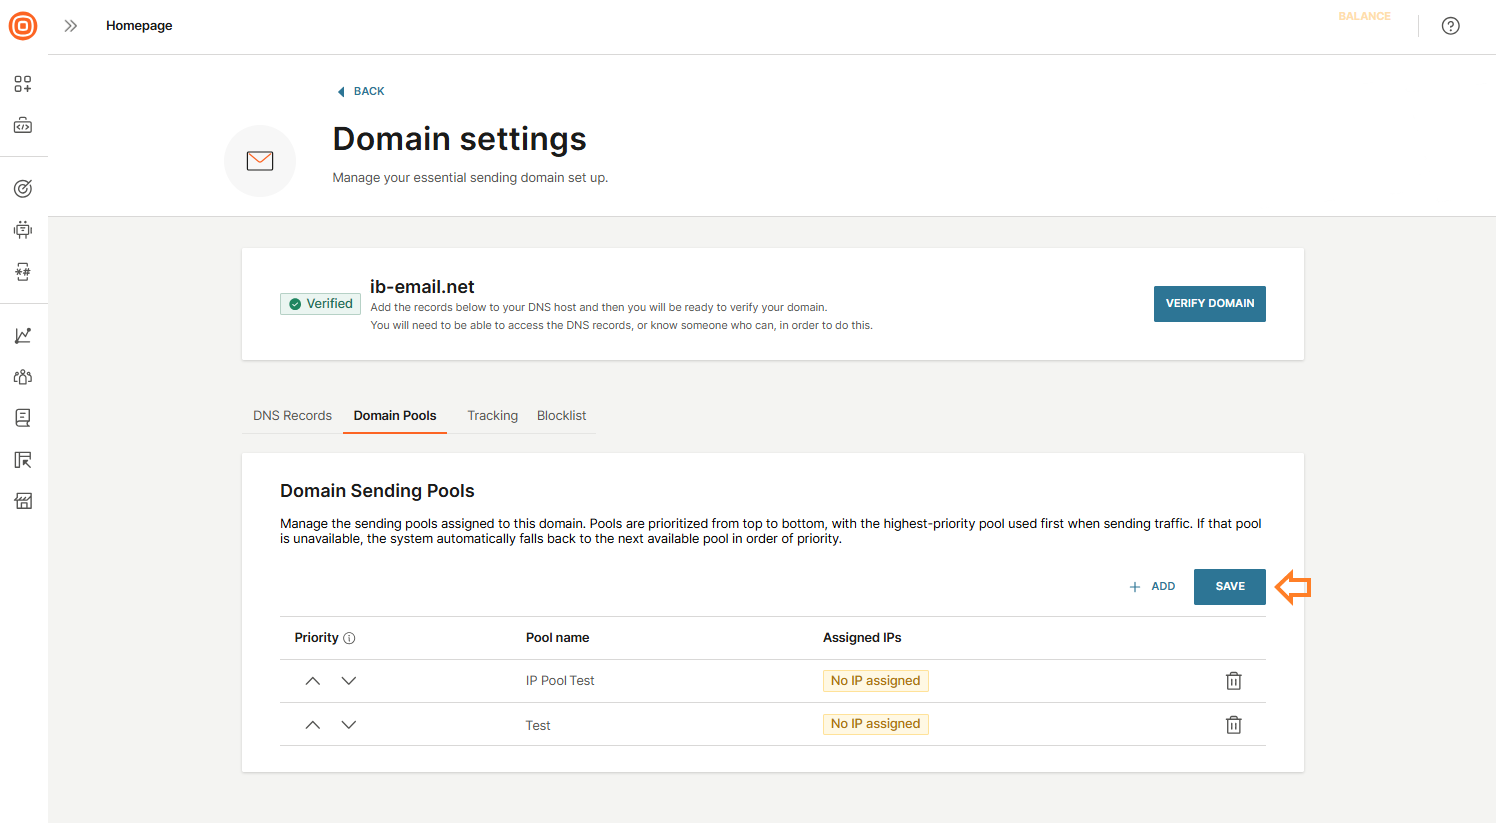
- Domain pools: Manage the sending pools linked to this domain. Pools are ordered by priority from top to bottom - the top pool is used first when delivering traffic. If it becomes unavailable, the system will automatically switch to the next pool in the priority list. Here, you can add a domain pool by selecting the + Add button.
- To add a domain pool, select the + Add, then choose the pools you want to assign, either individually or by clicking Select all. Confirm by selecting the Assign to domain button.
- After adding pools, you can adjust their priority or remove them if needed. Do not forget to select Save to apply your changes.
- To add a domain pool, select the + Add, then choose the pools you want to assign, either individually or by clicking Select all. Confirm by selecting the Assign to domain button.
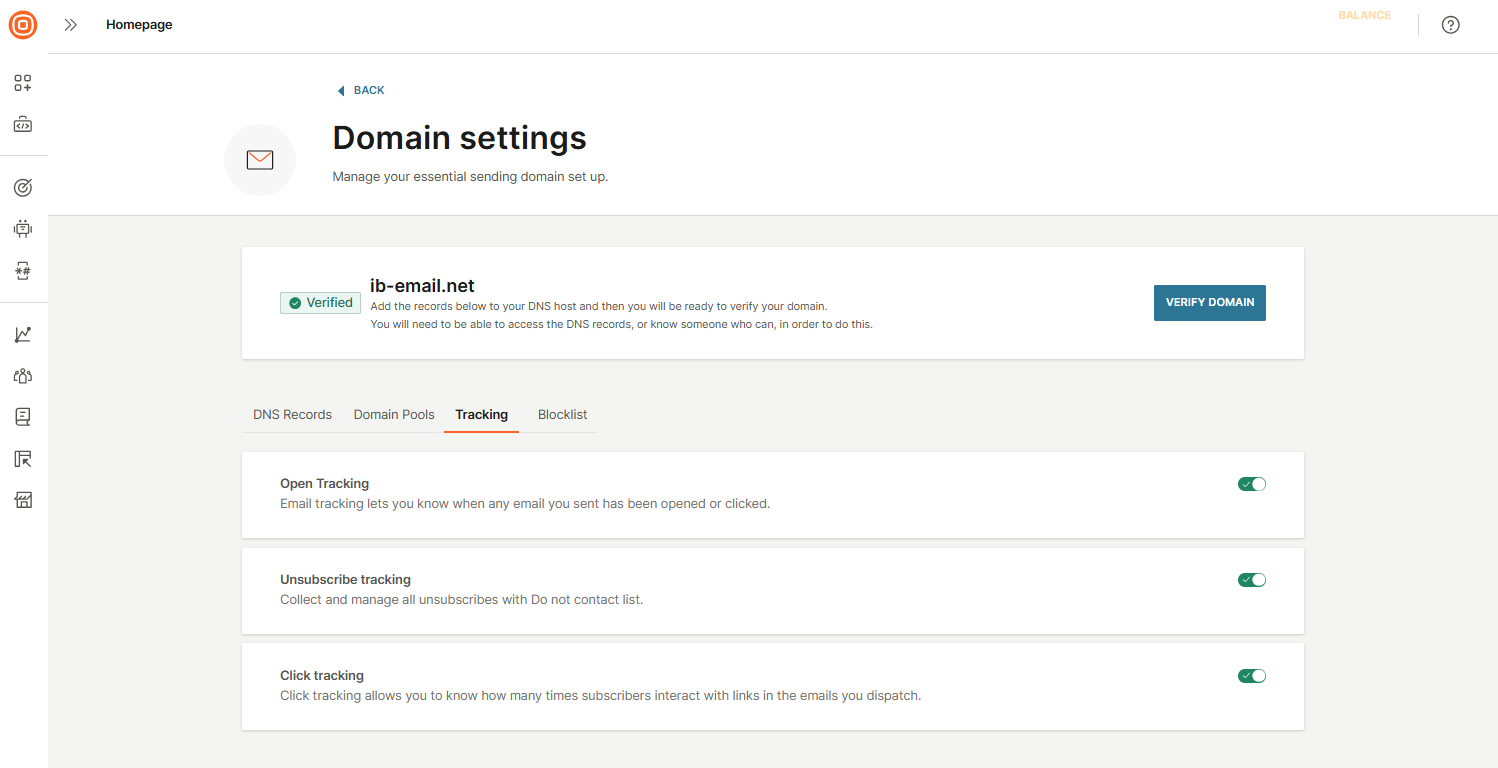
- Tracking: Configure how recipient interactions are tracked:
- Open tracking: Monitor when recipients open your emails.
- Click tracking: Track when recipients click links in your messages.
- Unsubscribe tracking: Manage opt-outs using the Do Not Contact list.
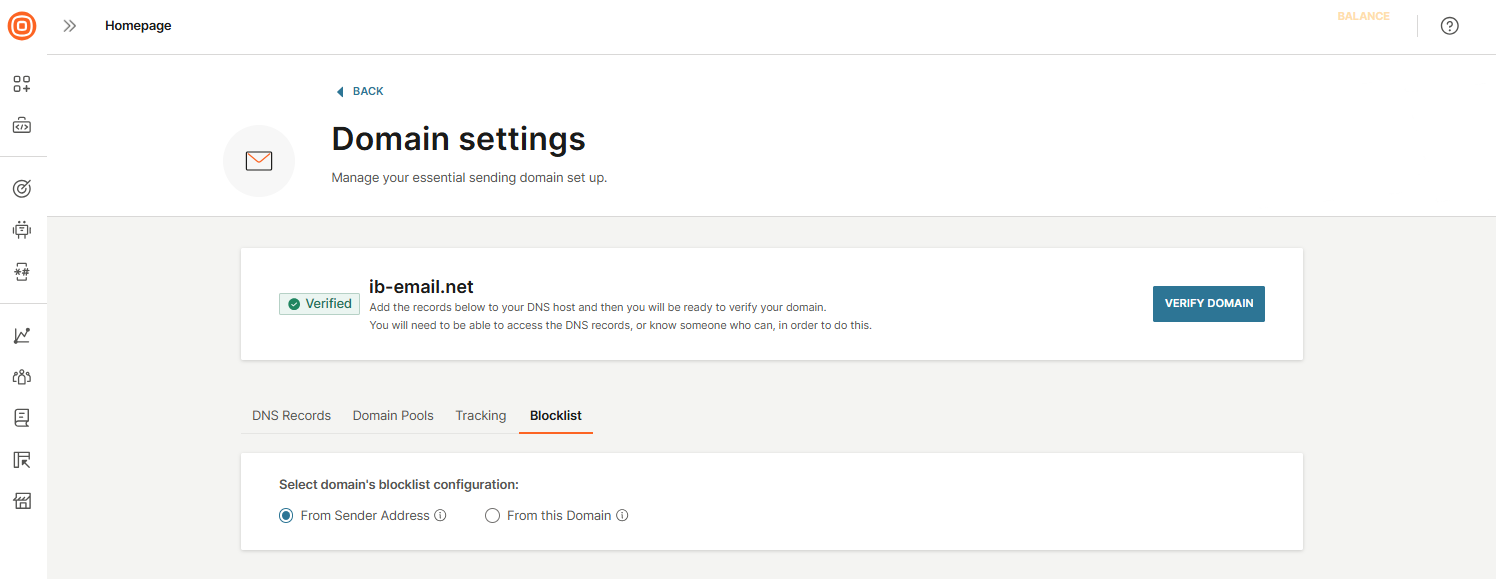
- Blocklist: Choose how to handle unsubscribes:
- From sender address: Block messages from a specific email address (for example,
[email protected]). The user may still receive emails from other addresses in the same domain. - From this domain: Block messages from the entire domain used by this account (for example,
%infobip.com).
- From sender address: Block messages from a specific email address (for example,
- DNS records: View the DNS records needed for domain verification. If your domain is not yet verified, copy these records and add them to your DNS host. When the records propagate, your domain will be ready to send email messages.
Use the domain configuration panel to align your settings with your communication needs and to troubleshoot deliverability or feature access issues.
DNS records
To ensure proper email delivery, you need to configure the following DNS records.
| Record type | Record value | Record purpose |
|---|---|---|
| TXT | Find the value of this record in Domain details under the Expected Value column. | DKIM - Protects your domain from spoofing and improves overall deliverability. |
| CNAME | emailtracking.email-messaging.com | Enables your emails to include your sending domain in tracking links instead of the default Infobip tracking domain. |
| CNAME | Find the value of this record in Domain details under the Expected Value column. The DMARC record starts with _dmarc. | DMARC - Authenticates the domain in your From address, increases trustworthiness, and provides reporting for configuration or spoofing issues. |
| CNAME | Dynamically generated based on the client's envelope domain. | Propagates the required SPF, MX, and A records for successful email delivery. |
Common providers for editing TXT records [#common-providers-for-editing-txt-records-dns-records]
The process for adding DNS records depends on your hosting provider. Infobip provides step-by-step instructions for:
Infobip will notify you by email when your DNS records are updated and your domain is verified. You will also see a Verified label next to your domain in the dashboard.
Domain verification can take up to 48 hours, depending on DNS propagation between Infobip and your service provider.
After verification, you can configure tracking for each domain. Tracking is enabled by default, but you can disable it if needed.
Inbound domain configuration
Inbound and outbound email domains are managed separately. To send emails, you need to create an outbound domain. If you want to receive inbound emails, create a separate inbound domain with its own MX record configuration. This setup lets you control which domain handles incoming messages and how replies are routed.
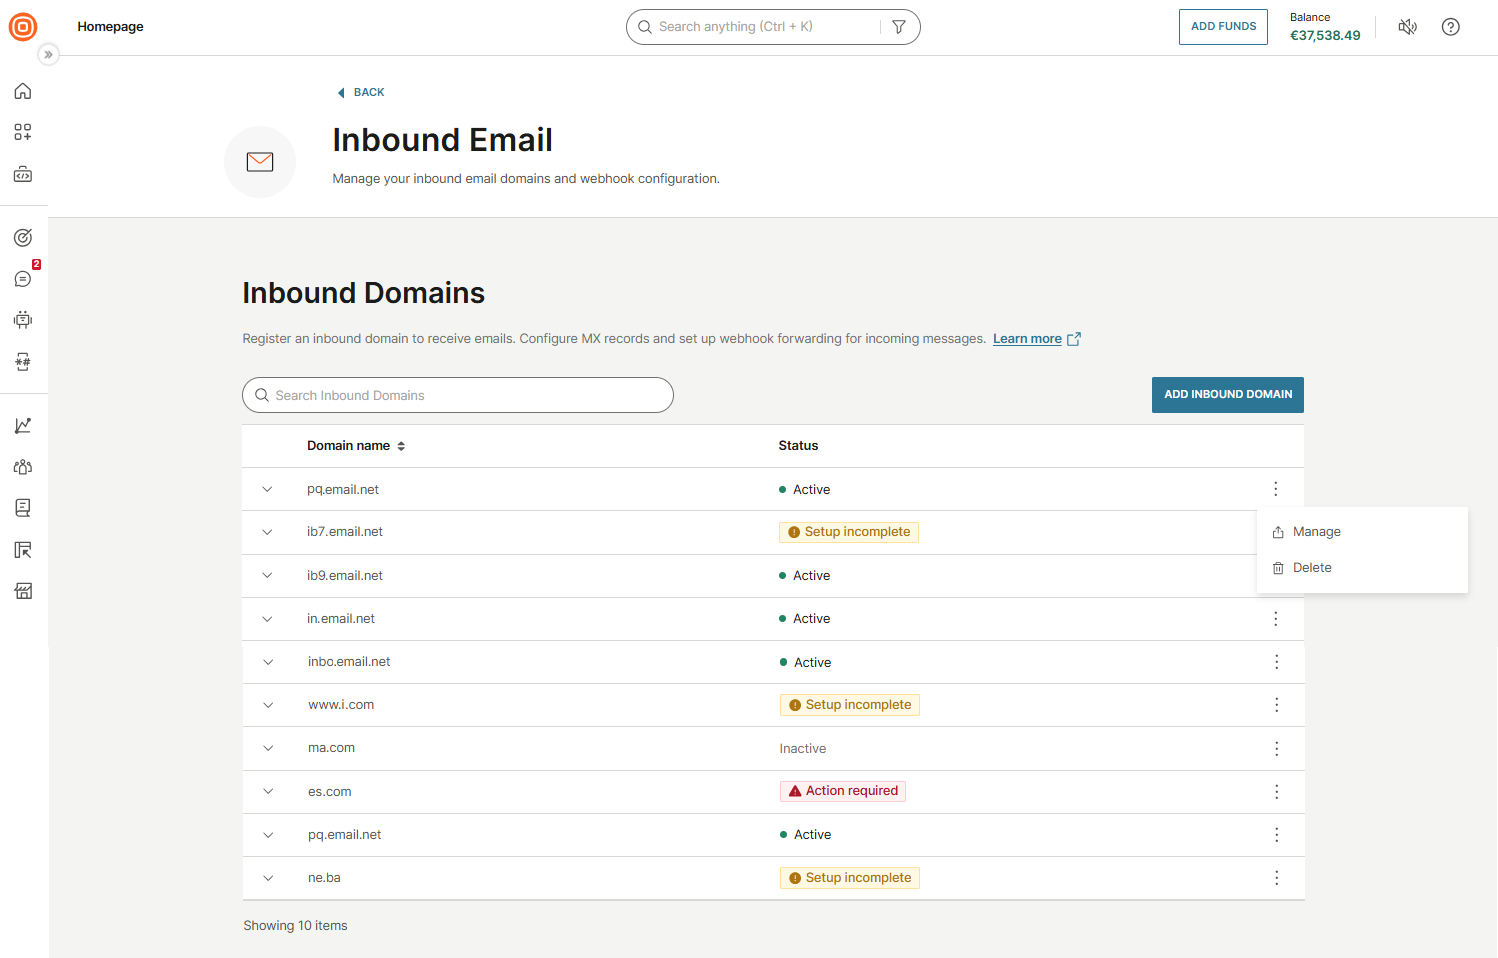
Go to Channels and Numbers → Channels → Email → Inbound Email.
The Inbound Email page lists all registered inbound domains. Use the search bar to find a specific domain or add a new one.
Each domain entry shows:
- Domain name: The registered inbound domain
- Status: The current domain status (for example, Active, Setup incomplete, Action required)
To manage a domain, select the three-dot menu next to it and choose:
- Manage: Open the domain configuration page
- Delete: Remove the inbound domain
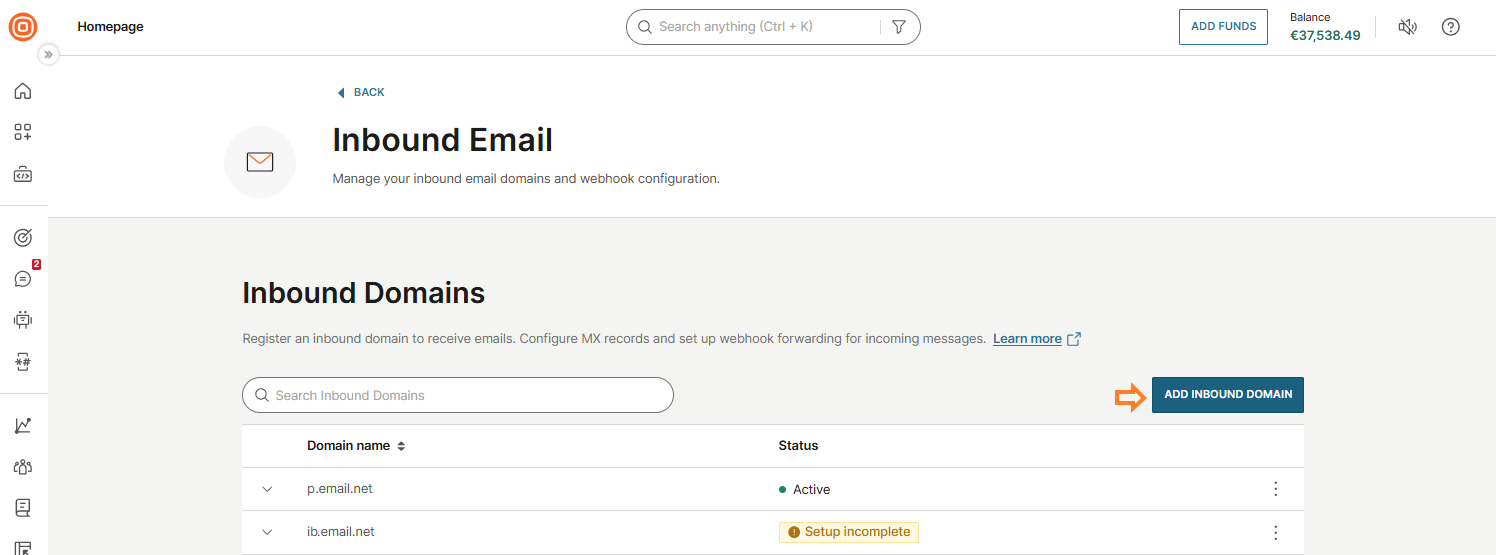
Add an inbound domain [#add-an-inbound-domain-inbound-domain-configuration]
To register a new inbound domain:
- Go to Channels and Numbers → Channels → Email → Inbound Email.
- Select the Add inbound domain button.
- In the pop-up, enter the domain you want to use for receiving inbound emails. Enter the domain name without prefixes (for example,
example.cominstead ofhttps://example.com). - Select Add domain.
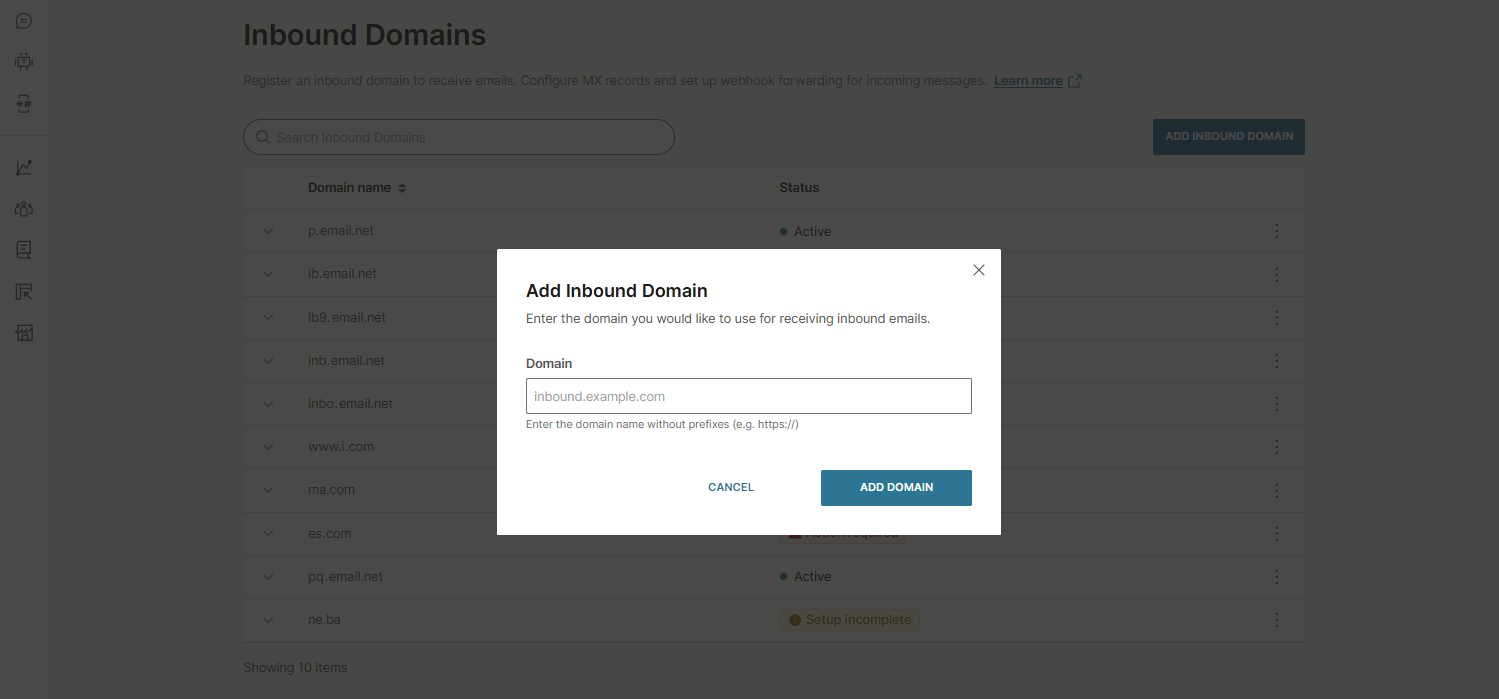
The domain appears in the domain table. You can then manage the domain to configure MX records and webhook forwarding.
Manage inbound domains [#manage-inbound-domains-inbound-domain-configuration]
To configure an inbound domain, select the three-dot menu next to the domain and choose Manage.
This opens the domain configuration page, where you can complete the setup.
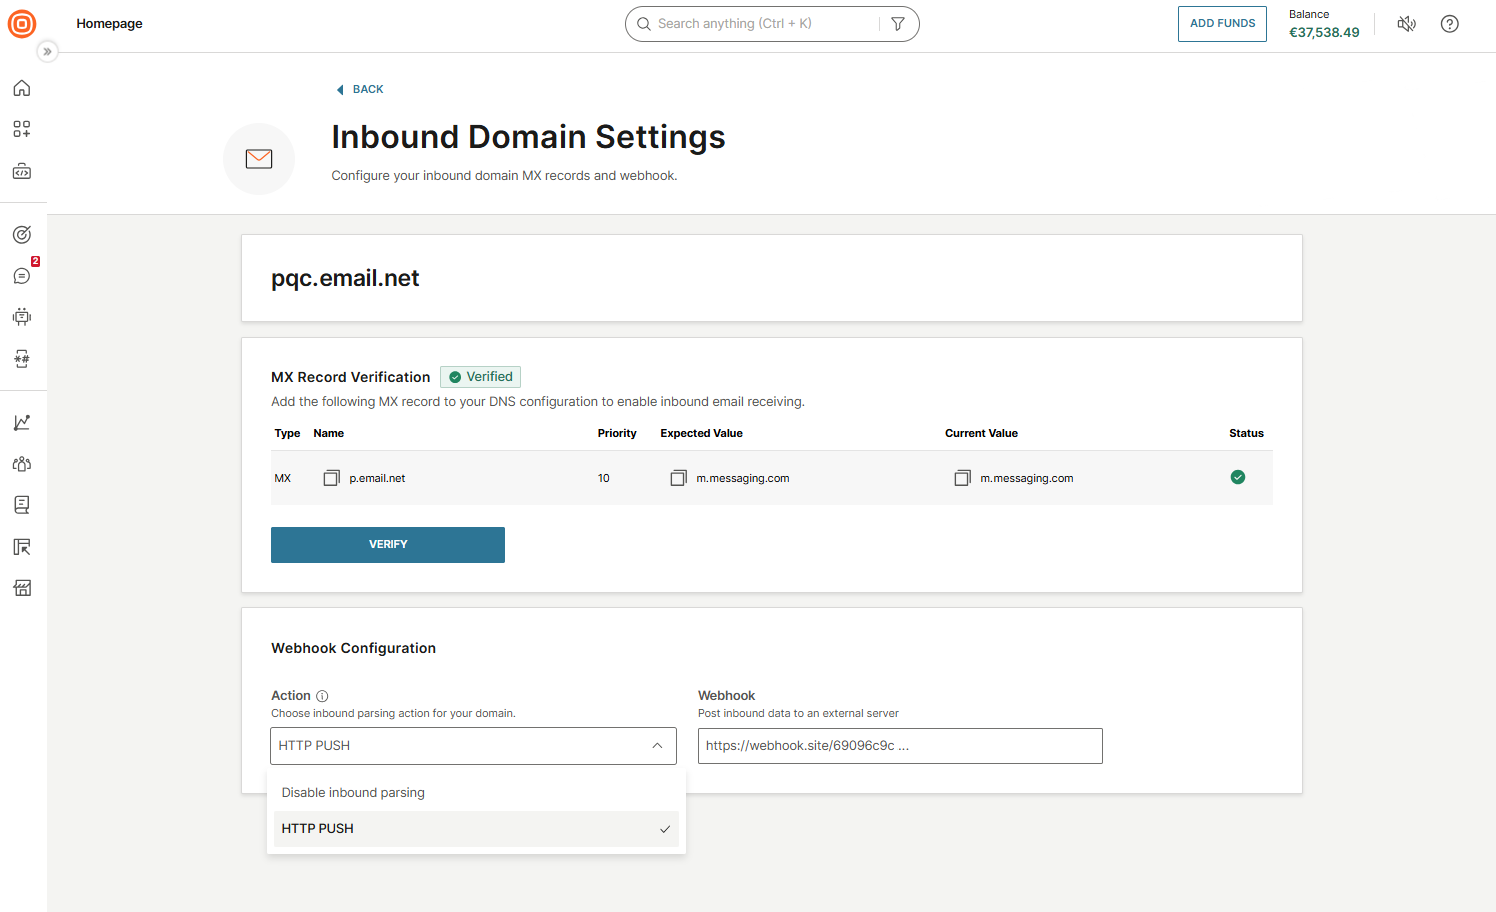
MX record verification
- Add the MX record shown on this page to your DNS configuration.
- Wait for the DNS changes to propagate.
- Select Verify to confirm the record is correctly configured.
The MX record details include:
- Type - The DNS record type
- Name - The record name to add to your DNS configuration
- Expected value - The value the MX record should resolve to
- Current value - The value currently configured in your DNS
- Status - The verification status of the record
Webhook configuration
- Choose how you want to handle inbound emails:
- Webhook (HTTP Push) - Parses inbound emails and forwards structured content to your webhook URL in real time (charged per inbound message)
- MX record only - Receives emails via the MX record without forwarding (no additional cost)
- Select an inbound parsing action:
- Disable inbound parsing - Stops processing incoming emails
- HTTP Push - Enables parsing and forwarding to your webhook
- Enter your Webhook URL to specify where inbound email data should be sent.
- Select Save.
Verify your inbound domain [#verify-your-inbound-domain-inbound-domain-configuration]
To fully activate an inbound domain, you must configure and verify both the MX record and the webhook.
An inbound domain is considered fully configured and active only when:
- The MX record is verified, and
- The webhook is configured
Configuration states
Depending on what you set up, the domain can be in one of the following states:
- Webhook configured, MX record not verified
- Billing is active
- The domain is not fully configured
- Inbound email will not work correctly
- MX record verified, webhook not configured
- Billing is not active
- The domain is not fully configured
- Inbound email processing is incomplete
- Both MX record verified and webhook configured
- Billing is active
- The domain is fully configured
- Inbound email works as expected
Configure Reply-To [#configure-reply-to-inbound-domain-configuration]
Replies are routed based on the Reply-To header in your outbound emails. If your inbound domain is different from your sending (outbound) domain, set the Reply-To header so replies are directed to the correct address.
You can set Reply-To using:
- HTTP API: Include the
replyTofield in your send request. - SMTP API: Add the
Reply-Toheader in your SMTP request. - Web interface: Configure
Reply-Toin your email settings.
The following table outlines common reply routing scenarios and the recommended setup:
| Scenario | What to do |
|---|---|
You send from infobip.com and want replies on the same domain. | Create infobip.com as your inbound domain. Replies work out of the box. |
You send from infobip.com but want replies on replies.infobip.com. | Create replies.infobip.com as your inbound domain. Set the Reply-To header to your preferred address (for example, [email protected]) using the API or web interface. |
You send from infobip.com and do not need inbound. | No action needed. Do not create an inbound domain. |
If your inbound and outbound domain are the same, Reply-To is not required. Replies are routed to the sending address by default.
Receive parsed inbound traffic [#receive-parsed-inbound-traffic-inbound-domain-configuration]
After you configure webhook forwarding, incoming emails sent to your registered inbound domain are automatically processed. Infobip extracts the message content, converts it into a structured format (parsed payload), and forwards it to your designated webhook URL for real-time handling.
For an example of the parsed payload structure, see the Receive parsed emails endpoint in the API documentation.
Envelope domain system
When you use your main domain to send emails, protecting its reputation is essential. Infobip automatically creates a unique envelope domain whenever you register a new sender domain. This envelope domain manages bounces and delivery errors without exposing or risking your main sending domain.
An envelope domain works behind the scenes during email delivery. It directs bounce messages and supports authentication mechanisms like DKIM (DomainKeys Identified Mail). Recipients do not normally see it, but it appears in the Return-Path field when viewing the full email headers.
How it works [#how-it-works-envelope-domain-system]
Infobip generates a subdomain (for example, ib38450.example.com) to act as the envelope domain. This separation improves deliverability, monitoring, and troubleshooting, while keeping bounce handling isolated from your primary domain.
Outgoing emails use your root domain in the visible From address, but are actually sent using the envelope-from subdomain.
DMARC alignment [#dmarc-alignment-envelope-domain-system]
DMARC alignment determines whether an email message is authenticated using the same domain shown in the visible From address (VBFR).
For DMARC to pass, at least one authentication method must both pass and align with the VBFR domain:
- DKIM authentication and alignment, or
- SPF authentication and alignment
DMARC records can also include tags that provide visibility into authentication results, such as aggregate and forensic reports. These reports help you monitor alignment and identify configuration or delivery issues.
DMARC tags
DMARC records consist of tag-value pairs that instruct receiving email servers how to handle messages from a domain and define reporting preferences. DMARC alignment behavior is configured using DMARC tags in the DNS record.
Each tag has a specific purpose. For example, a record with p=none; sp=quarantine; pct=100 means that messages from the primary domain that fail DMARC are monitored but not enforced, while all messages from subdomains that fail DMARC are quarantined.
If neither SPF nor DKIM passes and aligns based on these settings, the DMARC policy is applied by the receiving mail server.
The table below summarizes the main DMARC tags and their functions.
| Tag | Required | Description |
|---|---|---|
v | Yes | Specifies the DMARC protocol version. The only valid value is DMARC1. |
p | Yes | Defines the policy applied to messages from the primary domain that fail DMARC authentication. Supported values are none, quarantine, and reject. |
sp | No | Defines the policy applied to subdomains when it differs from the primary domain policy. |
pct | No | Specifies the percentage of messages to which the DMARC policy is applied. |
aspf | No | Defines SPF alignment mode. Supported values are r (relaxed) and s (strict). |
adkim | No | Defines DKIM alignment mode. Supported values are r (relaxed) and s (strict). |
rua | No | Specifies email address(es) that receive aggregate DMARC reports containing authentication statistics. |
ruf | No | Specifies email address(es) that receive message-level forensic reports for authentication failures. |
fo | No | Controls when forensic reports are generated (for example, on SPF failure, DKIM failure, or both). |
rf | No | Specifies the format used for forensic reports. |
ri | No | Defines the interval, in seconds, at which aggregate reports are sent. |
DKIM alignment [#dkim-alignment-envelope-domain-system]
DKIM alignment evaluates whether the domain used in the DKIM signature (d= tag) aligns with the VBFR domain.
Strict DKIM alignment
With strict alignment, the DKIM signing domain must exactly match the VBFR domain.
- DKIM tag domain:
example.com - VBFR:
[email protected]
Relaxed DKIM alignment
With relaxed alignment, the DKIM signing domain must belong to the same organizational domain as the VBFR domain. Subdomains are allowed.
- DKIM tag domain:
ib.321.example.com - VBFR:
[email protected]
How DKIM alignment affects DMARC [#how-dkim-alignment-affects-dmarc-envelope-domain-system]
DKIM alignment on its own does not enforce any action. It is evaluated by DMARC together with SPF alignment to determine whether a message passes DMARC authentication.
SPF alignment [#spf-alignment-envelope-domain-system]
SPF alignment checks whether the domain authenticated by SPF matches the visible From address (VBFR). SPF authentication is based on the envelope sender domain (also known as the MAIL FROM or Return-Path domain), which is checked against the sending IP address.
SPF alignment is evaluated by DMARC and does not enforce any action on its own.
SPF alignment modes
SPF alignment behavior is controlled by the DMARC aspf tag, which supports relaxed and strict alignment.
Strict SPF alignment
With strict alignment, the envelope sender domain must exactly match the VBFR domain.
- Envelope sender domain:
example.com - VBFR:
[email protected]
Relaxed SPF alignment
With relaxed alignment, the envelope sender domain must belong to the same organizational domain as the VBFR domain. Subdomains are allowed.
- Envelope sender domain:
mail.example.com - VBFR:
[email protected]
SPF alignment and DMARC [#spf-alignment--and-dmarc-envelope-domain-system]
For DMARC to pass, SPF must both pass authentication and align with the VBFR domain based on the aspf setting. If SPF passes but does not align, it does not satisfy DMARC requirements. In that case, DKIM alignment may still allow the message to pass DMARC.
Late bounces and reporting [#late-bounces-and-reporting-envelope-domain-system]
Late bounces are not reflected in reporting, and the message status stays as delivered once the provider confirms delivery. If late-bounce information arrives after that, the message status will not be updated.
To receive late bounce events, subscribe to late bounce webhooks.
See Late bounces for details.