Create and configure an AI agent
You can create an AI agent either from scratch or import a previously exported agent configuration.
To create an AI agent, choose one of the following options:
Create a new AI agent
To create a new AI agent:
- On the Infobip web interface, go to AI Agents > My agents.
- Select Create agent.
- Configure the fields as described below.
Import an AI agent
To import an AI agent:
- On the Infobip web interface, go to AI Agents > My agents.
- Select Import agent.
- Browse for the
.exportfile. - Confirm by selecting Import.
Configure your agent
Configure the agent properties that define its identity, behavior, integrations, and model settings.
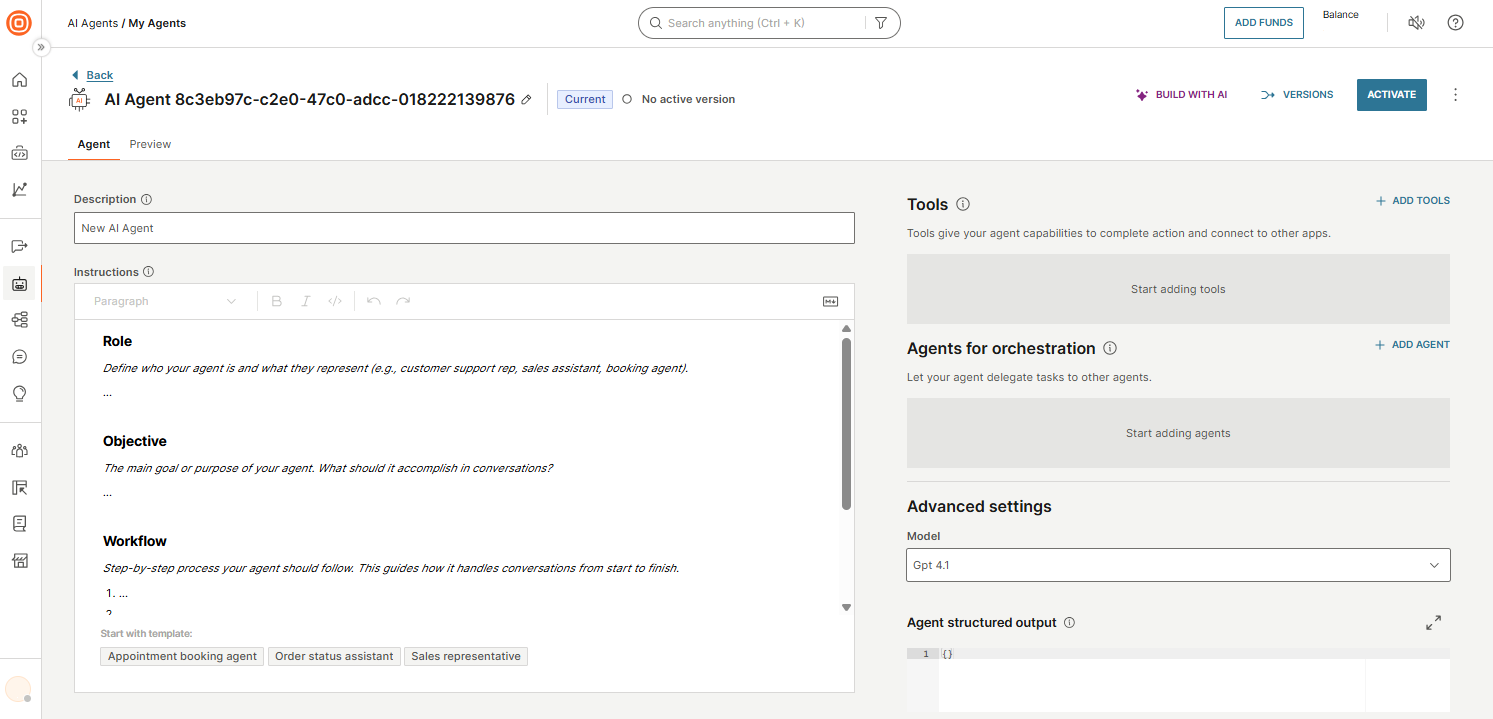
| Field | Description |
|---|---|
| Name | Uniquely identifies the agent in your workspace. To rename, select the pencil icon next to the current name. |
| Description | (Mandatory) Short description that explains the purpose and responsibilities of the agent. Other agents use this to understand when and how to call this agent. |
| Instructions | Defines the agent’s behavioral specification, including how it communicates, performs tasks, and interacts with end users. Acts as the system prompt for the underlying language model. The editor provides a structured template with recommended sections. |
Effective prompts are essential for reliable AI agents. See Write prompts for AI agents for best practices on role definition, instructions, tool usage, and complete examples.
You can use a predefined template to populate the instructions:
- Appointment booking agent
- Order status assistant
- Sales representative
For a complete prompt example, see Write prompts for AI agents.
Tools
Tools extend the capabilities of an AI agent by allowing it to execute actions and integrate with external systems.
For example, tools can enable the agent to:
- Call APIs
- Execute backend logic
- Retrieve external data
- Trigger automated workflows
In the Tools section:
- Select Add tool.
- Select the type of tool:
- Component
- MCP server
- Exchange Application
- To remove a tool, select the X icon next to it.
Component [#component-tools]
Components encapsulate reusable logic and can orchestrate multiple API calls or backend processes. Use components when the agent needs to execute complex workflows or backend integrations.
See Use chatbot components in AI agents for best practices.
You can use only channel-agnostic components in your AI agent. Channel-agnostic components work across all communication channels.
To add a component:
- Select Create component to create a new one (follow the Components documentation), or select one or more existing components from the list.
- Select Add component.
If you select a draft component, publish it before activating the AI agent.
MCP server [#mcp-server-tools]
Configure the following fields:
| Field | Description |
|---|---|
| Name | Unique name to identify the MCP server. |
| URL | Endpoint URL the AI agent sends requests to. |
| Headers | HTTP headers as key-value pairs (for example, authentication tokens). |
| Allowed functions | Actions the server is permitted to take when called. |
To edit the MCP server after adding it, select it and update the details.
For use cases and more information, see MCP servers.
Exchange application [#exchange-application-tools]
- Select one or more integrations from the list.
- Select Add.
Subagents
You can configure this agent as an orchestrator that coordinates other AI agents. Orchestrator agents can:
- Delegate tasks to specialized agents
- Combine responses
- Control conversation routing
Add subagents [#agents-for-orchestration]
To add subagents:
- Select Add agent.
- Select one or more AI agents from the list.
- Select Add agent. Alternatively, select Create agent.
For more information about orchestration, see Orchestration.
Advanced settings (optional)
| Field | Description |
|---|---|
| Model | Select the LLM model that best matches your requirements for reasoning capability, latency, and cost. |
| Guardrails | Select content filters to detect and block harmful content in agent conversations. For configuration details, see Configure guardrails. |
| Agent structured output | Define a JSON schema to enforce a specific response format. For use cases and details, see Structured output. |
Save and version your agent
While you configure your agent, changes are autosaved to the current draft. The system keeps a maximum of 10 autosaved versions.
When you are ready to save a named snapshot:
- Select Versions > Create version.
- The system assigns a version number automatically (V1, V2, and so on).
- You can optionally add a version name and description.
To deploy a version for production use:
- Select Activate.
- Activating a version sets it as the active version for the agent.
For more information about versioning, see Version history.
Select the menu icon (three dots) to access the following options:
- View as code: View the agent configuration as code.
- Go to Session history: View previous sessions and associated analytics.