Test your RCS sender
When the sender status is set to In testing, you can validate the RCS sender by registering test devices and initiating test message flows. In this stage, you can record the mandatory sender demonstration video required for launch approval.
Certain RCS features are only accessible with an active subscription and may not be available during the testing phase. For details on managing your subscription, refer to Subscriptions management.
Testing process:
- Prepare your test device by sending an invitation to the end user's mobile number to become a tester for the sender.
- Receive feedback after the end user accepts the invitation.
- Send a test message to the registered device.
- If the end user's device is not RCS enabled, you will receive a notification indicating this status.
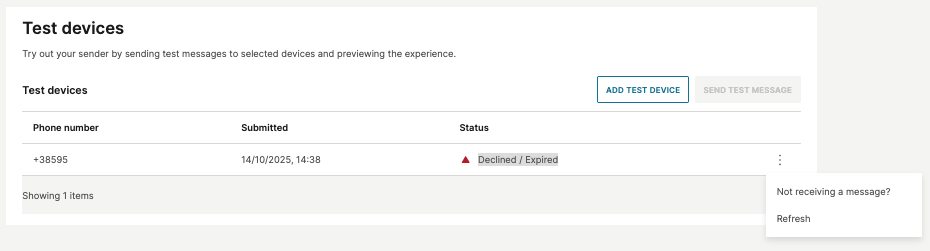
- If the end user does not accept the invitation within 24 hours, the device status changes to Declined or Expired. You must manually restart the invitation results fetching by selecting Refresh from the options menu on the test device.
Prepare your test device
Before adding a test number for safelisting, ensure the physical device is set up correctly:
- Enable chat features: On your Android testing device, go to your Messages app settings and confirm RCS chats are enabled and connected. See Google's documentation for more information.
Add test device numbers for safelisting
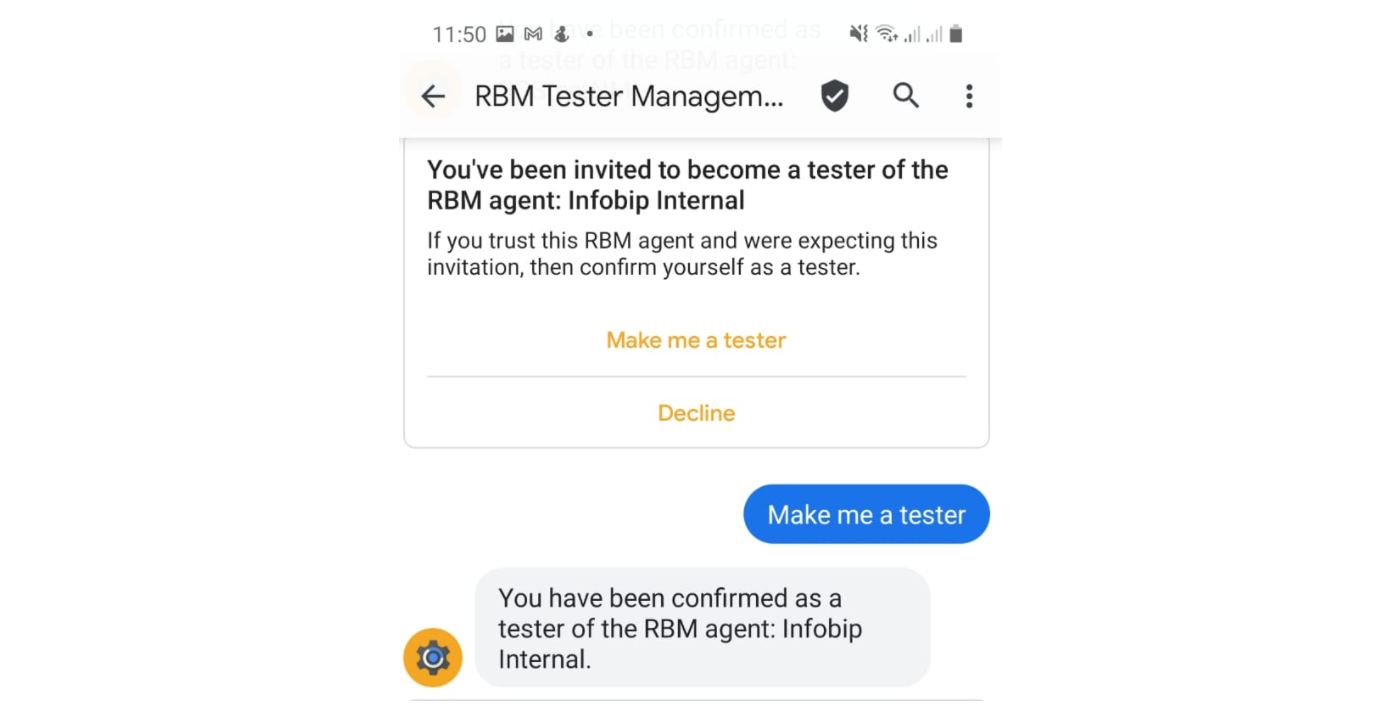
- Accept RBM tester invitation: You will receive a Google tester invitation message on your device once the number is added for testing. If you receive this invitation, select Make me a tester and wait for confirmation.
- Add the phone number(s) of your prepared test device(s) to your sender configuration on the Infobip interface.
Only safelisted numbers can receive test messages while the sender is in the In testing phase.
You can add test devices in the following stages:
- When the sender is initially created.
- After sender creation, go to Senders > Sender name > Test devices in the sender overview.

Test devices can also be added through:
The web interface:
- Go to Channels and Numbers > Channels > RCS Business Messaging > Senders.
- Select your sender (status must be In testing).
- Go to the Test devices tab.
- Select Add device and enter the phone number(s) in E.164 format (for example,
+1234567890).
API:
- Call the Add RCS test number API endpoint.
- See the Add RCS test number API reference for request structure and parameters.
Send test messages
Once your test device is added and the end user has accepted the invitation to test your sender, you can send messages by:
-
Using the web interface (Broadcast):
- Go to Moments > Broadcast.
- Select Create broadcast, choose RCS as the channel, and add your sender.
- Enter your safelisted test number(s) as recipients.
- Compose messages using RCS features (text, rich cards, carousels, buttons).
-
Using prepopulated messages:
- On the web interface select Channels and Numbers > Channels > RCS Business Messaging.
- Select the Senders tab, select a sender with the In testing status, then choose Test devices.
- Choose Send test message.
You can also create custom messages from the same menu to test additional RCS features and interactions.


-
Using RCS API:
- Call the Send RCS messages API endpoint.
- Target your safelisted test number(s).
- See the API details for request structure and parameters.
Check the video below to learn more about sending test messages: