Collect debts from customers
When end users do not make payments for products or services on time, businesses find it necessary to send them payment reminders.
This tutorial explains how to send proactive reminders to end users for outstanding payments, offer them multiple payment options, and manage their questions.
The tutorial uses Moments flows to send invoices and payment reminders, Answers chatbots to manage end users' questions, and has the option to use Conversations to transfer chats to live agents.
Products and channels
Prerequisites
-
Integration setup: Ensure you have a WhatsApp Business API account set up and registered with Infobip.
-
Infobip account with the following enabled:
-
WhatsApp phone number that is registered with Infobip: You can also use Infobip's test phone number for this tutorial. But you can only test the chatbot but cannot share it with others.
For end users to contact your chatbot, you must use a registered WhatsApp phone number.
Process flow
The following image shows an overview of the process flow.
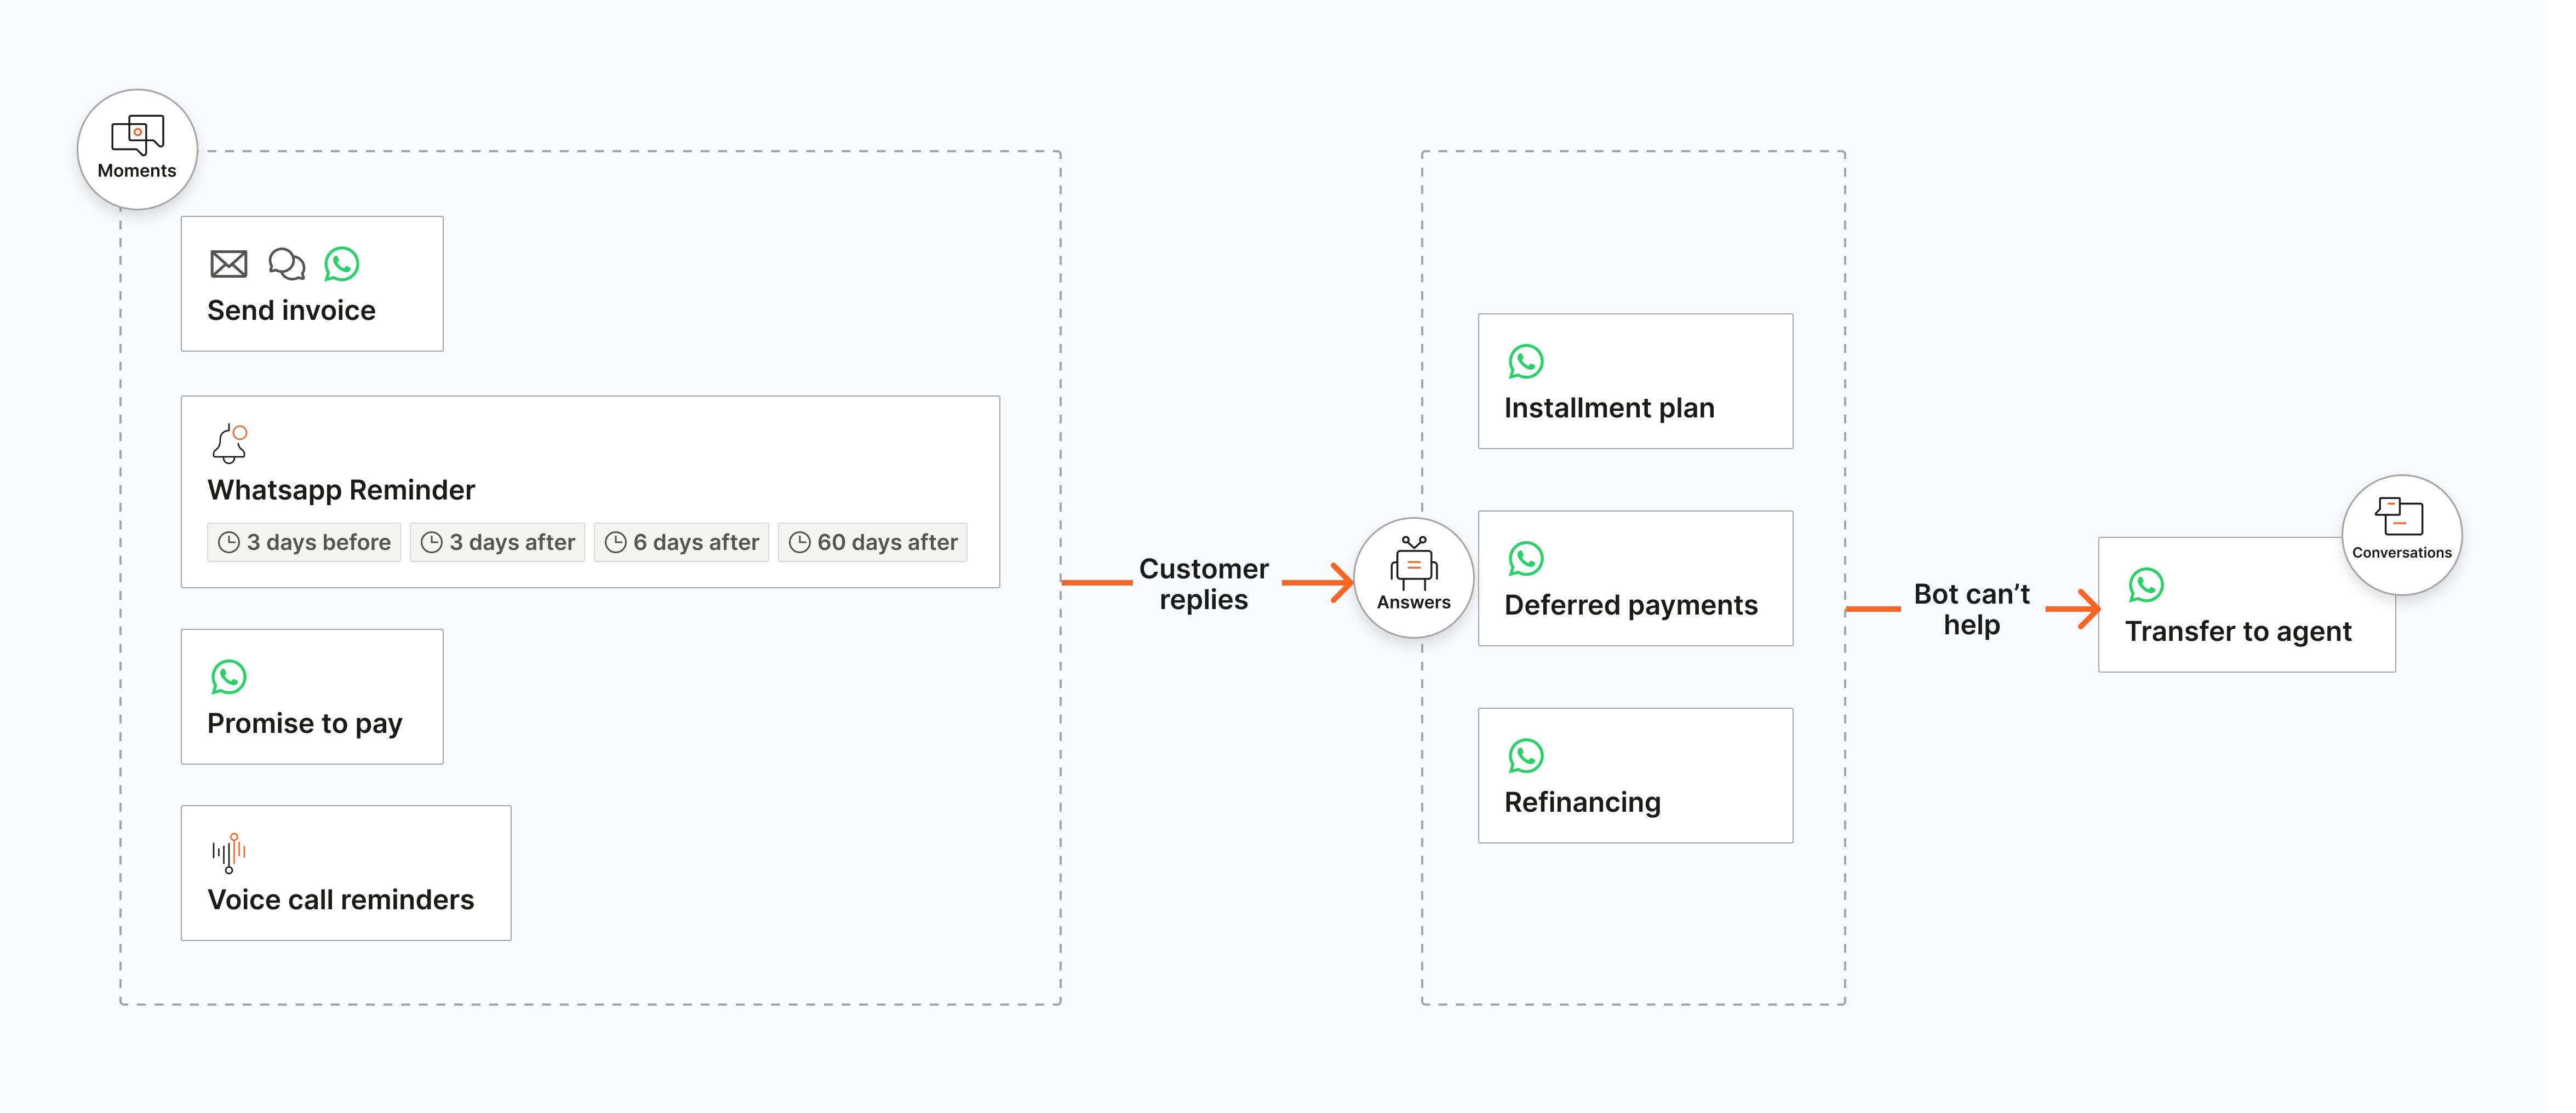
The process flow is as follows:
-
Moments flows
-
Sends an invoice to end users for their purchases.
- Offers them the option to pay their outstanding balance immediately.
-
Sends scheduled reminders to end users about their outstanding payments as follows:
- 3 days before the due date
- 3 days after the due date
- 6 days after the due date
- 45 days after the due date with the option to promise to pay later
- 60 days after the due date
-
Reminds customers about their outstanding payments through IVR.
-
-
Answers chatbot
- Provides the option for end users to change their payment method.
- Enables end users to split their payment into multiple installments.
- Provide flexible refinancing options or debt extension directly through the chatbot.
- Enables end users to contact a human agent for assistance in managing the payment.
-
People
- Collects end users' contact information and details about their purchase and saves the information in People.
- Use audience segmentation to eliminate manual effort in sending the payment reminders.
Process overview
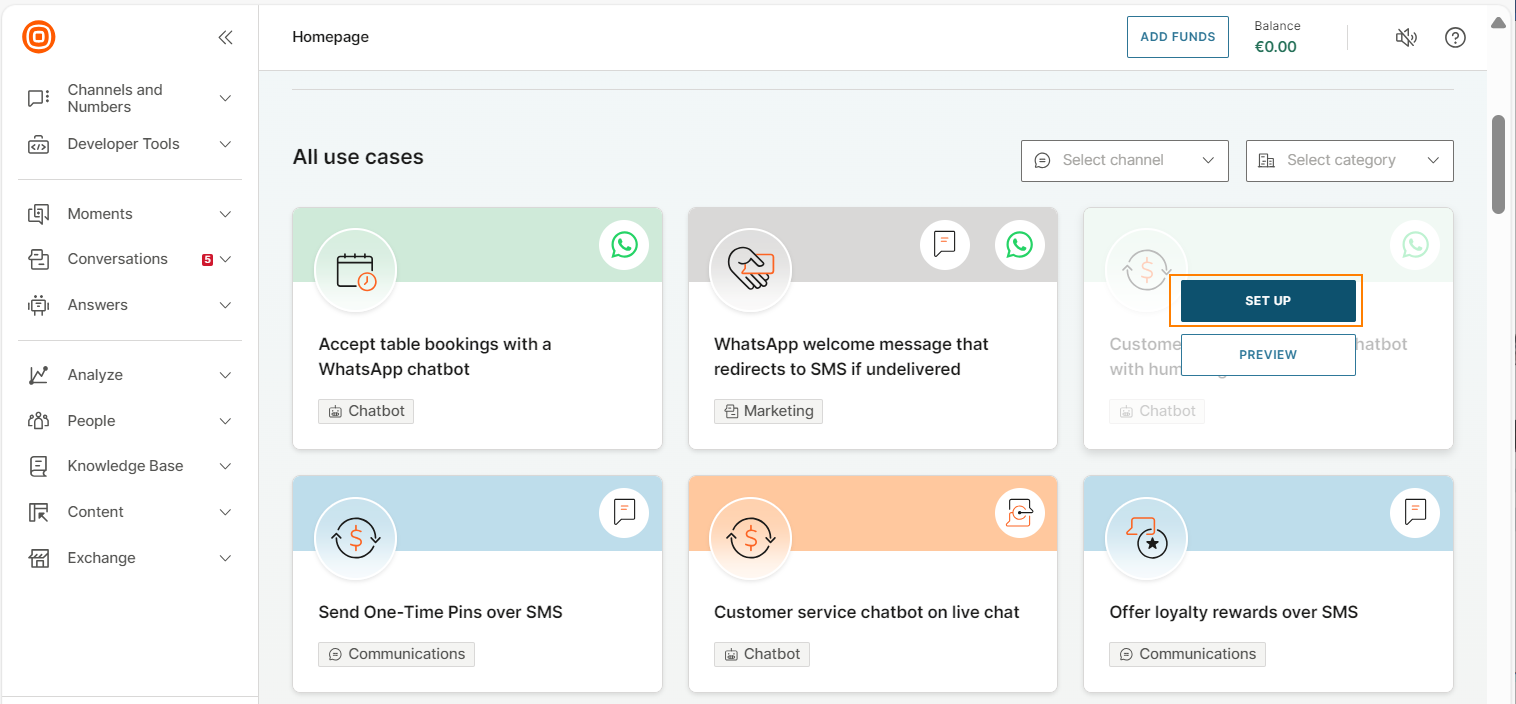
You can implement the tutorial in one of the following ways:
- Use the Experiences wizard. The chatbot uses the predefined Debt collection template.
- Create from scratch.
Automated implementation using Experiences wizard
-
On the Infobip web interface, go to Experiences (opens in a new tab).
-
Go to the Debt collection template. You can use Search and Filter options to find the template.
-
(Optional) Hover over the template and select Preview to view information about the template.
-
Hover over the template and select Set up to configure the template.
-
In the WhatsApp number section, select the WhatsApp phone number on which end users can contact your chatbot and from which you can send reminders.
NoteIf you use Infobip's test number, you can only test the chatbot but cannot share it with others. For end users to contact your chatbot, you must use a registered WhatsApp number.
-
Select Finish setup.
The system creates the chatbot and flows, and prepares data in People.
NoteThis process takes up to 3 minutes.
-
Scan the QR code to test the chatbot on your device.
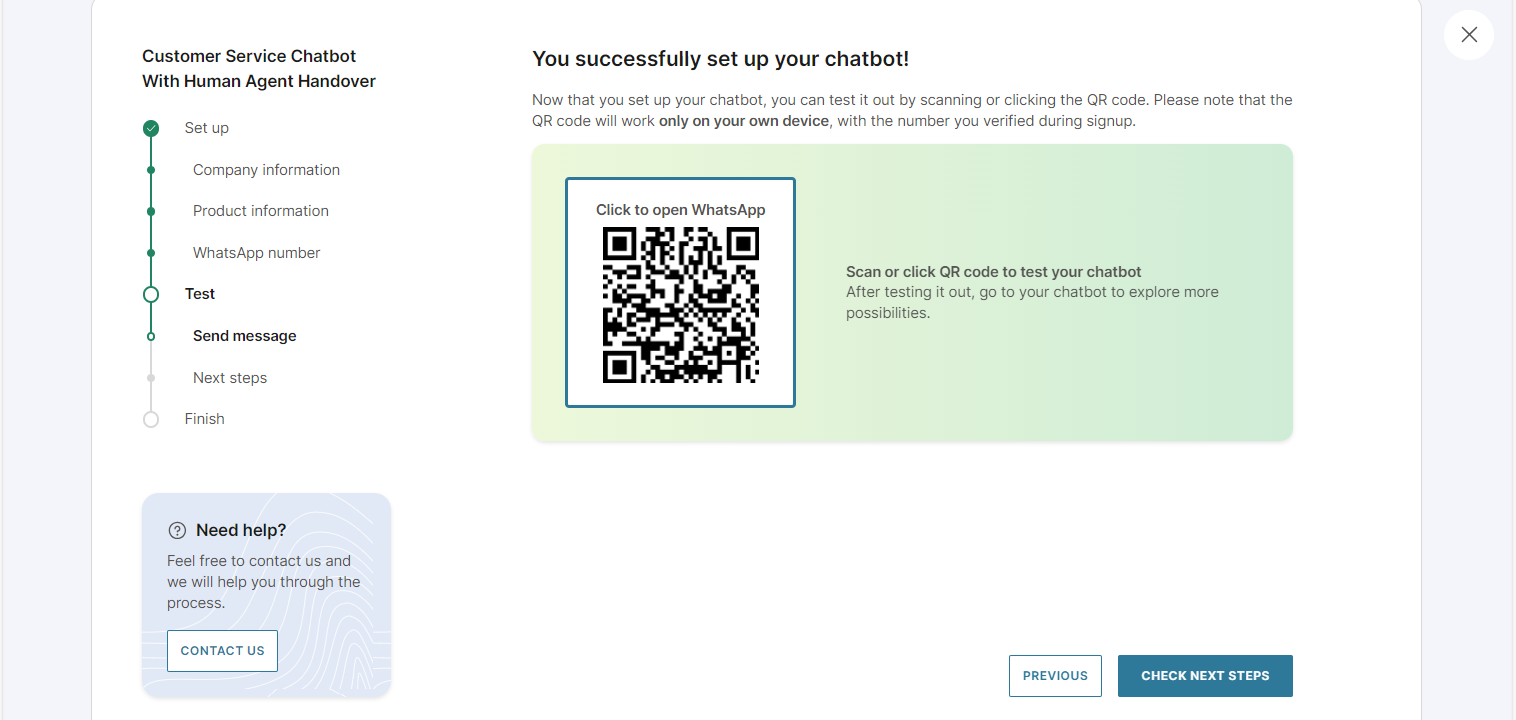
-
Select Check next steps to see the instructions to finish the setup.
-
To view the chatbot, go to Answers > Chatbots. To view the flows, go to Moments > Flows.
-
(Optional) Test the chatbot in the simulator and on your device.
Manual implementation
This following steps explain how to set up manually. Follow the steps in each of the sections sequentially.
Prepare data in People
Create an event
Use events to triggers the flows. Create a people custom event, Purchase, with the following properties:
| Property | Data type |
|---|---|
paymentInstallments | Number |
paymentConfirmationReceived | True/False |
paymentConfirmationLink | Text |
invoicePaidDate | Text |
invoiceLink | Text |
invoiceCreatedDate | Date |
earlyPaymentReward | Text |
paid | True/False |
invoiceDueDate | Date |
purchaseId | Text |
amount | Text |
Create a list attribute
Use list attributes to save purchase and payment information in People. Create a list attribute, Purchase, with the following properties:
| Property | Data type |
|---|---|
amount | Text |
earlyPaymentReward | Text |
invoiceCreatedDate | Date Time |
invoiceDueDate | Date Time |
invoiceLink | Text |
invoicePaidDate | Date Time |
paid | True/False |
paymentConfirmationLink | Text |
paymentConfirmationReceived | Text |
paymentInstallments | Whole number |
purchaseID | Text |
Prepare messages to send to the end user
Create the following messages:
- An invoice message using Email
- A promise to pay message using WhatsApp
Create an Email message to send invoice details
-
On the Infobip web interface, go to Content > Messages.
-
Select Create new message > Email.
-
Rename the message as Invoice.
-
Add the email sender and domain.
-
In the Subject field, enter Invoice.
-
In the Variables section, create the following variables to use in the email content.
Flow variable Type amount Text invoiceDueDate Date Time invoiceLink Text -
Select Create custom email and create the email content.
- In the message, include the variables that you created earlier.
-
When you finish creating the email, select Done designing.
-
In the Tracking and reporting section, select the following:
- Track opens
- Track URL clicks
-
Select Activate.
Create a WhatsApp message offering options to pay later
Offer end users options to pay at a later date:
- The next day
- Within 7 days
- Within 14 days
Do the following:
-
On the Infobip web interface, go to Content > Messages.
-
Select Create new message > WhatsApp.
-
Rename the message as Promise to pay - not now.
-
Select a sender.
-
Select to create content.
-
Select List message.
-
In the Message, add the following content:
Thank you, {FirstName}. When are you planning to make the payment? Please select one of the options below.
-
In Button sections, create the following buttons:
- Tomorrow
- Within 7 days
- Within 14 days
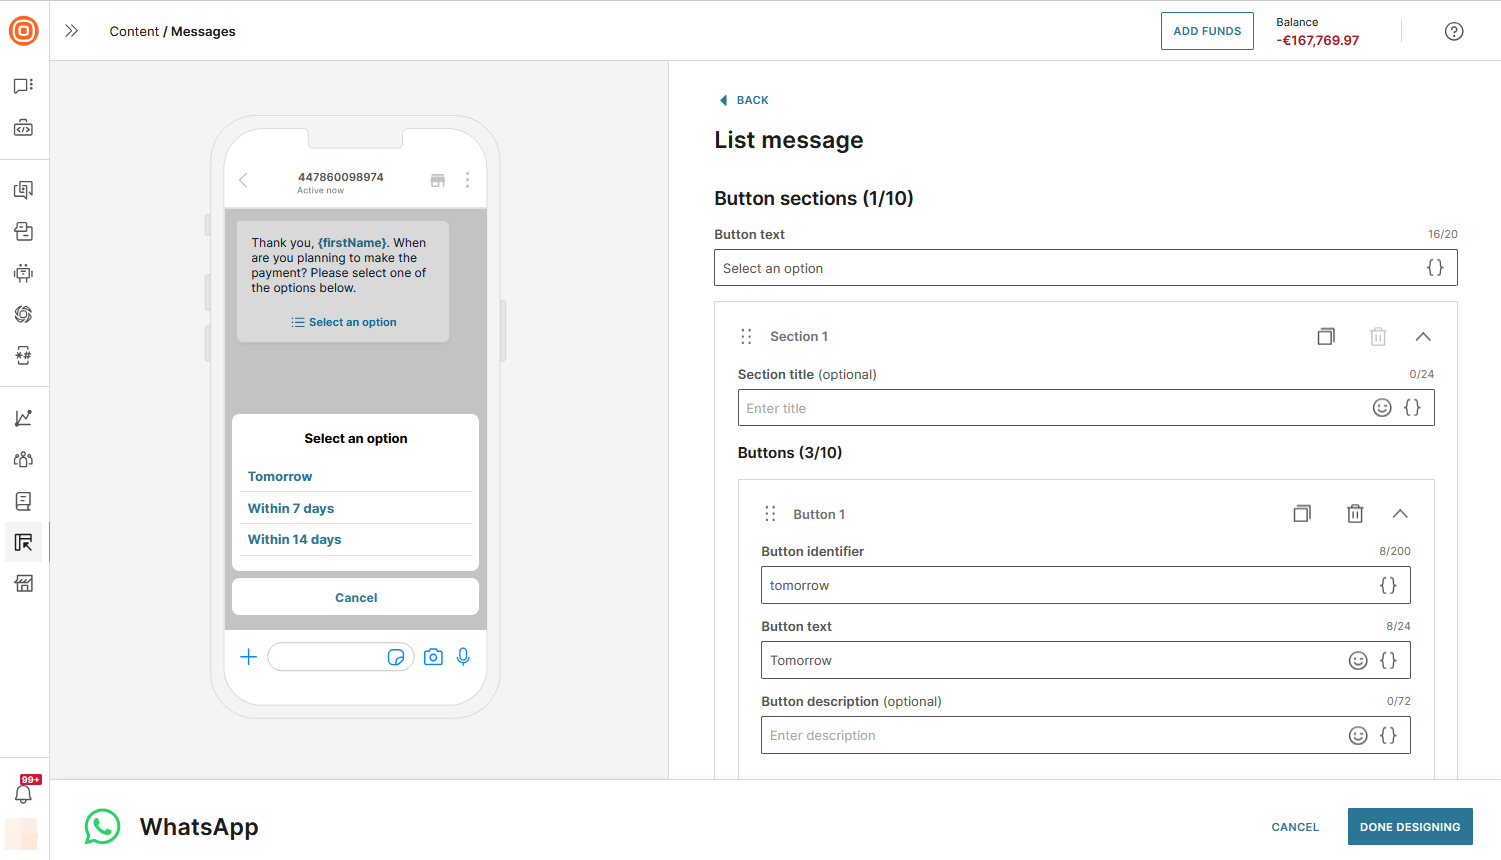
-
Select Done designing.
-
Activate.
Create WhatsApp templates
Create WhatsApp templates to use in messages that you send to end users.
Create the following templates:
Template to send invoice
Create a template named debt_collection_invoice with the following content:
Hi
{firstName}
! Your invoice has been created. *Invoice amount*:
{amount}
*Due Date*:
{invoiceDueDate}
To ensure that your payment is processed on time and to avoid any late fees, kindly make the necessary arrangements to pay by the due date. Click below to view your invoice, or proceed with the payment.
Template to inform that payment is due in 3 days
Create a template named debt_reminder_due_in_3_days with the following content:
Hello,
{firstName}.
Your payment is due in 3 days. Pay now to earn extra loyalty points!
Template to inform that payment is overdue by 3 days
Create a template named debt_collection_payment_3_days_ago with the following content:
Hi
{firstName}
! We've noticed that your recent invoice is overdue. Please make your payment as soon as possible to avoid additional fees. Kindly confirm if the payment has already been made in the meantime.
Template to inform that payment is overdue by 6 days
Create a template named debt_reminder_6_days_ago with the following content:
Hi
{firstName}
! We still haven’t received your payment. Please make your payment as soon as possible to avoid legal action and penalties.
Template to inform that payment is overdue by 60 days
Create a template named debt_reminder_60_days_ago with the following content:
Hi
{firstName}
! Your invoice is 60 days overdue. Please make your payment as soon as possible to avoid additional fees. You can also change to a payment option that is more convenient for you.
Template to ask for payment now
Create a template named debt_collection_pay_now with the following content:
Click below to pay it now:
Template to use in the voice chatbot
Create a template named transfer_ivr_answers_invoice with the following content:
Hello
{firstName}.
Please choose how would you like to make a payment.
Template to transfer the call to a live agent
Create a template named transfer_ivr_agent with the following content:
Hello,
{firstName}
! Welcome to
{address}
WhatsApp Channel. Would you like to discuss other payment options?
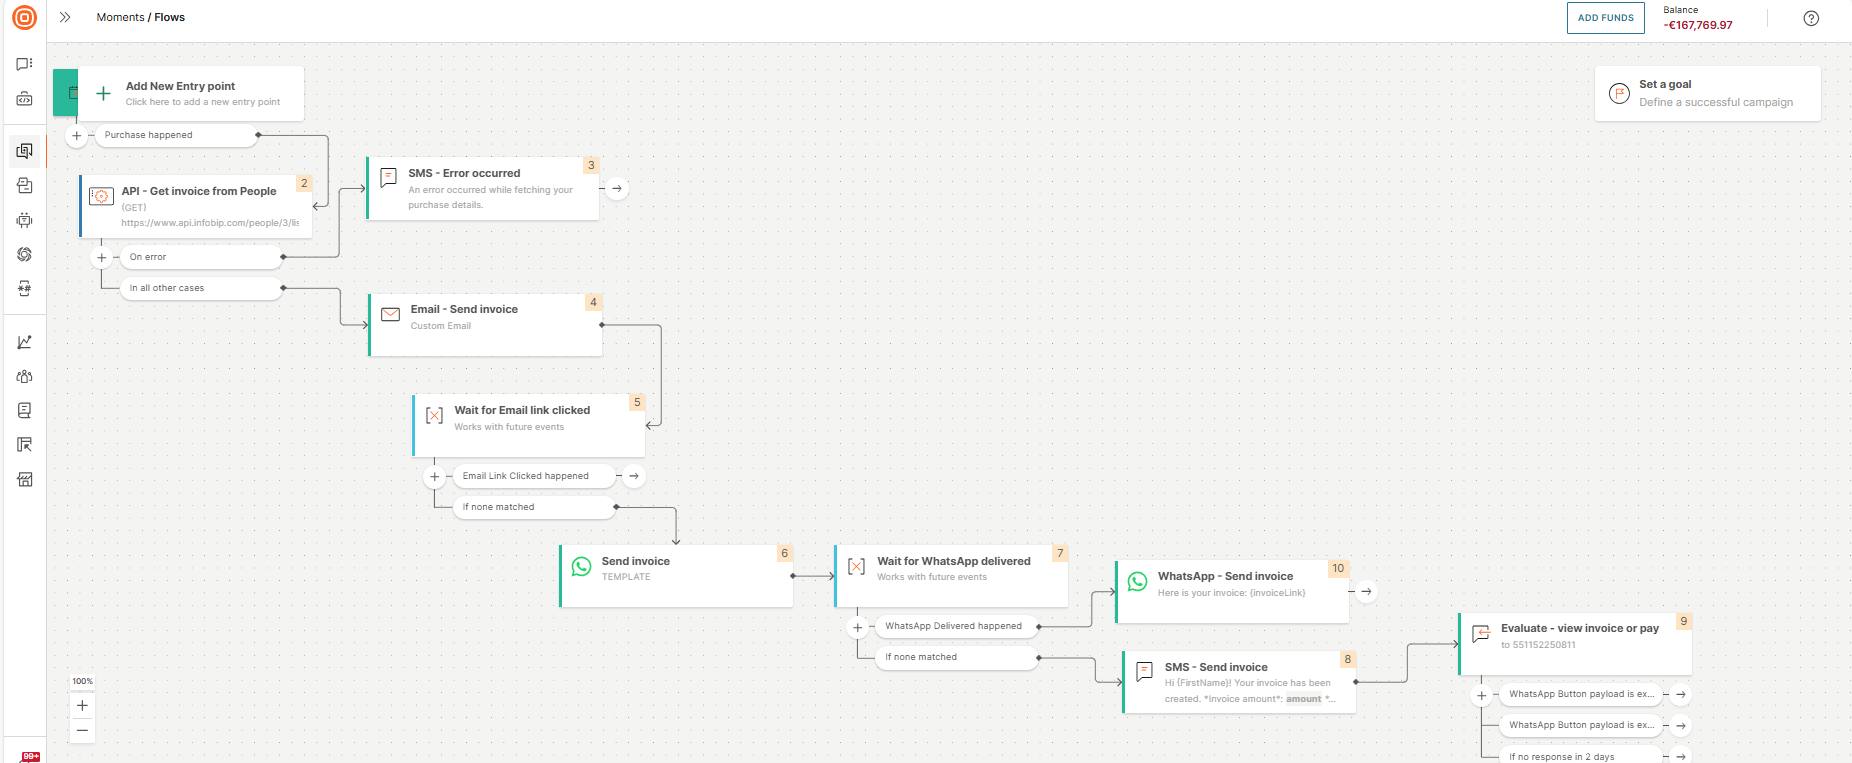
Create a flow to send the invoice
This flow does the following:
- Flow triggers when a purchase has been made but payment has not yet been made.
- Gets invoice information from People and saves it in Flow variables.
- Creates an invoice from this information and sends it to the end user.
Follow these steps to create the flow:
-
Create a flow that is triggered when a purchase has been made but payment has not yet been made. On the Infobip web interface, go to Moments > Flows.
-
Select Create flow > Start from scratch > Trigger > People real-Time event.
-
In the People real-time event element, select the Condition as follows:
Purchase happened
more or equal 1 times
within the last 5 minutes
paid is False
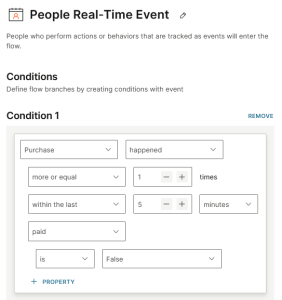
-
Create the following Flow variables to save the invoice information.
Flow variable Type amount Text invoiceDueDate Date Time invoiceLink Text -
Add a Call API element that calls an API to get details about the purchase from People.
-
Configure the Call API element as follows:
-
In the Request tab > Request URL field, enter the following:
https://www.api.infobip.com/people/3/lists?listNames=Purchase&type=PHONE&identifier=\{Msisdn\} -
In the Method field, select Get.
-
Add your API key in the Header field.
-
In the Response tab, enable Wait until response is received.
-
Save the invoice information, which you get as the response from the API, in Flow variables. You can use these variables later in the flow.
In the Response Body Variable section, select Variable and map the JSON path to the Flow variables that you created.
JSON path Variable $.Purchase[0].invoiceLink invoiceLink $.Purchase[0].amount amount $.Purchase[0].invoiceDueDate invoiceDueDate 
-
In the Handle status codes section, select Add status code and select On error.
-
-
In the On error branch of the Call API element, do the following:
-
Add an SMS element.
-
In the SMS element, select the Sender.
-
Add the following text:
An error occurred while fetching your purchase details.
-
-
Send the invoice information to the end user through email.
In the In all other cases branch of the Call API element, do the following:
-
Add an Email element.
-
In the Email element > Choose existing message field, select Invoice.
-
In the Variables section, match the variables from Messages to the variables in the flow.
Messages variable Flow variable invoiceLink invoiceLink amount amount invoiceDueDate invoiceDueDate 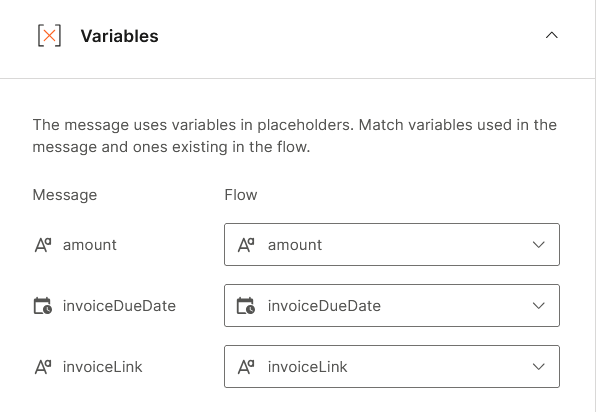
-
Add a Wait for an event element.
- In the Wait for an event element, select the Condition as follows:
Email link clicked happened
more or equal 1 times
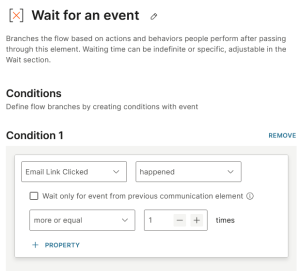
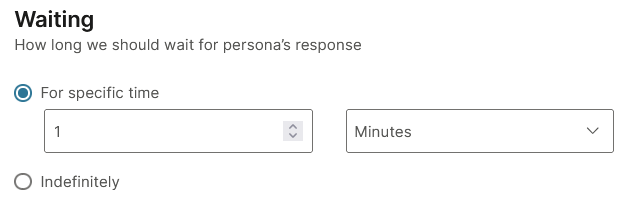
- In the Waiting section, select Specific time and configure 1 Minutes.
-
-
If the end user did not click the link in the email, send them the invoice through WhatsApp.In the If none matched branch of the Wait for an event element, do the following:
- Add a WhatsApp element.
- In the WhatsApp element, disable Use messages.
- In the From field, select the sender
- In the Type field, select Template.
- In the Template field, select debt_collection_invoice.
- In the Placeholder mapping field, add placeholders where necessary.
-
Check whether the WhatsApp message was delivered.
After the WhatsApp element, add a Wait for an event element.
-
Select the Condition as follows:
WhatsApp delivered happened
more or equal 1 times
-
In the Waiting section, select Specific time and configure 5 Minutes.
-
-
If the WhatsApp message is delivered, send the invoice to the end user.
In the WhatsApp delivered happened branch of the Wait for an event element, do the following:
-
Add a WhatsApp element.
-
In the WhatsApp element, disable Use messages.
-
In the From field, select the same sender that you used in the WhatsApp element for sending the invoice.
-
In the Type field, select Text.
-
In the Content field, enter the following:
Here is your invoice:
{invoiceLink}.
-
-
If the WhatsApp message is not delivered, send the link for the invoice through SMS.
In the If none matched branch of the Wait for an event element, do the following:
-
Add an SMS element.
-
In the SMS element, select the Sender.
-
Add the following text:
Hi {FirstName}! Your invoice has been created.
*Invoice amount*: {amount}
*Due Date*: {invoiceDueDate}
Click here to view your invoice and make a payment: {invoiceLink}.
-
Add an Evaluate inbound message element.
-
In the Evaluate inbound message element, select WhatsApp as the channel.
-
In the WhatsApp channel, select the same sender that you used in the WhatsApp element for sending the invoice.
-
Offer options for the end user to either view the invoice or make a payment.
Add the conditions as follows:
Button payload is exact match to view_invoice
Button payload is exact match to pay_now
-
The flow should be similar to the following image:
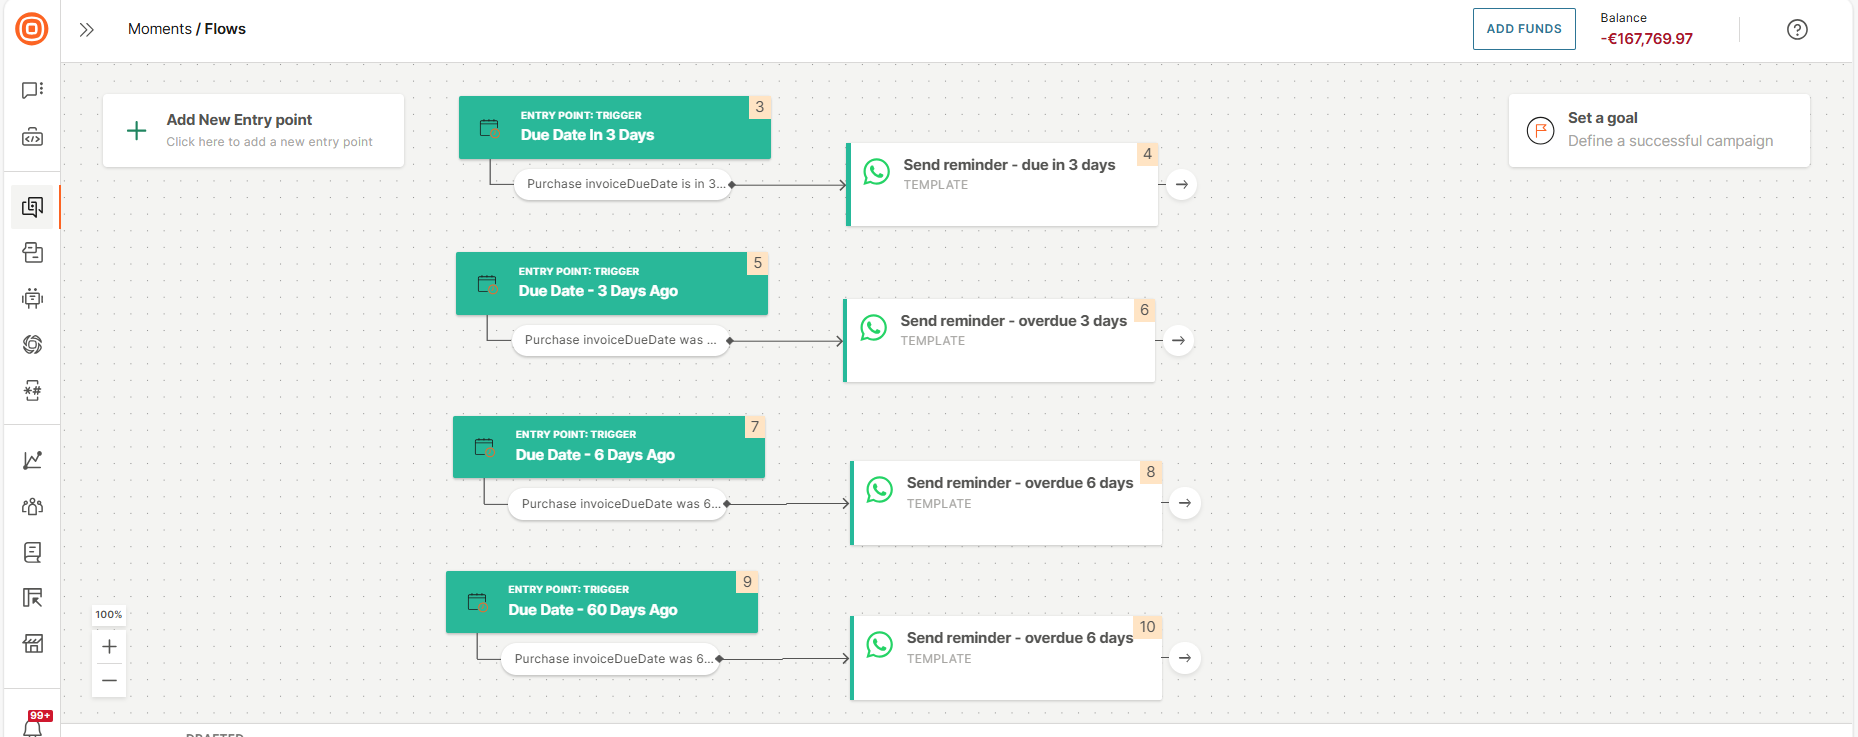
Create a flow to send reminders to pay the invoice
This flow sends reminders to end users based on the following schedule:
- 3 days before the due date
- 3 days after the due date
- 6 days after the due date
- 60 days after the due date
Follow these steps to create the flow:
-
On the Infobip web interface, go to Moments > Flows.
-
Select Create flow > Start from scratch > Trigger > Date or time.
-
Trigger the flow when the payment is due in 3 days. In the Date or time element, select the Condition as follows:
Purchase
invoiceDueDate is in 3 days
paid is False

-
Send a message to the end user reminding them that the payment is due in 3 days.
Add a WhatsApp element.
- In the WhatsApp element, disable Use messages.
- In the From field, select the sender
- In the Type field, select Template.
- In the Template field, select debt_reminder_due_in_3_days.
- In the Placeholder mapping field, add placeholders where necessary.
-
Add another Date or time trigger to the flow.
-
Trigger the flow if the payment is overdue by 3 days. In the trigger, select the Condition as follows:
Purchase
invoiceDueDate was 3 days ago
paid is False
-
Send a message to the end user reminding them that the payment is overdue by 3 days. Add a WhatsApp element.
- In the WhatsApp element, disable Use messages.
- In the From field, select the sender
- In the Type field, select Template.
- In the Template field, select debt_collection_payment_3_days_ago.
- In the Placeholder mapping field, add placeholders where necessary.
-
Add another Date or time trigger to the flow.
-
Trigger the flow if the payment is overdue by 6 days. In the trigger, select the Condition as follows:
Purchase
invoiceDueDate was 6 days ago
paid is False
-
Send a message to the end user reminding them that the payment is overdue by 6 days. Add a WhatsApp element.
- In the WhatsApp element, disable Use messages.
- In the From field, select the sender
- In the Type field, select Template.
- In the Template field, select debt_collection_payment_6_days_ago.
- In the Placeholder mapping field, add placeholders where necessary.
-
Add another Date or time trigger to the flow.
-
Trigger the flow if the payment is overdue by 60 days. In the trigger, select the Condition as follows:
Purchase
invoiceDueDate was 60 days ago
paid is False
-
Send a message to the end user reminding them that the payment is overdue by 60 days. Add a WhatsApp element.
- In the WhatsApp element, disable Use messages.
- In the From field, select the sender
- In the Type field, select Template.
- In the Template field, select debt_collection_payment_60_days_ago.
- In the Placeholder mapping field, add placeholders where necessary.
The flow should be similar to the following image:
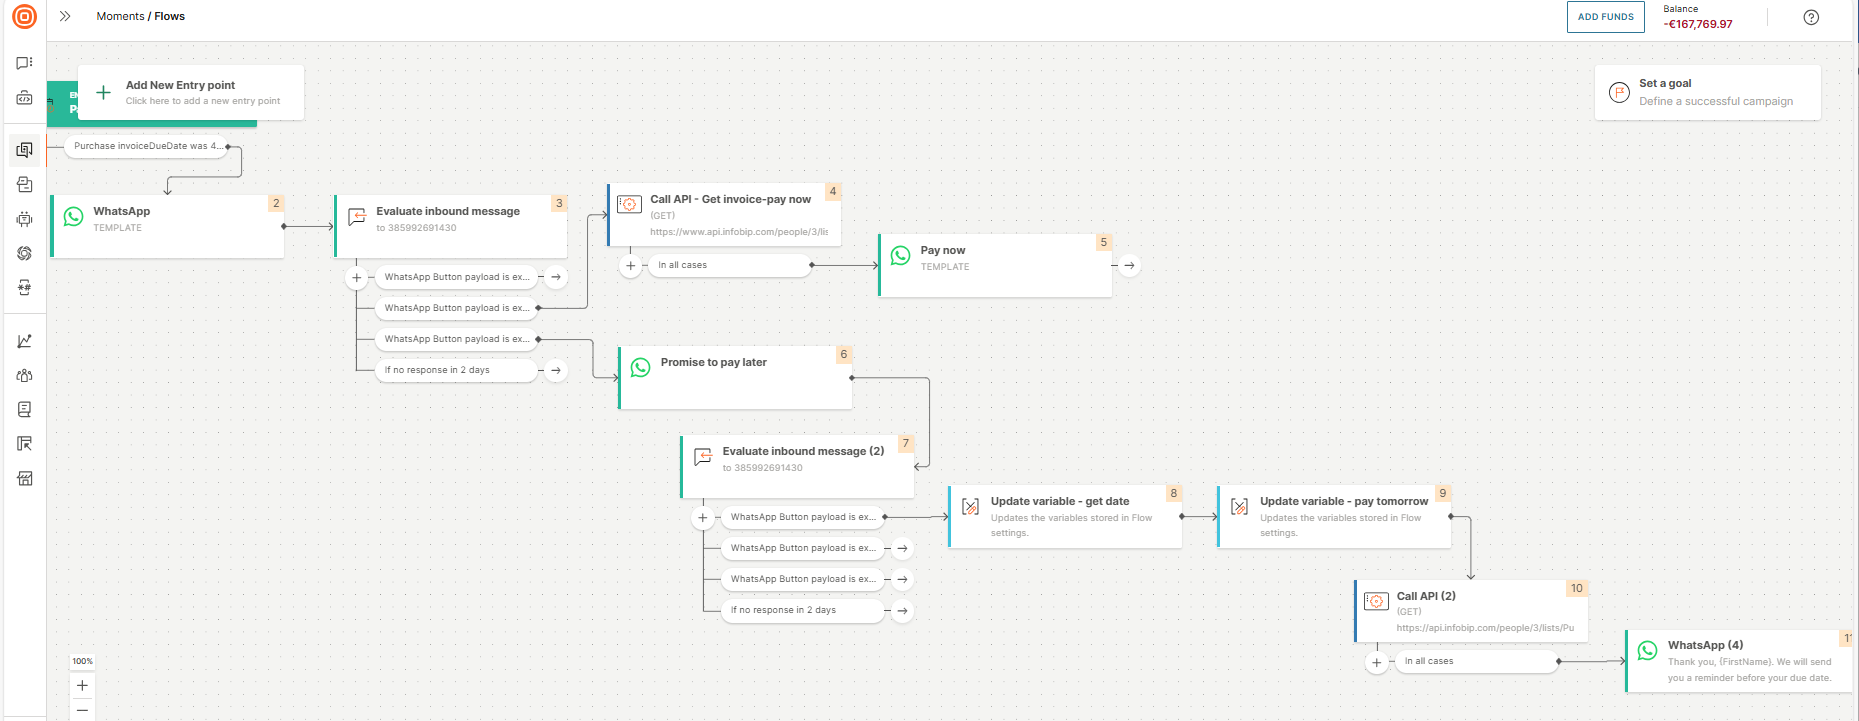
Create a flow for end user to pay later (Promise to pay)
When the payment is overdue by 45 days, offer end users the following options:
- Pay immediately
- Pay the next day
- Pay in 7 days
- Pay in 14 days
Do the following:
-
On the Infobip web interface, go to Moments > Flows.
-
Select Create flow > Start from scratch > Trigger > Date or time.
-
Trigger the flow when the payment is overdue by 45 days. In the Date or time element, select the Condition as follows:
Purchase
invoiceDueDate was 45 days ago
paid is False
-
Add a WhatsApp element.
- In the WhatsApp element, disable Use messages.
- In the From field, select the sender
- In the Type field, select Template.
- In the Template field, select debt_collection_payment_6_days_ago.
- In the Placeholder mapping field, add placeholders where necessary.
-
Add an Evaluate inbound message element.
-
In the Evaluate inbound message element, select WhatsApp as the channel.
-
In the WhatsApp channel, select the same sender that you used in the WhatsApp element for sending the invoice.
-
Offer end users options to chat with an agent, pay immediately, or pay later.
Add the conditions as follows:
Button payload is exact match to chat
Button payload is exact match to pay_now
Button payload is exact match to not_now
-
If the end user selected the option to pay immediately, send them the invoice with the payment option.
In the WhatsApp button payload is exact match pay_now branch of the Evaluate inbound message element, do the following:
-
Add a Call API element that calls an API to get details about the purchase from People.
-
Configure the Call API element as follows:
-
In the Request tab > Request URL field, enter the following:
https://www.api.infobip.com/people/3/lists?listNames=Purchase&type=PHONE&identifier={Msisdn} -
In the Method field, select Get.
-
Add your API key in the Header field.
-
In the Response tab, enable Wait until response is received.
-
Save the invoice link, which you get as the response from the API, in Flow variables. You can use these variables later in the flow.
In the Response Body Variable section, select Variable and map the JSON path to the Flow variable.
JSON path: $.Purchase[0].invoiceLink
Flow variable: invoiceLink
-
-
Add a WhatsApp element.
- In the WhatsApp element, disable Use messages.
- In the From field, select the sender
- In the Type field, select Template.
- In the Template field, select debt_collection_pay_now.
- In the Placeholder mapping field, add placeholders where necessary.
-
-
If the end user selected the option to pay immediately, send them the invoice with the option to pay at a later date.
In the WhatsApp button payload is exact match not_now branch of the Evaluate inbound message element, add a WhatsApp element.
-
In the WhatsApp element, do the following:
- Enable Use messages.
- Select Promise to pay - not now.
-
Add an Evaluate inbound message element.
-
In the Evaluate inbound message element, select WhatsApp as the channel.
-
In the WhatsApp channel, select the same sender that you used in the WhatsApp element for sending the invoice.
-
Offer end users multiple options to pay at a later date. Add the conditions as follows:
Button payload is exact match to Tomorrow
Button payload is exact match to 7days
Button payload is exact match to 14days
-
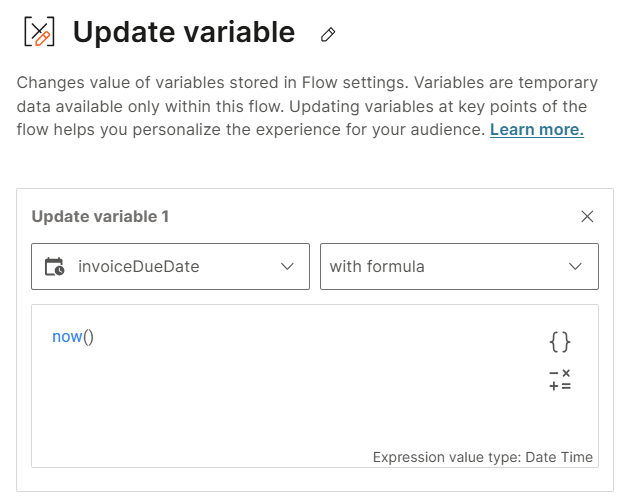
Create a Flow variable, invoiceDueDate of Type Date Time.
-
For each branch in the Evaluate inbound message element, do the following:
-
Add an Update variable element.
-
In the Update variable element, select Variable.
-
Configure the variable as follows:
invoiceDueDate
with formula
now()
-
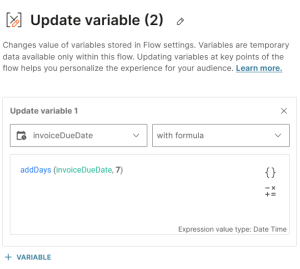
Add another Update variable element.
-
In the Update variable element, select Variable.
-
Configure the variable as follows:
invoiceDueDate
with formula
addDays (invoiceDueDate, n)
where
n = 1 for the Tomorrow branch, 7 for the 7days branch, and 14 for the 14days branch.
invoiceDueDate is the flow variable. Make sure to select this flow variable by using the Placeholders icon. Do not enter it manually.
-
Add a Call API element.
-
In the Call API element > Request tab > Request URL field, enter the following:
https://api.infobip.com/people/3/lists/Purchase/items/{itemId}?type=PHONE&identifier={Msisdn} -
In the Method field, select Patch.
-
Add your API key in the Header field.
-
In the Response tab, enable Wait until response is received.
-
Save the invoice due date, which you get as the response from the API, in Flow variables. You can use these variables later in the flow.In the Response Body Variable section, select Variable and map the JSON path to the Flow variable.
JSON path: $.Purchase[0].invoiceDueDate
Flow variable: invoiceDueDate
-
Add a WhatsApp element.
-
In the WhatsApp element, disable Use messages.
-
In the From field, select the sender that you used to send the invoice.
-
In the Type field, select Text.
-
In the Content field, enter the following:
Thank you, {FirstName}.
We will send you a reminder before your due date.
-
-
The following image shows a part of the flow:
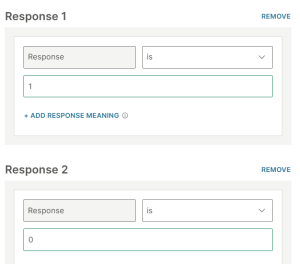
Create a flow to send reminders over IVR
When the payment is overdue by 90 days, call the end user to remind them of the payment.
-
On the Infobip web interface, go to Moments > Flows.
-
Select Create flow > Start from scratch > Trigger > Date or time.
-
In the Date or time element, select the Condition as follows:
Purchase
invoiceDueDate was 90 days ago
paid is False
-
Add a Start outgoing call element.
- In the From field, select the number from which the call needs to be initiated.
-
Offer the end user the option to pay immediately or to speak to a live agent.
In the Call answered branch of the Start outgoing call element, add a Play element.
-
In the Text-to-speech tab > Content field, enter the following:
Hello {FirstName}, I am calling you from My business. Our records indicate that your account has an open debt.
To make a payment now, press 1; to speak with an agent press 0.
-
In the Voice field, select a persona.
-
-
Get the response from the end user. In the Audio is played branch of the Play element, add a Collect element.
-
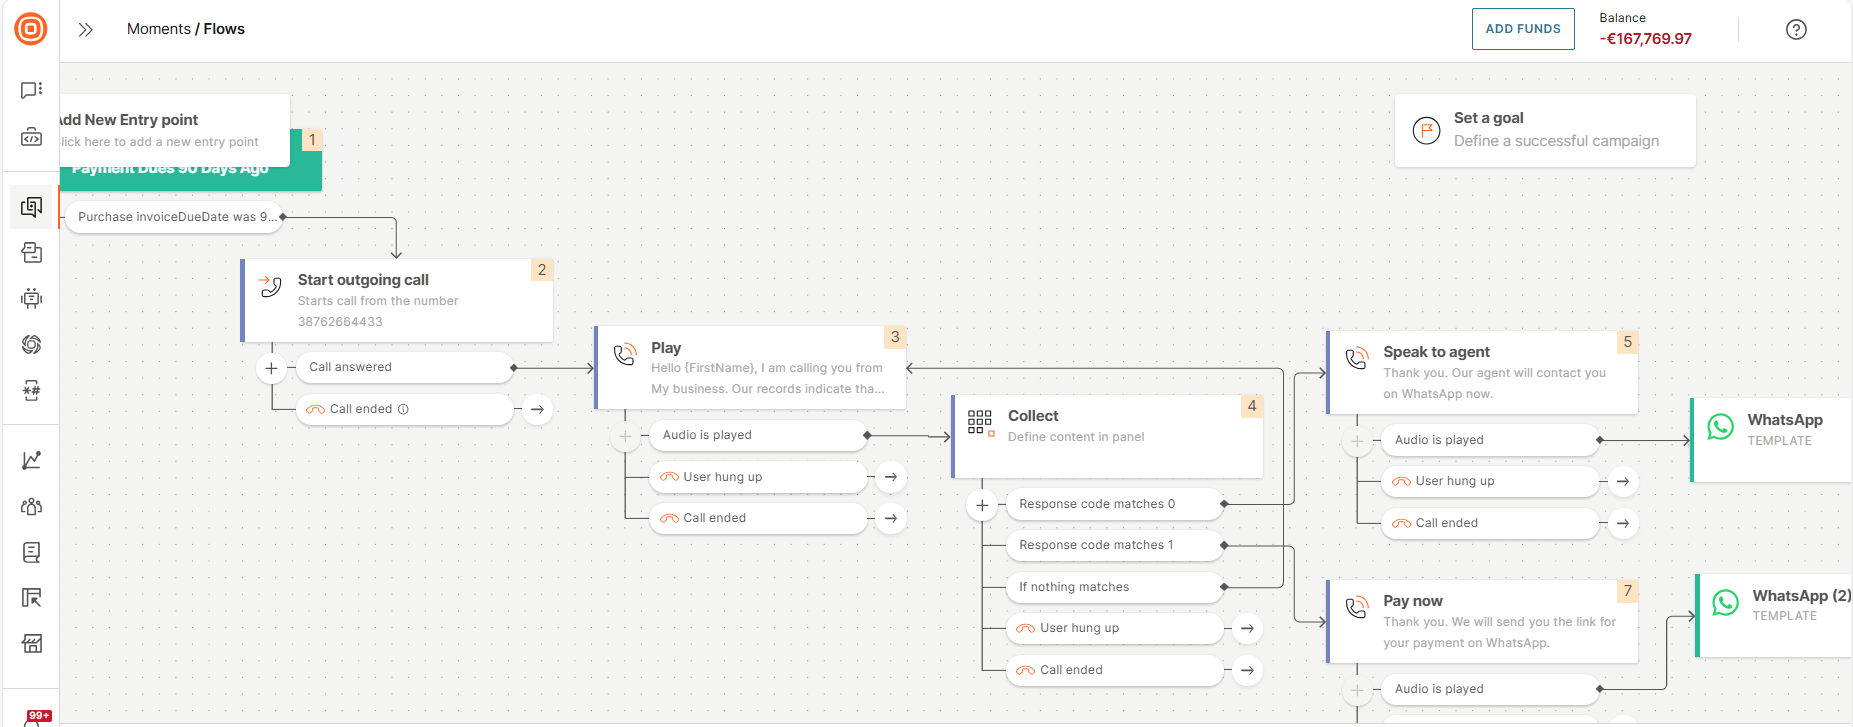
Configure the responses as follows:
Response is 0
Response is 1
-
In the Response settings section, Maximum number of digits field, select 1.
-
In the Waiting time (seconds) field, select 5.
-
-
If the end user does not select an option, replay the message. In the If nothing matches branch of the Collect element, route the flow back to the Play element.
-
If the end user chooses to speak to a live agent, send them a confirmation through a voice message. In the Response code matches 0 branch of the Collect element, do the following:
-
Add a Play element.
-
In the Text-to-speech tab > Content field, enter the following:
Thank you. Our agent will contact you on WhatsApp now.
-
In the Voice field, select a persona.
-
-
Add a WhatsApp element.
- Disable Use messages.
- In the From field, select the sender
- In the Type field, select Template.
- In the Template field, select transfer_ivr_agent.
- In the Placeholder mapping field, add placeholders where necessary.
-
-
If the end user chooses to pay immediately, send them the payment options. In the Response code matches 1 branch of the Collect element, do the following:
-
Add a Play element.
-
In the Text-to-speech tab > Content field, enter the following:
Thank you. We will send you the link for your payment on WhatsApp.
-
In the Voice field, select a persona.
-
-
Add a WhatsApp element.
- Disable Use messages.
- In the From field, select the sender
- In the Type field, select Template.
- In the Template field, select transfer_ivr_answers_invoice.
- In the Placeholder mapping field, add placeholders where necessary.
-
-
Complete the flow as required.
The flow should be similar to the following image:
Create a chatbot to offer payment options to end users
Create a chatbot that does the following:
- Provides the option for end users to change their payment method.
- Enables end users to split their payment into multiple installments.
- Provide flexible refinancing options or debt extension directly through the chatbot.
- Enables end users to contact a human agent for assistance in managing the payment.
Create the chatbot
- On the Infobip web interface, go to Answers (opens in a new tab).
- Create a new chatbot and add the dialogs as shown in the following sections.
Follow the instructions in each section sequentially.
Create a dialog to show payment options
Offer various payment options to the end users. Also, offer the option for the end user to contact your business to discuss details.
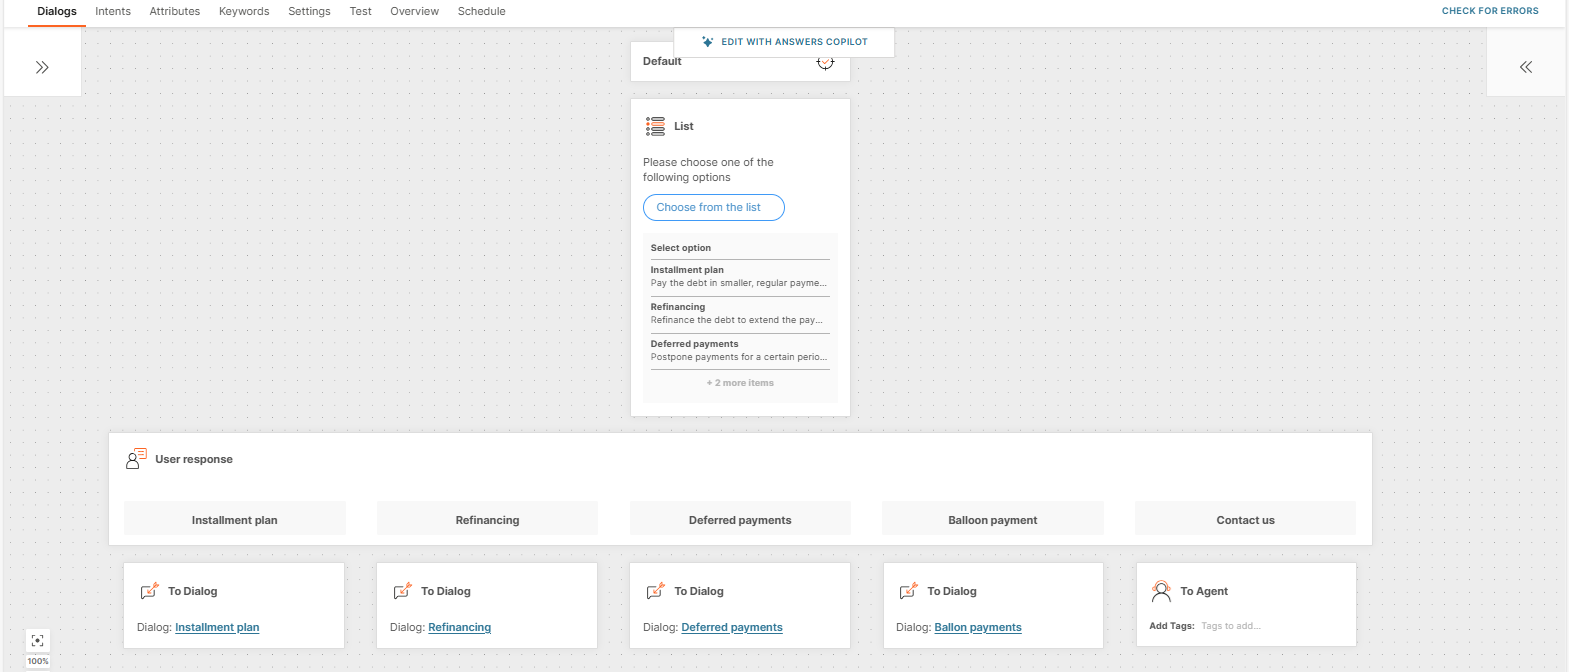
In the Default dialog, do the following:
-
Show the payment options to the end user.
-
Add a List element that contains the payment options.
-
Configure the element as follows:
-
Body text: Ask the end user to select options.
Example: Please choose one of the following options.
-
List button text: Add the text to display on the button.
Example: Choose from the list.
-
Section title: Example: Select option.
-
-
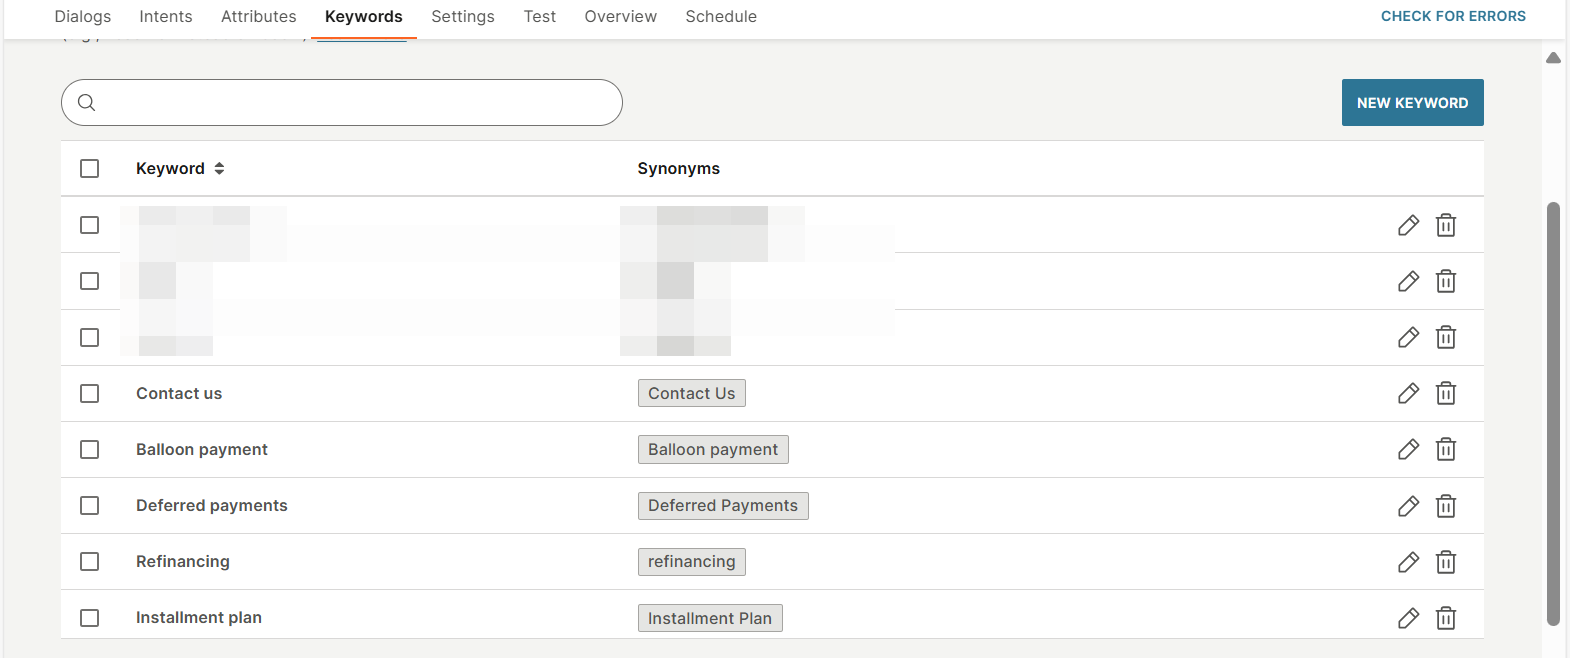
Add the following list items for the payment options.
Item title Item description Postback Installment plan Pay the debt in smaller, regular payments Installment plan Refinancing Refinance the debt to extend the payment period Refinancing Deferred payments Postpone payments for a certain period. Interest rate is applied Deferred payments Balloon Payment Make small payments and pay the remaining balance at the end Balloon Payment Contact us Get in touch to discuss your options Contact us
-
-
For each payment option (list item), the chatbot needs to route the end user to the correct path.
-
Create the following empty dialogs:
- Installment plan
- Refinancing
- Deferred payments
- Balloon payment
- Contact us
-
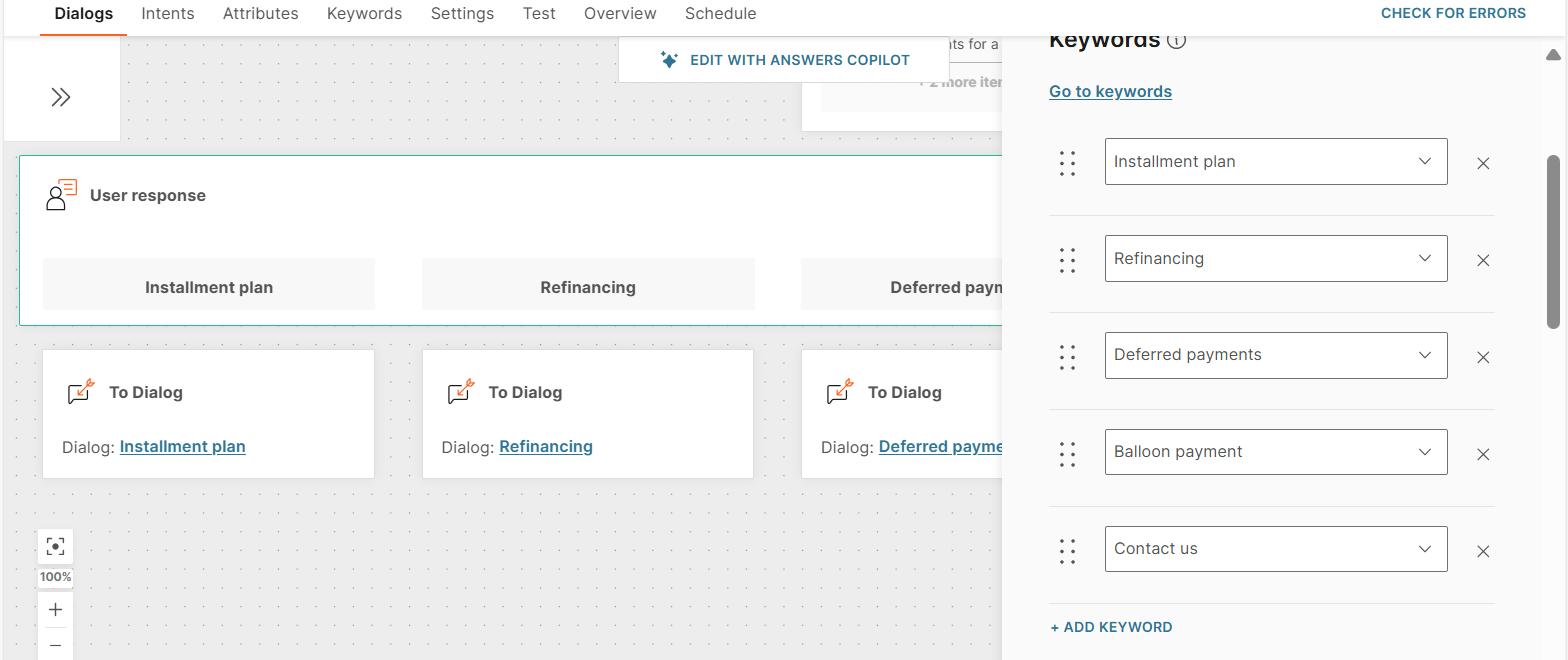
Create the following keywords to route the end user to these dialogs:
- Installment plan
- Refinancing
- Deferred payments
- Balloon payment
- Contact us
-
Add a User response element to route the end user to these dialogs. Use the keywords that you created.
-
Create an empty Fallback dialog to use as a fallback option for the User response element.
-
The dialog should look as shown in the following image.
Create an installment plan
Offer installment options to the end user. Based on their selection and their purchase information, create an installment plan and share it with them.
In the Installment plan dialog, do the following:
-
Offer end users the option to pay in 3, 6, or 9 installments.
- Add the Reply buttons element. The end user can select one of the buttons (options).
- Configure the element as follows:
-
Body text: Ask the end user to select the number of installments.
Example: How many installments would you like to use to pay your debt?
-
Add Buttons with 1, 2, and 3 as the button titles.
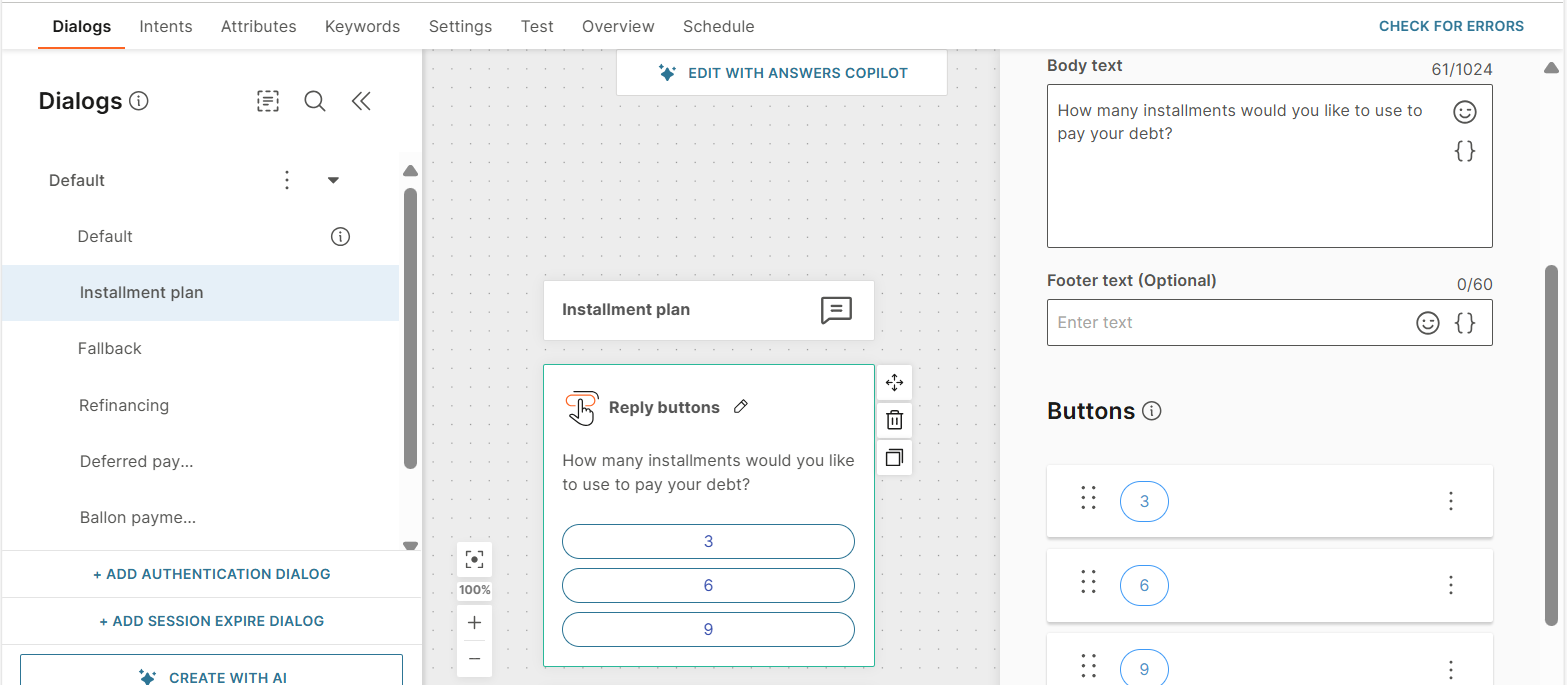
-
-
Save the end user's response from the Reply button in an attribute.
-
Create a Text attribute, installments, to save the end user's response.
-
Add a Save user response element and add the attribute to it.
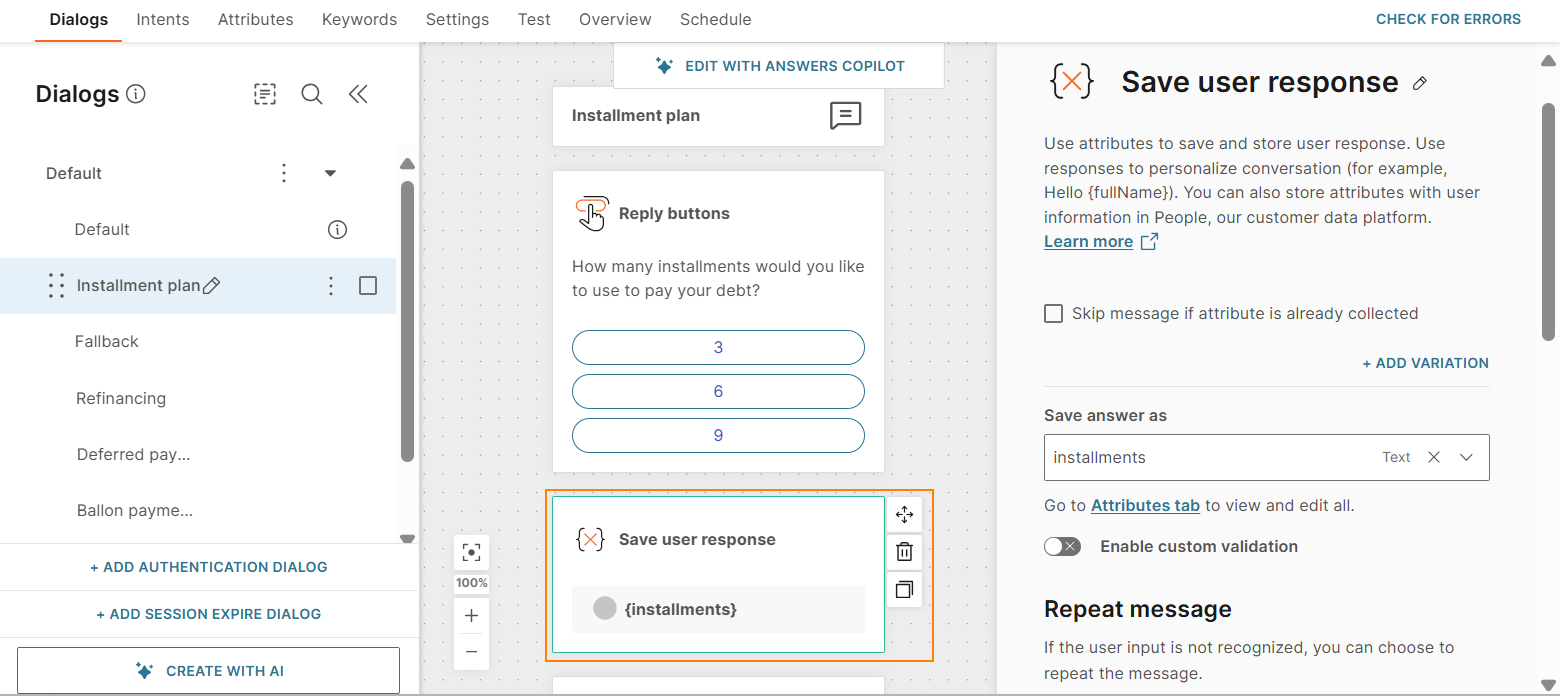
-
-
Pass the attribute value to the API. Add the Code element with the following code.
var responseString = attributeApi.get('installments');
var response = JSON.parse(responseString);
var installments = response.payload;
attributeApi.set('installments', installments);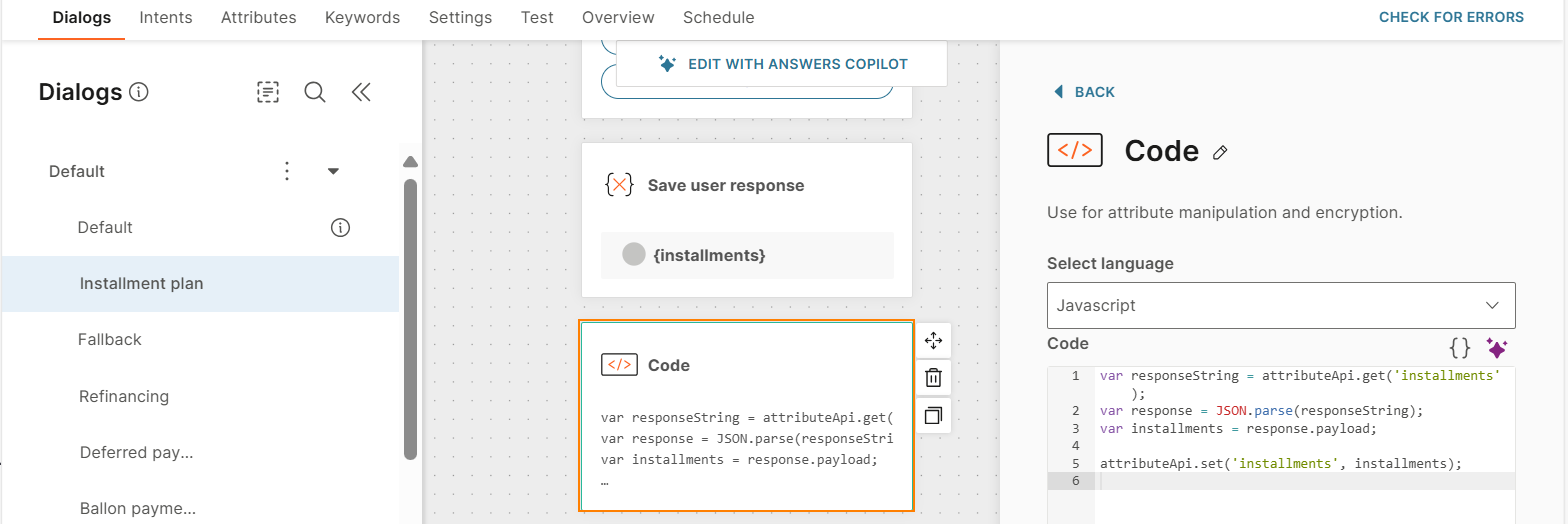
-
Get the purchase details from the end user's profile in People.
-
Create a List attribute, Purchase.
-
Add the People profile element.
-
Configure the element as follows:
- Select action: Select Get information.
- Contact information attribute: Select {endUserDestination}.
- Map the List attribute to the attribute in People that contains the purchase information.
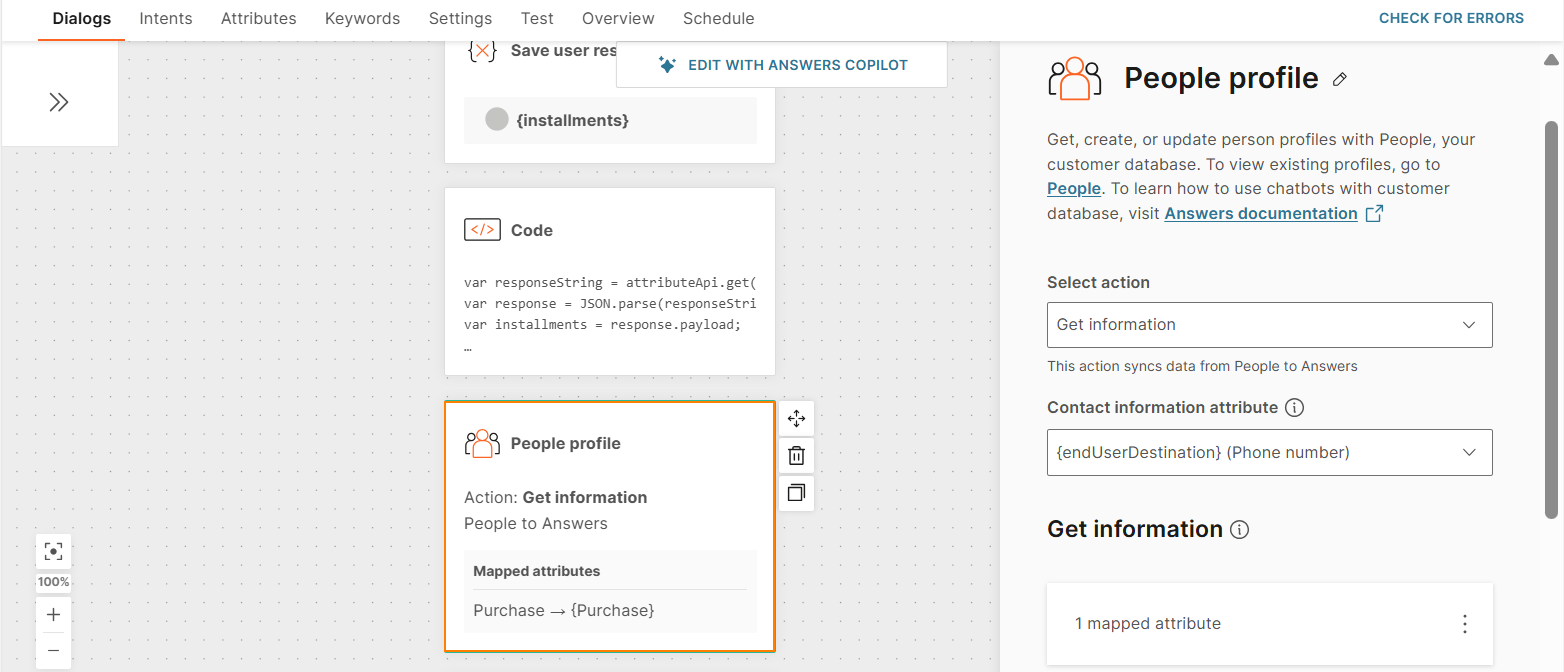
-
Create a Text attribute, amount, to save the purchase amount obtained from the end user's profile.
-
Get the purchase amount from the end user's profile. Add a Code element with the following code:
var response = attributeApi.get('Purchase');
var amount = response[0].amount;
attributeApi.set('amount', amount);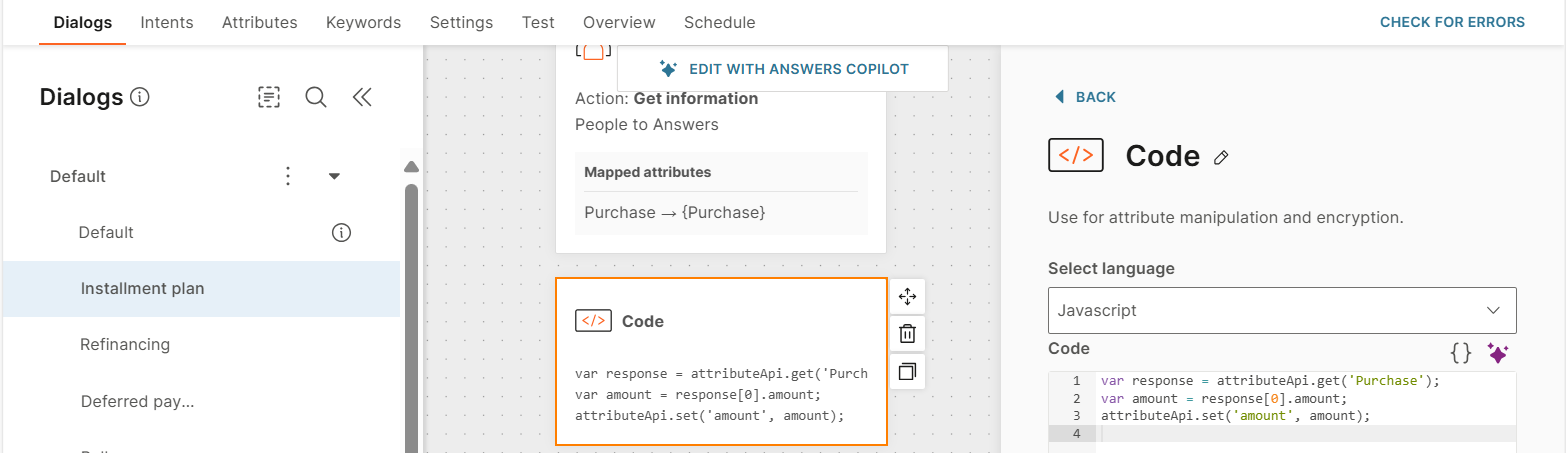
-
-
Use the information from People to create an installment plan. Share it with the end user.
-
Add a Text element to introduce the payment plan.
Example: To assist with the payment of your debt, we propose a plan that allows you to pay the amount of {amount} in {installments} equal installments. This will give you the flexibility to manage your payments over a period.
-
Create a Text attribute, paymentPlan, to save the payment plan.
-
Create a structured payment plan. Add the Code element with the following code:
function generatePaymentPlan(amount, installments) { if (installments <= 0) { return "Installments must be greater than 0"; } const installmentAmount = (amount / installments).toFixed(2); const paymentPlan = []; const today = new Date(); // Function to get the correct ordinal suffix (st, nd, rd, th) function getOrdinalSuffix(number) { if (number > 3 && number < 21) return 'th';// Handle 11th, 12th, 13th, etc. switch (number % 10) { case 1: return 'st'; case 2: return 'nd'; case 3: return 'rd'; default: return 'th'; } } // Generate installment details for (let i = 1; i <= installments; i++) { const dueDate = new Date(today.getFullYear(), today.getMonth() + i, 15);// Set due date to the 15th of each month paymentPlan.push({ installment: i, amount: `$${installmentAmount}`, dueDate: dueDate.toLocaleDateString('en-US', { month: 'long', day: 'numeric', year: 'numeric' }) }); } // Construct the output message let planDetails = `Total Debt: $${amount.toFixed(2)}\n\n`; paymentPlan.forEach((plan, index) => { const suffix = getOrdinalSuffix(plan.installment); if (index === installments - 1) { planDetails += `Final Installment: ${plan.amount} due on ${plan.dueDate}\n\n`; } else { planDetails += `${plan.installment}${suffix} Installment: ${plan.amount} due on ${plan.dueDate}\n`; } }); // planDetails += `Please Confirm, Reject or Change payment option.`; // -
Send the payment plan to the end user. Add a Text element with the {{paymentPlan}} attribute.
-
-
Offer the end user the option to accept, reject. or modify the proposed payment plan.
-
Add the Reply buttons element. The end user can select one of the buttons (options).
-
Configure the element as follows:
-
Body text: Offer options to the end user.
Example: Please Confirm, Reject or Change payment option.
-
Add Buttons with the following button titles - Confirm, Reject, Change options.
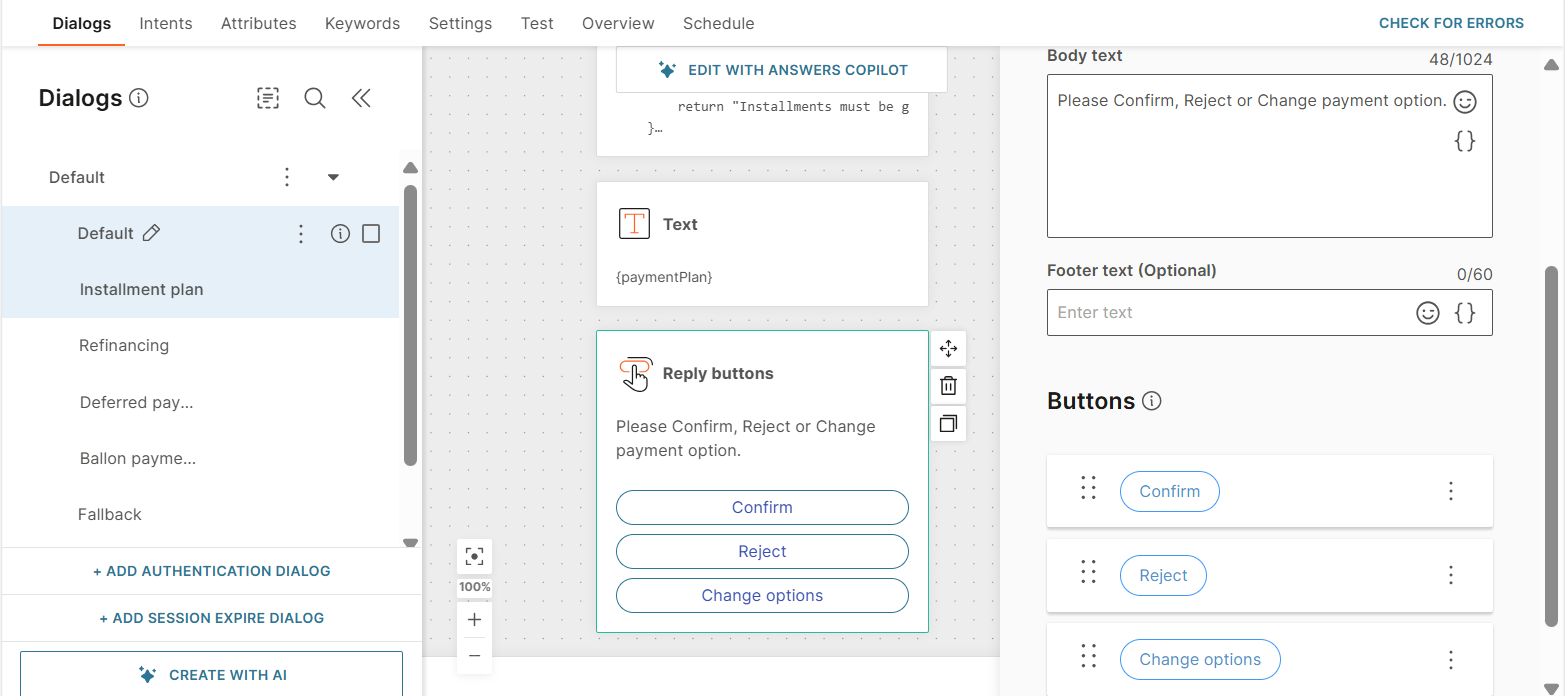
-
-
-
For each of the options in the Reply button element, add the next step.
-
Create the following keywords to route the end user to the relevant step.
- Confirm
- Reject
- Change options
-
Add a User response element to route the end user. Use the keywords that you created.

-
Configure the next steps for each branch in the User response element as follows:
-
In the Confirm branch, add a Text element to thank the end user.
Example: Thank you for confirming!
-
In the Reject branch, redirect the end user to a human agent to discuss the next steps. Add a Text element to inform the end user that they will be redirected to an agent. Add the To agent element.
-
In the Change options branch, redirect the end user to the Installment plan dialog.

-
-
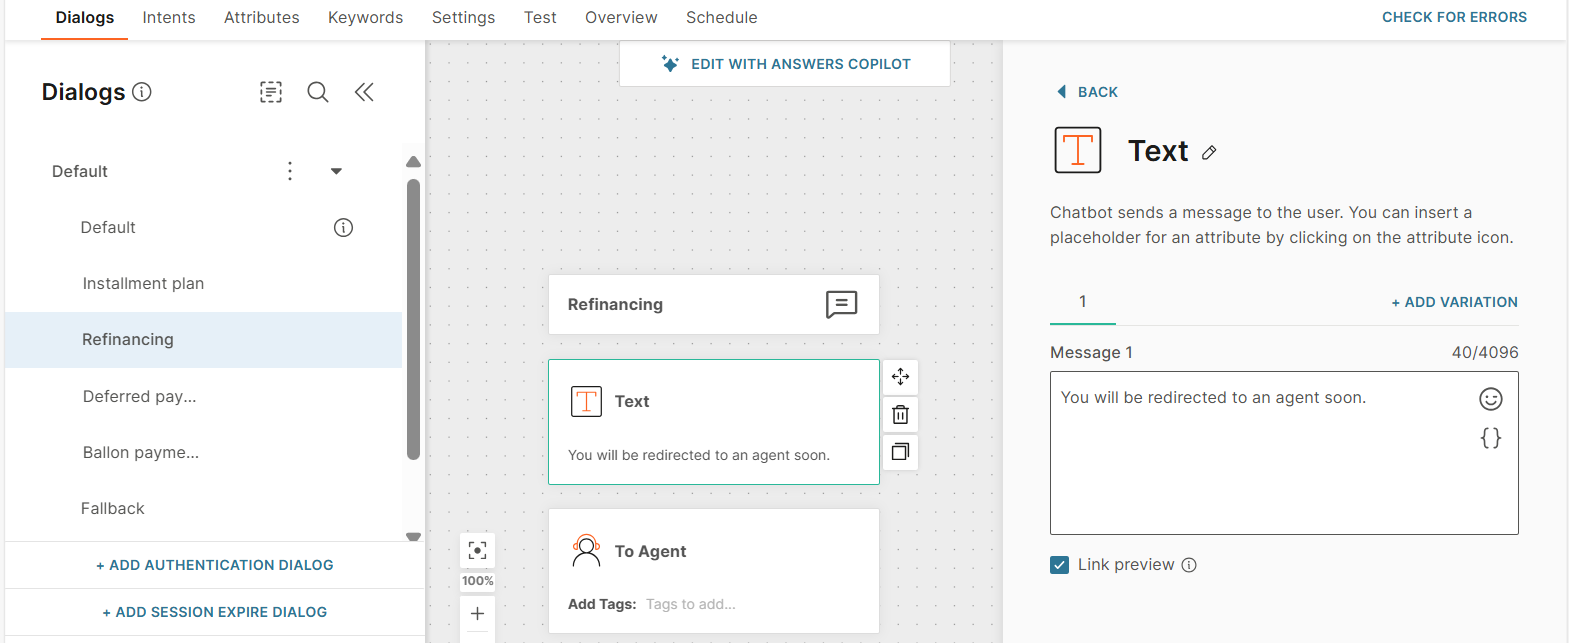
Configure the dialog to offer refinancing options
Offer the end user the option to refinance their debt. In the Refinancing dialog, redirect the end user to a human agent in Conversations to discuss the details.
Do the following:
-
Add a Text element to tell the end user that the chat will be transferred to a human agent.
Example: You will be redirected to an agent soon.
-
Add the To agent element.
The dialog should look as shown in the following image.
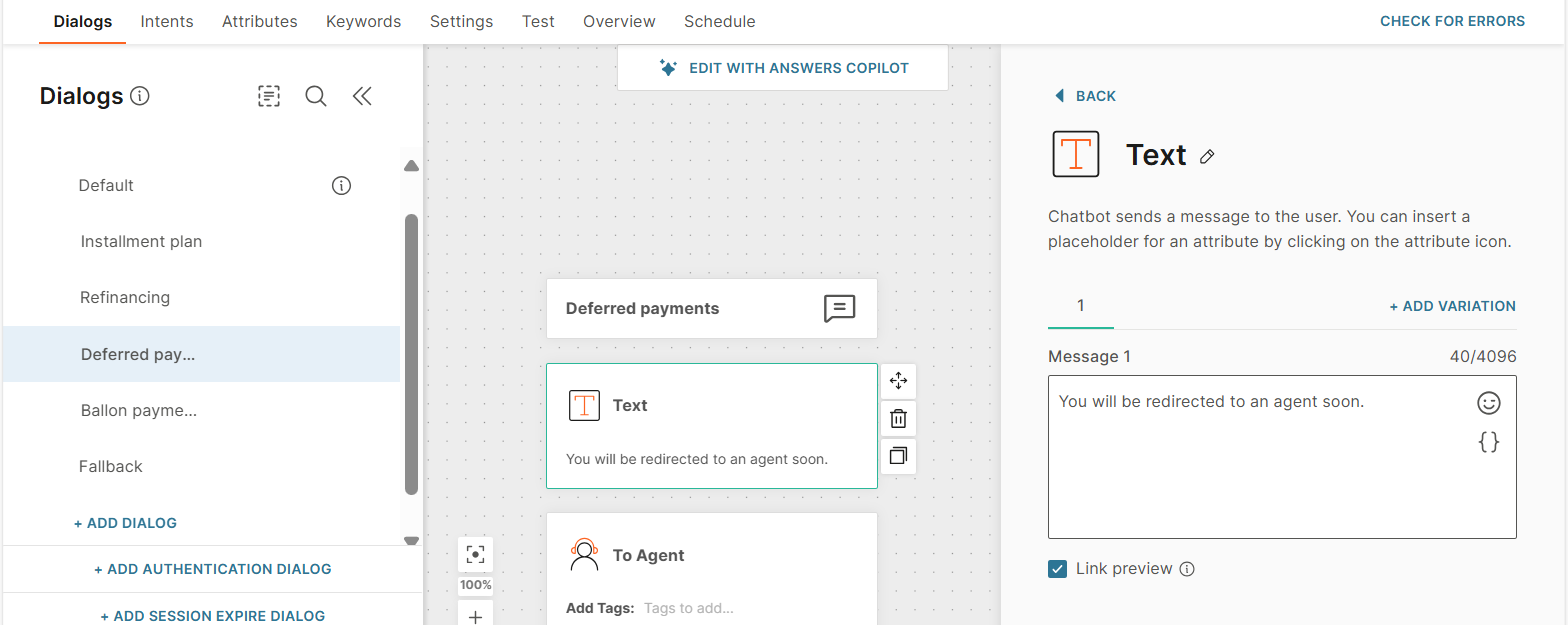
Configure the dialog to postpone the payment
Offer the end user the option to postpone the payment. In the Deferred payments dialog, redirect the end user to a human agent in Conversations to discuss the details.
Do the following:
-
Add a Text element to tell the end user that the chat will be transferred to a human agent.
Example: You will be redirected to an agent soon.
-
Add the To agent element.
The dialog should look as shown in the following image.
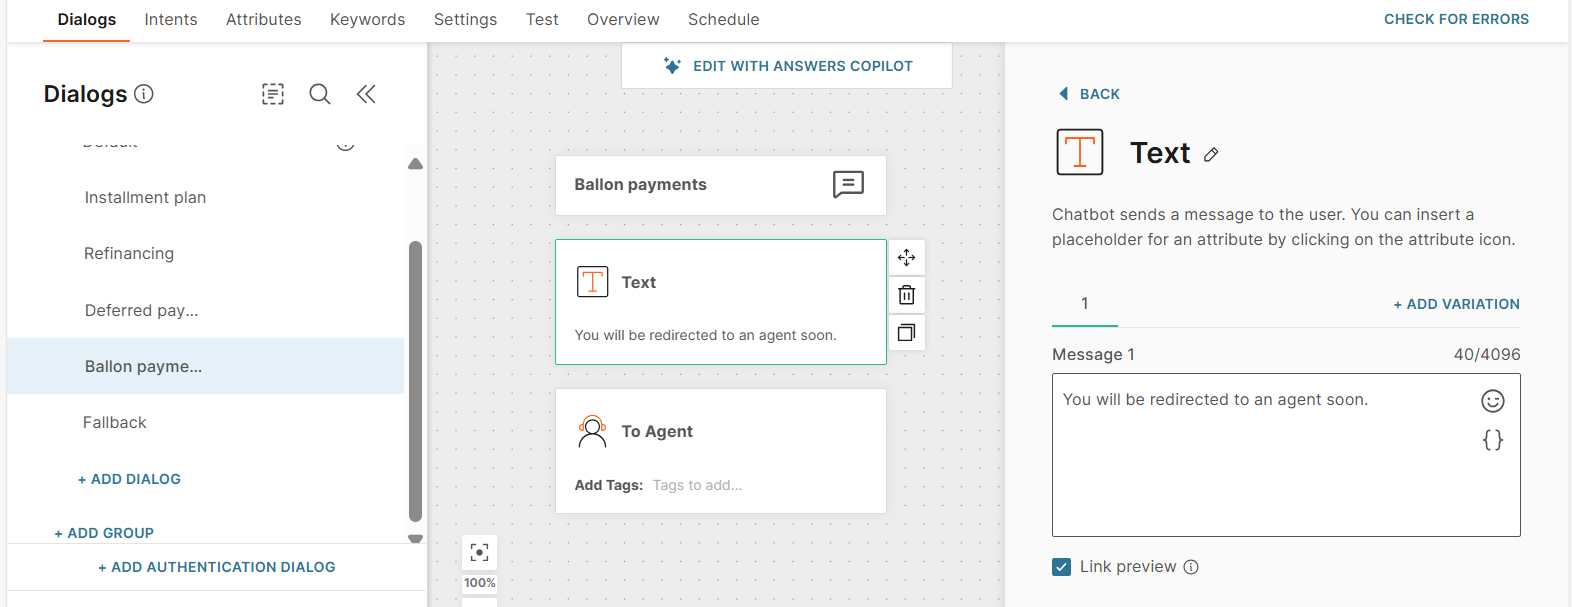
Configure the dialog for balloon payment
Offer the end user the option to make balloon payment. A balloon payment consists of a set of small monthly payments followed by a big final payment.
In the Balloon payments dialog, redirect the end user to a human agent in Conversations to discuss the details.
Do the following:
-
Add a Text element to tell the end user that the chat will be transferred to a human agent.
Example: You will be redirected to an agent soon.
-
Add the To agent element.
The dialog should look as shown in the following image.
Configure the Fallback dialog
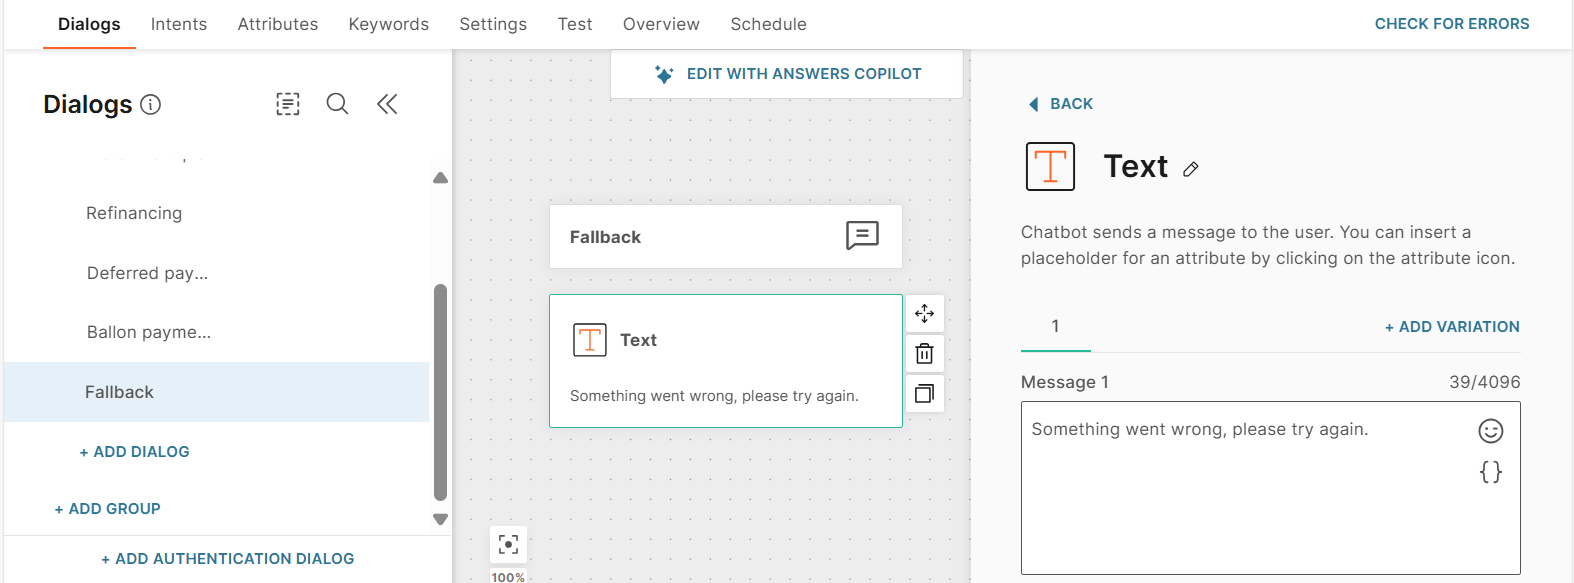
In the Fallback dialog, add a Text element with the following content: Something went wrong, please try again.
Use this dialog in all elements that need a fallback.
Synchronize your audience to People
To fully automate the process, synchronize your audience to People.