Journey editor
Editor overview [#editor-overview]
The Journey editor is the interface used to build and configure journeys. It provides a visual canvas where you can add and connect journey elements, configure settings, and manage the journey.
How to access the editor [#access-editor]
Existing journey:
- Go to the Journeys page.
- Select the journey you want to open.
- The journey opens in the editor.
New journey:
- When you create a new journey, the editor opens automatically.
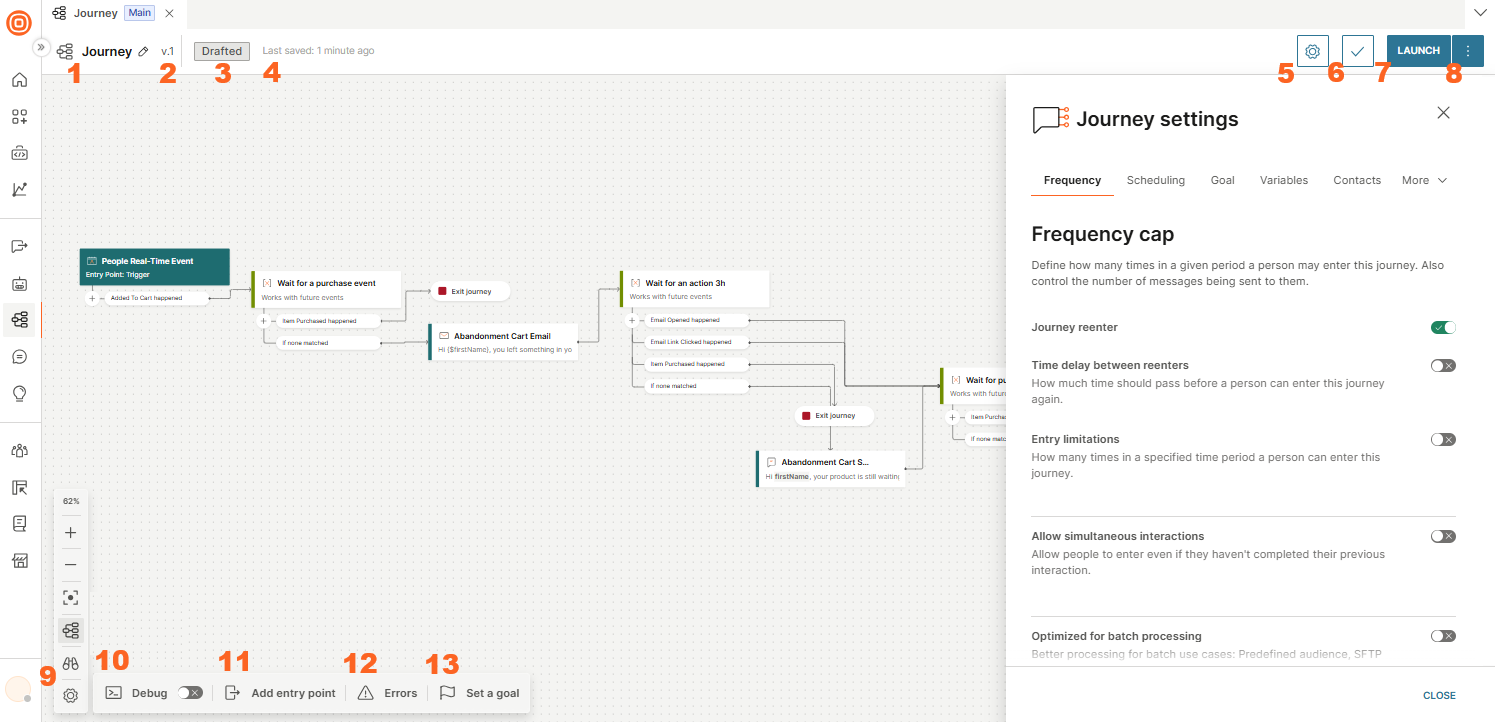
The numbers shown in the image correspond to specific areas of the editor interface, outlined below.
Structure of the editor [#editor-structure]
The editor consists of the following areas.
Header [#header]
The header bar at the top of the editor shows:
| Element | Description |
|---|---|
| 1. Journey name | The editable name of the journey. Select the pencil icon to rename. |
| 2. Version | The current version number (for example, v.1). |
| 3. Status badge | The current journey status (for example, Drafted, Active). |
| 4. Last saved | Timestamp showing when the journey was last saved. |
| 5. Settings (gear icon) | Opens the Journey settings side panel. |
| 6. Validate (checkmark icon) | Validates the journey configuration before launch. |
| 7. Launch | Launches the journey. See saving and publishing. |
| 8. Three-dot menu (⋮) | Additional actions. See Editor actions. |
Editor actions [#editor-actions]
The three-dot menu in the header provides the following actions:
- Duplicate: Create a copy of the journey.
- Delete: Delete the journey (Drafted journeys only).
- Save as template: Save the journey as a custom template.
- Copy to another account: Copy the journey to a different Infobip account.
- Export: Export the journey.
Canvas [#canvas]
The main workspace where you add and arrange journey elements to design the flow. See canvas navigation for zoom controls, connection line styles, and enhanced controls.
Side panel [#side-panel]
Opens on the right when you select an element or open journey settings. Shows configuration options for the selected item. See configuring elements.
Footer bar [#footer-bar]
The footer bar at the bottom of the editor contains the following controls:
| Control | Description |
|---|---|
| 9. Settings (gear icon) | Opens canvas controls: Enhanced controls toggle and Connection line style (Bezier or Stepped). |
| 10. Debug | Toggle debug mode on or off. |
| 11. Add entry point | Add an entry point to the journey. |
| 12. Errors | Shows the number of validation errors. Select to view error details. |
| 13. Set a goal | Open the Goal settings. |
Journey settings panel [#journey-settings-panel]
Select the Settings gear icon in the header to open the Journey settings side panel. The panel has the following tabs:
| Tab | Description |
|---|---|
| Frequency | Configure frequency cap settings (journey reenter, time delay, entry limitations, simultaneous interactions, batch processing). |
| Scheduling | Configure scheduling (journey start, stop, time zone). |
| Goal | Set a goal event to track journey performance. |
| Variables | Create and manage journey variables. |
| More | Additional settings: Shared message history (share message history with Conversations agents) and Tags (add campaign tags to the journey). |