Test your agent (Quality center)
Test your AI agents to verify their behavior and performance.
To access testing, go to AI agents > Quality center.
You can test agents in the following ways:
- Manual testing: Send messages and view responses immediately. For more information, refer to Send test messages manually.
- Automated testing: Create test groups with multiple test cases and run them in sequence. For more information, refer to Automated testing workflow.
Manual testing
Test your agent by sending messages and viewing responses immediately. Use this option for quick testing and debugging.
Send messages
-
On the AI agents > Agents page, open the agent that you want to test.
-
Select Preview.
The Chat & traces window opens.
-
Do the following:
- Send messages to test the agent's behavior in a conversation.
- (Optional) In End user destination, configure test phone numbers to simulate end user interactions.
The agent responds to the messages.
Review the test results
After sending test messages, do the following:
- Check the conversation: Verify that the agent responses match your expectations.
- View processing details: In the right panel, view the processing details. This includes the timestamp of each event, the request sent to the LLM, the response from the LLM, and the result. You can use either Timeline or Tree views.
- Save useful conversations (Optional): Select Save conversation to save this conversation for reuse in test cases. Saved conversations can be added to test groups for automated testing. For more information, refer to Add saved conversations to a test group.
Automated testing
Use the Quality center to create test groups with multiple test cases and run them in sequence.
Quality center page
The Quality center enables you to test AI agents by running automated tests.
To access Quality center, go to AI agents > Quality center.

On this page, you can do the following:
-
Search: Search for test groups by name by using the search box
-
Filter: Filter test groups by agent or date by selecting the Filter icon
-
Create test groups: Create new test groups by selecting Create test group
-
View test groups: View a list of test groups. For each test group, you can view the following information:
- Test group: Name of the test group
- AI agents: The AI agent associated with the test group
- Test cases: Number of test cases in the group
- Last run: Date and time of the most recent test run
For each test group, you can do the following through the menu (three dots):
- Duplicate test group: Create a copy of the test group
- Delete: Remove the test group
Automated testing workflow
To test your agent with test groups, follow these steps:
- Create a test group: Set up a test group for an AI agent.
- Add test cases: Add test cases to the group by creating them manually, importing from CSV, or adding saved conversations.
- Run the test group: Execute the test group one or multiple times to verify consistency.
- View results: Review pass/fail results, compare expected vs actual behavior, and identify issues.
The following sections explain each step in detail.
Create a test group
Test groups organize related test cases. Each test group is associated with one AI agent and can contain multiple test cases. You can create multiple test groups for a single agent.
For guidance on organizing test groups effectively, refer to Best practices for testing.
You can create a new test group either manually or by duplicating an existing test group.
Create a test group manually
- In Quality center, select Create test group.
- In the New test group window, configure the following:
- Agent: Select the agent that you want to test.
- Test group name: Enter a descriptive name for the test group.
- Select Create test group.
You can now add test cases to the group.
Duplicate an existing test group
You can duplicate an existing test group to reuse test cases.
Do the following:
- In the list of test groups, select the menu (three dots) next to the test group.
- Select Duplicate test group.
- In the window that opens, select the required agent.
- Select Duplicate.
Test group page
When you open a test group, the test group page displays all test cases for that group.

On this page, you can do the following:
-
Search: Search for test cases by using the search box
-
Filter: Filter test cases
-
Add test cases: Add new test cases by selecting Add test case
-
View test cases: View a list of test cases. For each test case, you can view the following information:
- User input: The first end user message in the test case
- Conversation turns: Number of messages exchanged between the agent and the end user
For each test case, you can do the following through the menu (three dots):
- Edit: Update the test case
- Duplicate: Create a copy of the test case
- Delete: Remove the test case
Add test cases to a test group
After creating a test group, add test cases to define the expected behavior of your agent. Test cases contain example conversations between the end user and the AI agent.
For guidance on what to include in your test cases, refer to Test case requirements.
You can add test cases in the following ways:
- Manually
- Upload a CSV file that contains the test cases
- Add saved conversations as test cases
Create test cases manually
Create test cases by configuring the conversations manually.
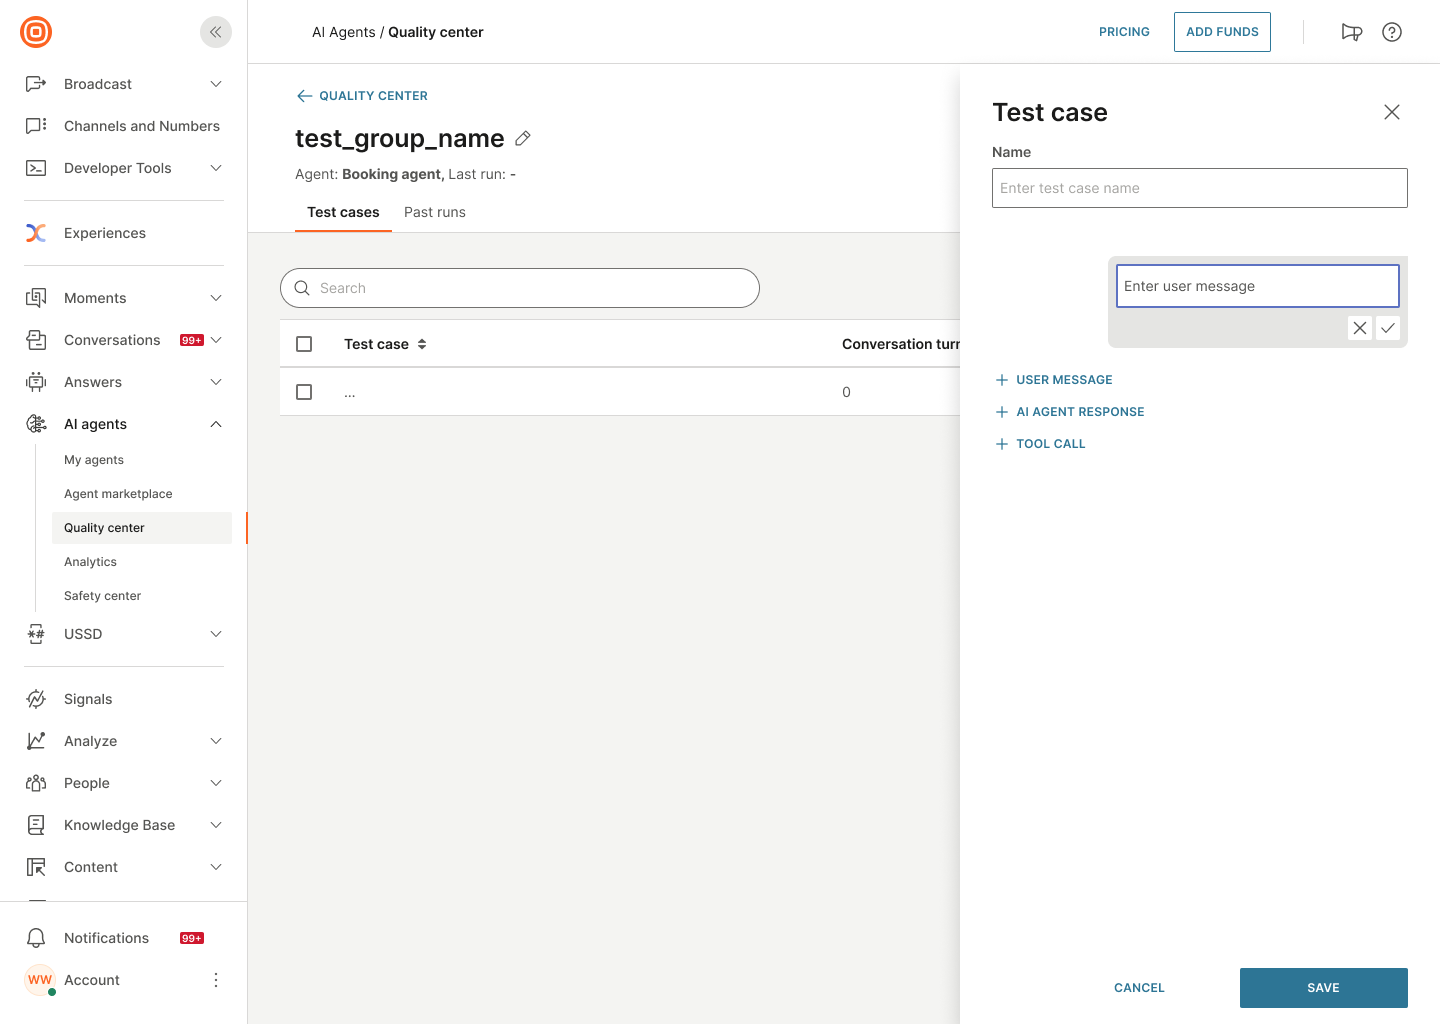
-
In the test group page, select Add test case.
-
In the right-hand panel, enter an example end user message and select the checkmark.
-
Add the expected agent response by doing one or more of the following:
- Enter the agent message manually. Select AI agent response and then select the checkmark.
- Use either a tool or a sub-agent to generate the response. Select Tool call and choose either a tool or an agent from the list.
-
Continue creating the conversation. Add an end user message, then add the expected agent response. Repeat this sequence throughout the conversation.
NoteAvoid adding multiple consecutive agent responses.
-
(Optional) For each message, tool, or sub-agent in the conversation, you can do the following:
- Modify the message or select a different tool or sub-agent: Select the pencil icon.
- Remove the message, tool, or sub-agent: Select the Delete icon.
- Add a new message, tool, or sub-agent below the current one: Select the plus sign (+) and then select the required option.
-
When the test case is complete, select Save.
Import test cases from CSV
Import multiple test cases by using a CSV file.
- In the test group page, select the menu (three dots).
- Select Import from CSV.
- Upload your CSV file.
The test cases from the file are added to the test group.
Add from saved conversations
Use the conversations that you saved during manual testing.
-
In the test group page, select the menu (three dots).
-
Select Add saved conversations.
A window opens with a list of saved conversations.
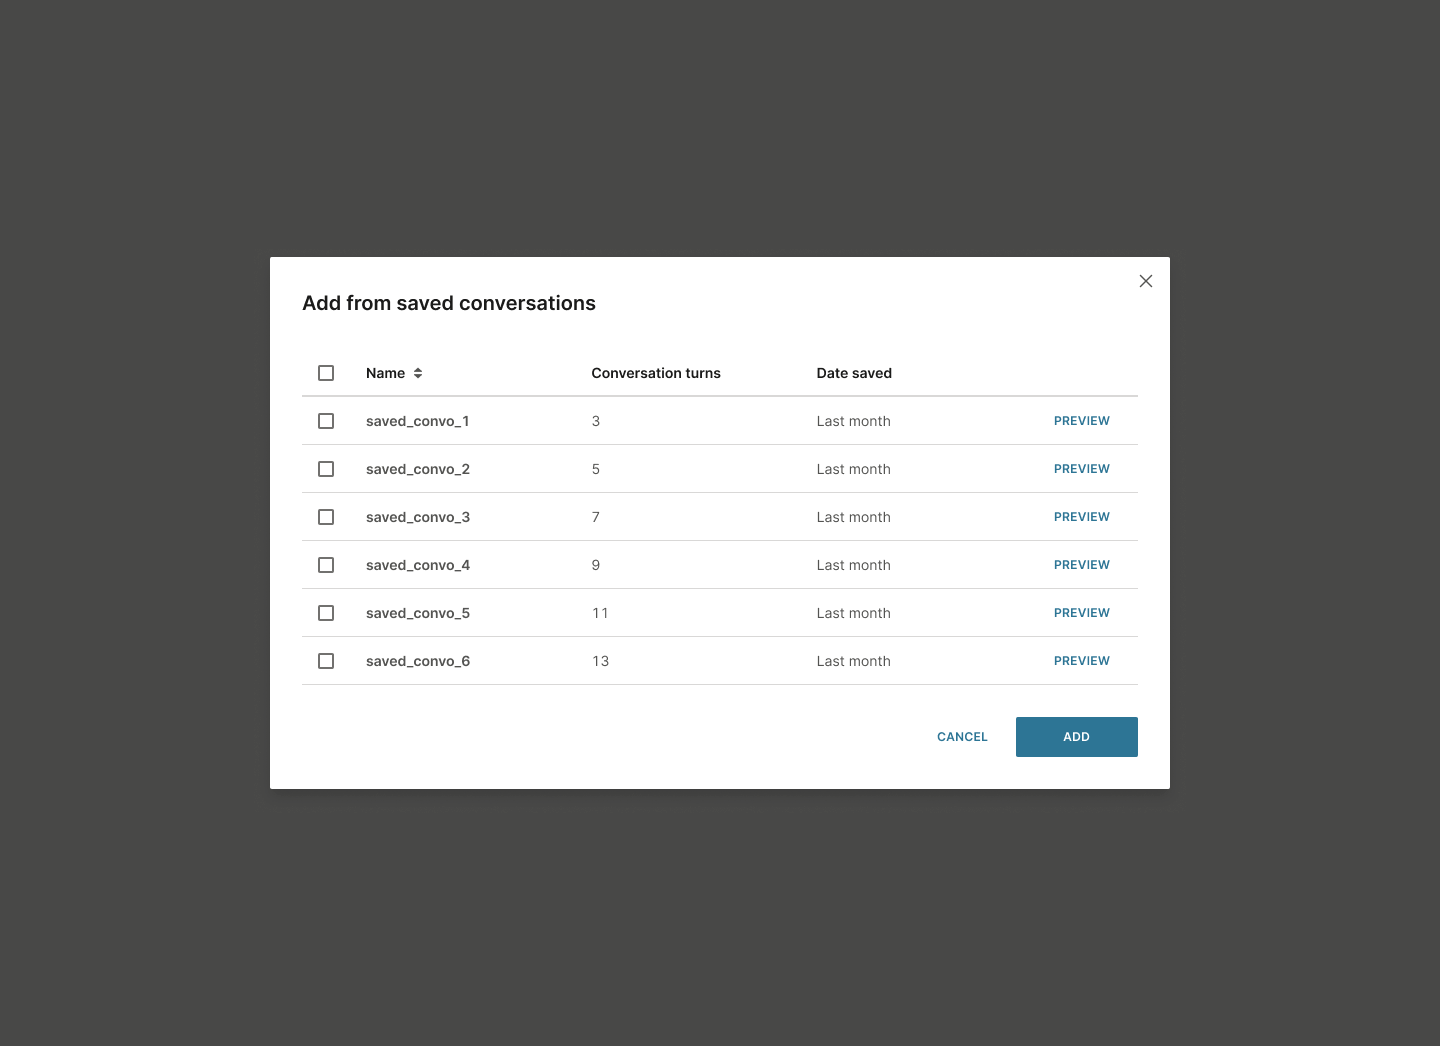
-
Review the available conversations. They show the following information:
- Name: Conversation name
- Conversation turns: Number of messages exchanged between the agent and the end user
- Date saved: Date the conversation was saved
-
Select Preview to view the conversation before adding.
-
Select the required conversations.
-
Select Add.
Each selected conversation is added as a separate test case to the test group.
Run the test cases in a test group
Run the test cases in a test group to validate agent behavior. You can run test cases multiple times to ensure consistency and reliability.
To run the test cases, do the following:
-
Open the test group you want to run.
-
Select Run test group.
-
In the window that opens, configure the following:
-
AI agent version: Specify which agent version you want to test.
-
Number of runs: Specify how many times to run the test group.
You can specify a maximum of 10 runs. The default value is 1.
Why multiple runs?Run tests multiple times to ensure that the agent responses are consistent, reliable, and accurate across different runs.
-
-
Select Run test.
This runs all the test cases in the test group.
While the test runs, you can see a progress indicator showing the current run. Example: 1/5 runs.
When testing completes, select Go to test run to view the results.
Past runs tab
When you go to a test group and select the Runs tab, the Past runs tab displays all test executions for that test group.
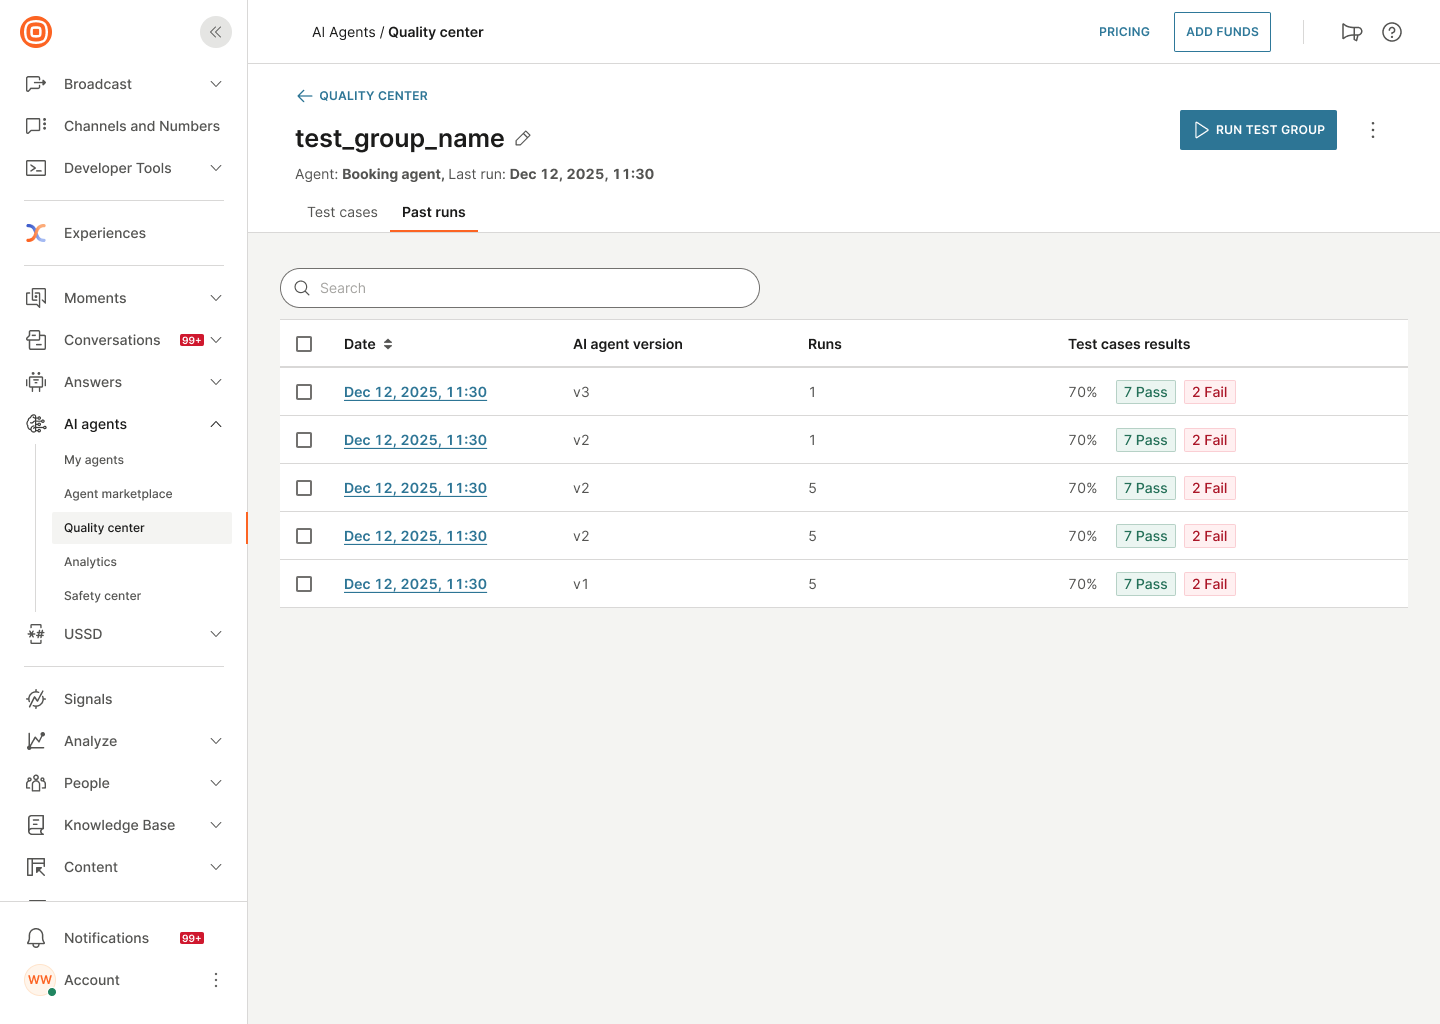
On this page, you can do the following:
-
Search: Search for test executions by using the search box
-
View test executions: View a list of test executions. For each test execution, you can view the following information:
- Date: Date and time when the test execution was run
- AI agent version: Version of the agent that was tested
- Test case results: Summary of test results showing the percentage, number of passed test cases, and number of failed test cases. Example: 70%, 7 Pass, 2 Fail
For tests that are running, Test case results shows In progress.
- Sort test executions: Select a table header to sort.
Select a test execution to view the detailed results.
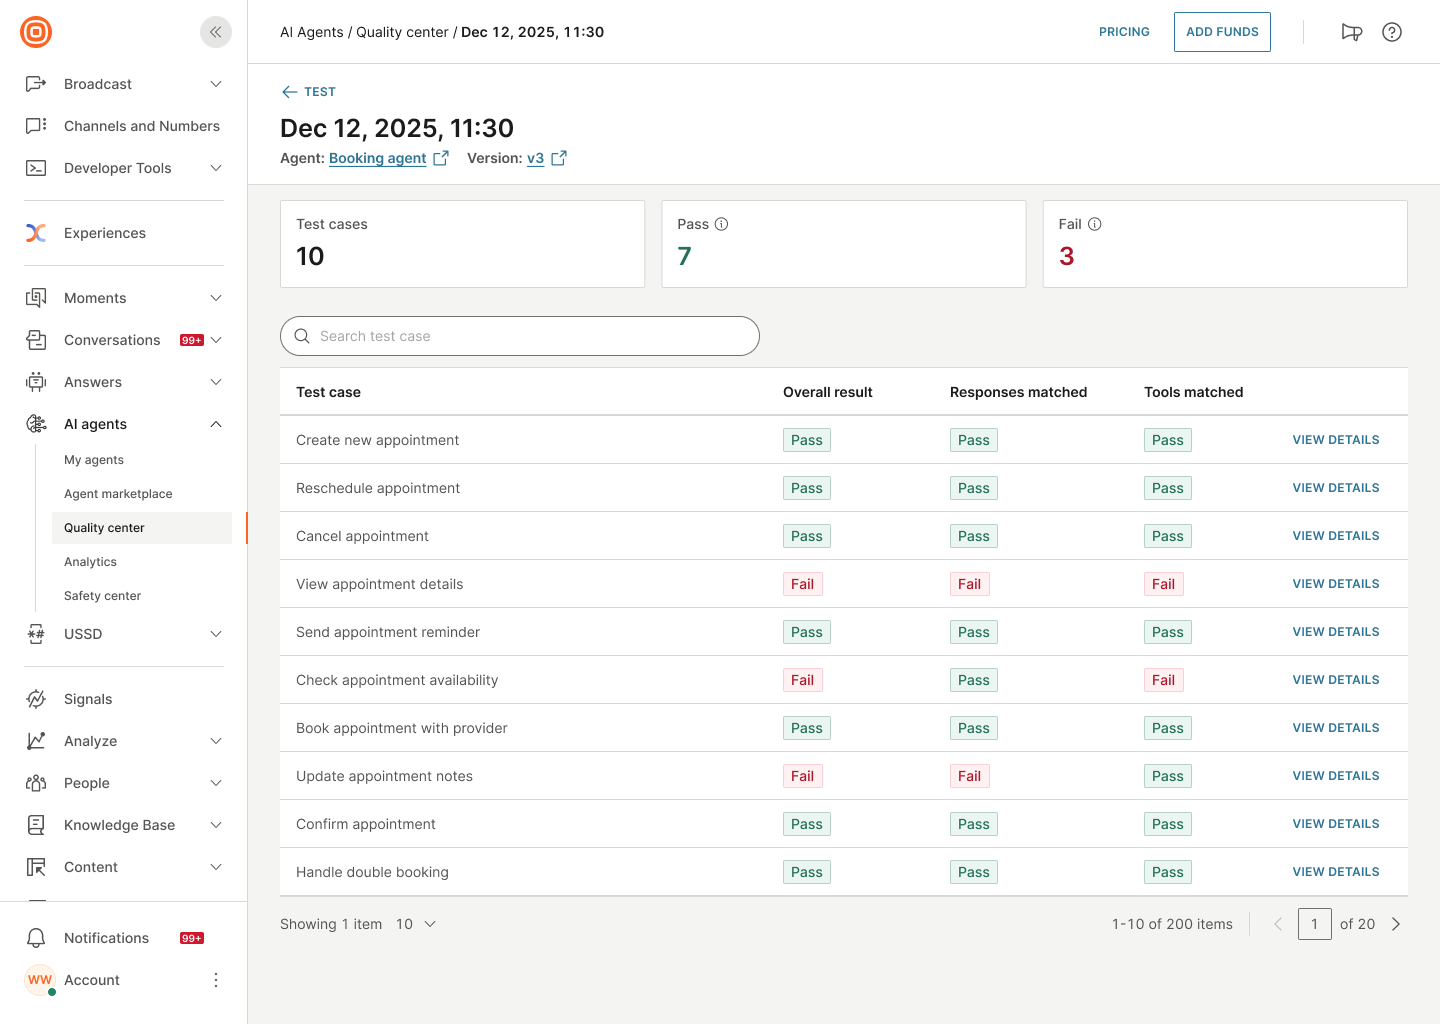
View test results
Review test results to identify issues and verify agent behavior.
To view test results:
- Go to your test group.
- Go to the Past runs tab.
- Select the test execution you want to review.
View the details for a test case
Find the test execution that you want to review. You can also sort test executions by date, use the Search box, or use the Filter icon to find the required test execution.
Select the date of the test execution for which you want to view the details. Example: Dec 12, 2025, 11:30.
You can view the following:
Overall performance: Review pass/fail counts for the entire test execution.
- Test cases: Total number of test cases
- Pass: Number of passing test cases. Agent called the required tools and gave the correct answers.
- Fail: Number of failing test cases. Agent either did not call the required tools or gave incorrect answers.
View the following details for each test case:
- User input: The first end user message in the test case
- Overall result: Pass or Fail
- Responses matched: Pass or Fail
- Tools matched: Pass or Fail
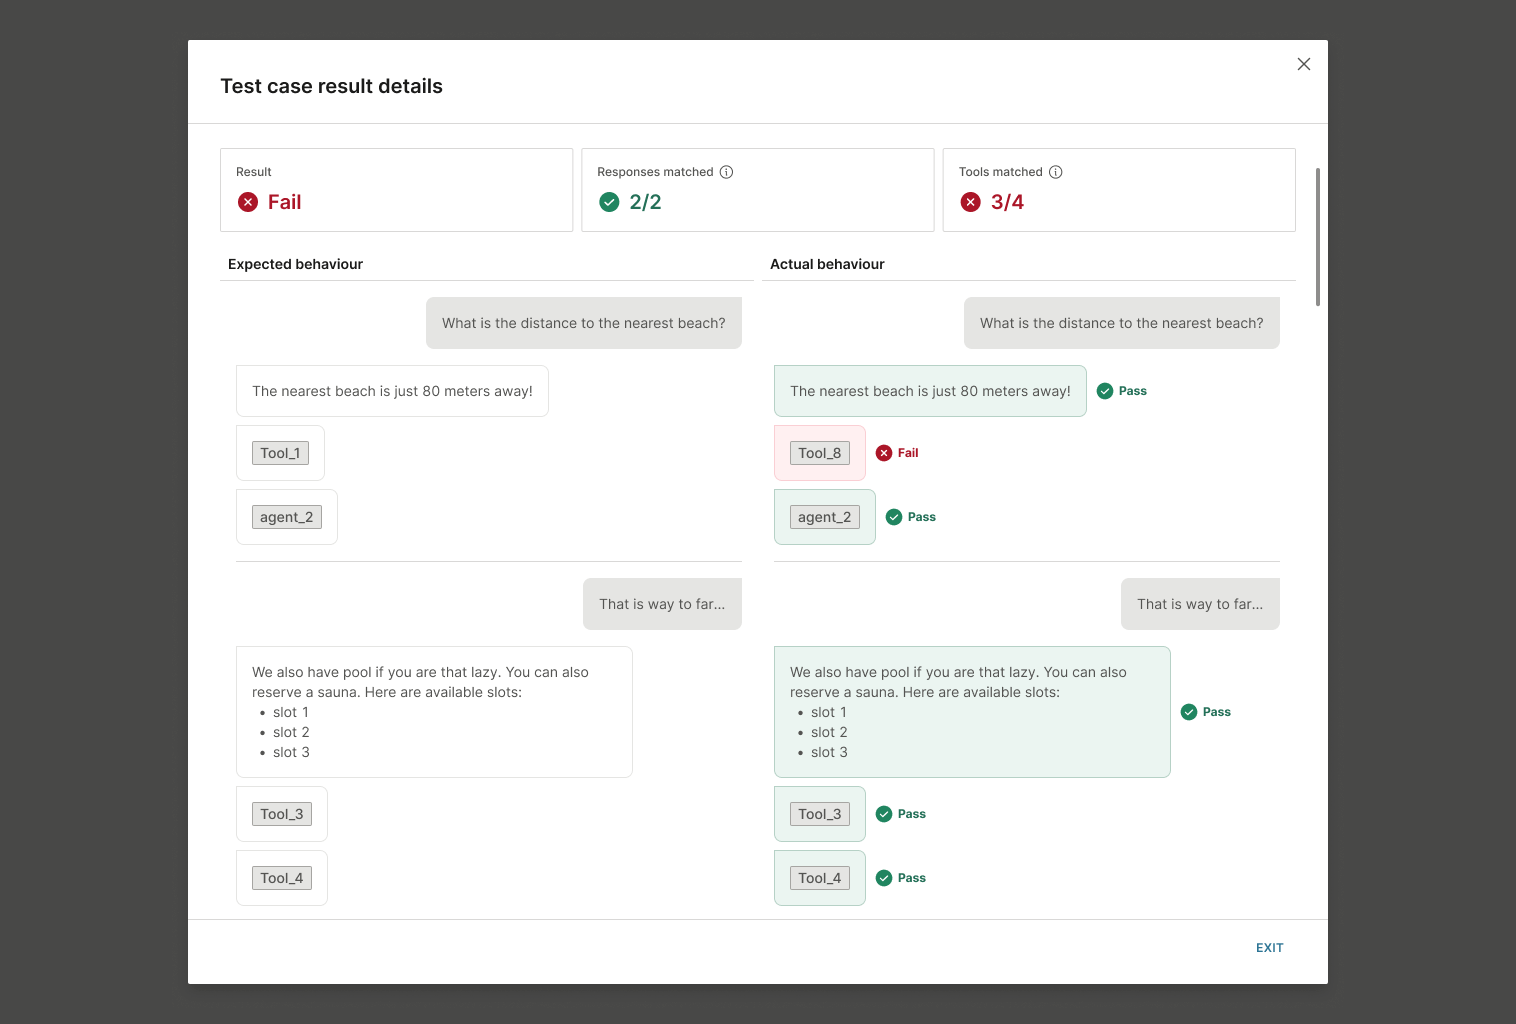
View the details of a test case
Note: A test case fails if even one agent message, tool call, or sub-agent call does not match the expected behavior.
-
Select View details for the test case that you want to view.
-
Review the aggregated summary:
- Result: Overall pass or fail status
- Responses matched: Whether the agent's response matched the expected response. Number matching (Example: 2/2)
- Tools matched: Whether tool and agent calls matched expectations. Number matching (Example: 4/4) - Pass or Fail.
-
Compare expected and actual behavior:
- Expected behavior (left column): The test case that you configured
- Actual behavior (Right column): How the agent actually responded
-
Identify the failure point:
- Review each agent message, tool call, and sub-agent call
- Look for Pass or Fail indicators next to each element
- The overall result fails if ANY element fails.
- Agent message does not match expected response
- Tool call does not match expected tool
- Sub-agent call does not match expected sub-agent
-
Use the insights to update your agent or test cases.
Compare results across multiple runs
If the test execution has multiple runs, you can view the overall results in addition to the details for each run.
- Test cases: Total number of test cases in the test group
- Pass rate: Average of passed test cases across all the runs. Agent called the required tools and gave the correct answers.
- Fail rate: Average of failed test cases across all the runs. Agent either did not call the required tools or gave incorrect answers.
Review the results for each run to identify consistency issues. Each test run is in a separate tab. Each tab has an indicator that shows whether the test run passed or failed.

Manage test groups
Edit a test group
In Quality center, select the test group you want to edit. Update the test group name or modify test cases as needed.
Delete a test group
In the list of test groups, select the menu (three dots) next to the test group. Select Delete.
Duplicate a test group
For information about duplicating a test group, refer to Duplicate an existing test group.
Manage test cases
Edit a test case
Go to the test group. Select Edit for the required test case.
Delete a test case
Go to the test group. Select the menu (three dots) next to a test case and select Delete.
Duplicate a test case
Go to the test group. Select the menu (three dots) next to a test case and select Duplicate.
Export test cases in a test group
Go to the test group and select Export to export all the test cases in that group to a CSV file.
Best practices for testing
Plan your testing strategy before building the AI agent to ensure that the agent meets your requirements.
Organize test groups effectively
- Group related test cases: Create separate test groups for different features or user journeys
- Use descriptive names: Name test groups clearly to identify their purpose
- Run multiple times: Execute test groups 3-10 times to verify consistency
- Save useful conversations: During manual testing in Preview, save conversations that represent important scenarios
Test case requirements
Create comprehensive test cases that include the following:
- All expected user journeys: Successful scenarios and standard interactions
- Non-standard input: Unusual or unexpected input from end users
- Negative scenarios: API failures or missing data
- Error-handling situations: How the agent responds when errors occur
Use these test cases for the following:
- Acceptance criteria: Show that the AI agent system works
- Performance benchmark: Measure quality and efficiency
- Regression test: Ensure that updates do not break existing features
Evaluation criteria
When evaluating agent behavior, check the following:
- Response quality: Is the text accurate, appropriate, and helpful?
- Tool usage: Did it call the correct APIs? Did it use the correct parameters?
- Reasoning process: Did it break down complex tasks logically?
- Error handling: Did it gracefully manage failures?
- Validation steps: Did it process results correctly before taking actions?
For AI agents, correctness means both textual output and operational behavior. An agent that produces clear output but calls the wrong API is still non-functional.
Next steps
If the test results are not as expected, update the AI agent to resolve the issues.
After you finish testing, publish the AI agent.