Getting started
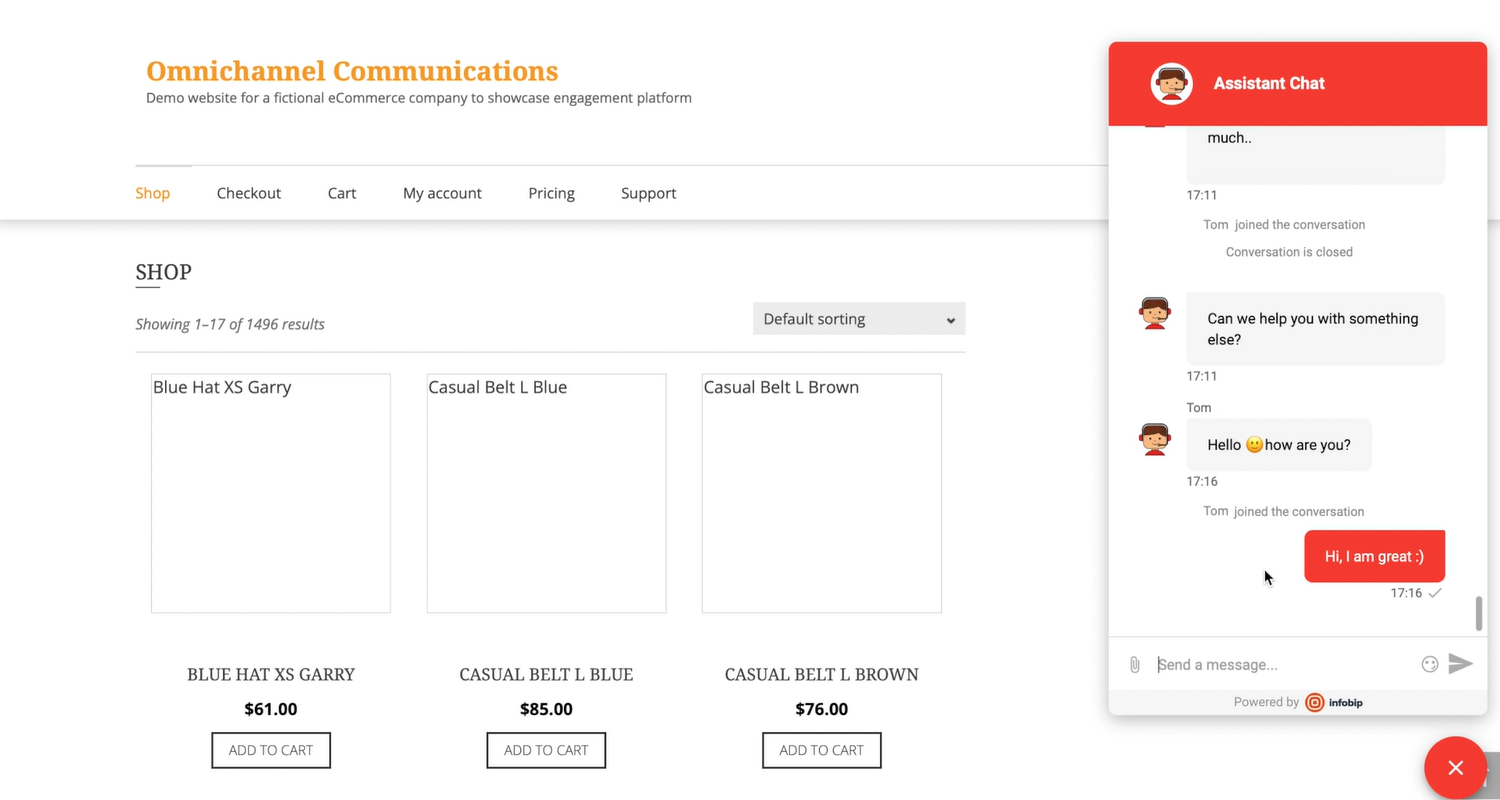
To get started with Live Chat, create your widget first. There are various ways how you can customize the widget and test it out on your website before launching it for your customers.
During the testing phase, you will have the opportunity to try the demo app and simulate the experience as if it were your app. You can set up the widget to be used only for the web or create one for mobile.
Web widget
This article covers the steps needed to install a web widget on your website.
Before we continue, check a few important terms that you will see throughout the documentation:
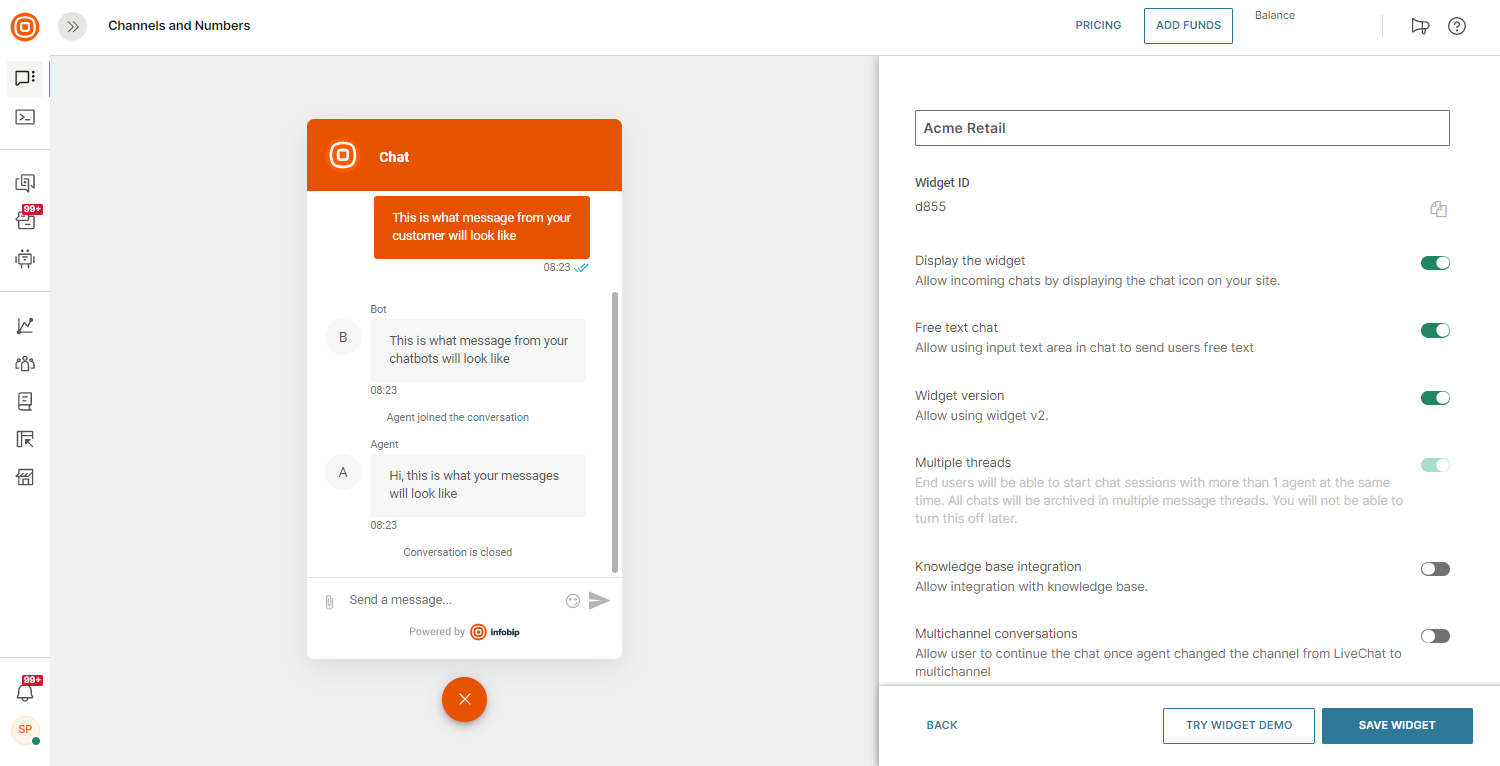
- Widget - A component on your website where your customers start a conversation. The widget component includes API to manage your customer chat sessions. Messages sent through widgets can have the following statuses: Sent, Delivered, Seen, and Failed to send. If a message fails to be sent (for example, no internet connection), there is an option to retry.
- Secret key - A unique private key to generate a personalization token according to JSON Web Token (JWT) technology.
- Personalization token - A specially generated JSON Web Token (JWT) for authenticating users and their identification in the widget. The personalization token is generated on your backend service. Find out more about the personalization token generator.
Installation [#installation-web-widget]
In this section, we explain how to create and install the web widget on your website.
To use the Infobip platform, you need credentials. If you already have an Infobip account, log in to the web interface. Otherwise, create an account.
- Log in to your Infobip account.
- Go to Channels and Numbers located at the bottom left → Live Chat → Create Widget → Installation & Security.
- Copy the snippet code from the Installation & Security section.
- Locate the main HTML frame in your website source code and paste the script code in between < head > tags.
- Save it and deploy your website application. The widget will be visible on your website immediately.
Example:
If your web application is a single-page application (SPA), then it is sufficient to put the snippet in the main static HTML frame. Otherwise, any static HTML is preferred. The other option is to put the snippet into any HTML page where you want to use the snippet. However, bear in mind that only one HTML page with a snippet should be displayed to your visitors.
Depending on how you configured the widget, that is how your website visitors will see it. For website visitors, you may need to configure and customize the chat session timeout. We recommend you set the session timeout to 24 hours.
The widget can be used on both HTTP and HTTPS websites, but we strongly recommend you use it on HTTPS websites only. Due to the insecure nature of HTTP, the website content can be tampered with by a malicious attacker, making the widget unsafe to use for sensitive communications.
If you do not configure user authentication for the web widget, all website visitors will be flagged as leads by default.
Set language [#set-language-web-widget]
Learn how to adjust the language settings in the Live Chat widget and configure language-specific routing.
Test [#test-web-widget]
When you create a new widget or modify an existing one, check how it works in practice with the Live Chat demo functionality.
-
Start widget configuration Open your widget configuration in Channels and Numbers → Live Chat → and select your widget.
Select the Try widget demo button to test your widget.
-
Showcase page
The showcase page allows you to test Live Chat with Conversations and Answers emulating the experience you would have if it were your own website. During the demo, you can verify cases with your leads and authenticated users.
Live Chat widget on the testing page allows you to control different visibility options:
- Display the widget - Controls visibility of the widget on your website.
- Pages - Safelists domains and pages where your configured widget is visible to your customers.
- Scheduling - Schedule the timeframe for the widget to be visible to customers on your website.
Simulation settings
By default, the showcase page starts with a lead. This case simulates a situation where a visitor is browsing on your website.
To simulate an authenticated user session click Log In. The authenticated user would be the one who logs in to your website.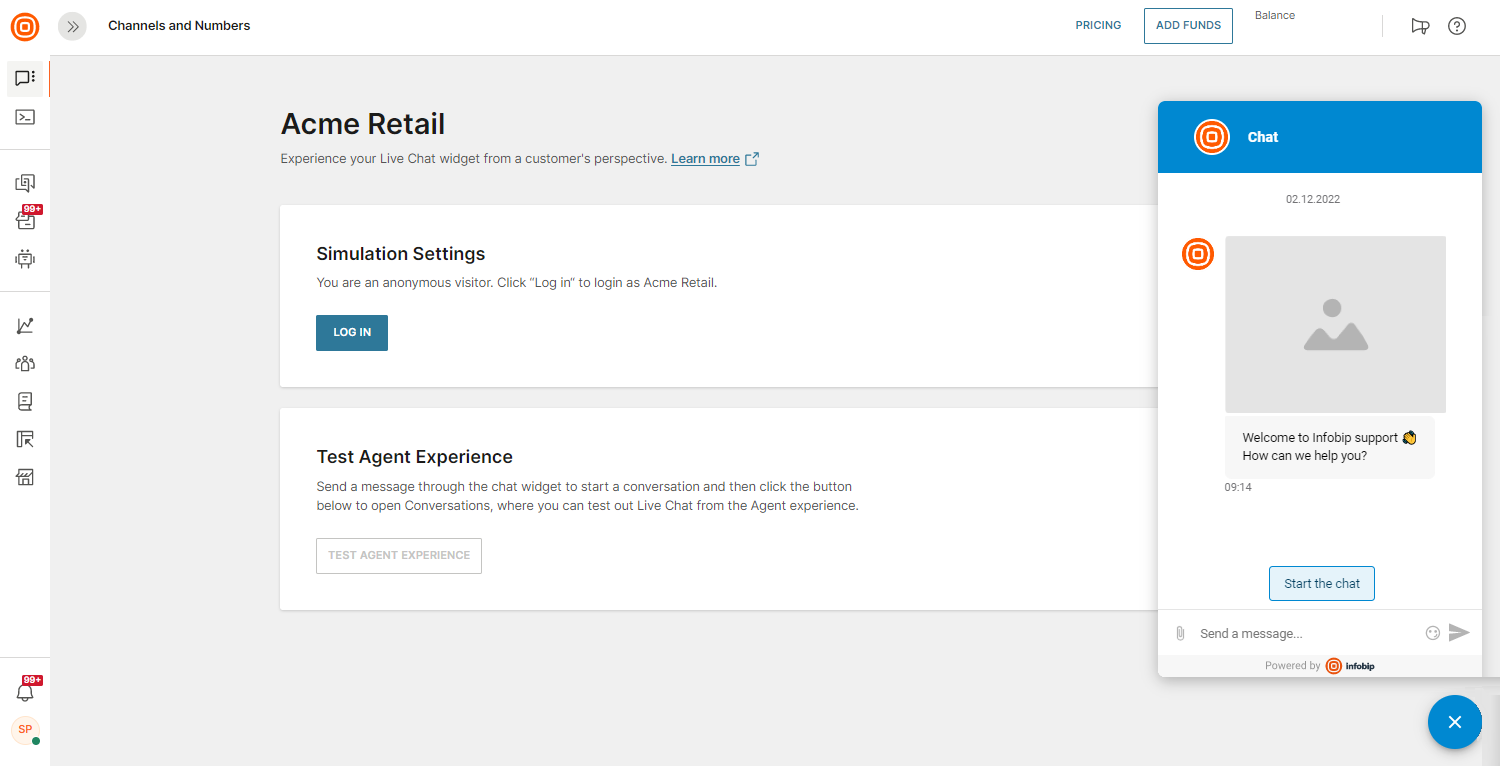
The showcase page uses your email address as a username for the authenticated user session. To reset your Live Chat session back to visitor, click Log Out.
Test agent experience
Once you have sent the first message in the Live Chat widget, click the Test agent experience button to open the agent panel with the conversation you initiated from the showcase page.
If you closed the conversation from the agent side, just send a new message from Live Chat to open a new conversation and the button will be active.
-
Start conversations as a visitor
This case emulates a situation where the end user comes to your website and asks a general question. At this moment, you do not know their identity, and they are just a visitor on your website.
- Send your first message from the showcase demo page chat.
- Click the Test agent experience button to open the dialogue in the agent panel.

-
Upgrade conversation from lead to authenticated user
One of the most common cases is when you need a trustful session to verify the end user asking for support. However, users may start a conversation even before they are logged in to your website.
We handle this in a way that once your end user proceeds with signing in on your website, the widget will show the previous conversation and the agent will then see the identity of the user who logged in. The end result here is that the incipient conversation will be preserved and upgraded to the authenticated user conversation.
Click Log in in the Simulation settings ongoing conversation on the showcase page and your chat session will automatically be upgraded to a chat with an authenticated user.
If you have had previous conversations as an authenticated user, the widget will show the history above your current conversation messages.
-
Reset authenticated session
Once the end user logs out from the website, they are treated as untrusted and the authenticated session will be reset to the visitor session once again.
Click the Log out button to simulate an authenticated user logging out from your website.
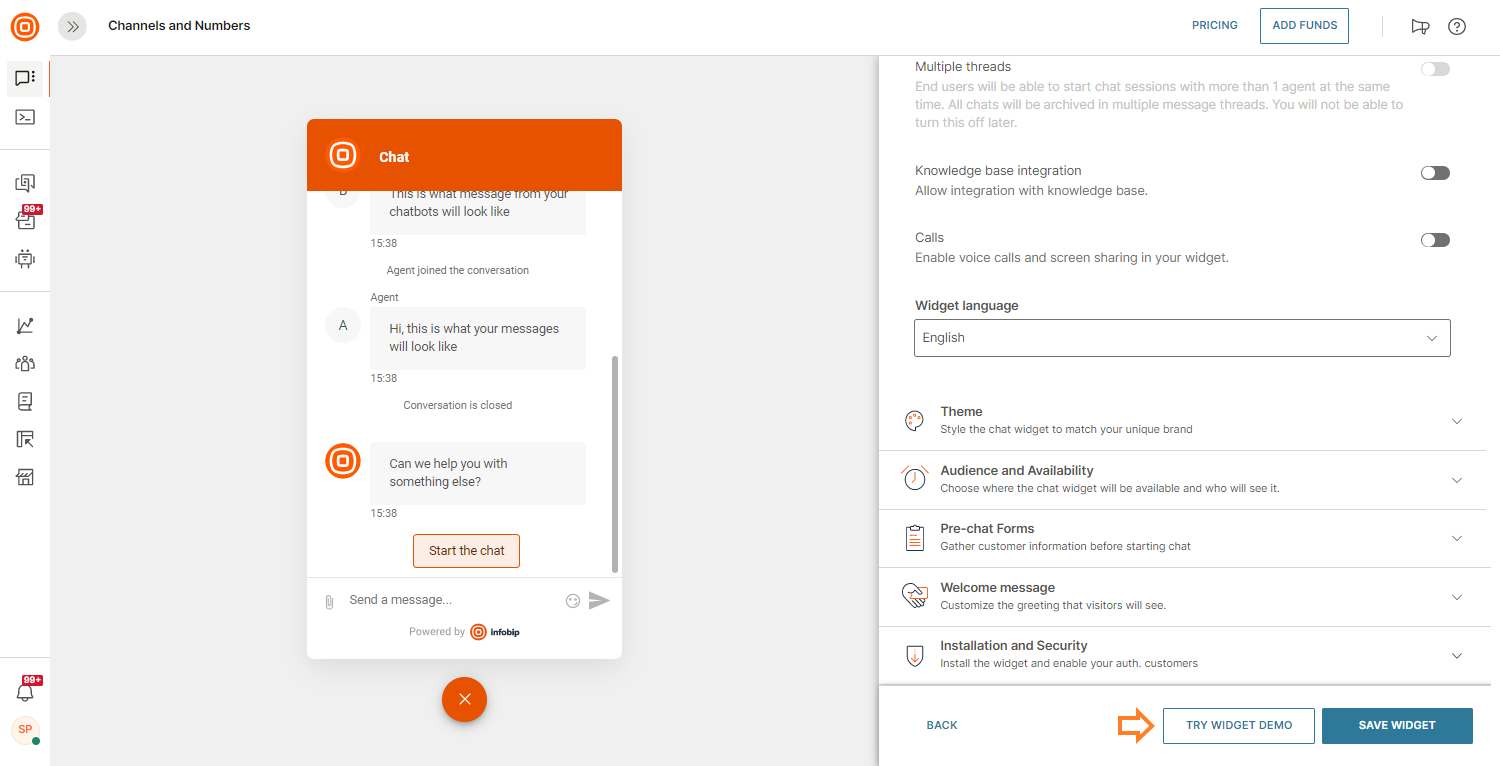
Pre-chat forms [#pre-chat-forms-web-widget]
Pre-chat forms are those forms displayed to customers before they even get to chatting in LiveChat. Consider this to be a prerequisite to even start the chat.
These forms collect information about the end user based on the list of questions you have added to the pre-chat form.
The main values Infobip brings here are:
- Increase the creation of the leads (have chats with known users that you have basic information about, and continuously enrich the profiling data).
- Obtain important business information (name, email address, phone number, interest).
- Decrease spamming or irrelevant conversations that are hindering agents' capacity or bot sessions.
- Allows you to hide your email address to avoid spam. Have your visitors contact you only via LiveChat and start gathering basic information.
- Qualification based on the type of the request before escalating to available agents (this way, you have a structured customer experience to collect certain data before the request is routed to available agents).
Within the Live Chat widget, you can set different pre-chat forms for:
- Leads - This is an anonymous user, and not trusted yet.
- Authenticated users - A known user, and considered as trusted based on the received Personalization token.
Pre-chat forms are available only for the Live Chat web widget.
Configuration [#configuration-web-widget]
- Once set up, you will see the pre-chat forms appear in your widget configuration.
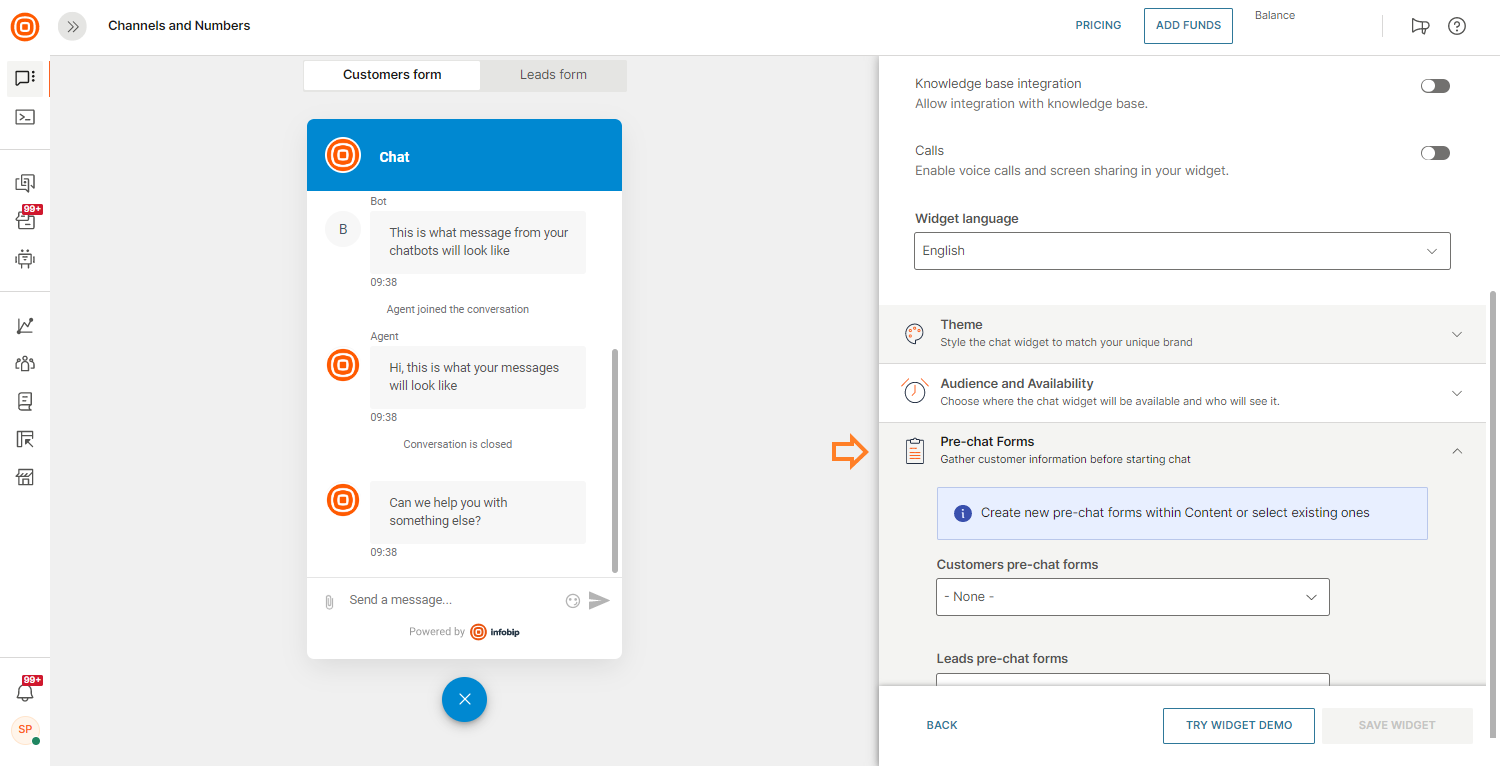
- Here you will see two different settings options:
- Customers pre-chat forms (intended for authenticated users on your web page).
- Leads pre-chat forms (intended for possible leads/new customers coming to your web page).
- If this is your first time creating a new form, the list will be empty (once you have created forms, all will be visible on the list).
- Proceed by clicking the Create new form button.
- You are redirected to the Form builder.
- While building your form, you can add any component and set any form attributes you may need (field name, drop-down menu options, etc.).
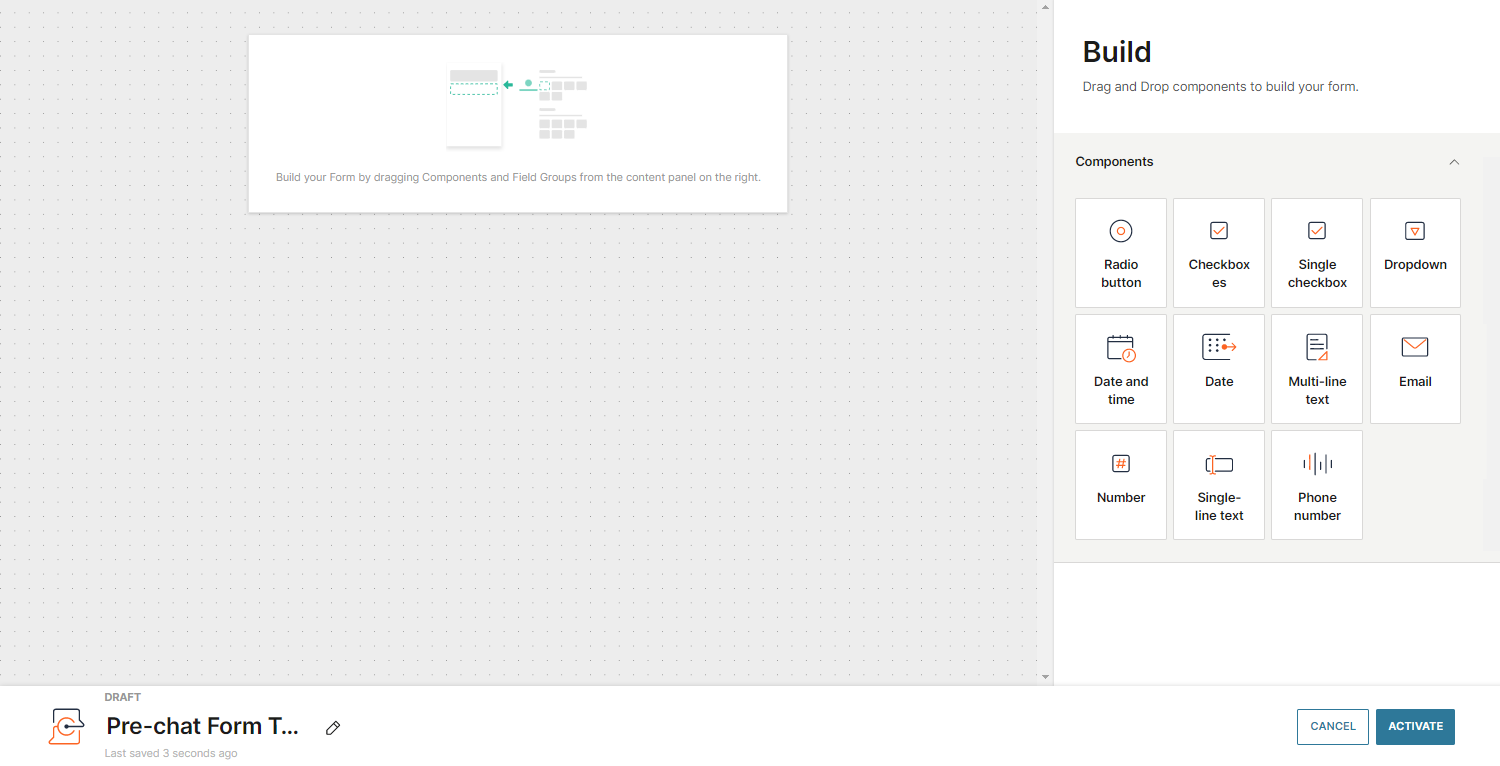
- Clicking on the dragged element in the builder shows different configuration options on the right-hand menu. Here you can set element names, mandatory and optional questions, and more.
Read more on how to manage forms.
- Once you have set all your preferred form data, click the Activate button.
- You will be redirected to the widget configuration. The form you had just created will be preset and you can see it on the widget preview on the left side of the widget configuration.
- To use your saved forms, select the Save widget button to confirm the changes.
Leads and customer behavior with pre-chat forms [#leads-and-customer-behavior-with-pre-chat-forms-web-widget]
The flow goes like this:
- Customer opens the chat.
- Pre-chat form is displayed.
- Customer submits the form.
- Welcome message is displayed.
- Chat can start.
Your leads and customers will see the pre-chat form for every new open conversation.
Agents will see the data the users have entered in the form as part of specific messages in the agent panel.
Multithreading [#multithreading-web-widget]
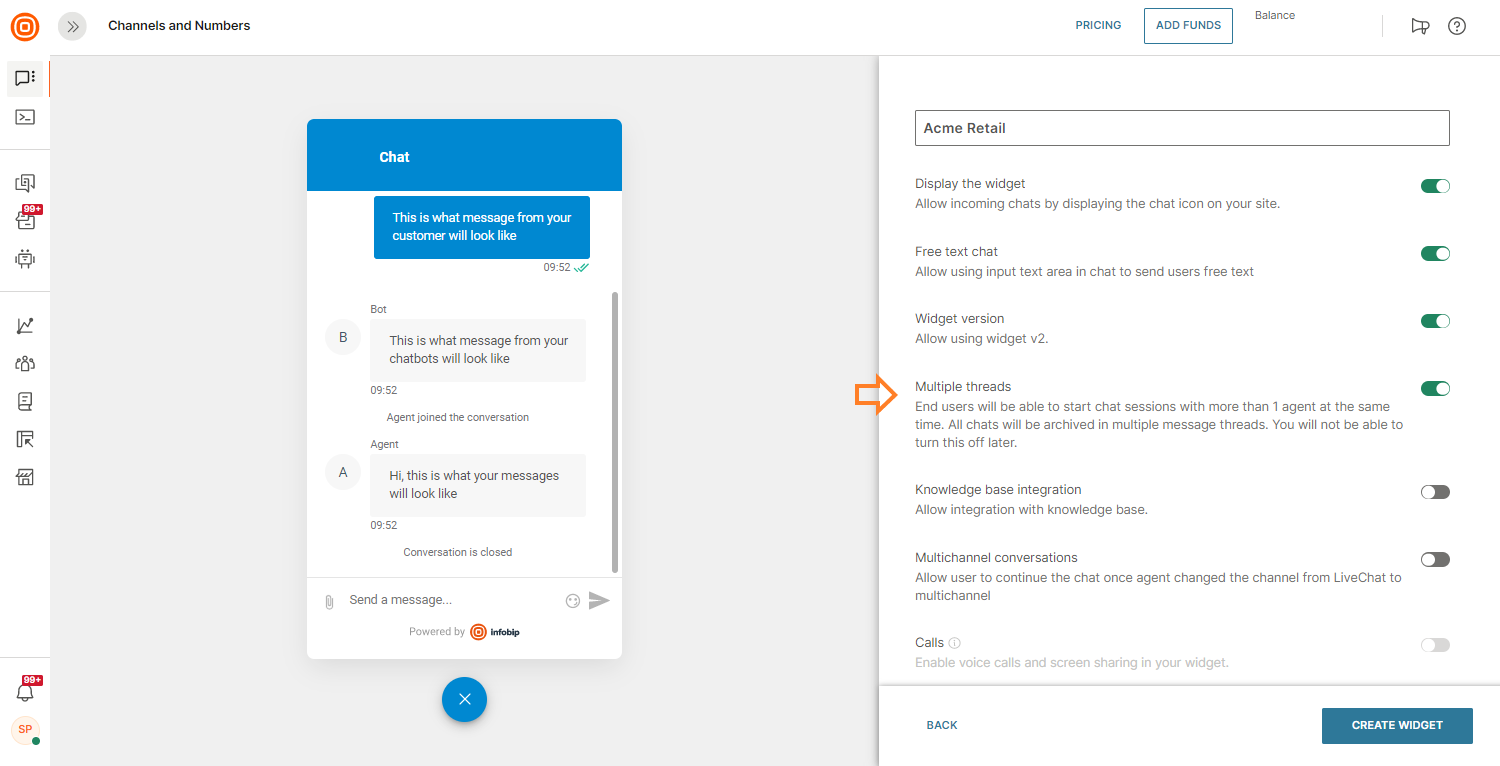
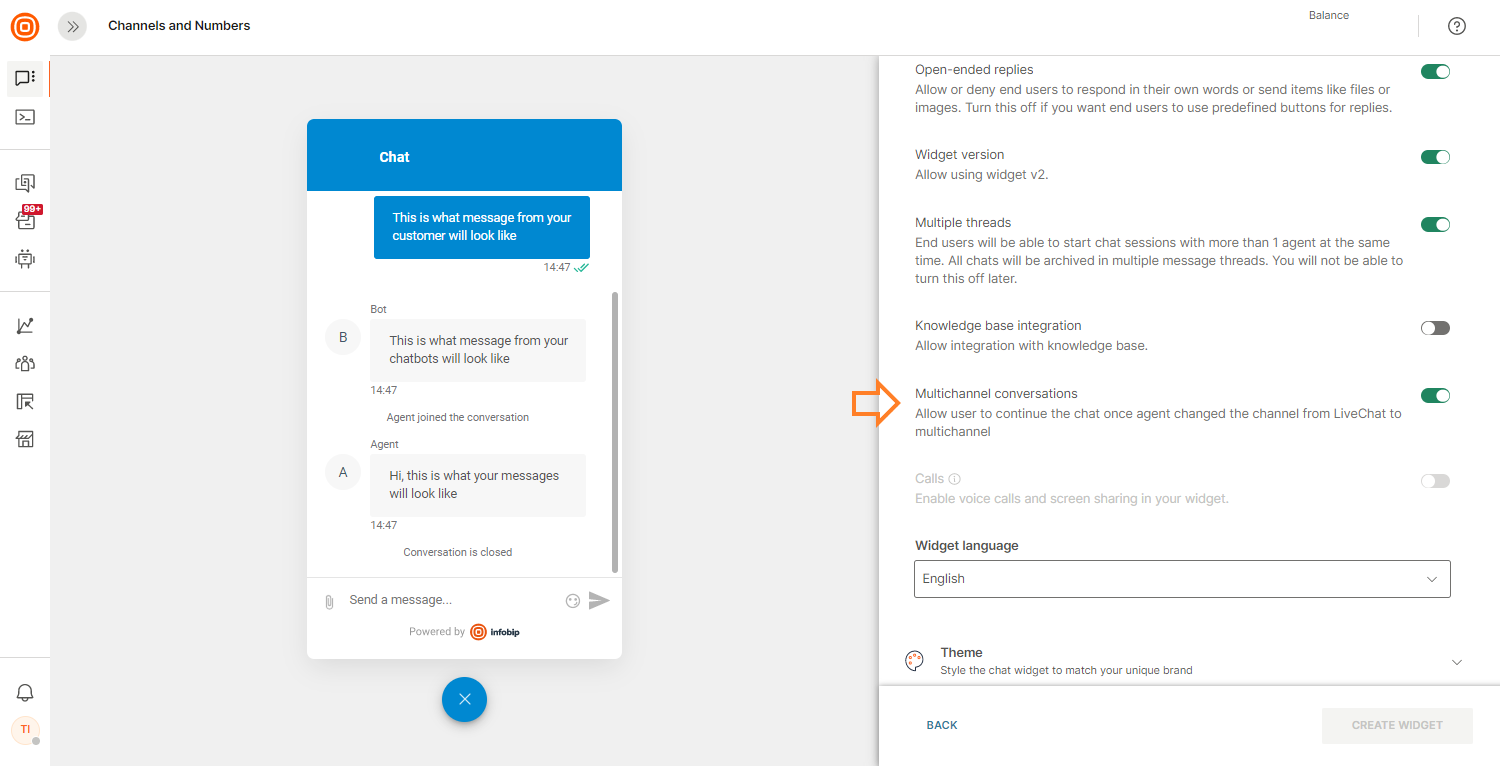
Live Chat supports multiple chat sessions being opened at the same time. This way the end users can use multiple chats to resolve different issues they may have.
Previous sessions started by the same end user are also preserved so the agents can have a better overview of the current issues the end user is experiencing.
To use Multithreading in Live Chat, you need to enable it first:
- Go to your Live Chat web widget → Multithread → click the toggle to turn it on.
Multichannel conversations [#multichannel-conversations-web-widget]
Once you enable the Multiple threads, the Multichannel conversations option displays as well. This option allows you to continue the conversation if the agent changes the channel from Live Chat to multichannel.
If you enable multichannel:
- The end user is allowed to continue chatting on any channel switch. The channel switch icon on the thread card appears only if the last message indicates the channel switch. If the end user or agent continues the chat via Live Chat, the icon disappears.

- If you disable multichannel, and the agent or the end user switches the channel, the thread card reflects this change. The user sees a switch and lock icon implying that they cannot continue the conversation.

- If the end user clicks and opens the locked thread, they see a message informing them that they cannot continue the conversations because of the channel switch.

Start outbound conversation [#start-outbound-conversation-web-widget]
EARLY ACCESS
This feature is released as Early Access.
The agents can start an outbound conversation with an existing customer to provide additional support and immediate assistance, which ultimately results in higher customer satisfaction.
The agent can initiate a new outbound conversation for:
- Authenticated user profiles
- Leads with valid active session
To start an outbound conversation:
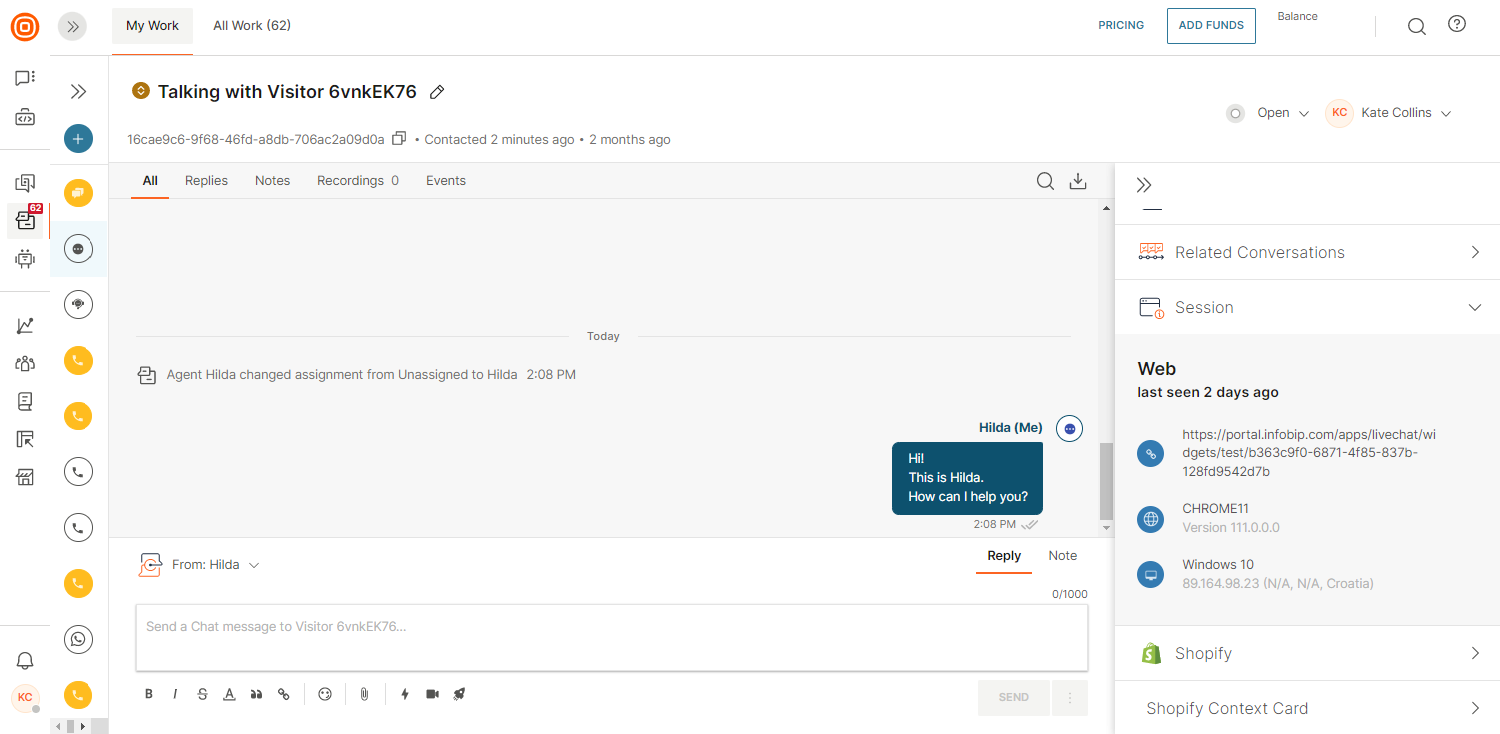
- Select the + symbol → Start conversation option in My Work.

- Once the page opens, choose the Live Chat widget.
- Find the wanted contact that already has an existing Live Chat profile, enter your message, and click the Start Conversation button.
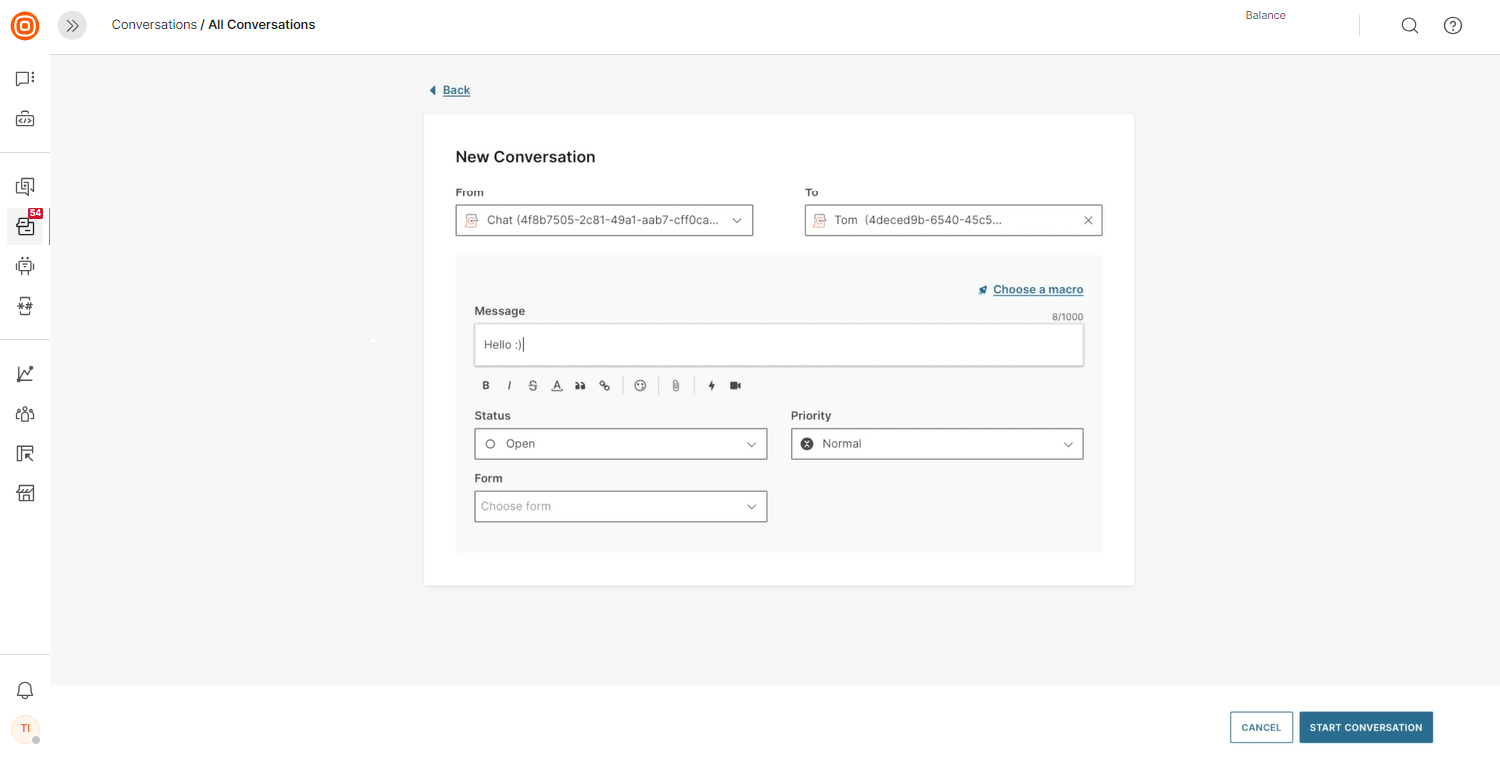
- The customer will see your sent message once they log into their account, and they can reply to you to continue the conversation.
The conversation can be initiated only as text-based. The in-app Live Chat call can be established once the conversation has started.
Browser support [#browser-support-web-widget]
The following browsers are supported for web and mobile responsiveness:
- Google Chrome and other Chromium-based browsers
- Brave
- Edge (Chromium based)
- Safari
- Mozilla Firefox
- Opera
- IE 11 (limited support)
Mobile in-app chat
In this section, we will explain how to configure the in-app chat in your mobile application which is available on iOS, Android, and Huawei mobile platforms, as well as the following plugins: React Native, and Flutter. Following our guide, you can try the mobile in-app chat in practice without any development effort.
To use the Infobip platform, you need credentials. If you already have an Infobip account, log in to the web interface. Otherwise, create an account.
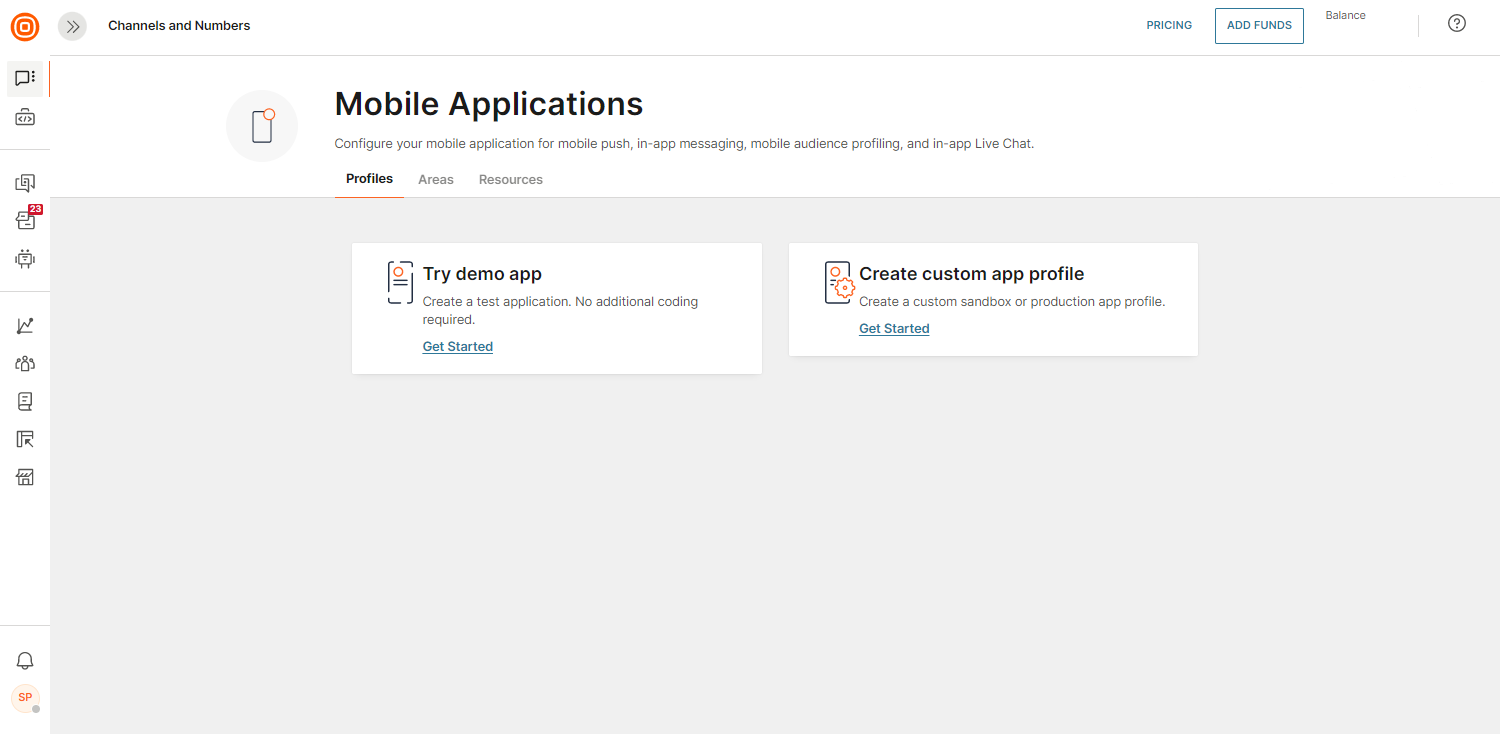
Installation [#installation-mobile-in-app-chat]
To install the in-app chat (mobile version of Live Chat), follow these steps:
- Create the mobile application profile.
- Create the Live Chat widget.
- Connect the mobile application profile and the Live Chat widget. In the Live Chat widget configuration, navigate to Audience and Availability → Mobile Applications → select the created mobile application profile to connect it to the widget.
After this, complete the initial configuration as described on the following SDK pages:
- iOS
- Android
- Huawei
- React Native
- Flutter
- Cordova (deprecated, no new features will be added for Live Chat in the future)
Now, enable and customize the in-app chat based on your needs. You have two customization options:
- Widget customization
- In-app customization:
User personalization and authentication [#user-personalization-and-authentication-mobile-in-app-chat]
These are the steps you need to take to set up the user profile via Mobile SDKs:
There are two authentication options:
Here is an outline of what the user personalization process entails:
- User installs the app and launches it for the first time – Mobile SDK gets initiated = created
pushRegistrationId.PushRegistrationIdis a unique app instance ID on the device issued by Infobip. User Profile in the People data platform is automatically created and gets the anonymous installation assigned. Useful links: React, iOS, Android - User is authenticated in the mobile app, user enters their credentials (login/pass) and passes 2FA. The personalize call containing user identity details is expected. User profile on Infobip People gets updated with user identity details and becomes personalized. Note: One person profile in Infobip People can have multiple connected devices. Attaching a device to a profile occurs by the 'personalize call' and key identity (phone number, email, or externalUserId) or via JWT authentication. Useful link: Personalize API call
- After the user's current session is ended (MB app is minimized), the user comes again and passes a quick login to get access to the mobile app secure area. The push notification will come only in case if session is ended and if Moments is enabled. Personalize call is not needed - Infobip profiling remembers that the user is associated with installation.
- User does explicit logout and comes back to initial registration. On the user’s logout event, Infobip expects to receive the depersonalize call so that the platform can detach the device from Person and bring it to an anonymous installation state awaiting for the next personalize. Useful link: Depersonalize API call
- User uninstalls the mobile app – Infobip SDK tracks the uninstalls, although it is not in real-time. There will be a period of up to 48 h after Infobip tracked the uninstall from Cloud (APNS/FCM) and the pushRegistrationID is removed from profiling with an uninstalled flag.
- User installs the app again – refer to step 1. The new installation will be associated with a new pushRegistrationId.
Test [#test-mobile-in-app-chat]
Test the experience of the in-app chat with our mobile showcase demo application by following these steps:
- Download the showcase demo application.
- Link the showcase application to your widget configuration.
- Start a conversation in the demo application.
- Reply to a message in Conversations.
Download showcase demo application [#download-showcase-demo-application-mobile-in-app-chat]
If you have already installed your showcase application with the Demo App Guide, proceed to the Link showcase application to your widget configuration section below.
The following section assumes that you have not already created a demo application. If you have already created a demo application then you will be passed straight to the mobile application dashboard after step 1. The mobile application dashboard will show the demo application and other applications that you have created for your account.
- Log in to the web interface using your credentials.
- Go to Channels and Numbers → Mobile applications.
- Under the Profiles tab, select the Get started button in the Try demo app widget.
- Enter recipients to send out invitations to join the demo application.
- Once you receive the invite, open the invitation on a mobile phone and download the Infobip Push application.
Link showcase application to your widget configuration [#link-showcase-application-to-your-widget-configuration-mobile-in-app-chat]
- Go to your widget configuration inside Channels and Numbers → Live Chat → Your widget name → Audience & Availability and select Mobile Application from the list.
- Click the Save widget button to confirm the mobile application profile link to the widget configuration.
You can link only one mobile application profile to the widget configuration.
Start a conversation in the demo application [#start-a-conversation-in-the-demo-application-mobile-in-app-chat]
After you have linked your demo application, you should see a successful confirmation. Then, after launching the showcase application, the chat option will appear.
- iOS: Tap on the chat icon in the lower right corner to start a conversation
- Android: Tap on the top-left navigation menu, and select Chat to start a conversation
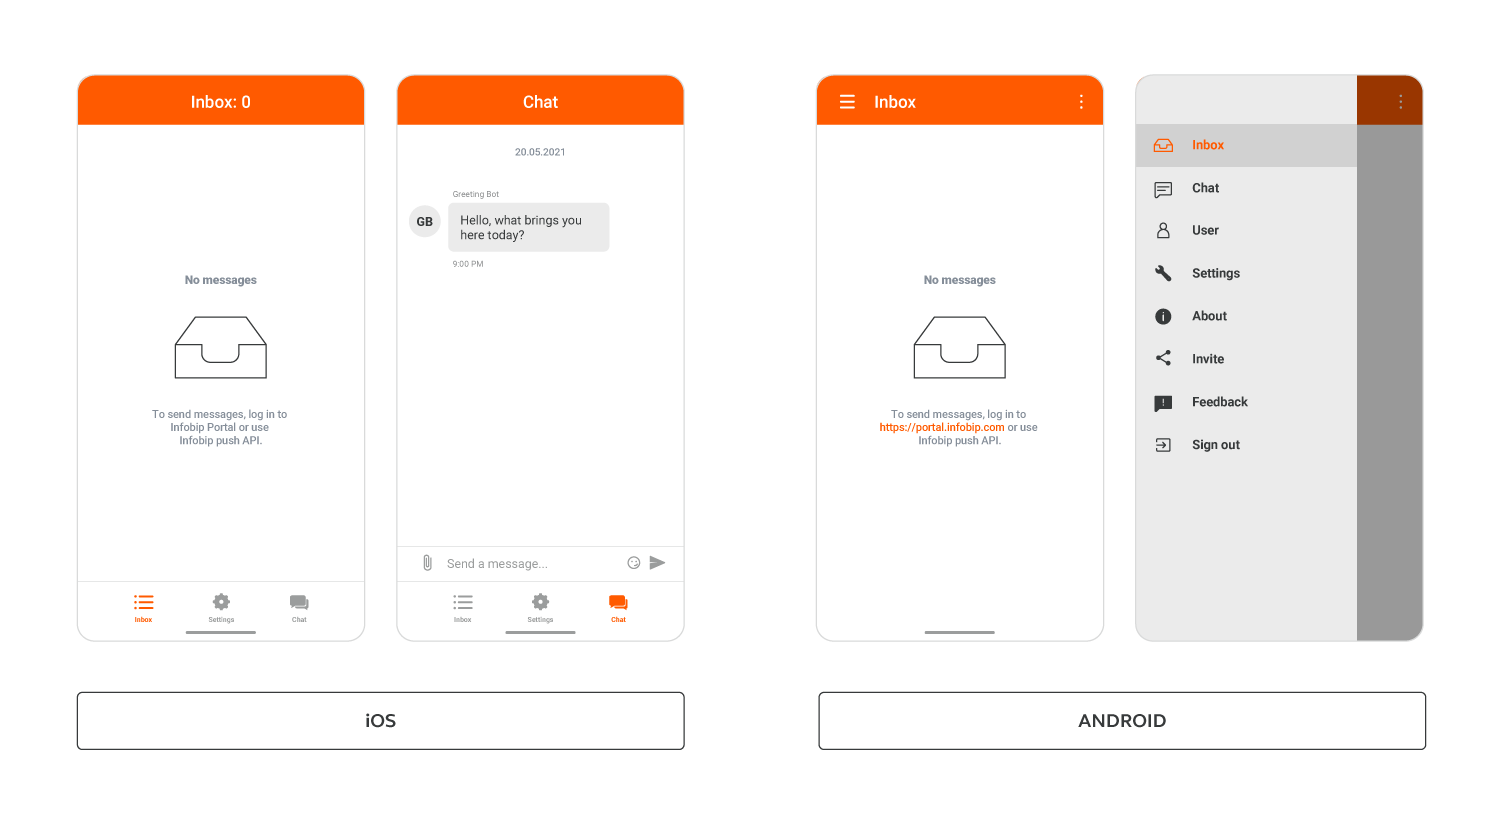
Color styles in the chat are applied automatically from your widget configuration.
Reply to a message in Conversations [#reply-to-a-message-in-conversations-mobile-in-app-chat]
All widgets are connected with Conversations so that you can easily emulate your in-app chat conversation during this test without any development effort as if it was implemented in your own application.
In the event the showcase application is not running on your device screen, you will automatically receive a push notification with a message.
Multithreading [#multithreading-mobile-in-app-chat]
Already available in the web widget, you can now use this function on mobile chat as well.
Live Chat supports multiple chat sessions being opened at the same time. This way the end users can use multiple chats to resolve different issues they may have. Previous sessions started by the same end user are also preserved so the agents can have a better overview of the current issues the end user is experiencing.
To use multithreading in Live Chat mobile, you need to enable it first via the web widget:
- Go to your Live Chat web widget.
- Find Multiple threads → click the toggle to turn it on.
When the above is enabled, the mobile chat will automatically offer:
- A list (initially empty) of all unsolved conversations the end user has opened.
- A button to Start new chat thread.
- Navigation to each specific conversation. To open a particular chat, just tap on any conversation thread on the list.
Mobile chat uses SDK in the background. If you want to know more, read the Multiple chat threads SDK article.
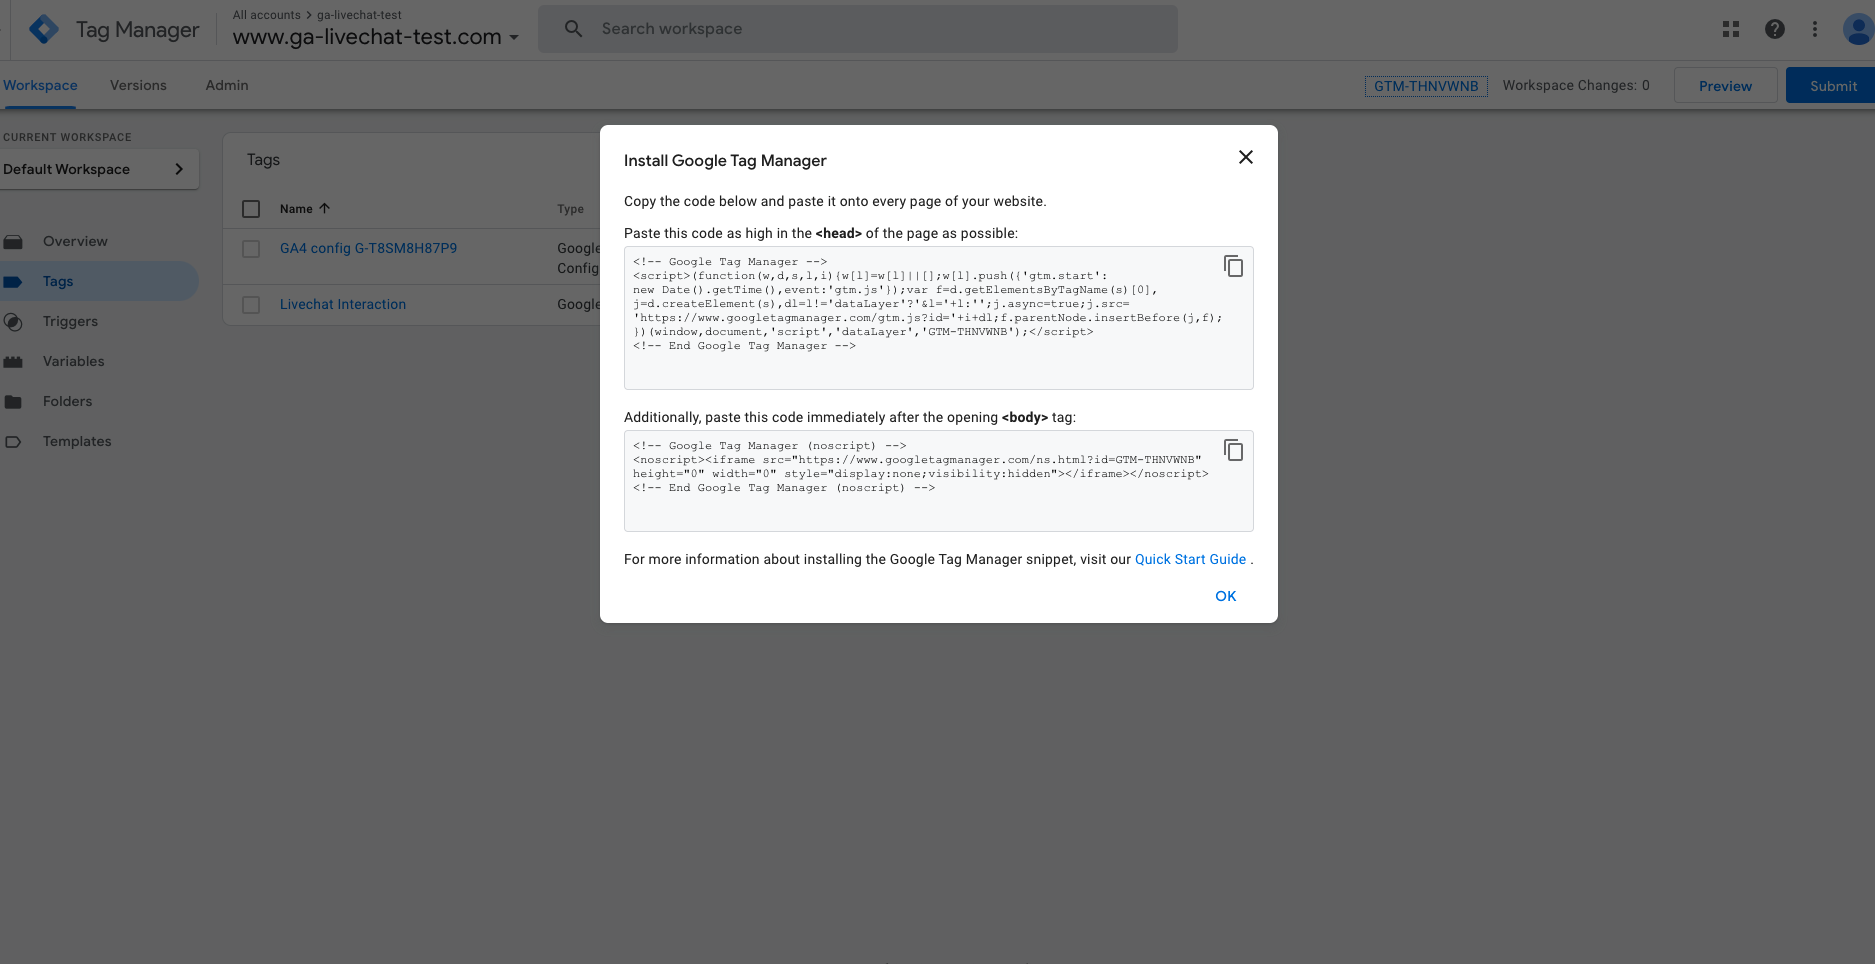
Connect Google Tag Manager
Use the Google Tag Manager to manage your website tags without the need to edit code. This is a simple and easy tag management solution that can now be used over Infobip Live Chat.
If you are already using Google Tag Manager on your web pages for other purposes, you can use it in Live Chat with zero downtime.
If you already have a Google Tag Manager account [#if-you-already-have-a-google-tag-manager-account-connect-google-tag-manager]
- Log in to the Infobip web interface and go to Channels and Numbers → Live Chat → Create Widget → Installation & Security.
- Click on Google Tag Manager and copy the snippet code.
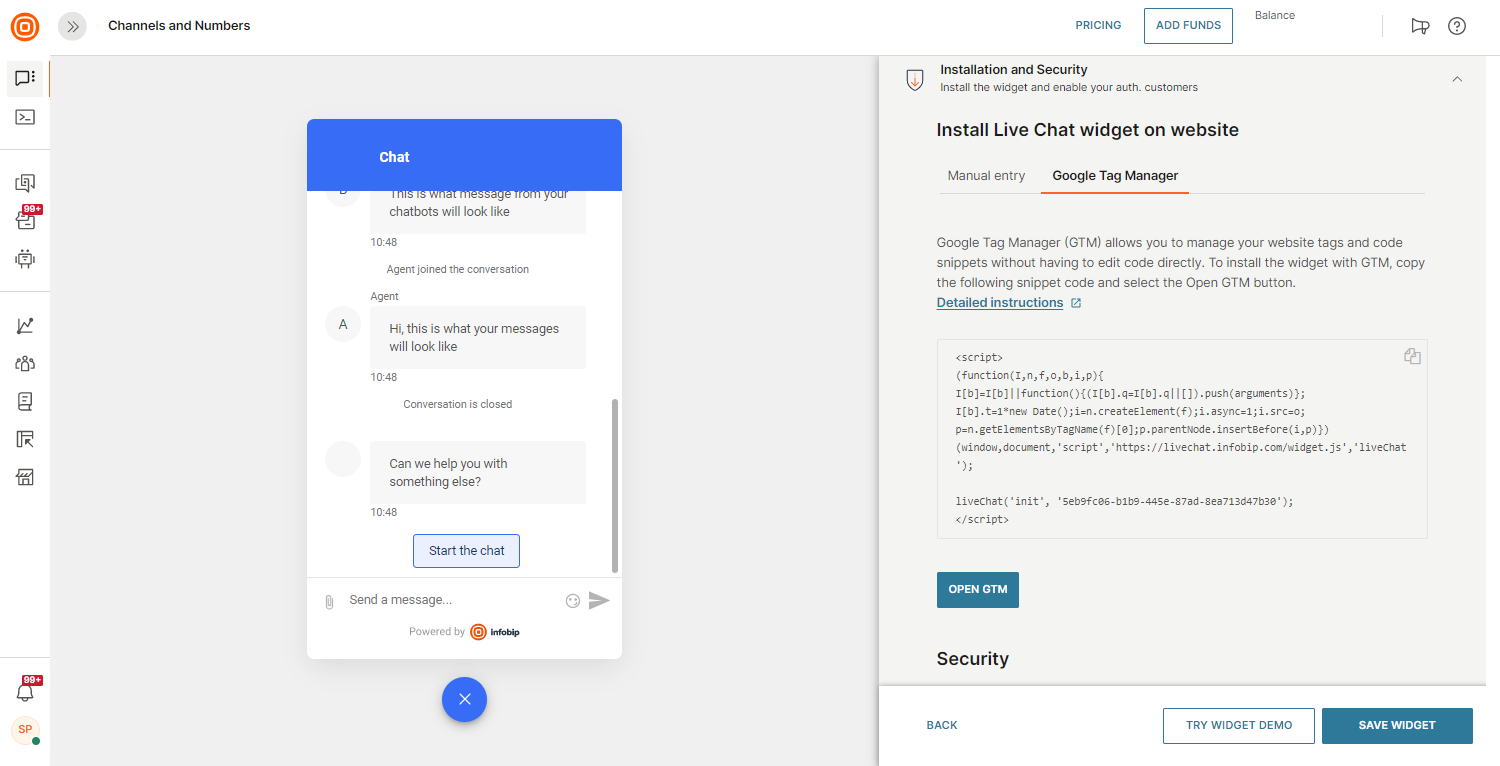
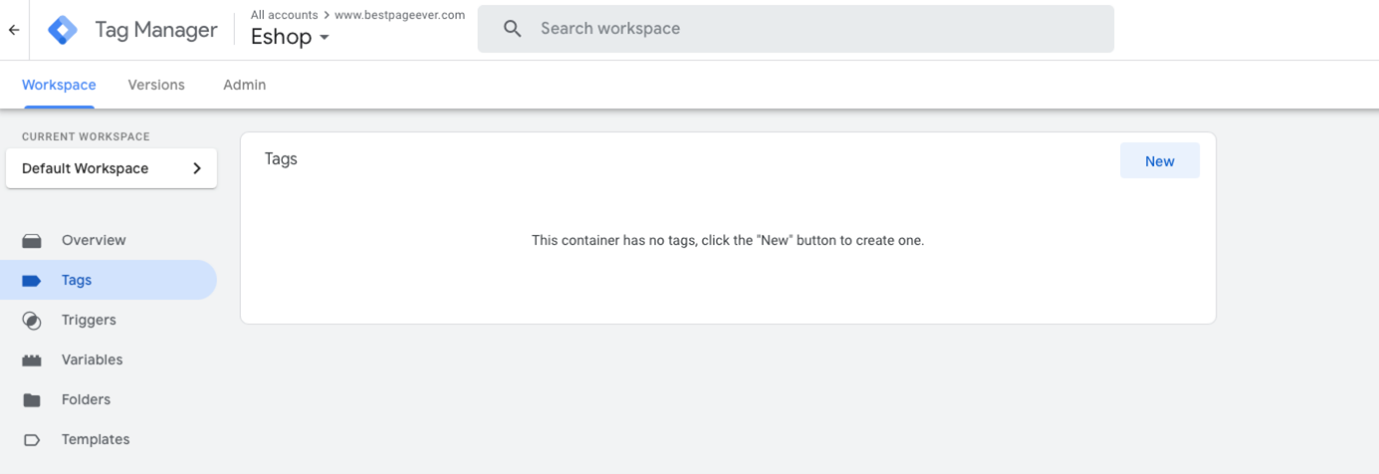
- Now, click the Open GTM button below the snippet code where you can log in to Google Tag Manager associated with your Google account.
- Under Tags, click the New button in the top right corner to add a new tag.
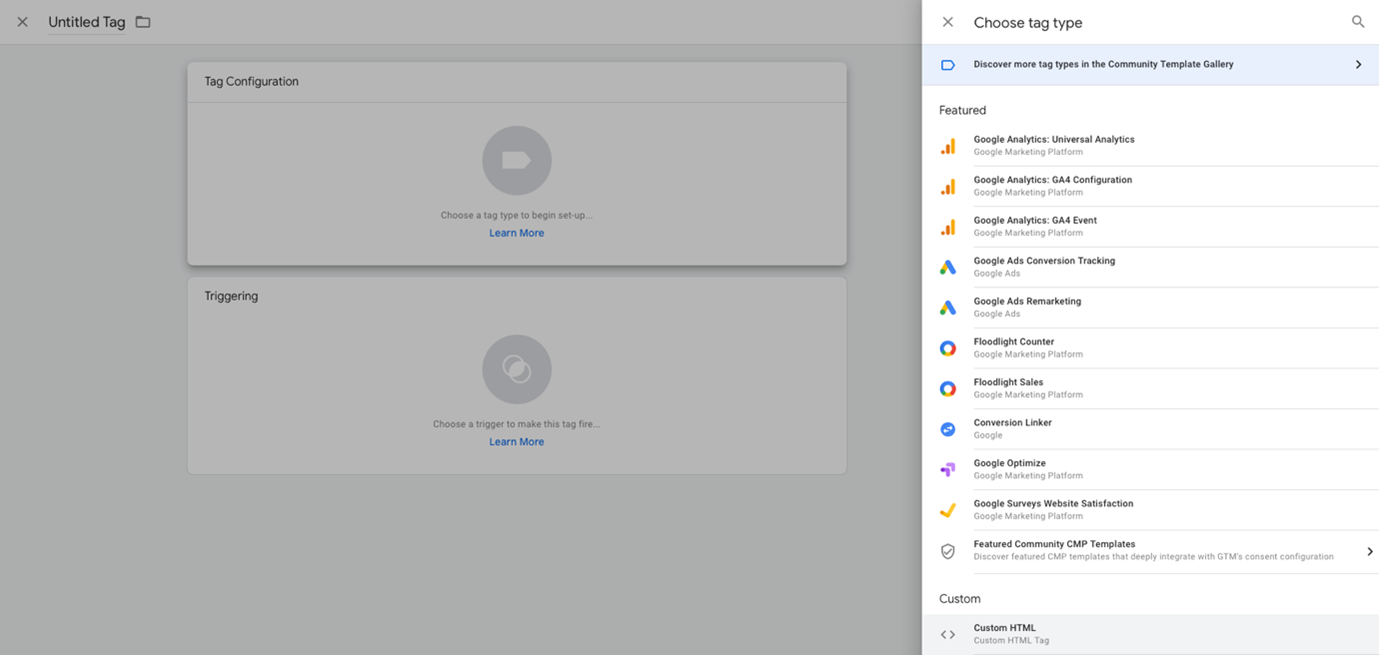
- Click the Tag Configuration panel and select the Custom HTML tag type.
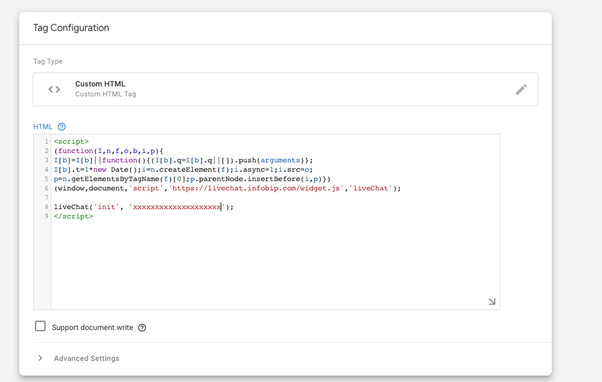
- Paste the copied snippet code from Step 2 in the HTML textbox.
- Configure the Tag Firing to run whenever you would like on your website.
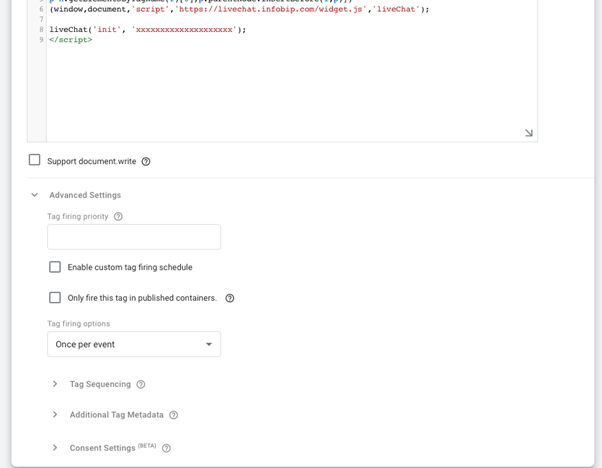
- Configure the Triggering.
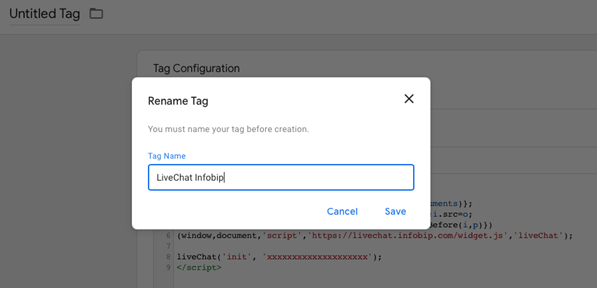
- Save the created tag.
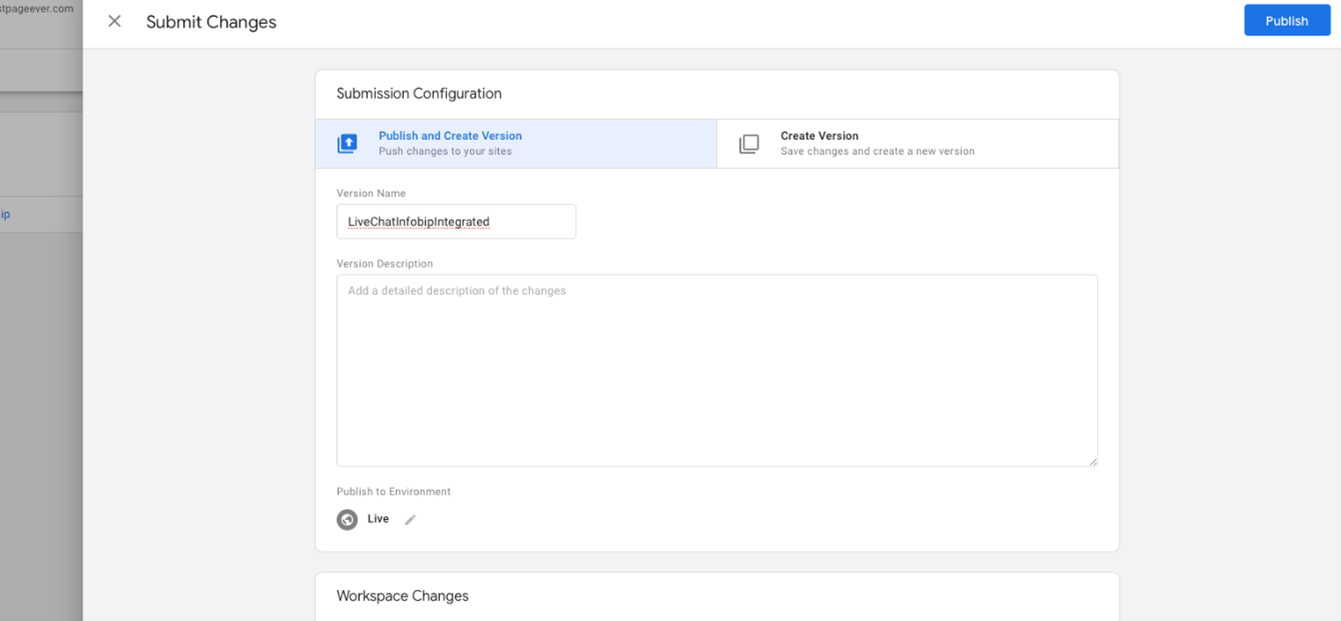
- Publish the new tag (select the Publish and Create Version option - to push changes to your sites).
If you do not have a Google Tag Manager account [#if-you-do-nothave-a-google-tag-manager-account-connect-google-tag-manager]
- Create a Google Tag Manager account.
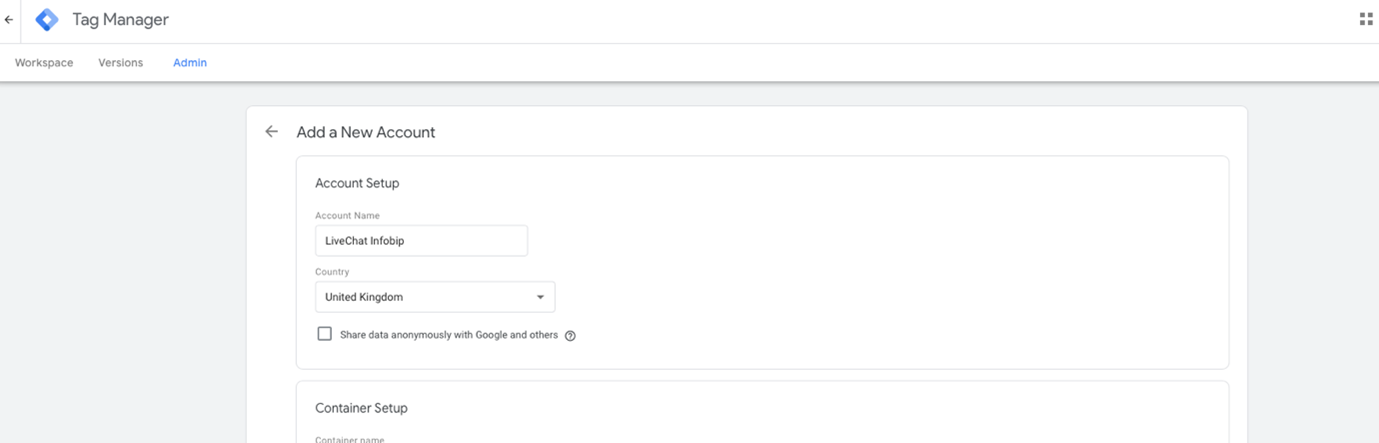
- Log in to your existing Google account or create a new account.
- Navigate to Google Tag Manager.
- Click Create account located on the right side.
- Enter the name of your account, country, container name, and platform.
- Confirm your setup by clicking the Create button.
- Read through and accept the Google Tag Manager Terms of Service Agreement.
- Continue with the GTM installation on your website by following the instructions on Google Tag Manager. For more information, read the GTM Quickstart documentation.
You have now successfully installed the Google Tag Manager in your application and you can continue with the steps at the beginning of this article (If you already have a Google Tag Manager account).
Share events from LiveChat to Google Analytics [#share-events-from-livechat-to-google-analytics-connect-google-tag-manager]
You can use the Infobip Live Chat channel to share events to your Google Analytics account. The following discusses how to set this up so you can use Google Analytics via the Google Tag Manager to track these events.
At this stage, the following events are supported:
WIDGET_OPEN- When the widget button is clicked and the chat opens.WIDGET_CLOSE- When the widget button is clicked again and chat closes.EYE_CATCHER_ENGAGED- If this is enabled, a small bubble-like text is shown next to the widget and this event will be called when the end user clicks on the bubble.EYE_CATCHER_DISMISS- When the end user closes the eye-catcher.CONVERSATION_OPENED- This event is called when the end user clicks on the Start chat button.CONVERSATION_SOLVED- The event is called when the conversation is solved.CONVERSATION_CLOSED- The event is called when the conversation is closed.
These events are part of a single liveChatInteraction Google Analytics event that expands on more information (parameters) regarding which exact action was triggered.
Configuration steps [#configuration-steps-connect-google-tag-manager]
If you have already integrated Google Analytics + Google Tag Manager on your website, the Live Chat widget automatically sends these events when triggered. If not, set up Google Tag Manager. Also, set up Google Analytics for your website.
Then, configure Live Chat event tracking.
-
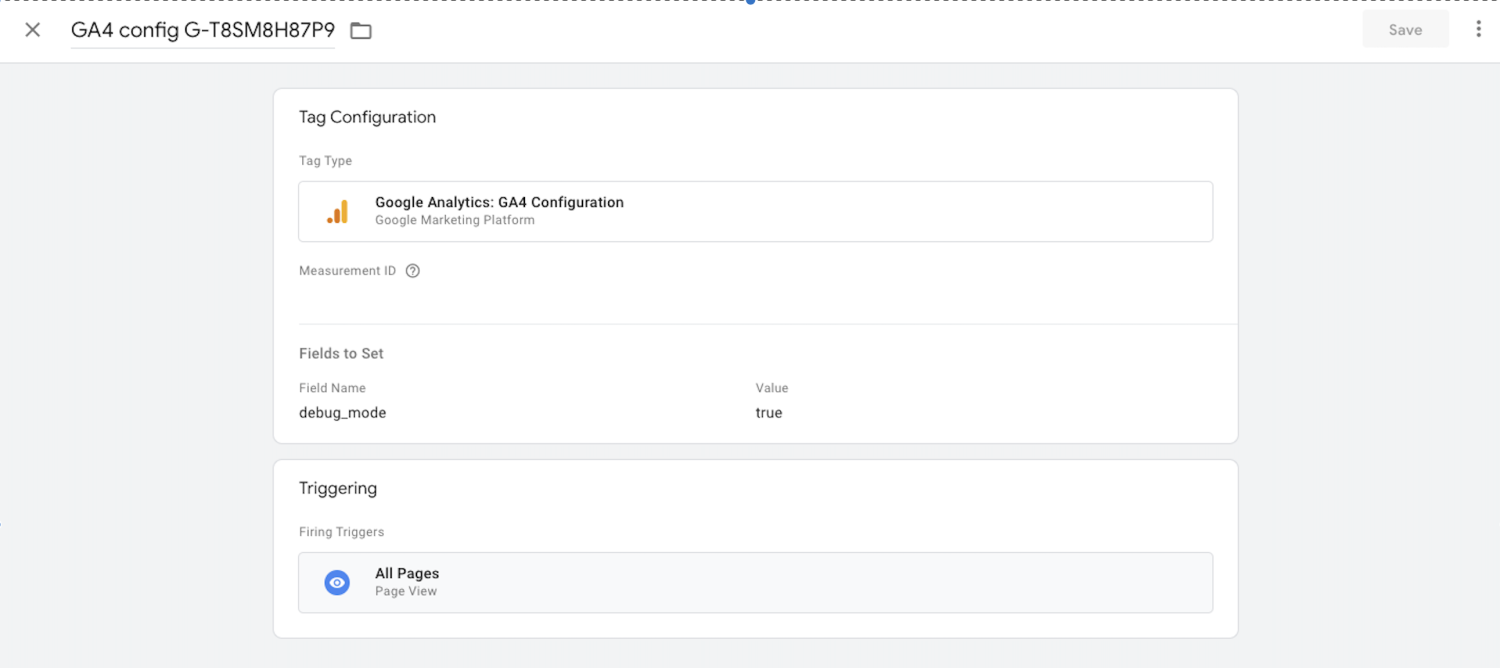
Use the Tag Configuration section to integrate Google Analytics with Google Tag Manager. Make sure to provide the Measurement ID from your Google Analytics account.
-
Import this Live Chat file to Google Tag Manager (contains tag, trigger, and variable required to track LiveChat events).
-
Go to the Admin panel → click on Import container.
-
Copy the code snippet to integrate your web application with Google Tag Manager. If you have not integrated this already, learn more about how to connect Google Tag Manager to LiveChat.
 Note
NoteIt might take some time until the events start registering.