Customize widgets
Follow these steps to create and customize your widget.
To configure the widget:
- Go to Channels and Numbers.
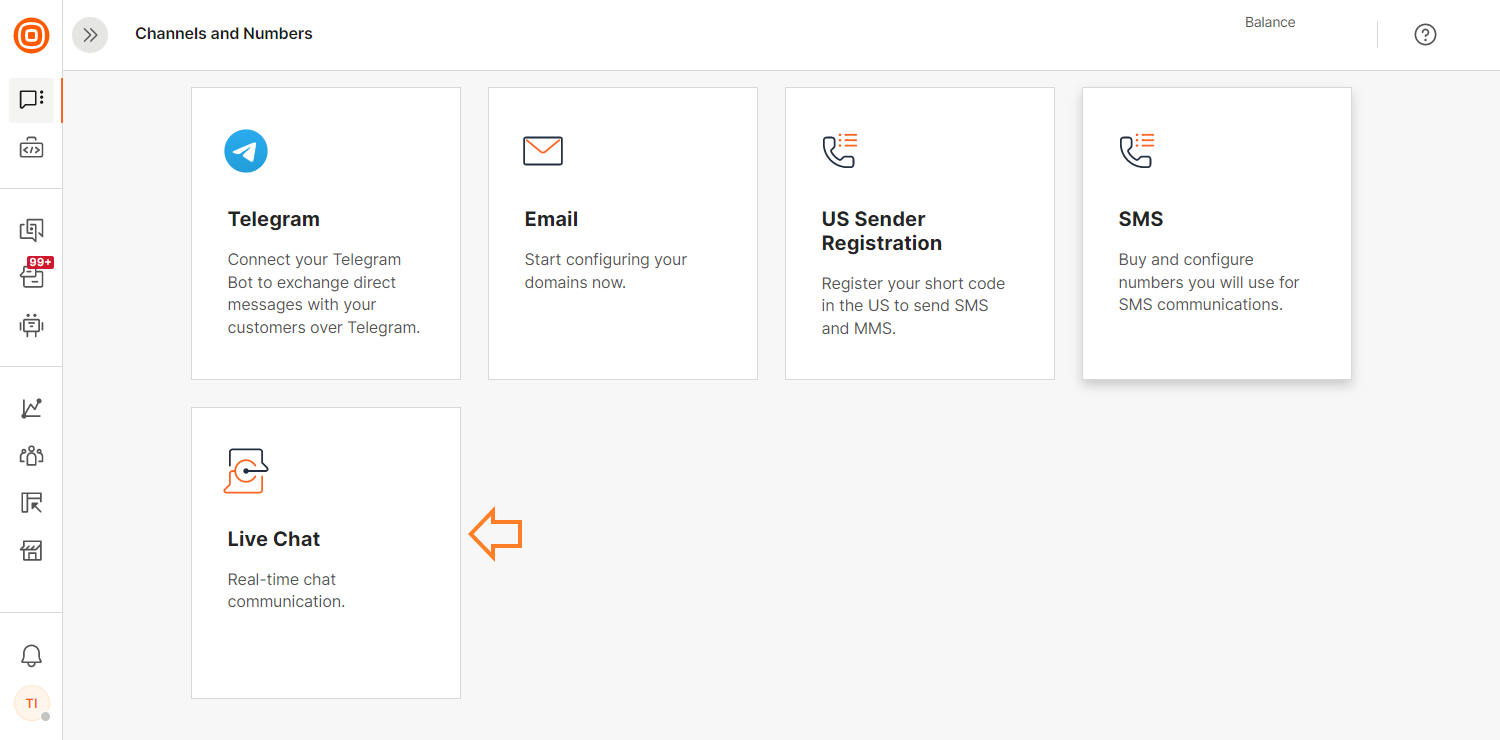
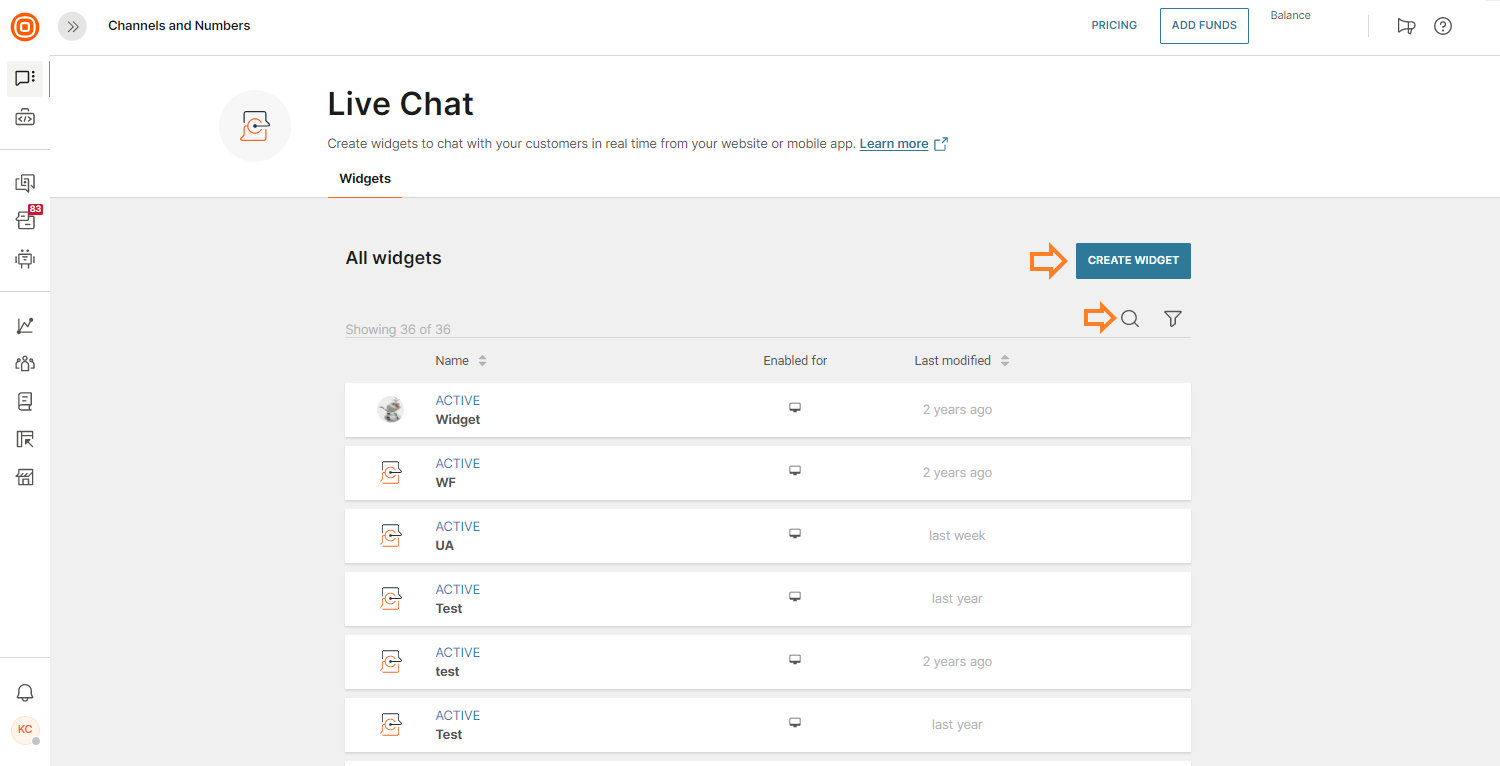
- Select Live Chat → Create widget.
Each Live Chat widget configuration can support both web and mobile in-app widgets. You can organize different configurations for different purposes.
For example, you can have two configurations (production and testing) that are linked to different domains and mobile app profiles. Additionally, you can have separate production widgets for different purposes such as for mobile app or website.
Every widget is an entity where conversations are associated with customers and can be routed to the agent queue using the routing option.
Filter parameters:
- Status: Each widget configuration can be Active or Inactive. Use the option to filter widgets by status in case you have more widgets.
- Type: Each widget configuration can be associated both for mobile applications and websites or separately. Filter by widget type to quickly find required widgets.
Settings
With widget configuration, you can define how your widget looks and works. You can also set up security options. When you create the widget, provide the widget name (required).
Additionally, you can set up the following features:
- Name - Widget name which will be used in routing and conversations to identify where your customers’ messages come from.
- Widget ID - Unique widget configuration ID.
- Display the widget - The trigger that enables widget configuration. The default state is disabled but you can enable or disable it at any point. For example, if you want to enforce turning off the widget on your website, move the toggle to disable state and the widget will disappear for your website customers.
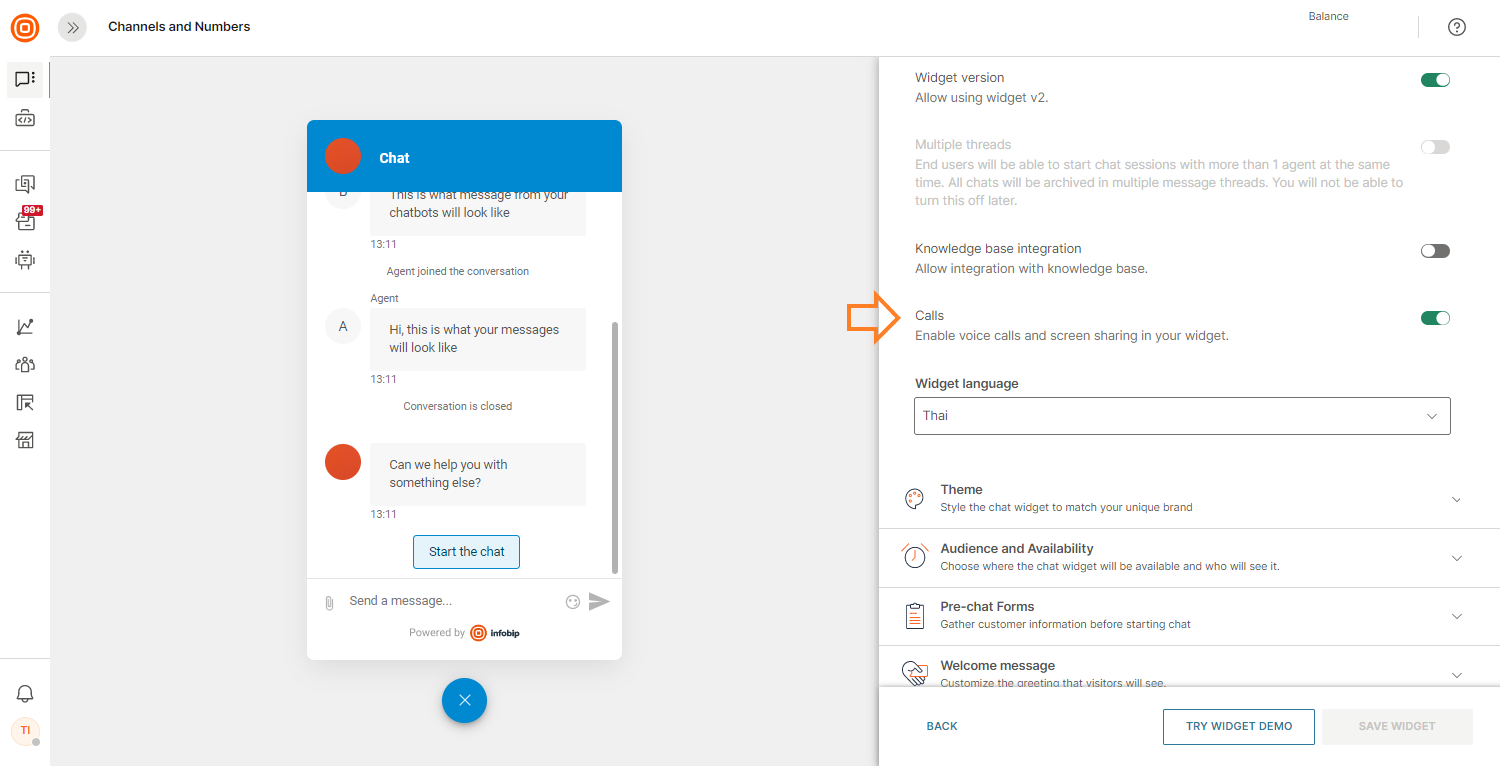
- Multiple threads - End users will be able to start simultaneous chat conversations with multiple agents. Multiple message threads will be used to archive all chats. This cannot be turned off once enabled.
- Widget language - Select the language to be applied to widget phrases.
- Try Widget Demo button - Check out how your widget configuration works in practice.
- Calls - If you have a WebRTC channel and Live Chat provisioned, as well as Live Chat Calls turned on in the widget configuration, you can have calls and screen sharing for mobile in your widget.
Send a message | Input widget field |
{Agent Name} joins the conversation | Automatic event when an agent is assigned to the conversation |
Conversation is closed | Automatic event when a conversation is closed |
Upload failed. Max file size is 10MB. | Validation message in the input field when an attachment exceeds allowed size |
All widget styling will be automatically available on your website when you click the Save Widget button.
Calls [#calls-settings]
Instead of sending messages, agents can use calls and screen sharing in Live Chat mobile to quickly resolve more complex customer issues without having to leave the chat or application. Customers can share their screen to receive guidance more quickly.
To have Calls in mobile, the following is required:
- APP to APP type of the WebRTC application set up.
- Live Chat enabled.
- Calls turned on in the Live Chat widget configuration.
Besides this, the following code work for Mobile SDK indicators needs to be applied:
Calls and screen sharing in Live Chat is only available for the Scale and Grow package and for customers with a WebRTC provisioned channel.
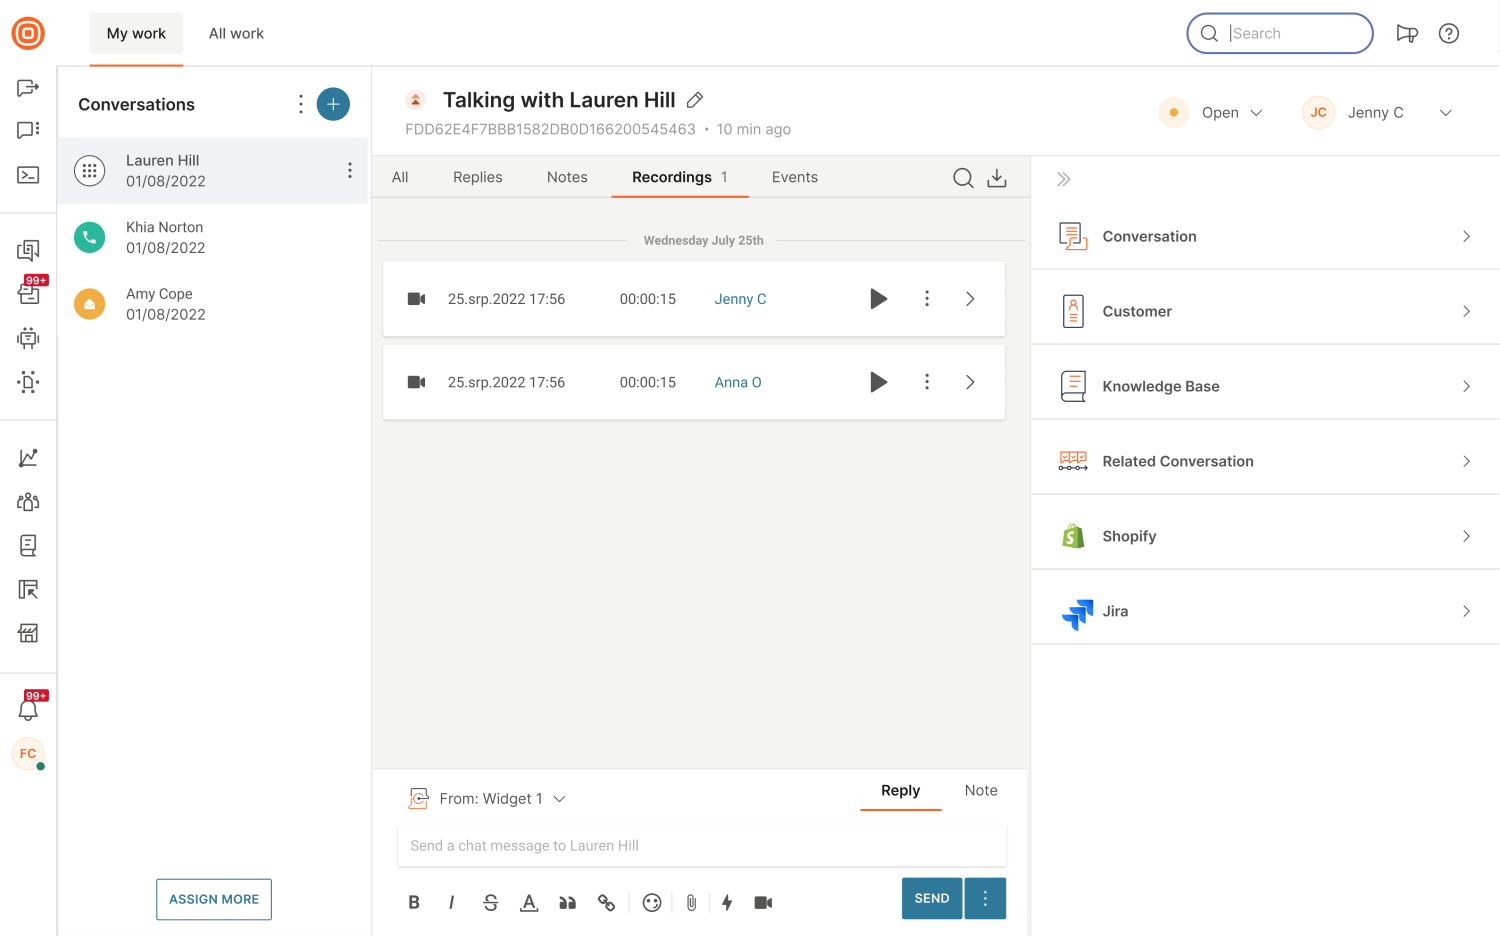
Call recording
Once the call/video is ended, the supervisor can check the linked recording that also appears in the Recordings tab.
Theme [#theme-settings]
Here you can define the widget layout and appearance on your website.
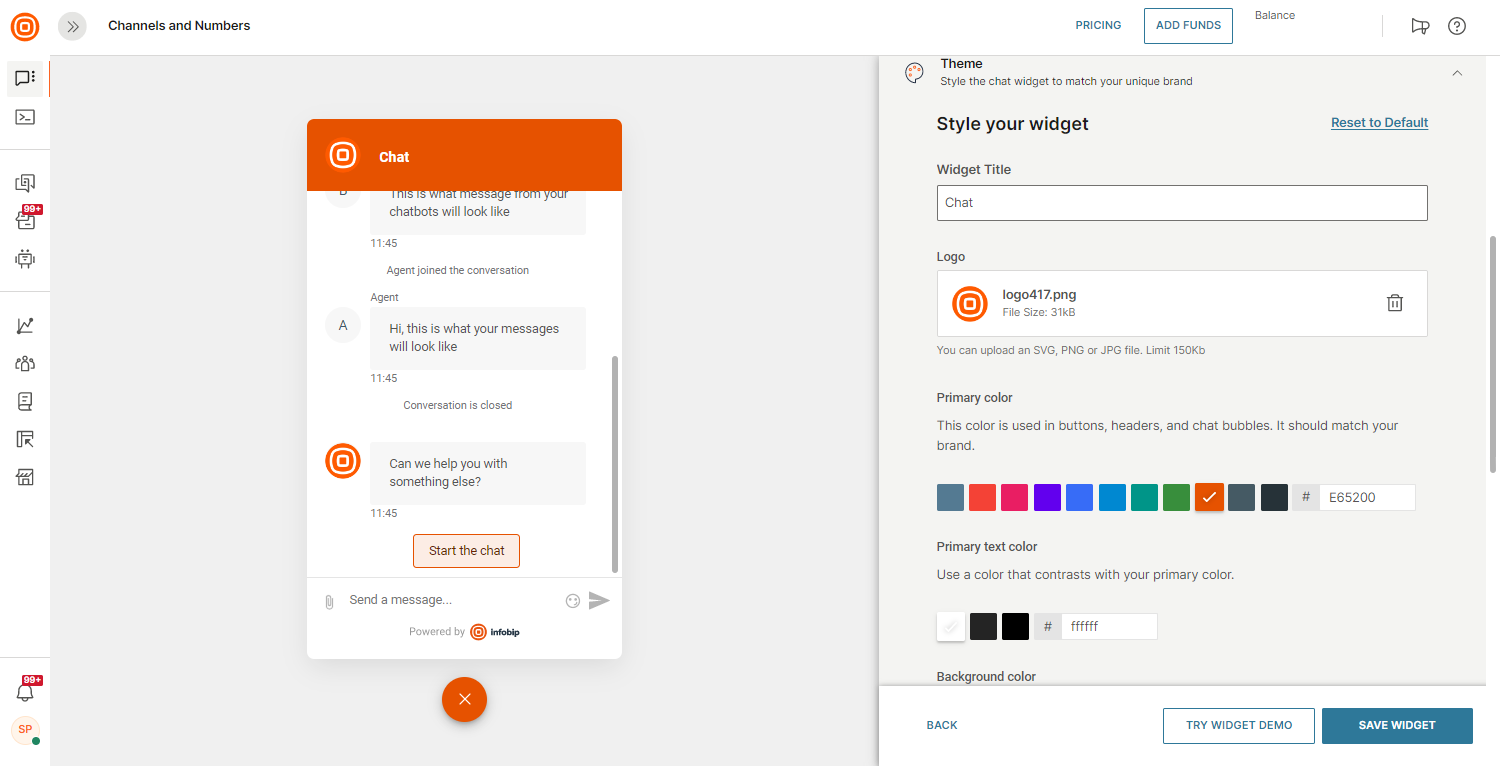
- Widget Title - Widget header title can uniquely identify your widget purpose for customers or represent your brand name.
- Logo - Upload your brand logo which will be displayed on the widget header. Recommended size 300x300px.
- Primary color - Widget header, customer messages bubbles, and send button color. Select an existing color or enter a HEX code from your brand book.
- Primary text color - Customers’ text message color.
- Background color - Messages background color.
- Widget Icon - Upload your widget icon and set up how the widget will be displayed in a collapsed view on a website. Primary color settings are applied for default icons. Recommended size 300x300px.
- Widget position - Define where you would like to place the widget icon on the website. The bottom right corner is the default placement.
- Display the watermark - Allow to show the Infobip watermark section in your widget
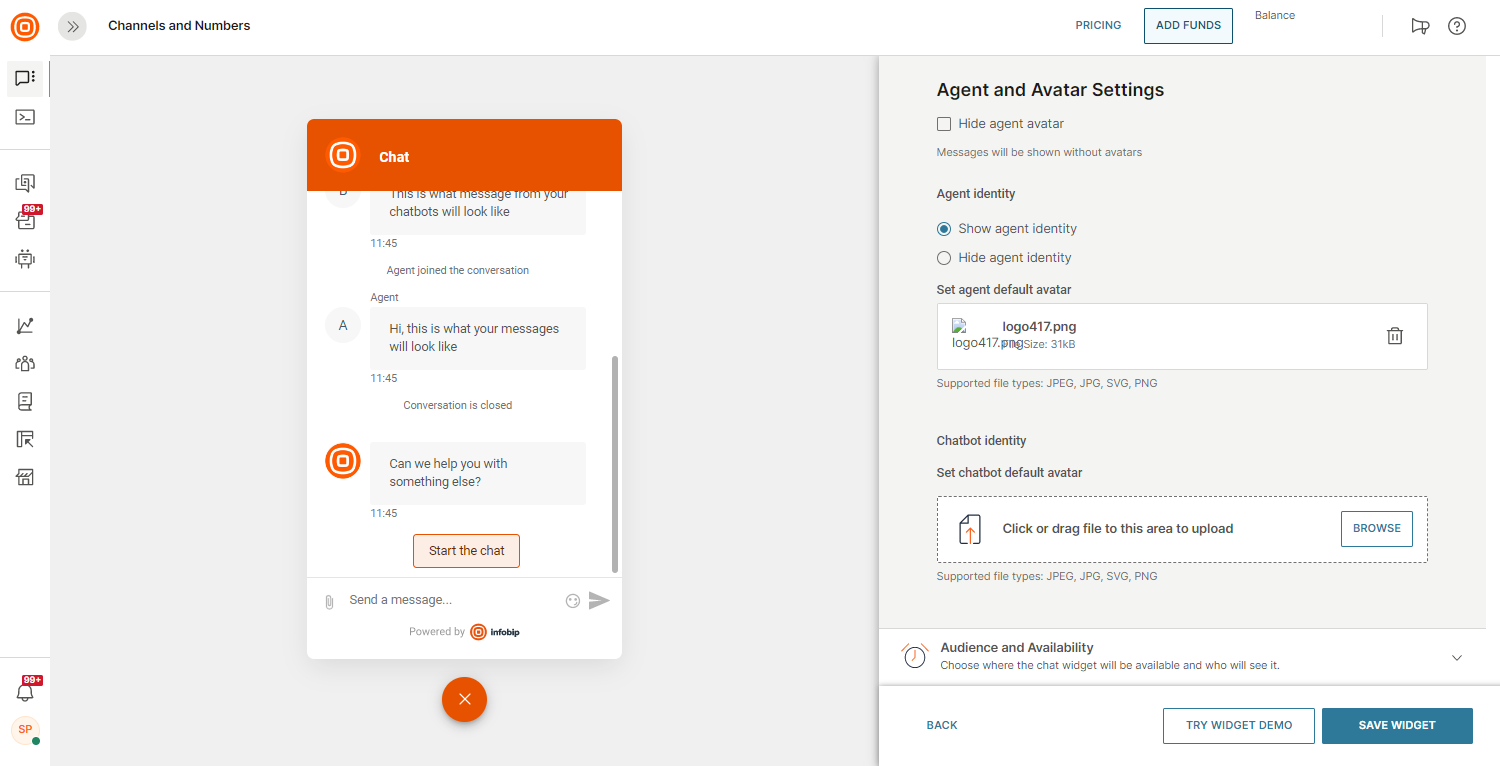
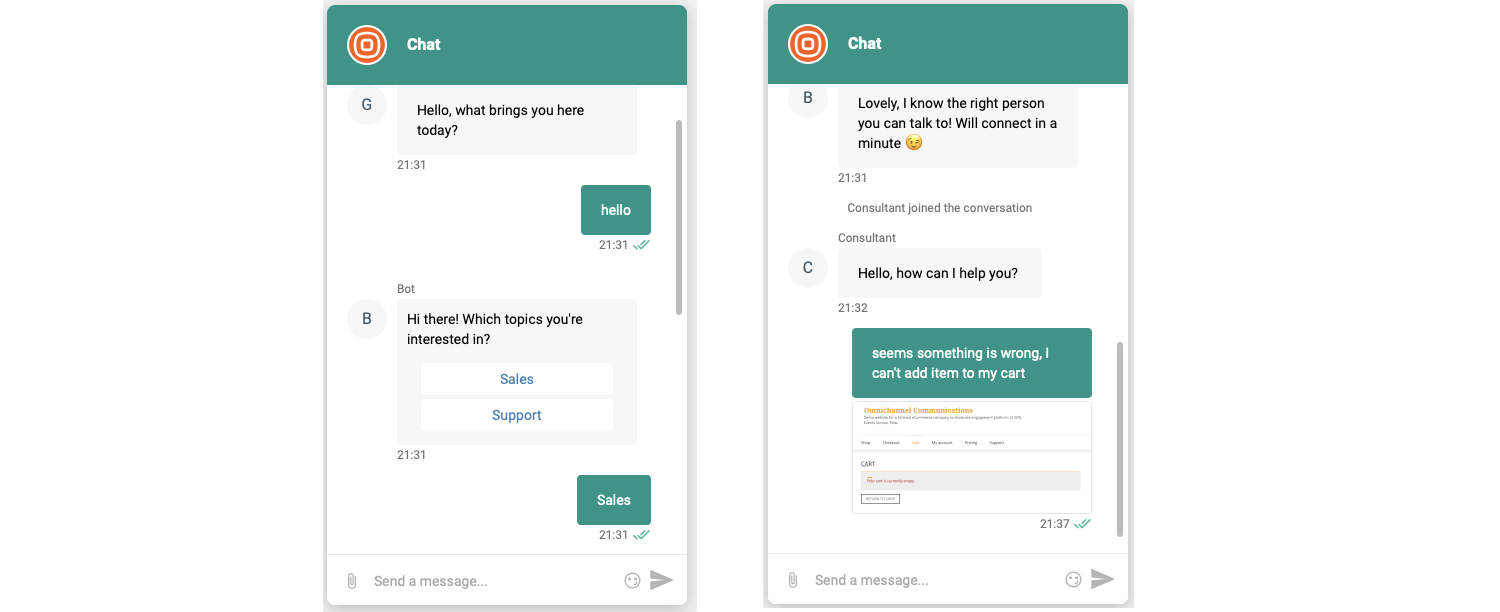
Agent and avatar settings [#agent-and-avatar-settings-settings]
Default agent and bot avatars feature allows for more flexibility in your widget layout configuration. This is where you can configure your default avatar which will override the agent avatar with a unified brand icon.
Also, businesses may sometimes have strict security policies that do not allow them to expose agents' names to the end user.
- You can use the Hide agent identity option to configure a default public name for all agents, for example, “Consultant” or “Support”.
- Click Save Widget to apply changes.
Advanced customization [#advanced-customization-settings]
EARLY ACCESS
For more information about Advanced customization, visit this page.
Audience and availability [#audience-and-availability-settings]
In this section, you can configure the widget audience, and safelist domains, and define working hours when your widget is available.
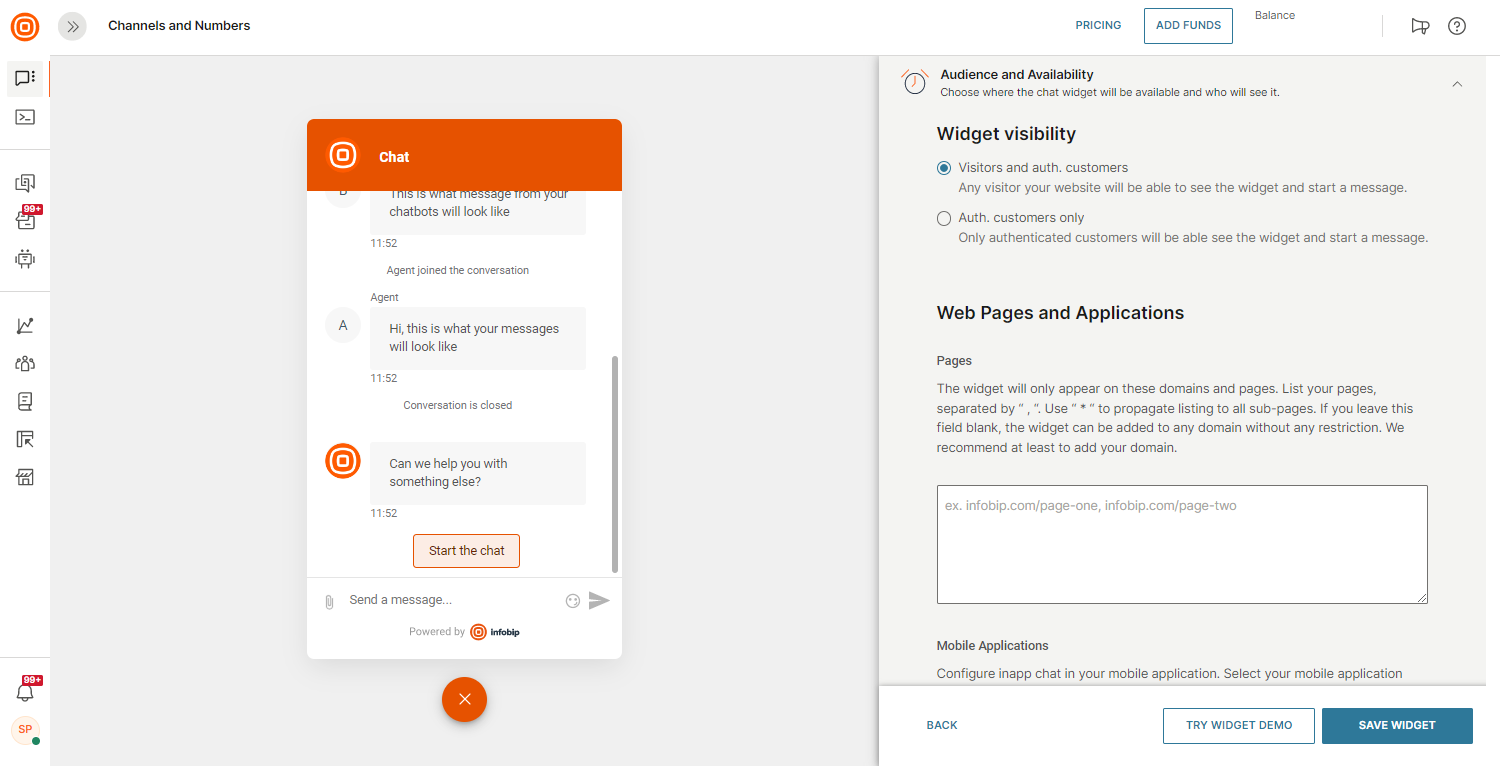
Widget visibility [#widget-visibility-settings]
Visitors and authenticated users - Widget will be visible for your website visitors (non-authorized users) and users who logged in on your website. Learn more about visitors and authenticated users.
Authenticated users only - Widget will be visible to the customers who logged in to your website. Read more about widget customer authentication.
Web pages and applications [#web-pages-and-applications-settings]
Pages
Use these options to safelist domains where the widget will be implemented or define specific pages on which the widget will be visible.
The field supports multiple entries with “,” using a comma as a divider. Domains should start with a full name, for example, https://domain.com
Mobile applications
Define the mobile application profile to connect the Live Chat configuration for your in-app chat. Only one mobile application profile can be linked to a particular Live Chat widget configuration.
For test purposes, you can check how in-app chat works in practice by connecting the Demo application mobile profile.
Rules defined in this field form apply only if the widget is added to your website.
Scheduling [#scheduling-settings]
Based on your time zone, you can define working hours and agent shifts if you do not have 24/7 availability.
When you define the working hours, the widget will not be visible on your website outside those working hours.
Pre-chat forms [#pre-chat-forms-settings]
Pre-chat forms are those forms displayed to customers before they even start chatting in Live Chat. Consider this to be a prerequisite to start the chat.
These forms collect information about the end user based on the list of questions you have added to the pre-chat form.
The main values Infobip brings here are:
- Increase the creation of the leads (have chats with known users that you have basic information about, and continuously enrich the profiling data).
- Obtain important business information (name, email address, phone number, interest).
- Decrease spamming or irrelevant conversations that are hindering agents' capacity or bot sessions.
- Allows you to hide your email address to avoid spam. Have your visitors contact you only via Live Chat and start gathering basic information.
- Qualification based on the type of the request before escalating to available agents (this way, you have a structured customer experience to collect certain data before the request is routed to available agents).
Within the Live Chat widget, you can set different pre-chat forms for:
- Leads - This is an anonymous user, and not trusted yet.
- Authenticated users - A known user, and considered as trusted based on the received personalization token.
For more information about Pre-chat forms, click here.
Welcome message [#welcome-message-settings]
First impressions matter. Use this option to greet customers or suggest how to restart a conversation.
When configuring the Welcome message, you will see two main parts:
- Welcome message - The first message your customers see when they join the chat for the first time.
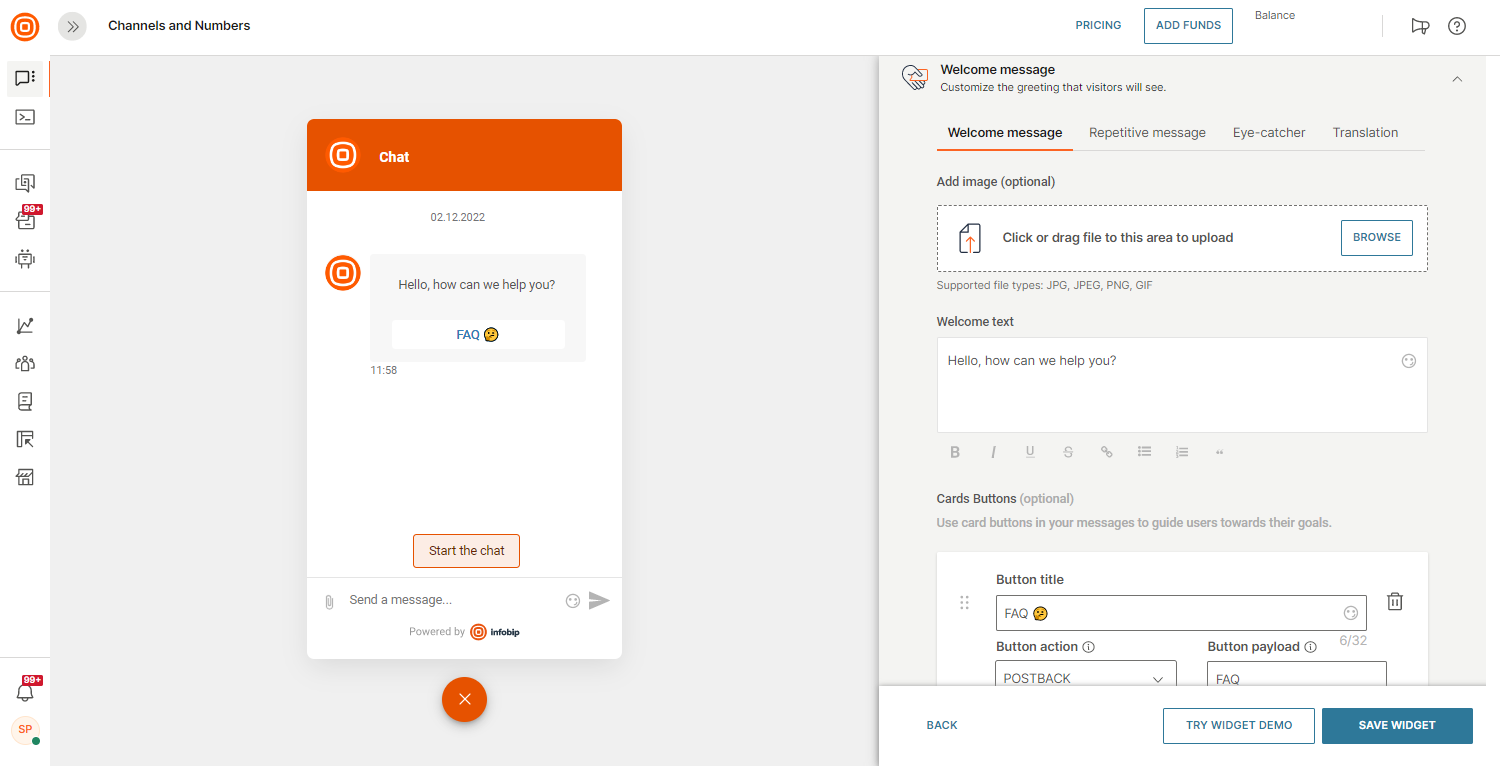
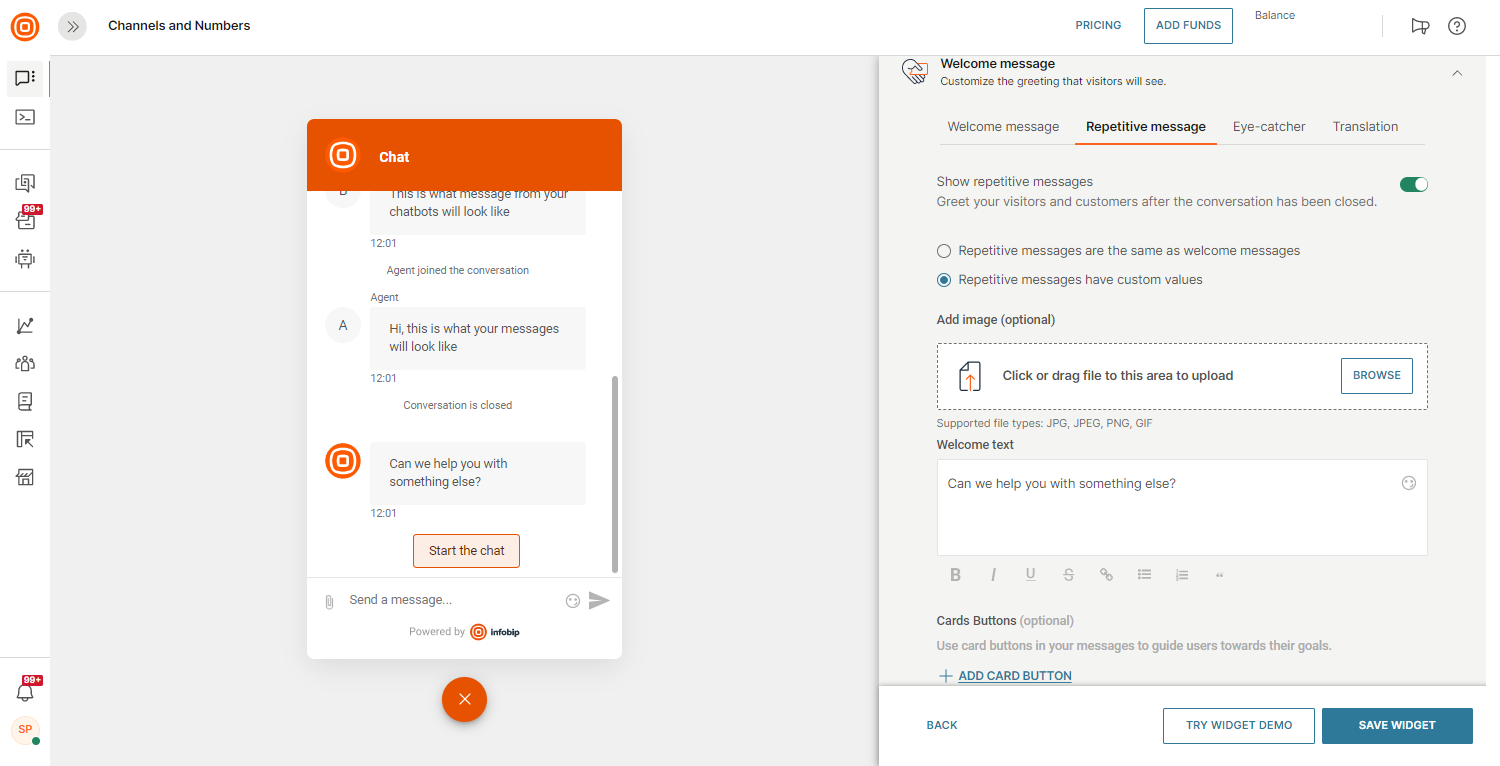
- Repetitive message - The suggestion that triggers automatically in the chat widget after the previous conversation has been closed. You can use the same content for both the repetitive and welcome messages or you can create a custom one.
You can enrich each message with certain elements that can help you make your greeting more recognizable and ease into a conversation for your users:
- Image - Add an image that will grab your users' attention.
- Text - You can use rich text formatting to highlight important content or add emoticons for additional message engagement.
- Card buttons - Specify additional action with URL or custom button payload for your chatbot.
- Quick Replies buttons - Predefined answers that are a great resource to be used in routing to a specific queue of your agents or as keywords in Answers chatbots.
Quick replies [#quick-replies-settings]
Make a conversation seamless and natural by adding quick replies buttons.
Each label serves as an automatic postback message when the end user clicks on one of the quick replies.
Predefined answers are a great resource to be used in routing to a specific queue of your agents or as an intent in Answers chatbots to automate the first touchpoints with your end users.
You can arrange the order of your quick replies by a simple drag-and-drop and use the preview option to get a sense of the experience your end users have while chatting.
Multiple languages in automatic messages [#multiple-languages-in-automatic-messages-settings]
The language on the web and in the app can be customized by the end-user to suit their needs. This feature enables setting up multiple languages strategy on one live chat widget through multilingual automated messages such as:
- Welcome messages
- Repetitive messages
- Quick replies
- Buttons
- Eye Catcher messages
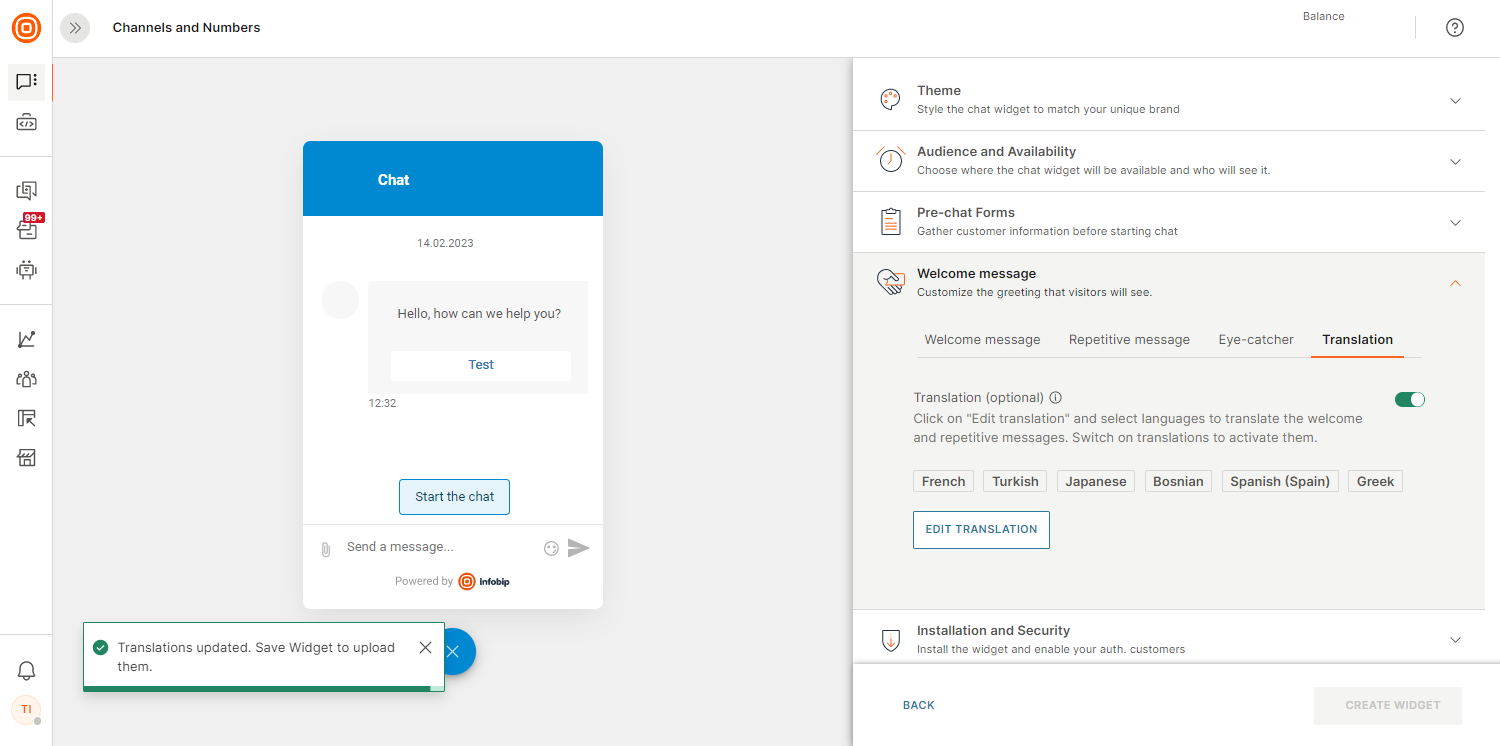
In the Welcome message option you can set up the multiple languages strategy for:
- Welcome text
- Cards Buttons (optional)
- Quick Replies (optional)
- Choose the Translation tab and turn on the translations by clicking the switch and the Activate Translation button.
- Alternatively, you can add the translations first by following the instructions listed below; after adding all translations, enable the Activate translations switch and save the widget.
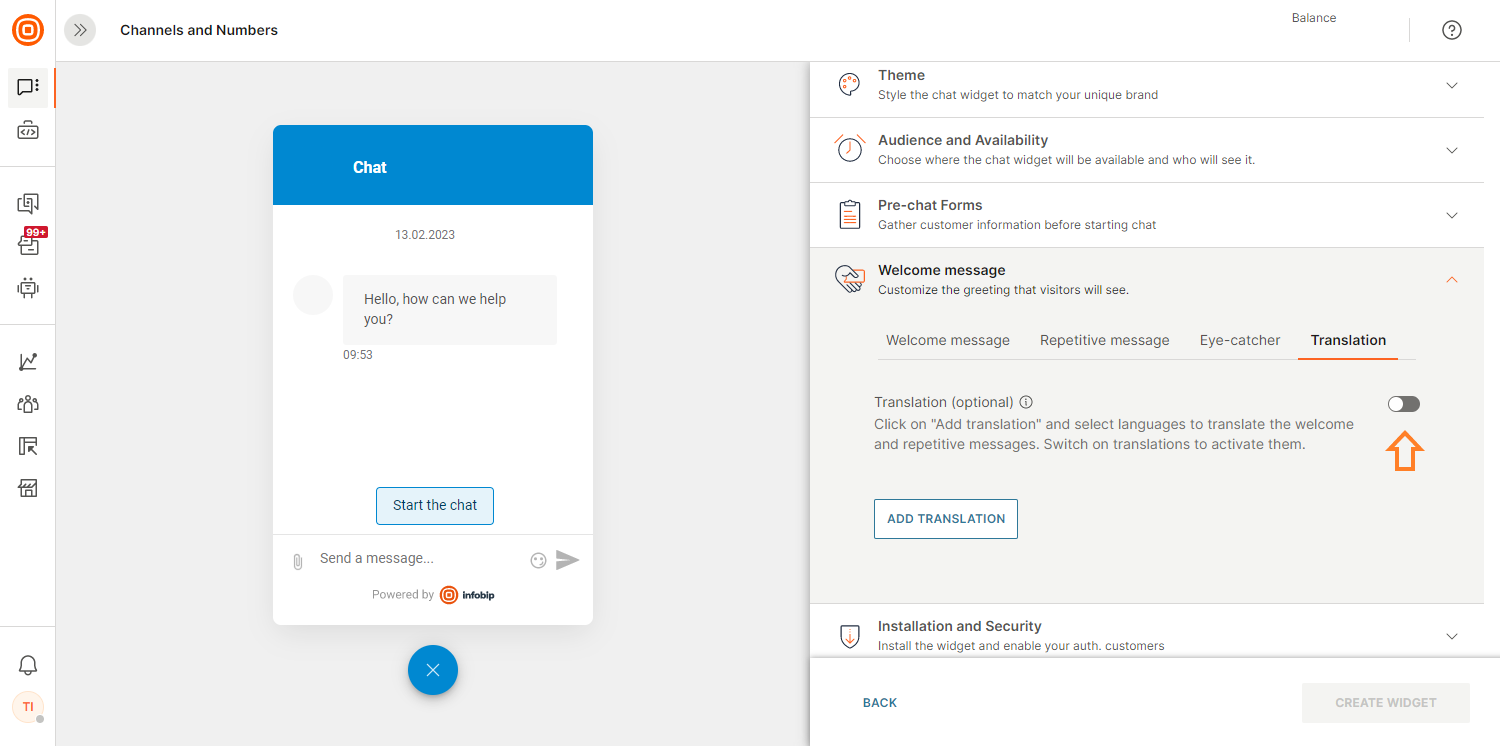
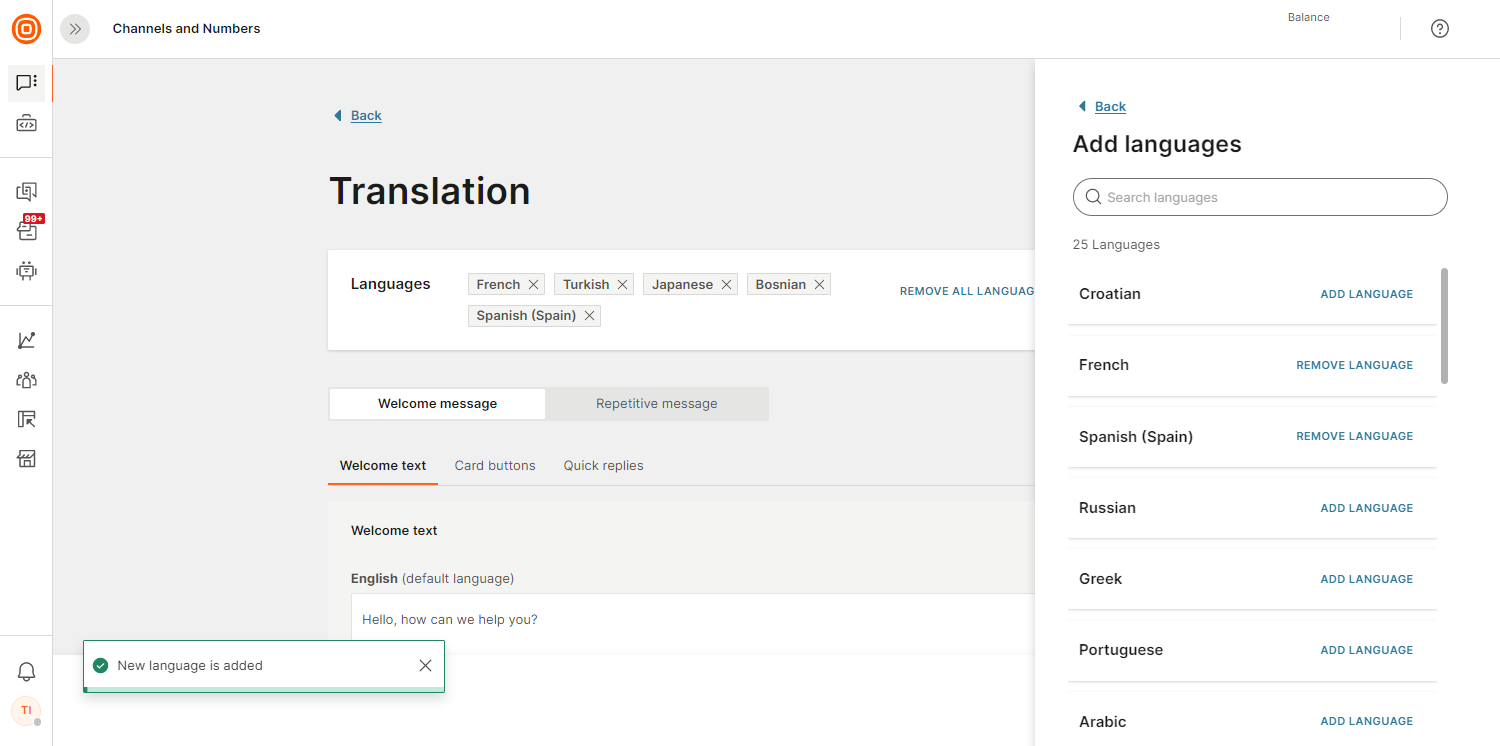
- Once the translations are activated, select the language(s) to translate the welcome and repetitive messages.
- Select Add Translation button that opens the Translation page with the following features:
- Inactive/Active slider
- Add Language button
- Remove All Languages button
- Possibility to add translations for:
- Welcome message
- Welcome text
- Card buttons
- Quick replies
- Repetitive message
- Welcome text
- Card buttons
- Quick replies
- Cancel
- Save Translation
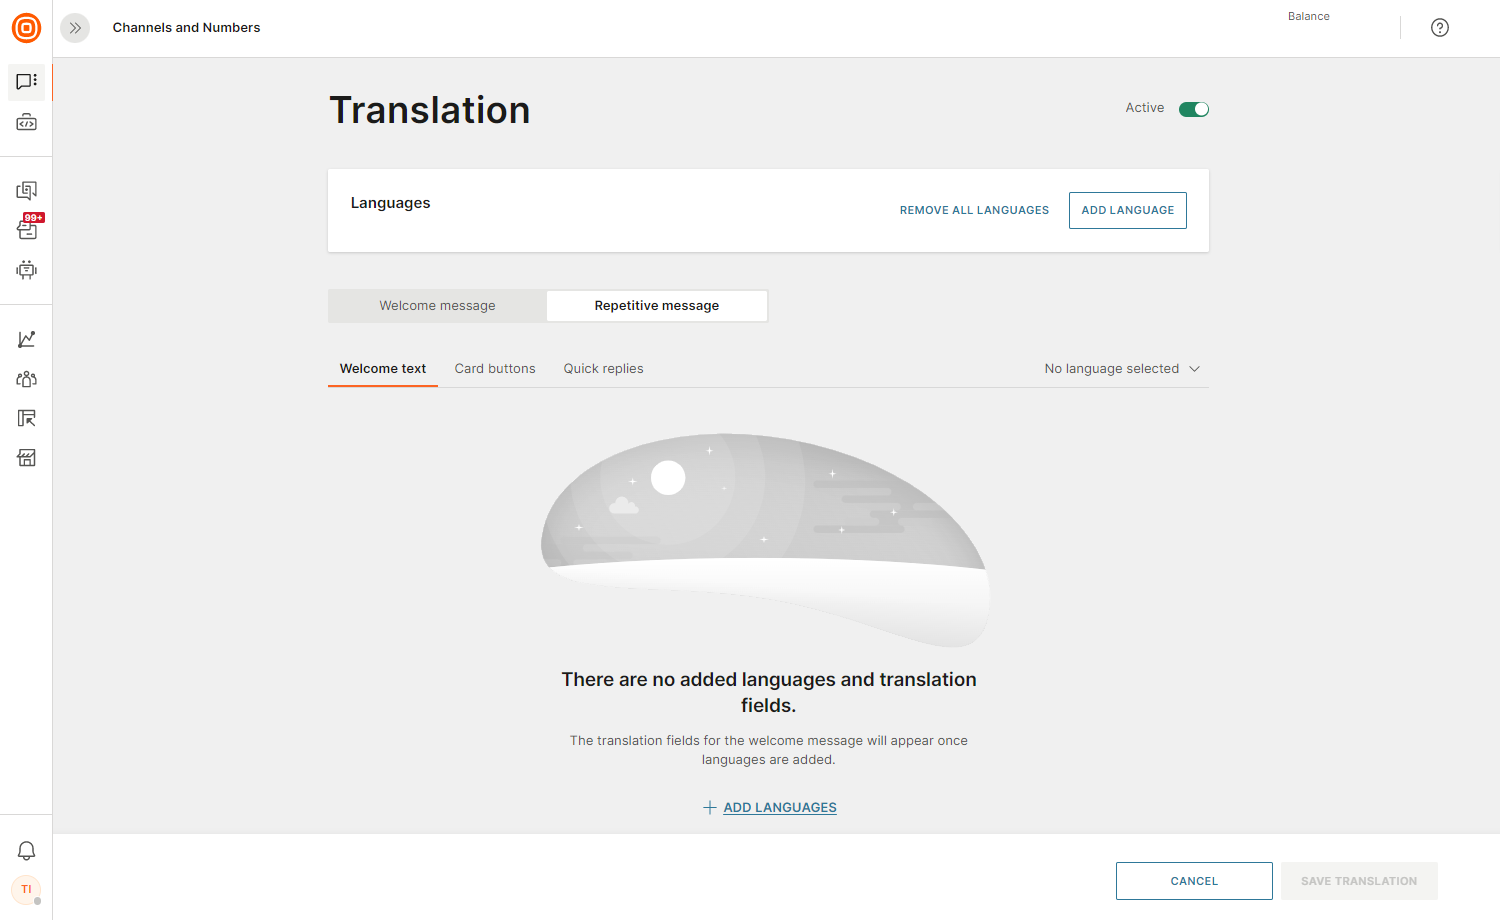
- Welcome message
- Clicking the Add Language button opens the language menu where you can search for and select the wanted language(s) by clicking the Add Language button.
- Once you add the language(s), they are displayed in the Languages tab.
- After adding the translation(s) and editing the necessary details, click the Save Translation button.
- Once you save the translation(s), you are taken back to the widget editing page where you need to Save/Create the widget by clicking the appropriate button.
- You can edit the translation(s) as needed by clicking the Edit Translation button.
Additionally, in order for the feature to work properly, it needs to be combined with the Language Web API, followed by a platform-specific plugin (for example, Android). By doing this, the client is informing us about the language preference made by the user on the website or mobile application. Having this information allows us to display the correctly configured language variation as opposed to a random configuration.
Supported languages:
Turkish, Korean, Russian, Japanese, Chinese, Spanish, Portuguese, Polish, Romanian, Arabic, Bosnian, Croatian, Greek, Swedish, Thai, Lithuanian, Danish, Latvian, Hungarian, Italian, French, Slovenian, Ukrainian.
Multilanguage support currently applies only to automatic messages configured in Live Chat.
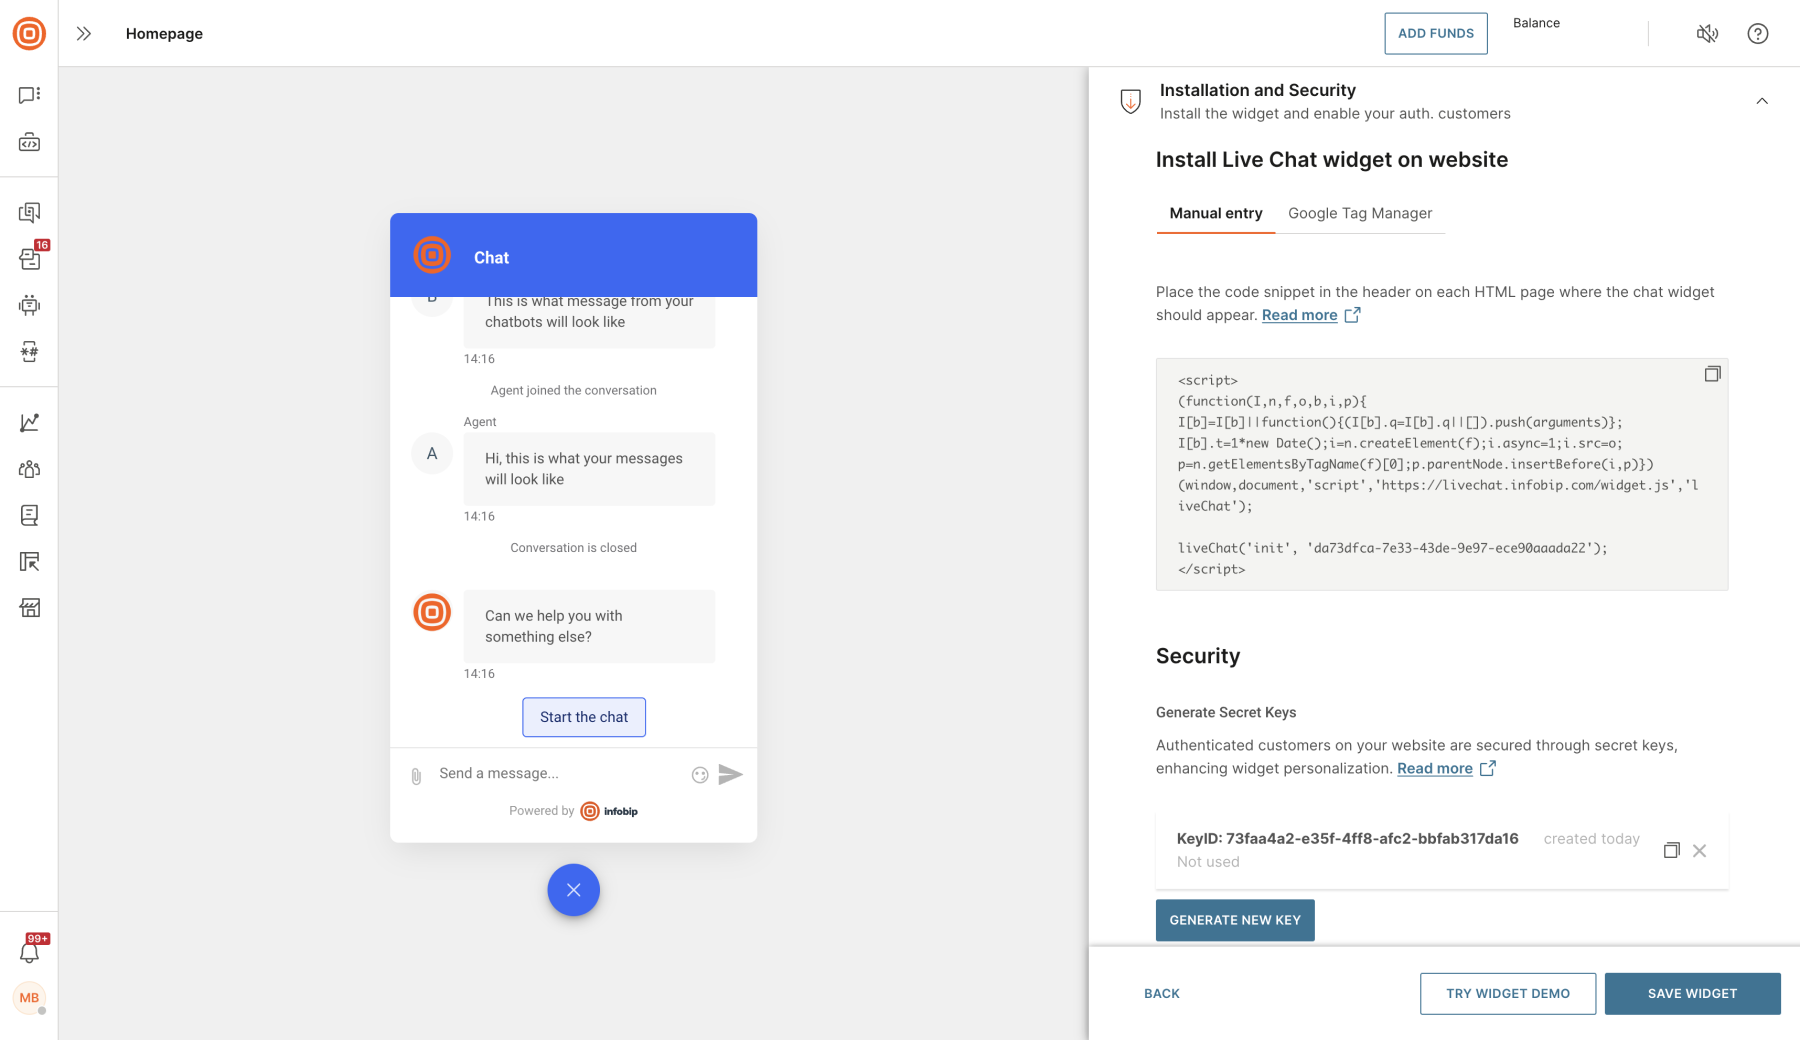
Installation and security [#installation-and-security-settings]
This section contains instructions for installing the widget on your website and security settings for user authentication.
For detailed installation instructions, refer to the Installation section.
Below is a detailed description of the individual security-related settings.
Generate secret keys
This section allows you to generate and manage secret keys. Use these keys to authenticate your users, enabling them to access their personal chat history and allowing your agents to verify their identities. Your widget can have as many secret keys as needed.
For more information on authenticated users, see User authentication.
Secret keys are confidential. Share them only with those responsible for integrating your widget. Never make them publicly accessible. Unauthorized access to secret keys can allow attackers to access your users' history or impersonate your customers.
Mobile app customer authentication
This option enhances the security of Live Chat in mobile applications by requiring a JSON Web Token (JWT) in addition to personalization to authenticate users.
For more information, refer to our Android and iOS Live Chat documentation.
Keep user as lead when authenticating
Live Chat manages your users' profiles in People. By default, when a user is authenticated for the first time, Live Chat creates a Customer profile. For unauthenticated users, Live Chat creates a Lead profile. If an existing lead user is authenticated, the system automatically promotes them to an authenticated customer.
Enabling this property prevents Live Chat from automatically creating user profiles or promoting leads to authenticated users. This means that, unless a customer profile already exists, a lead profile will always be created and used for both unauthenticated and authenticated users.
Unauthenticated history retention length
Use this property to set a history retention period for unauthenticated users. For example, if the retention period is set to 24 hours, the system removes the chat history of a user who remains inactive for that period, and the history becomes inaccessible. Inactivity starts when the user loses connection to the page containing Live Chat, such as when the page is closed. Opening Live Chat with an ongoing conversation resets the inactivity period.
Enabling the Keep user as lead when authenticating setting will allow authenticated lead users to retain their chat history indefinitely.
Mobile customization [#mobile-customization-settings]
To help our clients effortlessly represent their brand's visual identity and voice, even more mobile customization possibilities are offered for the Live Chat widget. Providing this option through an SDK solution enables you to adhere to the brand's visual identity.
The following options are available to customize the mobile Live Chat experience:
- Customizable native message composer:
- Attachment icon and behavior
- Sent message icon and behavior
- Message composer's colors, padding, shapes, background, shadowing, etc.
- Possibility to replace the message composer with a native composer
To find out more about customizing the in-app chat, see the links below:
Features
A variety of Live Chat widget features set you off on a unique user experience that your customers will enjoy and benefit from.
- Message statuses - All sent messages show a status (sending, delivered, seen), so the end user can see if their message has actually reached the intended customer representative.
- Conversation real-time events - End user can see in real time when an agent joins the conversation, when they are typing and also when the conversation has been solved.
- Conversation history:
- The system shares leads chat history automatically across multiple tabs of the same browser.
- Leads' conversation history retention is controlled by the
leads chat session timeoutparameter. - The widget stores the leads session and its history for 24 hours by default.
- Authenticated user history supports seamless sharing across all sessions of the authenticated customer. For example, customers can be logged in to the mobile app and have a session on the website - and all messages are synced in real time.
- Interactive card buttons - Functional actions are
open URLorpostback replywith a button keyword. The limitation is 3 interactive buttons per message. The interactive buttons are available in interactions over Answers. - Attachments - The widget preview renders images, video, and pdf attachments. Other types of attachments are available for download only. Note that file size limit is 10MB. You can send attachments inside the in-app chat from your media gallery or captured from your camera device.
- Widget icon (launcher) - Indicates received and unread messages. You can customize the widget icon to an animated gif to focus additional attention on chat indication.
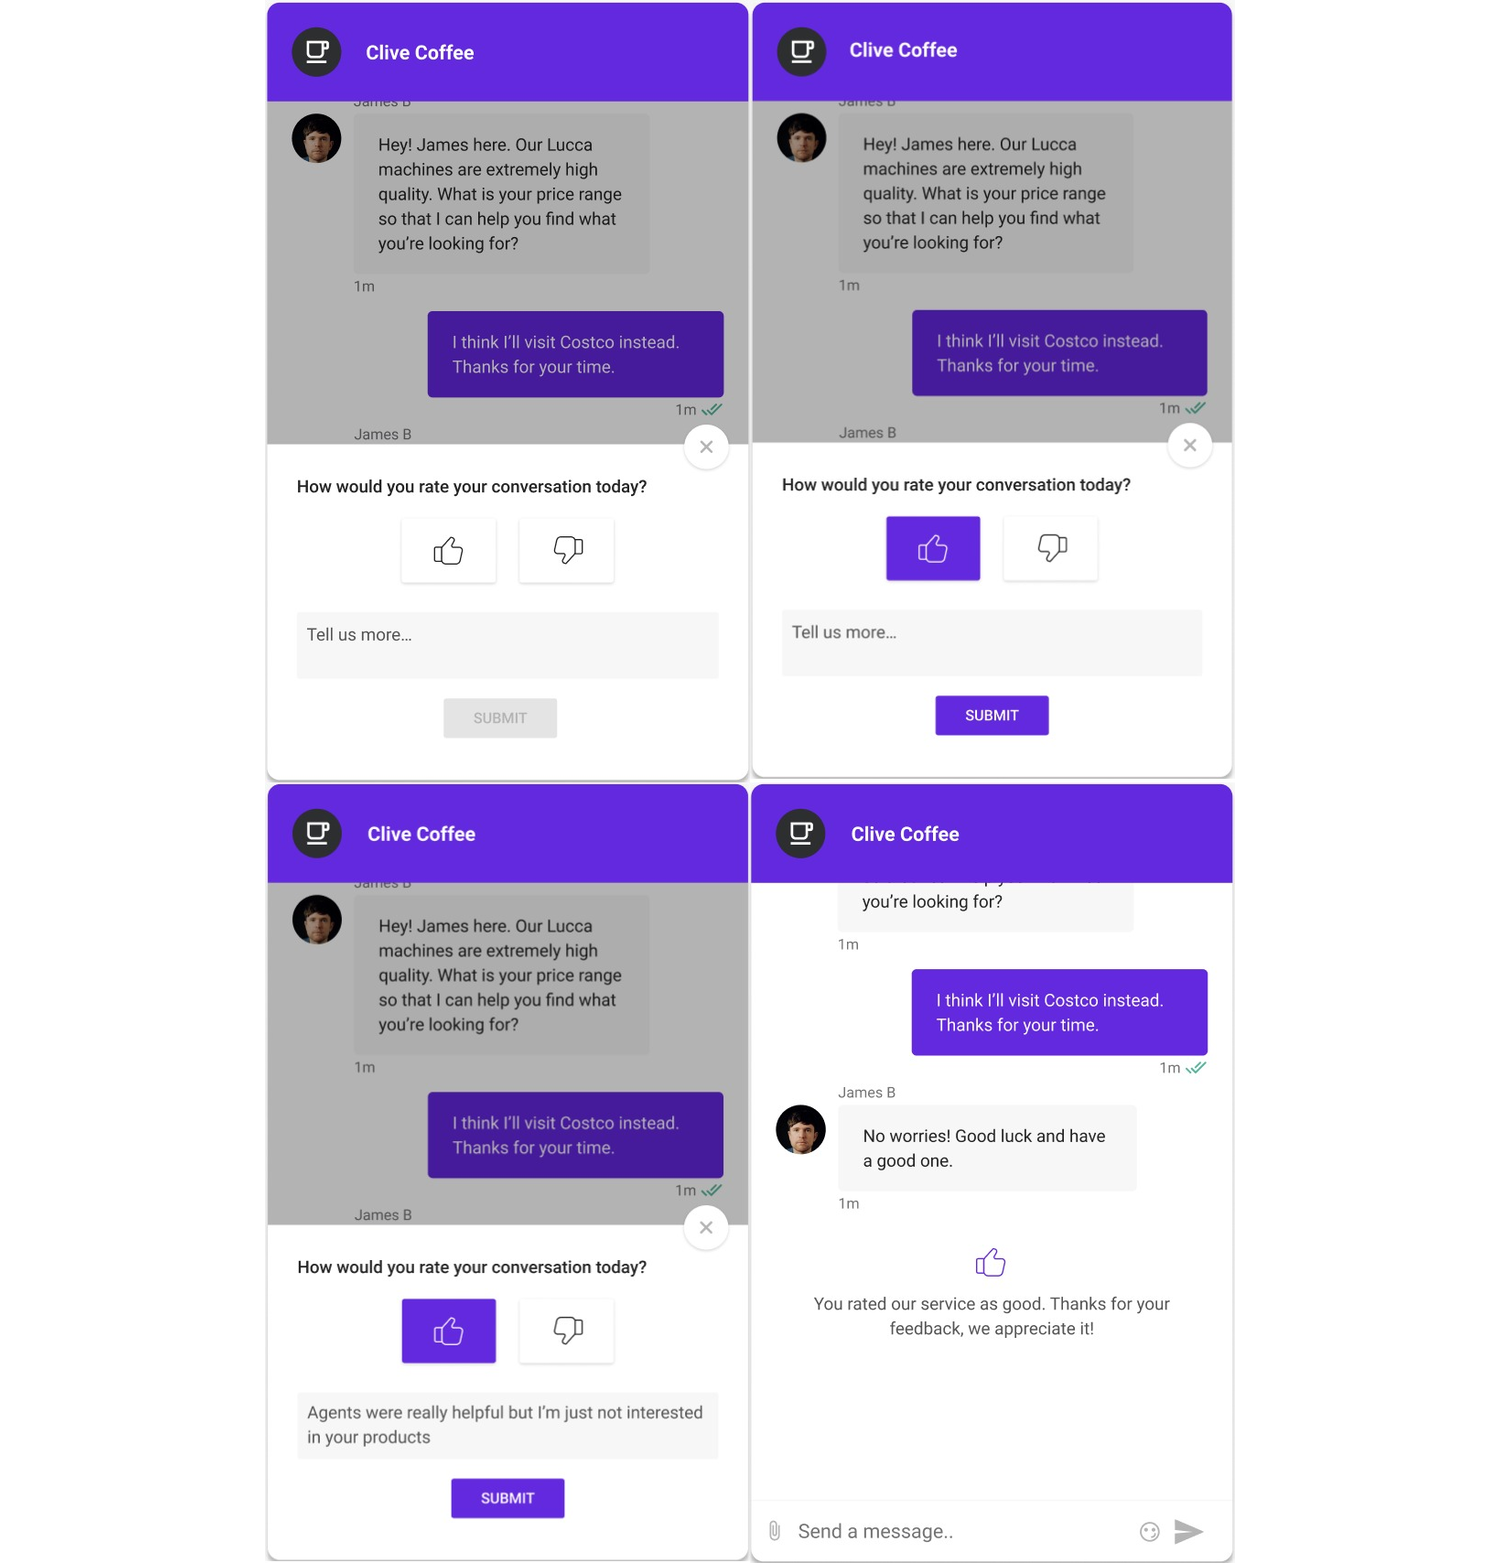
- Widget surveys - Serve for analyzing customer feedback for a particular conversation. According to the configured Conversation Surveys, the widget triggers an interactive bottom banner - which the end user can dismiss anytime. Besides a quick rating on the conversation experience (e.g., happy / not happy), the end user can write additional comments. A push notification is triggered to transfer the end user to the in-app chat survey if they have a mobile app with the in-app chat. The feedback window is available for 1 minute (default) and if the end user is inactive during that period, the survey will not show up out of context of the ongoing conversation.