Demo application guide
Use the Demo application to learn how to use Infobip mobile messaging products. The app helps you do the following:
- Test the functionality of Infobip's mobile messaging SDK before integrating the SDK into your live application.
- Test Mobile push notifications, In-app messages, and Live chat.
- Test the mobile audience profiling capabilities of People. You can verify user creation, tracking, and engagement analytics.
The demo app does not require code development.
The following sections explain how to download, install, personalize, and test the demo app.
The examples in this guide are for Android devices. The screens might look different on iOS devices.
Supported operating systems [#supported-operating-systems]
- Android version 5.0 (Lollipop) or higher
- iOS version 16.0 or higher
Process overview [#process-overview]
The following steps show how to get started with the demo application.
- Download the demo app to a device.
- Register your device.
- Launch the app.
- View and manage profile data and device information.
- Link the app to a person profile in People to personalize the profile. You can now use the person profile to send personalized messages.
- Set up and test event tracking functionality.
- Test sending mobile push notifications and delivery.
- Analyze the results. View delivery reports and engagement metrics.
Download the app [#download-the-app]
Download the app on your mobile device. You can also invite developers and business users to download the demo app on their devices and test it.
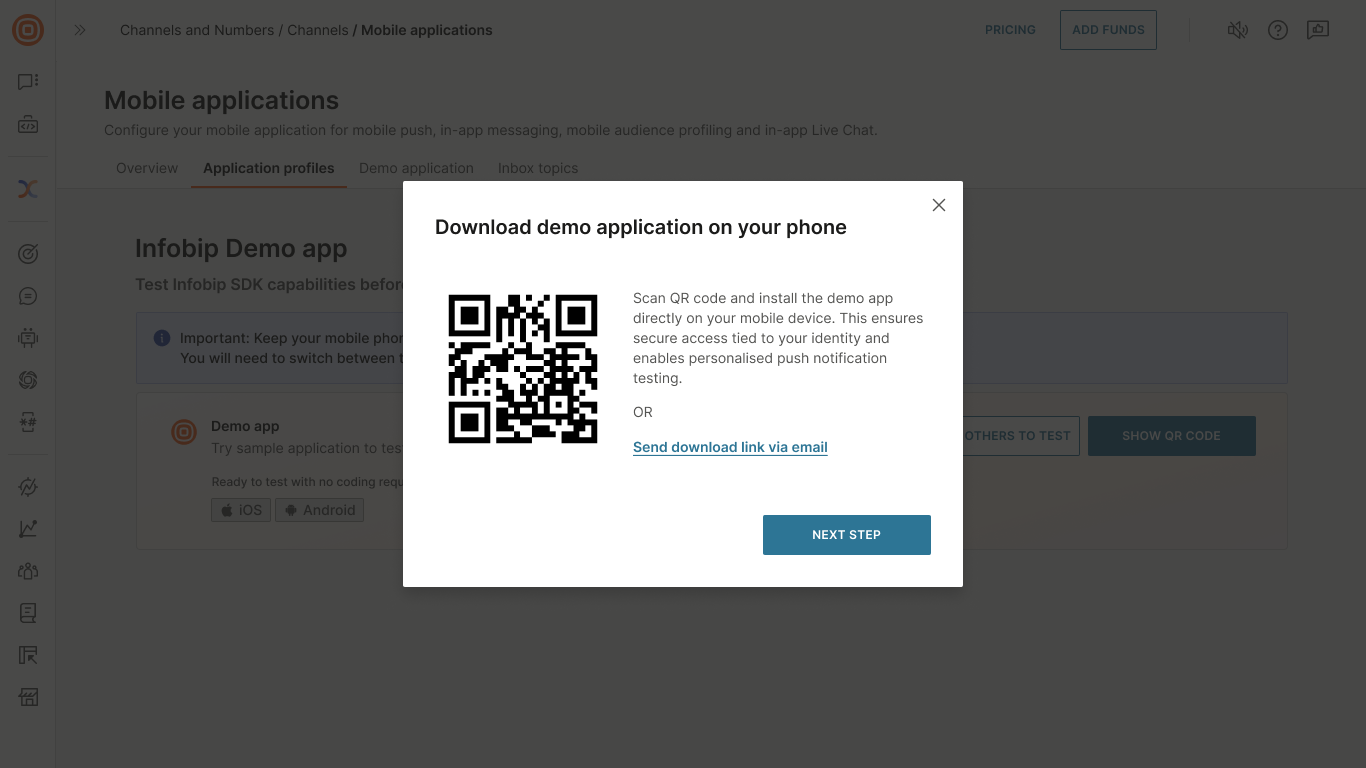
Download the app on your device
To download the app, you can either scan a QR code or receive the download link through email.
-
On the Infobip web interface, go to Channels and Numbers > Channels > Mobile Applications > Demo applications tab.
-
Select Show QR code.
-
To download by using the QR code, use your device to scan the QR code that is on the Infobip web interface.
The app is downloaded to your device.
-
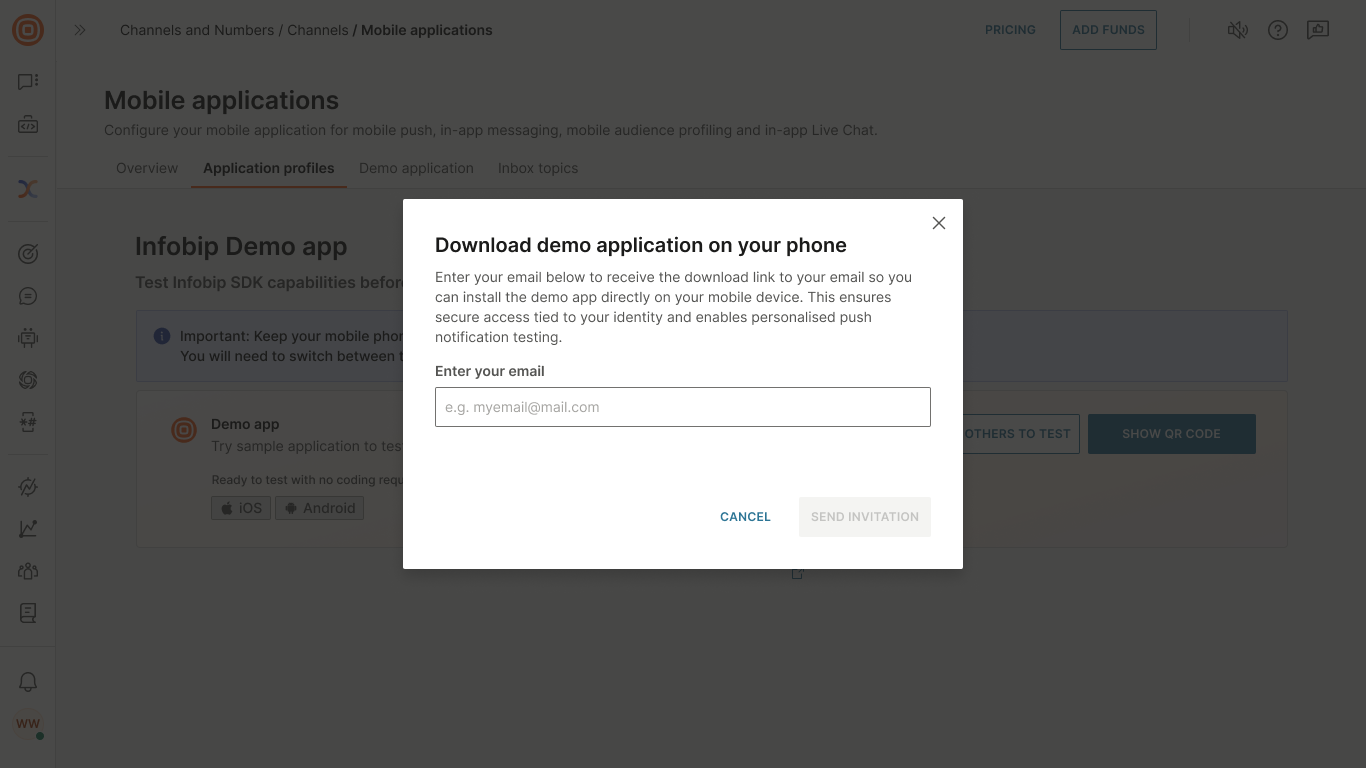
To receive the download link through email, do the following:
-
Select Send download link via email.

-
Enter your email address.
-
Select Send invitation.
-
On your device, use the received link to download the app.
-
-
Select Next step.
-
Select Go to access control to register your device.
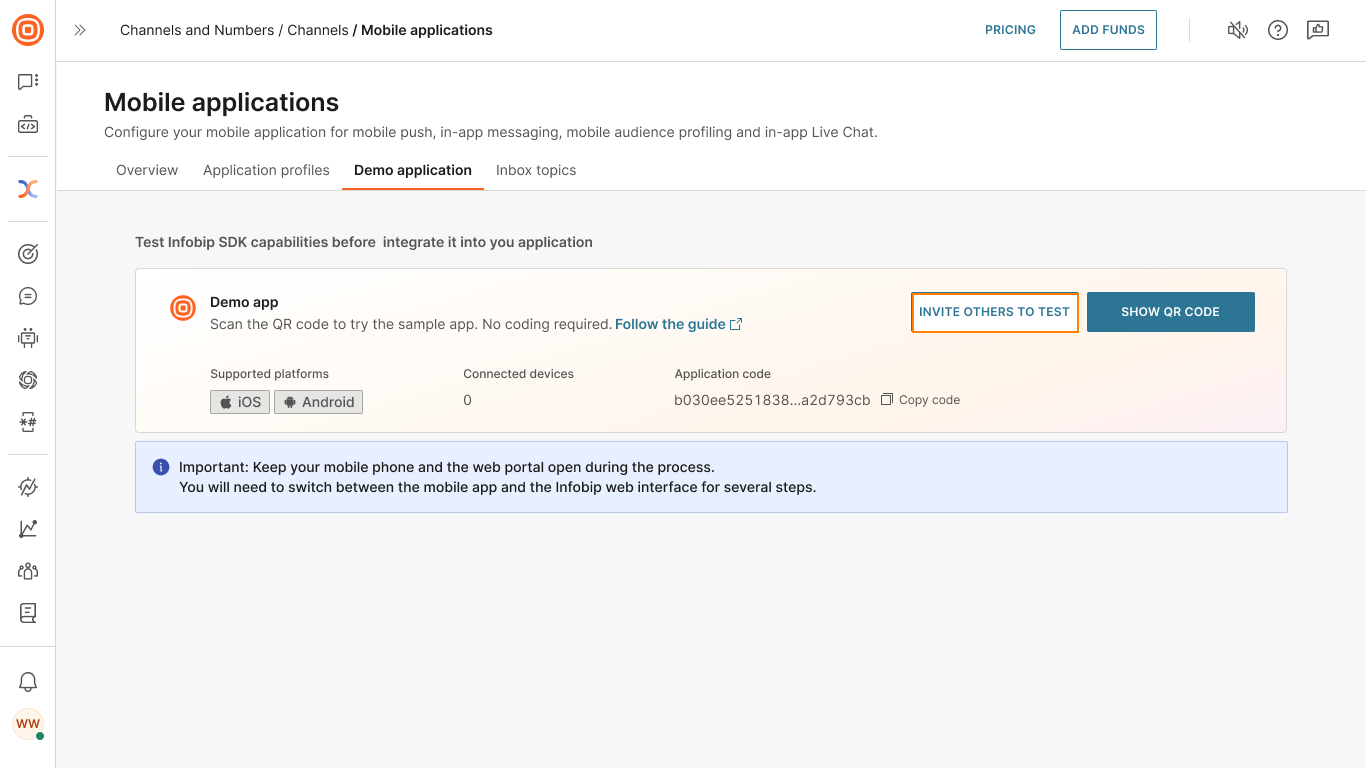
Invite other people to install and test the app
To invite other people to install and test the app, do the following:
-
On the Infobip web interface, go to Channels and Numbers > Channels > Mobile Applications > Demo applications tab.
-
Select Invite others to test next to the demo app.
-
Enter the email addresses of the recipients.
-
Select Send invitation.
When the recipients get the invitation, they can open it on a mobile device and download the app.
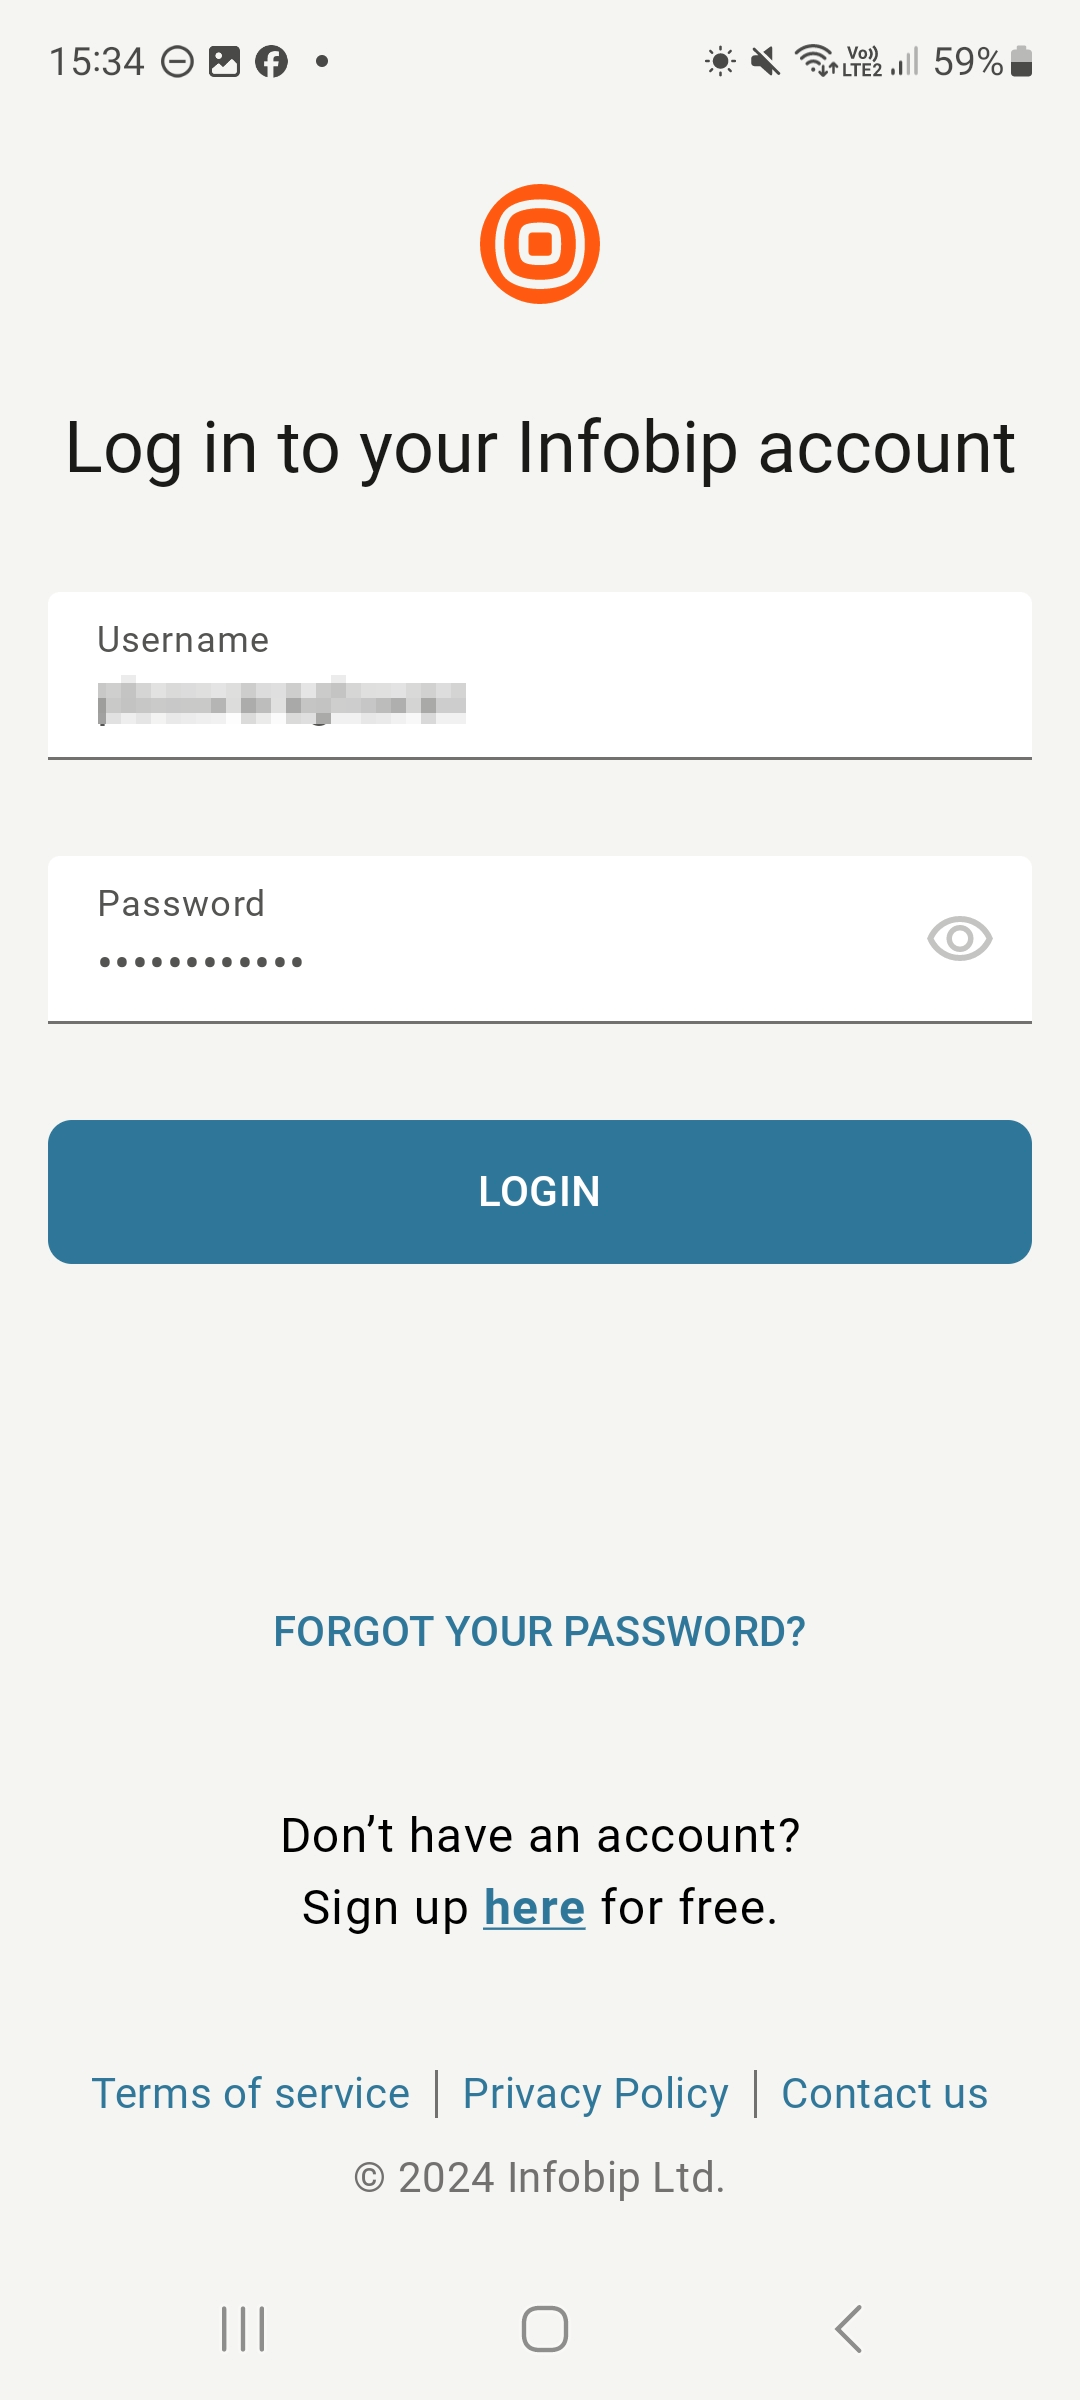
Register your device [#authentication]
After you download the app on your device, you need to register the device with Infobip.
Using 2FA in the demo app
The registration process uses two-factor authentication (2FA).
2FA is a security process that requires end users to provide two different authentication factors to access their account. The demo app authentication uses a Time-based one-time password (TOTP) method that creates a one-time code.
This additional layer of security helps ensure that only the intended user can complete the login, thus enhancing account safety and reducing the risk of unauthorized access.
Implementation steps
To register your device, you must use both the demo app and the Infobip web interface.
Complete the following steps.
-
Log on to the Infobip web interface.
-
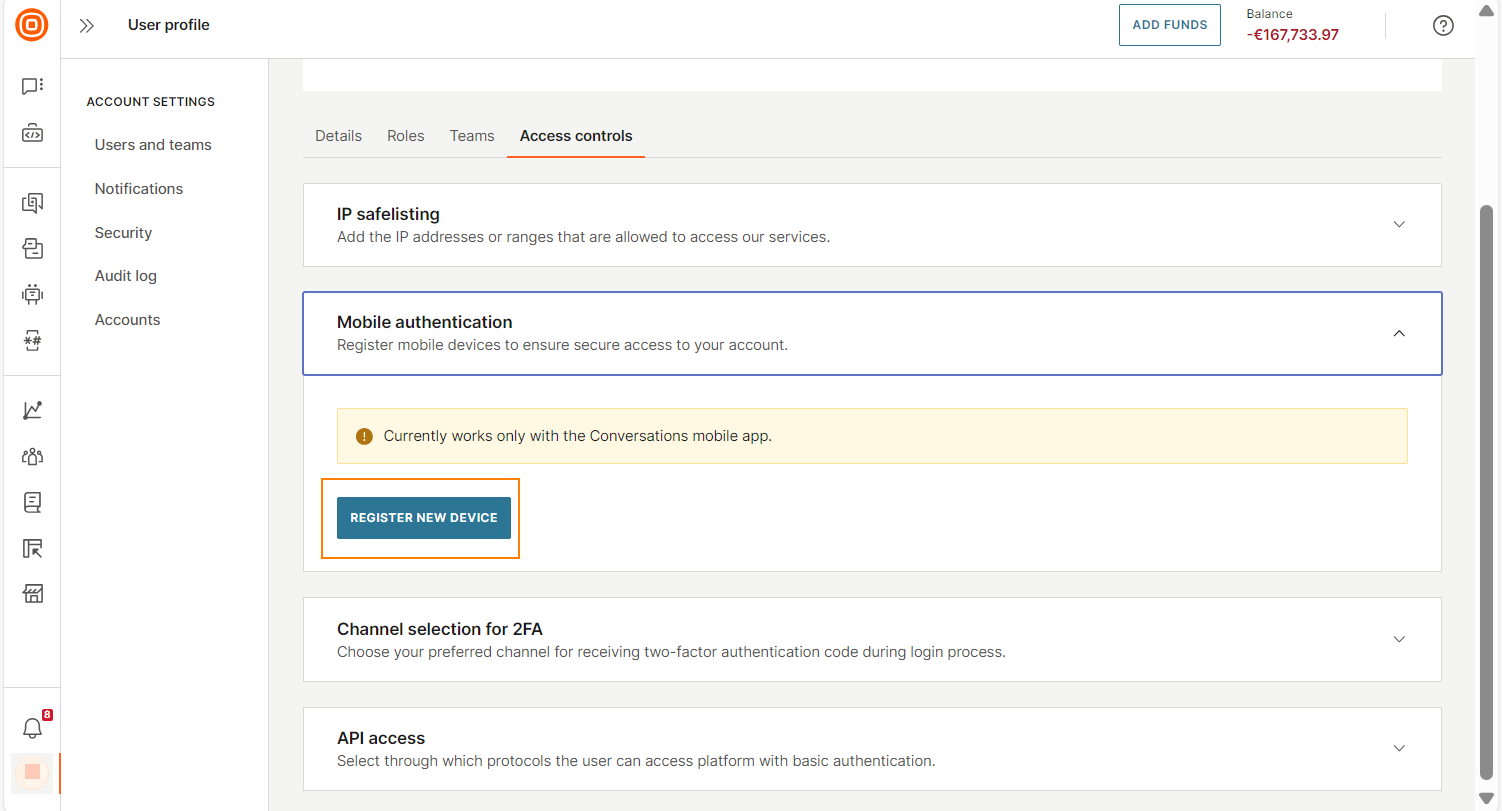
Go to your account > User profile > Access controls tab.
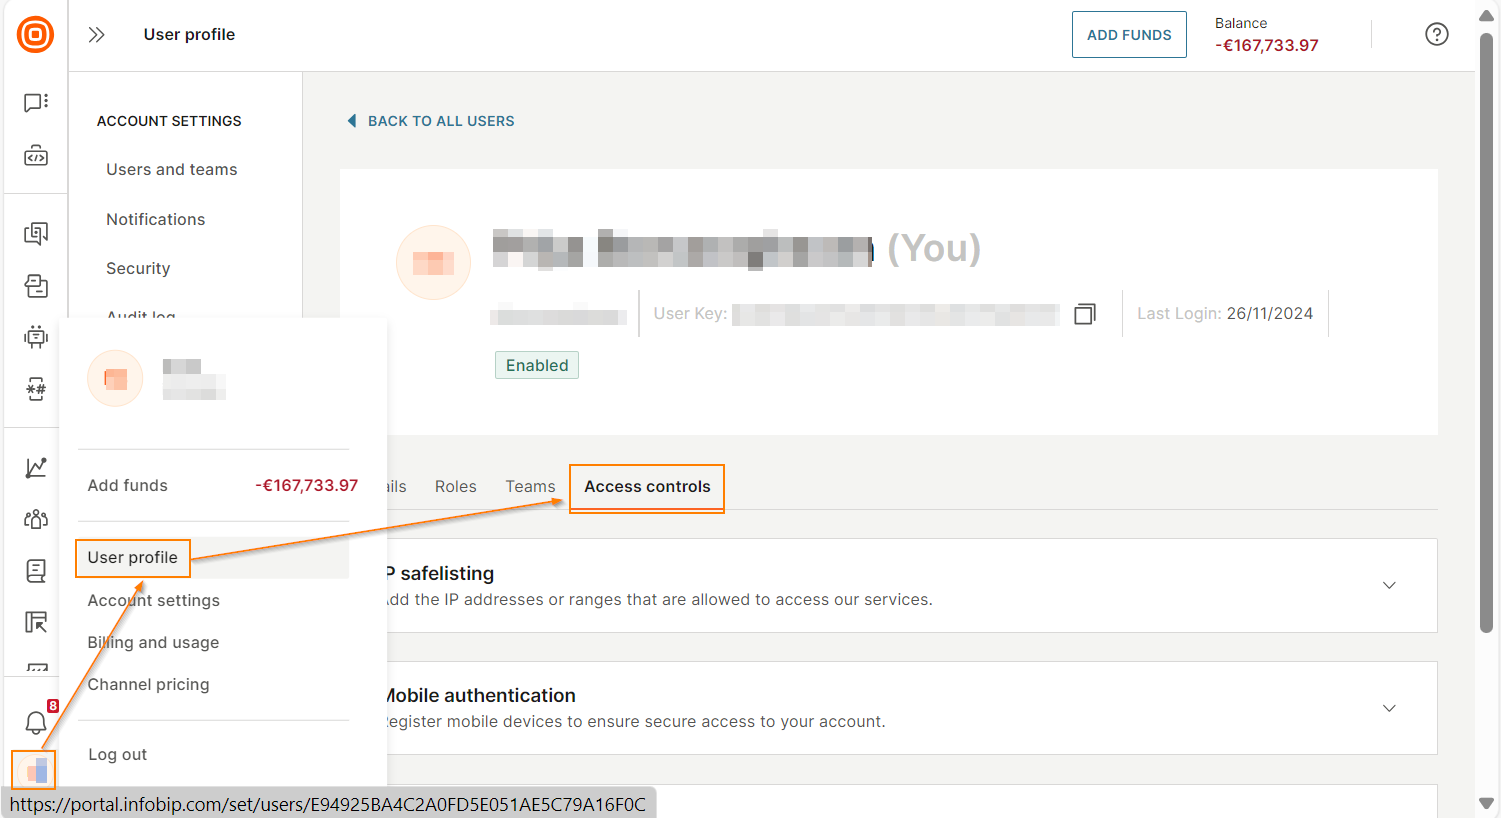
-
Select Mobile authentication > Register new device.
-
In the Device name field, enter a name for the device. Choose a descriptive name that will help you identify the device.
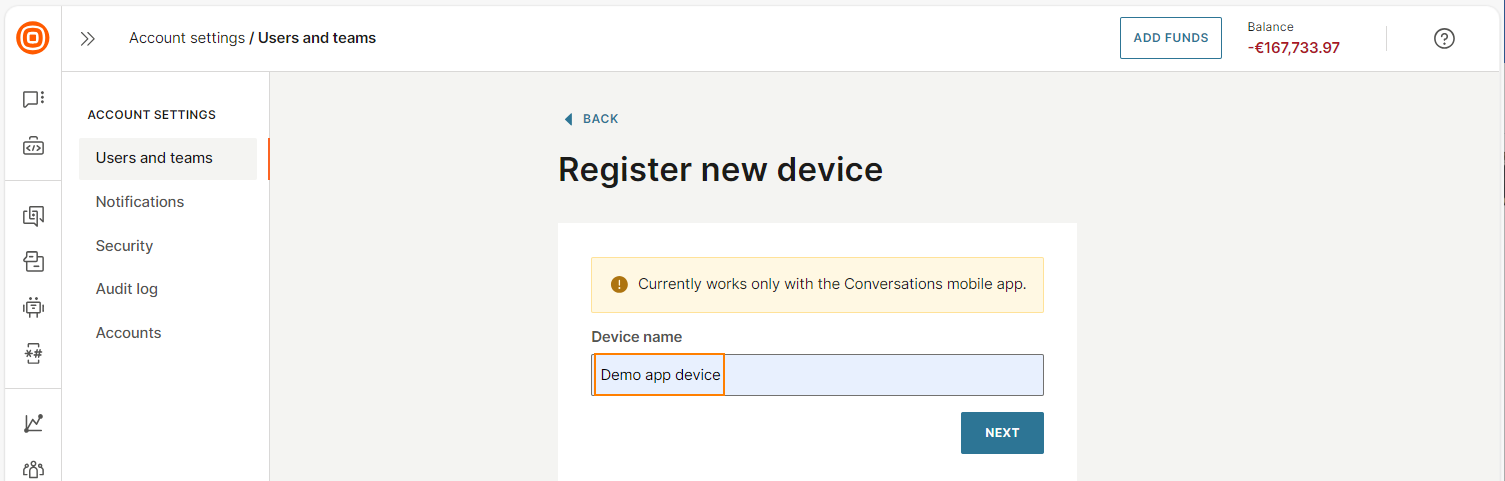
-
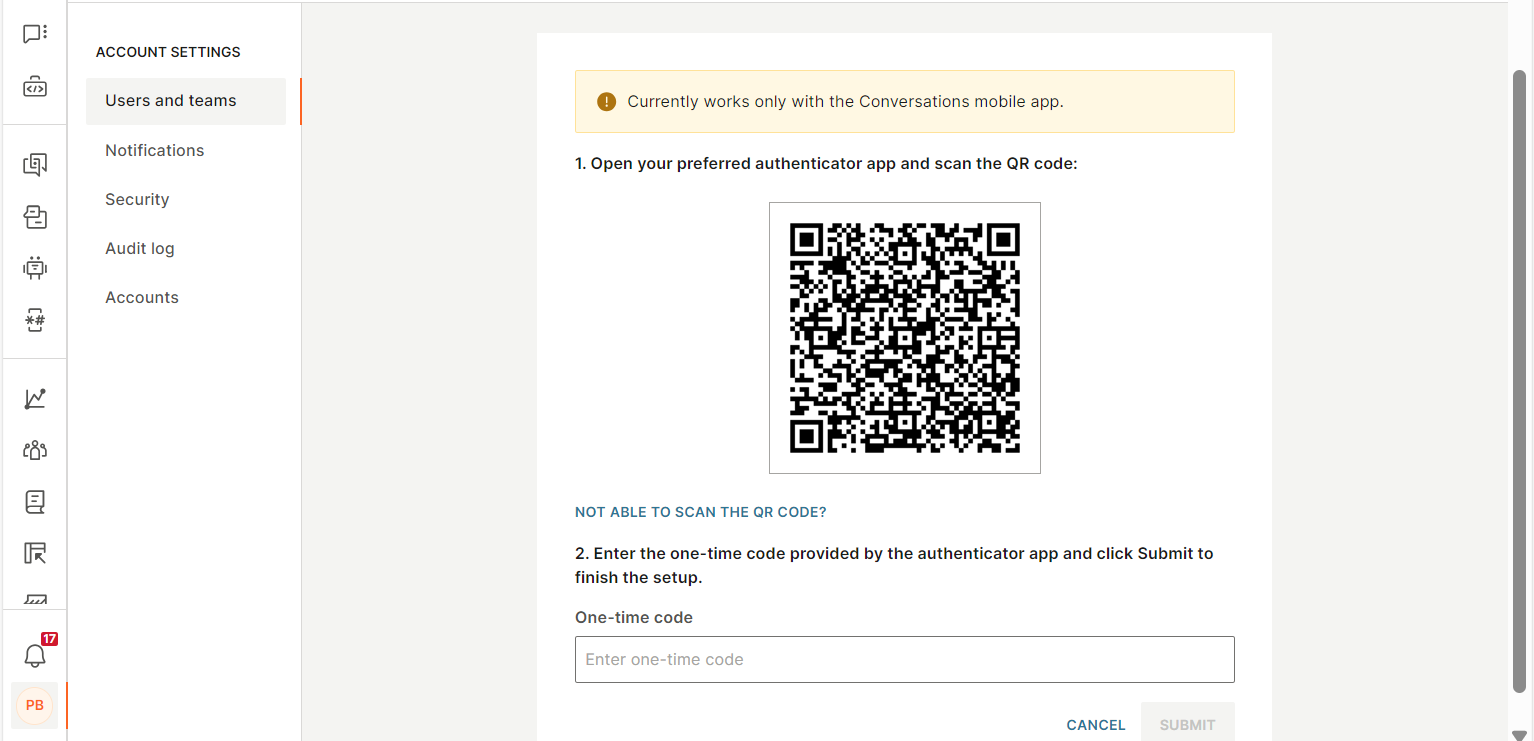
Select Next. A QR code is displayed.
-
On your mobile device, open the demo app.
-
Log on to the demo app by using your Infobip username and password.
-
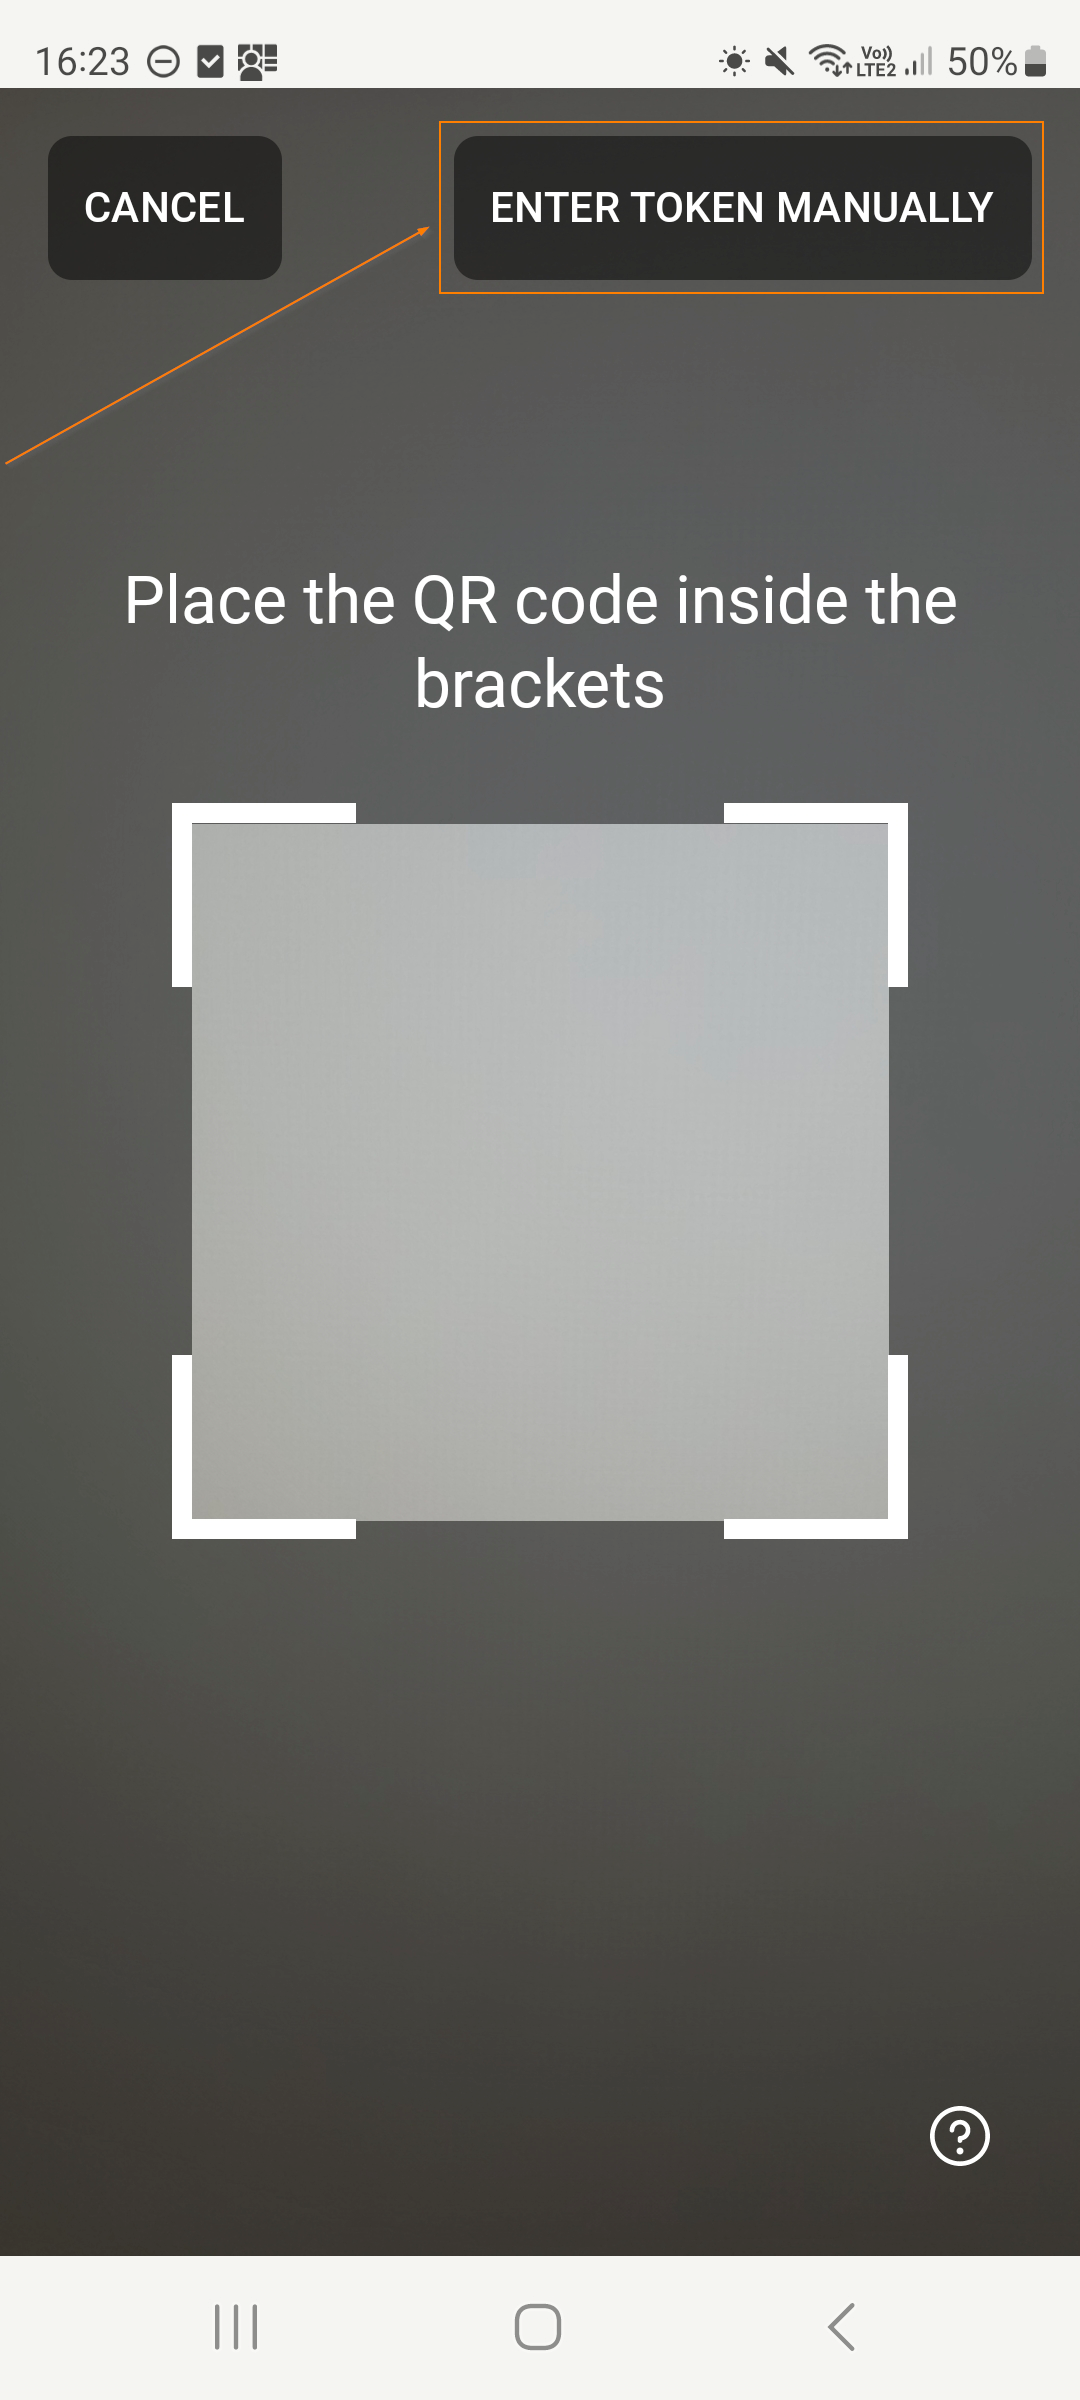
On the Verify device screen, select Scan QR.
NoteTo scan the QR code, you must give Camera permission to the demo app.
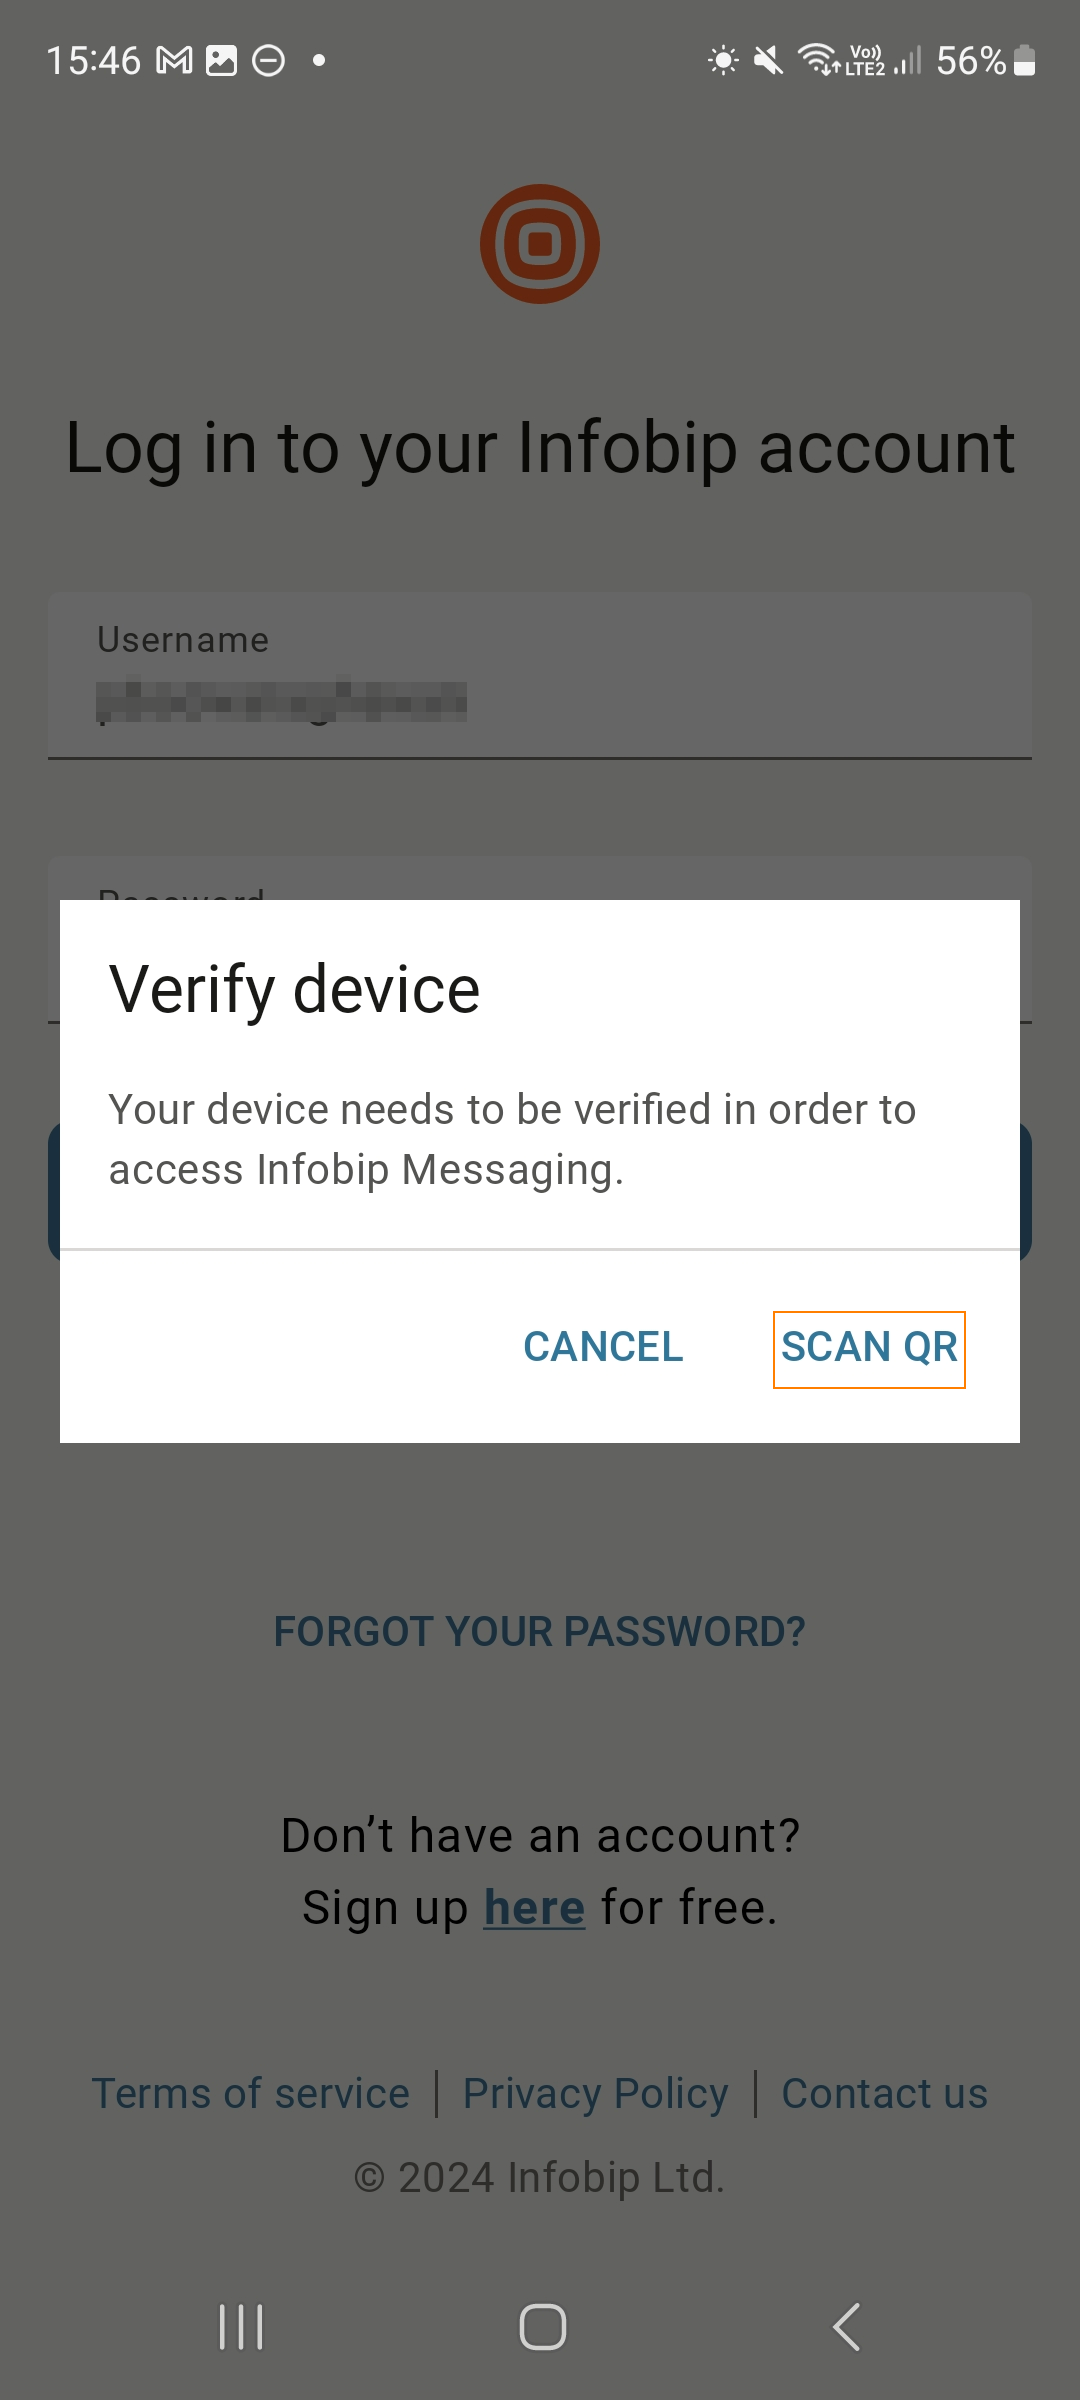
-
If your mobile device has a camera: Use your device to scan the QR code that is on the Infobip web interface. Position the QR code within the brackets.
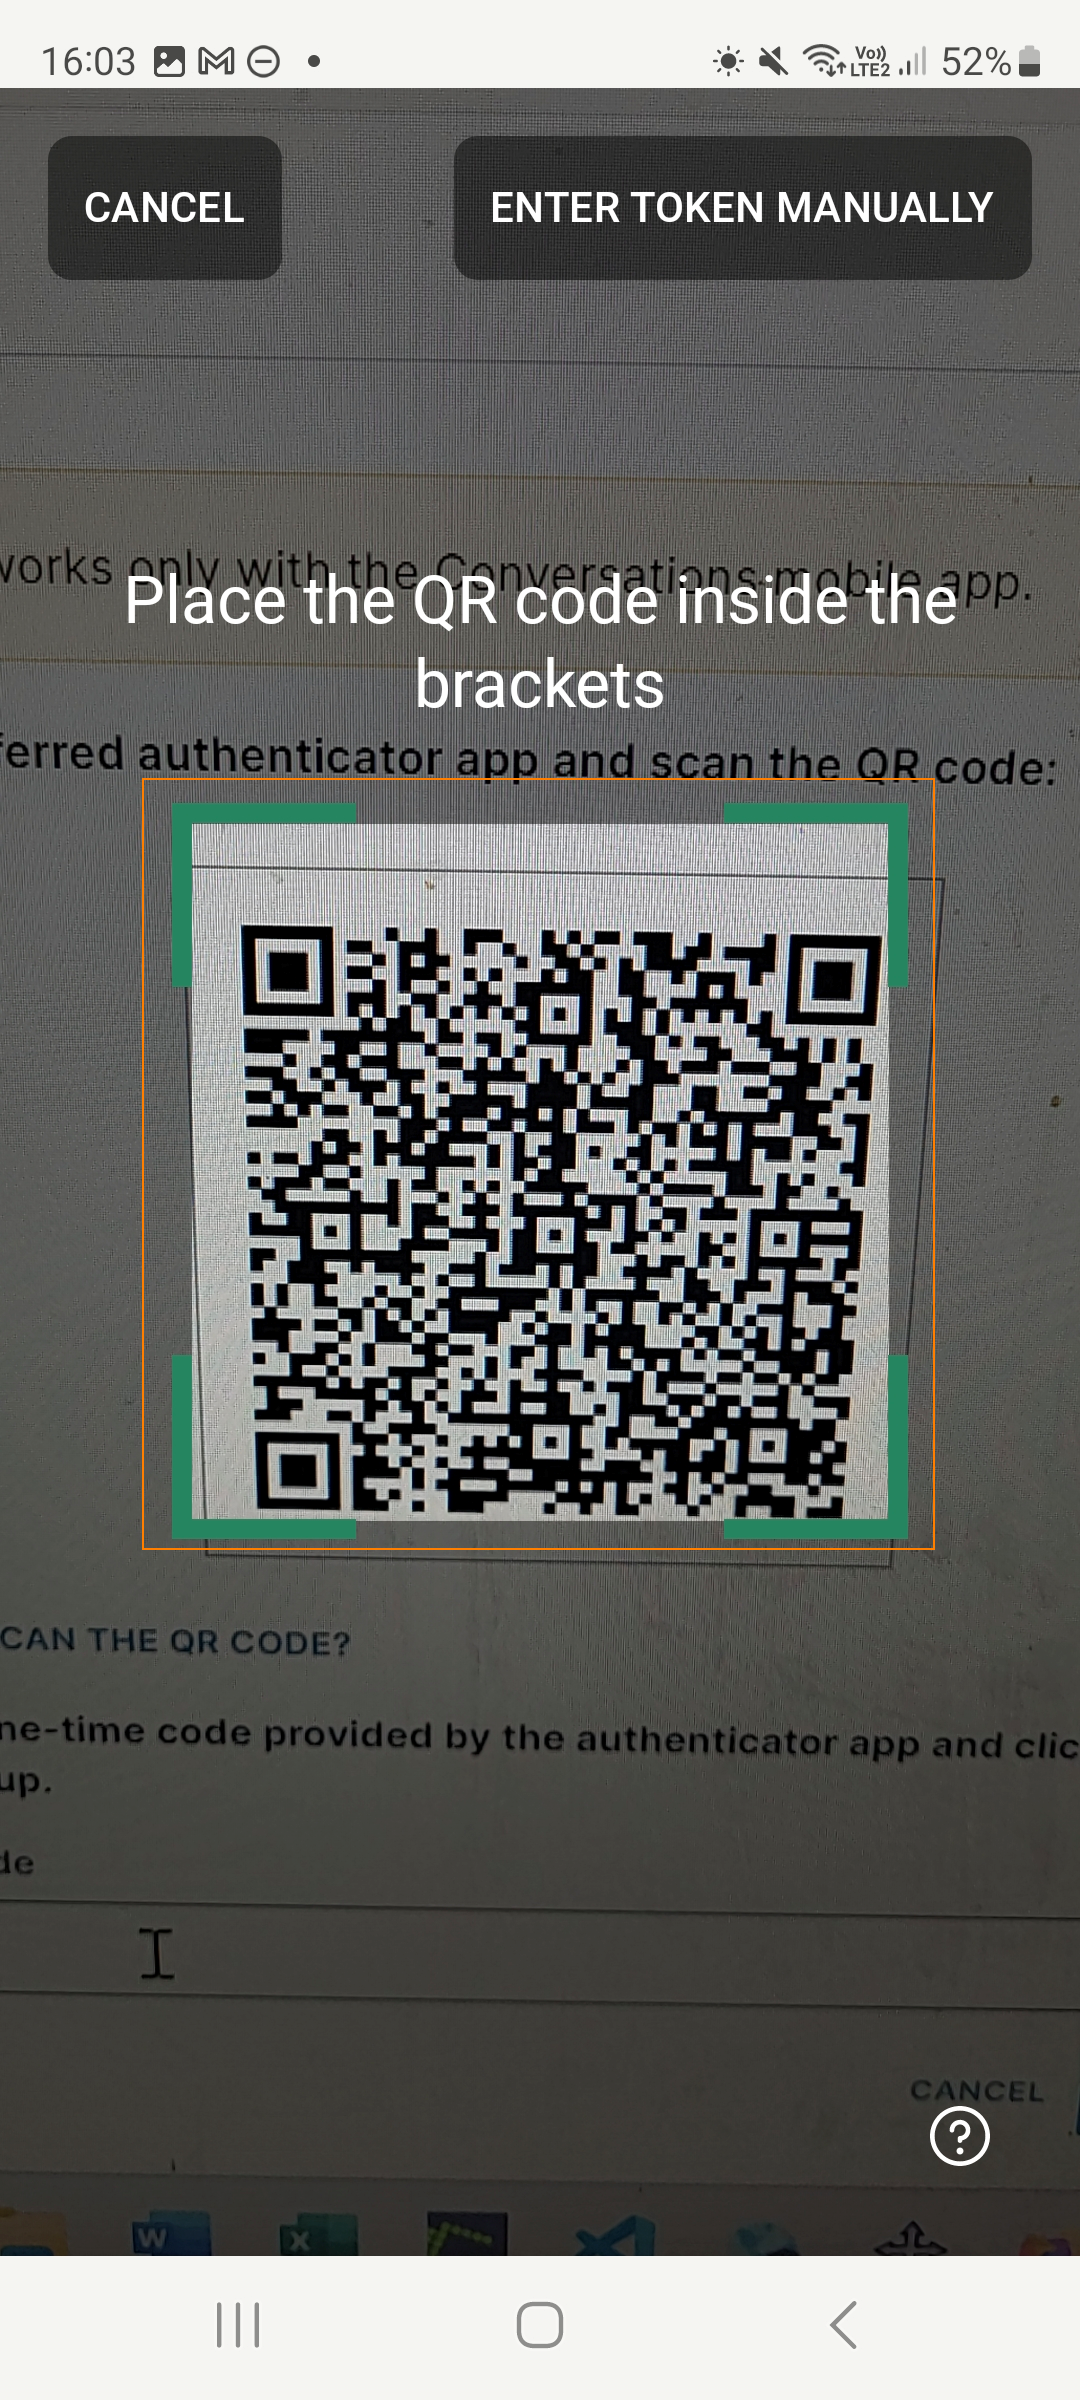
A one-time code is generated on your device.

-
If your device does not have a camera or you are unable to scan the QR code: Do the following.
-
Select Not able to scan the QR code.
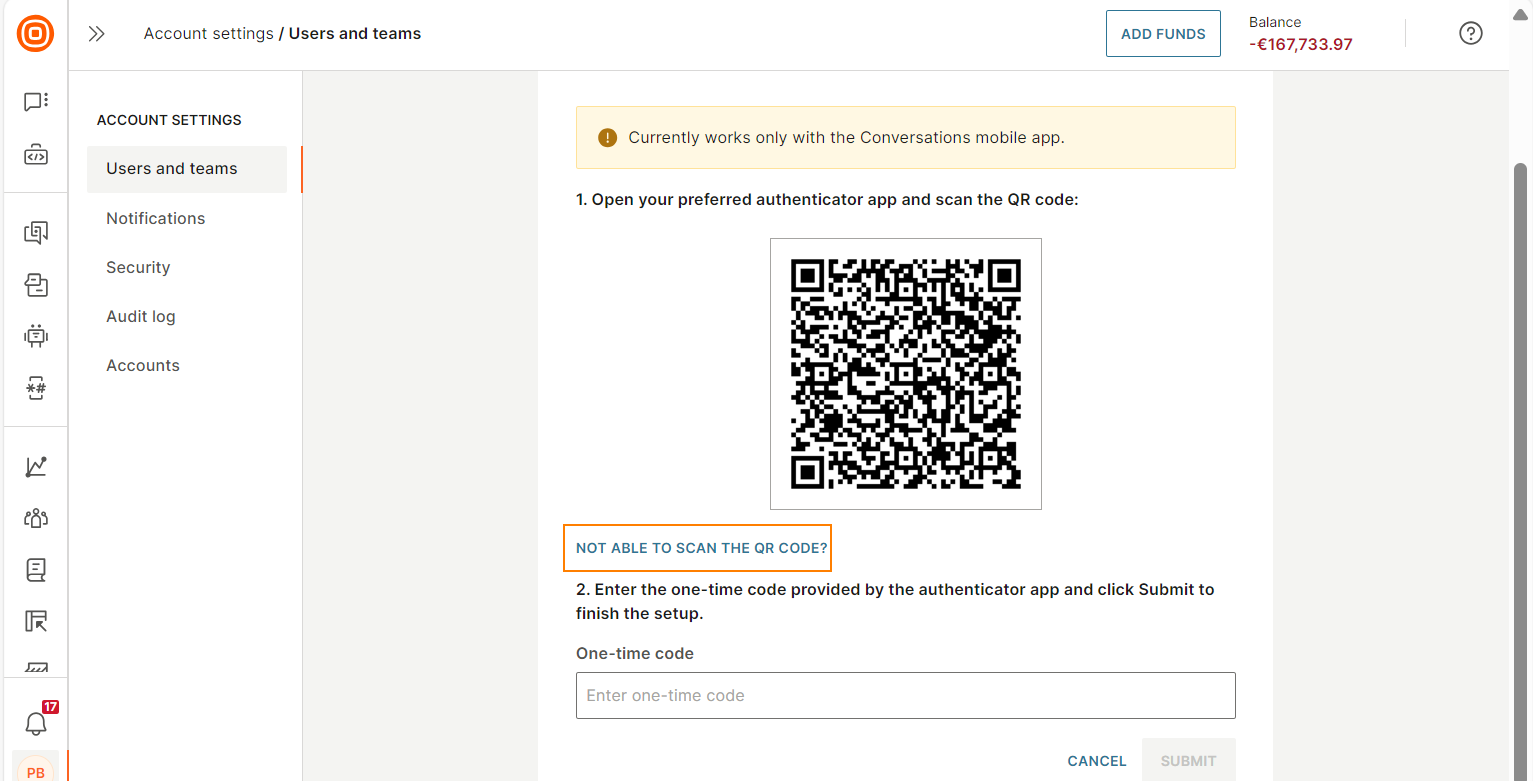
A code is displayed.

-
On your device, select Enter token manually.
-
In the Device name field on your device, enter the name of the device, which you created in the Infobip web interface.
NoteThe device name is case sensitive.
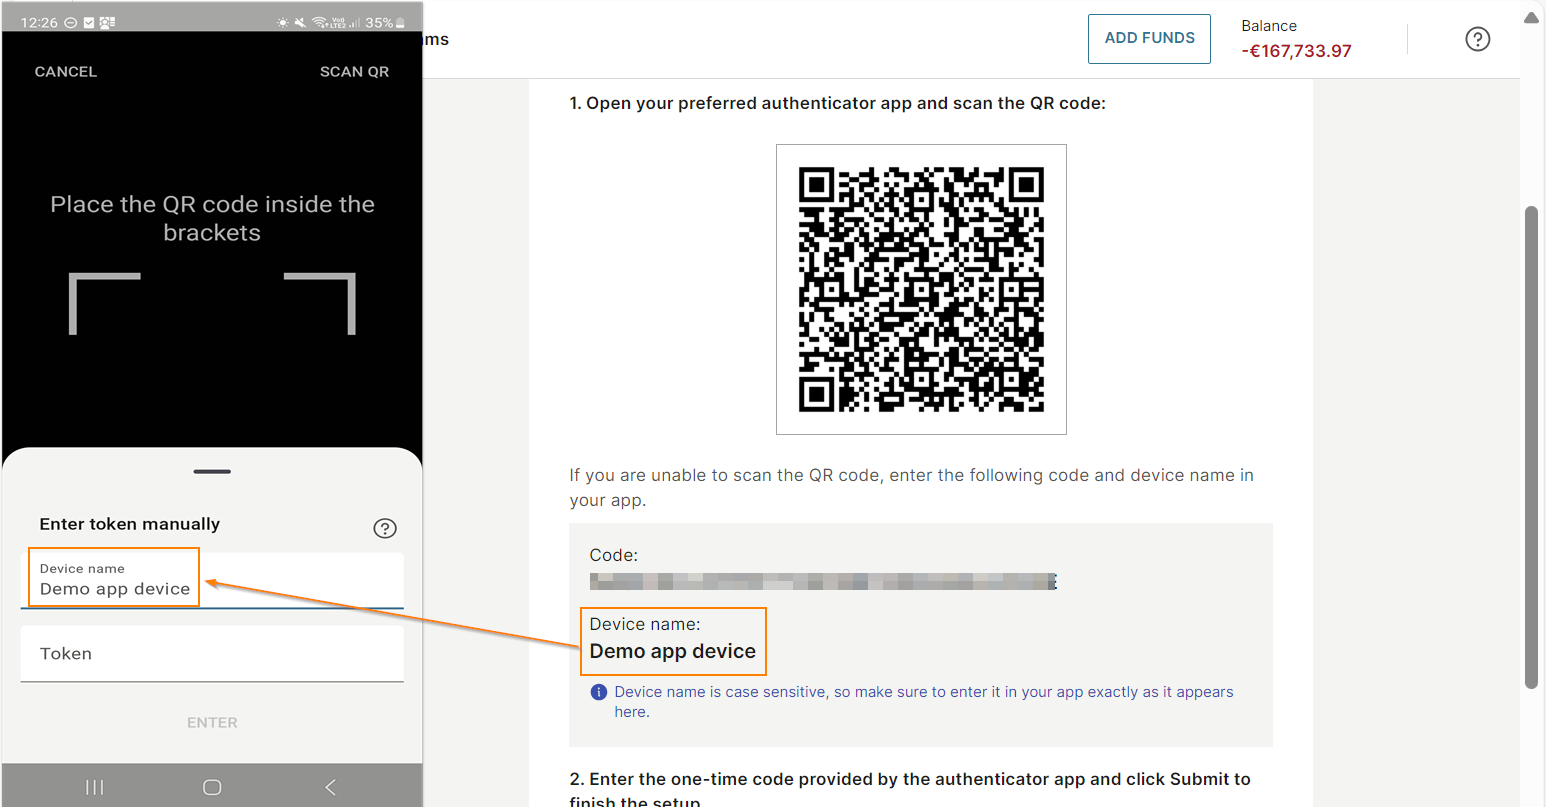
-
In the Token field on your device, enter the code that is displayed on the Infobip web interface. You do not need to enter any spaces in the code.

A one-time code is generated on your device.

-
-
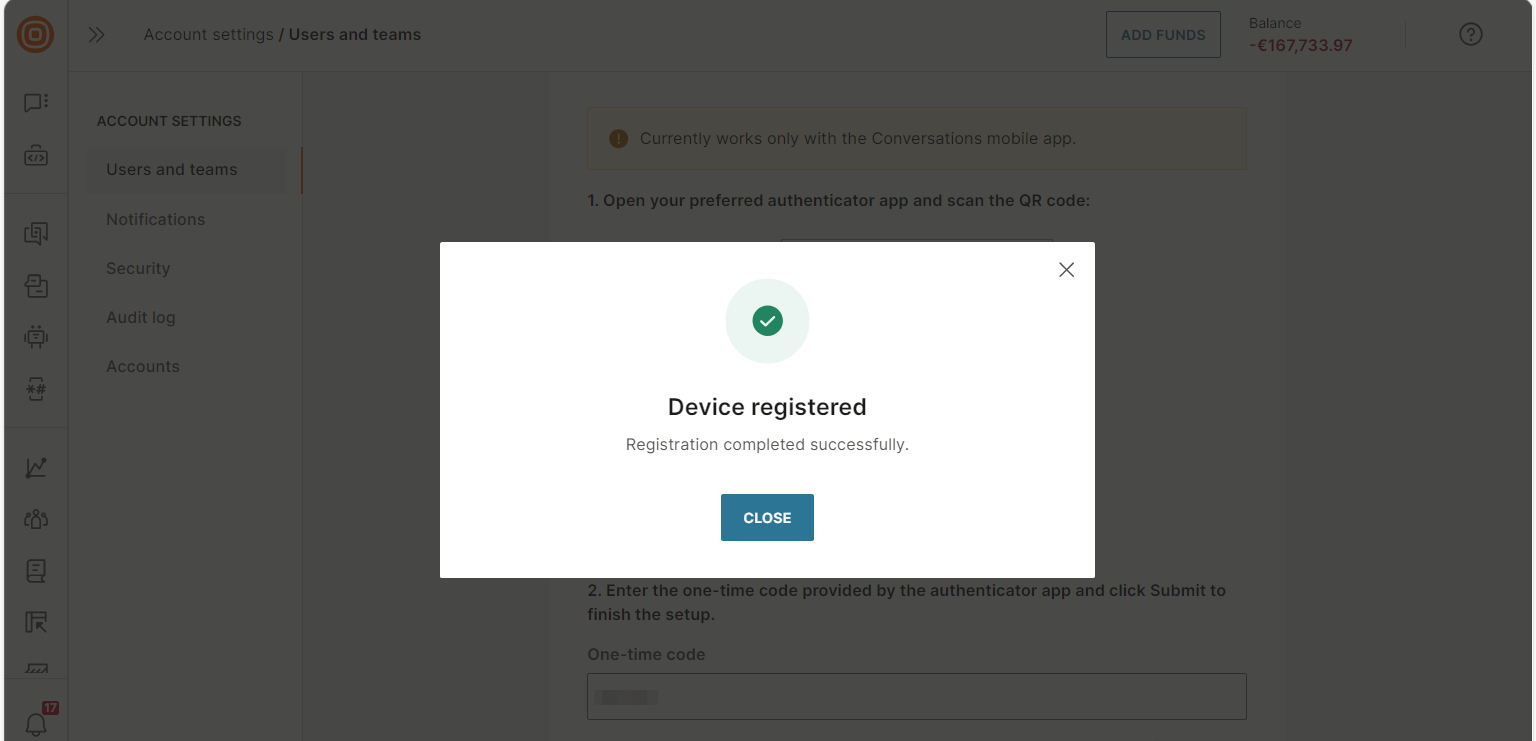
In the One-time code field on the Infobip web interface, enter the one-time code that is displayed in your demo app.

-
Select Submit.
You get a notification that the device has been registered.
-
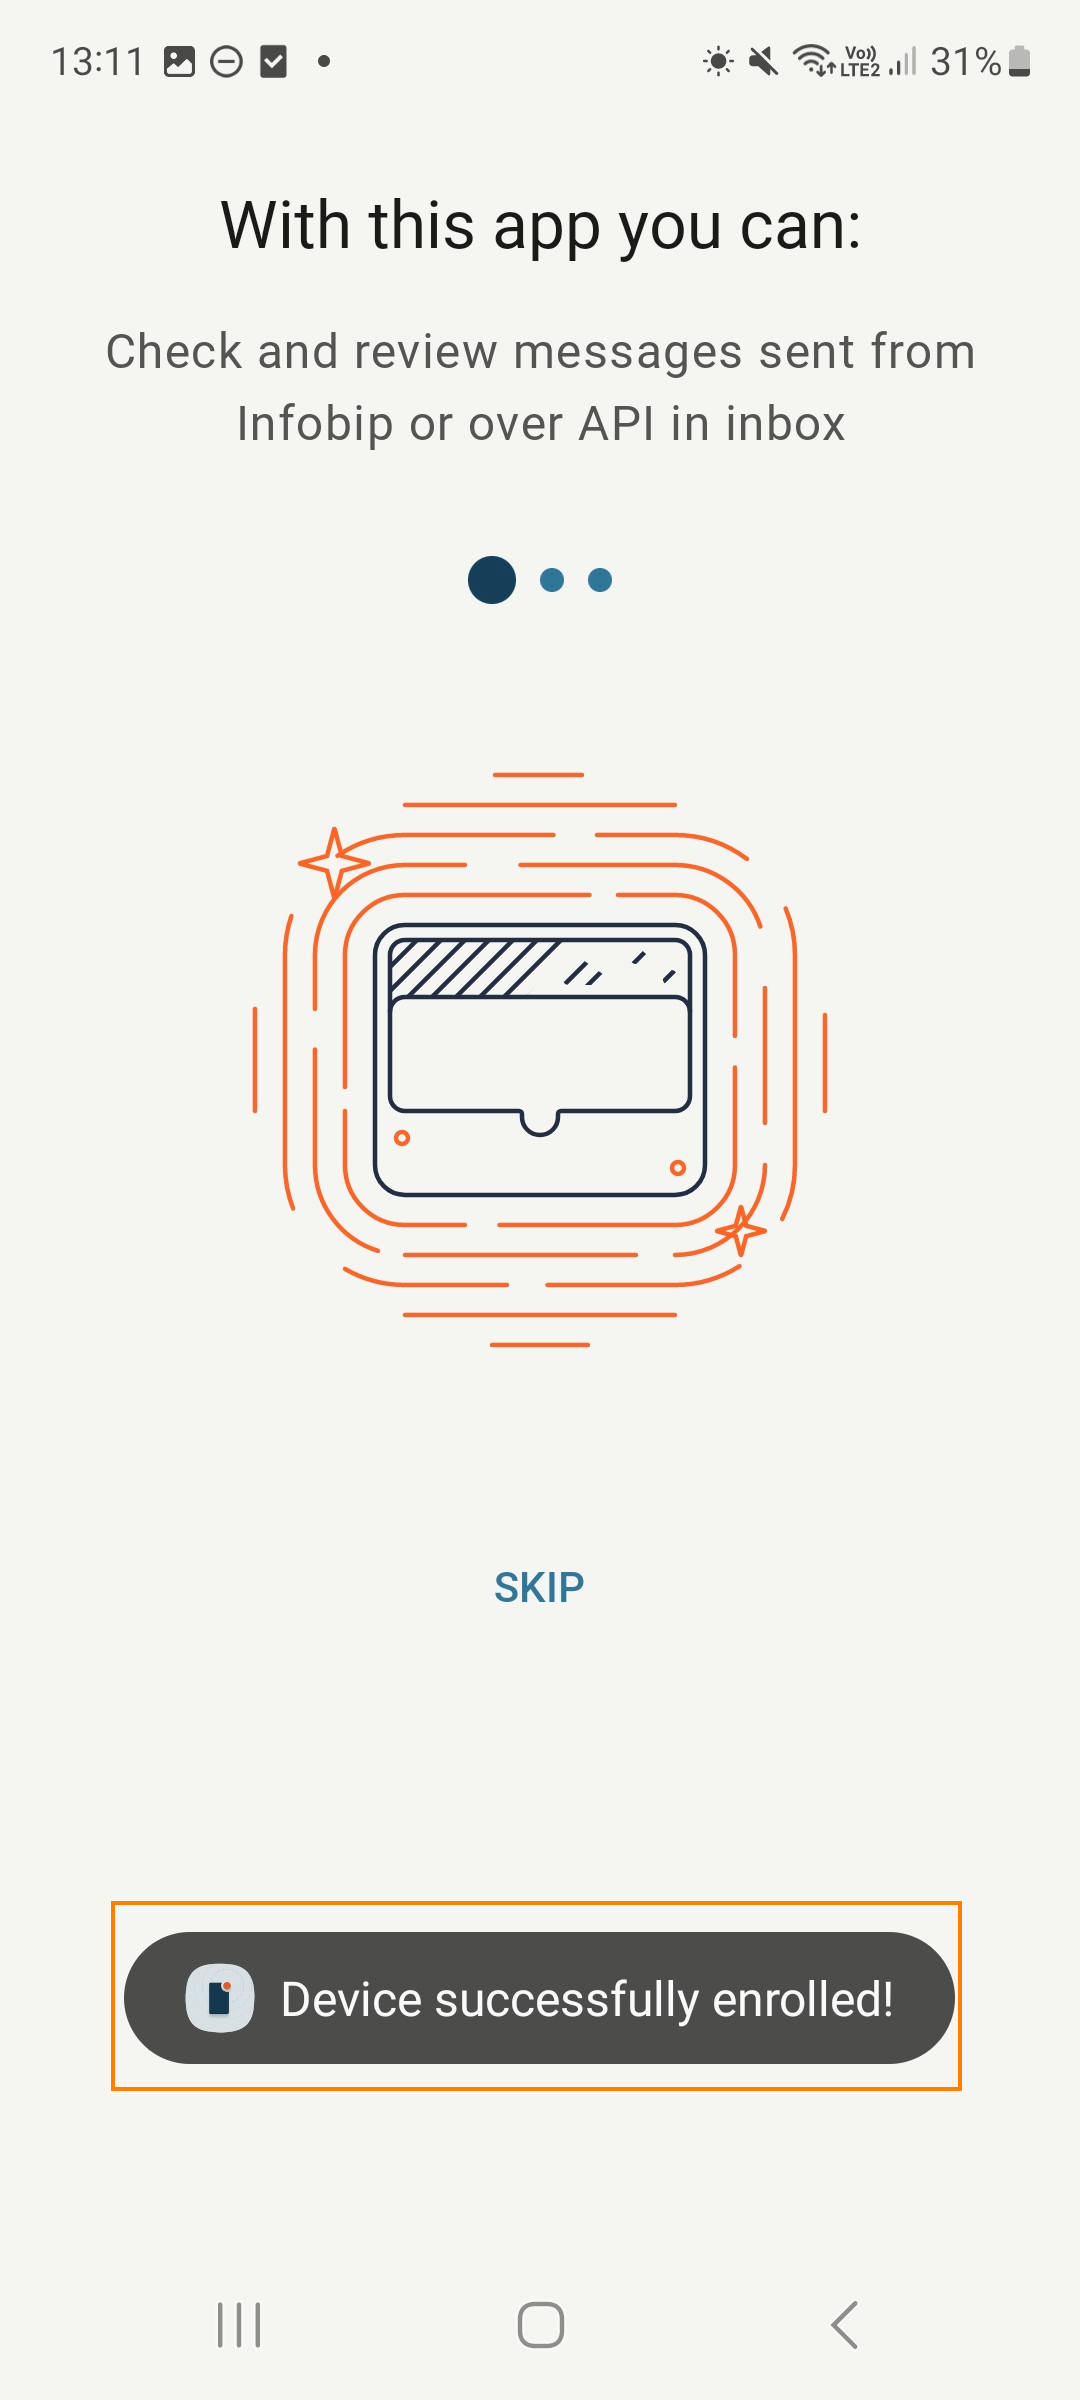
On your device, select Continue.
You get a notification that the device has been enrolled.
Launch the app [#launch-app]
After you finish registering the device, follow the on-screen instructions.

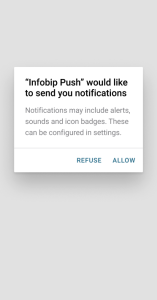
On the last screen, you will see a request to allow the demo app to send Mobile push notifications. For demonstration purposes, select Allow.
View profile in People [#view-profile-in-people]
After you install and launch the Demo app, the mobile SDK notifies the Infobip platform. A person profile with the app's pushRegistrationId is automatically created in People. The pushRegistrationId is specific to the app instance and the device that has this app instance. This ID remains the same during the lifecycle of the app on the device - from the time you install the app to the time you uninstall it.
To view the pushRegistrationId in your demo app, go to About > Infobip registration ID.
To see the person profile, on the Infobip web interface, go to People > Persons. In the list of profiles, you can see a No name profile.
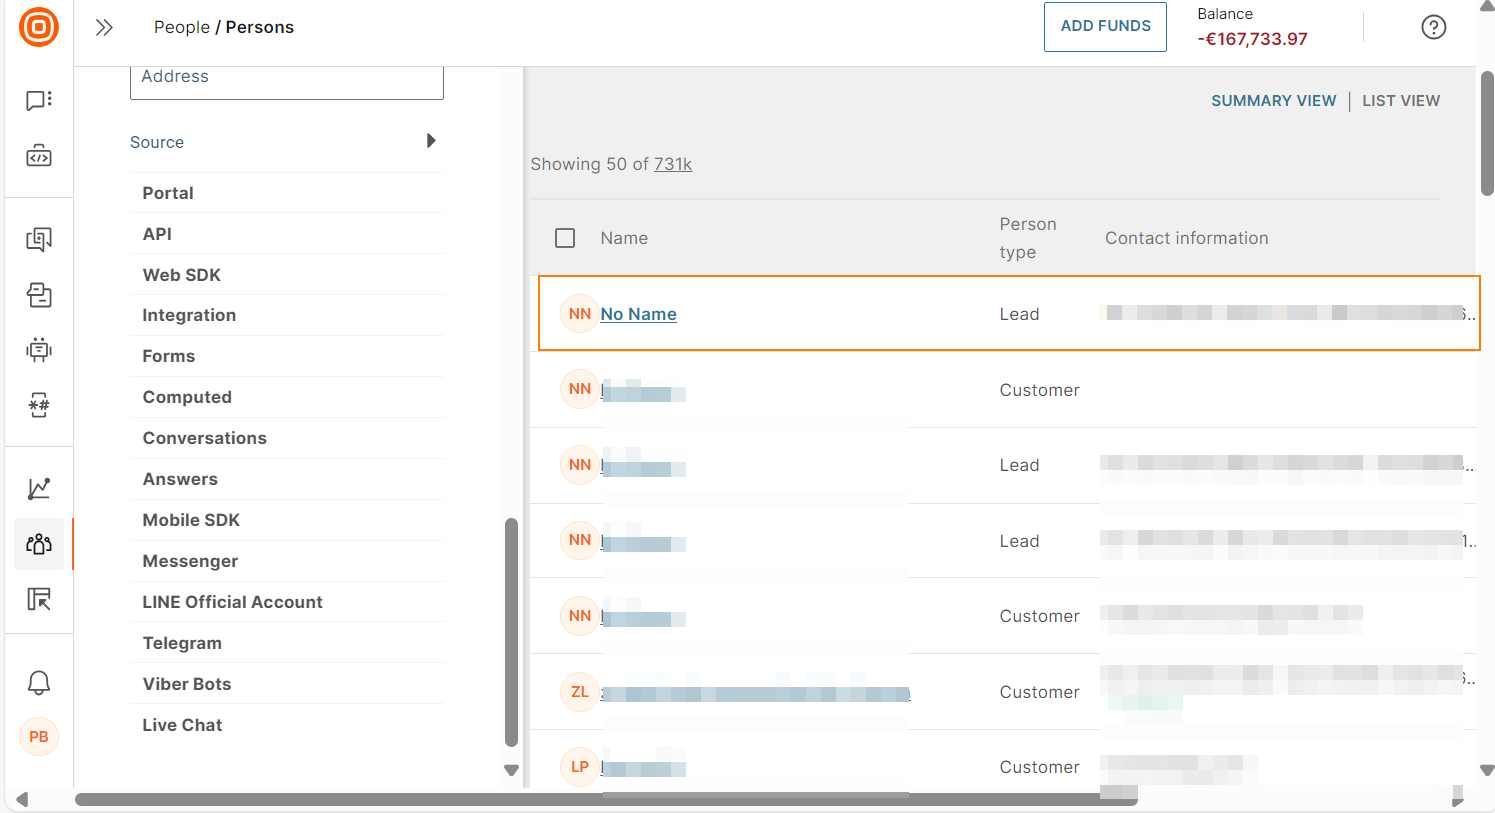
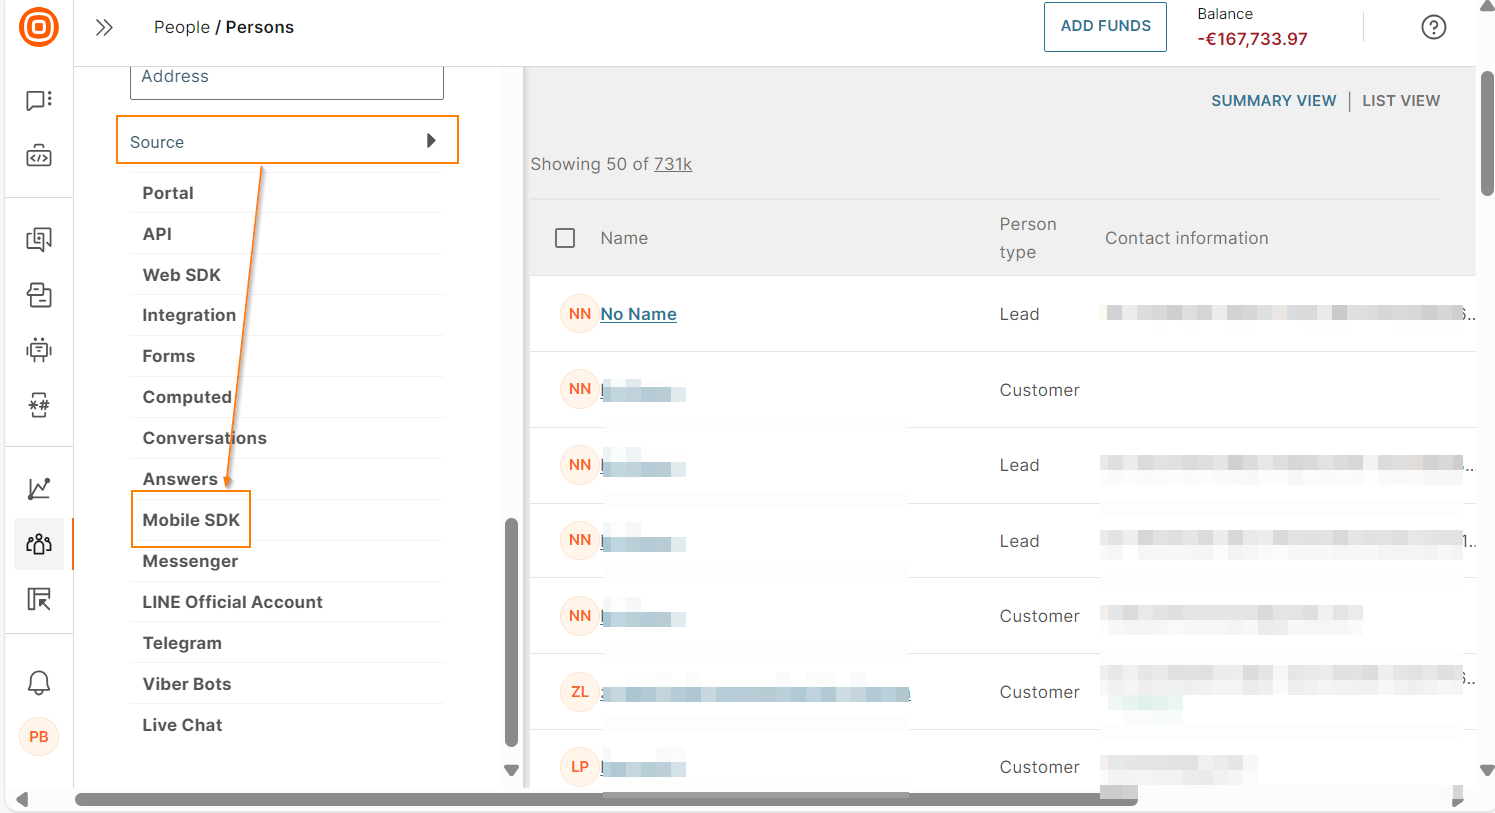
Alternatively, you can filter by Source > Mobile SDK to find the profile.
View system data and device attributes [#view-system-data-device-attributes]
View in People [#view-system-data-people]
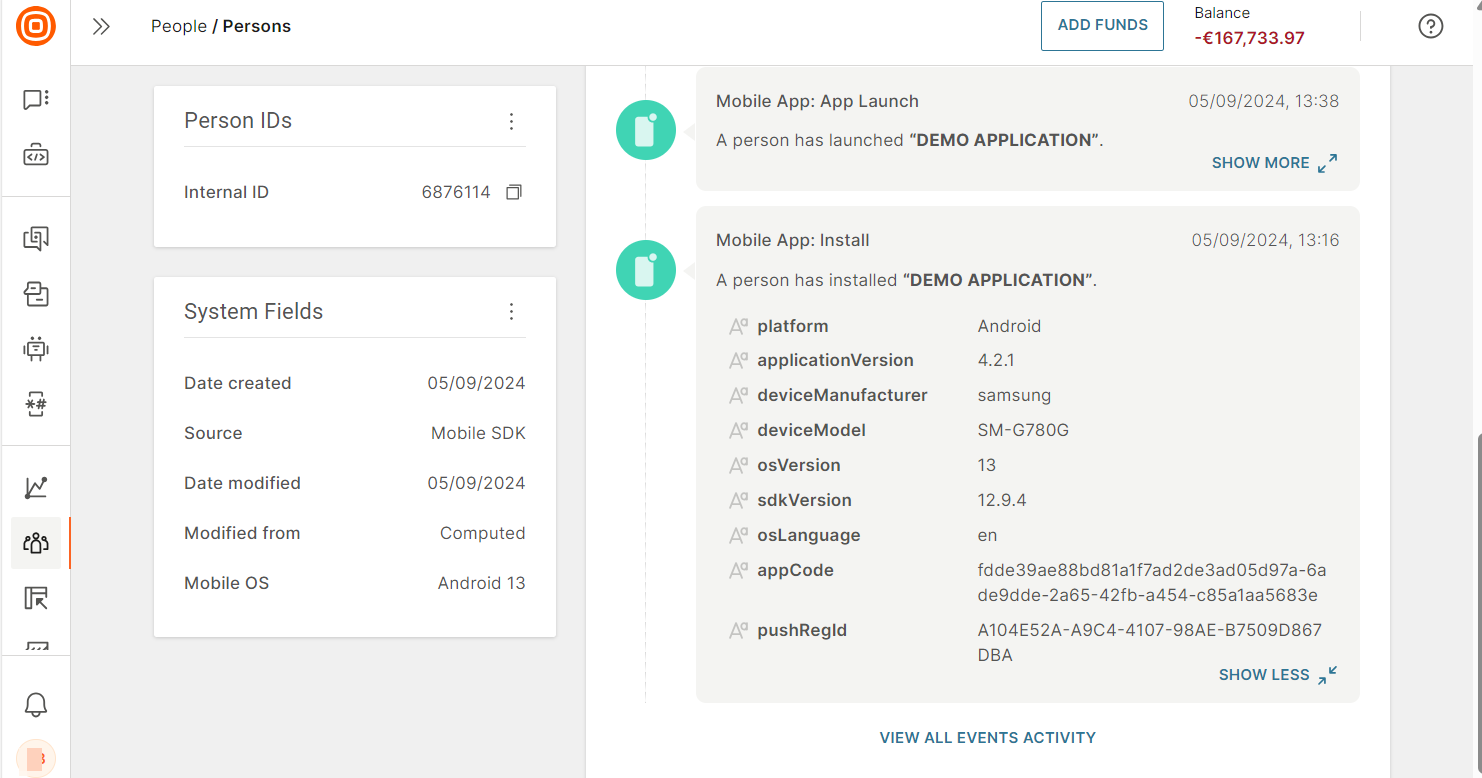
In People, select the person profile. In the Activity feed section, you can see the following information.
- Person created event: Information about when the profile was created.
- Mobile app: Install event: Information about the app installation on the end user's device. This event also shows the name of the app - Demo application. Select Show more to see key system information that was fetched by mobile SDK. Example: Platform, application version, device, operating system, and SDK version.
The Infobip platform also tracks whether the app has been uninstalled from the device. If the person profile has the Mobile app: Uninstall event, you can take relevant action. Example: You can communicate with the end user over other channels such as Email or SMS, or send the end user a new invitation to download the app.
Select Show more to view additional information about the events.
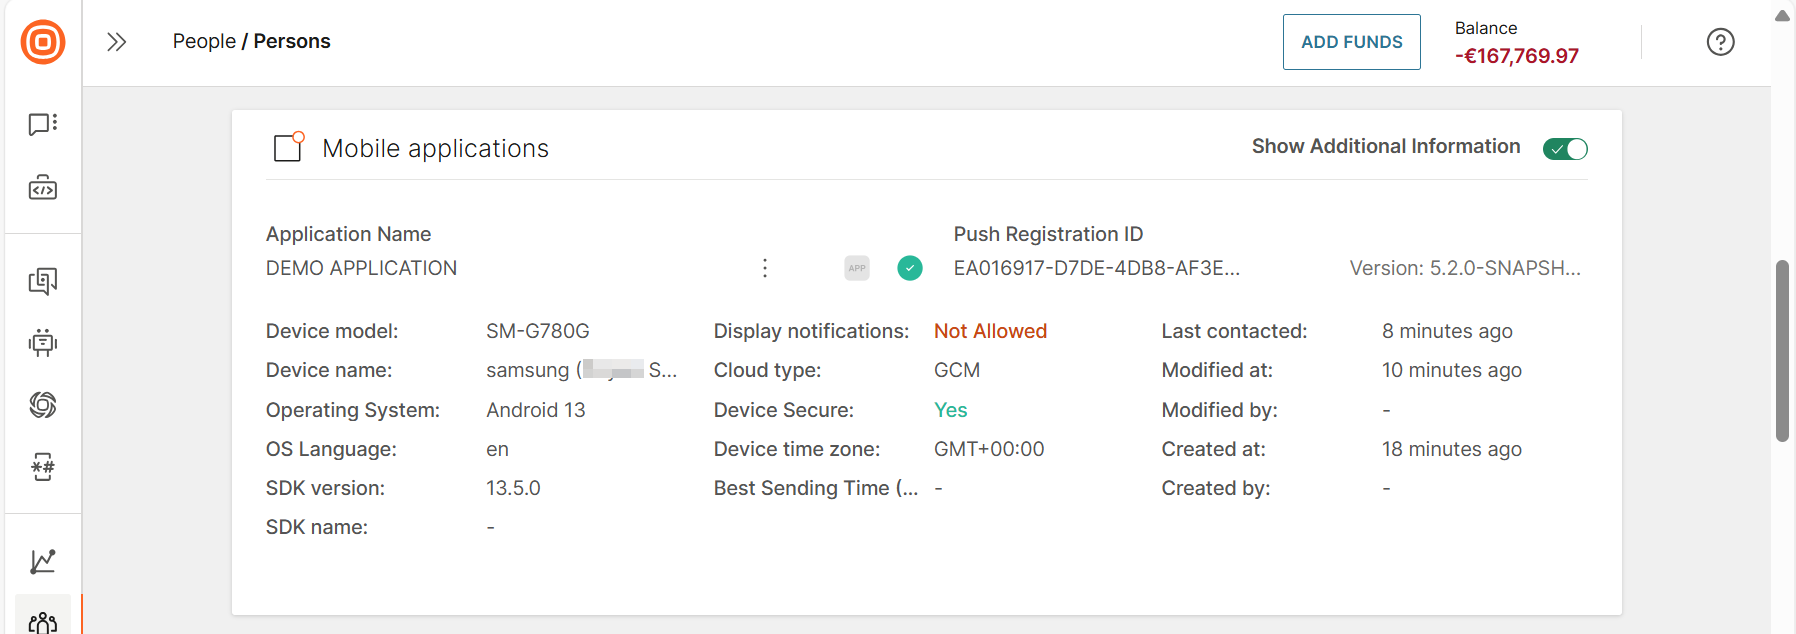
To view more information about the app, go to the Contact information tab > Mobile applications section. You can see the name of the app and the pushRegistrationId.
Enable Show additional information to see details such as platform, application version, device, operating system, and SDK version.
View in the app [#view-system-data-app]
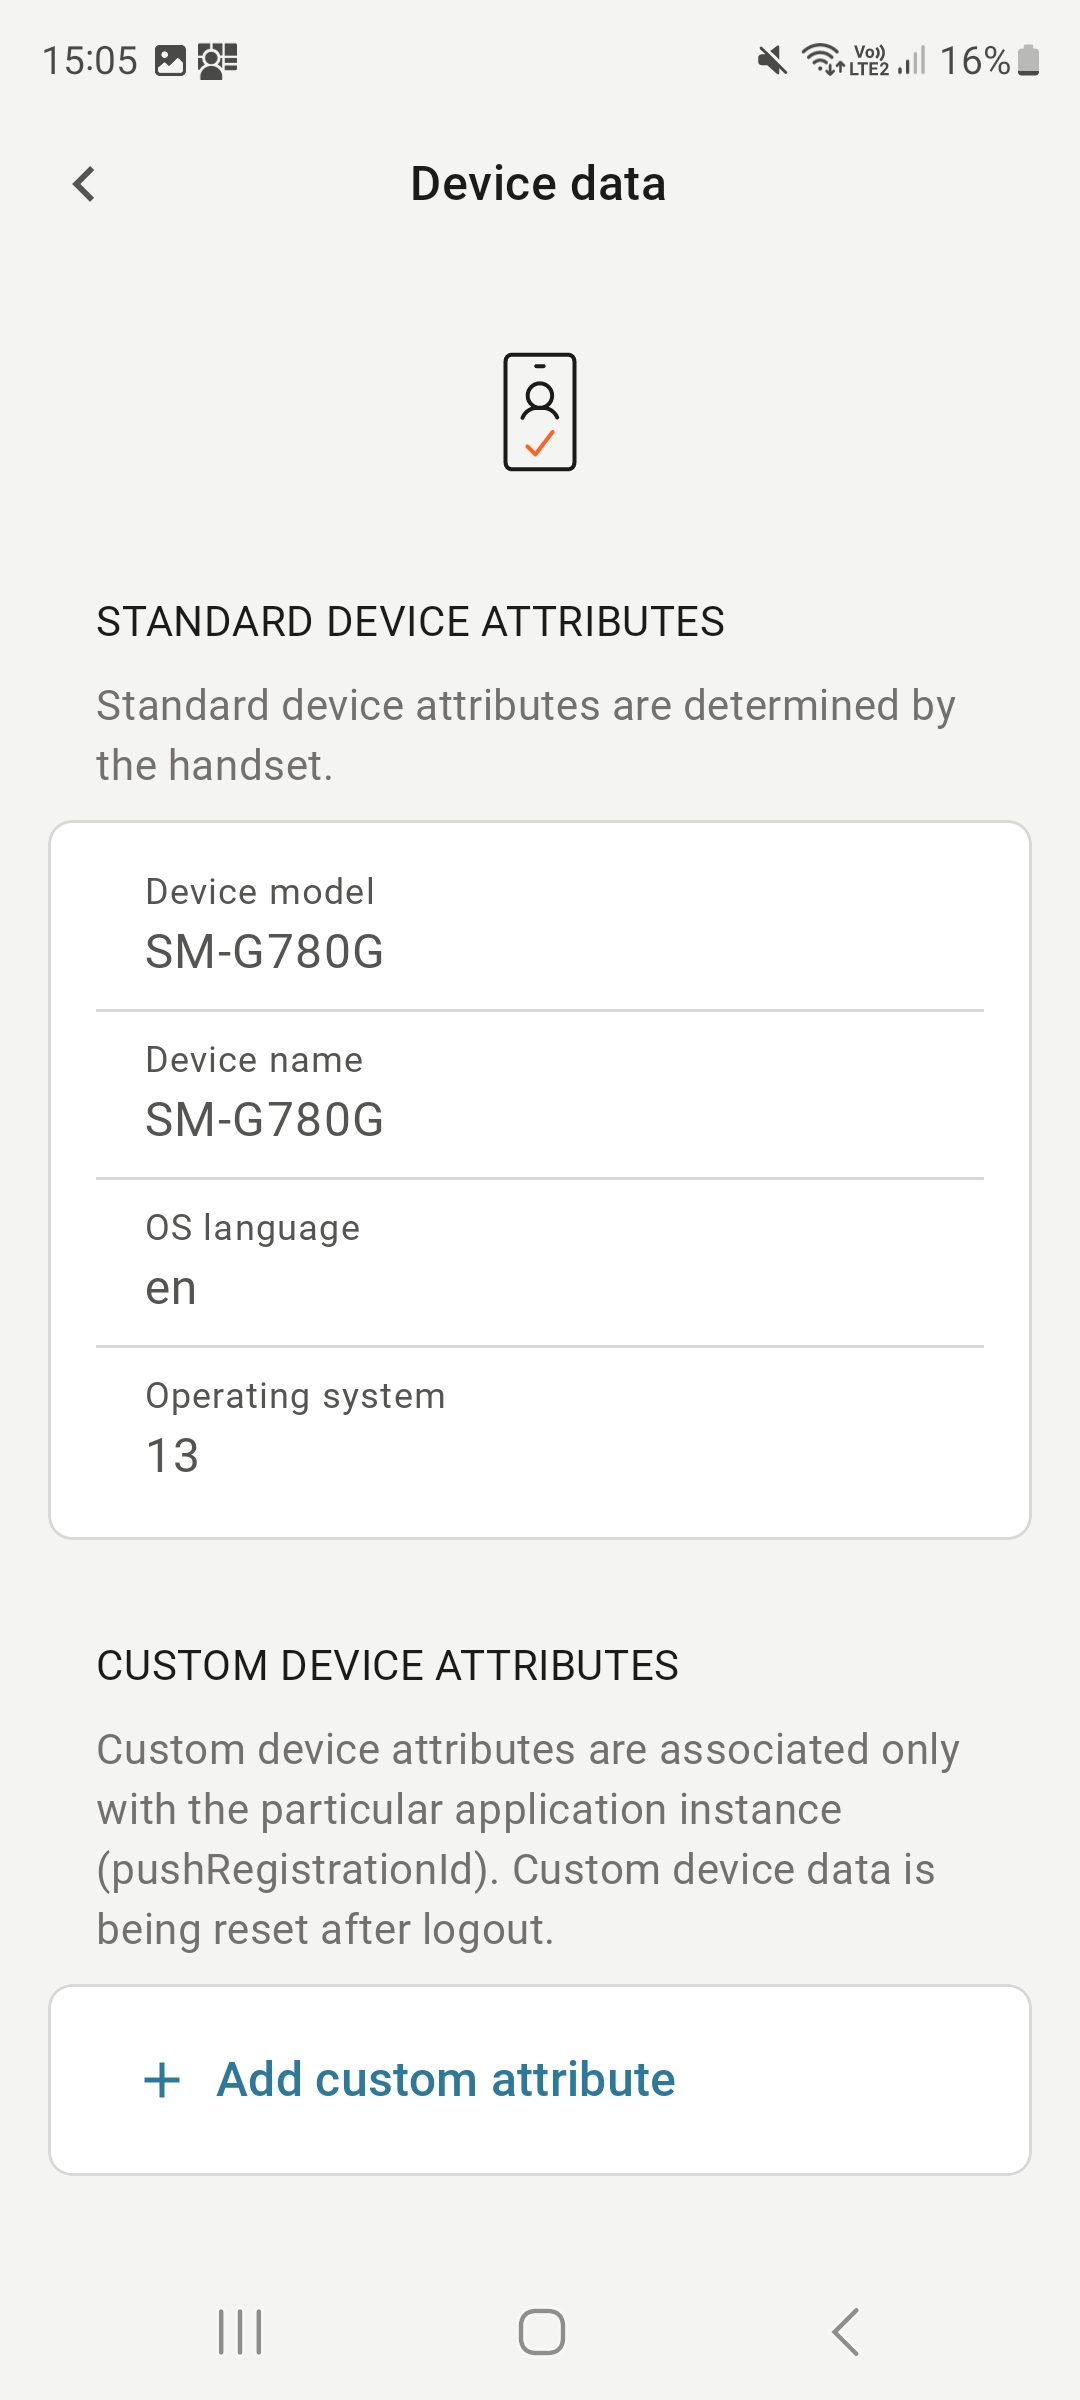
In the Demo app, go to User > Device data > Standard device attributes. You can see the system information fetched by the mobile SDK.
Custom attributes [#view-system-data--custom-attributes]
You can also set custom device attributes that are specific to your app instance. Example: Create a custom attribute, source_paid, to indicate the source of acquisition.
To create a custom attribute, do the following.
- In the Demo app, go to User > Device data > Custom device attributes.
- Select Add custom attribute.
- Select the attribute Type.
- Enter a Name for the attribute and enter its Value.
- Select Add.
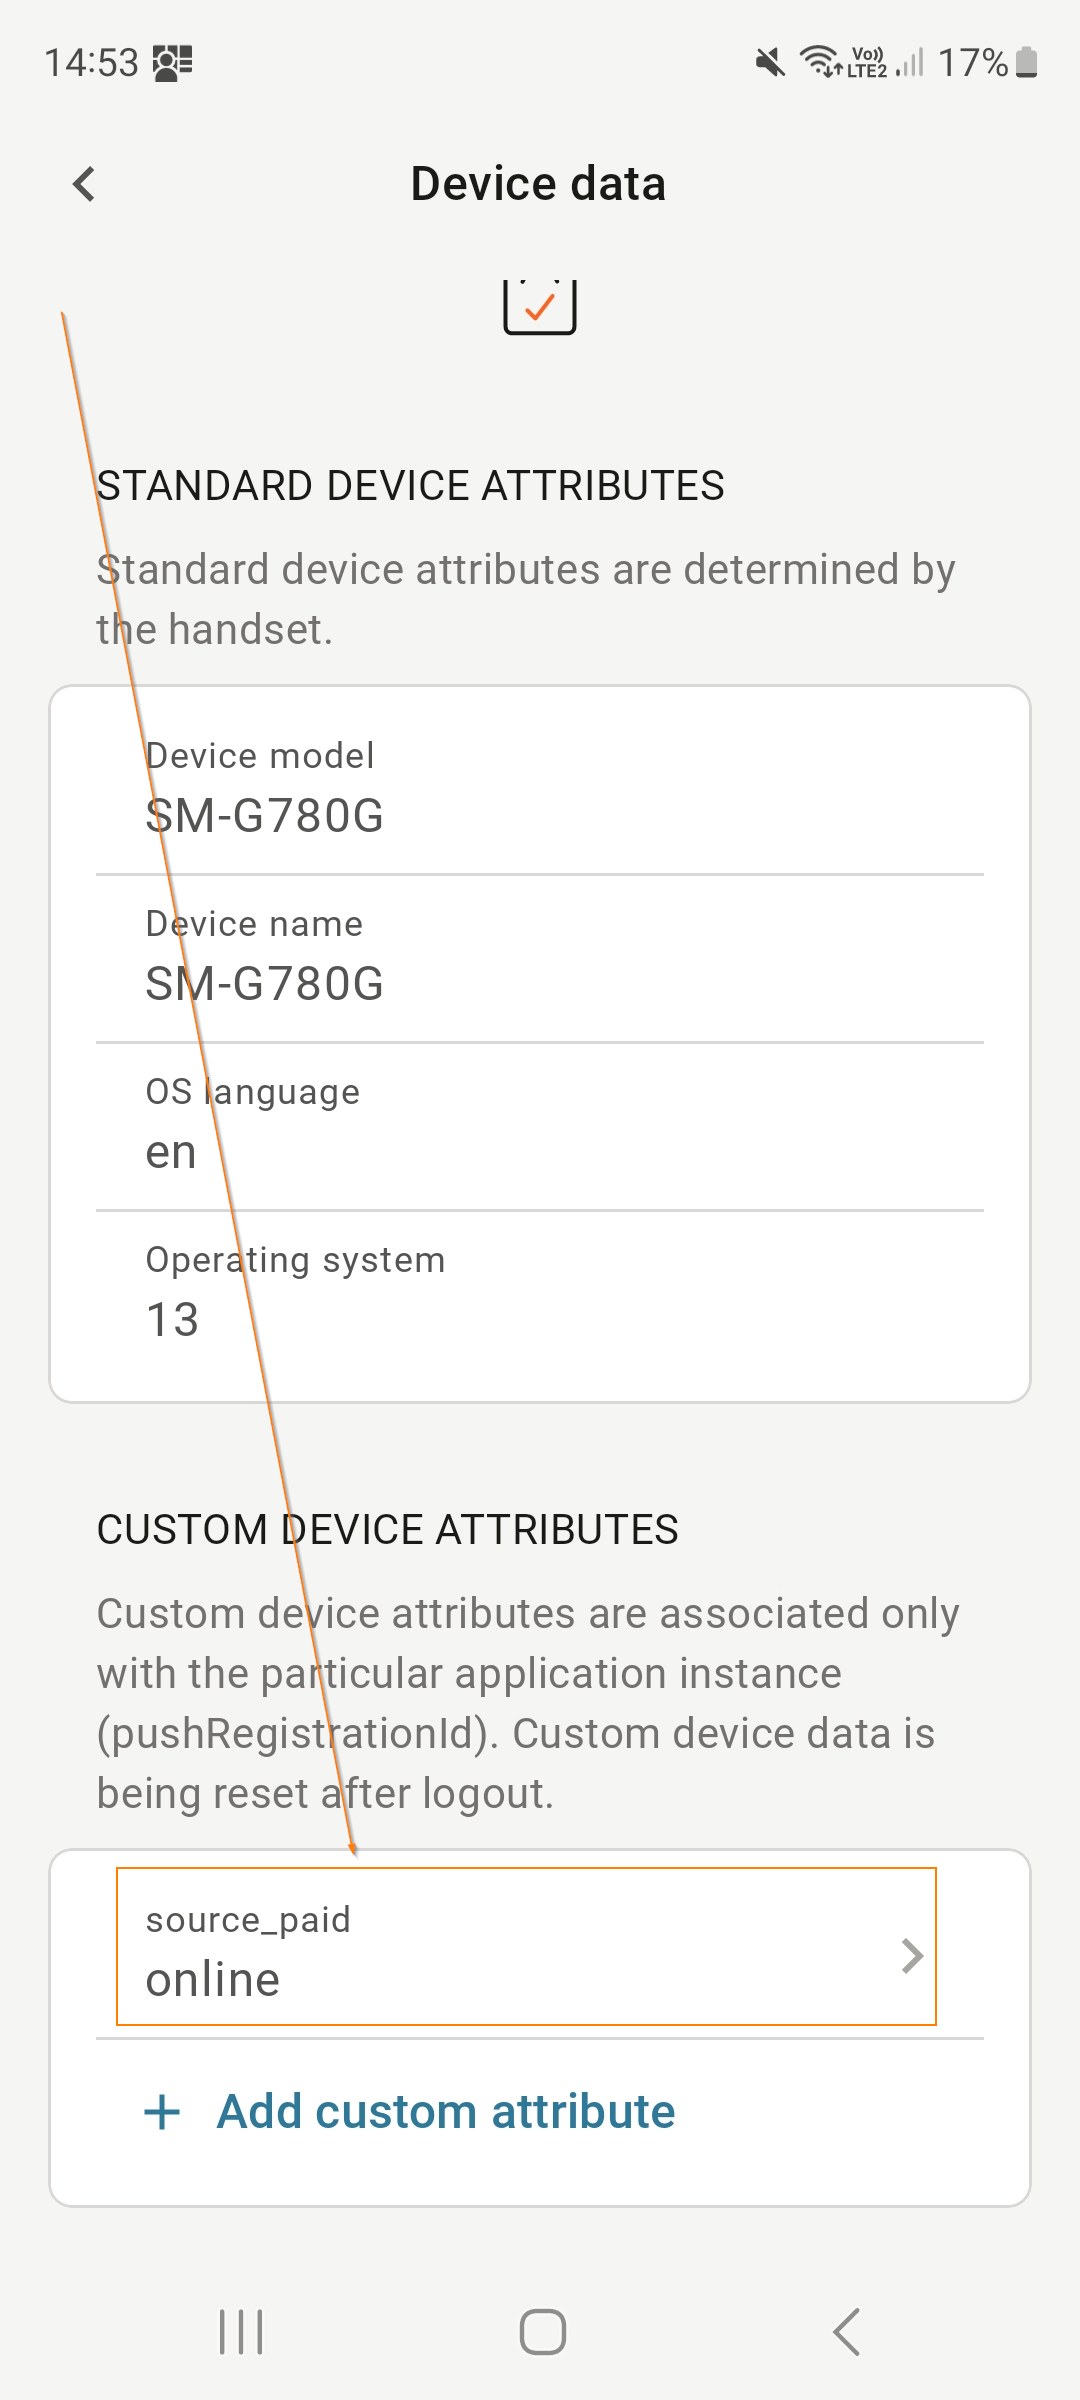
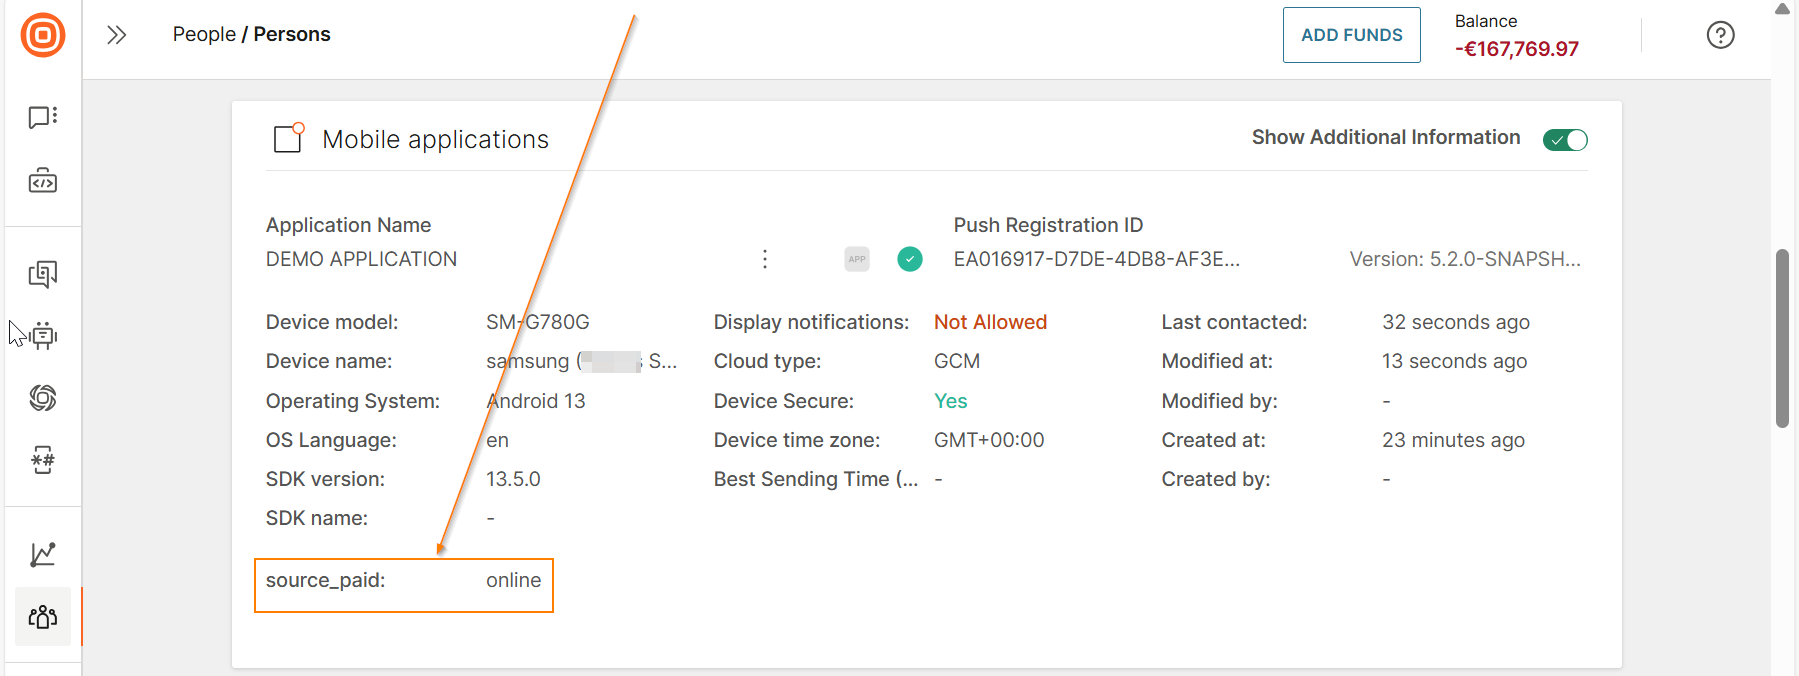
You can now view this custom attribute in People.
- In People, go to the person profile > Contact information tab > Mobile applications section.
- Enable Show additional information.
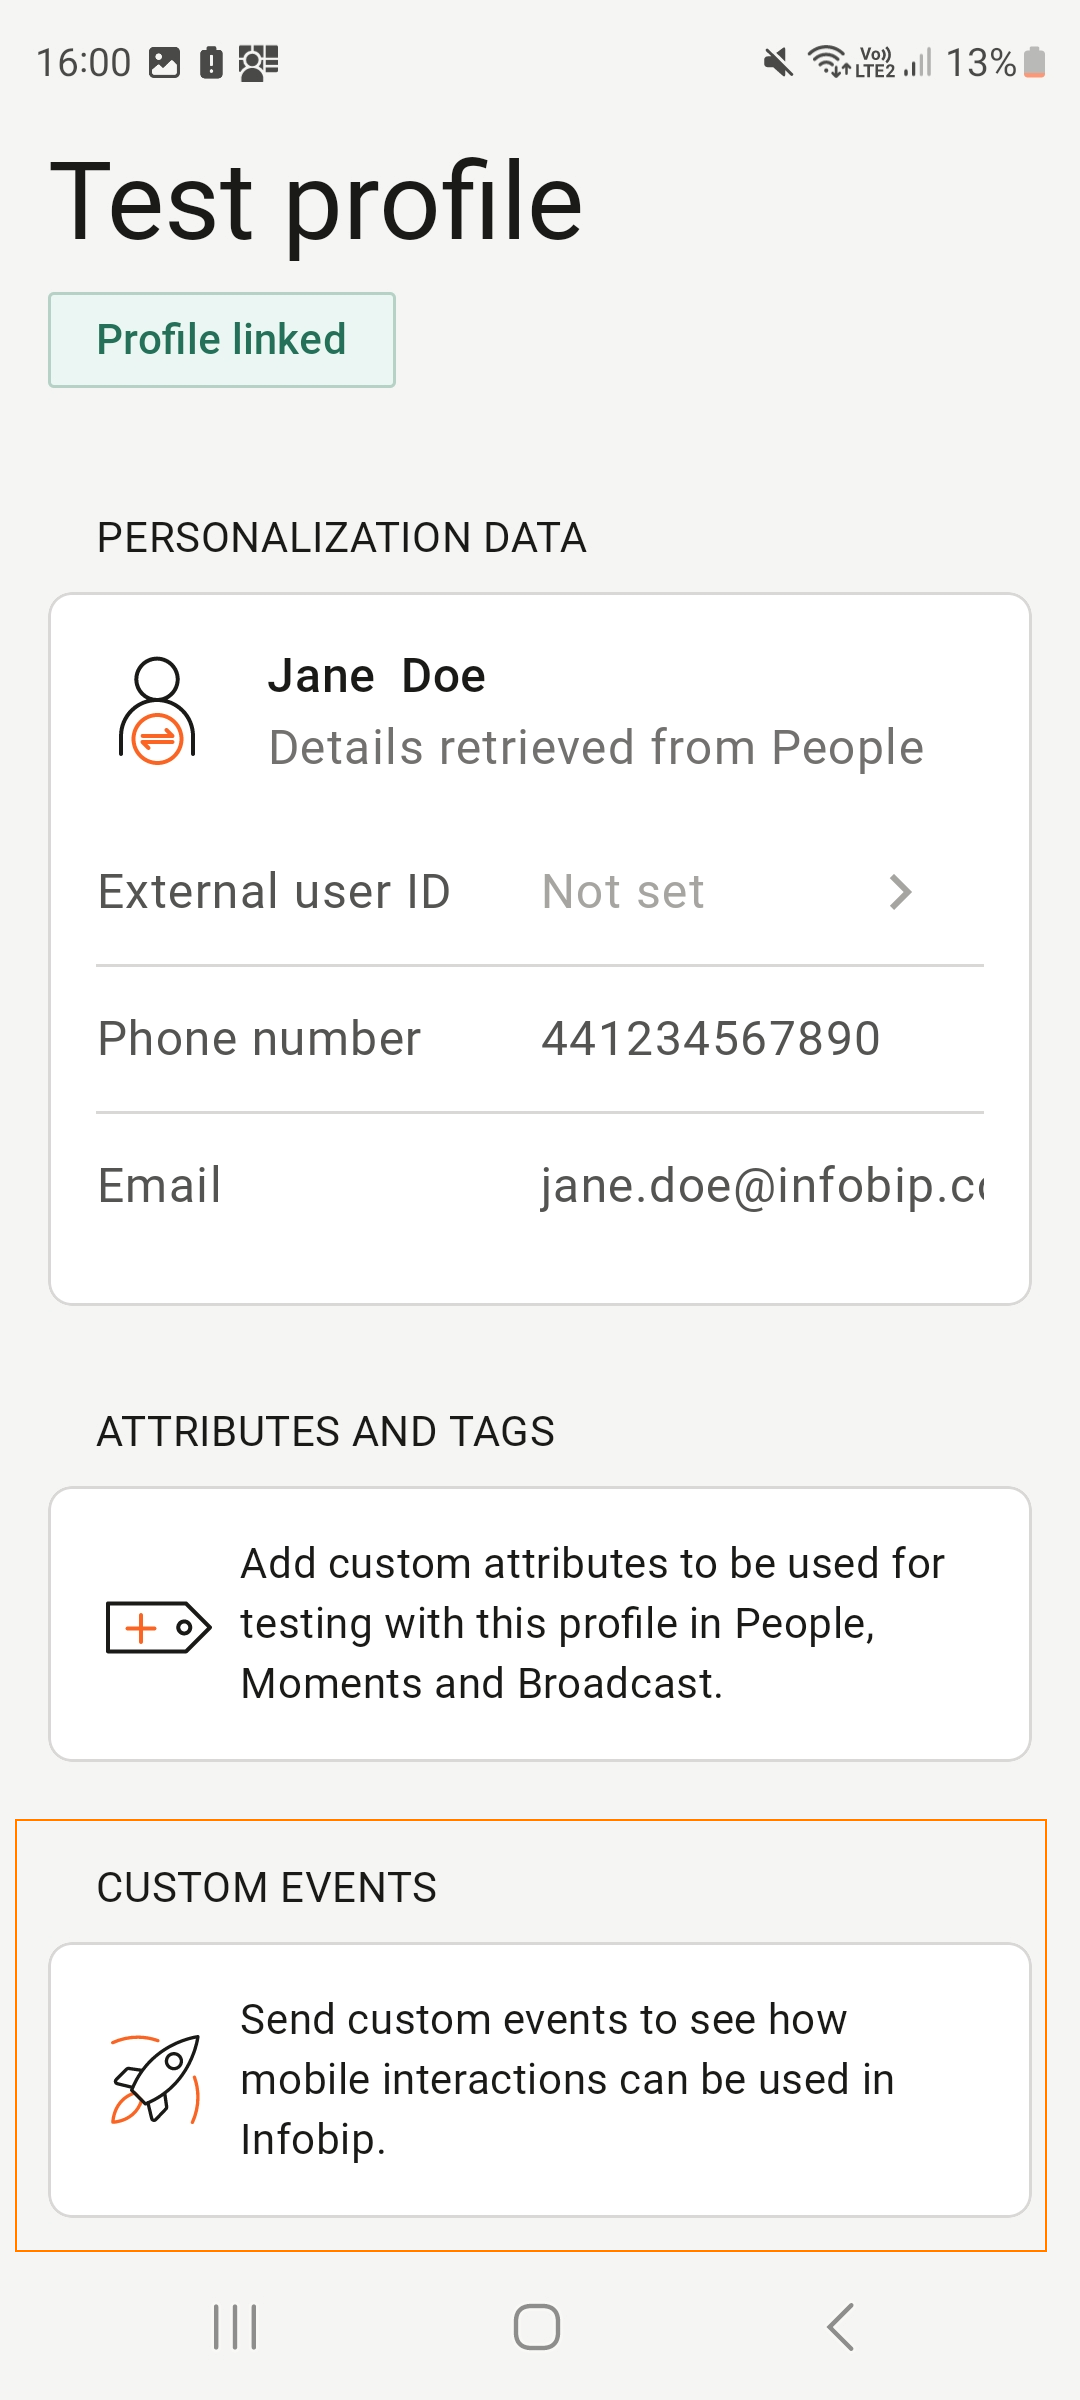
Personalization [#personalization]
The person profile that is created in People is marked as an anonymous profile of type Lead.
To get personalized messages and to store custom events in the profile, you must link the app to a person profile in People. You can either customize the anonymous profile or link to an existing profile.
To personalize the profile, in the Demo app, go to User > Personalization data.
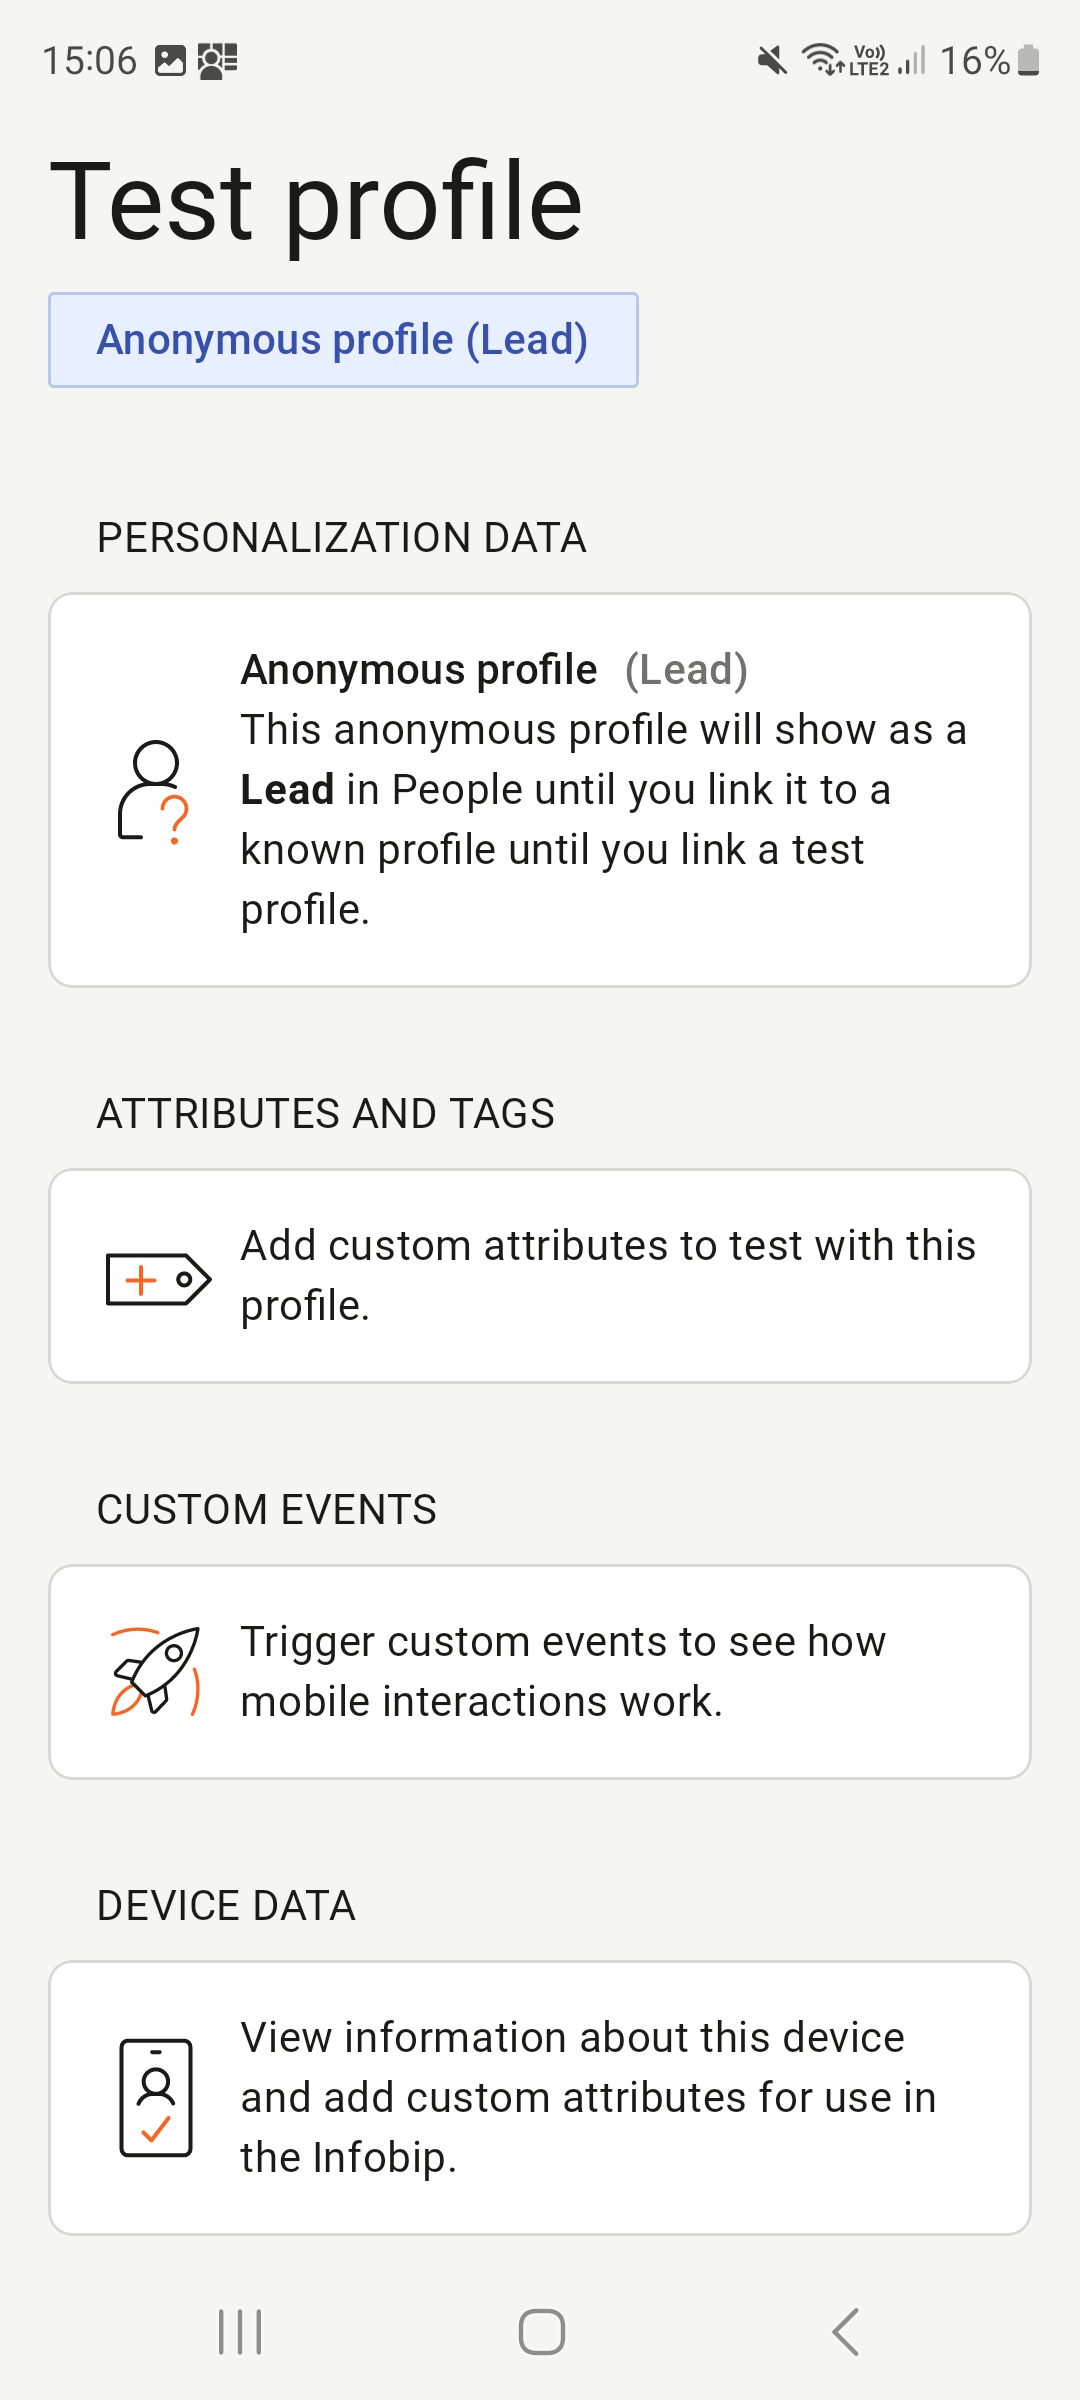
The message shows that the app is not yet personalized.
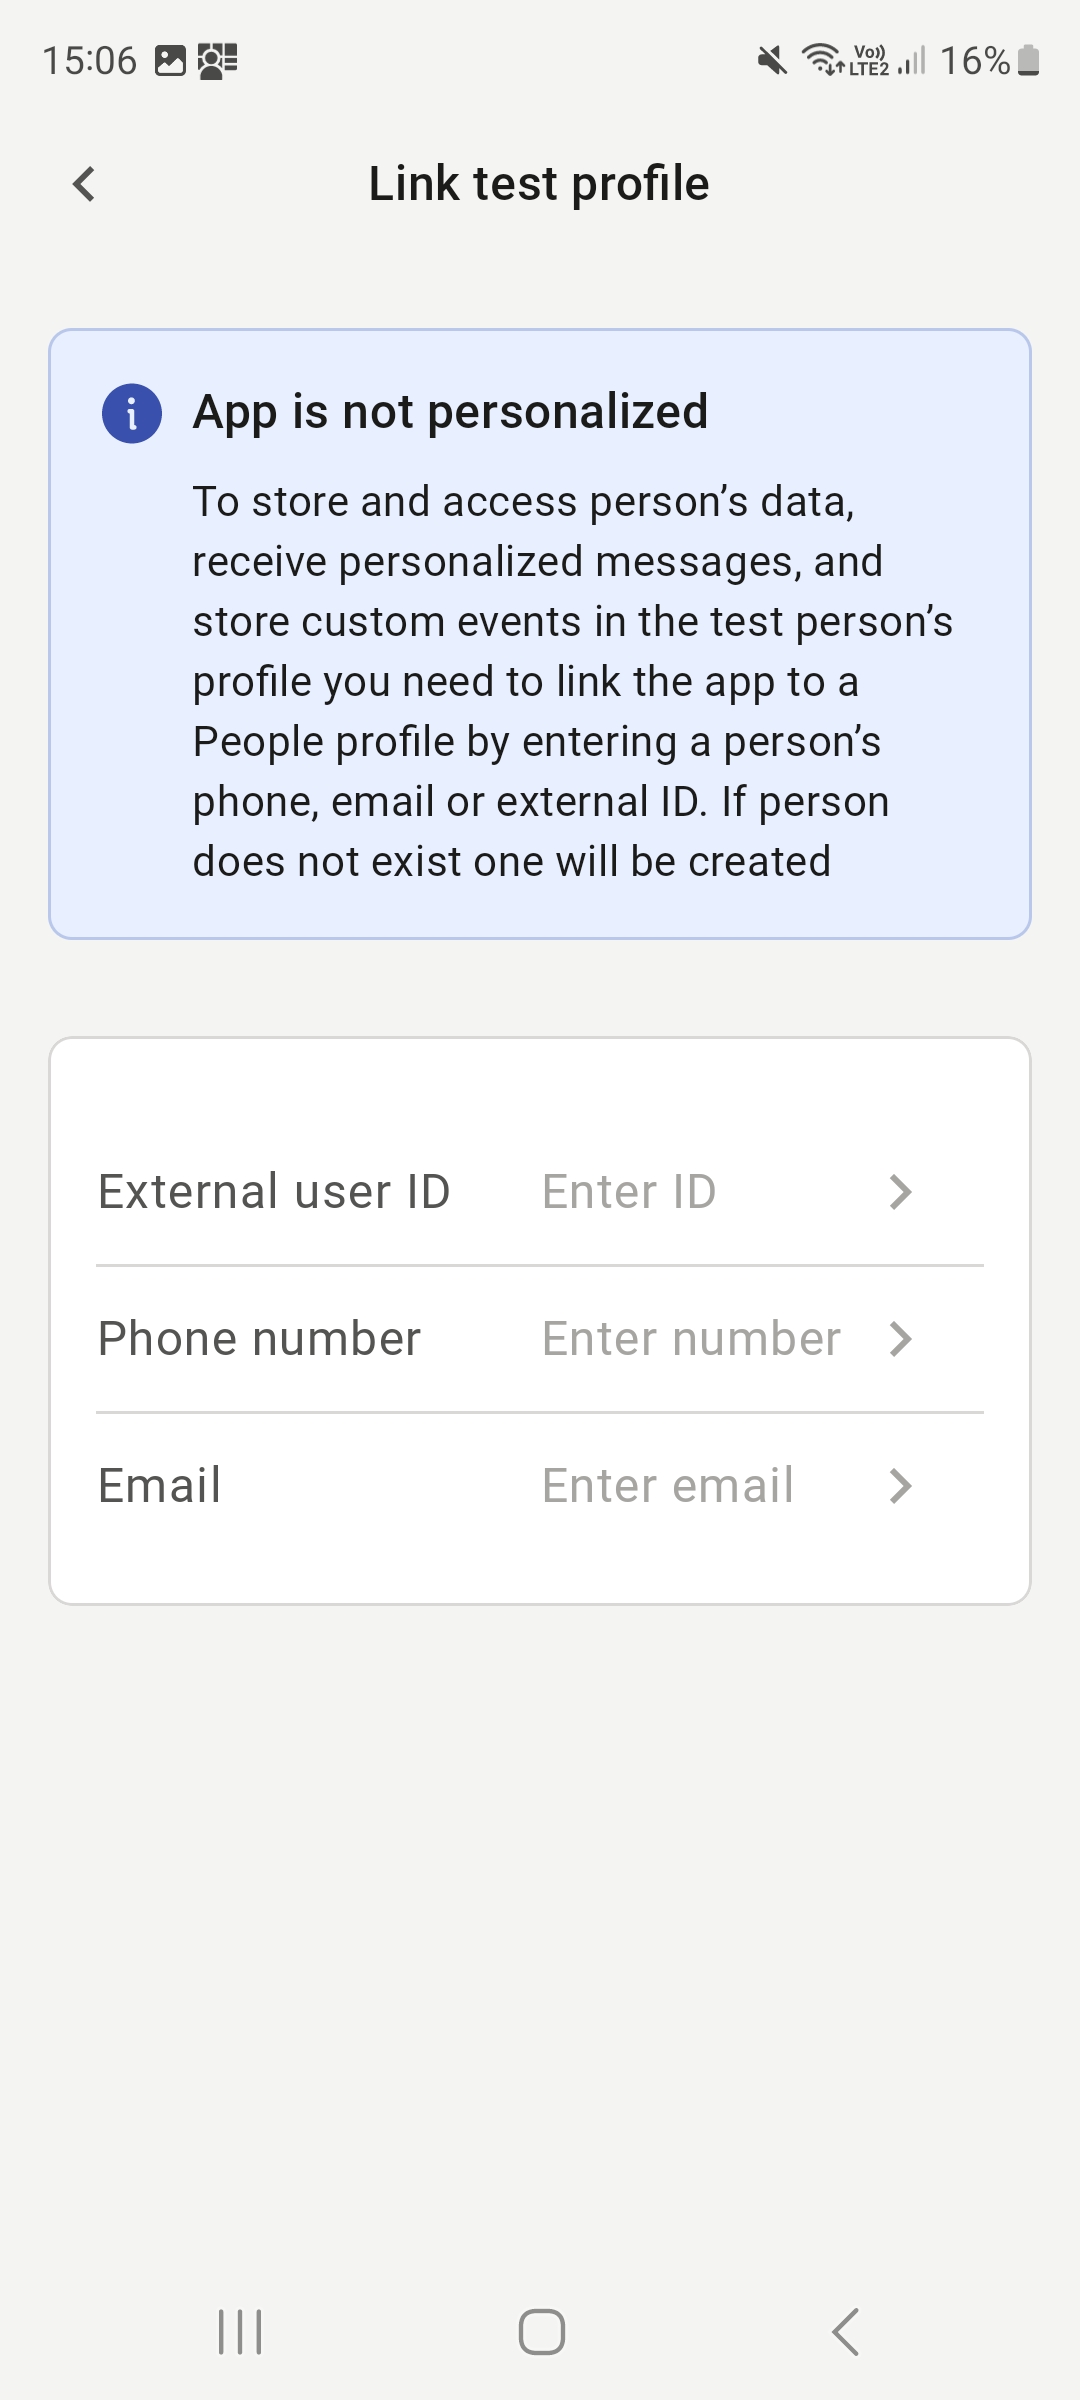
Personalize the profile [#personalization-personalize-the-profile]
In the app, set one or more of the following identification attributes and select Add.
- External user ID: This is the ID from an external system such as a CRM.
- Phone number
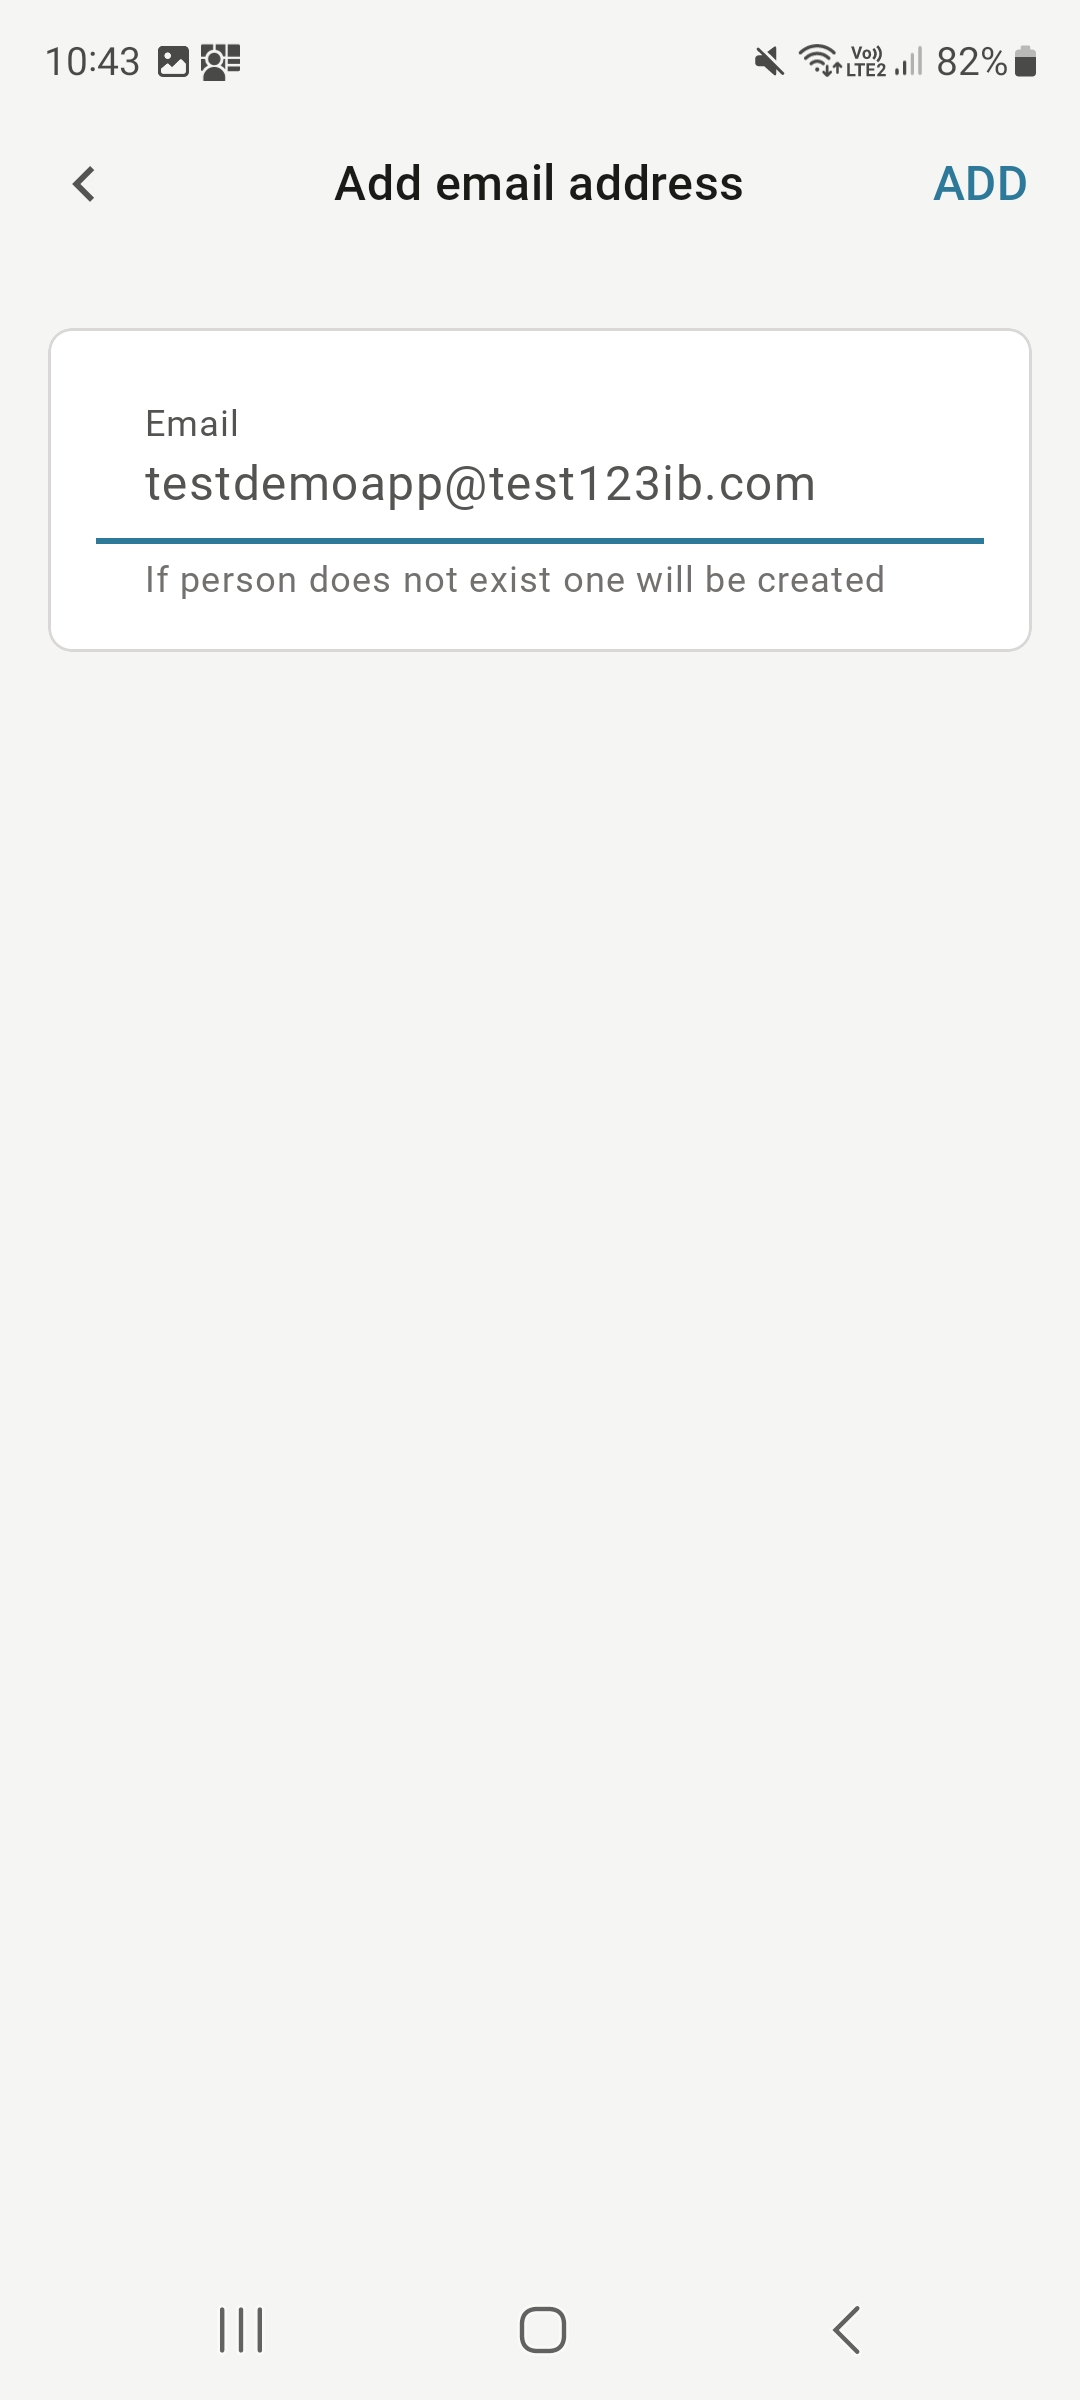
In the following example, the email address, testdemoapp@test123ib.com, is added.
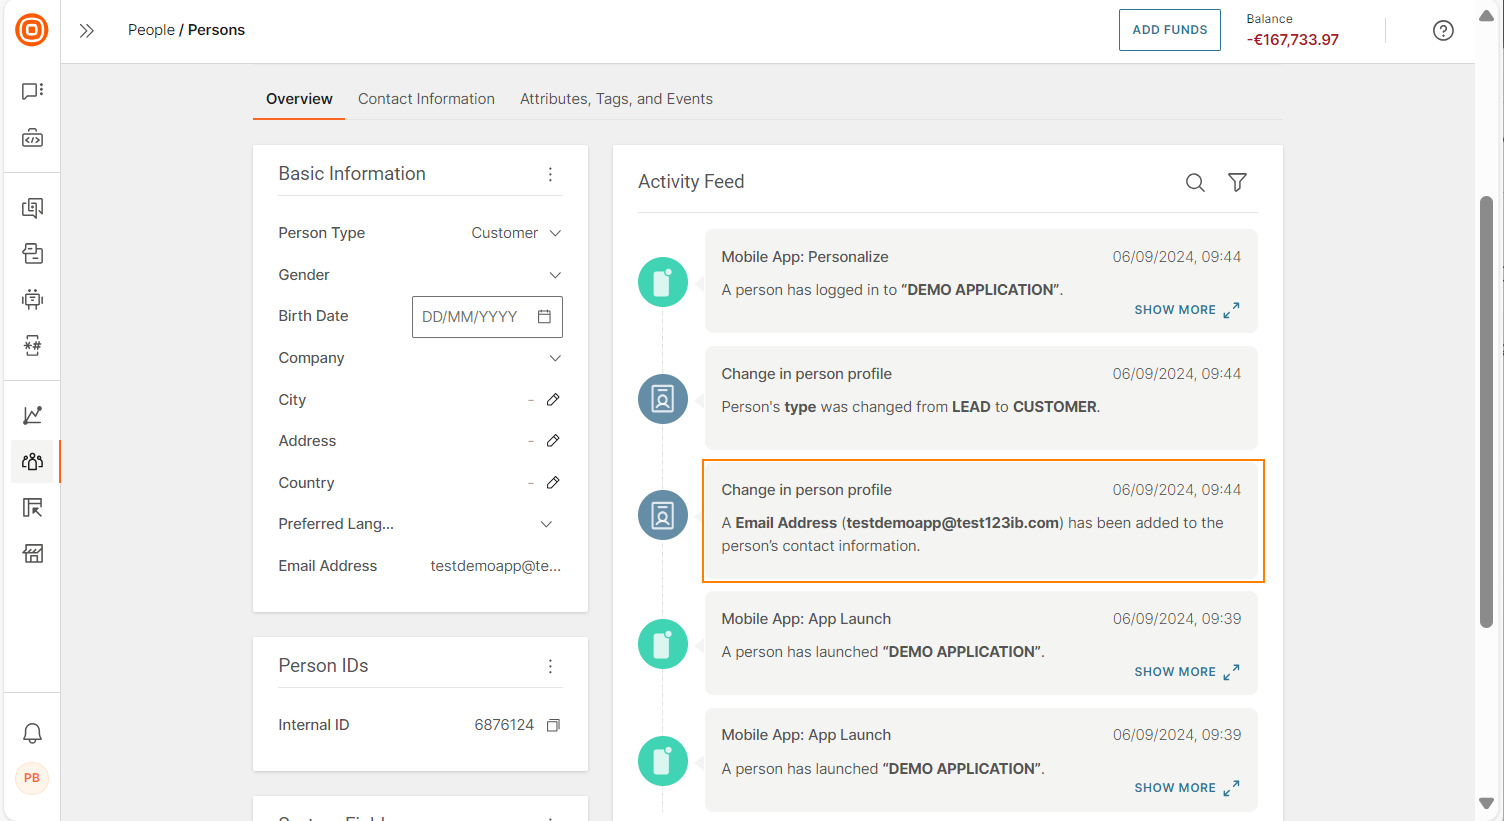
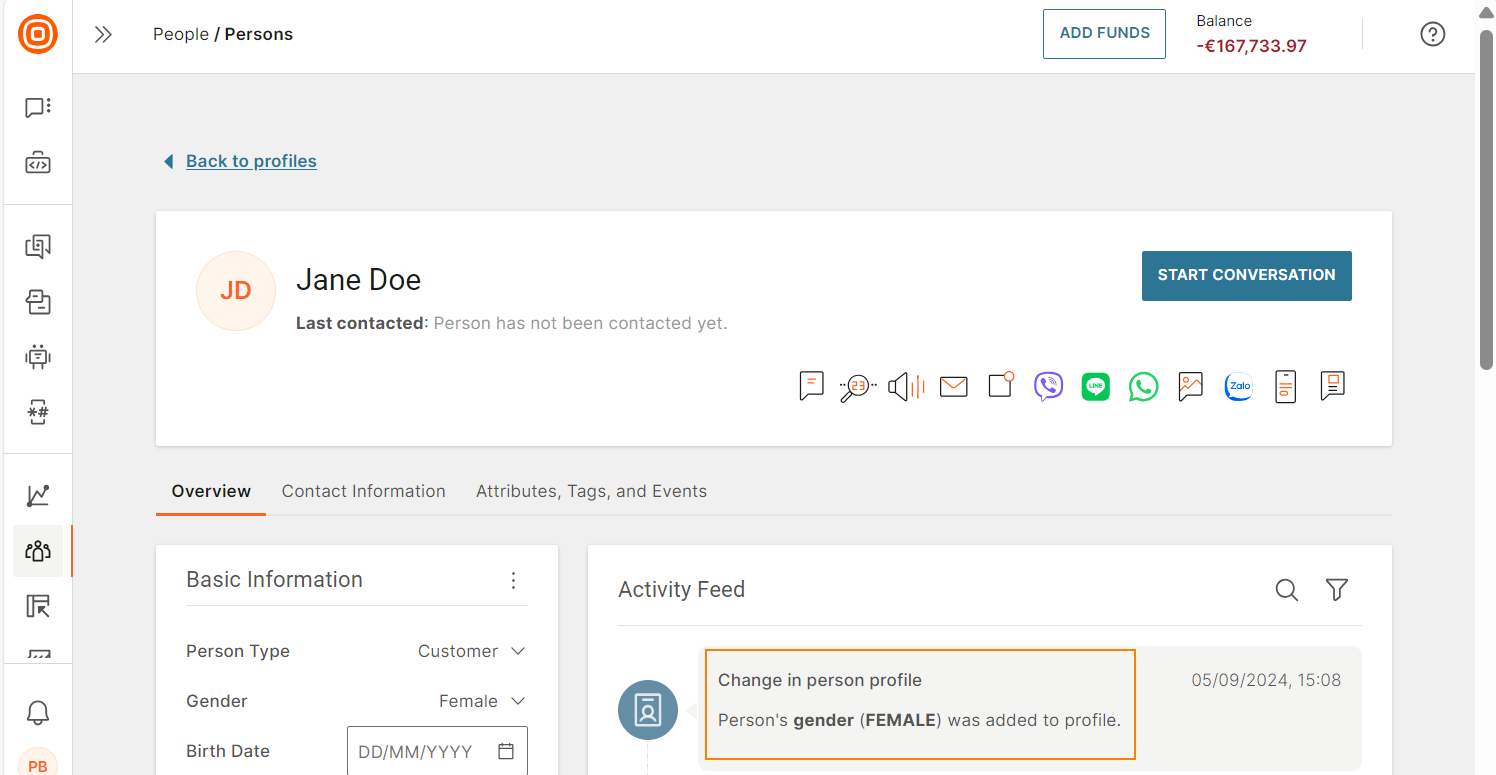
The profile is now updated in People. Select the person profile and go to the Activity feed section > Change in person profile event. You can view the identification attribute that you added.
Link to existing Person profile [#personalization-link-existing-profile]
You can link the app installation to an existing Person profile of type Customer in People.
In the app, set one or more of the following identification attributes of an existing Customer profile and select Add.
- External user ID
- Phone number

The pushRegistrationId from the anonymous profile is now assigned to the selected customer profile.
In the app, you can now see the profile data that is fetched from People.
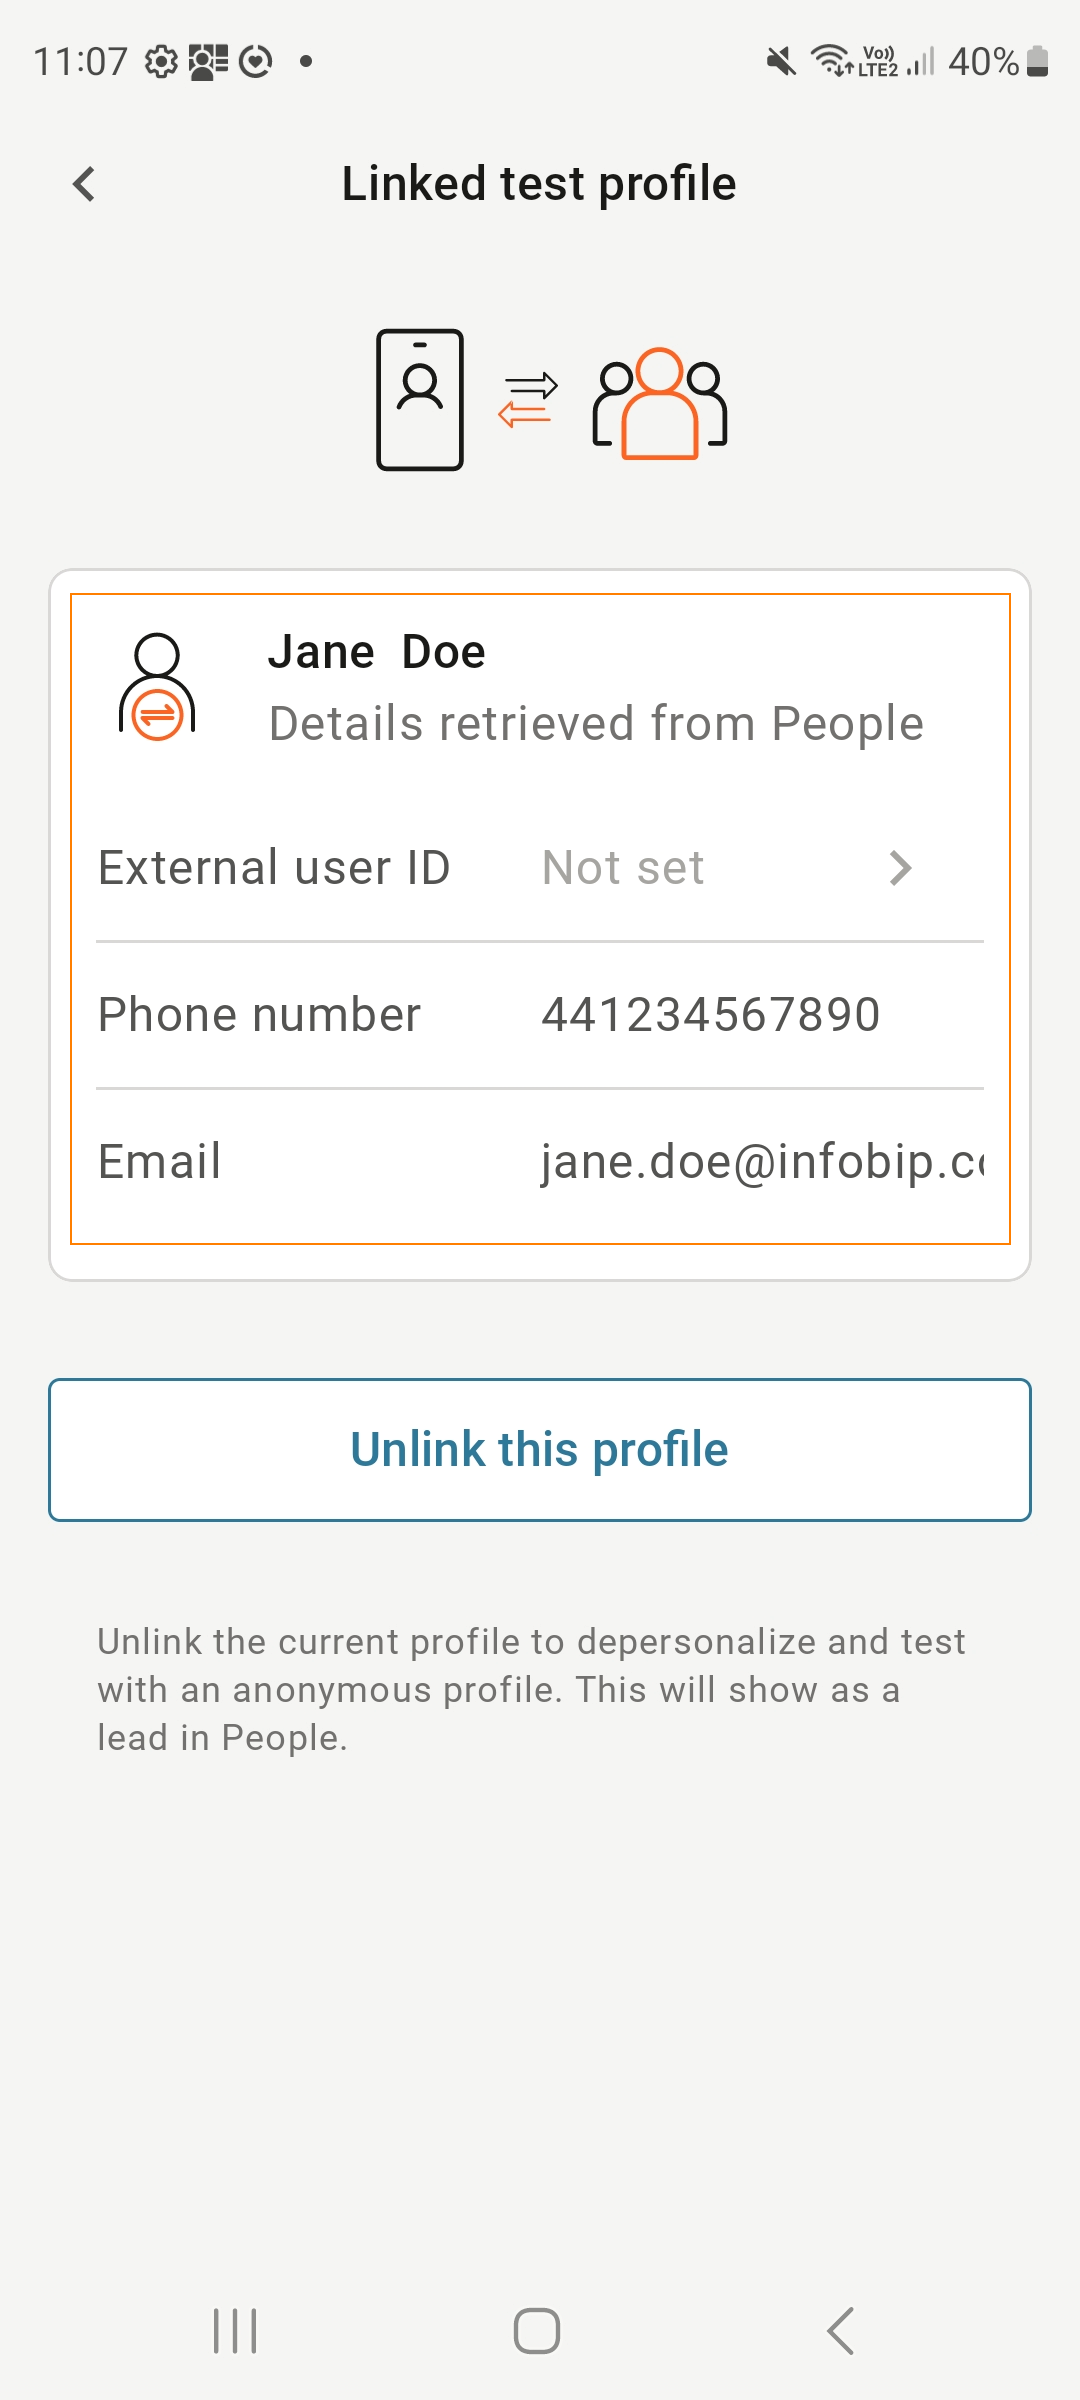
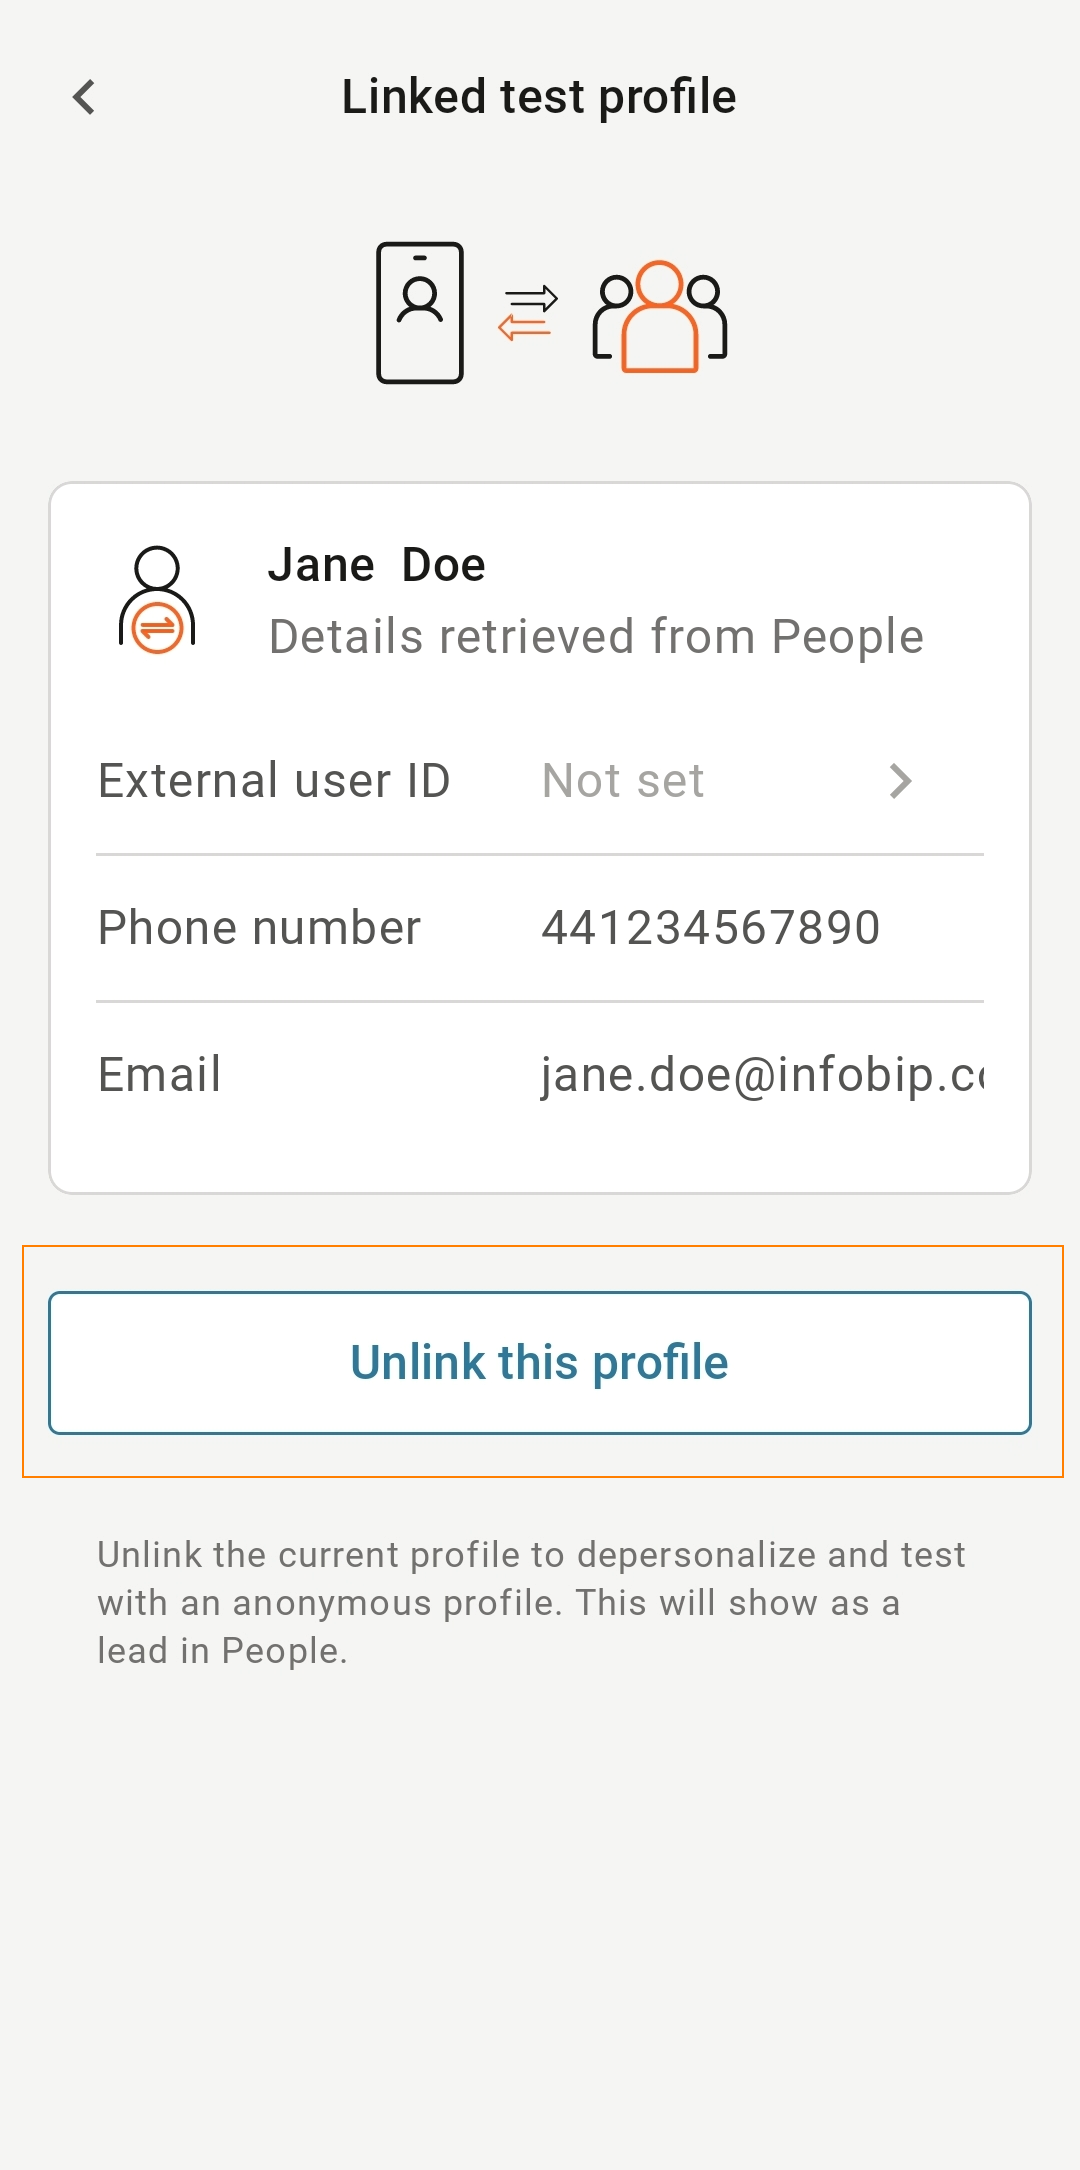
Remove personalization [#remove-personalization]
To remove personalization, in the demo app, select the profile. Select Unlink this profile.
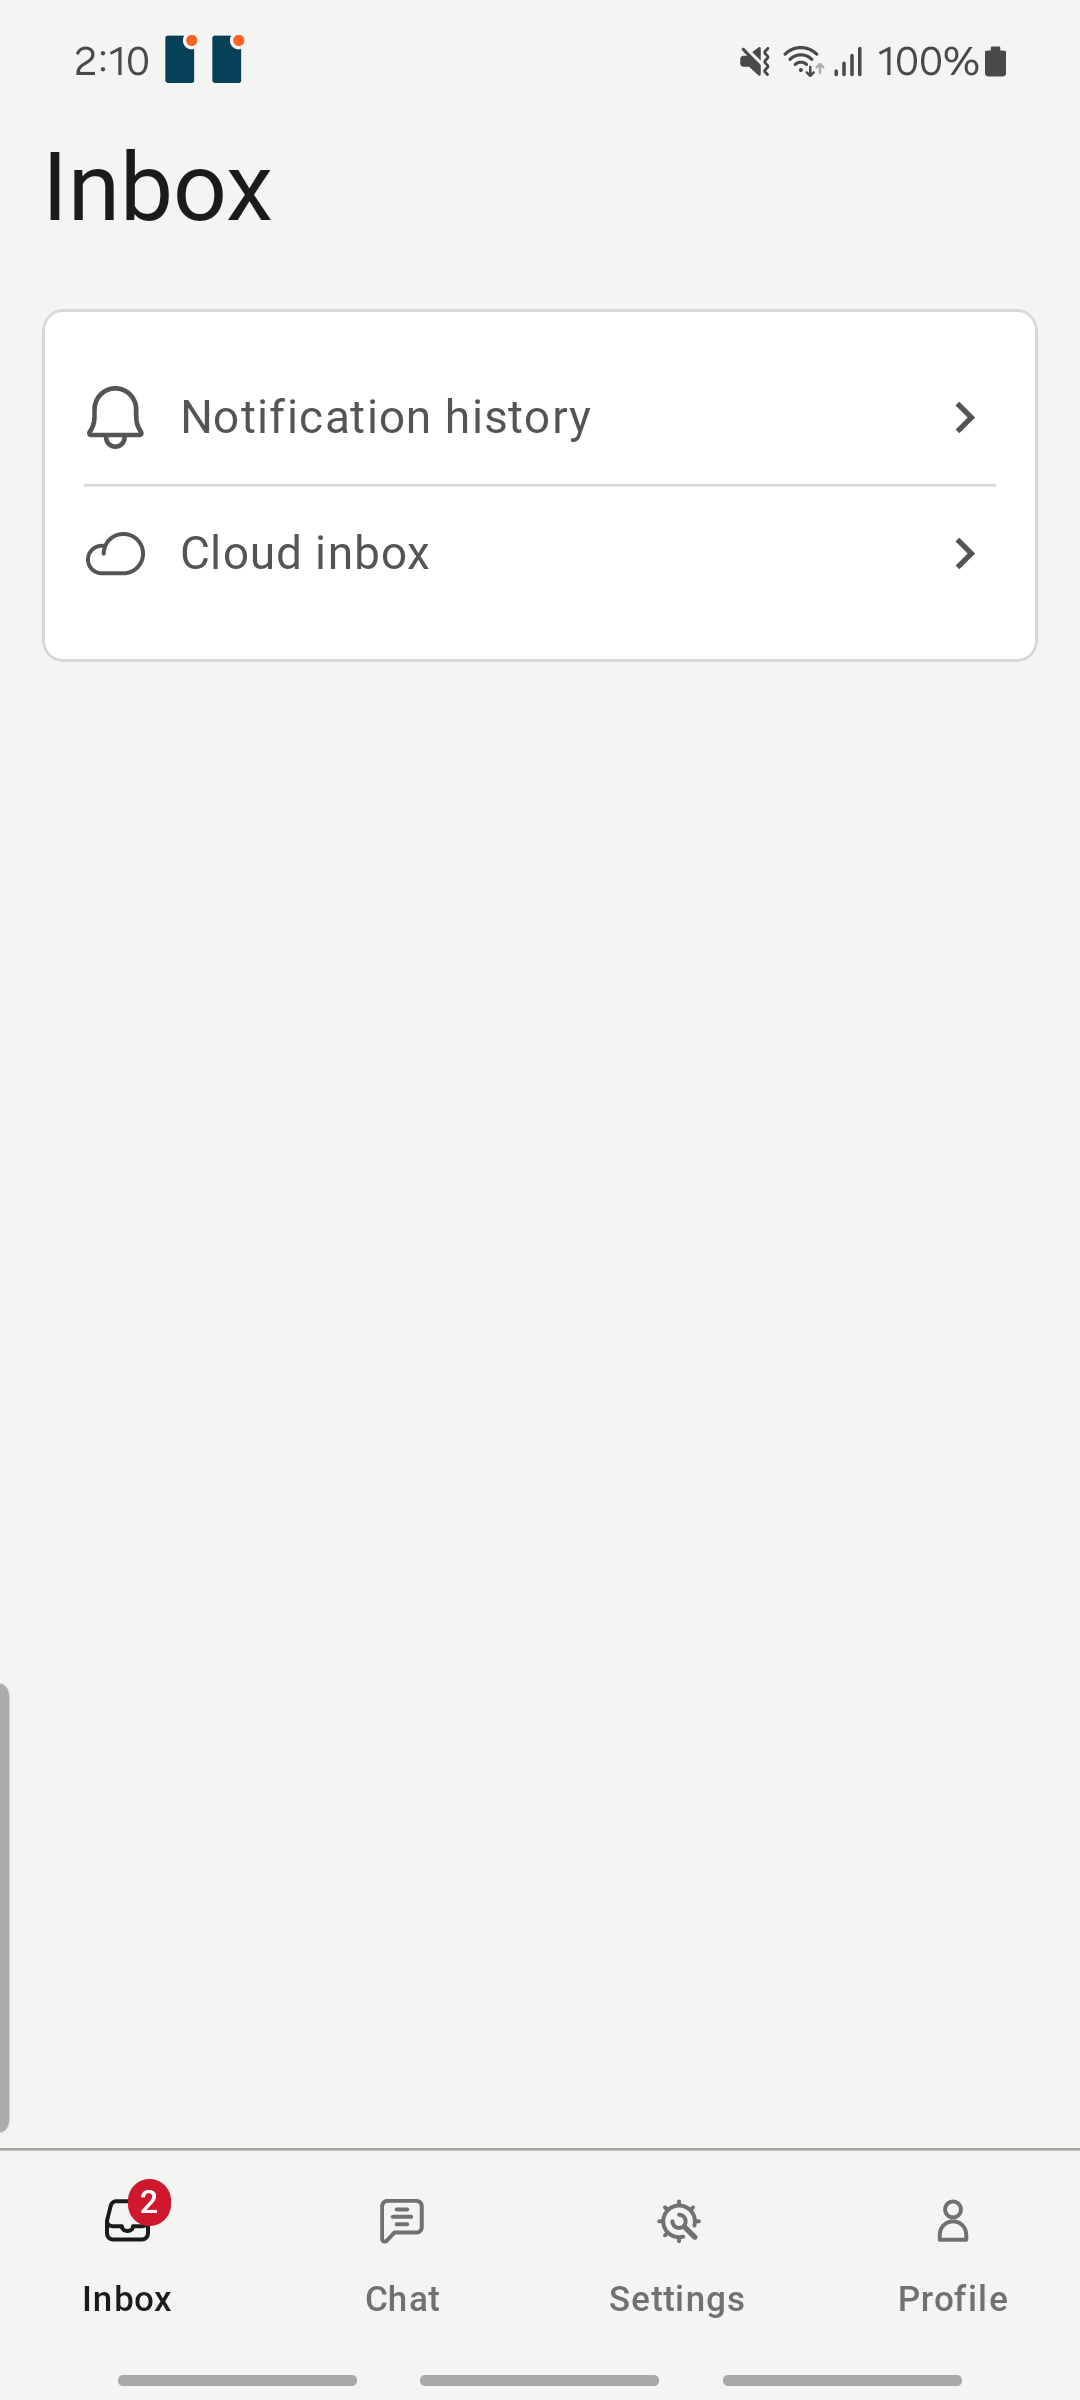
Inbox [#inbox]
Inbox enables you to save push notifications in the demo app even after they are dismissed.
To use the inbox in the demo app, the app must be personalized with externalUserId.
To access the inbox in the demo app, go to Inbox. Within the inbox, Push notifications are saved in the following locations:
- Notification history
- Cloud inbox
Notification history [#inbox-notification-history]
This section shows a list of saved push notifications. Notifications are deleted when the end user logs out of the app.
Cloud inbox
This section shows a list of saved push notifications. Notifications are not deleted even if the end user logs out of the app.
To enable saving to Cloud inbox, configure the Save to app inbox field when you create the push notification.
The Cloud inbox has the following features:
-
Saved push notifications are categorized into All messages, Promotions, and Transactions tabs.
-
You can filter notifications by topic or date.
-
When you open a notification, you can see the content as well as details about the notification, such as the message ID, Sent and Received/Seen dates, delivery report status, and custom fields.

Attributes and tags [#attributes-tags]
The mobile SDK supports fetching standard attributes, custom attributes, and tags from People, and updating them in the app. The changes are shared across all devices.
In the app, go to User > Attributes and tags. For personalized devices, you can see the standard attributes from People.
To test the app, update any of the standard person attributes in the app, and select Save changes.
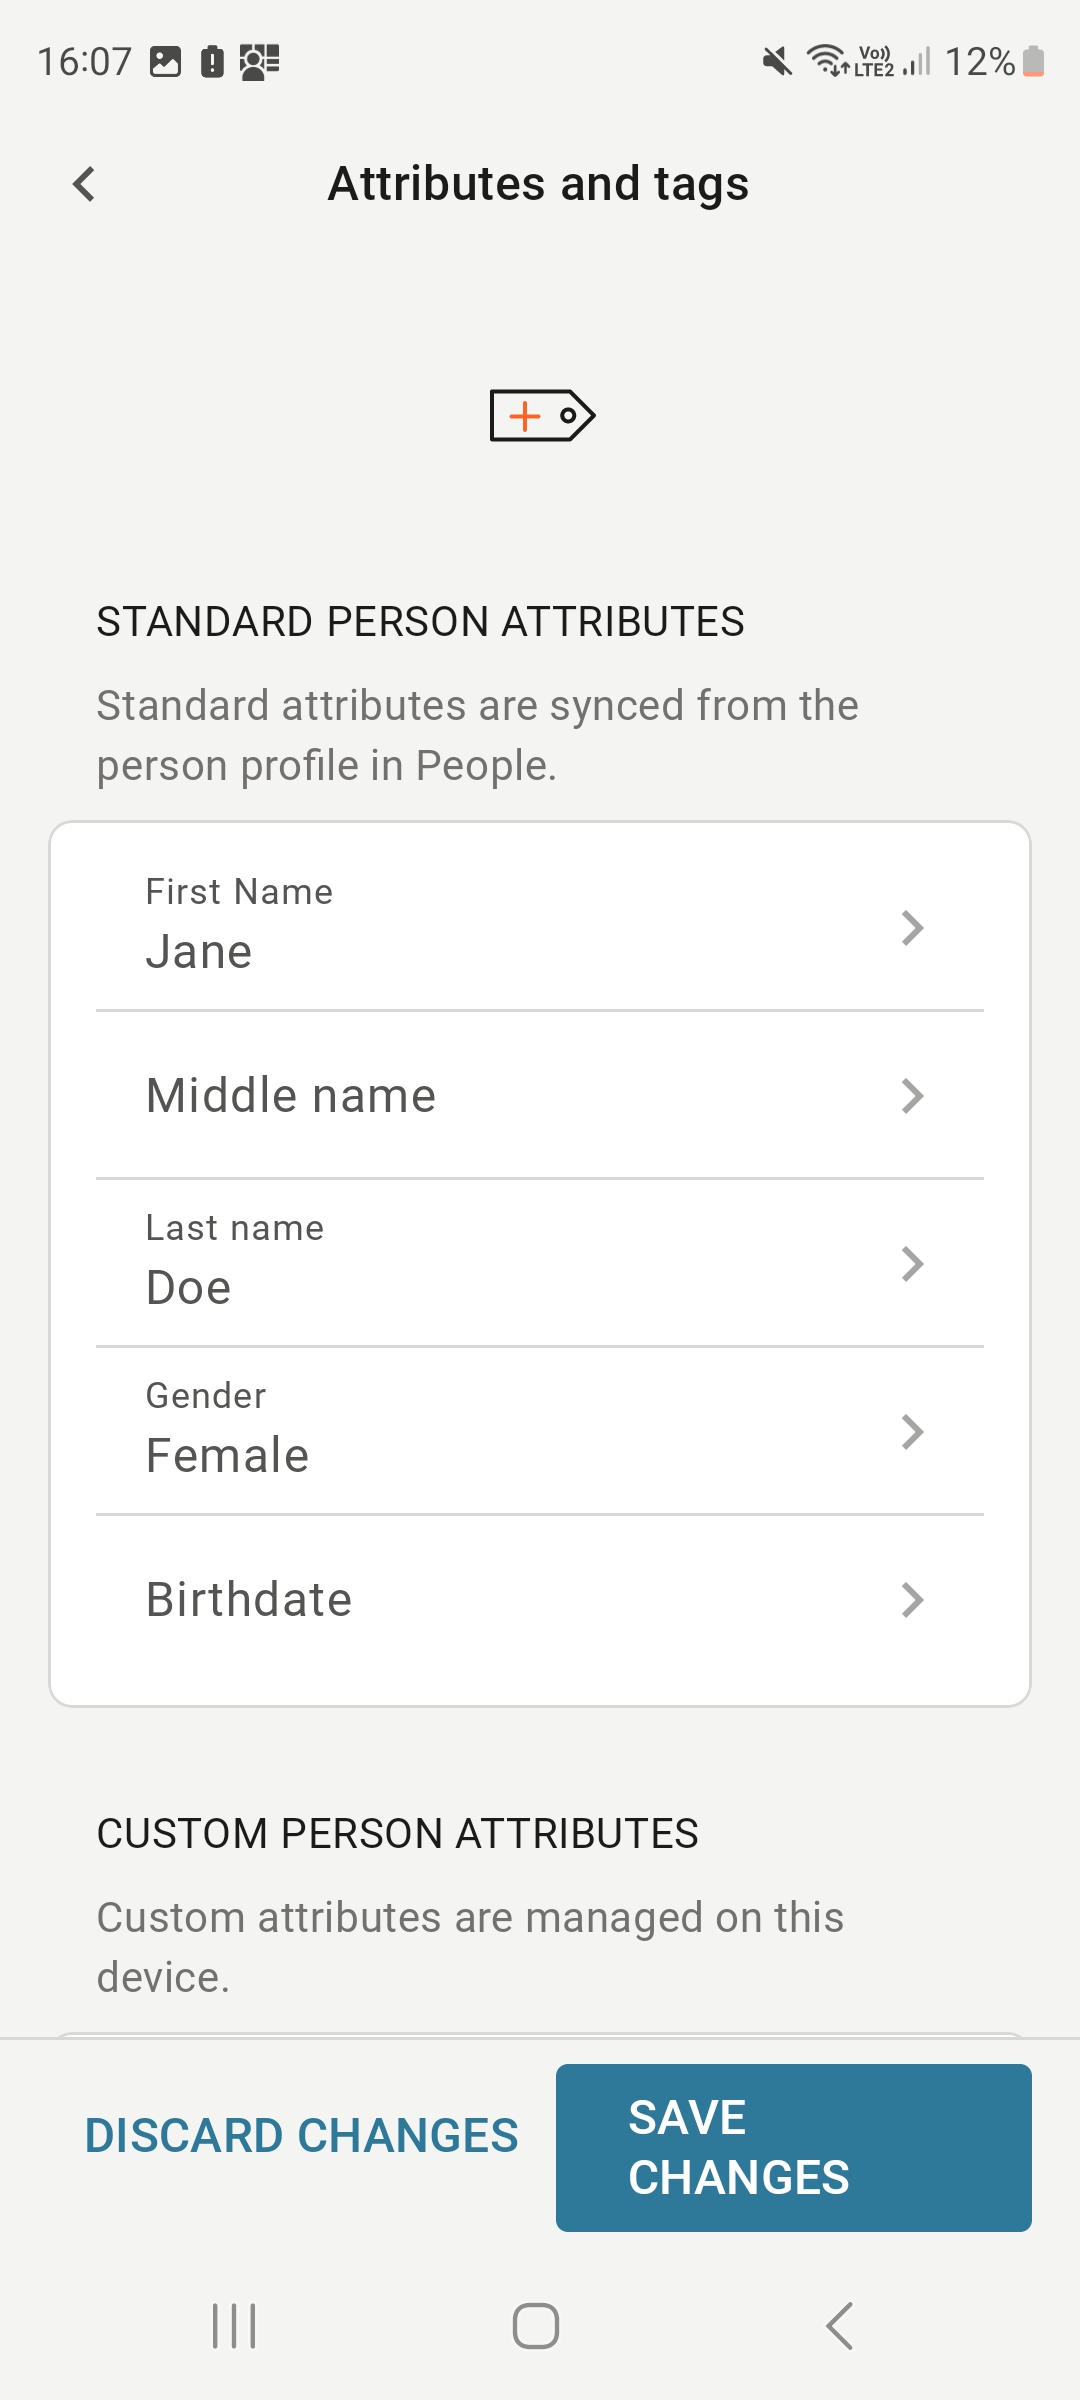
To verify that these changes are automatically updated in People, go to the Attributes, tags, and events tab in the person profile.
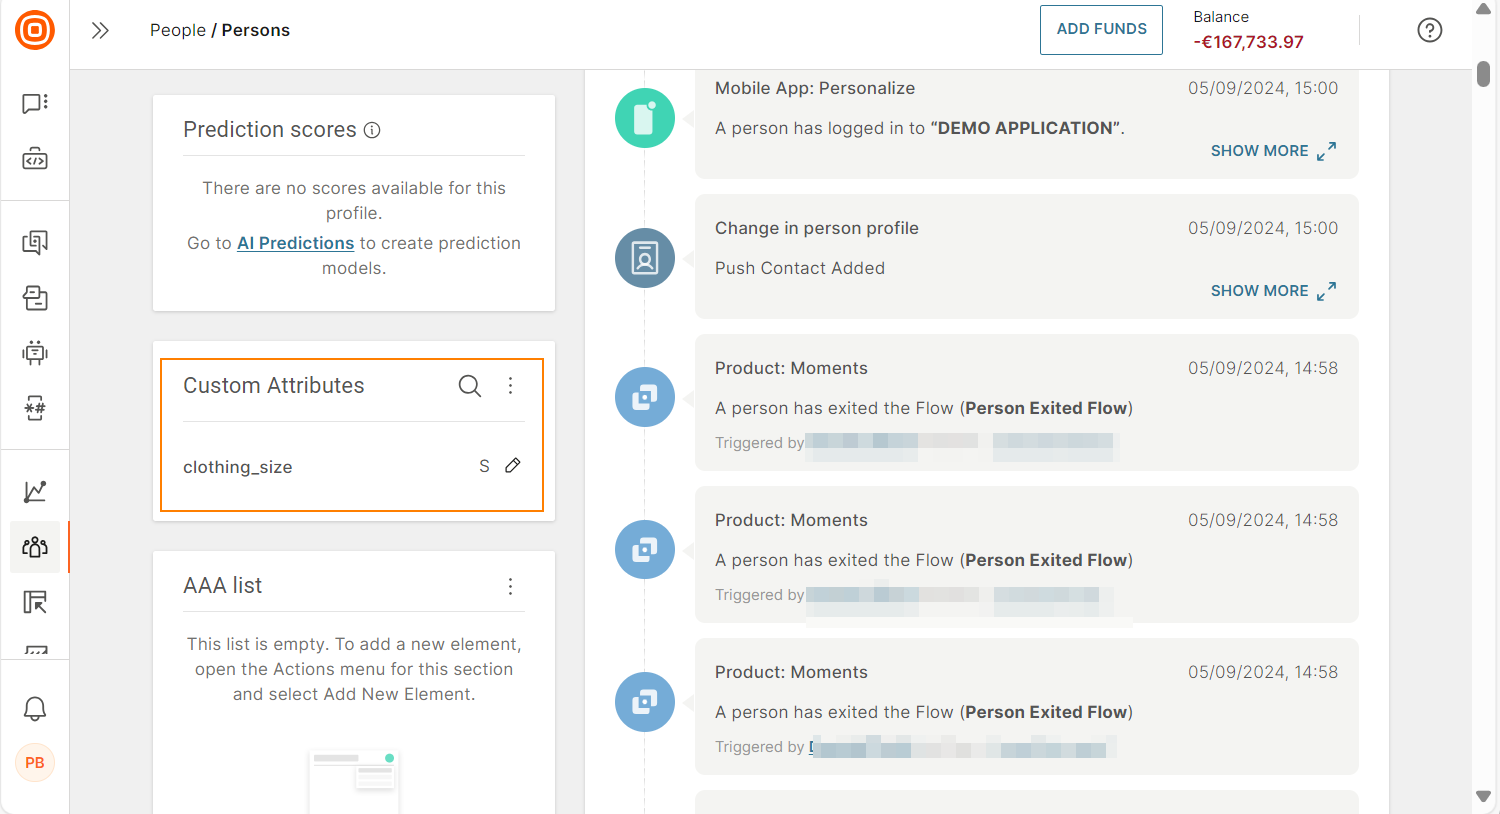
Similarly, you can update the custom attributes and tags.
Example: In the app, change the clothing_size custom person attribute from XXL to S.
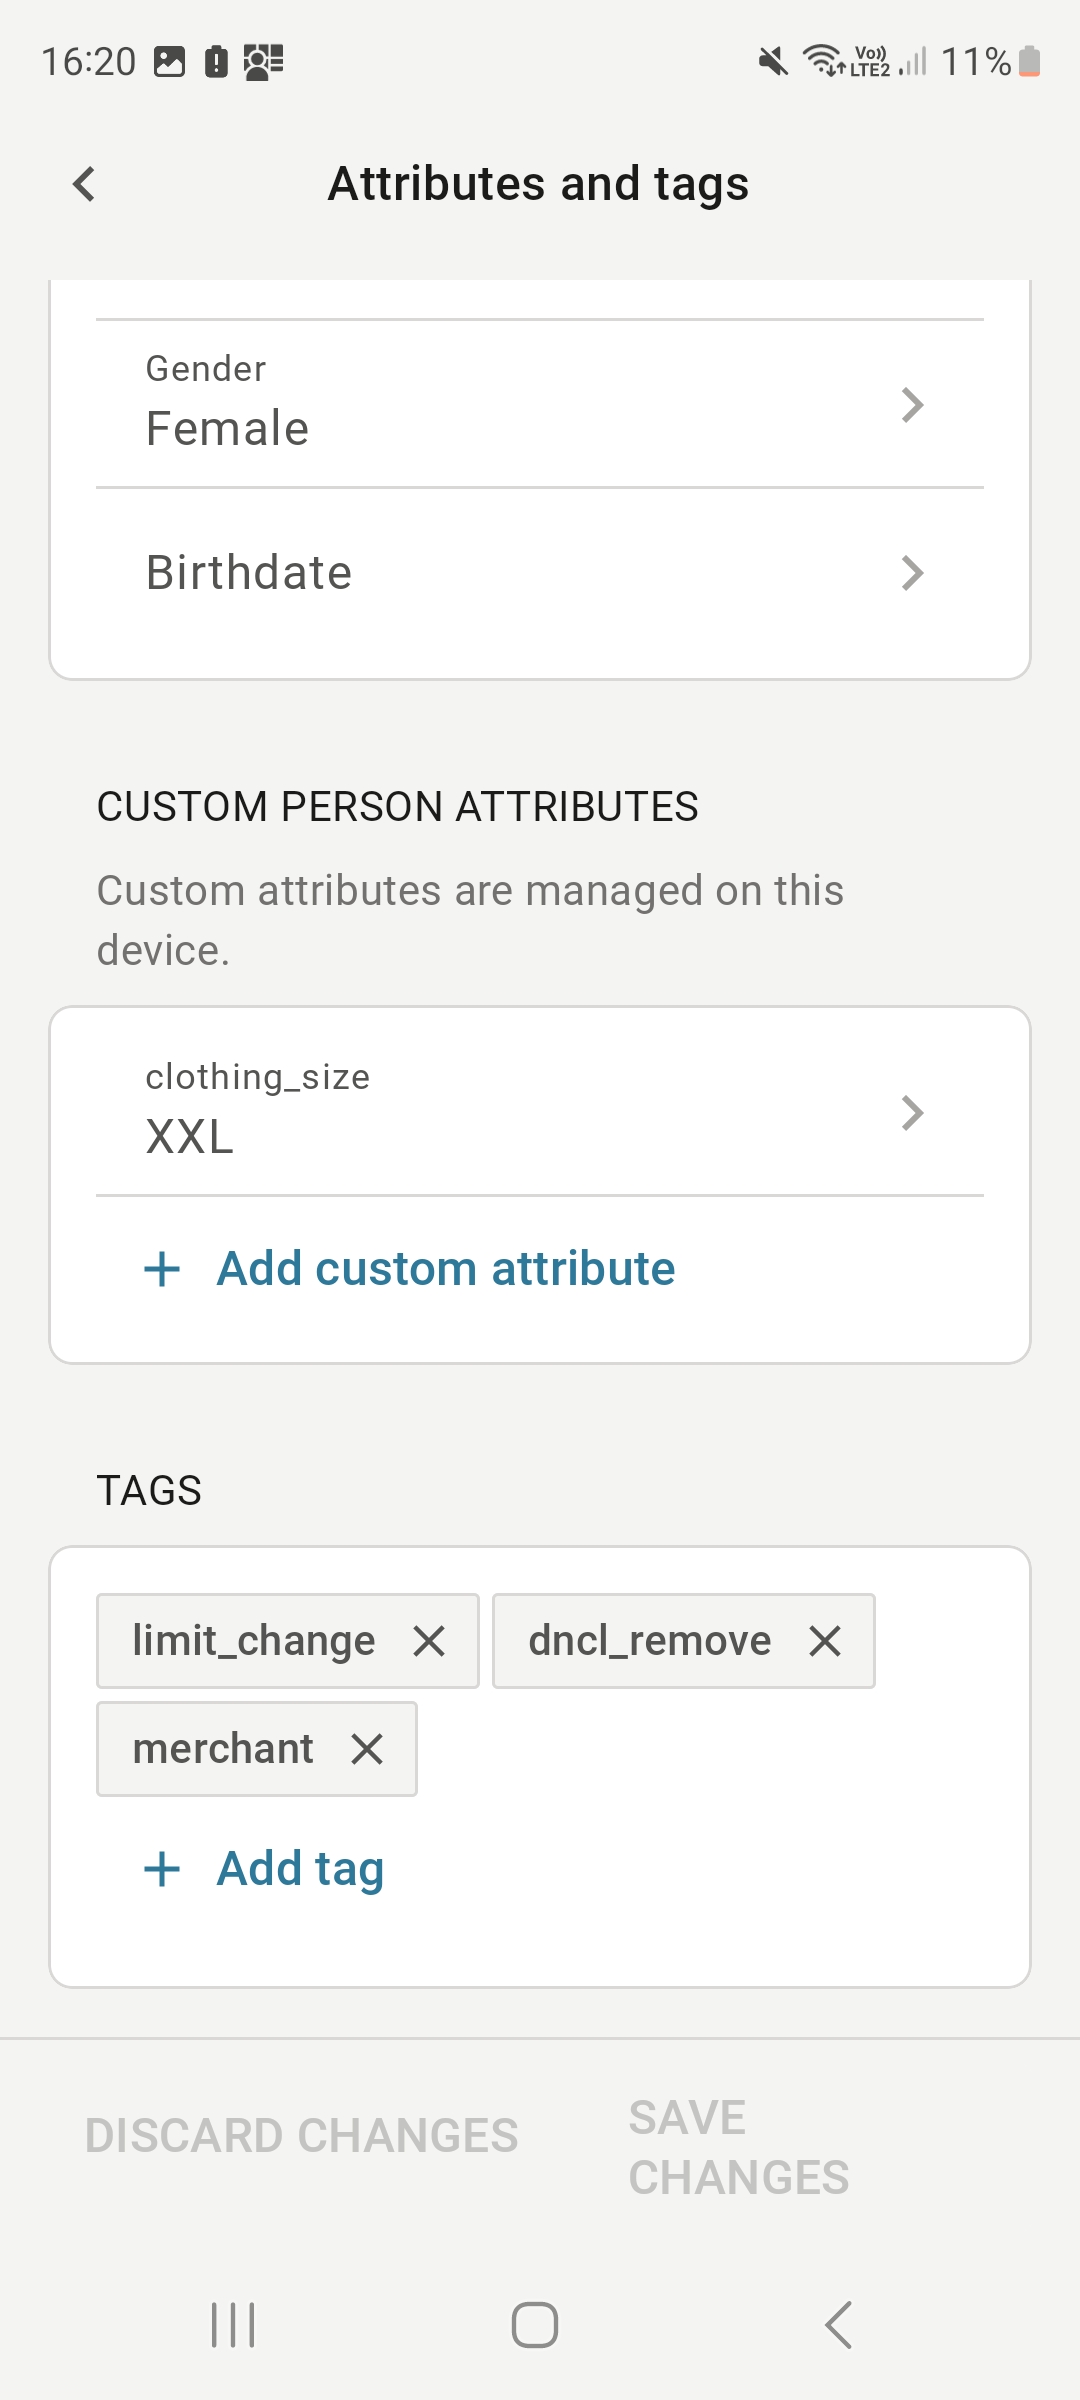
To verify that these changes are automatically updated in People, go to the Attributes, tags, and events tab in the person profile.
Track events [#events-tracking]
Use events to track end user activities inside or outside the mobile app. You can also use events to trigger timely communication with the mobile app user.
Use the demo application to recreate app behavior and trigger standard and custom events.
You can also use the demo application to test different events and event-triggered scenarios before implementing it in your production application.
To track custom events in the demo application, make sure that you have defined the event in People.
In the Demo app, do the following.
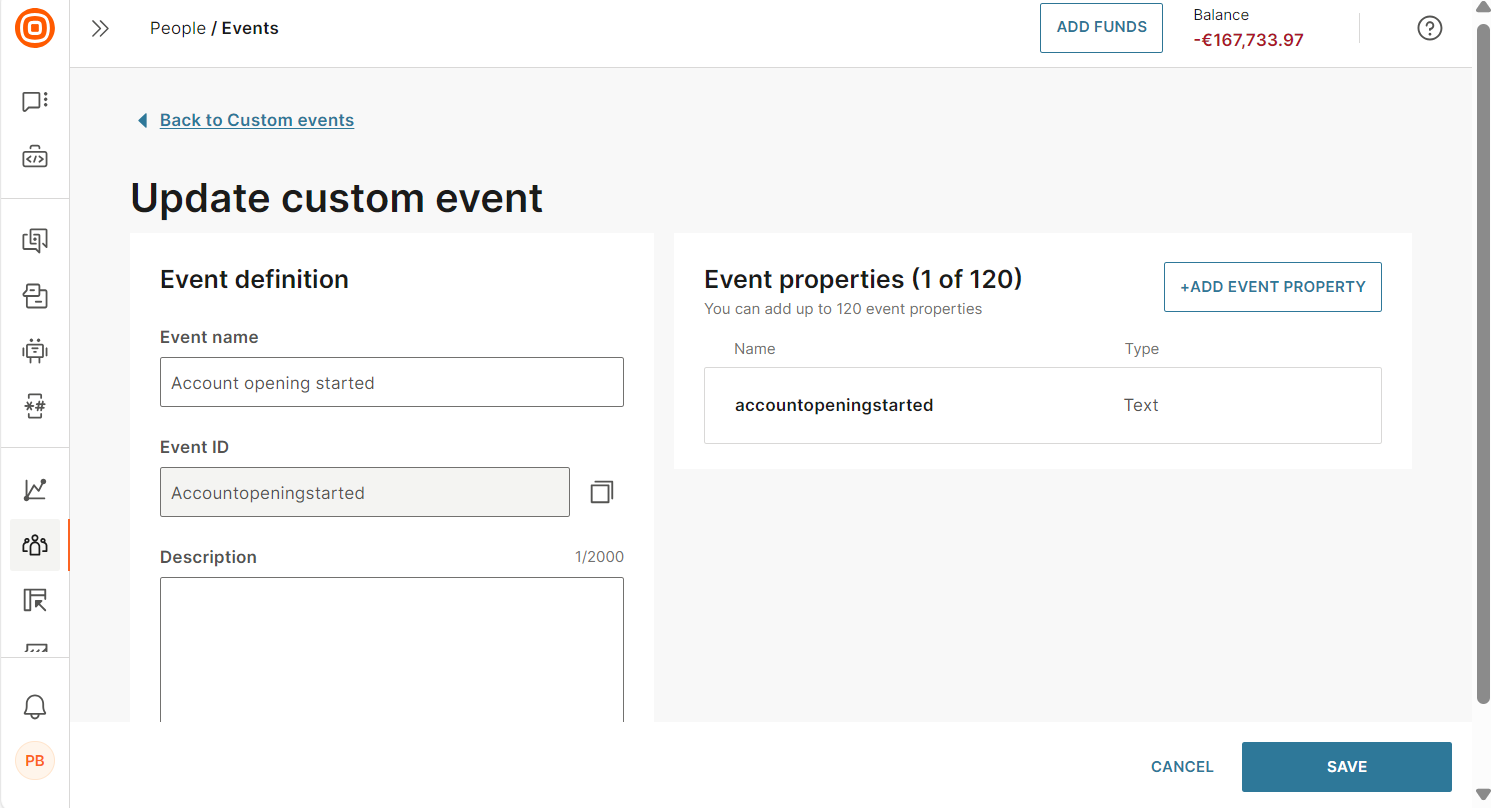
- Go to User > Custom events.
- Add the Event ID from the event in People. Example: Accountopeningstarted.
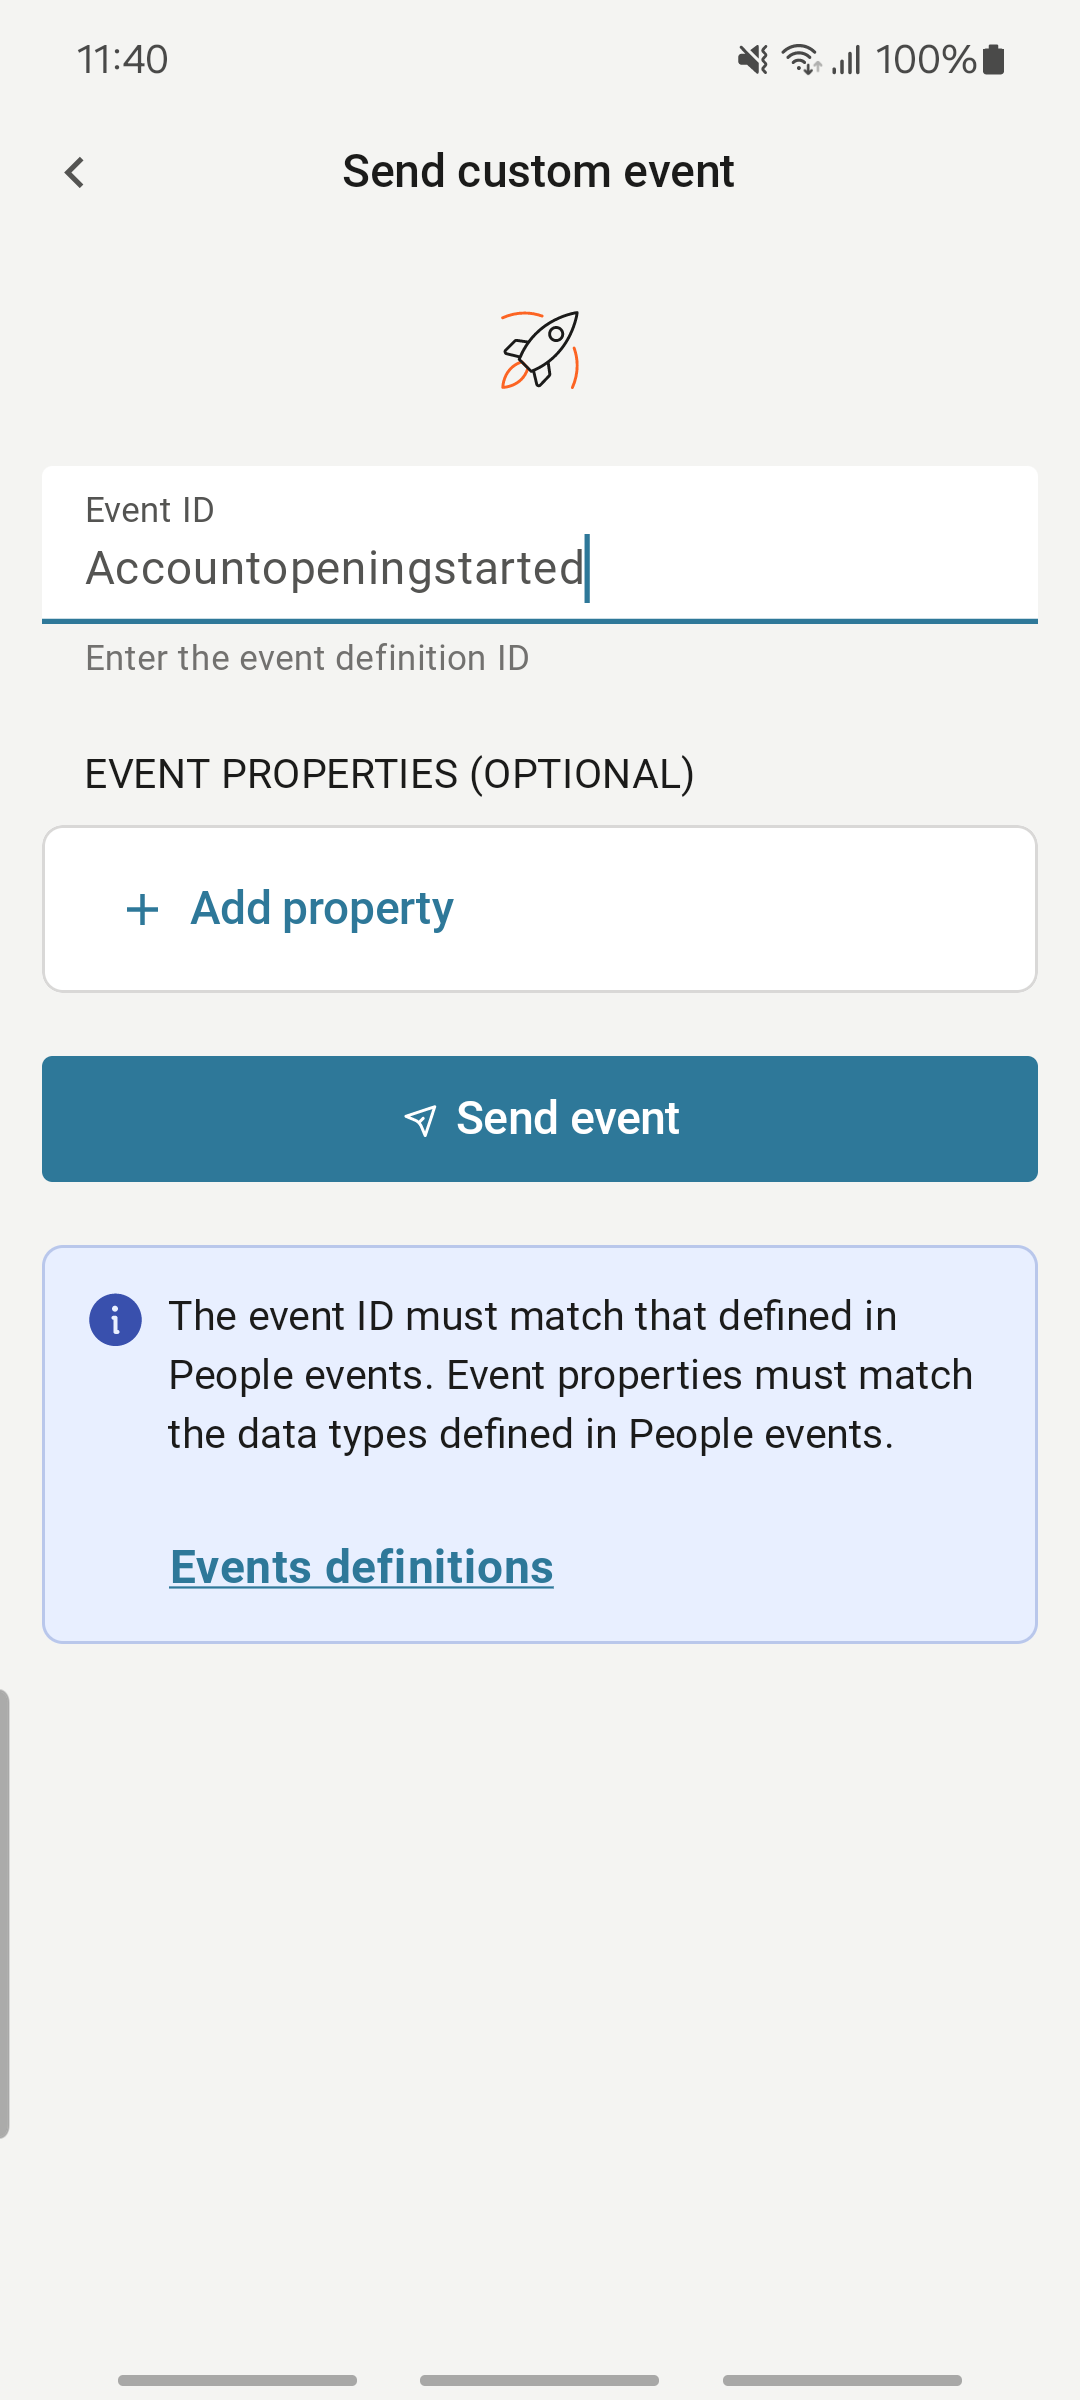
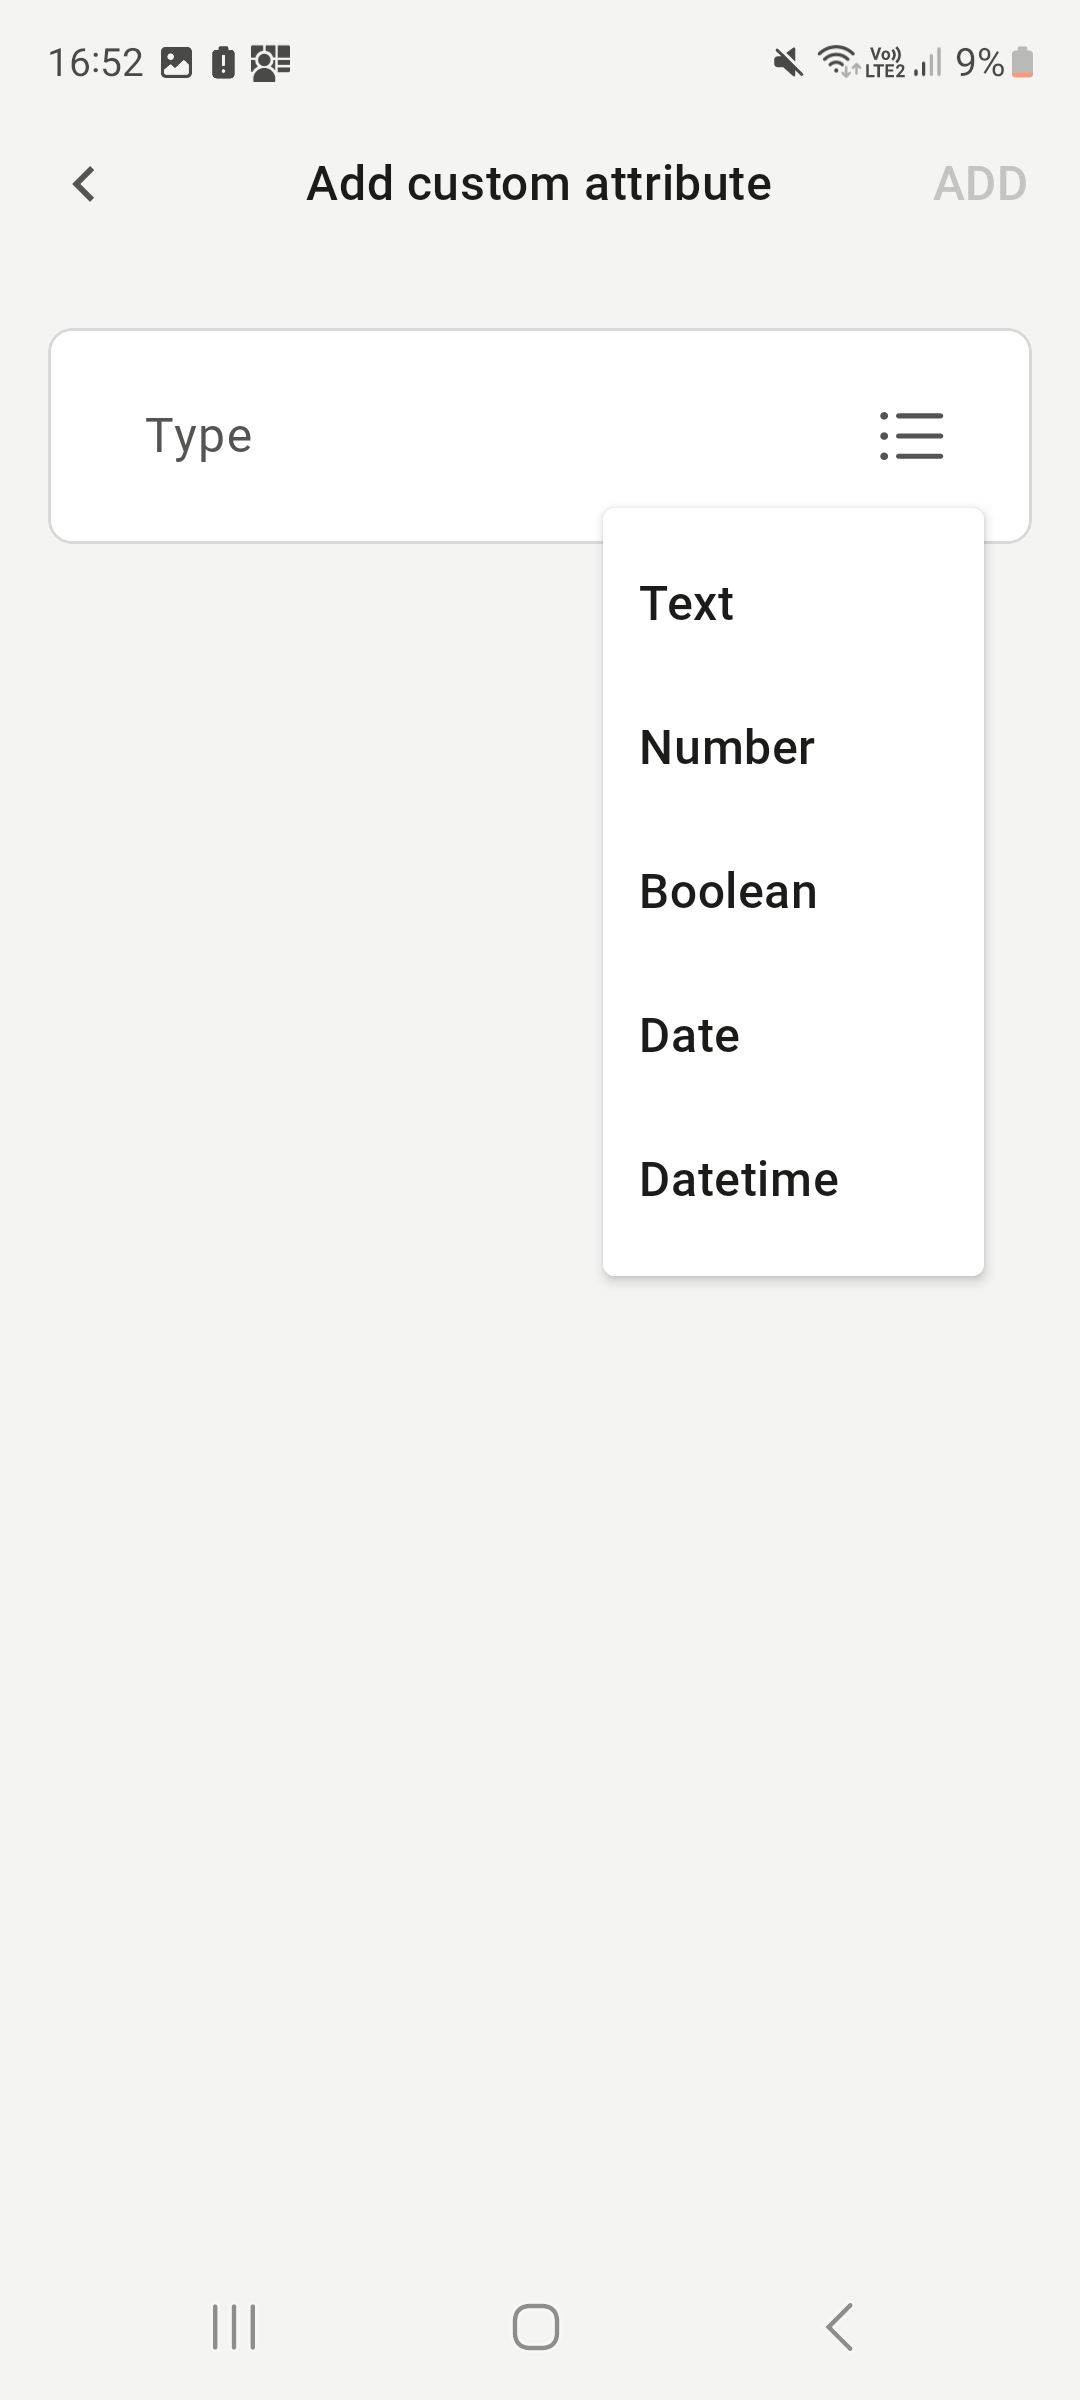
- To add event properties, select Add property.
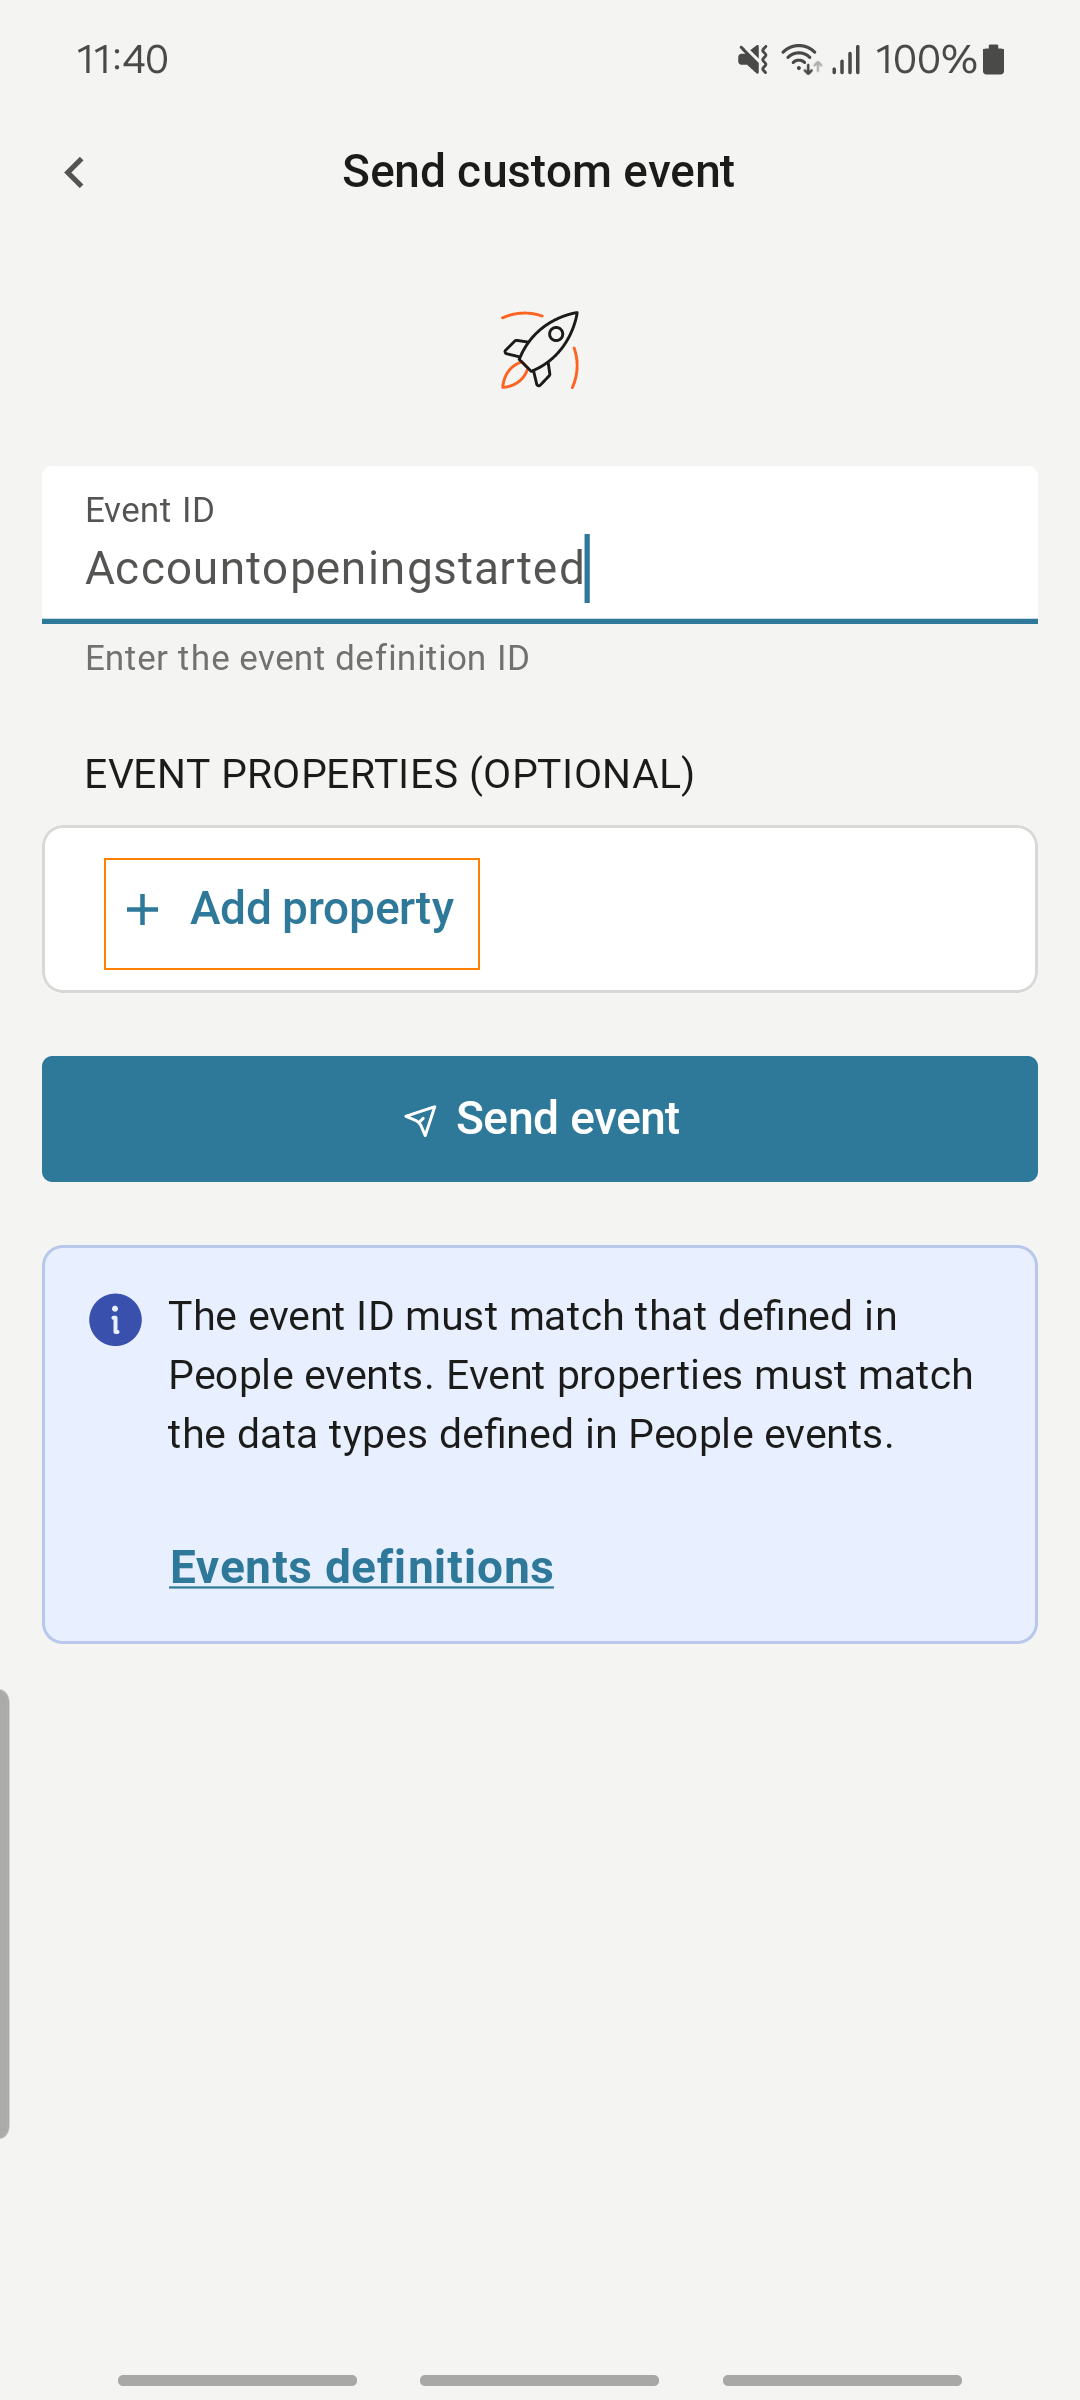
- Select the attribute Type. You must use the same data type that is specified in the event definition in People. Example: For the Accountopeningstarted event, the data type for the property is Text. So, select Text.
- Enter the attribute Name and Value. You must use the same name that is specified in the event definition in People.
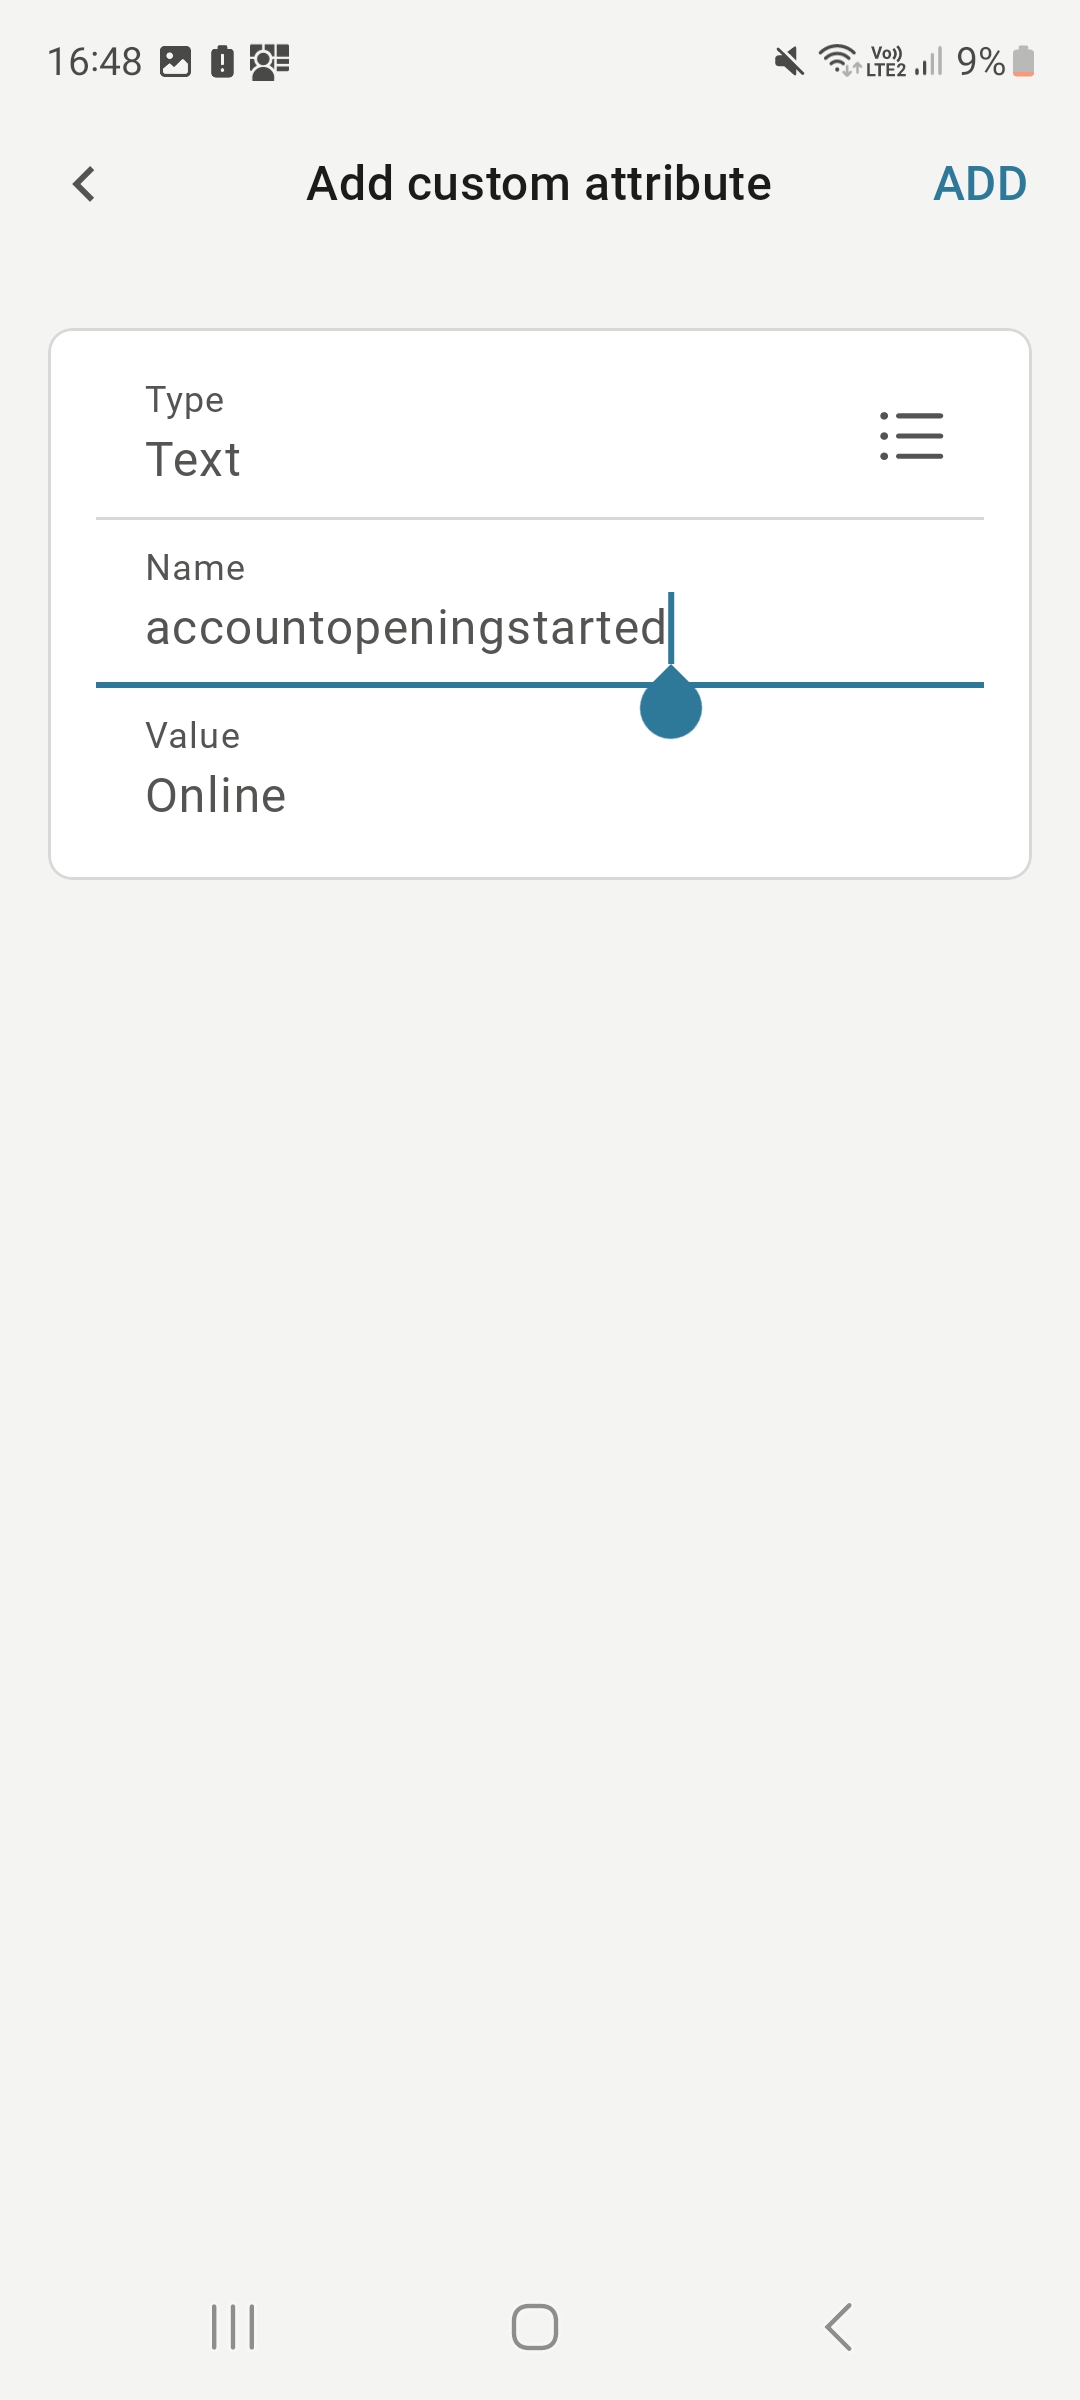
- Select Send event to send a custom event to the Infobip platform.
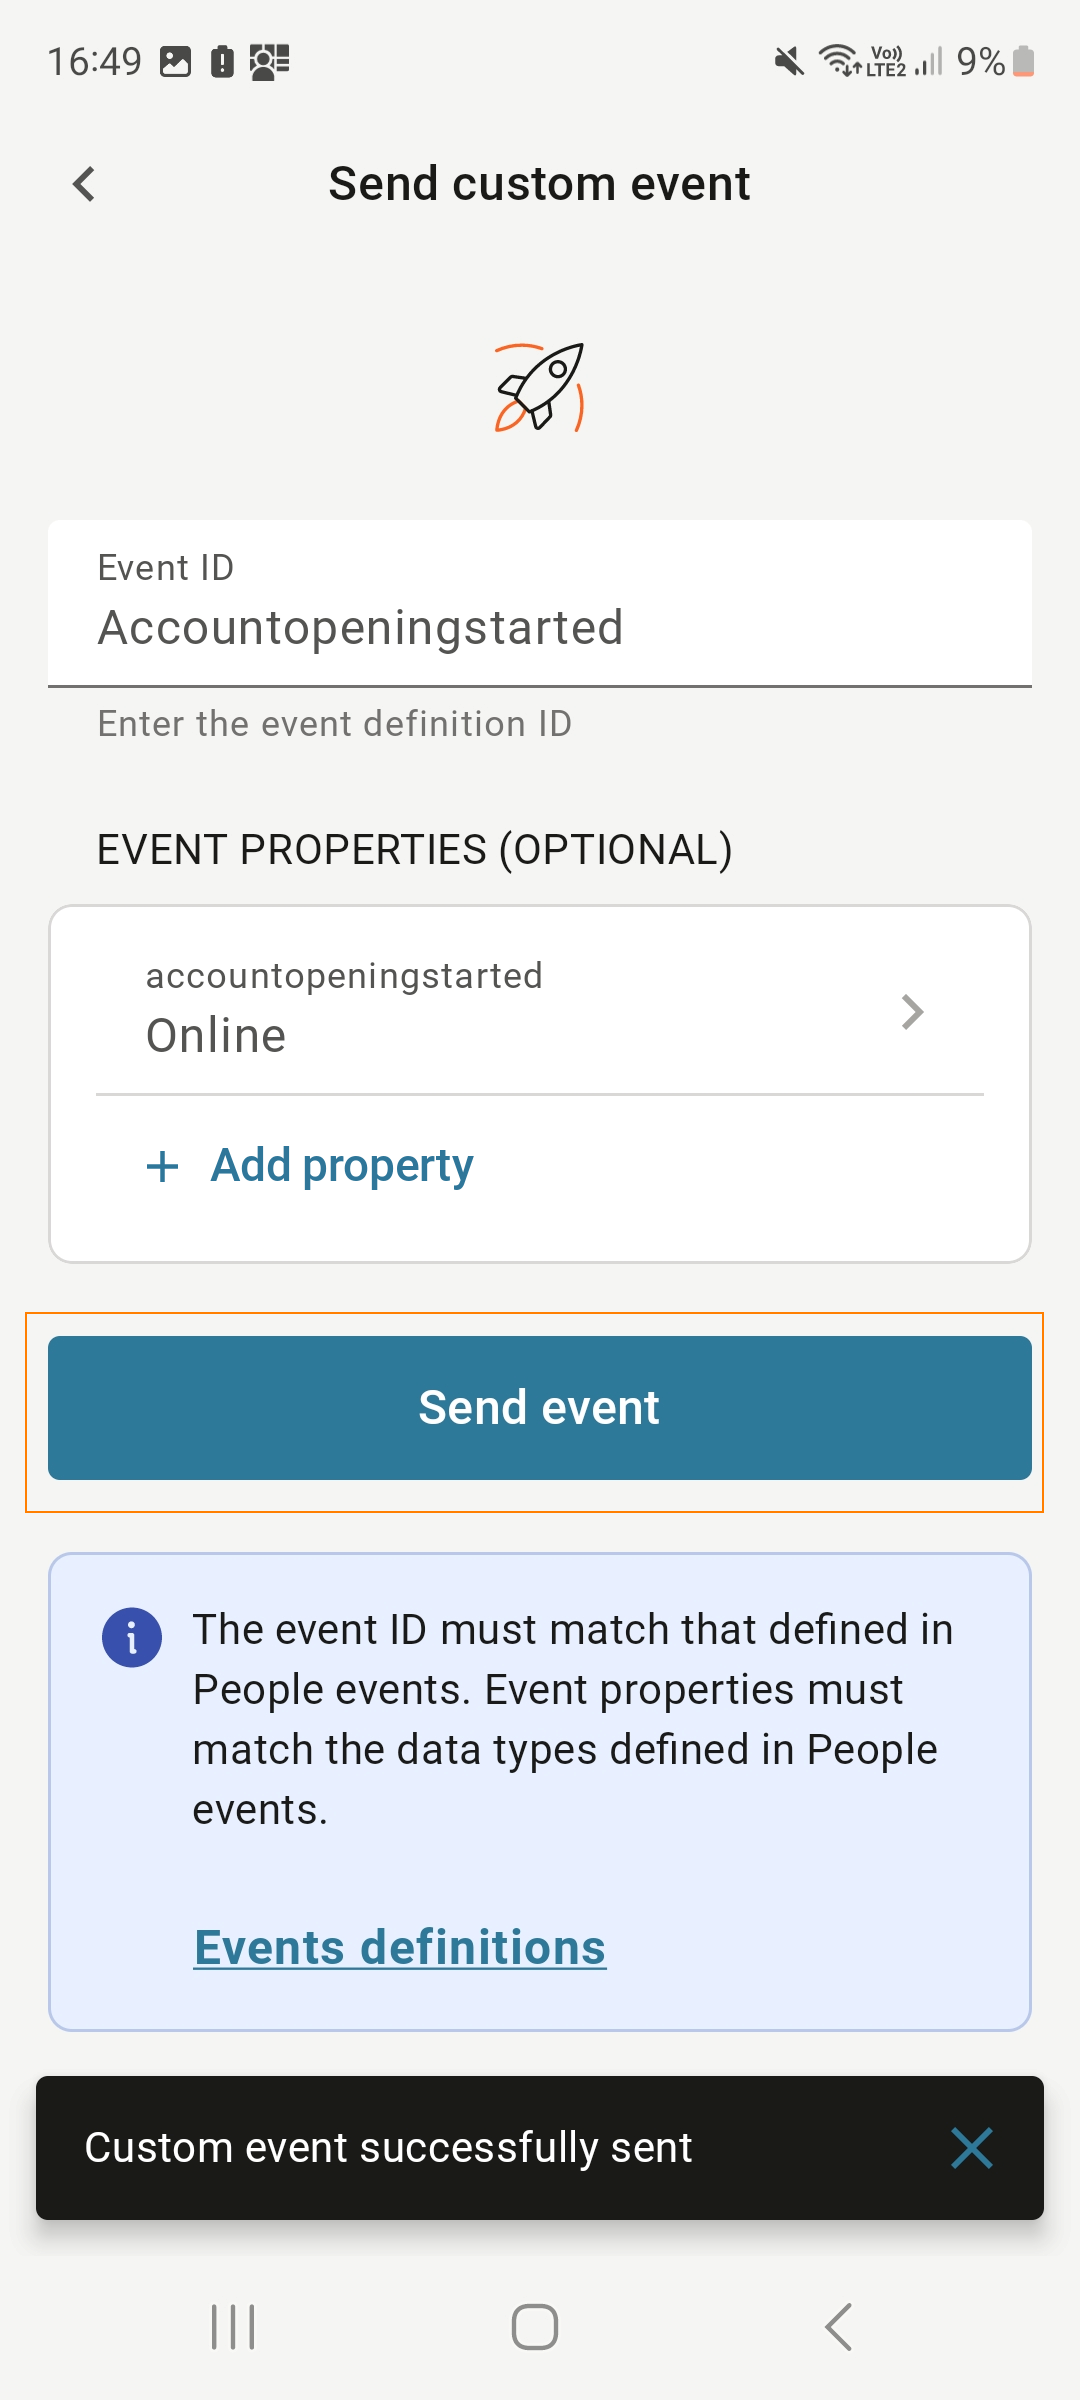
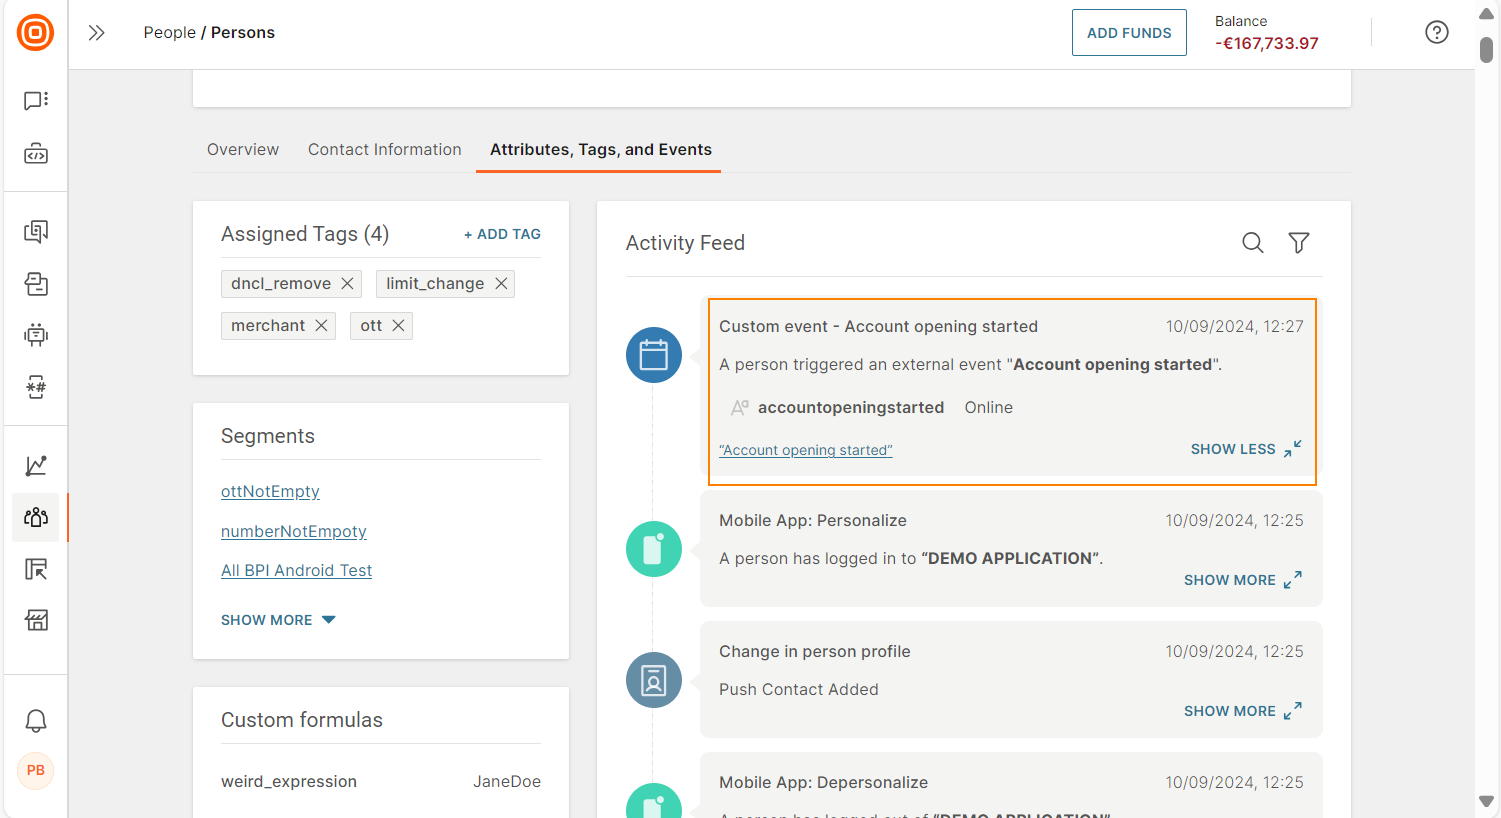
If the event details are correct, you can now see the event in People. If the event details were not configured correctly, an error message is displayed.
In People, go to the person profile > Activity feed section.
Send Mobile push notifications [#send-push-notification]
After you finish setting up the demo app, you can send Mobile push notifications through Broadcast and Flow to the Demo app.
To make sure that you target the correct audience, create Segments in People. Example: To target end users who are eligible for a gift card, create the giftCard segment.
Send Mobile push over Broadcast [#send-push-over-broadcast]
- Select Mobile push as the communication channel.
- Specify the recipients of the push notification. You can select recipients from People, use tags, or use predefined segments.
- Select Demo app as the Sender.
- Create the content of the push notification in the editor.
For more information, refer to the Send Mobile push over Broadcast documentation.
Send Mobile push over Flow [#send-push-over-flow]
You can use Flow to send Mobile push notifications to the Demo app. You can build communication scenarios that are triggered by events such as purchases or application launch. You can also combine Mobile push with other channels for failover scenarios.
For more information, refer to the Send Mobile push over Flow documentation.
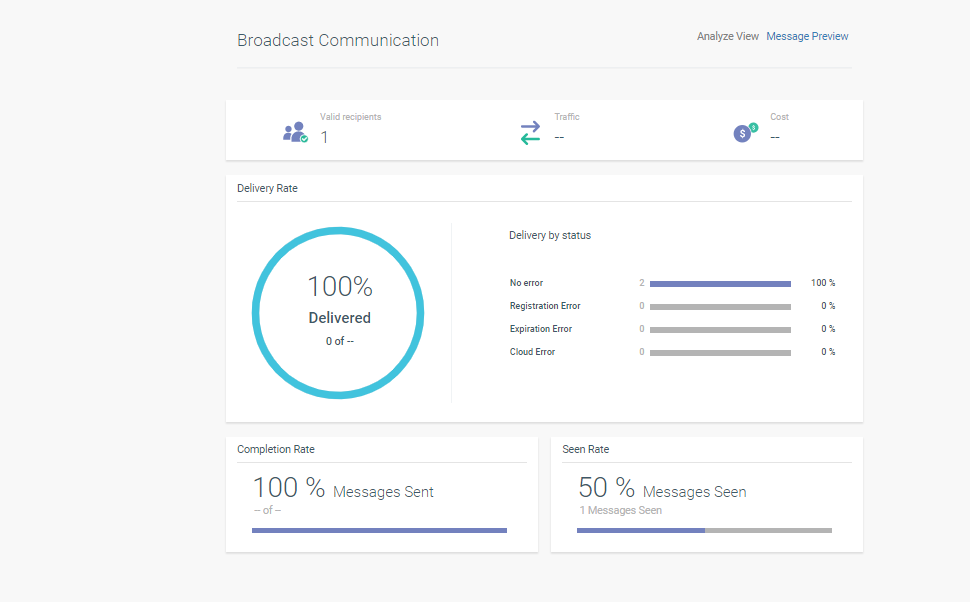
Analyze [#analyze]
After you send your first push notification, you will receive a message on your mobile device. The mobile SDK automatically creates a delivery report. If you open the message, the mobile SDK also adds the seen status.
To get a detailed report, search for your communication and select it.
The example below shows 1 valid recipient (person profile in People) with 2 registered devices (2 messages delivered and sent). The seen rate is 50%, which indicates that the message was opened on only one of the two devices.