Manage forms
Learn how to work with different types of forms depending on what you need to do.
View the available statuses and actions inside forms, and discover what you can do with different features and possibilities in the form editor.
Editor
The editor will help you build a form of your choice and activate it. Read the quick guides in the below sections to understand how to create different types of forms.
Create regular form
-
Go to Content > Forms. Click Create Form and select the form type Regular Form
-
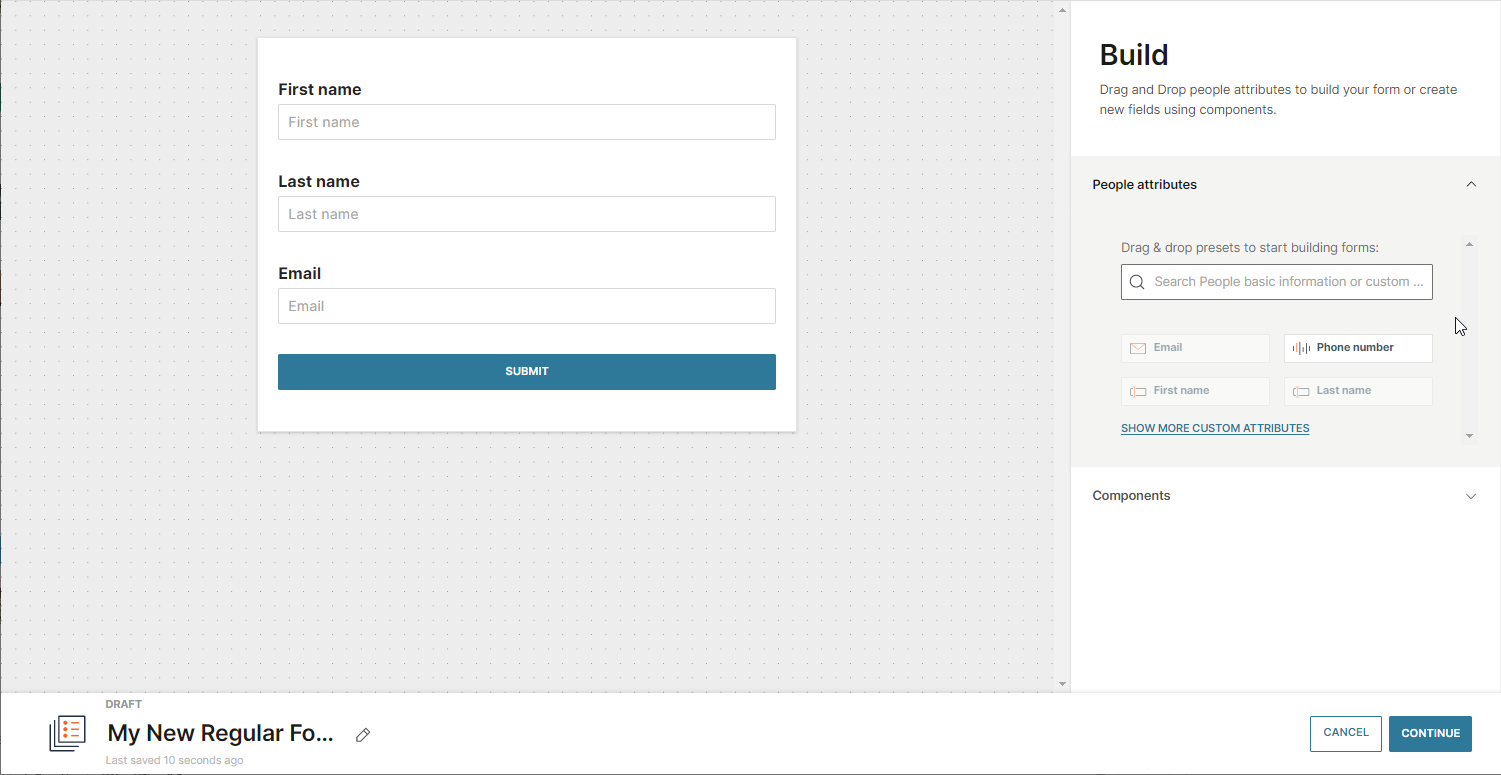
Drag and drop the Contact Information—email, phone number, or both—that you want to include in the form. This is a required step because contact information is one of the person identifiers that lets you automatically create and update profiles in People.
-
Set up Person Attributes such as first name and last name*,* or any other standard or custom attribute available in this block. Note that the custom attributes need to be configured in People > Configuration if you want to be able to select them here.
 NOTE
NOTEOnce you start adding fields to your form, the Submit component will appear. Click on it if you wish to change the name of the button.
-
Although not mandatory, you can define other Components as well. Such fields will help gather some additional data from visitors. They are not connected to People and will be available only in Raw Data. You could, for instance, add the Text Area so that the visitors can leave a message, or let them rate your service with the radio button.
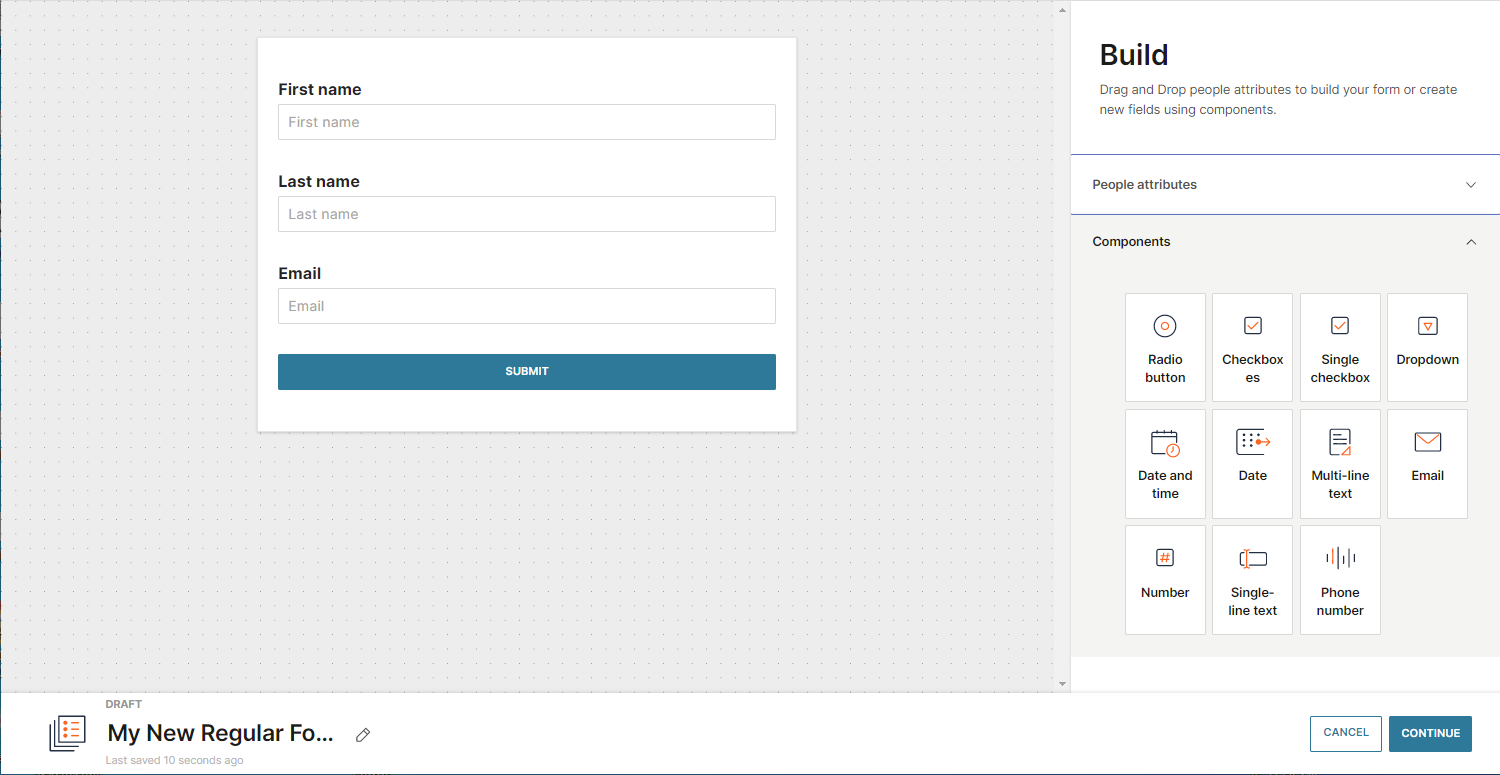
Components are not mapped to a person attribute by default. To store the collected data in person profiles, you can manually connect the field to a standard or custom attribute.
-
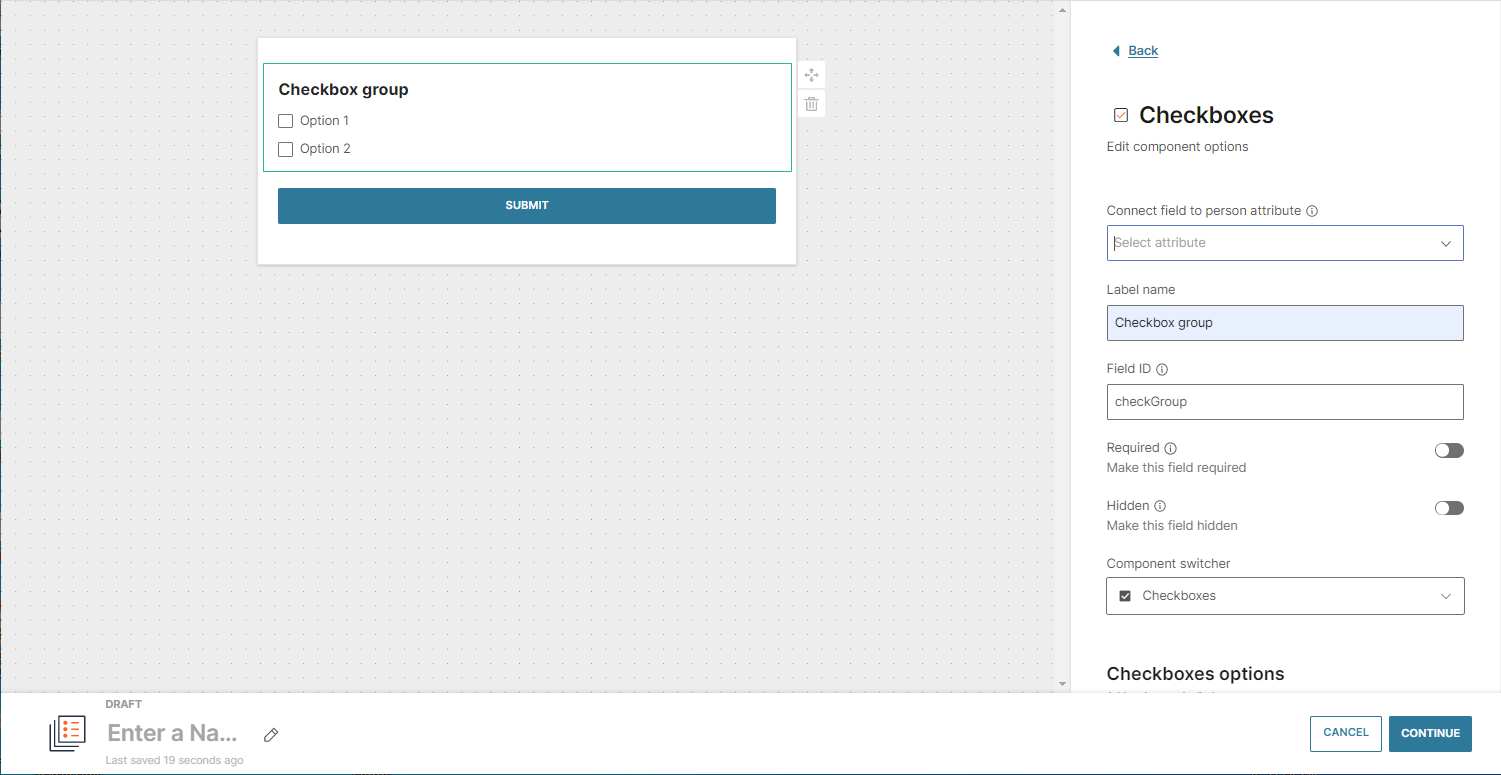
When you click on any of the fields, you will be able to use their properties in the editor. These will allow for a flexible form set up.
The table below includes all fields and their descriptions.
FIELD DESCRIPTION Connect field to people attribute Use this option to connect a field to an attribute - a standard or custom one. This means that you can customize the storing logic of data against the attributes in this form. Label name The name of the field. Field ID Used to identify the field and submit correctly over API. Placeholder The placeholder text that appears inside the field before the user starts entering their information. Required Turn on the toggle if the field is required. Users will not be able to submit a form without populating or defining this field. Hidden Turn off the toggle if you would like to keep the field in the form but hide it in a live environment Static value This value will be statically applied for each form submit with no option to change it. Field with static value will not be visible over API. Use the static value for profile attribution. Data type This information is used to connect the form's input type to the data type stored in People. -
The next step involves data processing rules: enable it if you want to save profile information on the People platform for future use in automated communication and funnel analytics.
-
Click Activate. The code that will appear in the pop-up window should be added to your web page.
Create Opt-out form
-
Select Opt-out Form when creating a new form on the main Forms page.
-
Inside the editor, you can use the Component block, available in the side panel. For example, add the Radio button component and type in the form's name.
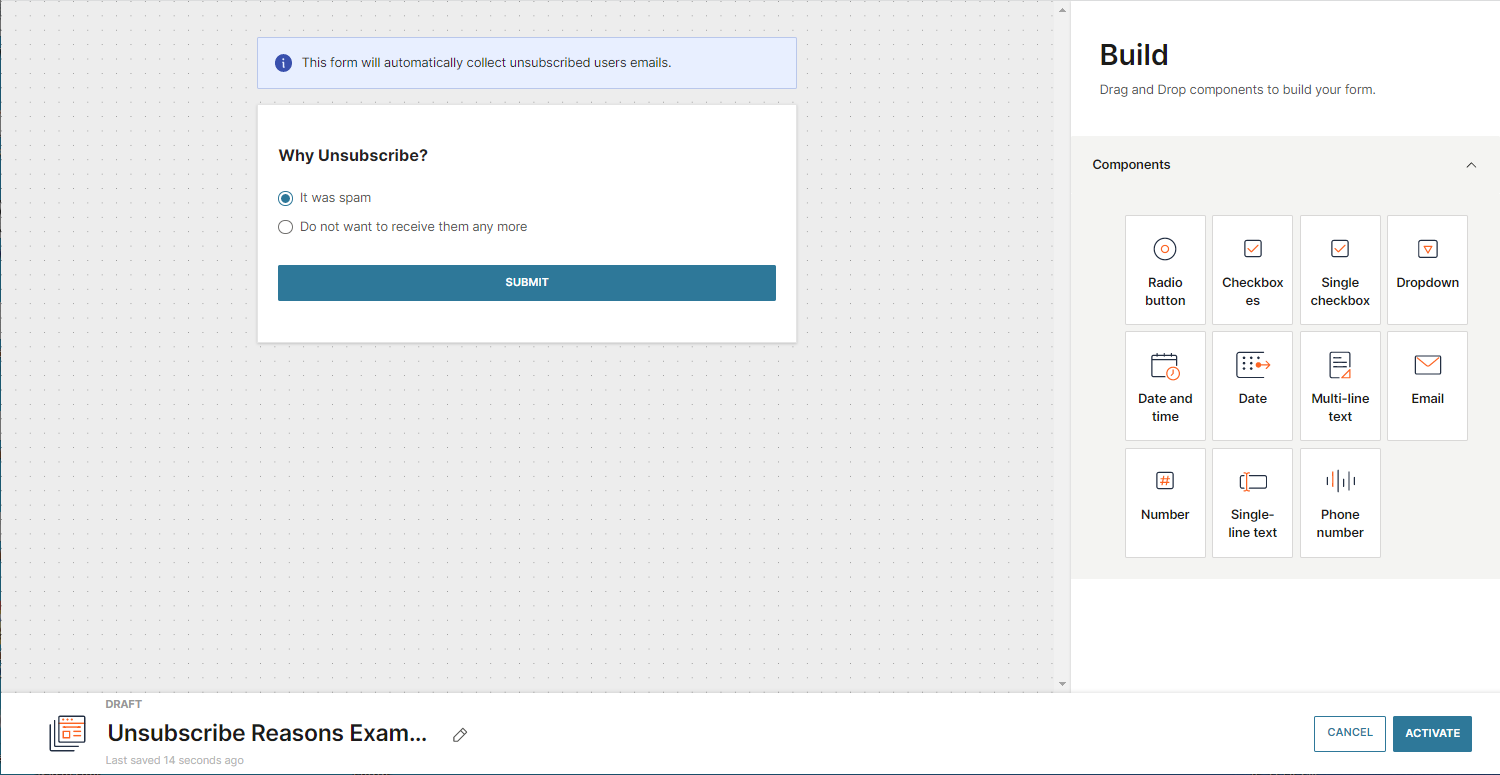
You don't need to add any contact information as this form will automatically collect unsubscribed users' emails. Moreover, Components are not connected to People profiles, and no processing rules have to be specified for them.
-
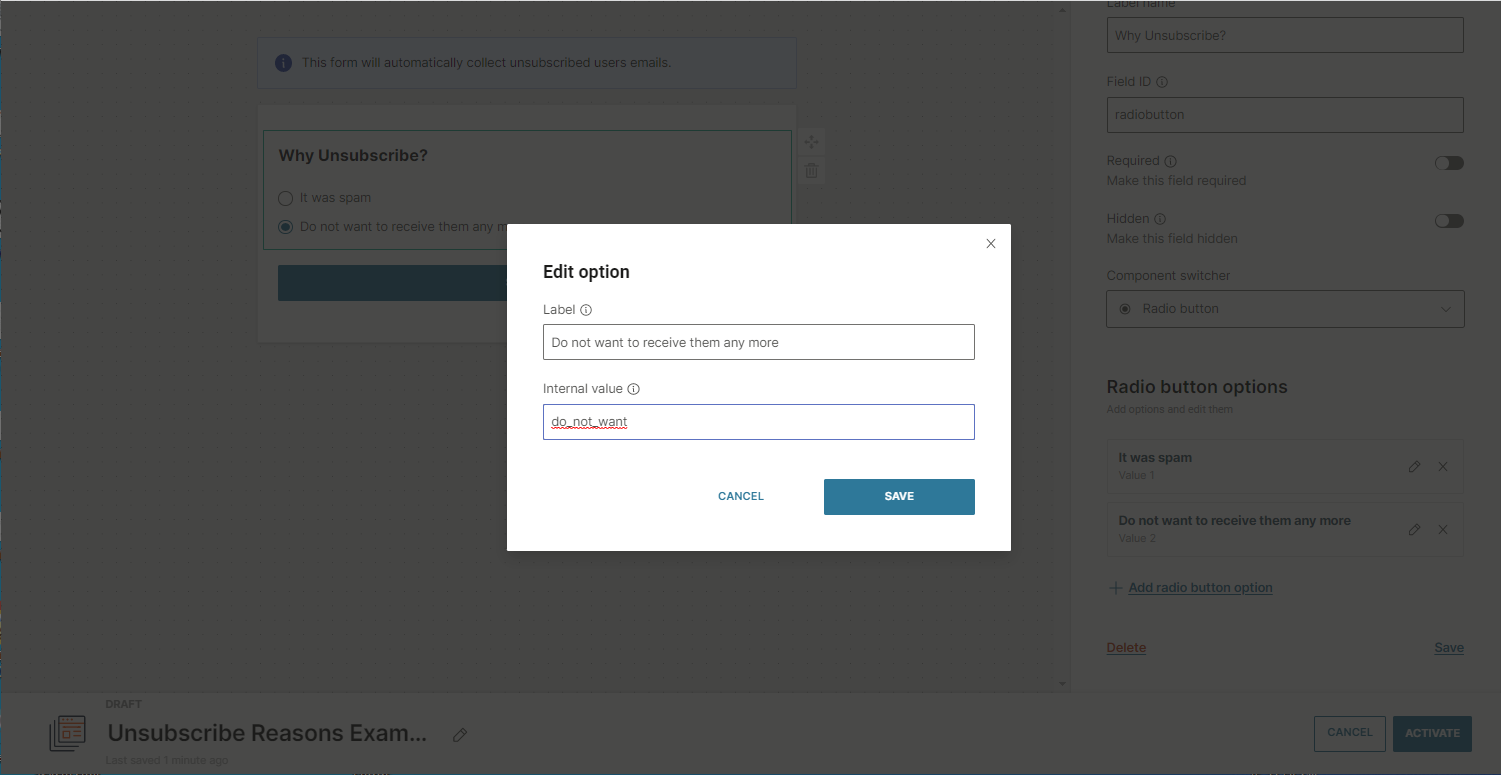
Next, add options to the component. They are available in the side panel.
-
Activate the form.
-
Remember to go to Landing Pages and embed the opt-out form into the landing page.
Connect Facebook forms
A Facebook business account must be connected in order to collect form data automatically from Facebook forms. This can be done by enabling the Facebook Leads App in the Exchange area of the portal.
- Go to Exchange. Select Facebook Leads and click Connect Account.
- Follow the on screen instructions to log in to your Facebook account, select the pages you want to add, and accept permissions. Click Connect with Facebook.
- Go to Content > Forms. Click Create New and select Facebook form. If the connection to Facebook has been successful, you will see Lead Ads Facebook forms listed in the Forms template area of the web interface. Both active or archived forms may be visible depending on the forms you have configured in Facebook.
Select an active form by clicking the three-dot menu on the form card to see the possible actions.
Click Use Form to open the form editor to see the fields of the form rendered in the same way they have been configured in Facebook. Archived forms can not be selected.
Once the connection has been established it is then possible to set field mappings to each field in order to save data directly in People and define the processing rules so new Leads will be created in People as soon as the Facebook form is submitted.
Create Live Chat forms
EARLY-ACCESS
-
Select Live Chat Form when creating a new form on the main Forms page.
-
Inside the editor, use the Component block to create new fields. For example, add the Radio button component and type in the form's name.
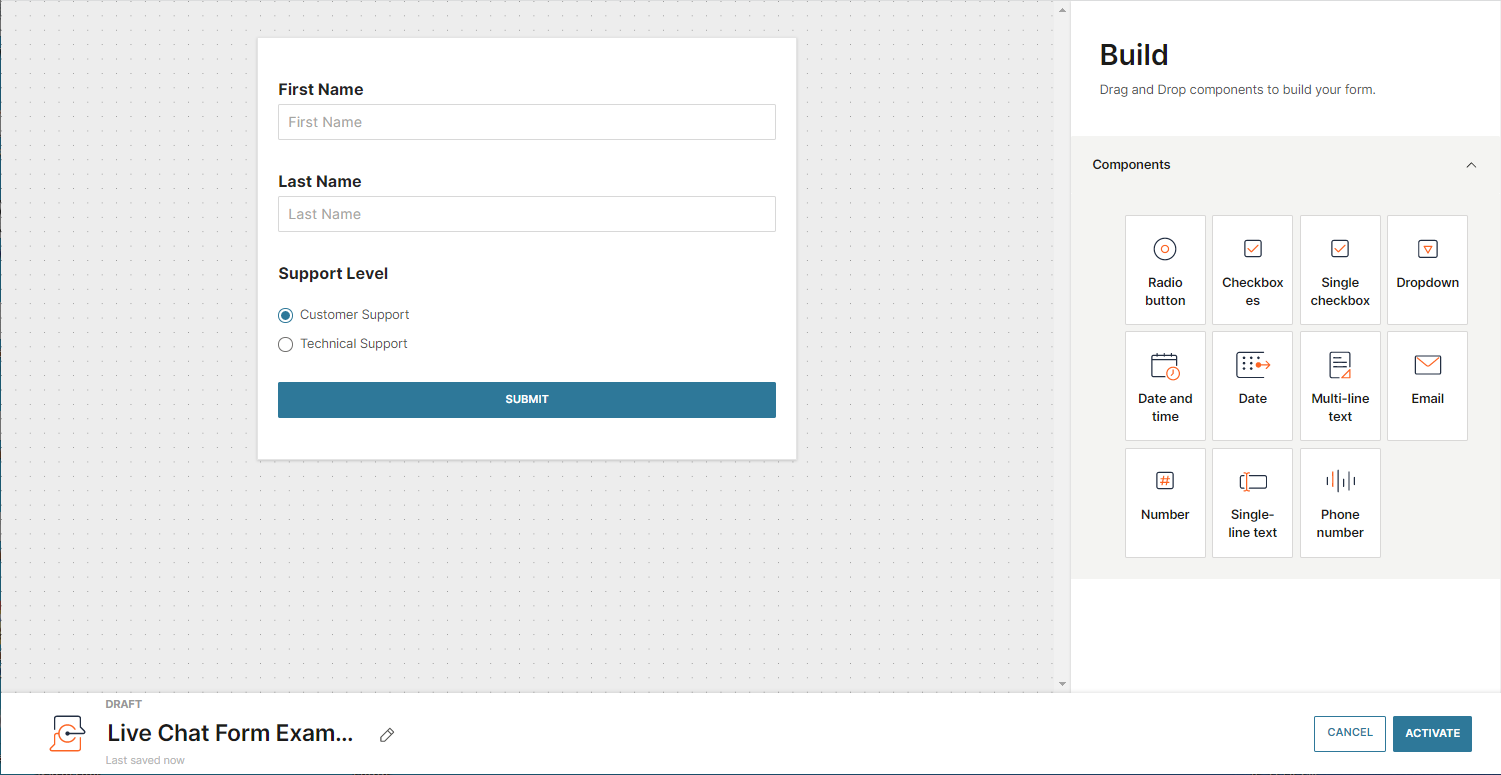
Components are not connected to People profiles and no processing rules have to be specified for them.
-
Next, add options to the component. They are available in the side panel.
4. Activate the form. -
Create Live chat widget to use the Live Chat form.
Create Apple Messages for Business forms
An Apple Messages for Business account must be activated and connected to Infobip in order to collect form data automatically from Apple forms. See Apple Messages for Business Getting Started to learn more.
- Select Apple form when creating a new form on the main Forms page.
- Inside the editor, use the Component block to create new fields. For example, add the Radio button component and type in the form's name.
- Next, add options to the component. They are available in the side panel.
- Click Settings to choose if the form should be marked as private (so responses cannot be viewed by agents in Conversations) or if you would like the user to see a summary of their responses before submitting the form.
- Define the processing rules for the form in order to update profile information in People so you can use it in future marketing campaigns and for funnel analytics.
- Activate the form.
Manage WhatsApp Flows forms [#whatsapp-flow-forms-manage-forms]
WhatsApp Flows is an interactive message that enables end users to perform tasks without leaving the WhatsApp chat with your business. Example: They can submit information through the flow.
A WhatsApp Flows form collects the data that end users submit over WhatsApp Flows. You can then use the form data to do the following.
- Use the data to create personalized end user journeys. Example: In a flow in Moments.
- Save the data to a person profile in People.
Process overview [#process-overview-whatsapp-flow-forms-manage-forms]
You cannot manually create a WhatsApp Flows form. The form is automatically created through the following process.
-
Connect your WhatsApp business account with your Infobip account. This is required so that the data that is submitted through a WhatsApp Flow is automatically shared with your Infobip account.
-
Create a WhatsApp Flow either in WhatsApp manager or through the Infobip API for WhatsApp.
-
For each WhatsApp Flow that you create, a draft WhatsApp Flows form is automatically created in your Infobip account.
-
Configure the form.
- Verify the fields in the form.
- Map relevant fields to People attributes to save these fields in People.
- Create processing rules to make sure that the new Lead profiles can be created.
-
Activate the form.
-
When an end user submits data through the WhatsApp Flow, the data is automatically collected by the form. Mapped data is saved in the end user's profile in People. If the profile does not exist, a new Lead profile is created.
-
Use the data in the form to create personalized end user journeys. Example: Use the data in a flow in Moments.
For more information about these steps, refer to the following sections.
Create a WhatsApp Flow in WhatsApp manager [#create-in-whatsapp-manager-whatsapp-flow-forms-manage-forms]
To create and use WhatsApp Flows, set up an account on the WhatsApp Business Platform. This gives you access to the WhatsApp Manager.
If you need help in creating WhatsApp Flows, contact your Infobip account manager or contact our support team.
Configure the form [#configure-form-whatsapp-flow-forms-manage-forms]
View the form in your Infobip account [#view-form-configure-whatsapp-flow-forms-manage-forms]
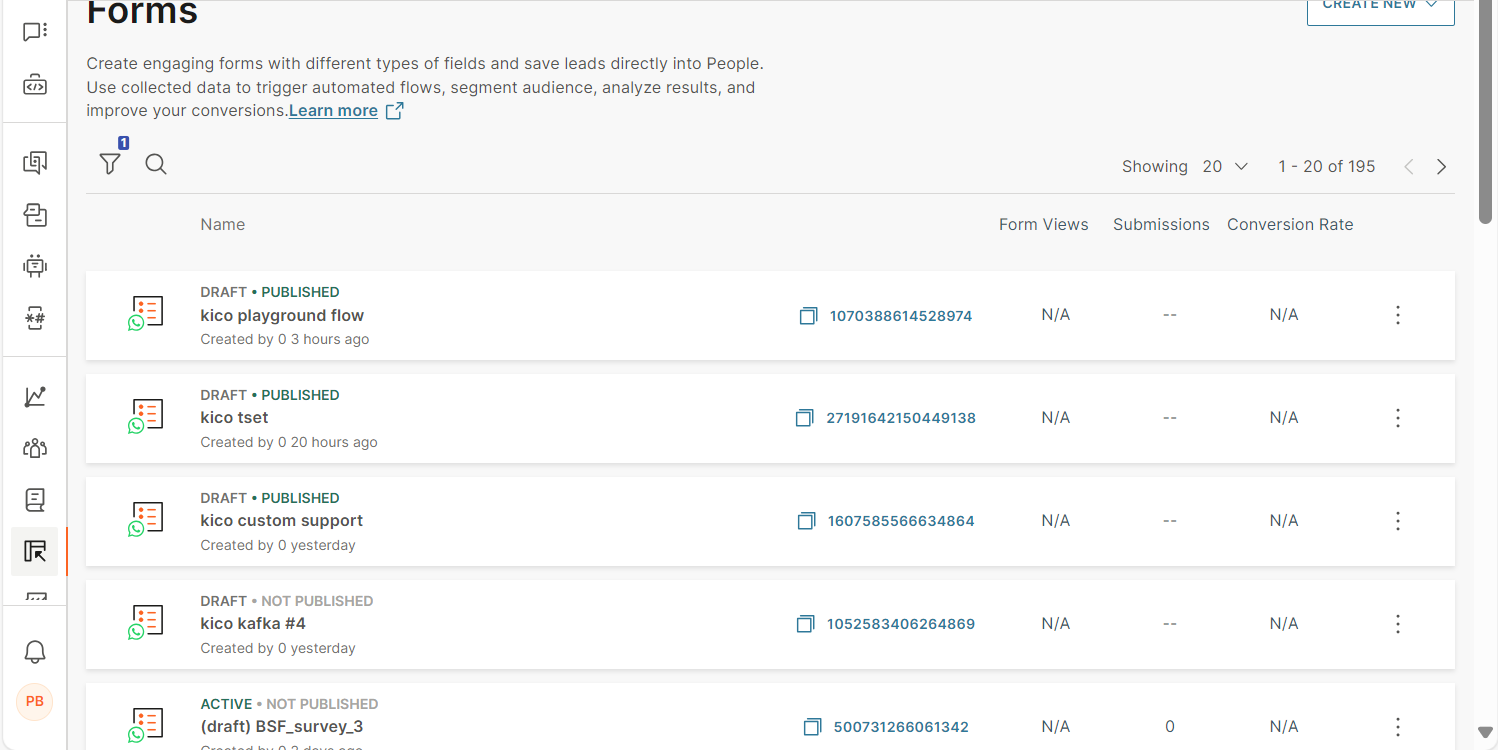
To view the form, on the Infobip web interface, go to Content > Forms. In the Forms home page, find the WhatsApp Flows form that was created.
You can view the status of the form and of the WhatsApp Flow. Example: Draft - Published indicates that the form is in Draft status and the flow is in Published status. The WhatsApp Flows form that was created is in Draft status.
The status of the form is different from the status of the WhatsApp Flow. Statuses of WhatsApp Flows indicate the status of the flow lifecycle and are assigned by Meta. For more information, refer to the WhatsApp Flows Meta status section.
You can also view the WhatsApp Flow ID. Select the ID to copy it.
Verify the fields in the form [#verify-form-fields-whatsapp-flow-forms-manage-forms]
The form contains the fields from the WhatsApp Flow. You cannot add or remove any fields in the form.
-
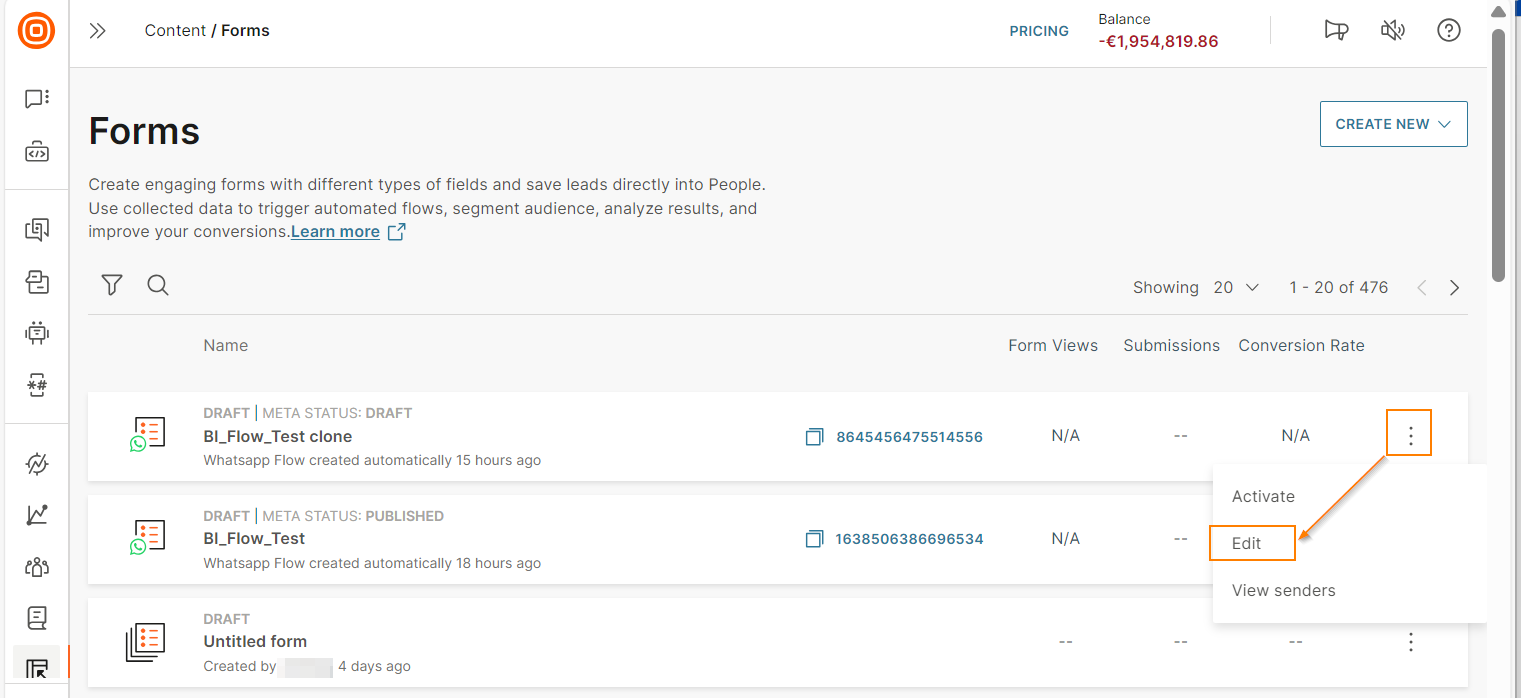
Select the three-dot menu next to the required WhatsApp Flows form and select Edit.
-
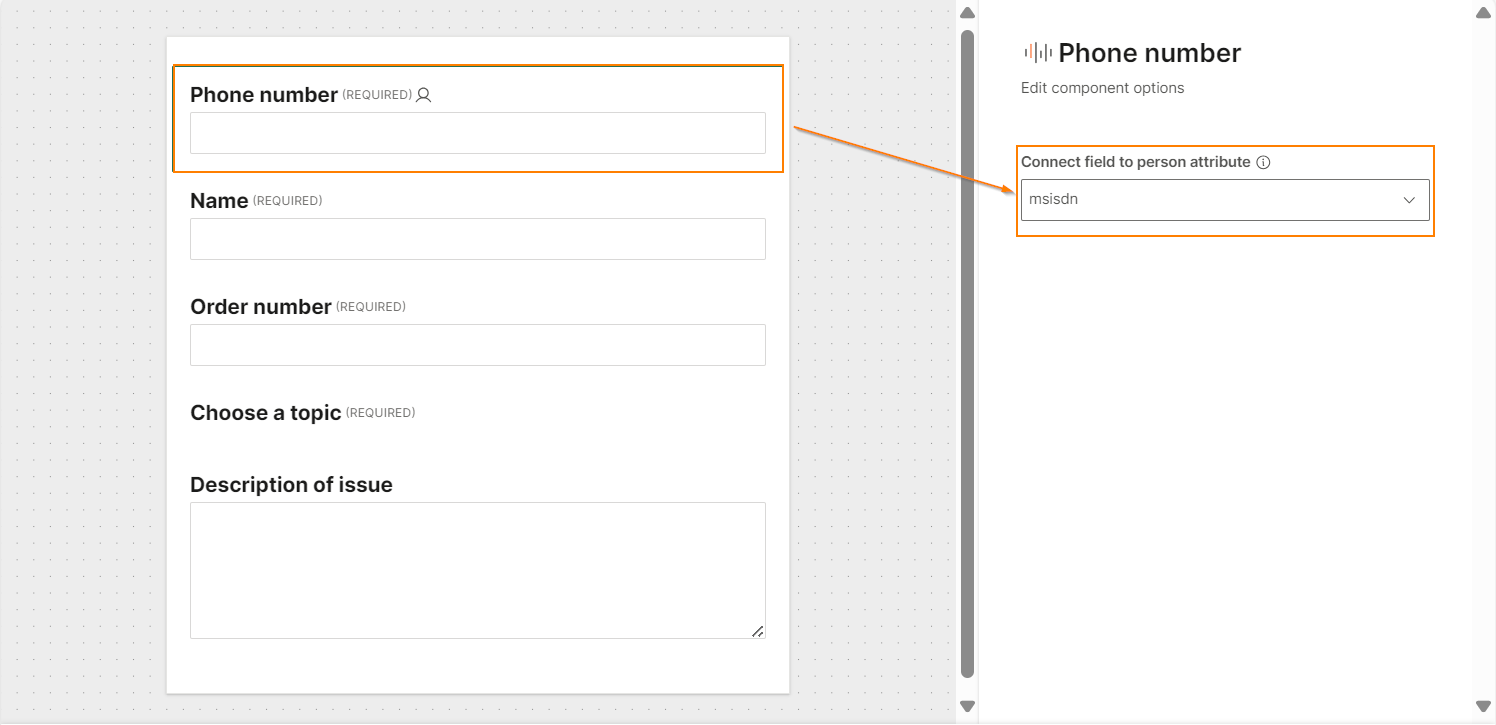
In the form editor, make sure that the fields in the form are the same as in the WhatsApp Flow.
The Phone number field is created by default. This field is not visible to the end user. When the end user submits the WhatsApp Flow, this field automatically collects the end user's phone number.
Save form data to People [#save-to-people-whatsapp-flow-forms-manage-forms]
To save data from a WhatsApp Flow to People, map the fields in the WhatsApp Flows form to the corresponding attributes in People. When an end user submits the WhatsApp Flow, the data is collected by the form. Mapped field values from the form are saved in the attributes in the end user's profile in People.
You do not need to map all the fields. If a field is not mapped, the form still collects the data from the WhatsApp Flow but does not save this data in People.
By default, the Phone number field is mapped to the MSISDN attribute.
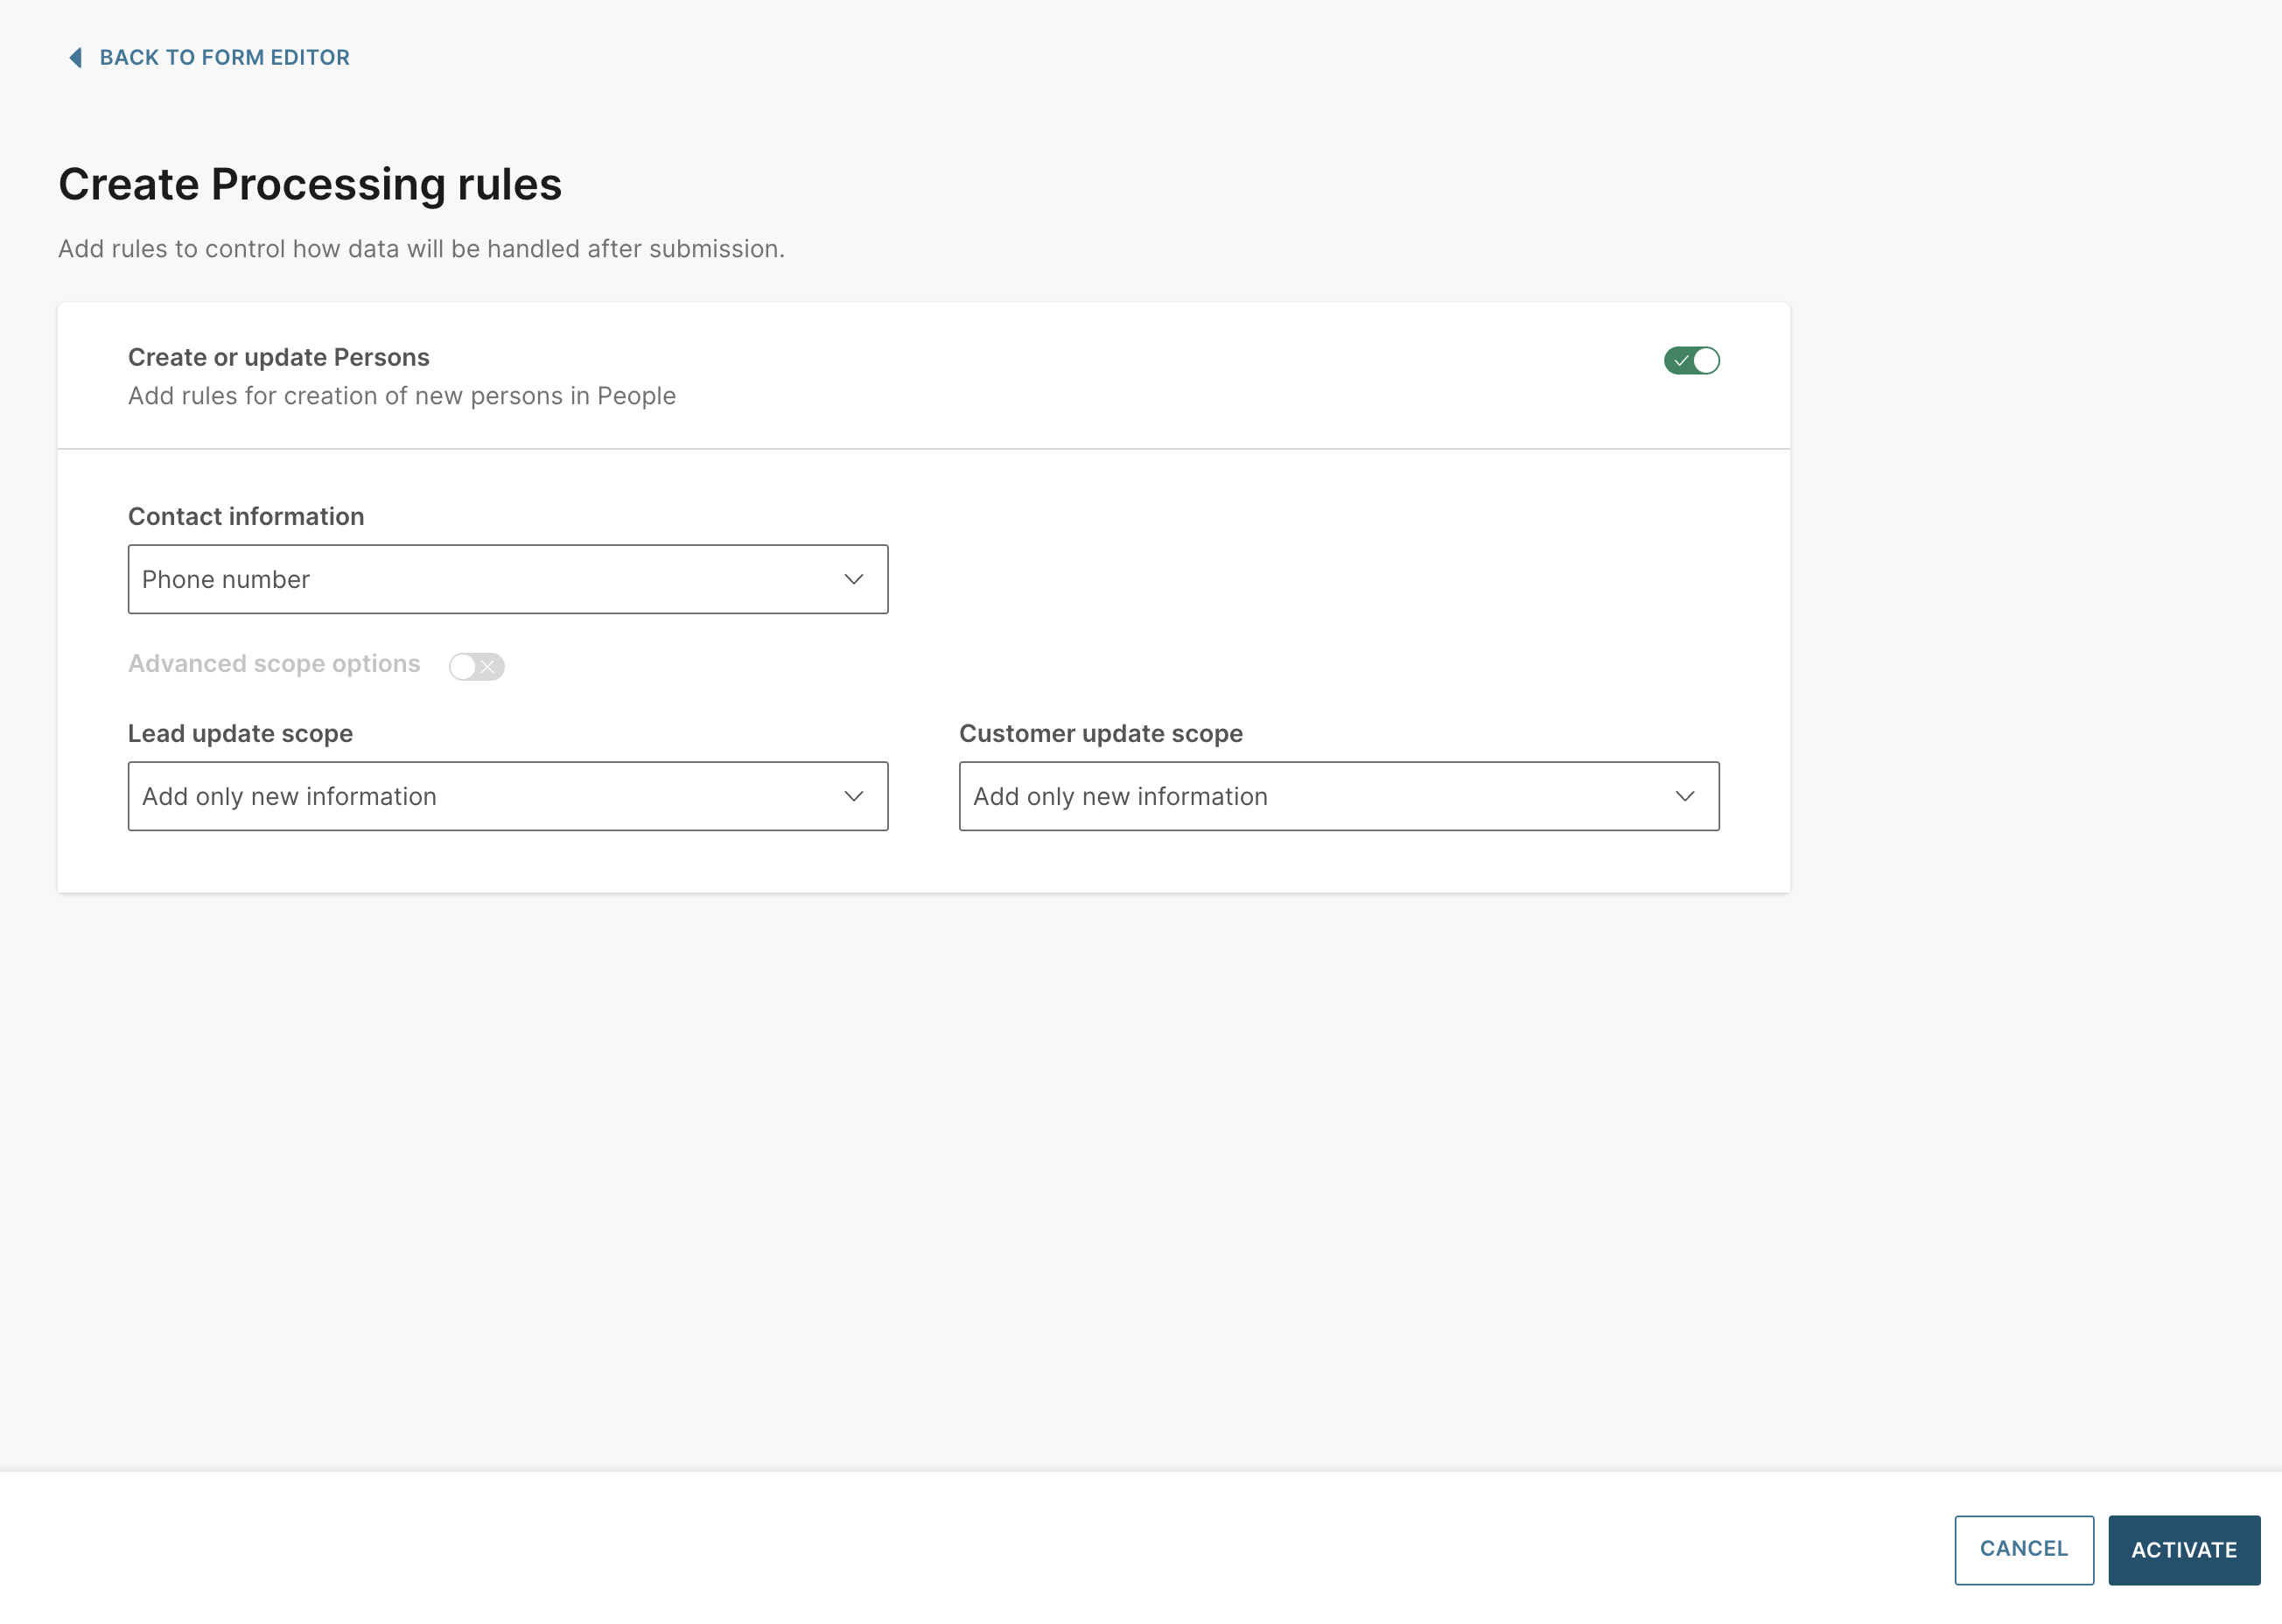
Define processing rules for the form [#define-processing-rules-whatsapp-flow-forms-manage-forms]
Define processing rules for the form so that if the person profile does not exist in People, a new Lead profile is automatically created.
Activate the form [#activate-whatsapp-flow-forms-manage-forms]
The WhatsApp Flows form that is automatically created in your Infobip account is in Draft status. To start collecting submissions from WhatsApp Flows, to save the form data to People, and to use the Form submitted event, the form must be in Active status.
You can activate the form regardless of the status of the WhatsApp Flow in WhatsApp Manager.
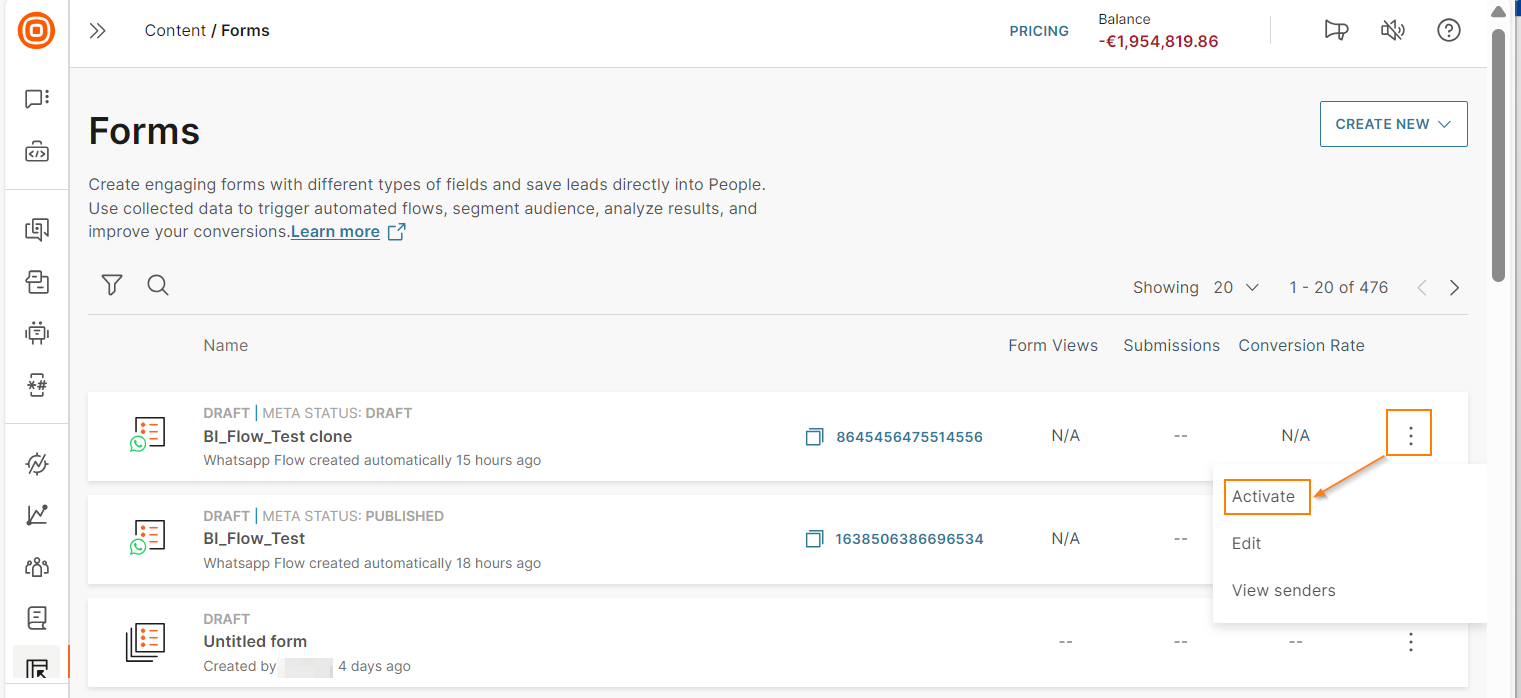
To activate the form, do one of the following.
- Select Activate after configuring the processing rules.
- Select the three-dot menu next to the WhatsApp Flows form, and select Activate.
Use the form data in a flow in Moments [#use-in-moments-whatsapp-flow-forms-manage-forms]
The following are ways in which you can get and use the form data in a flow in Moments.
- Use attributes to get the form data from People: If you have saved the form data in People, you can get the data from the attributes in the person profile and use them in the flow. This process is similar to using any People attribute.
- Use events to get the form data: Even if you don't save form data to People, you can still get the fields directly from the form. Use the Form submitted happened event in either the Wait for event element or the People real-time event trigger. Refer to the example in this section.
- Save form data to flow variables: Save the form data to flow variables and use them later in the flow.
Example [#example-form-in-moments-whatsapp-flow-forms-manage-forms]
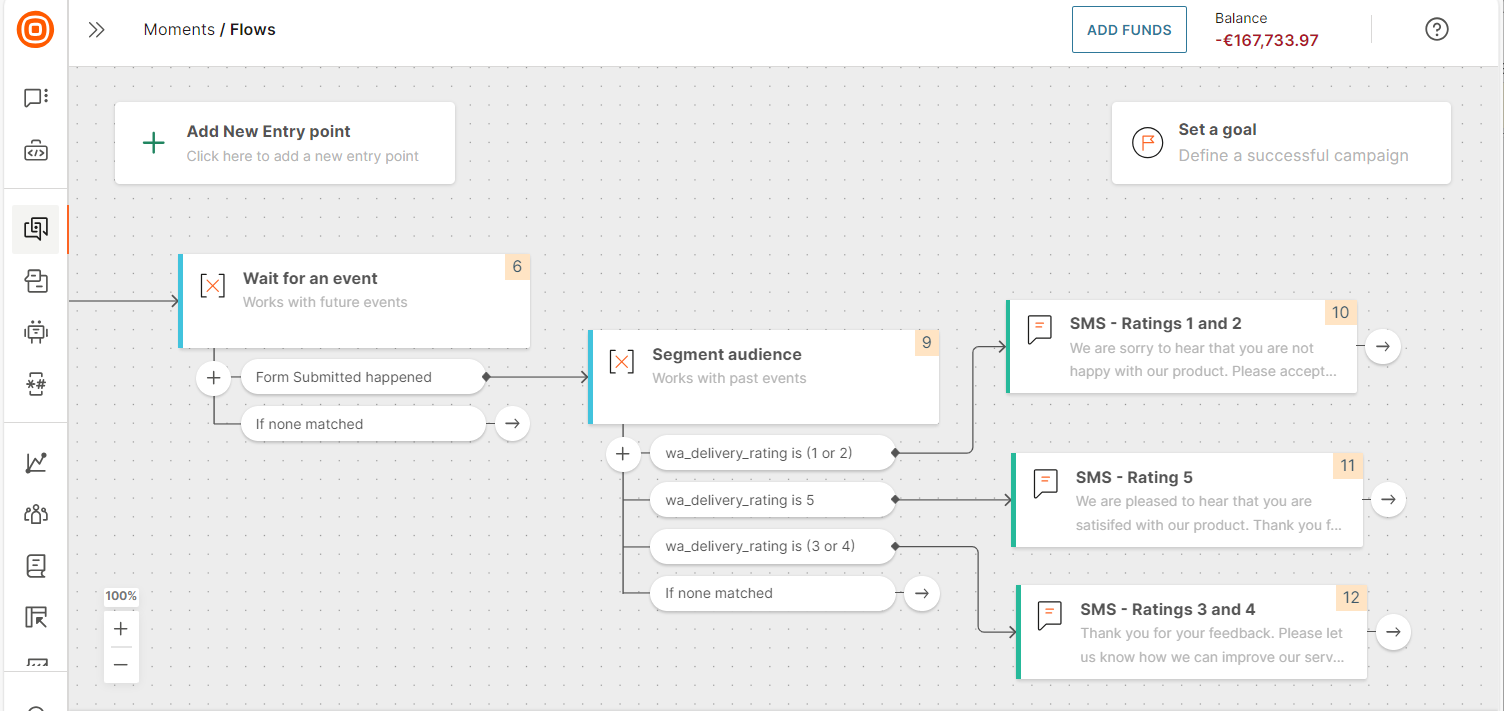
You have a WhatsApp Flow in which end users submit ratings for your products. You want to send personalized messages to end users based on these ratings.
The WhatsApp Flow data is saved in the Rating for product form in the Infobip web interface. You have not saved the form data to People.
Configure your flow as follows.
-
Add the Form submitted happened event to the Wait for event element in the flow.
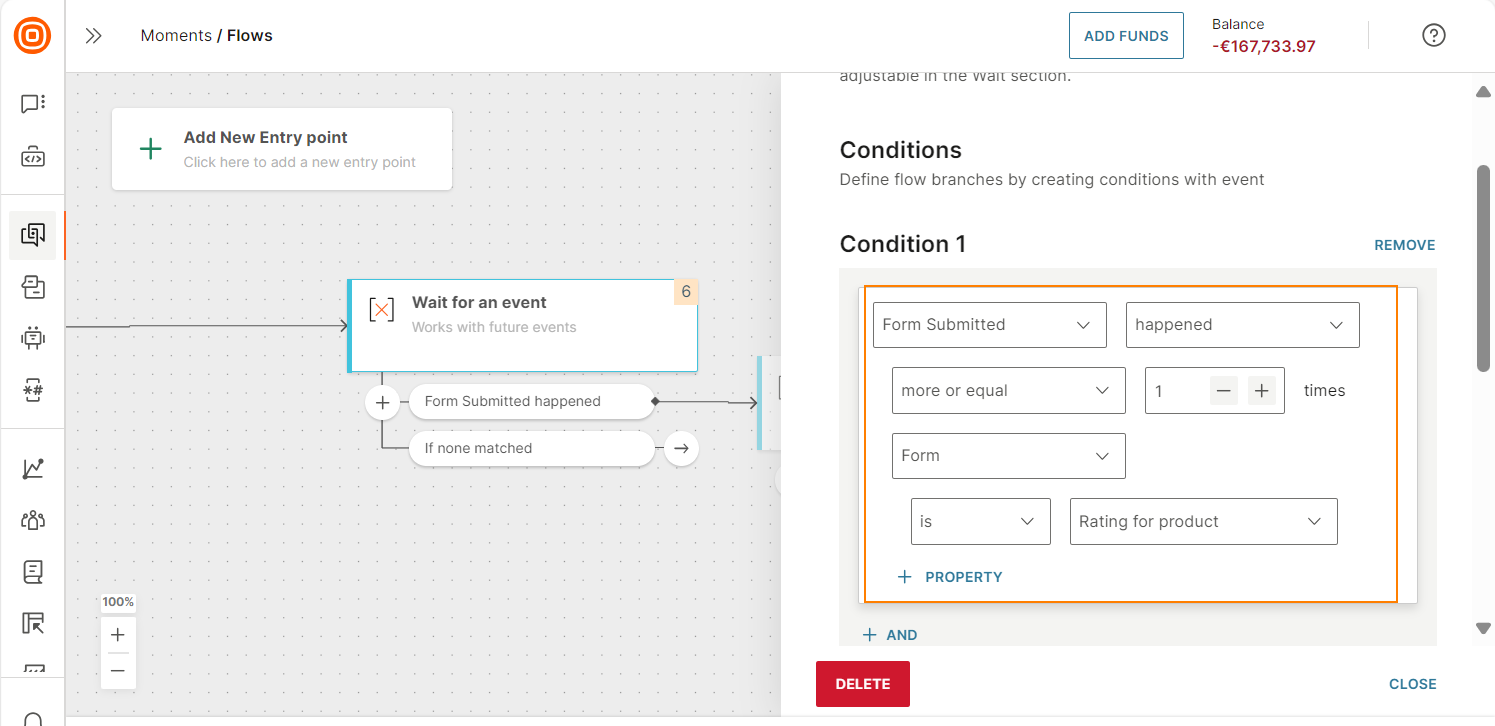
-
Segment the audience based on the wa_delivery_rating field in the form.
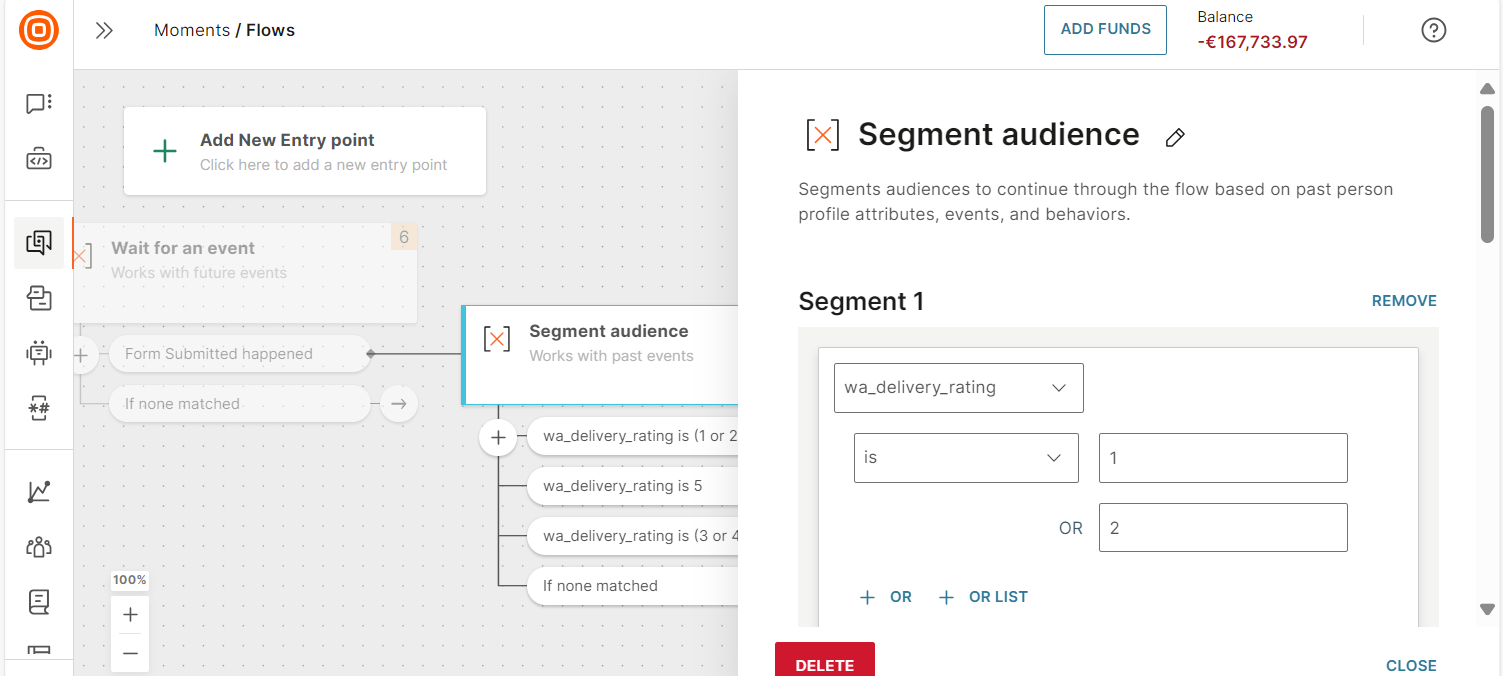
-
Send personalized messages to each audience segment. Example: Send a gift voucher if the wa_delivery_rating is 1 or 2.
You can also save the form data to flow variables. In the Wait for event element, map the fields in the form to flow variables. You can use these variables later in the flow to personalize the end user's journey.
Statuses and actions [#statuses-actions-manage-forms]
Forms have different statuses that describe them and can be managed using actions such as activate, edit, duplicate, delete, or disable.
These are the available statuses:
-
Draft – Form has not been activated yet. Drafts will be deleted 90 days after the last update.
-
Active – Forms are live and will be seen across the web. API submissions are also active. This status is triggered when the form has been activated in the form editor.
-
Disabled – Forms are disabled and cannot receive any data. Disabling a live form will take immediate effect. If it is embedded on any of your web pages, it will no longer be available and may show an error.
-
Deleted – Form is removed from the web page and raw data will be deleted. However, events will remain stored for audience segmentation.
- Opt-out forms and live chat forms: You cannot disable or delete these forms if they are being used on an active landing page.
- WhatsApp Flows forms: You can delete these forms only if they are deleted in the WhatsApp manager.
To manage form statuses, go to Content > Forms. Click the three-dot menu on the form card of your choice to see possible actions.
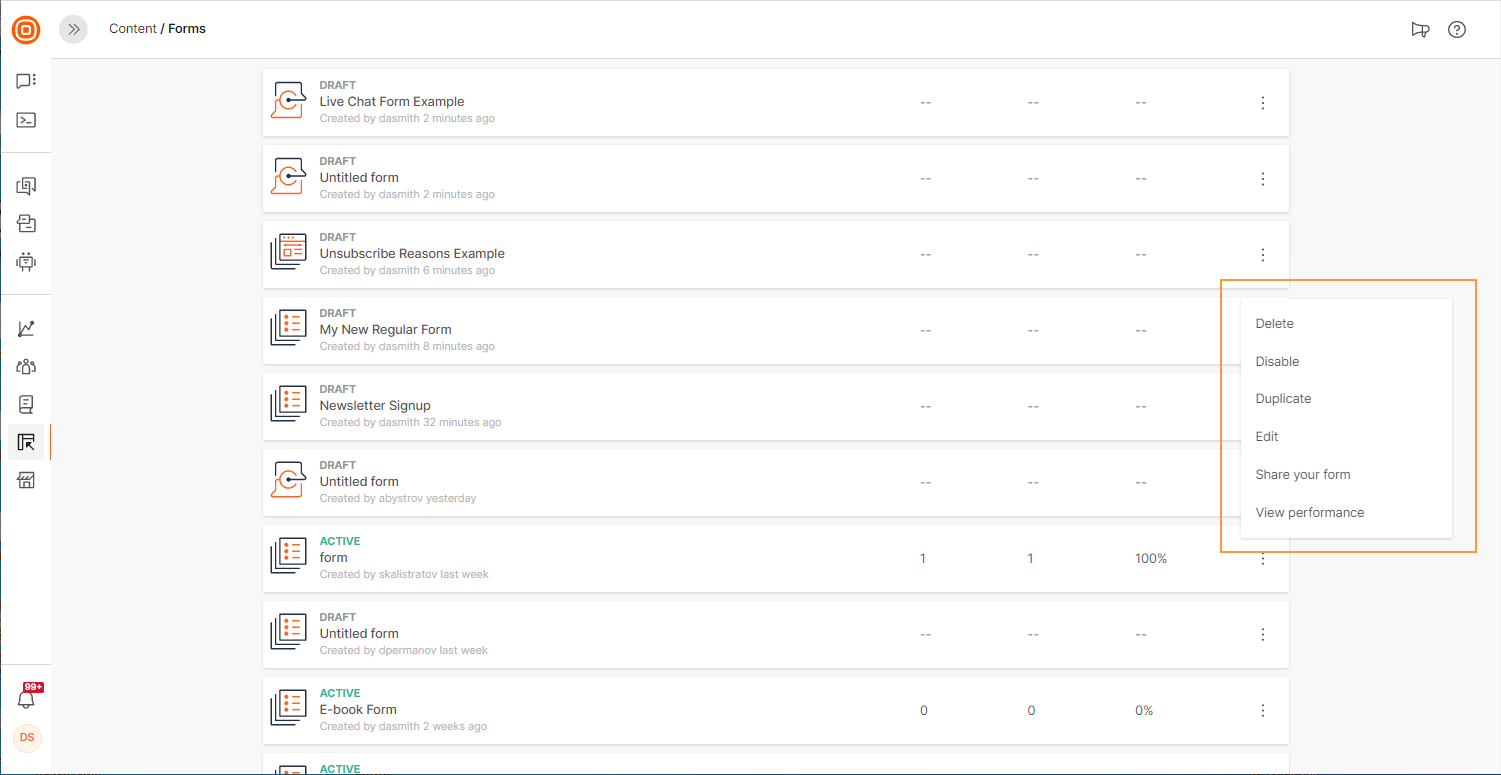
All forms that appear on the homepage can be duplicated, except Facebook and WhatsApp Flows forms. Use their existing setup and layout, or modify them as you wish. The duplicate version will have the Draft status.
Facebook forms status [#facebook-forms-status-statuses-and-actions]
Facebook forms statuses may have different meaning to statuses in Forms because configuration is handled on Facebook side. The status mapping between Facebook forms and Moments are handled in the following way:
| Facebook status | Moments status | Notes |
|---|---|---|
| Draft | - | Draft Facebook forms cannot be added to Moments. They are not visible in the web interface. |
| Active | Draft | Active Facebook forms have been connected to Moments but the form has not been activated in Moments. When the form is in this status, the user can setup the field mapping for the form. Remember to ensure that Facebook forms are not left in draft in Moments for too long as leads will not be transferred into the system. |
| Active | Active | Facebook forms displaying as active in Moments shows that mapping is complete, the form is live and receiving leads. Leads will only start appearing in Moments once the Facebook form is active in the web interface. |
| Archived | Active | Facebook forms that have been archived in Facebook will continue to show as active in Moments. If your form is active and not receiving leads from Facebook, please check the form status in Facebook to ensure it is not archived. |
| Any status | Disabled | Facebook forms will show as disabled in Moments if the user disconnects his Facebook account. |
| Any status | Deleted | A user can delete any connected Facebook forms at anytime. By doing this the form will not receive any leads in Moments. If a user adds the deleted form again from Facebook it will be treated as a new form by Moments. |
WhatsApp Flows Meta status [#whatsapp-flow-meta-statuses-actions-manage-forms]
The following tables shows the statuses of WhatsApp Flows in your WhatsApp manager. These statuses are assigned by Meta. You can also view these statuses in the Forms dashboard.
| WhatsApp Flow status | Description | Status set by system |
|---|---|---|
| Draft | Flow is created and can be modified. Flow can be deleted if it is no longer needed. Flow can be sent only for testing and not shared with end users. | No |
| Deleted | Flow no longer exists. | No |
| Published | Flow can be sent to end users. It can no longer be modified or deleted. | No |
| Depreciated | Flow can no longer be sent to end users. The flow might still be present on end users' devices. You might still get responses from the deprecated flow. | No |
| Throttled | If WhatsApp monitoring detects that the endpoint for your WhatsApp Flow is unhealthy, it transitions the flow to a Throttled state. A throttled flow can still be opened and sent. However, sending is limited to 10 messages per hour. If WhatsApp monitoring detects an improvement in the health of the flow's endpoint, the flow will be transitioned out of the Throttled state and back to the Published state. | Yes |
| Blocked | If a flow has entered the Throttled state and WhatsApp monitoring detects that the health of the flow's endpoint has deteriorated even further, the flow will be transitioned into the Blocked state. This is done to prevent degraded end user experience for the flow. If a flow is in the Blocked state, you cannot send the flow to end users. If end users already have the flow on their device, they cannot open the flow. WhatsApp monitoring will continue to check the health of the endpoint. If there is improvement, the flow is transitioned back to Throttled and then to Published state. | Yes |
Components
Think of components as building blocks, and use them to create a form that will best serve your purpose. What you need to do is drag a component to the editor, name it, and, where possible, add options.
Component options [#component-options-components]
When selecting a component, you will either see a field that allows free input, such as the Text component, or you can set up predefined options. These predefined options are available for the Checkboxes, Dropdown, and Radio buttoncomponents, and they are visible in the right side panel.
To store the data that the user will input there, connect Components to People by matching it with the corresponding data type in People. For instance, the Date component would be connected to the data type Date. If you are going for the form with multiple answers - use the Checkboxes component, and connect it to the List attribute in People.
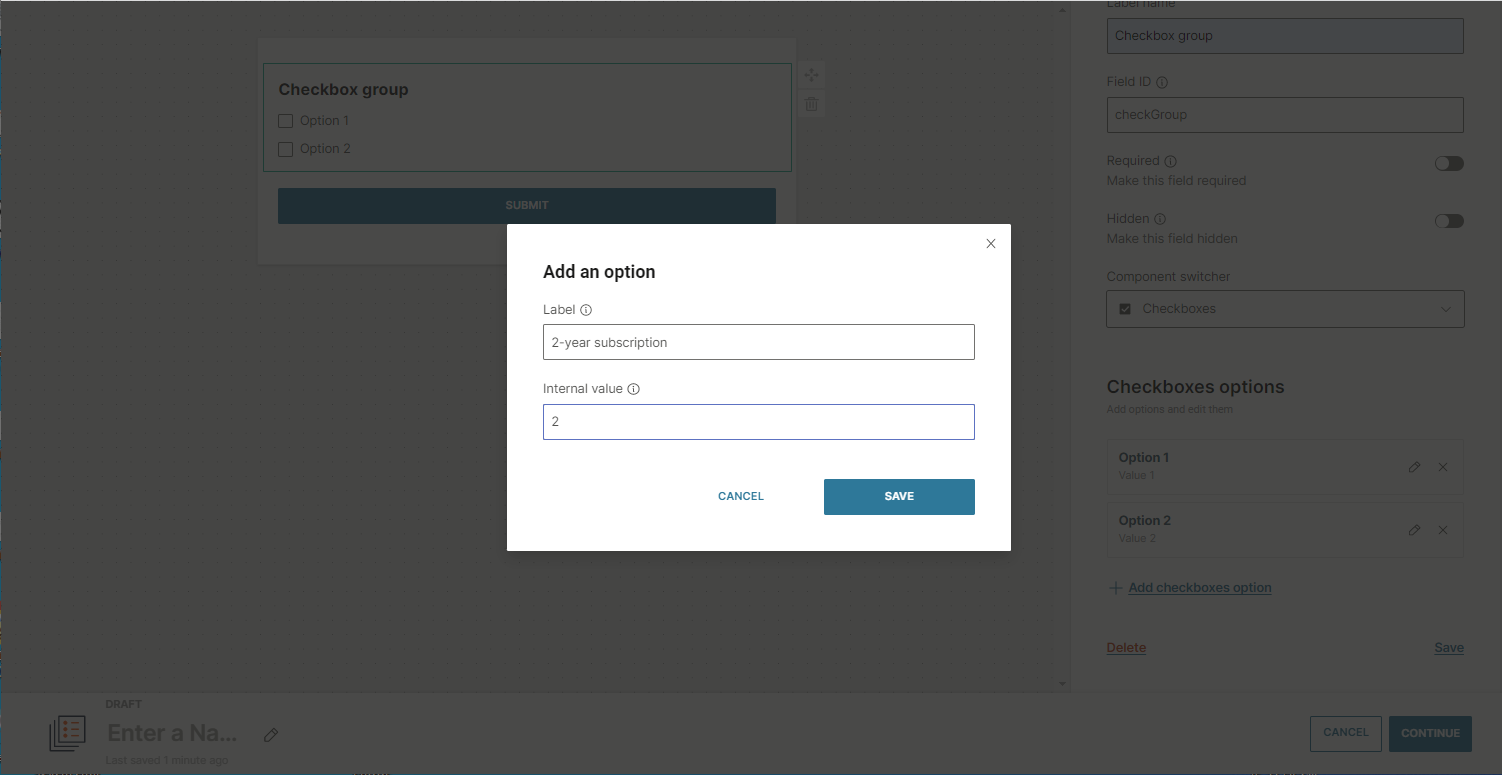
Create a component option [#create-a-component-option-components]
Click on the field to type in the name and value for each option. Give the check box a name that will be visible on the form and assign the value that will be stored in People. If you want your website visitors to see a2-year subscription, you can do that and save2 as a value in People.
Connecting profile attributes and components [#connecting-profile-attributes-and-components-components]
To save information on the data platform, you need to establish a link between the profile attributes and the form's components.
The Checkboxes, for example, can be connected to the Lists attribute in People. Each check box value that the form's user has chosen will be saved as a new item in the list. This is what you will need to do:
-
Create a custom List attribute in People > Configuration and save it.
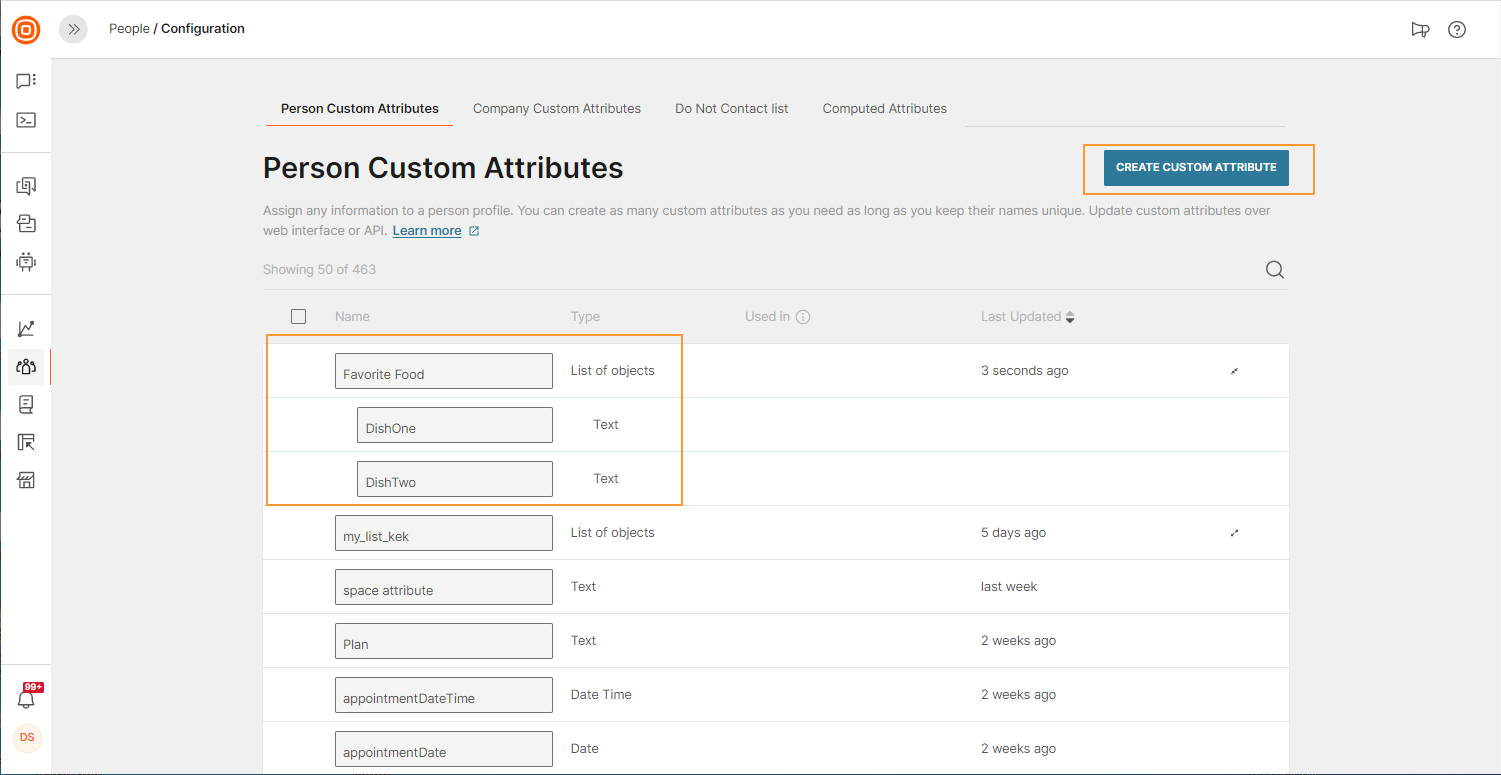
-
Go back to the Forms module: Content > Forms. Link the Component(Checkboxes) to the List attribute that you have just created.
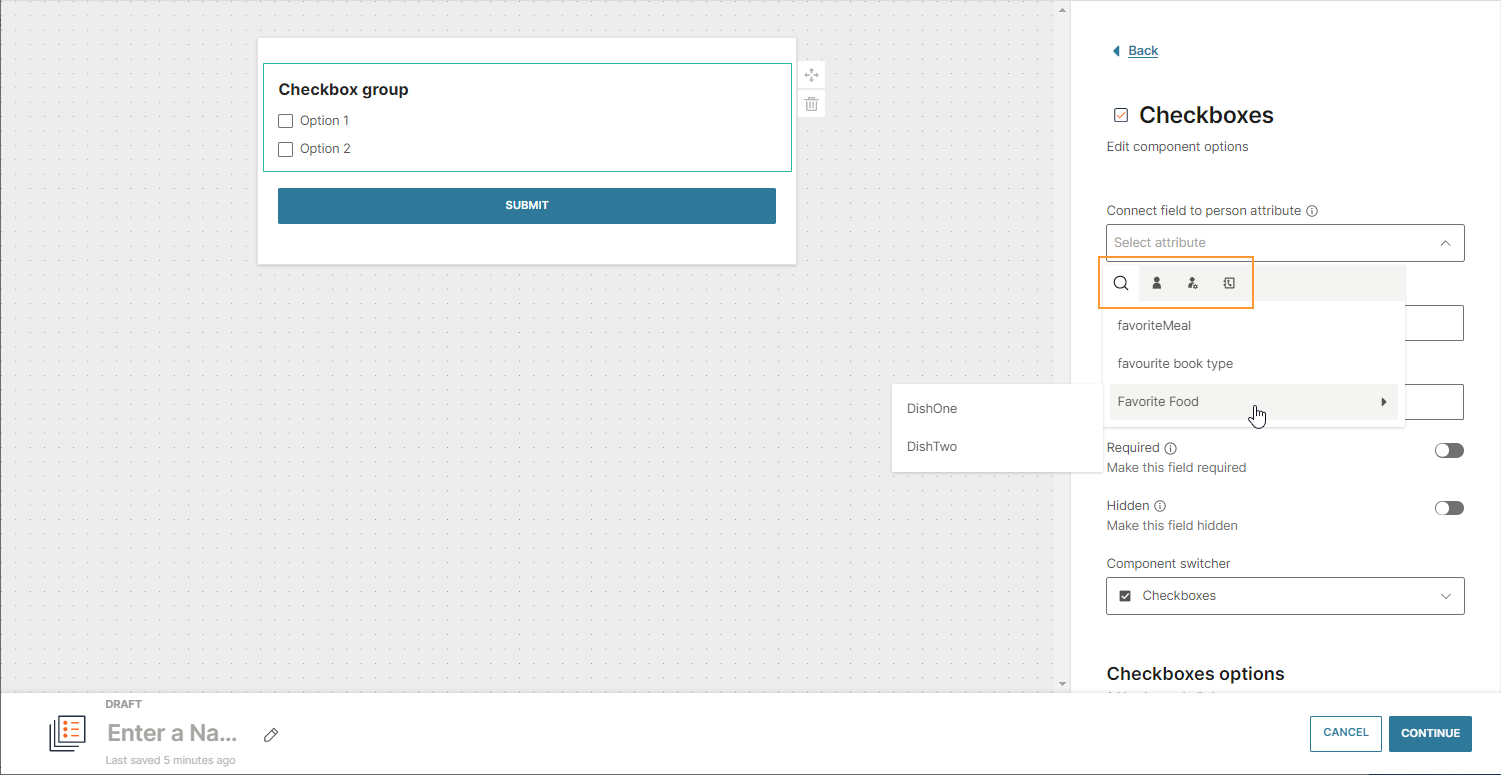
-
After selecting the matching attribute, click the component field and use the pop-up window to enter options that will be recorded in People.
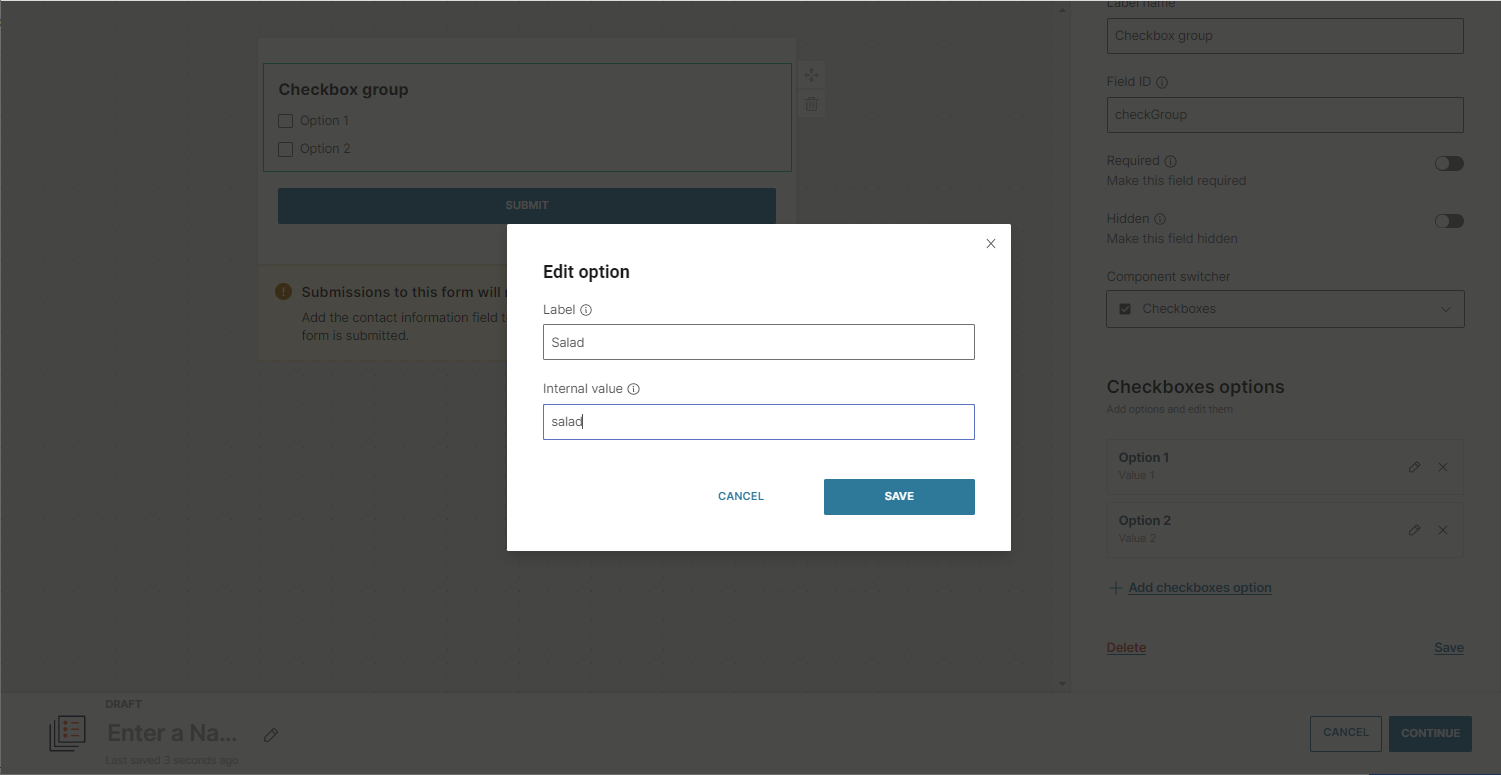
-
Continue to the next step: Processing Rules. To rewrite the existing data when the user submits the same form or another form that contains the same attributes, select Override. If you select Add new, the new items will be appended to the list enriching your existing data.
Apple forms components [#apple-forms-components-components]
There are a few small differences when using components with Apple forms in comparison with creating other Forms.
Firstly and most importantly, the final component view on the form in the editor will be rendered slightly differently on the users device. This is because the form editor is a skeleton for the form but Apple design the final view of the components that are displayed for the user.
Apple forms also offer a bespoke Splash component that acts as a landing page for the form with customizable image, text and button.
If you add a splash component to the form then it will automatically be placed at the top of the layout in the editor.
You can even select from different mobile keyboard types to guide the user on the type of input that is needed and ensure the smooth user interaction.
Apple forms conditions [#apple-forms-conditions-components]
Conditional fields are optional and allow you to place conditional questions inside forms. By doing this, you can build bespoke forms that seamlessly send your user to different fields of a form (also known as 'pages') depending on the response they give.
For example, if a conditional field is applied to a radio button component you can branch the responses depending if the user replies yes, or no. If the user selects yes, they will be sent to a page that contains a different question than if they answer no.
Toggle the conditional fields option on the sidebar when a component is selected to define what page of the form the user should be sent to next.