Set up a SIP trunk
SIP trunks can be created and managed using the Infobip web interface and API. For background on trunk types, codecs, and billing plans, see What is SIP trunking.
The following diagram shows what source IPs and destination IPs mean for a static SIP trunk:
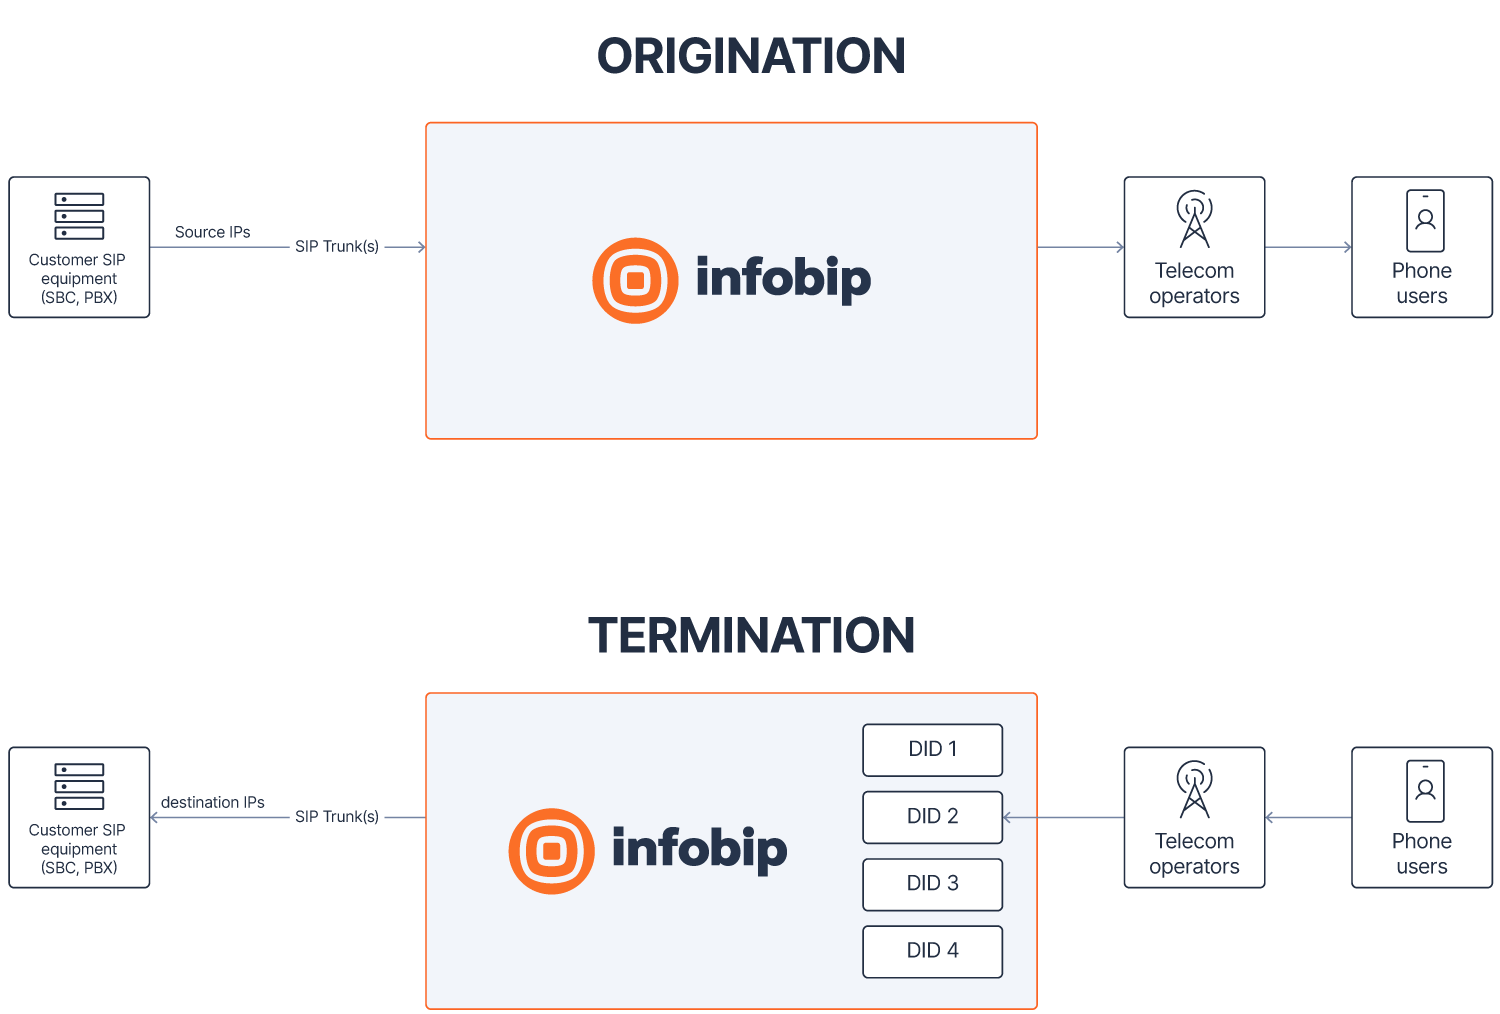
If a static SIP trunk definition does not include at least one source IP, then SIP traffic cannot be sent from your equipment to the Infobip infrastructure. Similarly, if a SIP trunk definition does not include at least one destination IP or FQDN, then incoming voice traffic to the Infobip platform cannot be forwarded over your SIP trunk.
For registered SIP trunks, make sure your Private Branch Exchange (PBX) is compatible with registered trunks.
Before you start
By default, a single Infobip account can have:
- Up to 10 trunks per account.
- Up to 10 trunks per Infobip data center.
- Up to 3 IP addresses per trunk for inbound traffic.
- Up to 3 IP addresses per trunk for outbound traffic.
- SIP trunks in up to 2 different Infobip data centers.
For US-based SIP trunks, register service addresses before creating the trunk. See Managing service addresses.
Using the Infobip web interface
SIP trunks are managed from the Infobip web interface.
Go to Channels and Numbers > Channels > Voice and WebRTC > SIP Trunking.
If you intend to create a trunk in one of the Infobip USA data centers, or if your Place of Primary Use (PPU) is in the United States, make sure that you have declared a service address first (see Service addresses).
Choose the SIP trunk provider
Select CREATE SIP TRUNK and choose the type of trunk (trunk provider) you want to provision. See Supported SIP trunk types and characteristics for more information.
For SIP trunks other than Infobip (that is, Freshworks, Genesys PureCloud, and so on), see Specific notes for provider trunks.
Choose plan and options
Choose between a Metered or Unlimited channel plan. For more information about these channel plans, see SIP trunk channels and related billing plans.
SIP trunk plans need to be activated on your account. If the plan selection is not available, contact your account manager or Support.
Select the number of required channels.
Main trunk settings
Follow the wizard to complete the SIP trunk details. Depending on the SIP trunk provider (INFOBIP, FRESHWORKS, and so on) and type (registered, static), complete the following fields as applicable:
| Parameter | Description | INFOBIP | FRESHWORKS |
|---|---|---|---|
| SIP trunk name | The name you assign to this SIP trunk. This name is also used as a reference in your invoice. | X | X |
| SIP trunk type | Choose static or registered. See Supported SIP trunk types and characteristics to understand the differences between static and registered trunks. | X | |
| Datacenter location | Choose the Infobip data center in which the trunk is provisioned. | X | X |
| Service address | The service address or Place of Primary Use (PPU) for your SIP equipment. | X | X |
| TLS encryption | Enables you to choose between UDP (TLS disabled) or TLS/SRTP (TLS enabled). | X | |
| Codec | Add all of the CODECs you want to use on this SIP trunk. If you add multiple CODECs, you can order them into your preferred priority. | X | |
| DTMF | Select the DTMF transcoding method. | X | |
| Fax | Specify your preferred protocol for the transmission of fax calls. | X | |
| Number format | Choose the numbering format you want for this trunk:
| X | |
| International calls | Choose whether to block or enable calling to international numbers on this trunk. A call is considered to be international when A and B numbers are from different countries. | X | X |
| SIP Options | Request Infobip to send SIP OPTIONS messages to your SIP equipment at a fixed interval of 60 seconds. Infobip always responds to incoming SIP OPTIONS requests with a 200 OK response. When SIP OPTIONS polling is enabled, Infobip sends OPTIONS requests toward your infrastructure to monitor trunk availability. If the polling detects that the trunk is out of service, this status is considered for call routing decisions. The OPTIONS status is not exposed in the Infobip web interface or through the SIP trunk status API. | X (static) | |
| Invite Challenge Authentication | When enabled, the platform performs an authentication challenge on each individual session. | X (registered) | |
| DIGEST Authentication | Whether to generate a DIGEST username and password (inbound DIGEST credentials) that the remote platform must include on their call requests to Infobip. Mandatory if you plan to accept call requests sent by the remote platform. | X (authenticated) | |
| Header Value | The X-IB-AccessCode header value that the remote platform must include in call requests to Infobip. If not defined, a value is auto-generated. Required if you plan to accept inbound call requests from the remote platform. | X (authenticated) | |
| FQDN | The FQDN of the remote platform to which Infobip sends call requests. Add the port to the FQDN if required by the remote platform (for example, "sip.remote.com:5061"). For ElevenLabs, Retell AI, and Vapi, see Specific notes for authenticated trunks. | X (authenticated) |
Infobip SBC locations
When you create a SIP trunk, Infobip returns the SBC address(es) you need to configure on your environment. The format depends on whether your account already has existing SIP trunks:
- If you had no existing SIP trunks in your account on April 13, 2026 (first trunk ever created): you receive a unique FQDN for each trunk you create, along with a list of IP subnets to allowlist on your firewall.
- If you already had one or more SIP trunks in your account on April 13, 2026: you continue to receive static SBC IP addresses, including for trunks you create after this date.
You can check whether you have existing SIP trunks in the SIP trunking section of your Infobip account.
SBC addresses for accounts with existing SIP trunks [#sbc-addresses-existing-trunks-infobip-sbc-locations]
The following table lists the SBC IP addresses by data center.
| Location name | Geography | Infobip static trunk SBC address | Infobip registered trunk SBC address |
|---|---|---|---|
| FRANKFURT | Frankfurt, Germany | 62.140.31.124 | 62.140.31.213 |
| BOGOTA | Colombia | 81.23.252.124 | 81.23.252.80 |
| NEW_YORK | New York, US | 185.255.9.23 | 185.255.9.216 |
| PORTLAND | Portland, US | 185.255.11.170 | 185.255.11.110 |
| SAO_POLO | São Paulo, Brazil | 81.23.253.104 | 81.23.253.60 |
| SINGAPORE | Singapore | 81.23.254.103 | 81.23.254.222 |
| JOHANNESBURG | Johannesburg, South Africa | 202.22.162.104 | 202.22.162.50 |
| MOSCOW | Moscow, Russia | 202.22.163.127 | 202.22.163.222 |
| ISTANBUL | Istanbul, Turkey | 202.22.169.124 | 202.22.169.222 |
| KUALA_LUMPUR | Kuala Lumpur, Malaysia | 202.22.165.100 | 202.22.165.222 |
SBC addresses for new accounts (FQDN-based) [#sbc-addresses-new-accounts-infobip-sbc-locations]
When you create your first SIP trunk, the system generates a unique FQDN for that trunk. The FQDN follows this format:
For example: a1b2c3d4-e5f6-7890-abcd-ef1234567890.eu.sip.voice.infobip.com
The FQDN is returned at trunk creation and is specific to that trunk. Each trunk gets its own FQDN. This FQDN can be used with both SRV and A record lookups, depending on your equipment's capabilities:
| DNS record type | What it resolves to | Use case |
|---|---|---|
SRV (_sips._tcp.<FQDN> or _sip._udp.<FQDN>) | Primary SBC and secondary SBC (when available), with port, priority, and weight | Devices that support SRV-based service discovery for automatic failover |
A (<FQDN>) | Primary SBC IP address only | Devices that require a single static IP or FQDN |
Infobip can publish SRV records for trunks created in the following region pairs. The primary SBC is always in the data center you selected at trunk creation. The secondary SBC is in the paired region.
| Region pair | Primary DC | Secondary (failover) DC |
|---|---|---|
| Europe | Frankfurt | Sweden |
| North America | New York | Portland |
| Asia-Pacific | Singapore | Malaysia |
If the primary DC becomes unreachable, the SRV record allows SRV-capable SIP devices to automatically route traffic to the secondary DC using the priority and weight values configured in the record.
For trunks created in data centers not listed in the region pairs table (standalone data centers), the SRV record points only to the SBC in that single data center (no secondary failover target is available).
The A record for a trunk FQDN resolves only to the Infobip SBC in the data center selected at trunk creation. If you cannot use SRV-based failover on your equipment and rely solely on A records, you can create a separate SIP trunk in a different Infobip data center and manually fail over to it when needed.
In addition, you must safelist the returned IP subnets on your infrastructure to enable traffic from the Infobip SBCs.
IP configuration
This configuration step appears only when configuring an INFOBIP static trunk.
Enter the list of source and destination IP addresses/FQDNs.
For destination IPs, if you do not have multiple redundant network elements, add your static IP address with the default SIP port of 5060. If you enter more than a single IP/FQDN, you can select the routing strategy to be applied:
- Failover: When sending calls to your SIP equipment, destination IPs are selected in the order they are configured. If the first IP is unavailable, the next IP is selected, and so on.
- Round-robin: When sending calls to your SIP equipment, destination IPs are selected in sequential order and distributed evenly. Round-robin is best used with symmetrical trunks (that is, trunks with the same capacity).
For source IPs, specify all the IP addresses from which your equipment sends traffic to the Infobip network. These can be different from the destination IPs.
Review order
Review all settings, then confirm the trunk creation. To change any value, select Back to return to the previous step.
Select Pay now to submit your creation request. A dialog displays the Infobip primary and backup SBC IP addresses (see SIP trunking redundancy). Safelist the Infobip SBC IP addresses on your infrastructure so that traffic can be processed on both sides. For registered trunks, this dialog also includes your username and password.
Record your username and password and store them in a safe place.
After you acknowledge this dialog, the SIP trunks list appears. Monitor the Admin and Action status. See SIP trunk status.
Retrieving your authentication (registered trunks)
For registered trunks, the final dialog during trunk creation displays your username and password. If you lose your credentials or suspect they are compromised, reset them. From your SIP trunk list, select your registered trunk and select the Reset password button. A dialog displays both the username and a new password.
Retrieving your authentication (authenticated trunks)
For authenticated trunks, the final dialog during trunk creation displays:
- Your Infobip trunk FQDN.
- Header value: the value of the X-IB-AccessCode header that the remote platform must include in its SIP INVITE to Infobip.
- Inbound DIGEST username and password: for the remote platform to authenticate to Infobip.
- Outbound DIGEST username and password: for Infobip to authenticate to the remote platform.
If you lose your credentials or suspect they are compromised, reset them. From your SIP trunk list, select your authenticated trunk and select the Reset credentials button. A dialog displays the newly generated credentials.
Using API
For more information about the API methods used for managing locations and SIP trunks, see Calls API platform.
Specific notes for provider trunks
These notes apply only to Freshworks, Genesys PureCloud, Cisco Webex, and OpenAI Realtime provider trunks.
Freshworks trunks [#freshworks-trunks-specific-notes-for-provider-trunks]
Freshworks provider trunks enable you to use Freshworks services (call center Freshcaller) while leveraging Infobip as the underlying voice connectivity provider for both inbound and outbound calls.
Freshcaller uses Twilio as its communication engine. To use Infobip for voice connectivity with Freshcaller, you must:
- Configure a Bring Your Own Carrier (BYOC) connection with Twilio
- Have a properly configured Freshworks account
Follow the official Freshworks documentation for setup instructions.
To set up an Infobip provider trunk for Freshworks, you must provide these two specific parameters:
| Parameter | Description |
|---|---|
| Twilio Account SID | Your Twilio Account SID. |
| Destination Host | Your Twilio SIP domains (FQDN), as received from Freshworks. |
When defining multiple Freshworks trunks in the same Infobip data center, consider the following specific behaviors:
- Channels
- On inbound traffic (origination): The channel count defined per SIP trunk is applied as a channel upper limit on each individual trunk.
- On outbound traffic (termination): The total channel count for all defined Freshworks trunks is applied as an upper group limit across all Freshworks trunks.
- Reports and Logs
- On inbound traffic (origination): Reports and logs show the SIP trunk ID and SIP trunk name used for sending traffic to Freshworks.
- On outbound traffic (termination): Reports and logs show the ID and name of the oldest provisioned Freshworks trunk. This is because traffic from Freshworks does not include a trunk identifier.
Genesys PureCloud trunks [#genesys-purecloud-trunks-specific-notes-for-provider-trunks]
See the Genesys PureCloud Provider SIP Trunk Configuration Guide to help you set up a Genesys PureCloud trunk and configure it in Genesys PureCloud.
You can determine the appropriate region where the SIP trunk needs to be created based on your Genesys PureCloud web interface login URL:
| Genesys PureCloud Login URL | Infobip SIP Web Interface Region name | Infobip SIP API Region name |
|---|---|---|
https://login.mypurecloud.jp | AP Northeast 1 | AP_NORTHEAST_1 |
https://login.apne2.pure.cloud | AP Northeast 2 | AP_NORTHEAST_2 |
https://login.apne3.pure.cloud | AP Northeast 3 | AP_NORTHEAST_3 |
https://login.aps1.pure.cloud | AP South 1 | AP_SOUTH_1 |
https://login.mypurecloud.com.au | AP Southeast 2 | AP_SOUTHEAST_2 |
https://login.cac1.pure.cloud | CA Central 1 | CA_CENTRAL_1 |
https://login.mypurecloud.ie | EU West 1 | EU_WEST_1 |
https://login.euw2.pure.cloud | EU West 2 | EU_WEST_2 |
https://login.mypurecloud.de | EU Central 1 | EU_CENTRAL_1 |
https://login.euc2.pure.cloud | EU Central 2 | EU_CENTRAL_2 |
https://login.mec1.pure.cloud | ME Central 1 | ME_CENTRAL_1 |
https://login.sae1.pure.cloud | SA East 1 | SA_EAST_1 |
https://login.mypurecloud.com | US East 1 | NA_US_EAST_1 |
https://login.use2.us-gov.pure.cloud | US East 2 | NA_US_EAST_2 |
https://login.usw2.pure.cloud | US West 2 | NA_US_WEST_2 |
Cisco Webex trunks [#cisco-webex-trunks-specific-notes-for-provider-trunks]
See the Cisco Webex Provider SIP Trunk Configuration Guide to help you set up a Cisco Webex trunk and perform the Cisco Webex BYOC Enterprise configuration.
Cisco Webex trunks are available in the US only.
OpenAI Realtime SIP trunks
To connect Infobip voice to the OpenAI Realtime API over SIP, provide your OpenAI Project ID.
- Infobip OpenAI Realtime SIP trunks integrate directly with OpenAI. These trunks do not support OpenAI Realtime deployments on Azure.
- You can create OpenAI SIP trunks in any listed Infobip data center. Infobip does not control which OpenAI data center or region will be triggered.
Connect inbound caller to your AI agent
Use Infobip Call Routing to connect inbound callers to your OpenAI Realtime project.
To set this up, follow these steps:
- Create a new route in Call Routing and set your OpenAI trunk as the destination.
- Configure the route based on how users will call your agent:
- PHONE: Ensure you have at least one Infobip DID. For detailed steps, see Call Routing documentation.
- WHATSAPP: Make sure you have at least one WhatsApp sender enabled for WhatsApp Voice. The setup is similar to phone, but inbound configuration is done from the WhatsApp Voice tab of your sender in the Numbers application on the web interface.
- WEBRTC: See the filter-based route execution documentation. In summary:
- Your WebRTC client (using the Infobip WebRTC JS or mobile SDK) must place an applicationCall to
CALL_ROUTING. - Your route in Call Routing must have a filter criteria defined of type
WEBRTC.
- Your WebRTC client (using the Infobip WebRTC JS or mobile SDK) must place an applicationCall to
Enable your AI agent to call recipients
Outbound calls from OpenAI to Infobip over the SIP trunk are not supported directly. To enable your AI agent to call recipients, build a voice application using the Calls API platform.
This application:
- Creates the outbound call to the recipient(s), either as an individual call or bulk calls.
- When the call is answered, connect it to an outbound SIP call to your AI agent by:
- Using the create Dialog method.
- Setting the
childCallRequestto use theSIPendpoint type and referencing the OpenAI trunksipTrunkId.
Specific notes for authenticated trunks
These notes apply only to authenticated SIP trunk configurations, which only work based on FQDNs.
ElevenLabs
Only calls from Infobip to ElevenLabs are supported.
Main setup
When creating your authenticated SIP trunk, use sip.rtc.elevenlabs.io:5061 as the FQDN value.
On the Infobip platform, once your authenticated SIP trunk is created:
- Go to Channels and Numbers > Channels > Voice and WebRTC > Call Routing.
- Create a new route and add a destination of type SIP Trunk, selecting your newly created authenticated SIP trunk.
- Go to Channels and Numbers > Channels > Voice and WebRTC > Numbers.
- Select your Infobip number.
- Select the Voice tab.
- For the inbound configuration, select Forward to Call Routing and associate the route you created in step 1.
On the ElevenLabs platform:
- Go to https://elevenlabs.io/app/agents.
- Select Phone Numbers under Deploy.
- Select + Import number and select From SIP trunk.
- Give your new phone number a label.
- Enter your phone number in international format (without the leading + sign). This is the same number as your Infobip DID that your users will call.
- On the inbound configuration:
- Media configuration: Allowed
- Remote domains: set your Infobip authenticated SIP trunk FQDN.
- On the outbound configuration:
- Address: set your Infobip FQDN with port 5071 (for example,
<Your_Infobip_FQDN>:5071). - Transport type: TLS
- Media encryption: Allowed
- Add a custom header with the key
X-IB-AccessCodeand the value from your authenticated SIP trunk. - SIP Trunk Username: the inbound username from your Infobip authenticated SIP trunk.
- SIP Trunk Password: the inbound password from your Infobip authenticated SIP trunk.
- Address: set your Infobip FQDN with port 5071 (for example,
- Assign your AI agent.
- Leave branch to default Follow traffic split.
Configuring call handover
Follow these steps to enable your agent to hand over the call to a human agent.
On the ElevenLabs platform:
- Go to https://elevenlabs.io/app/agents.
- Select your agent.
- Select Tools.
- In the system tools list, enable Transfer to number.
- Select the tool settings:
- Select transfer type of SIP REFER.
- Destination type: Phone number.
- Phone number: set the value of the phone number to redirect to.
On the Infobip platform:
- Go to Channels and Numbers > Channels > Voice and WebRTC > Call Routing.
- Create a new route to handle the transfer/refer requests coming from ElevenLabs:
- Set a filter criteria:
- Select the SIP trunk to ElevenLabs.
- Define the to value to the same number you defined above in ElevenLabs as the transfer destination.
- Leave other inputs in the filter as is.
- Add your destination in the route (PHONE or WebRTC type destination).
- Set a filter criteria:
Retell AI
Both calls to and from Retell AI are supported.
Main setup
When creating your authenticated SIP trunk, use sip.retellai.com as the FQDN value.
On the Infobip platform, once your authenticated SIP trunk is created:
- Go to Channels and Numbers > Channels > Voice and WebRTC > Call Routing.
- Create a new route and add a destination of type SIP Trunk, selecting your newly created authenticated SIP trunk.
- Go to Channels and Numbers > Channels > Voice and WebRTC > Numbers.
- Select your Infobip number.
- Select the Voice tab.
- For the inbound configuration, select Forward to Call Routing and associate the route you created above.
On the Retell AI platform:
- Go to https://dashboard.retellai.com/.
- Select Phone number, then add a new phone number and select Connect to your number through SIP trunking.
- Enter your phone number in international format (without the leading + sign) with format set to keep raw input.
- Termination URI: set your Infobip authenticated SIP trunk FQDN.
- SIP trunk User Name: set your inbound DIGEST username, as captured from your authenticated trunk creation on Infobip.
- SIP trunk Password: set your inbound DIGEST password, as captured from your authenticated trunk creation on Infobip.
- Set a nickname.
- Select outbound transport TLS.
- On the next screen, assign your inbound and outbound agents.
When making outbound calls from Retell AI, specify the custom SIP header X-IB-AccessCode with the value from your authenticated SIP trunk creation. You can regenerate your trunk credentials from the Infobip portal if you lose or compromise your original credentials.
Configuring call handover
Follow these steps to enable your agent to hand over the call to a human agent.
On the Retell AI platform:
- Go to https://dashboard.retellai.com/.
- Select your agent.
- Expand the functions pane.
- Edit the transfer_call function:
- Static destination: the phone number to which the call must be transferred.
- Select cold transfer method.
- Select SIP REFER as the SIP transfer method.
On the Infobip platform:
- Go to Channels and Numbers > Channels > Voice and WebRTC > Call Routing.
- Create a new route to handle the transfer/refer requests coming from Retell AI:
- Set a filter criteria:
- Select the SIP trunk to Retell AI.
- Define the to value to the same number you defined above in Retell AI as the transfer destination.
- Leave other inputs in the filter as is.
- Add your destination in the route (PHONE or WebRTC type destination).
- Set a filter criteria:
VAPI
Only calls from Infobip to Vapi are supported. Calls initiated through Vapi are not supported because Vapi does not support configuring custom headers on outbound SIP traffic.
Main setup
When creating your authenticated SIP trunk, use sip.vapi.ai as the FQDN value.
On the VAPI platform:
- Go to https://dashboard.vapi.ai/.
- Select Phone number, then Create phone number and select Free Vapi SIP.
- Define a minimum 8-character alpha identifier (for example,
myvapiuser). - Assign a label.
- Leave everything as is and select Import SIP URI.
- On the next screen, assign your agent for handling inbound calls.
On the Infobip platform:
- Go to Channels and Numbers > Channels > Voice and WebRTC > Call Routing.
- Create a new route and add a destination of type SIP Trunk, selecting your newly created authenticated SIP trunk.
- In the SIP destination definition, set the username to the alpha identifier you created on the Vapi platform (for example,
myvapiuser).
- Go to Channels and Numbers > Channels > Voice and WebRTC > Numbers.
- Select your Infobip number.
- Select the Voice tab.
- For the inbound configuration, select Forward to Call Routing and associate the route you created above.
Configuring call handover
Follow these steps to enable your agent to hand over the call to a human agent.
Follow the instructions to create a transfer tool on Vapi: https://docs.vapi.ai/call-forwarding.
- The destination type must be phone.
- The phone number must be entered in international format (with the leading +), and the Enforce E164 format option must be unchecked.
- Assign the transfer tool to your agent.
On the Infobip platform:
- Go to Channels and Numbers > Channels > Voice and WebRTC > Call Routing.
- Create a new route to handle the transfer/refer requests coming from Vapi:
- Set a filter criteria:
- Select the SIP trunk to Vapi.
- Define the to value to the same number you defined above in Vapi as the transfer destination.
- Leave other inputs in the filter as is.
- Add your destination in the route (PHONE or WebRTC type destination).
- Set a filter criteria:
Understanding SIP trunk status
A SIP trunk has three independent status classes (Administrative, Registration, and Action) that together describe its lifecycle. Use the following table to interpret each status value reported in the Infobip web interface or returned by the SIP trunking API.
| Status class | Status value | Description | Applies to |
|---|---|---|---|
| Administrative | ENABLED | The SIP trunk is enabled for use by the user. | Static & Registered trunks |
| Administrative | DISABLED | The SIP trunk is disabled for use by the user. The system does not process calls sent to this trunk. For registered trunks, setting the administrative status to disabled will force the deregistration of any registered clients. | Static & Registered trunks |
| Administrative | SYSTEM_DISABLED | The SIP trunk has been disabled by the system and cannot be re-enabled by the user unless the root cause has been fixed. When the root cause is fixed, the system transitions the trunk back to the disabled state. From that moment, the user can re-enable the trunk as required. | Static & Registered trunks |
| Registration | REGISTERED | At least one client is registered on the trunk. | Registered trunks |
| Registration | UNREGISTERED | No client is registered on the trunk. | Registered trunks |
| Action | PENDING | The submitted action (create, edit) has been submitted and its status is pending. No further action can be submitted until this action completes. | Static & Registered trunks |
| Action | SUCCESS | The submitted action (create, edit) has been successfully completed or applied. | Static & Registered trunks |
| Action | RESET | The submitted action (edit) did not complete and the trunk was restored to its original state. | Static & Registered trunks |
| Action | FAILED | The submitted action (edit) did not complete successfully, and the trunk is now in an unusable state. No traffic is permitted on this trunk, and the only available action is to delete the trunk definition. | Static & Registered trunks |
Next steps
After you create a SIP trunk, use Call Routing to forward inbound calls received on Infobip numbers to your telephony equipment over the trunk.