Get started with Voice and WebRTC
Infobip Voice and WebRTC lets you send voice messages, generate call links, and enable click-to-call from the web interface or API. To get started:
- Create an Infobip account and complete the platform onboarding.
- Verify your phone number during sign-up. This number is the recipient for test calls during the free trial.
Start your free trial
Your free trial starts when you create your Infobip account and lasts 60 days. A countdown at the top of the page displays the number of days remaining.
Limitations
During the free trial, Voice and WebRTC have the following limitations:
- 15 outgoing calls or voice messages to a phone
- 15 incoming calls from a phone
- 100 video or audio online calls over Web Real-Time Communications (WebRTC)
- Voice calls can only be directed to the mobile phone number you verified during sign-up
- Voice calls are limited to a 5-minute duration
Free trial users are limited to the countries listed below. If you need a country that is not in this list, contact Sales.
Available countries for Voice calls [#available-countries-for-voice-calls-start-your-free-trial]
Available countries for outbound calls
- Afghanistan
- Albania
- Algeria
- Angola
- Argentina
- Armenia
- Australia
- Austria
- Azerbaijan
- Bahrain
- Bangladesh
- Belarus
- Belgium
- Benin
- Bosnia and Herzegovina
- Brazil
- Bulgaria
- Burkina Faso
- Cameroon
- Canada
- Central African Republic
- Chad
- Chile
- Colombia
- Comoros
- Congo
- Cote d'Ivoire
- Cyprus
- Croatia
- Denmark
- Ecuador
- Egypt
- El Salvador
- Estonia
- Eswatini
- Ethiopia
- Finland
- France
- Gabon
- Georgia
- Germany
- Ghana
- Guatemala
- Guinea
- Honduras
- Hong Kong
- Hungary
- India
- Indonesia
- Iran
- Iraq
- Ireland
- Israel
- Italy
- Japan
- Jersey
- Jordan
- Kazakhstan
- Kenya
- Kosovo
- Kuwait
- Kyrgyzstan
- Lao People's Democratic Republic
- Libya
- Luxembourg
- Macao
- Malaysia
- Mali
- Mauritius
- Mexico
- Moldova
- Montenegro
- Morocco
- Mozambique
- Myanmar
- Namibia
- Netherlands
- Nigeria
- Norway
- Oman
- Pakistan
- Panama
- Paraguay
- Peru
- Philippines
- Poland
- Portugal
- Puerto Rico
- Qatar
- Romania
- Russian Federation
- Saudi Arabia
- Senegal
- Serbia
- Singapore
- Slovakia
- Slovenia
- South Africa
- Spain
- Sweden
- Switzerland
- Taiwan
- Tajikistan
- Tanzania
- Thailand
- Tunisia
- Turkey
- Uganda
- Ukraine
- United Arab Emirates
- United Kingdom
- Uzbekistan
- Vanuatu
- Venezuela
- Vietnam
- Yemen
- Zambia
- Zimbabwe
- USA (can only be enabled after contacting Support)
Available countries for inbound calls
- Argentina
- Australia
- Brazil
- Canada
- Chile
- Cocos (Keeling) Island
- Costa Rica
- Croatia
- Czech Republic
- Denmark
- Ecuador
- Estonia
- Germany
- Guatemala
- Hong Kong
- Jersey
- Kazakhstan
- Lithuania
- Malaysia
- Mexico
- Palau
- Panama
- Peru
- Philippines
- Puerto Rico
- Romania
- Singapore
- South Africa
- Sweden
- Taiwan
- Thailand
- Ukraine
- United Kingdom
- Vietnam
- USA (can only be enabled after contacting Support)
Upgrade to a paying account [#upgrade-to-a-paying-account-start-your-free-trial]
You can upgrade to a paying account at any time. Select Add funds at the top of the page and choose a billing option. After you add funds, the free trial ends and your account becomes a paying account.
If the free trial has expired, a banner appears at the top of the homepage. Select Upgrade now to add funds and continue sending messages.
Start using Voice and WebRTC
Go to the web interface and navigate to Guide. Select Voice as the channel.
At the top of the Guide page, choose your role: Business user, Developer, or MCP integrator. The Guide adjusts its steps based on your selection.
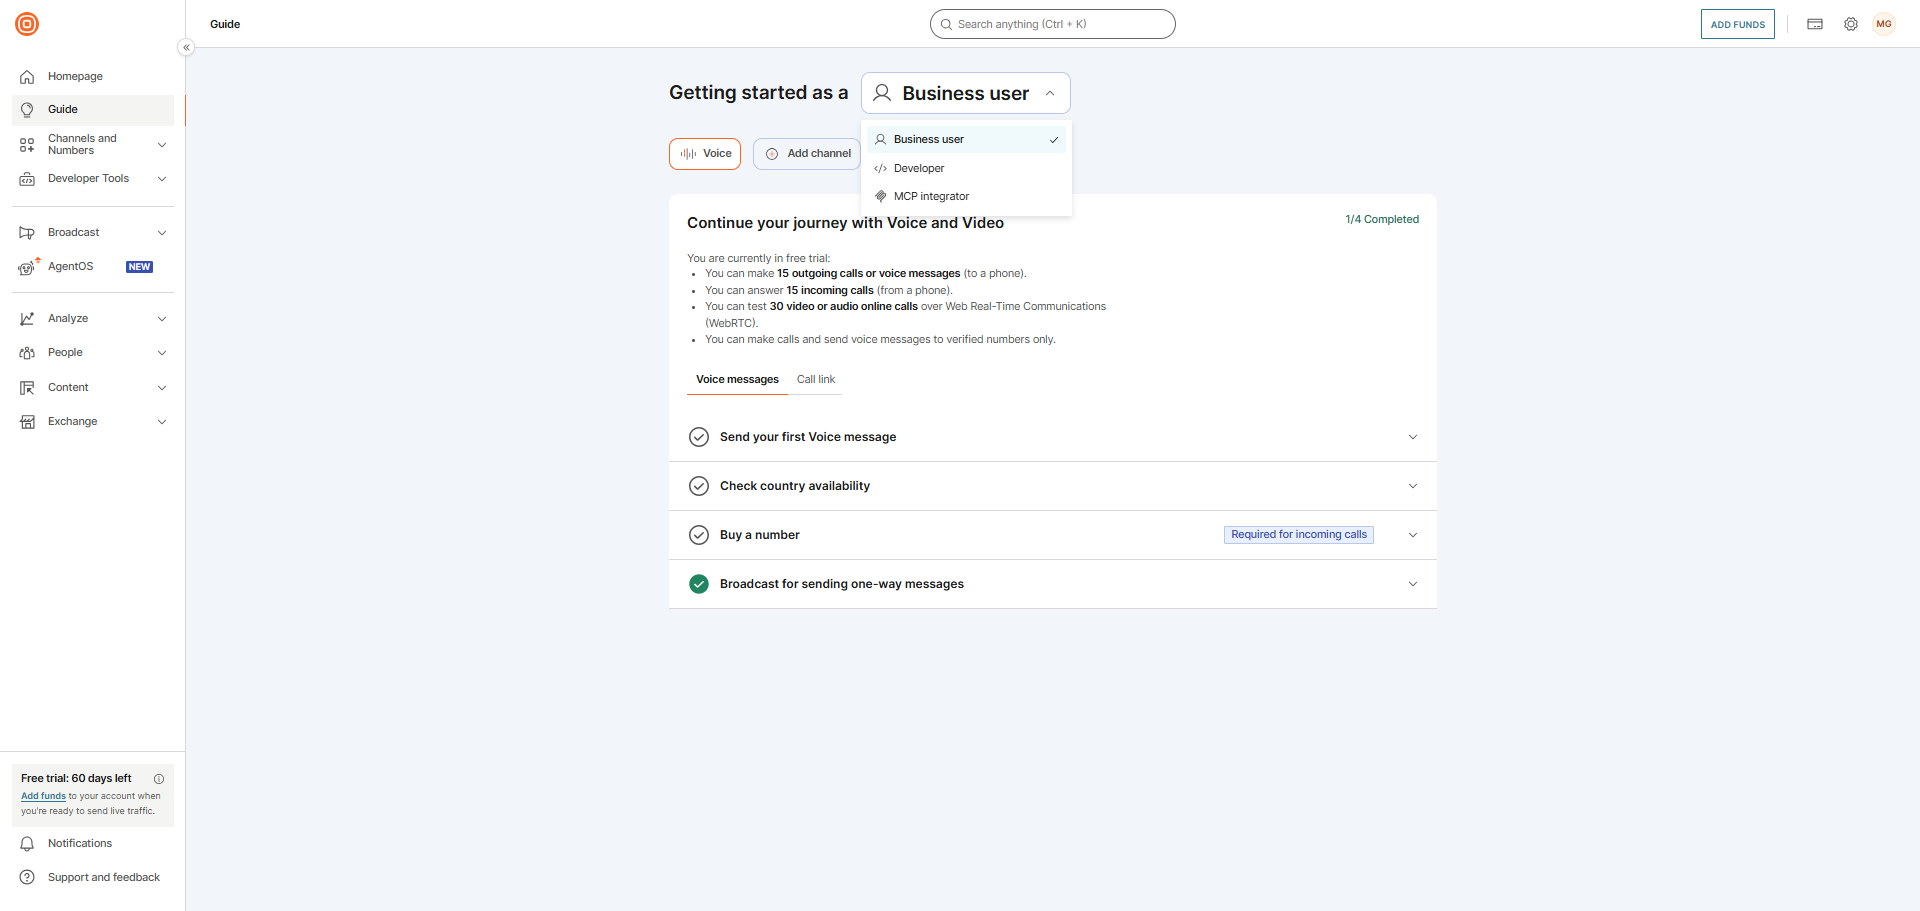
Business user experience
The Voice messages tab is selected by default. The Guide walks you through the following steps. Expand each step to complete it.
- Send your first Voice message. Fill in the form:
- Recipients: Prepopulated with the number you verified during sign-up. You can add up to five verified numbers.
- Sender: Enter a phone number to use as the caller ID.
- Text-to-speech: Type the message to convert to audio.
- Language, Voice, and Speech rate: Select the language, voice type, and speed.
- Select Send message to deliver the voice message.
- Check country availability. Review the list of available countries. Voice and video calls are available globally during the free trial. After the trial ends, availability may change for some countries.
- Buy a number to receive calls from your clients and display a specific number as your caller ID.
- Broadcast for sending one-way messages. Set up broadcast messaging after completing the previous steps.
Call link
Select the Call link tab to generate a shareable link for voice calls. You can create two types:
- Phone: A 1:1 call between a customer and your business.
- Room: A conference call for up to 15 participants, with optional password protection.
Developer experience
Select Developer from the dropdown at the top of the Guide page.
Your API key and API Base URL display at the top of the page. Each tab provides ready-made code snippets in cURL, C#, Go, Java, JavaScript, Node.js, Python, PHP, and Ruby. Expand each step to complete it.
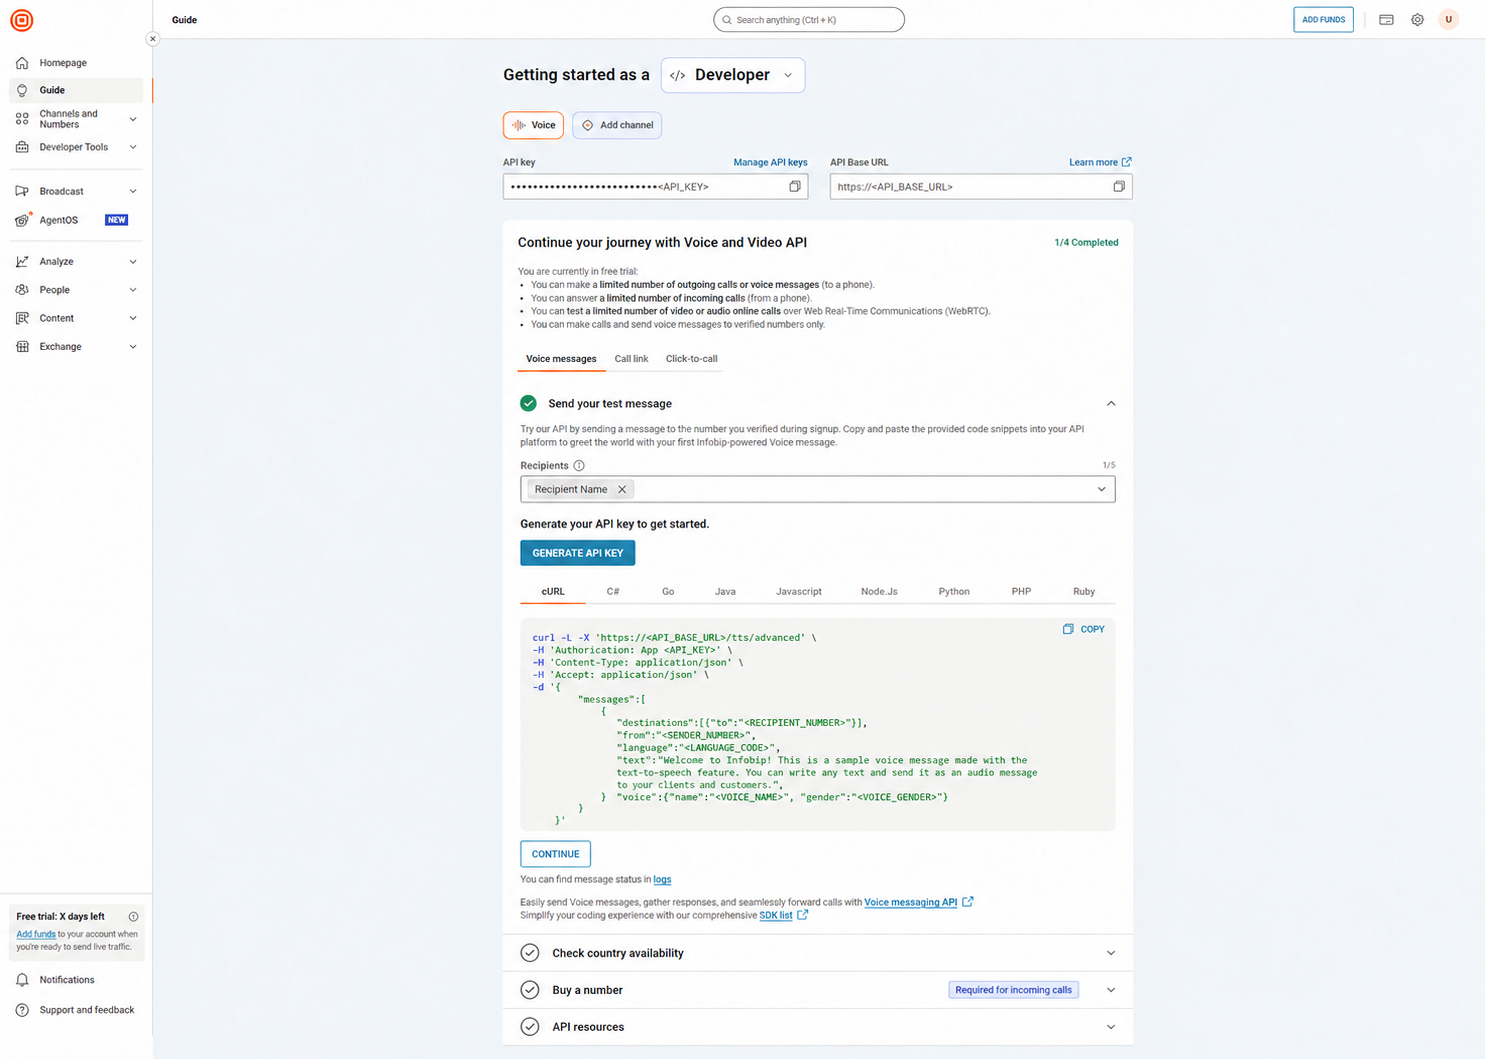
Send a test voice message
The Voice messages tab is selected by default.
- Send your test message. Select Generate API key to generate your credentials if you have not done so already. Copy the code snippet into your API platform to send a test voice message to the number you verified during sign-up. You can find the message status in the logs.
- Check country availability. Review the list of available countries. Voice and video calls are available globally during the free trial. After the trial ends, availability may change for some countries.
- Buy a number to receive incoming calls and set up your caller ID.
- API resources. Review the Voice messaging API and SDK documentation to build your integration.
Generate a call link
Select the Call link tab. A call link is a shareable URL that lets customers start a voice call with your business.
- Choose the call type:
- Phone: A 1:1 call between a customer and your business.
- Room: A conference call for up to 15 participants, with optional password protection.
- Generate the link. Copy the code snippet into your API platform to generate the link.
- Test the link. Share the generated link with anyone to verify the call experience.
Enable click-to-call
Select the Click-to-call tab. Click-to-call adds a callback button, image, or link to your website so customers can request a call.
When a customer requests a call from your website, they provide their contact number so your company can call them back.
- Verify a second number. This test requires two verified numbers. Verify a second number if you have not done so already.
- Test a callback request. Run the code snippet to simulate a customer requesting a call.
- View call status in logs. Check the delivery status after testing. If delivery fails, review the response status and error codes.
After completing the Guide
You can upgrade to a paying account at any time. Select Add funds at the top of the web interface.
Numbers and senders
For each Infobip voice solution, select a phone number to use as the caller ID. Whether this caller ID displays as-is on the end-user phone depends on the voice connection used to reach the destination. To ensure your caller ID always displays, contact the Support team.
To process inbound calls, use Infobip voice numbers unless your inbound calls reach the Infobip platform over SIP or WebRTC. You can lease voice numbers from Infobip and configure the desired voice action at any time.
For more details, see Voice Numbers.
Was this page helpful?