Calls
Calls is a voice feature designed for developers and available via API only.
You can use Calls to create any application to handle inbound and outbound calls. Your application implements the voice scenario logic and uses the Calls API to control and execute actions in calls and conferences, and does so via whichever voice channel (PSTN, webRTC, SIP) you choose.
Unlike Number Masking, Click-to-Call, Voice Message, or Interactive Voice Response, your application is not bound to any particular use case scenario: the Calls API is the building block here to help you build just about anything.
To use any of the following features with the Calls API, you need to have these activated for your account:
- Recording
- Automated machine detection (AMD)
- Conferencing
- Media streaming
- SIP trunking
Contact your dedicated Account Manager to have these features activated.
Concepts
Calls has four main concepts:
Calls Configuration [#calls-configuration]
In this section, we guide you through the process of creating a Calls Configuration for applications that use our Calls API. Defining a Calls Configuration linked to an event subscription is a vital part of integrating the diverse API methods and events that our platform offers.
Creating a Calls Configuration [#creating-a-calls-configuration-concepts]
A Calls Configuration is a required declaration for applications using the Calls API methods. It includes a unique identifier, the callsConfigurationId. This ID can be provided by the developer at the time of creation or, if not specified, will be generated by the system. Developers also have the option to assign a descriptive name to their Calls Configuration, aiding in easier management. To create a Calls Configuration, start by declaring your application for the Calls API. If you have a specific ID in mind, specify it; otherwise, the system will assign one automatically. Adding a descriptive name is also recommended but optional.
Event subscription association [#event-subscription-association-concepts]
Each new Calls Configuration needs an associated event subscription. This subscription outlines which events from the Calls API your application will receive. The choice of events is crucial as it determines how your application interacts with and responds to the API. This section guides you through the steps to create an event subscription and link it to your Calls Configuration.
- Create a subscription: the first step is to create at least one event subscription. You can create and manage subscriptions in the Infobip web interface, as well as, over API.
- Specify the channel type: When setting up your event subscription, specify the channel type as
VOICE_VIDEO. This defines the nature of the events your application will handle. - Define the profile: The profile section of your subscription should include details of your application's webhook. This includes the URL and security specifications of the webhook, ensuring secure and directed communication.
- List the desired events: In the
eventsarray of your subscription, list all the Calls API events you want to be sent to your webhook. These should be provided as a comma-separated list, encompassing all the events relevant to your application's functionalities. You can find the list of all possible Calls API events in Event Webhook. - Criteria object configuration: The final step is to specify the
callsConfigurationIdin thecriteriaobject of your subscription. This links the event subscription directly to your Calls Configuration, ensuring that the right events are routed to your application.
- Specify the channel type: When setting up your event subscription, specify the channel type as
You can define multiple subscriptions that use the same callsConfigurationId criteria to organize how you handle events. This approach enables you to route different event types to separate webhooks, which improves structure and processing efficiency. When doing so, ensure that each subscription contains a unique set of event types for that callsConfigurationId.
Calls API follows an event-driven development model. Events are not informational notifications. They are operational signals that drive backend execution logic.
Calls API event subscriptions are scoped exclusively to calls associated with your own callsConfigurationId.
Calls API methods and events do not provide access to calls managed by Infobip-operated applications, including Conversations (AgentOS), Number Masking, Voice Messaging, Click to Call, and IVR.
This restriction is intentional. Infobip-operated applications implement their own orchestration logic and internally consume and act on core call events. Exposing these low-level events without the corresponding application context leads to operational interference or misinterpretation. External systems do not have visibility into the actions already performed by the application backend.
If you require webhook-based event notifications for a specific Infobip voice application, use the event mechanisms provided by that application. These events include the necessary contextual metadata and are designed for external consumption.
Numbers [#numbers-concepts]
Inbound voice scenarios, where your application must answer or route incoming calls, require your account to own at least one Infobip voice number. This number must be associated with your application so Infobip knows where to route events related to these inbound calls.
You can link an Infobip voice number to one application only, but you can link several phone numbers to the same application.
Outbound voice scenarios, where your application initiates calls to PSTN, webRTC, or SIP destinations, may require your account to own at least one Infobip phone number.
You can specify this number in your application as a caller ID for new outbound calls. Note that this number does not need to be linked to your application, meaning that the same number could be displayed as callerID for outbound calls generated by different applications.
You can search for and lease available voice numbers both via API and in the web interface.
To link an Infobip voice number to the application, you need to use the API using the FORWARD_TO_SUBSCRIPTION action together with a callsConfigurationId.
Calls API [#calls-api-concepts]
Any action that you need your application to perform on and within calls and conferences is done via REST API. API will respond synchronously with an HTTP status code and payload to confirm the reception of the requested action.
There are several methods available to:
- Create calls and retrieve call details.
- Create conferences and retrieve conference details.
- Perform actions in calls and conferences.
- Manage audio files and recordings.
Events [#events-concepts]
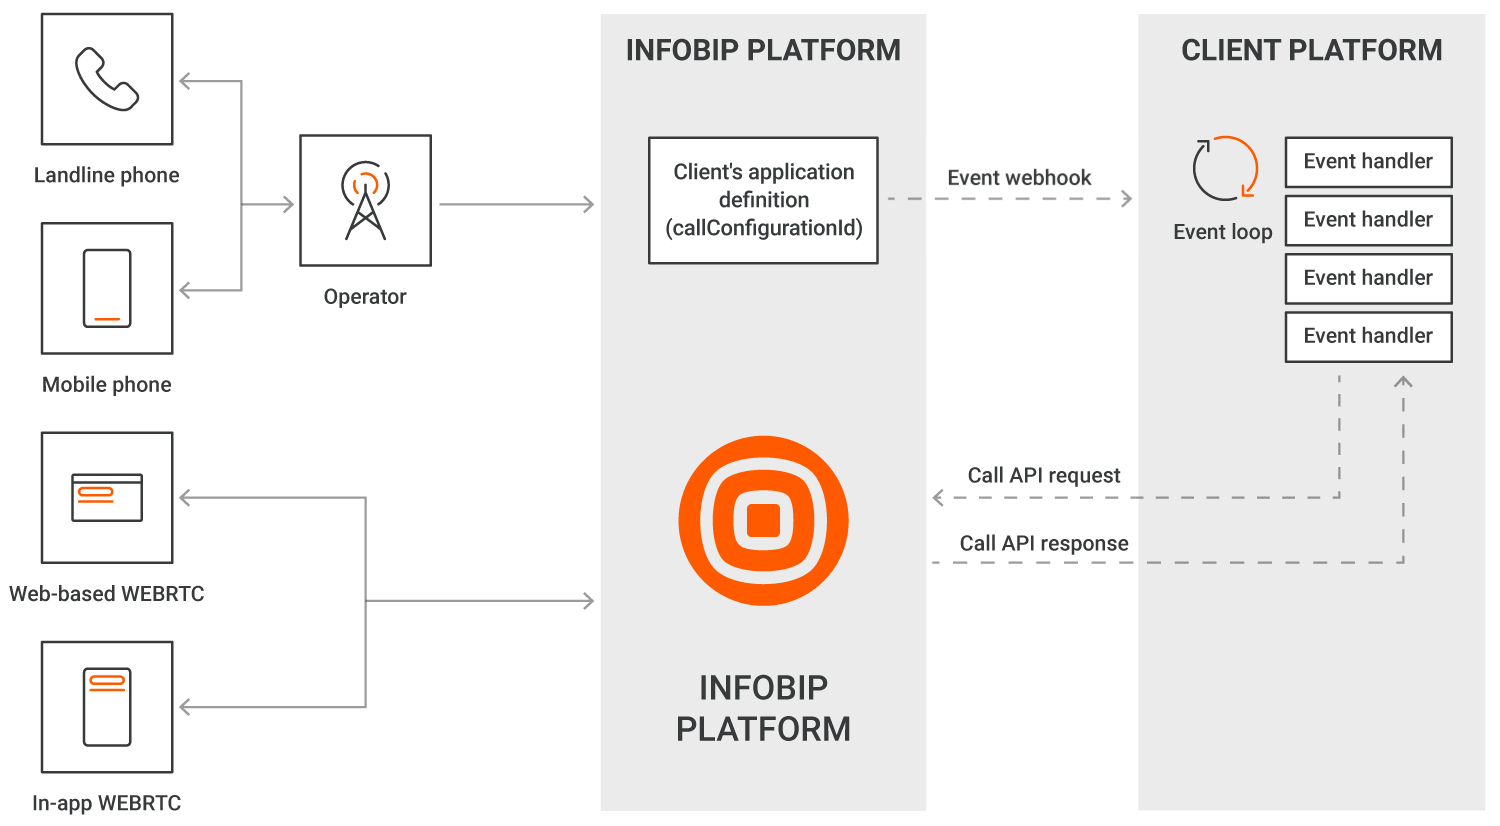
Most actions performed in calls and conferences using the Calls API will trigger an event in your application to confirm the completion of the action's execution or to raise an error. New incoming calls to your application will also result in an event being sent to your application, including all call information (TO, FROM, and so on).
In the diagram below, the client application or platform is exposing two different webhooks, one to receive only CALL_RECEIVED events and the other to receive all other event types.
Understanding Calls API
Calls, conferences, and dialogs [#calls-conferences-and-dialogs-understanding-calls-api]
Every inbound connection (TO) or outbound connection (FROM) the Infobip platform is designated as a call leg.
In the remainder of this documentation as well as in our API documentation, a call leg is referred as being a call.
Any voice or video application will always handle a minimum of one call. For instance:
- A voice messaging application that calls a user to deliver a voice message will create an outbound call.
- An interactive voice response application responds to an inbound call.
- An application that allows two or more participants to talk to each other will handle two or more calls, whether inbound, outbound or mixed.
Calls can be connected (bridged) in multiple ways:
- Conference:
- You can create a conference and add or remove participants using these conference methods explicitly.
- Using conferences results in a potentially large number of events related to the status of the conference as well as the status of each participant.
- Conferences are limited to a maximum of 15 participants, regardless of the involved endpoint types.
- Conferences should best be used when you expect to connect more than two call legs or participants together, or plan to add and remove participants on the fly.
- Connect:
- You can use the connect methods to join two call legs in a conference quickly without having to explicitly manipulate conference objects.
- Using the connect methods results in the implicit creation of conferences but simplifies the overall implementation.
- As an implicit conference is created when connecting two calls, it means that you can manipulate this conference to add and remove additional participants at any point in time.
- Dialog:
- A dialog allows you to bridge two and only two calls together
- A dialog is used to bridge the calls and is a different object from Conferences
- Two calls connected over a dialog cannot ever be joined by additional participants. A call that is part of a Dialog cannot be moved to another Dialog
- The overall Dialog flow results in far fewer events than if you use Connect or Conferencing methods.
- Using Dialogs is the recommended method for scenarios where only two call legs (or participants) will ever need to be joined.
The other main differences between a dialog and connect/conference are:
- Early media propagation: When connecting a new PHONE call to an existing call, the destination network might provide in-band tones or announcements that inform the caller of the call progress. When using dialog to connect calls, such early media, if any, will be propagated between the participants.
- Media bypass: When connecting two calls over PHONE/PSTN, and if both calls use the same codec, the Infobip platform handles only the signaling part of calls, whereas media (RTP) flows directly between the connected endpoints. This means that media is going over the shortest path between endpoints with minimum latency. Note that the RTP flow will be re-captured by the Infobip platform if a recording of the dialog is requested or if actions such as DTMF collection are requested. Similarly, if a dialog is being recorded and that recording is stopped, then the Infobip platform will release the RTP media and switch back to media bypass.
- Answering the inbound call: If your scenario using dialog is about bridging an inbound call to a new outbound call when using dialog, your application does not need to explicitly answer the inbound call, like it would with connect and conferences. When using dialog, if the new outbound call is answered, the Infobip platform will automatically answer the inbound call and bridge them together.
- Actions on call legs: When call legs are joined using a Dialog, it is only possible to play media (audio file or speech synthesis) on the Dialog object itself, and therefore this audio will be heard by the two call legs that are part of the dialog. With call legs joined over a conference, it is possible to use individual call methods such as playing an audio file or text to speech to a particular call leg in the conference, meaning that only that call leg will hear the playback media.
Every call has its own unique callId. Every Conference or Dialog has its own unique conferenceId or dialogId. These identifiers are not interchangeable.
With this in mind, these are the recommended call bridging methods for various use cases:
- You need to bridge an inbound call to an outbound destination ("call forwarding"): Dialogs would be most suitable
- You need to bridge two outbound calls together: Dialogs would be most suitable
- You need to bridge more than two participants together: use Conferencing or Connect methods
- You need to implement "call on hold" situations: use Conferencing methods, where the "on hold" participant
- Can be temporarily removed from a conference.
- Media is played on the participant's call leg during the on hold time.
- The participant's call leg is moved back into a conference with another participant when the call resumes.
- You implement a "smart dialer" use case: use Conferencing or Connect methods.
- The agent gets connected to a conference.
- Connected outbound calls are connected to the agent, in turn, in that conference.
Call states [#call-states-understanding-calls-api]
The following sections provide diagrams and more information for each of the call states.
Outbound call states [#outbound-call-states-understanding-calls-api]
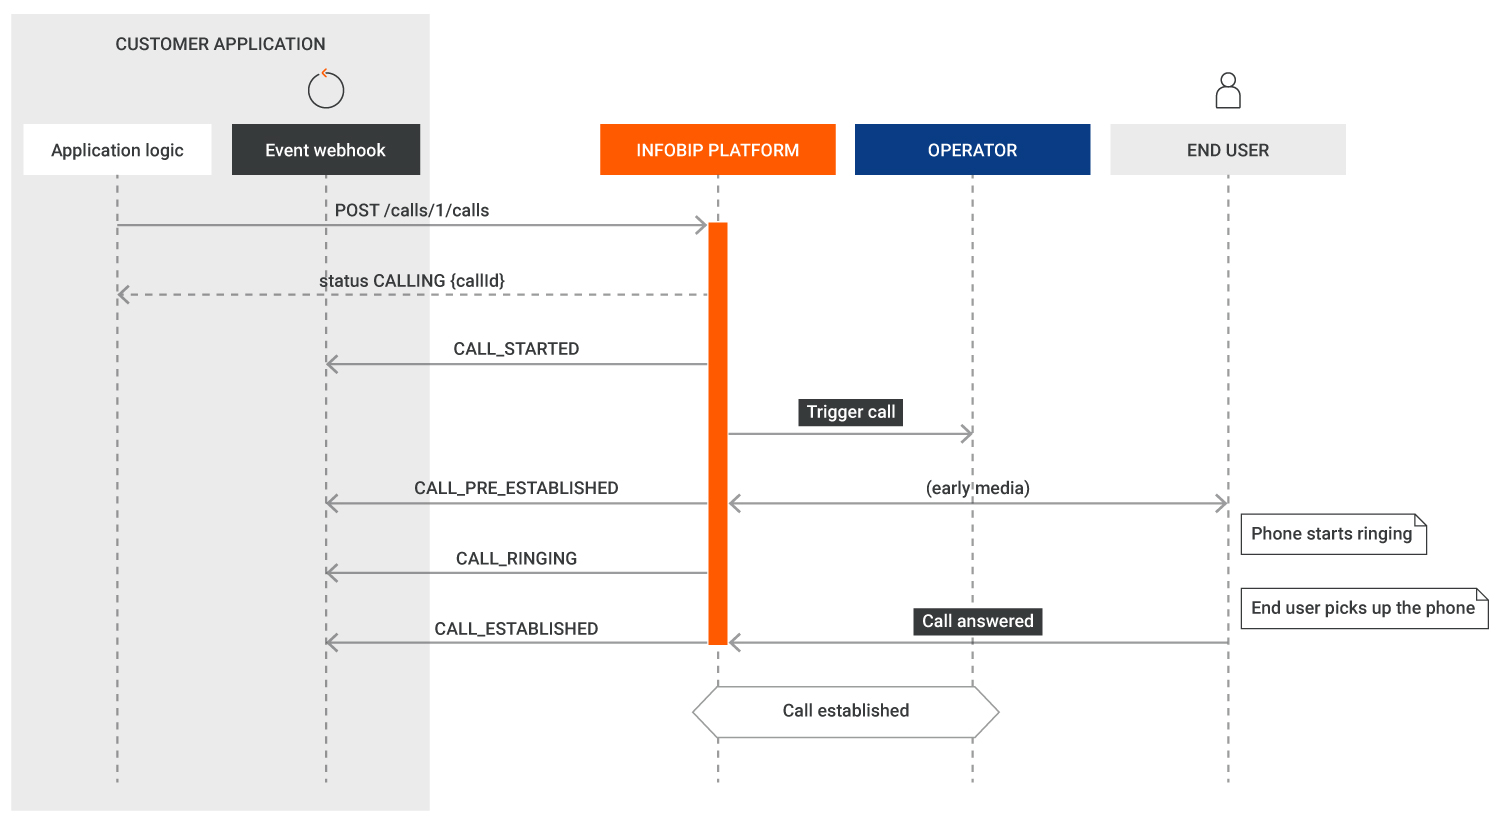
The following diagram shows various states for an outbound call and the events that represent these state transitions.
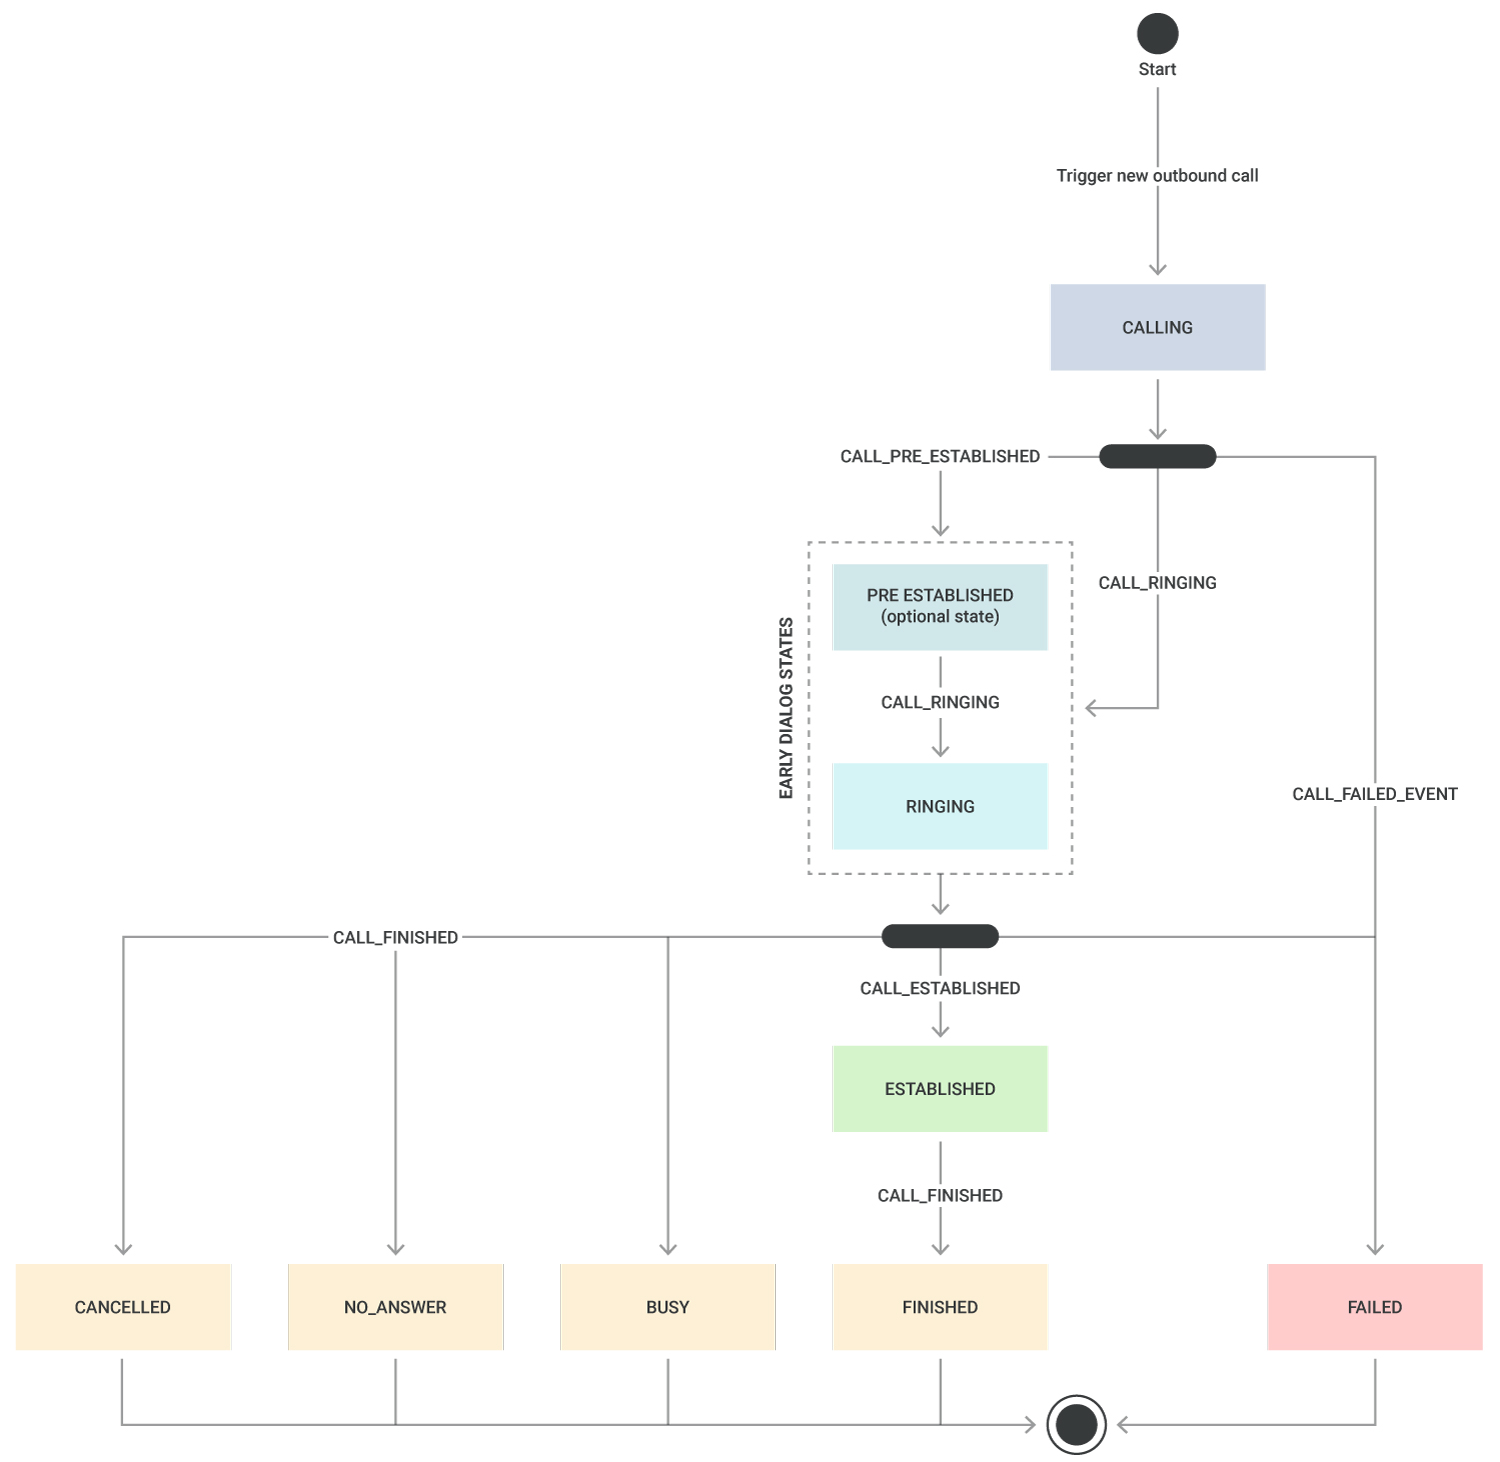
Early dialog states such as PRE_ESTABLISHED and RINGING, including their respective events, either optional or presented in any order, depend on telco operators' implementations. Calls to WebRTC and SIP never go through the PRE_ESTABLISHED states.
| CALLING | The call creation request has been accepted and queued for processing. |
| PRE_ESTABLISHED | The call is in the early media state. |
| RINGING | The called destination is ringing. |
| ESTABLISHED | The call is connected and established, the connection is active. |
Outbound calls will always end up in one of the following final call states:
| FINISHED | The call which was previously active is completed and hung up. |
| BUSY | The call could not be completed as we received a busy signal from the destination. |
| NO ANSWER | The destination did not answer before the connectTimeOut parameter value has been reached. |
| CANCELLED | The outbound call was canceled prior to being answered or prior to reaching the connectTimeOut parameter value. |
| FAILED | The call could not be established to the destination. |
For these final call states, the preceding CALL_FINISHED or CALL_FAILED events will include the reason for hung up or call failure.
Inbound call states [#inbound-call-states-understanding-calls-api]
The following diagram shows various states for an inbound call and the events that represent these state transitions.
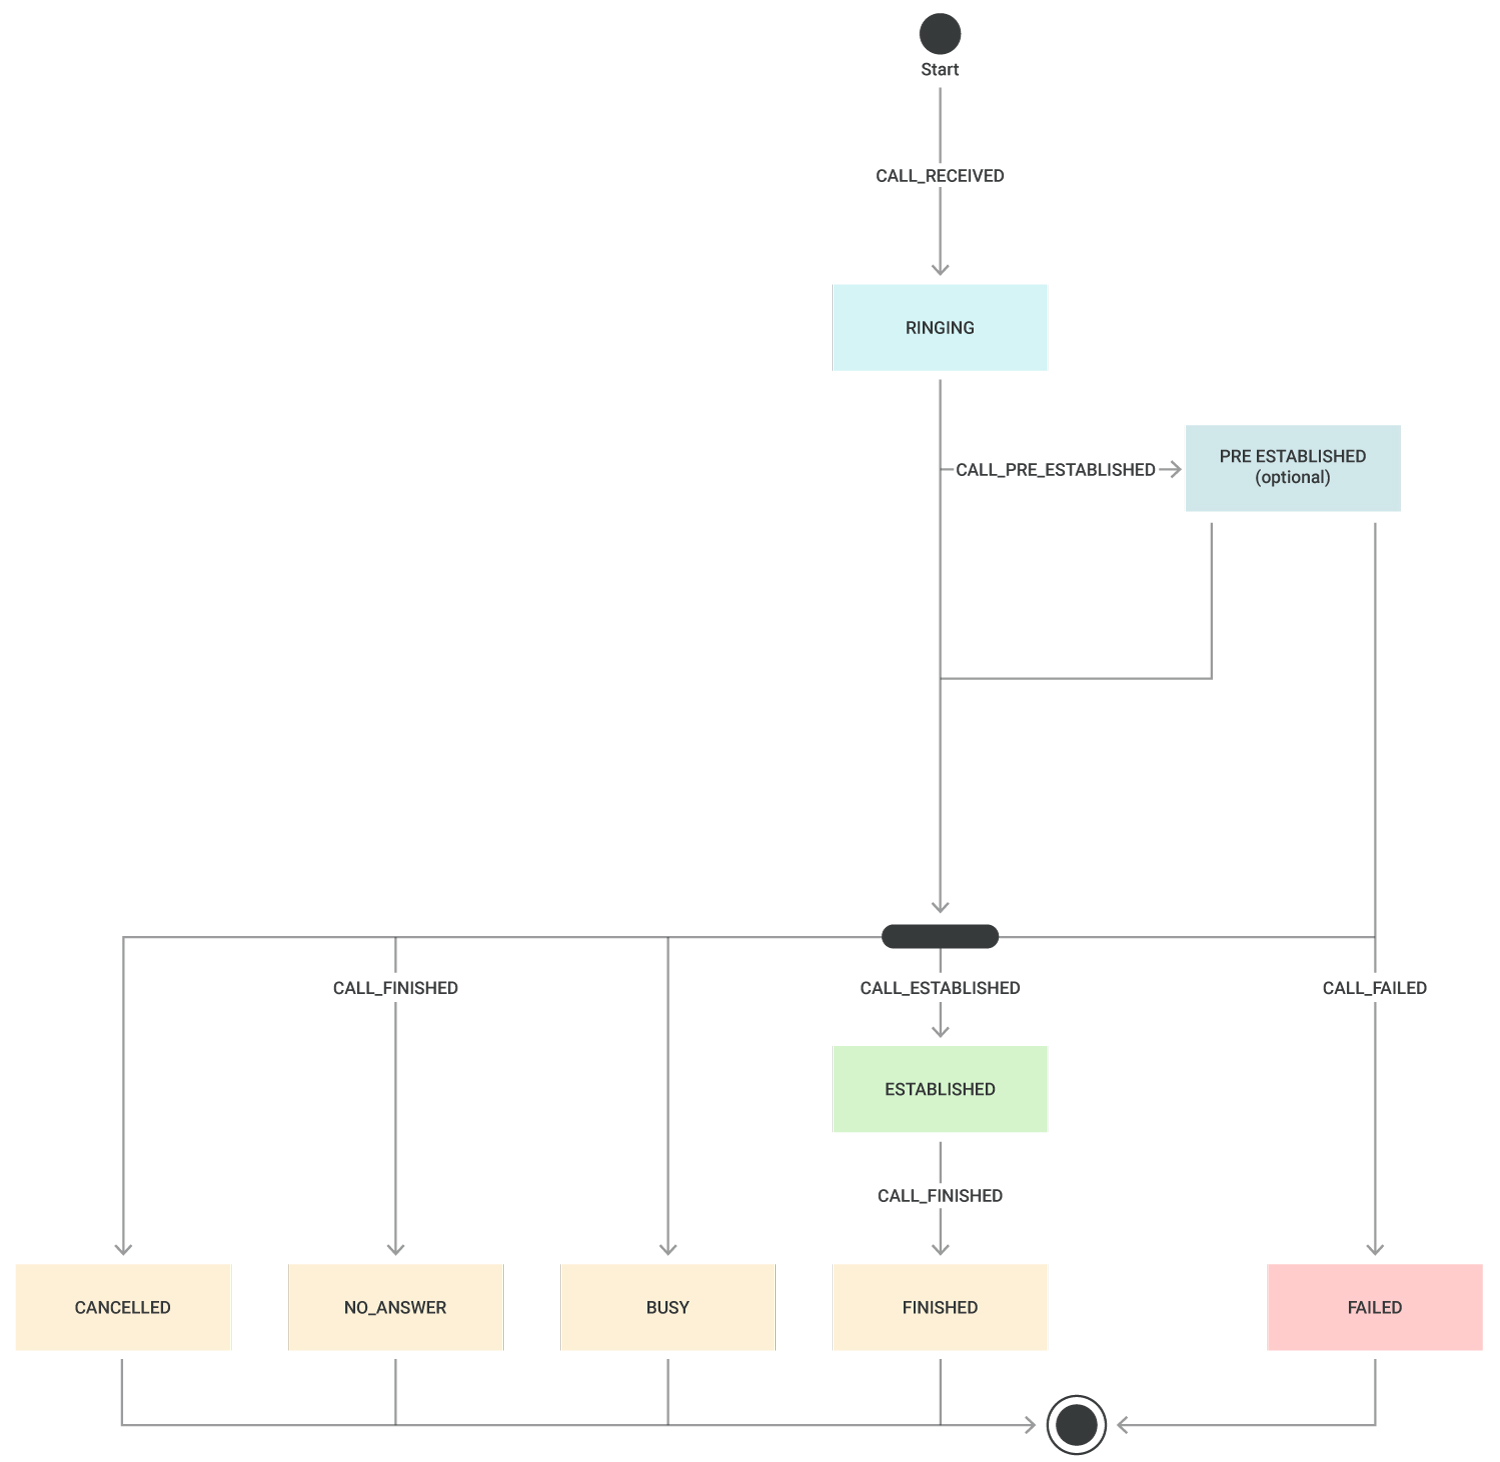
| RINGING | A new inbound call is received by the platform and presented to your application. |
| PRE_ESTABLISHED | Your application has requested to pre-answer the call to handle early media. |
| ESTABLISHED | The call is connected and established, the connection is active. |
Inbound calls will always end up in one of the following final call states:
| FINISHED | The call which was previously active is completed and hung up. |
| BUSY | The call could not be completed as we received a busy signal from the destination. |
| NO ANSWER | The destination did not answer before the connectTimeOut parameter value has been reached. |
| CANCELED | The outbound call was canceled prior to being answered or prior to reaching the connectTimeOut parameter value. |
| FAILED | The call could not be established to the destination. |
For these final call states, the preceding CALL_FINISHED or CALL_FAILED events will include the reason for hung up or call failure.
State of participants [#state-of-participants-understanding-calls-api]
When dealing with multiparty calls (whether one-on-one or true conferencing), your application can subscribe to multiple events to properly follow the state of participants:
- PARTICIPANT_JOINING, PARTICIPANT_JOINED, PARTICIPANT_JOINED_FAILED, and PARTICIPANT_REMOVED - As their names suggest, these events will let your application know about the joining state of participants in a conference.
- PARTICIPANT_MEDIA_CHANGE will tell your application when the media session of a participant has changed, such as camera or screen share being turned on/off (webRTC endpoint), microphone being turned on/off (webRTC endpoint) or participant being explicitly (un)muted.
- PARTICIPANT_STARTED_TALKING and PARTICIPANT_STOPPED_TALKING - These events will let your application know when any participant, identified by the conferenceId and callId, starts or stops talking.
Endpoints [#endpoints-understanding-calls-api]
When creating calls or conferences, you need to designate the endpoint or a list of endpoints to connect to.
The Infobip platform supports the following types of endpoints:
- Phone: the PHONE endpoint type is always associated with a
phoneNumberin E.164 format. Note that numbers in E.164 format do not contain any leading "+" or "00". - WebRTC: the WEBRTC endpoint type requires specifying at the very least the identity*,*a unique identifier designating the end user who will be called.
- SIP: applications can call users connected to your office PBX (on-premise or on the cloud) using the Session Initiated Protocol (SIP). Calling a SIP endpoint requires to at least declare the username, host, and port. Before creating calls towards SIP endpoints, you need to define a SIP trunk between Infobip and your office PBX using the Calls API SIP Trunk methods.
- VIBER: inbound calls coming from Viber users will be of type
VIBERand include the MSISDN of the calling Viber user. See Viber Business Calls for more information about receiving calls from Viber users.
When placing calls toward PHONE and SIP endpoints, you can specify the callerID that will be displayed to the called party. The callerID should ideally be the voice number that you are leasing from Infobip.
When placing calls towards WEBRTC endpoints, you can specify a fromDisplayName which can be set to any alphanumeric string.
Call flows [#call-flows-understanding-calls-api]
Inbound call flow [#inbound-call-flow-understanding-calls-api]
Before your application can receive events about inbound calls and answer these, you need to link it to your incoming number on the Infobip platform.
To link an Infobip DID number to an application, setup a voice action on your DID number:
- Via API:
- Create a voice setup on your Infobip number, with the action type FORWARD_TO_SUBSCRIPTION and include your
callsConfigurationId.
- Create a voice setup on your Infobip number, with the action type FORWARD_TO_SUBSCRIPTION and include your
- Via the web interface:
- Go to the Numbers application and select your number.
- Select the Voice tab.
- Create an inbound configuration where the Forward action is Forward to subscription and specify your
callsConfigurationId.
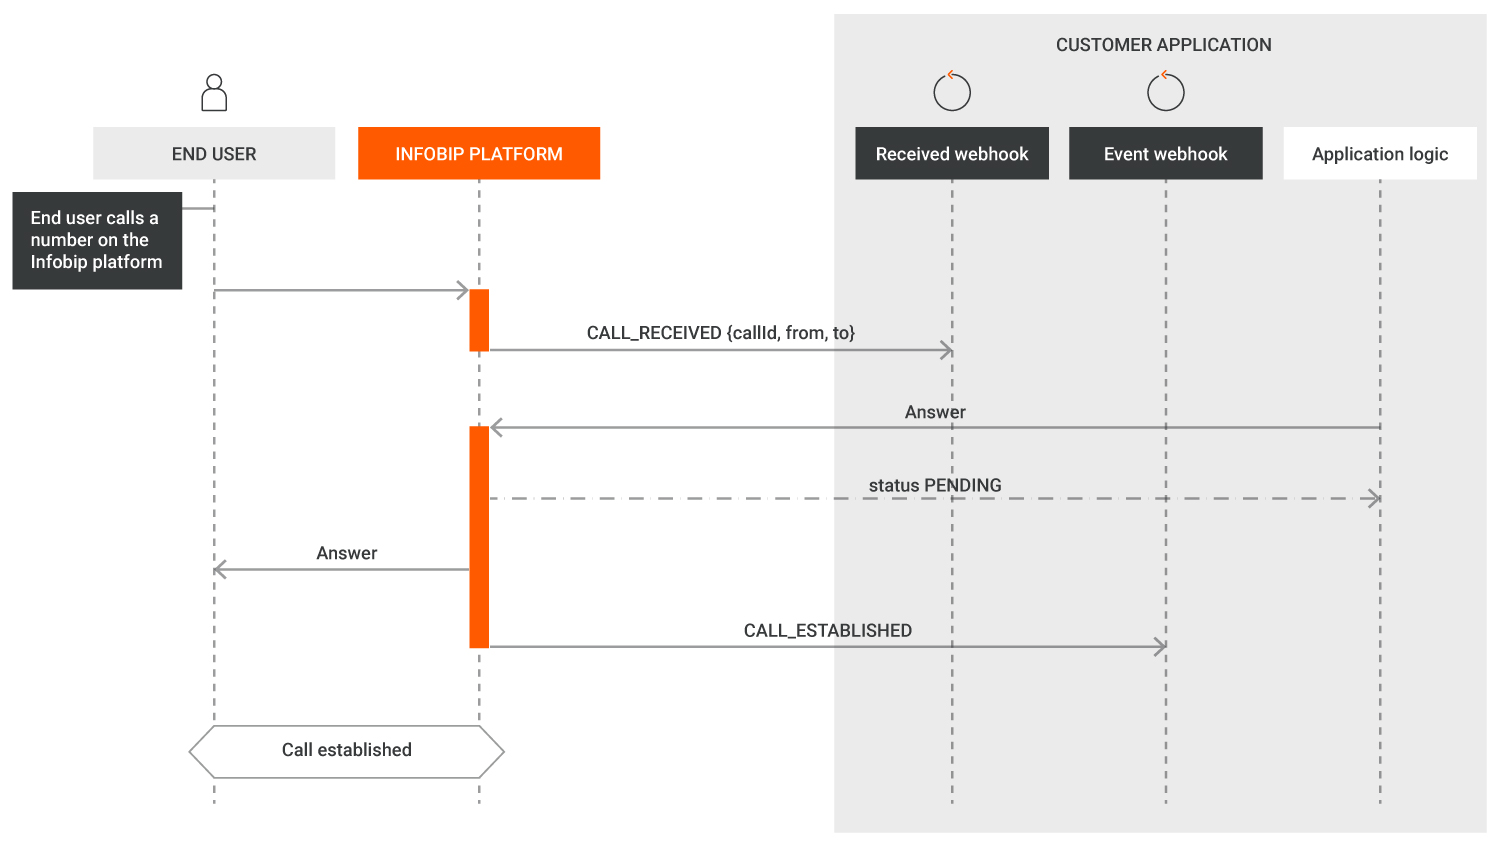
After receiving a new call, the application will receive a CALL_RECEIVED event including the identification of the call (callId) as well as to and from phone numbers. The caller will hear no ringing tone unless you decide to explicitly send these using the send-ringing method. Next, based on its own logic, your application can decide to reject the call, pre-answer, or answer it. If it decides to accept the call, it will use the accept method.
After receiving a CALL_ESTABLISHED event, your application has the confirmation from the Infobip platform that the call is live and your application can go on with its next steps.
In case the application receives a CALL_FAILED or CALL_FINISHED event, it will inspect the payload of that event to retrieve more details about the call status and the cause of call termination or failure.
In the diagram below, the application exposes two different webhooks to receive Calls API events.
Outbound call flow [#outbound-call-flow-understanding-calls-api]
When your application requests the Infobip platform to create a new outbound call, it will specify the type of endpoint to be called (PSTN, webRTC, SIP). The Infobip platform will return the identifier of this new call (callId), then send events with the status of that callId to your application's event webhook.
After receiving the CALL_ESTABLISHED event, your application has confirmation from the Infobip platform that the call is live and the application can proceed with the next steps. In case your application receives a CALL_FAILED or CALL_FINISHED event, it will inspect the payload of that event to retrieve more details about the call status and the cause of call termination or failure.
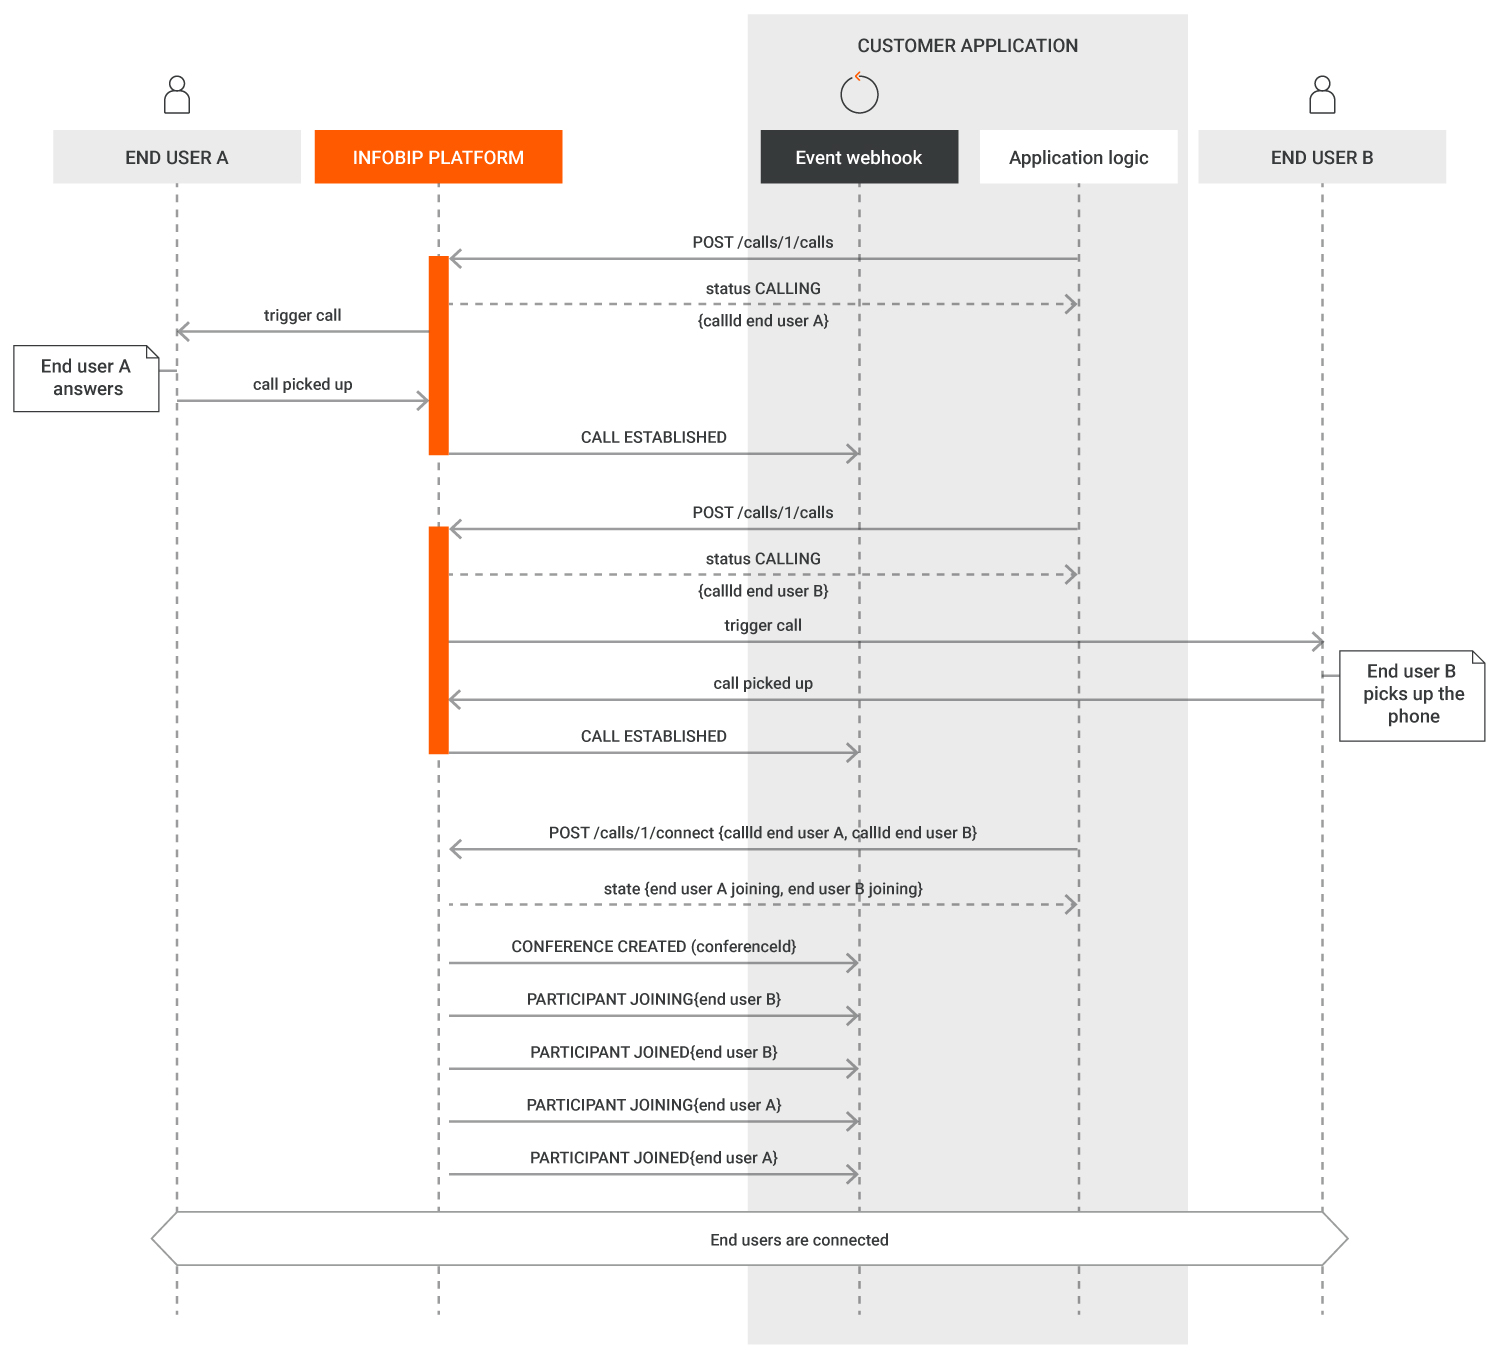
Connecting two calls with connect/conference [#connecting-two-calls-with-connectconference-understanding-calls-api]
To connect multiple calls together so that end users can talk to each other, use the connect method or conference-related methods. The connect methods allow you to connect two existing calls together or connect an existing call to a new call. These methods implicitly use conferencing capabilities but remove the need for a developer to explicitly manipulate a conference object.
The call flow below depicts an application that starts by creating two calls, where each call will have its unique callId identifier. After receiving both events confirming the calls are live ( CALL_ESTABLISHED events), the application connects the calls using the connect method, specifying the unique callId of both calls.
After receiving that request, the Infobip platform will:
- Create a conference room and confirm it with a CONFERENCE_CREATED event.
- Add each of the specified calls as participants, confirmed by PARTICIPANT_JOINING and PARTICIPANT_JOINED events.
Events always include the reference to the callId and conferenceId they are related to.
A developer can choose to have their application listen to all CONFERENCE_CREATED, PARTICIPANT_JOINING, and PARTICIPANT_JOINED events, or only to wait for the PARTICIPANT_JOINED event to confirm call bridging.
Connecting two calls with dialog [#connecting-two-calls-with-dialog-understanding-calls-api]
If you plan to connect only two calls together and not have the possibility to manipulate participant states (add/remove participants), you might prefer to use our dialog method, as explained earlier.
The call flow in the following sequence diagram shows an application that starts by creating one outbound call to End user A. Dialogs handle the notion of parent and child calls. The most common method for connecting two calls over a dialog is:
- To have an existing (established) call, whether inbound or outbound - this will be the parent call.
- To designate the destination to connect to in the dialog creation request - this will be the child call.
As an example depicted in the sequence diagram, after receiving the event confirming the call to End user A is live ( CALL_ESTABLISHED event), the application connects End user A to End user B using the dialog method, specifying the callId of End user A's call and the endpoint data to connect to End user B. As we can see in this example, the scenario results in a simplified event flow between the Infobip platform and the customer's application.
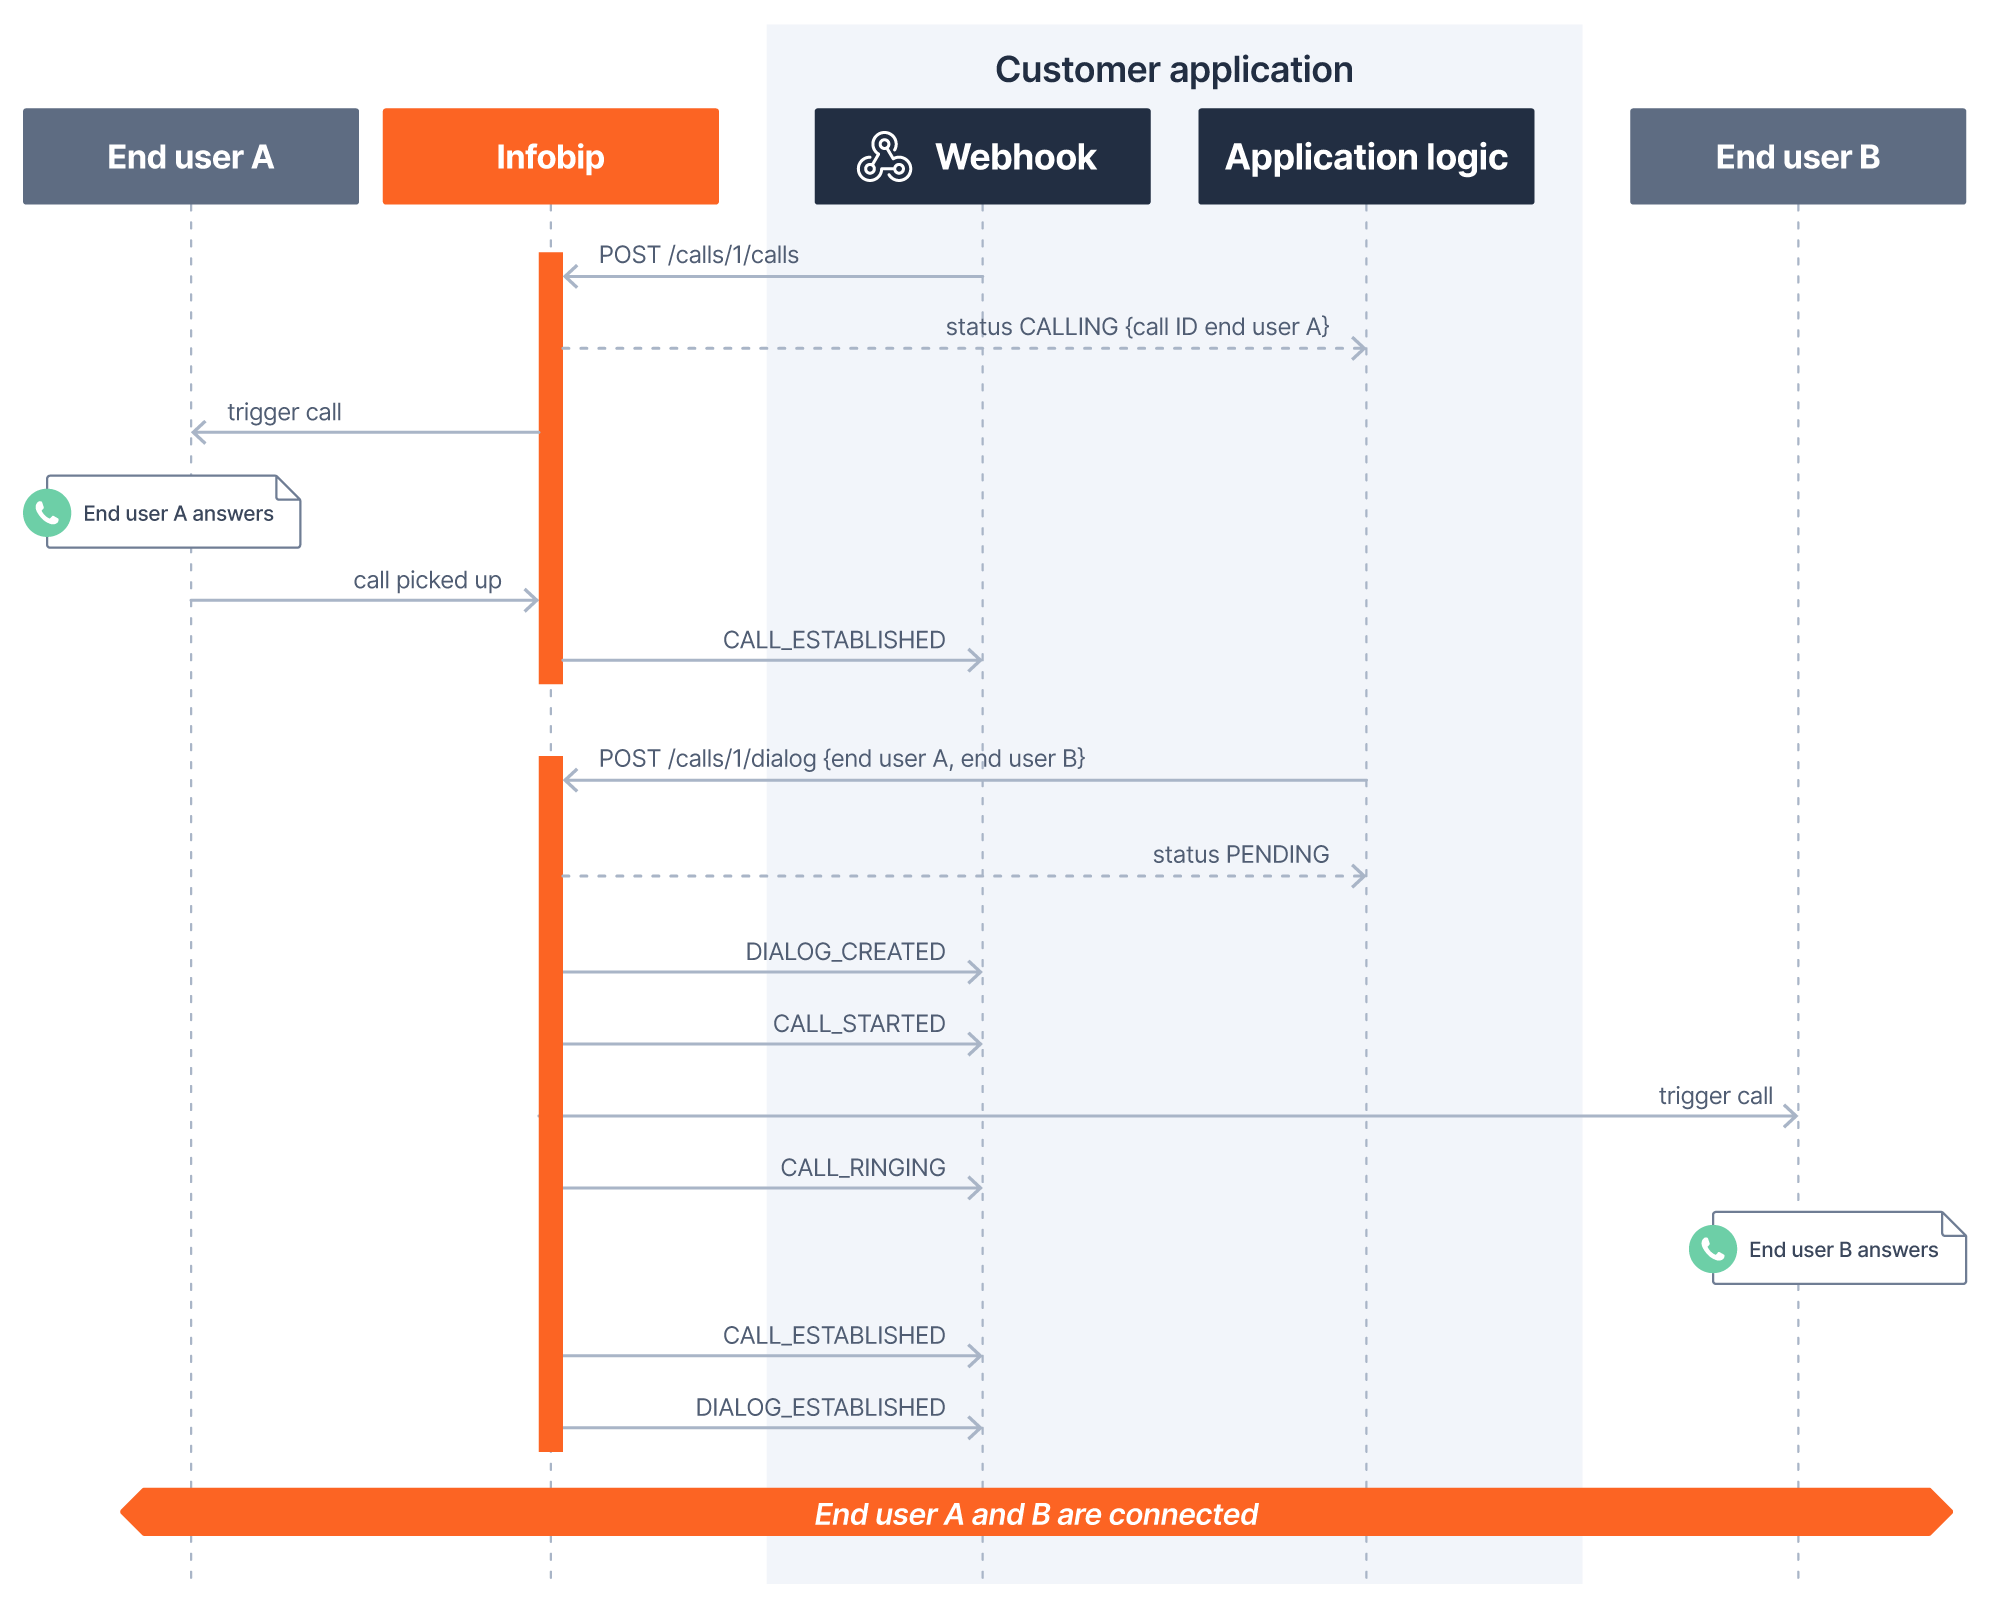
Although a method exists for creating a Dialog based on two existing (established) calls, it must be understood that this method only works if the second call (child call) has been created using the Call create method stating the parentCallId parameter equal to the parent call ID (that is, first call).
Conference flow [#conference-flow-understanding-calls-api]
With Calls API conferencing, your application can add a maximum of 15 participants in the same conference room. Conferences support multiple endpoints simultaneously, meaning that participants from the same conference can join via phone (PSTN), webRTC (with or without video), and SIP.
There are multiple ways to add participants to a conference:
- Existing (live) calls can be moved into a conference.
- New outbound calls can be started and immediately moved to an existing conference using a single API method.
In the conference flow below, we are adding existing calls to a conference and assume that the calls to end user A and end user B are already live. The conference first needs to be created, and it is confirmed by a CONFERENCE_CREATED event including a unique conferenceId. Both conferenceId and unique callId from end user A and end user B's calls are needed to bring in the participants.
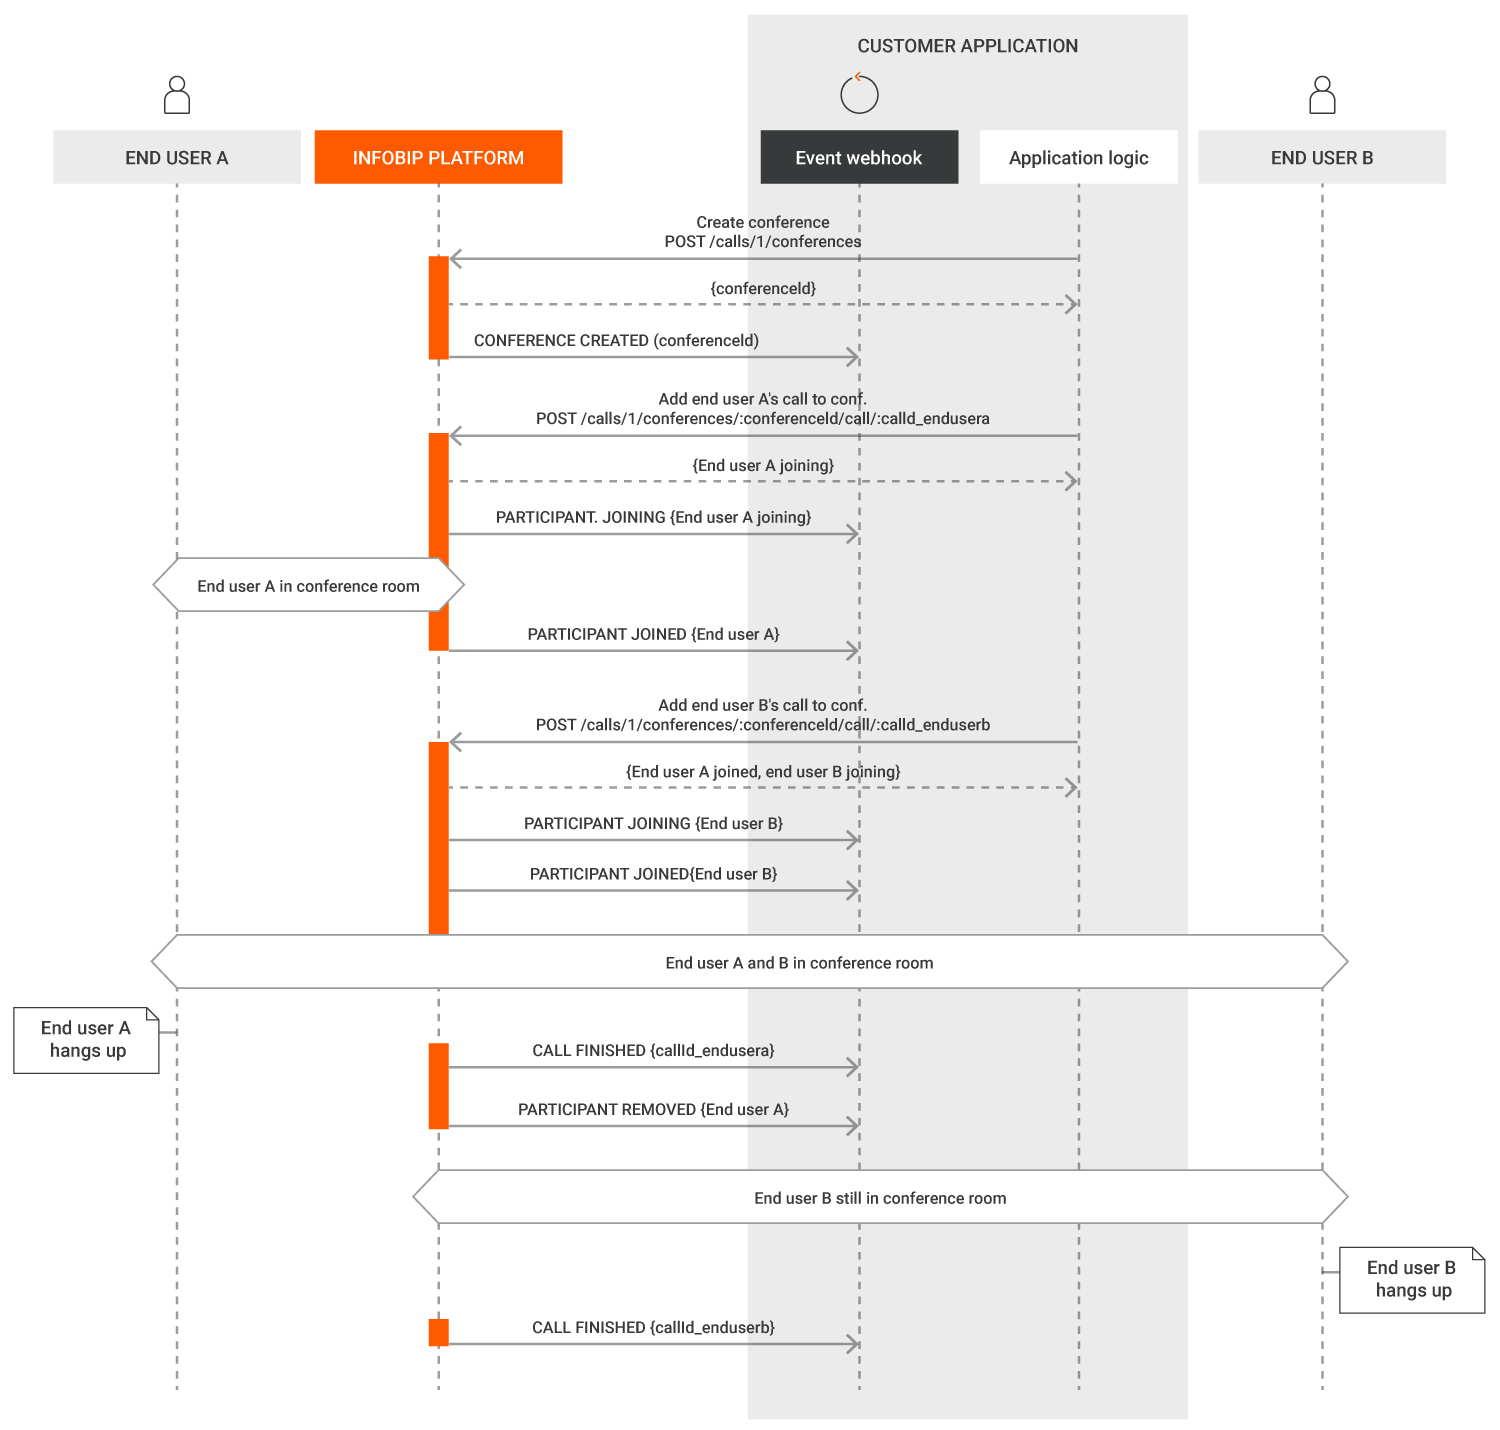
When the last participant leaves the conference, this automatically ends the conference ( CONFERENCE_FINISHED event). A closed conference cannot be reopened. You can create a new conference with the same name, however, it will contain a new unique conferenceId.
Transfer calls between applications [#transfer-calls-between-applications-understanding-calls-api]
As explained above, a call always belongs to an application so the Calls API platform knows to which webhook it needs to send events related to that call's status or to actions executed on that call. Calls API makes it possible to change the application ownership of a call using the application transfer methods.
For example, consider one application that implements an IVR scenario, and another application that represents your home-grown call center platform. An inbound call to your IVR application will be owned by it, but following the end-user's choices in the IVR scenario that call has to be transferred from your IVR to your call center. In this scenario, your IVR application will request an application transfer of that call toward your call center application.
Your call center application will receive this transfer request as an incoming event (APPLICATION_TRANSFER_REQUESTED) and either accept or reject that transfer using the corresponding API method. The requesting application (IVR) will receive events confirming that final status (APPLICATION_TRANSFER_FAILED or APPLICATION_TRANSFER_FINISHED).
Conferencing roles
To provide flexible and secure communication flows during a conference, Calls API supports assigning specific roles to participants. Conferencing roles determine each participant's capabilities in terms of visibility, speaking, and listening.
By assigning specific roles to your conference participant, you can tailor the interaction model to fit use cases like private coaching, silent supervision, or passive attendance without disrupting the overall experience for others in the session.
If no role is explicitly assigned, all participants are treated equally and assigned the DEFAULT role.
Assigning roles
Roles can be assigned by:
- Adding a new or existing call to a conference.
- Updating a participant’s call leg within an active conference.
Assigning roles provides you with more control over participant behavior and permissions within a conference session.
You can refer to the following table for available roles and their associated permissions:
| Role name | Role definition | Can hear | Can speak | Visibility |
|---|---|---|---|---|
| DEFAULT | The participant has standard capabilities. They can see and communicate with everyone who does not have a special role that hides them from other participants. If no role is selected/defined, this is the role that will be given to a new participant. | Can hear all DEFAULT (regular) participants. Can hear an ADVISOR who would be configured to talk to this participant. | Can speak to all participants in a conference. | For a participant connected over WebRTC to the conference, all DEFAULT participants are visible in the participant's list. |
| ADVISOR | A participant who can communicate privately with one or several designated participants during the conference without being heard or seen by others. When a participant is defined as an ADVISOR, their targets should be specified as part of the request. | Can hear all DEFAULT (regular) participants. | Can only speak to designated DEFAULT participants in the conference. These participants are designated by their respective call ID. | An ADVISOR participant is only visible to the WebRTC participants they are assigned to advise and remains hidden from all participants. |
| MONITOR | A silent, non-visible participant who can join a conference without being visible or audible to anyone. | Can hear all DEFAULT (regular) participants. | Cannot speak to anyone. This participant is unable to unmute themselves. | A participant connected over WebRTC to the conference, a MONITOR participant is invisible in the participant's list. A MONITOR participant who is included in the target list of an ADVISOR participant will be visible to that ADVISOR. |
| AUDITOR | A silent, non-visible participant who can join a conference without being seen or heard, but is able to see and hear ADVISOR participants. | Can hear all DEFAULT (regular) and ADVISOR participants. | Cannot speak to anyone. This participant is unable to unmute themselves. | A participant connected over WebRTC to the conference, an AUDITOR participant is invisible in the participant's list. An AUDITOR participant who is included in the target list of an ADVISOR participant will be visible to that ADVISOR. |
| LISTENER | A non-interactive participant invited to listen in on a conference. This participant is muted by default and does not have the permission to unmute themselves or engage in other interactions. Listeners are always visible participants in a conference. | Can hear all DEFAULT (regular) participants. | Cannot speak to anyone. This participant is unable to unmute themselves. | For a participant connected over WebRTC to the conference, all LISTENER participants are visible in the participant's list. |
Role transitions
It is possible to change the role of a conference participant using the update call method.
| DEFAULT | ADVISOR | MONITOR | AUDITOR | LISTENER | |
|---|---|---|---|---|---|
| DEFAULT | Allowed | Allowed | Allowed | Allowed | |
| ADVISOR | Allowed | Allowed | Allowed | Not Allowed | |
| MONITOR | Allowed | Allowed | Allowed | Not Allowed | |
| AUDITOR | Allowed | Allowed | Allowed | Not Allowed | |
| LISTENER | Not Allowed | Not Allowed | Not Allowed | Not Allowed |
Role changes are reflected in two distinct events:
PARTICIPANT_ROLE_CHANGEDPARTICIPANT_ROLE_CHANGE_FAILED
When you retrieve the conference history, each session will reflect the time spent in the conference for a certain participant under one role. If a participant changes roles, the logs will indicate that the session ended for one role and started for the same callId under a different role, even though the participant does not actually leave the conference during this transition.
Text-to-speech [#text-to-speech-understanding-calls-api]
Your application can use the say method to perform text-to-speech actions in any call managed by that application. Infobip supports more than 100 languages and accents.
Refer to this text-to-speech table when defining your say request payload, where:
- Language-code is the two-letter abbreviation of your chosen language.
- VoiceGender is MALE or FEMALE.
- VoiceName is the name of the voice.
The Infobip platform will send a SAY_FINISHED event to your application's event webhook:
- When the complete text has been transformed to the chosen voice and played in the call, or
- When the payload of the say method includes the stopOn clause and the end user presses a key (DTMF) on their phone while the speech synthesis is playing. In this case, the SAY_FINISHED event will include the DTMF input in its payload.
Note that capturing DTMF during the say method is limited to one DTMF input only. If the terminator is set to " any", any DTMF that the end user presses on their phone will be shown in the SAY_FINISHED event. If the terminator is set to # and the end user presses 1# on their phone, only the # will be shown in the SAY_FINISHED event
If you need your application to capture a longer DTMF input, use the captureDTMF method.
Speech-to-text [#speech-to-text-understanding-calls-api]
Speech to text technology is available under the Calls API platform with two different approaches:
- Capture speech: Intended for short duration interactions, such as when building a voice-based IVR or chatbot.
- Transcription: Intended for long duration interactions or typically for transcribing complete calls.
Whether you choose capture or transcription, these operations can only be executed on single call legs. In case you wish to get the transcription of a conference call or dialog with multiple call legs, transcription would need to be started separately on every call leg participating to this conference or dialog.
Speech capture and speech transcription actions support the definition of:
- The language to be used.
- A custom dictionary to enhance the speech recognition for uncommon words or specific spellings.
- Enhanced formatting options, including punctuation, proper casing, numeral normalization, and disfluency filtering.
Speech capture [#speech-capture-understanding-calls-api]
The speech capture action on call legs is made to transform spoken words to text in real-time and aims at short interaction types, typically a few seconds in length such as user interactions in IVR or voice bot scenarios. It is required to always specify the language in which words are being spoken. See the speech recognition languages as a reference of all currently supported languages.
With the combination of timeout and maxSilence parameters, you can state how long a speech capture action will be waiting to capture user input as well as the total amount of silence (in seconds) to consider that the interaction should be closed.
When specifying keyPhrases in the request, the system will search the transcript for the provided key phrase(s).You can implement two different behaviors using the terminateOnKeyPhrase parameter:
- Set to true (default value): The speech capture action halts when it encounters a key phrase.
Example: If your key phrase is "tomorrow" and the end user says "I will come tomorrow by train," the speech capture action stops when detecting the word "tomorrow," and reports "tomorrow" as the matched key phrase.
- Set to false: The speech action continues until either timeout or
maxSilenceis reached. It reports the full text of the transcript and highlight the first identified key phrase.
Example: If your key phrase is "tomorrow", "train" and the end user says "I will come tomorrow by train," the full text of the transcript will be "I will come tomorrow by train" and the reported identified key phrase will be "tomorrow".
The outcome of speech capture is reported in the SPEECH_CAPTURED event and include:
- The full text of the captured speech.
- The key-phrase that was matched during speech capture, if any such key phrase was defined.
- The reason why speech capture was terminated (expiration of the timeOut, maxSilence reached, keyphrase was found or end of call).
Speech transcription [#speech-transcription-understanding-calls-api]
Call transcriptions are not limited in time, except by the call duration itself (that is, when a call ends or when call is moved to Conference). Transcription is started and stopped via API methods. Note that your application must have a subscription that includes the event of type TRANSCRIPTION.
When starting the transcription of a call, you have the choice to receive both INTERIM and COMPLETE transcripts, or only the COMPLETE ones.
Transcripts | Description |
|---|---|
| INTERIM | These transcriptions are produced swiftly using a blend of syllables, individual words, and short phrases to interpret spoken language. They are presented in real-time, appearing as the words are spoken, providing immediate but less precise results compared to the COMPLETE transcription. |
| COMPLETE | Refers to the more accurate and complete output generated by the speech recognition engine after it has processed the entire phrase or sentence. Unlike interim results, final results are produced after considering the full context of the spoken content, thereby offering higher accuracy. This makes them suitable for applications where precision is paramount, though they are less useful for real-time feedback due to the processing delay. |
Play audio files [#playaudio-files-understanding-calls-api]
Your application can play audio files at any point during individual calls or conferences. When a file is played during a conference, all participants will hear it.
Audio files can be retrieved from a URL at playtime or can be uploaded first to Infobip servers. To play an audio file from Infobip servers, you must first upload that file (.wav or .mp3) using the POST /calls/1/file/upload method. The upload action will return a fileId that you will need to specify in your play action.
Mind that when playing an audio file from a URL, the first playback of that file might start with a slight delay due to the time it may take to download your file from Infobip servers. Subsequent playbacks will not have this delay as the file will have already been cached.
While you can define a loopCount (number of times the file will be played) for playing files both in calls and conference, playing files in calls offers additional controls such as:
- Timeout: The duration, in milliseconds, of the file to be played. If the timeout is not defined, the file will be played until its end.
- Offset: The starting point, in milliseconds, from which the file will be played. If the offset is not defined, the file will be played from the beginning.
Both timeout and offset apply to the first time an audio file is played. If you specify any value for these two parameters while specifying a loopCount higher than 1, subsequent loops of your file will play from the beginning until the end of that file.
A PLAY_FINISHED event is always generated:
- When the audio file has finished playing entirely (including loopCount, offset and timeout effects).
- When your application explicitly requests for the audio file playback to stop playing.
The playback of audio files in individual calls can be interrupted at any time by the end user when they press any DTMF key, from the moment you set the optional stopOn parameter in the POST /calls/1/call/:id/play API call.
In this case, the PLAY_FINISHED event will include, in its property attributes, the indication that the file was not played in full (playedCompletely:false) as well as the DTMF sent by the end user (capturedDtmf:1).
Note that capturing DTMF during the play method is limited to 1 DTMF input only. If the terminator is set to " any", any DTMF that the end user presses on their phone will be shown in the SAY_FINISHED event.
If the terminator is set to # and the end user presses 1# on their phone, only the # will be shown in the SAY_FINISHED event. If you need your application to capture a longer DTMF input, use the captureDTMF method.
Audio file playback is stopped when a call is moved into a conference.
Capture and send DTMF [#capture-and-send-dtmf-understanding-calls-api]
To interact with users or remote systems via DTMF (Dual-Tone Multi-Frequency), use the related capture and send methods.
There are multiple ways to collect DTMF input from a user:
- Explicitly, during playback of text-to-speech or audio files. Read about the usage of the stopOn parameter in the above sections about using text to speech or playing audio files. In this case, the maximum length of the DTMF collection is 1 digit. In this scenario, the collected DTMF will be returned in the corresponding PLAY_FINISHED or SAY_FINISHED events.
- Explicitly, using the capture DTMF method. You can collect DMTF input of any size, and optionally define a terminating character. If you only define the maxLength parameter, the platform will wait until the user has entered an input of that size or reaches the timeout. When setting the terminator parameter, the platform might return a user input shorter than the defined maxLength, if that terminator character was entered by the end user. In this scenario, the collected DTMF input will be returned in a DTMF_COLLECTED event.
- Unsolicited: the end user is entering DTMF inputs while you have no pending capture DTMF nor ongoing Say or Play action with stopOn defined. In this scenario, the platform will send a DTMF_COLLECTED event for each individual DTMF sent by the user.
End users can send DTMF inputs which include the following characters only: 0-9, w, W.
Automated machine detection [#automated-machine-detection-understanding-calls-api]
Create a new outbound call to a PHONE destination and set the application request to perform automated machine detection (AMD) by enabling the machineDetection option.
You can configure two optional parameters to perform AMD on a call:
- Detection time: AMD typically requires 3.74 seconds of audio to determine whether a human or a machine has answered. You can adjust the analysis time using the Detection time parameter. For example:
- Shorter detection times (as little as
1second) help identify voicemail pickup quickly. - Longer detection times (up to
5seconds) improve the accuracy of distinguishing between humans and machines.
- Shorter detection times (as little as
- Message detection timeout: This parameter indicates the maximum duration for detecting the end of the message announcement when an answering machine is detected. If you set this to
0, the system will not perform end-of-message detection.
The outcome of AMD analysis appears in the MACHINE_DETECTION_FINISHED event. This event includes 2 options that show the detection result:
detectionResult: This value always reports either MACHINE or HUMAN.confidenceRating: AJSONobject that includes the confidence level for each detection class. The AMD model analyzes the following classes:HUMAN,MACHINE,MUSIC,RINGING,NOISE,SILENCE, andOTHER. Each class has an independent confidence rating between 0.0 and 1.0. The sum of all confidence values may not equal 1.0.
Use the detectionResult field if you only want the AMD to tell you whether a human or a machine answered the call and use the confidenceRating object if you want to make your own estimation based on the individuals confidence scores for all detected classes.
Infobip uses internal detection class mapping to define the value of detectionResult, based on the highest confidence score among all individual detection classes:
- These detection classes will result in a
HUMANdetectionResult:HUMAN,NOISE,SILENCE. - These detection classes will result in a
MACHINEdetectionResult:MACHINE,RINGING,MUSIC,OTHER.
Enable message detection timeout in your AMD request to trigger additional events:
MACHINE_MESSAGE_DETECTION_FINISHEDMACHINE_MESSAGE_DETECTION_FAILED(in case of failure).
Unlike our other voice APIs, such as voice message or click-to-call, the Infobip platform does not take specific action when it detects that a machine has answered the call. After receiving the MACHINE_DETECTION_FINISHED and/or MACHINE_MESSAGE_DETECTION_FINISHED events, your application needs to determine how to proceed further with that call.
Recordings [#recordings-understanding-calls-api]
Recordings are available for calls, conferences, and dialogs, and are mutually exclusive.
Recording calls [#recording-calls-understanding-calls-api]
You can record calls:
- When a new call is created. Set the optional recording options in the call creation API method.
- When a call is answered. Set the optional recording options in the call answer API method.
- At any point during the call. Use the call recording API.
The recording of a call will end in one of these ways:
- When the call ends
- When the call joins a conference call
- When you use the stop recording API method, at any point after a recording has started
Conferences are used as soon as two calls are connected together.
Record conferences and dialogs [#record-conferences-and-dialogs-understanding-calls-api]
You can record conferences and dialogs using one of the following steps:
- Activate recording (audio or both audio and video) when a new conference or dialog is created
- Use the start conference recording API or start dialog recording API method to explicitly start recording
When you start a new recording, besides choosing whether only audio or both audio and video must be recorded, you can also choose whether the recording of all participants must be composed:
- If you choose composition, all participants will be merged into a single audio or video file.
- If you do not choose composition, all participants will have their own individual audio or video file.
The recording will end:
- When the conference or dialog is terminated (hangup).
- When you use the stop recording API method for conferences or dialogs.
On-demand recording composition [#on-demand-recording-composition-understanding-calls-api]
When you record conferences or dialogs without explicitly asking to compose the recording (that is, record only one single file where all participant tracks are mixed), your recording will result in multiple audio or video files (one per participant for each Start/Stop recording action while the conference or dialog is active).
You can compose these individual media files in Dialogs or Conferences recordings at any point in time after they are recorded, as long as they are still available on Infobip storage. Infobip cannot compose individual files after they have been transferred to your SFTP server.
When requesting an on-demand composition, you can request for the original individual media files to be deleted or preserved.
Multichannel recordings [#multichannel-recordings]
When requesting on-demand composition for Dialogs or Conferences, you may request for the resulting composed media file to be multichannel, in which case each participant to a dialog or conference will be isolated on a separate audio channel.
Having a multichannel media file can be valuable for:
- Legal and compliance situations, such as providing clear and indisputable evidence of what was said by each individual participant.
- Transcription and analysis: some transcription tools do not support proper speaker diarization and require each speaker to be isolated on a separate channel.
- Multichannel recordings are only available through on-demand composition.
View and download recordings [#view-and-download-recordings-understanding-calls-api]
To find and download a specific audio or video file via API:
- Retrieve the fileId using any of the GET recording methods (that is, relative to calls, conferences or dialogs). You can search for recordings by callId, conferenceId, dialogId or retrieve all known recordings for all calls, conferences and dialogs.
- Use the GET /calls/1/recording/file/:file-id method to download a bytestream representation of your file. Audio files are always rendered in a . wav format, and video files in a . mp4 format.
To find and download a your recordings from the Infobip web interface:
- Go to the recording tab under the Voice channel application.
- Select Calls, Conferences or Dialogs to see the list of your recordings.
- When expanding a particular recording entry, you will find the list of related files, whether composed or non-composed. Files that are stored on our cloud storage can be downloaded as well as their related metadata json file.
Setting custom metadata on your recordings [#setting-custom-metadata-on-your-recordings-understanding-calls-api]
When starting to record a call, conference or dialog you have the optional ability to set a custom data json object in which you can define any key-value pair(s) that may help you save relevant contextual data for that recording based on your use case. As recording can be started and stopped multiple times during the existence of a call, conference or dialog, and each recording action can have its own defined custom metadata and thereby this custom data will be reflected at a file level when retrieving your recordings. This custom data can't be used as a query element when retrieving the list of call, conference or dialog recordings.
Recording filename convention [#recording-filename-convention-understanding-calls-api]
The filename for recordings, whether Calls, Conference or Dialogs and whether composed or non composed is always fileId.ext, where ext can be wav or mp4 depending whether you are recording only audio or video.
Transfer recordings via SFTP [#transfer-recordings-via-sftp-understanding-calls-api]
If you prefer to have your recordings be pushed to your server via SFTP, you can do so by defining your SFTP configuration from thefrom the Infobip UI. Files that are successfully transferred to your SFTP server are deleted from Infobip storage but will remain referenced when retrieving the list of all your Calls API recordings.
By default, the naming convention for Calls API recordings that will be pushed to your SFTP server is: fileId.zip. The zip file includes both the media file (wav or mp4) and a corresponding json file with the metadata related to that recording. The files in the zip archive are named by the fileId parameter.
When using Calls API recording methods, you can influence the name of the resulting zip file that will be pushed to your server by specifying the optional filePreFix parameter on the relevant start recording method. If you specify this parameter but do not use SFTP, the parameter has no effect. If you do have an active SFTP configuration and set filePrefix to be "myCustomName", the zip file name will always be myCustomName.zip. Make sure to use unique prefixes when using this feature to avoid zip archives being overwritten when pushed to your server.
WebSocket streaming [#media-streaming-understanding-calls-api]
WebSocket audio streaming transmits real-time audio data over the internet using the WebSocket protocol. It establishes a persistent, bidirectional connection between client and server, enabling continuous audio exchange for applications, including live voice chat, interactive voice response systems, and real-time audio monitoring. This connection and efficient data transfer result in lower latency and improved performance compared to traditional methods.
Supported WebSocket streaming options
Infobip's Calls API supports integrating with external media processing services through WebSocket streaming. It offers two distinct options depending on your use case:
-
Streaming media action
- Initiates and stops on a specific call leg.
- Duplicates the audio stream from that call leg to an external service, with the option to perform media replacements.
- When media replacement is active, the original audio of that call leg is replaced by audio from the external service, so other participants in the conference or dialog hear the replaced audio instead of the original stream.
- Typical use cases:
- Streaming a designated call leg’s audio to an external speech transcription or sentiment analysis service.
- Using an external AI service to modify a designated call leg’s audio and replace it. Example: profanity filtering or voice enhancing.
-
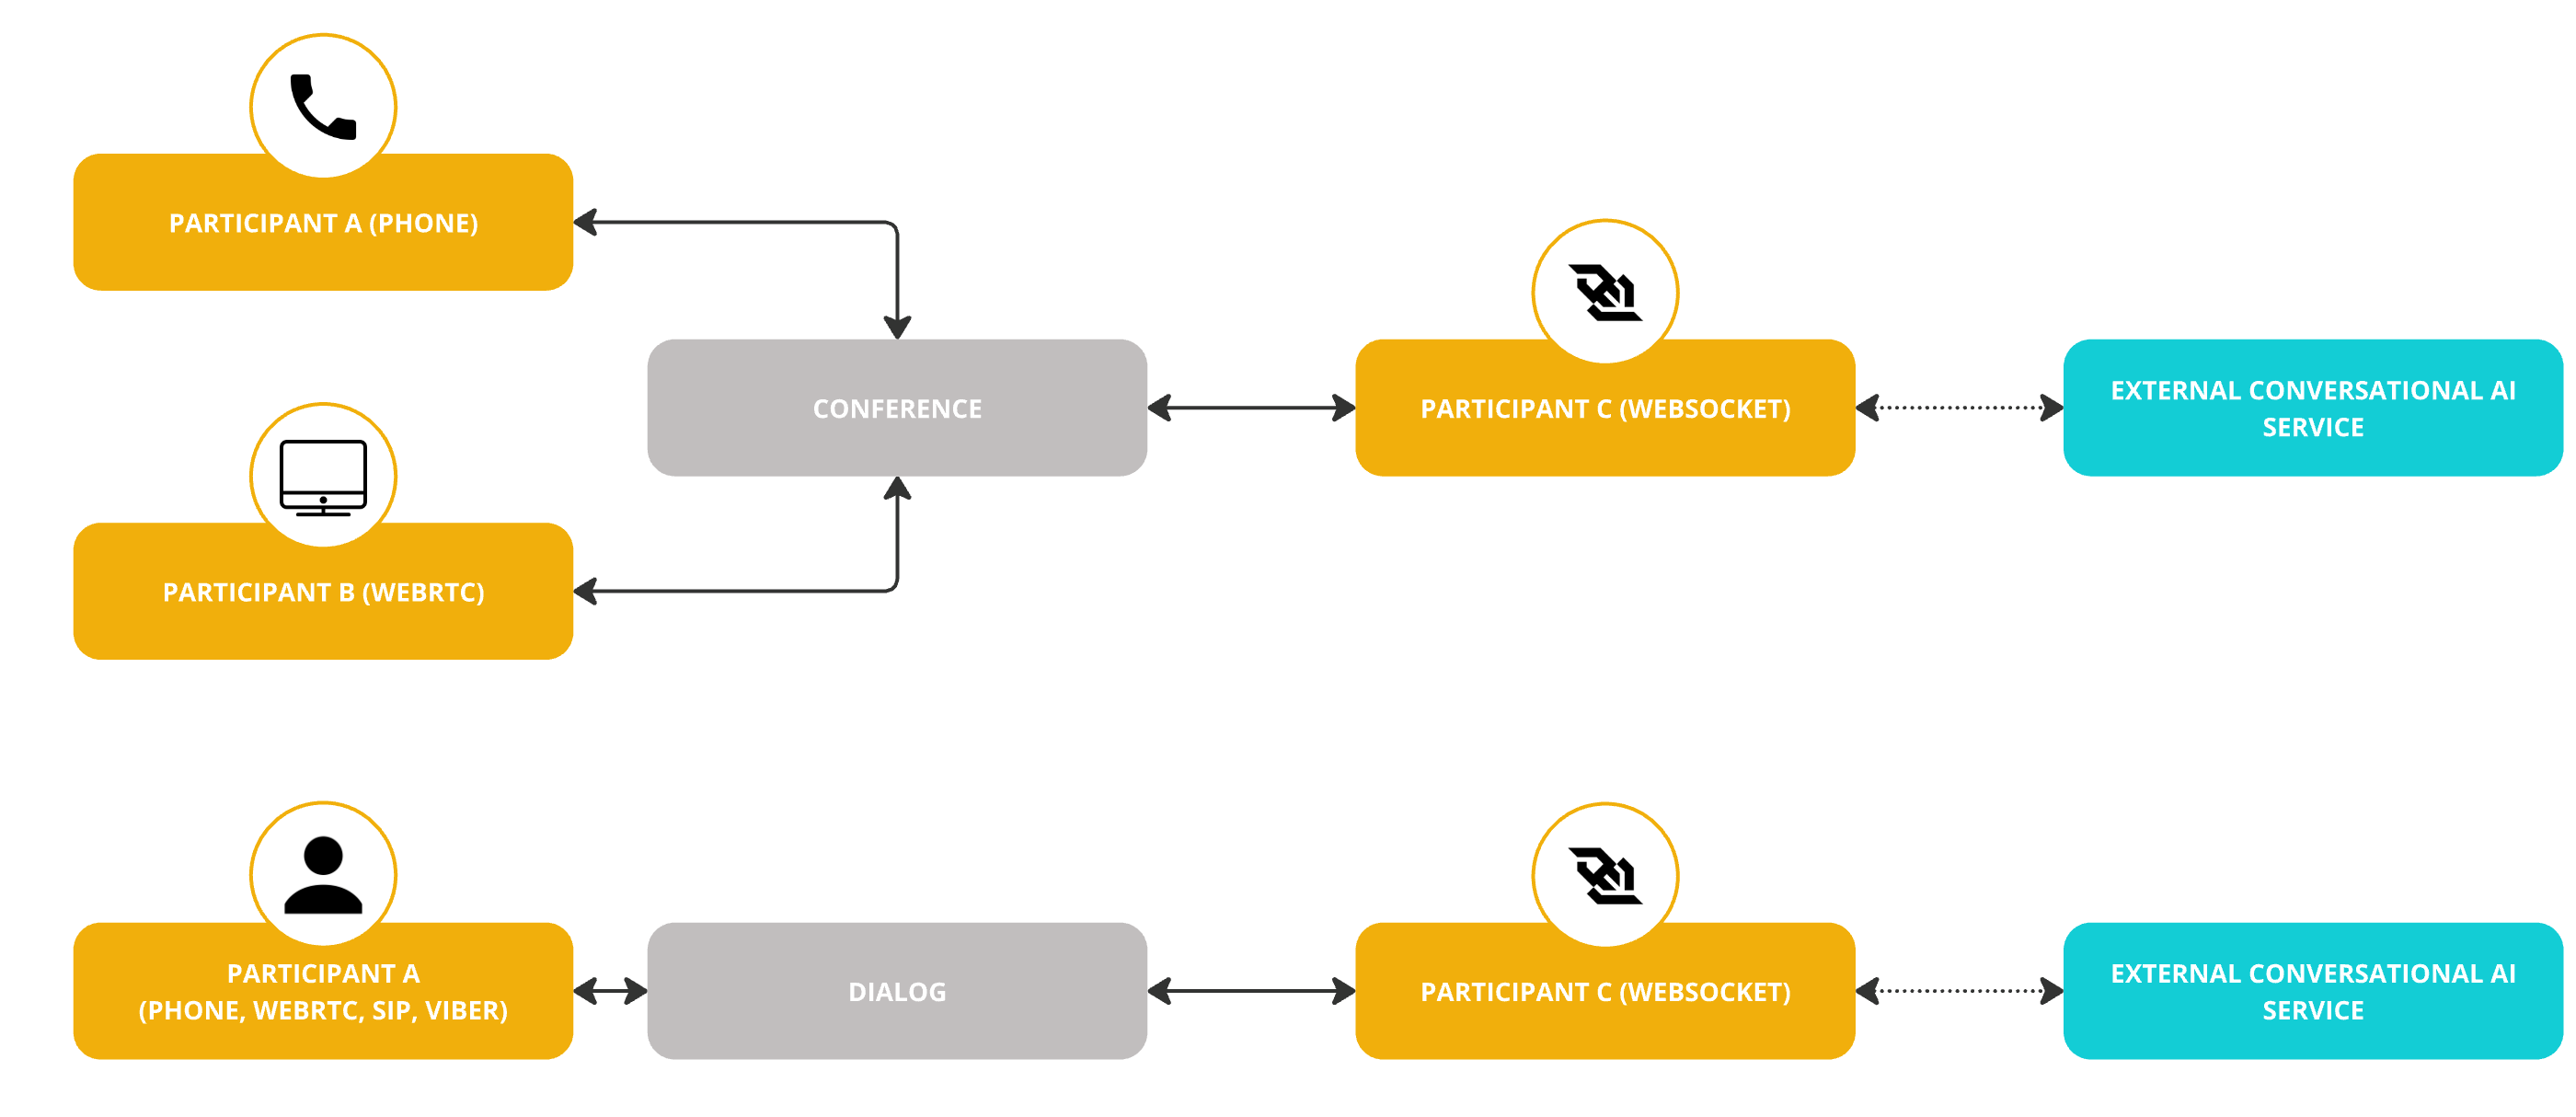
WebSocket endpoint
- Adds the external media processing service as a separate participant in a conference or dialog.
- Receives audio from all unmuted participants.
- Any audio generated by the external service is heard by every participant in that conference or dialog.
- Typical use cases:
- Integrating a conversational AI service (voicebot) into a conference or dialog.
- Streaming all participants’ audio to an external transcription service that supports speaker diarization.
- Streaming all participants’ audio to an external recording service.
- Streaming all participants’ audio to an external broadcasting service.
You can incorporate real-time audio processing or other advanced media capabilities into your Infobip Calls application using these integration methods.
Streaming media action [#streaming-media-action]
You can use Calls API to stream outbound call media from your application to an arbitrary host using a WebSocket. Only audio streaming is supported.
Audio streaming is configured on a per-call leg basis. Before you initiate the stream, you need to create at least one new media stream configuration. Then use the configuration ID within a call to start/stop streaming media. Media is streamed as a series of raw bytes.
Streaming without media replacement [#streaming-without-media-replacement-understanding-calls-api]
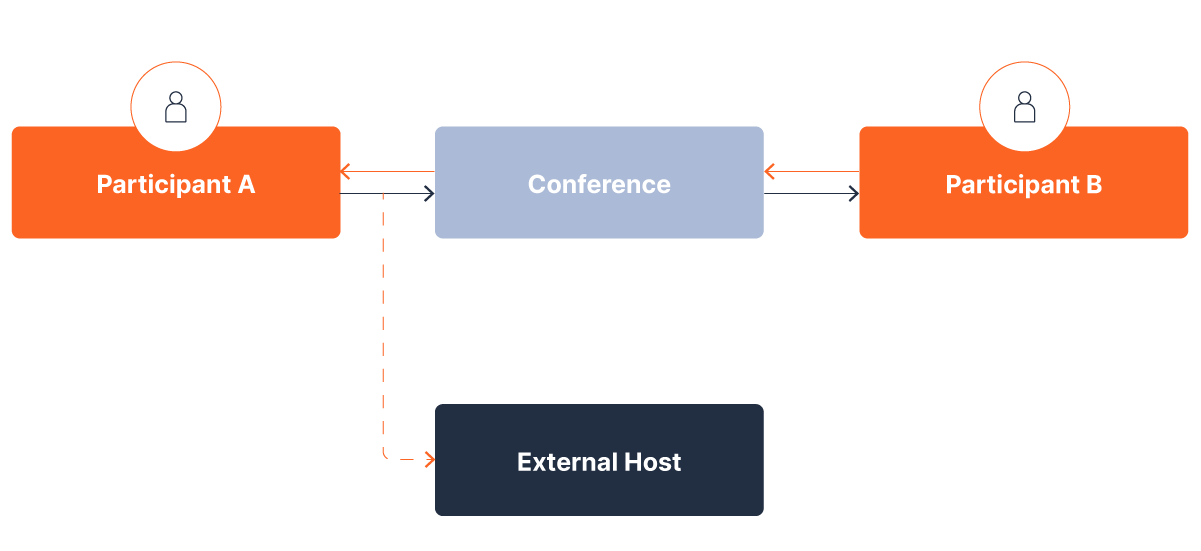
This is what streaming without media replacement would look like. Let's consider 2 participants are speaking with each other over a conference bridge, and the audio of participant A must be routed to an external transcription service while participant B must still hear participant A as is. Streaming without media replacement simply streams (forks) the outbound media to another listener.
Streaming with a media replacement [#streaming-with-media-replacement-understanding-calls-api]
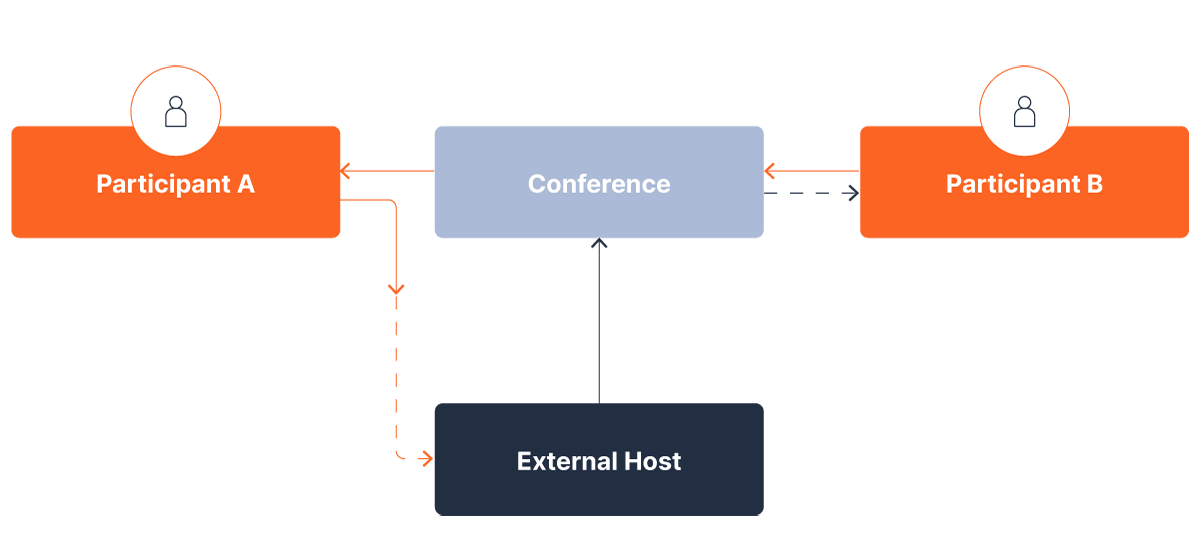
Now, let's use the same example as above, where the external host's role is to offer services such as audio filtering (voice changer, profanity filter, and so on). In this case, the modified audio is injected into the conference and this is the audio that all participants of this conference will hear.
Creating a media streaming configuration [#create-media-streaming-configuration-understanding-calls-api]
First, create a media stream configuration object. Within this object you need to specify the URL of the WebSocket host, as well as the authorization required to access it (if any):
Both ws and wss are supported. The response contains the ID of the newly created MediaStreamConfig object.
To start streaming media during a call, create a start-media-stream request. Within the request, specify the ID of the previously created configuration and specify whether the host will replace the media or not:
If everything was successful, the first message that your host will receive is:
This message contains the following fields:
callId- The corresponding callId. Useful when your host might be dealing with multiple calls.sampleRate- The sampling rate of audio being streamed. Expressed in units of kilo-hertz (kHz). The default is 48kHz.packetizationTime- The time elapsed between two successive packages being sent to your host. Expressed in units of milliseconds (ms). The default is 20ms.customData- in development (not supported completely)
Parsing incoming audio streams [#parsing-incoming-audio-streams-understanding-calls-api]
After sending the initial message upon establishing a connection, the Infobip platform will now continue to send audio packets to your host. Packets are sent every packetizationTime seconds (the value you entered in this field). The packets contain only pure audio.
For 48kHz sampled audio, 20ms of audio contains:
- number_of_samples = 48kHz x 20ms = 960 samples
Audio is streamed raw, meaning each audio sample is encoded as a 16-bit signed integer, which is represented as a 2-byte value. This means every incoming message should ideally contain 1920 bytes (960x2). However, if there are any network issues, it can happen that more than one packet is sent within a message. These packets are guaranteed to be multiples of 1920 bytes (3840, 5760, 7680, and so on).
Media replacement [#media-replacement-understanding-calls-api]
If your media stream request is configured to replace media, the Infobip platform expects you send back packets of 1920 bytes. Note that even when network errors occur and multiple packets are sent as a single cluster, your host should always send back packets of 1920 bytes. These packets are injected into the call and distributed to other participants. Therefore, when media replacement is active, you only need to send back a single stream of media, the Infobip platform will deliver it to other participants in the call.
If media replacement is not set, the Infobip platform ignores any incoming messages from the host.
WebSocket endpoint
You can use the WEBSOCKET endpoint to create outbound call legs to an external media service over WebSocket. As a call leg, it can be joined to:
- A conference with multiple participants.
- A dialog with a single participant.
This is possible regardless of the participants' respective endpoint types (PHONE, SIP, WEBRTC, VIBER, WHATSAPP).
Creating a WebSocket streaming configuration
To enable WebSocket streaming, you need to create a WebSocket streaming configuration object. Within this object, specify the URL of the WebSocket host and set the configuration type to WEBSOCKET_ENDPOINT.
If the WebSocket endpoint requires authentication, note that we currently support this using customData key-value pairs. The WebSocket endpoint must allow us to connect so we can send a websocket:connected event that includes customData.
Connect a WebSocket endpoint
WEBSOCKET call legs can be started with methods such as create call, connect with new call, add new call, and create dialog. When creating an outbound call of typeWEBSOCKET, provide a WebSocket configuration ID.
When you create a call leg of type WEBSOCKET, any key-value pair defined in customData is sent to the WebSocket server as part of the websocket:connected event. The maximum length for customData is 512 bytes.
WebSocket messages
WebSocket messages are functionally equivalent to SIP signaling and RTP packets, with text messages that handle signaling and binary messages that carry media data.
The initial message sent on an established WebSocket connection is text-based and contain a JSON payload:
After the initial text message, subsequent messages can be text (DTMF digits) or binary.
The audio codec supported on the WebSocket interface is Linear PCM 16-bit, with sample rates of 8kHz, 16kHz, 24kHz, or 32kHz, and a 20ms frame size.
| Sampling rate | Number of samples in 20ms | Bytes per message |
|---|---|---|
| 8000 | 160 | 2*160=320 |
| 16000 | 320 | 2*320=640 |
| 24000 | 480 | 2*480=960 |
| 32000 | 640 | 2*640=1280 |
If any party on the call connected to the WebSocket sends a DTMF tone, this will trigger an event on the WebSocket. This event is a text message with a JSON payload, interleaved between the audio frames and has the following format:
Writing audio to the WebSocket
To transmit audio back into the call, send binary messages via the WebSocket. The audio format must match the specifications outlined in previous sections. Each message should be exactly 320, 640, 960, or 1280 bytes, depending on the sample rate, and must represent a 20-millisecond segment of audio.
Messages can be sent at a speed exceeding real-time playback, as our platform stores them in a buffer before they are played. This enables you to transfer an entire audio file in a single operation, provided you adhere to the message size requirement (320, 640, 960, or 1280 bytes). However, keep in mind that Infobip's buffer capacity is limited to 1024 messages, which equates to roughly 20 seconds of audio. If your file exceeds this duration, introduce a delay of approximately 18-19 milliseconds between each message to prevent data loss.
External media platforms that you want to integrate using WebSocket might work with different audio formats or support other event types. In these cases, you may need to develop a proxy application hosted by you to translate the WebSocket flows between Infobip and the external media server.
Bulk calls [#bulk-calls-understanding-calls-api]
The bulks API methods allow you to create multiple calls with a single request and manage the scheduled bulks. Calls generated with the bulk methods support the same options as singular calls, such as automated machine detection and recording. Bulk calls can be created only for PHONE destinations.
Bulk calls support additional parameters such as:
- Scheduling: When to start the call generation, and what are the calling time windows for these calls.
- Validity period: For how long should the Infobip platform try to generate these calls. Use this parameter when defining calling time windows.
- Call rate: The number of calls you should start during the specified time unit (such as 15 calls per minute or 60 calls per hour).
You can bundle multiple bulks, each targeting multiple destinations with their own schedule and validity, in a single request.
You can pause, resume, cancel, or reschedule bulks. Each new call within a bulk will result in the same stream of event status updates as individually created calls (call_started, call_pre_established, call_ringing, and so on), giving your application full visibility and control over how each individual call needs to be handled.
For example, you may wish to create a bulk with a retry policy of five attempts. For each attempt, your application will receive the classical CALL_* events. By subscribing your application to the BULK_CALL_STATUS event, your application can be aware of the last retry attempt that was performed for a particular bulk destination. This event will be generated for each call (destination) part of a bulk request, either reporting success in delivering a call to that particular destination, or reporting a failure with it.
In case of successful connection to the destination, the BULK_STATUS_EVENT is sent only once the call has been completed.
Using WebRTC with Calls
Although you can use Infobip webRTC SDKs independently from the Calls API, combining webRTC with Calls API comes with the following advantages:
- Comprehensive and granular control of webRTC calls from your backend application.
- Easily join and remove webRTC calls to and from conferences.
- Mix webRTC calls into the same conferences with any other supported endpoints (phone, SIP).
- Implement routing logic for inbound webRTC calls in your backend applications.
- Play text-to-speech, collect and send DTMF, or play audio files in webRTC calls.
To use webRTC in Calls, you need to:
- Declare a webRTC Application by following our instructions in the webRTC Getting Started section.
- Integrate Infobip webRTC SDK into your application(s), whether web or mobile (Android/iOS).
- Follow specific guidelines related to the Calls API platform as documented in our webRTC's SDK Wikis: Javascript SDK, Android SDK, iOS SDK.
WebRTC's Dynamic Destination Resolving is becoming a deprecated feature, superseded by the Calls platform. When using webRTC together with the Calls API platform and if you need to take routing decisions in case of inbound webRTC call.
We strongly recommend that you do not implement the webRTC Dynamic Destination Resolving feature but instead leverage the Calls API platform and associated event traffic.
Calls API and CPaaSX
The Calls API platform supports Infobip CPaaSX. In particular, the following CPaaSX features are available when using Calls API:
- Subscriptions
- Application
- Entity
Although the usage of event subscriptions is mandatory, when using Calls API, the usage of Applications and Entities is optional.
ApplicationId and EntityId on Outbound calls
Setting CPaaSX applicationId and/or entityId on an outbound call can be achieved using the following methods, setting applicationId and/or entityId values in the platform object:
Similarly, when bridging an existing call already tagged with an applicationId and/or entityId with a new call, the applicationId and/or entityId from the parent call will be replicated on the new outbound call. These related methods are:
ApplicationId and EntityId on Inbound calls
Inbound calls flagged with the applicationId and/or entityId that are specified on the number's voice setup, either when this setup is defined by API or via the Inbound configuration in the Numbers application on the web interface.
Outcome of defining CPaaSX applications and entities on Calls
When a CPaaSX applicationId and/or entityId are defined for inbound or outbound calls, these applicationId and entityId will be reflected in:
- Any Calls API event related to that call.
- Detailed voice reports generated and downloaded from the web interface.
- Callsß, Conference, and Dialog Historical CDRs.
- Calls, Conference, and Dialog Recording CDRs.
Additionally, applicationId and entityId can be used a additional filter criteria for your event subscriptions. For example, if you define the following:
- a
callsConfigurationId"voice-prod-app" - two
applicationId"app1" and "app2"
You could then have:
- One event subscription with solely the
callsConfigurationId"voice-prod-app" as criterion. - One event subscription with
callsConfigurationId"voice-prod-app" andapplicationId"app1" as criteria. - One event subscription with
callsConfigurationId"voice-prod-app" andapplicationId"app2" as criteria.
The subscription used for calls related to your callsConfigurationId "voice-prod-app" depend on whether applicationId is also defined on your call and, if so, its value.
Troubleshooting
Check errors [#checkerrors-troubleshooting]
Our HTTP endpoints return standard HTTP status codes.
The CALL_FINISHED and CALL_FAILED events, sent to your eventUrl webhook, will include the hangup cause or failure reason in the errorCode object within the event's properties element.
The ERROR event, sent to your eventUrl webhook, includes error details specific to the failed action it relates to in the errorCode object within the event's properties element.
Check live calls and conferences [#check-live-calls-and-conferences-troubleshooting]
You can query the list of active (live) calls or information about a particular live call via API. Use the GET /calls/1/calls or GET /calls/1/calls/:id methods, respectively.
Similarly, you can query the list of active (live) conferences via API or information about a particular live conference via API. Use the GET /calls/1/conferences or GET /calls/1/conferences/:id methods.
Check historical logs and reports [#check-historical-logs-and-reports-troubleshooting]
From the web interface [#from-the-web-interface-troubleshooting]
You can retrieve the historical list of your calls by checking logs and reports in the Infobip web interface, under the Analyze module.
Use API [#useapi-troubleshooting]
You can query the list of historical calls or information about a particular past call via API. Use the GET /calls/1/calls/history or GET /calls/1/calls/:id/history methods, respectively.
Data will be available for a rolling period of two months. You can filter GET requests if you use query parameters, such as querying all past INBOUND calls with a state equal to FAILED in between two specific dates.