Branded Calling ID (BCID) EARLY ACCESS
Spam and spoofed calls have made it harder for businesses to reach customers. Branded Calling ID (BCID) helps you stand out by showing your verified company name, logo, and call reason on the recipient's device.
As an approved Originating Service Provider (OSP) within the CTIA ecosystem, Infobip uses cryptographically protected STIR/SHAKEN call headers to secure caller identity from spoofing or tampering. This authenticated and standardized service protects your brand, builds customer trust, and improves your answer-seizure ratio (ASR).
Requirements
Branded Calling ID is available if you meet the following criteria:
- Have a business office address in the USA.
- Use Infobip USA DIDs (10DLC).
- Have traffic originating and terminating in the USA.
Key concepts
The following table describes the key terms and components involved in Branded Calling ID.
| Term | Description |
|---|---|
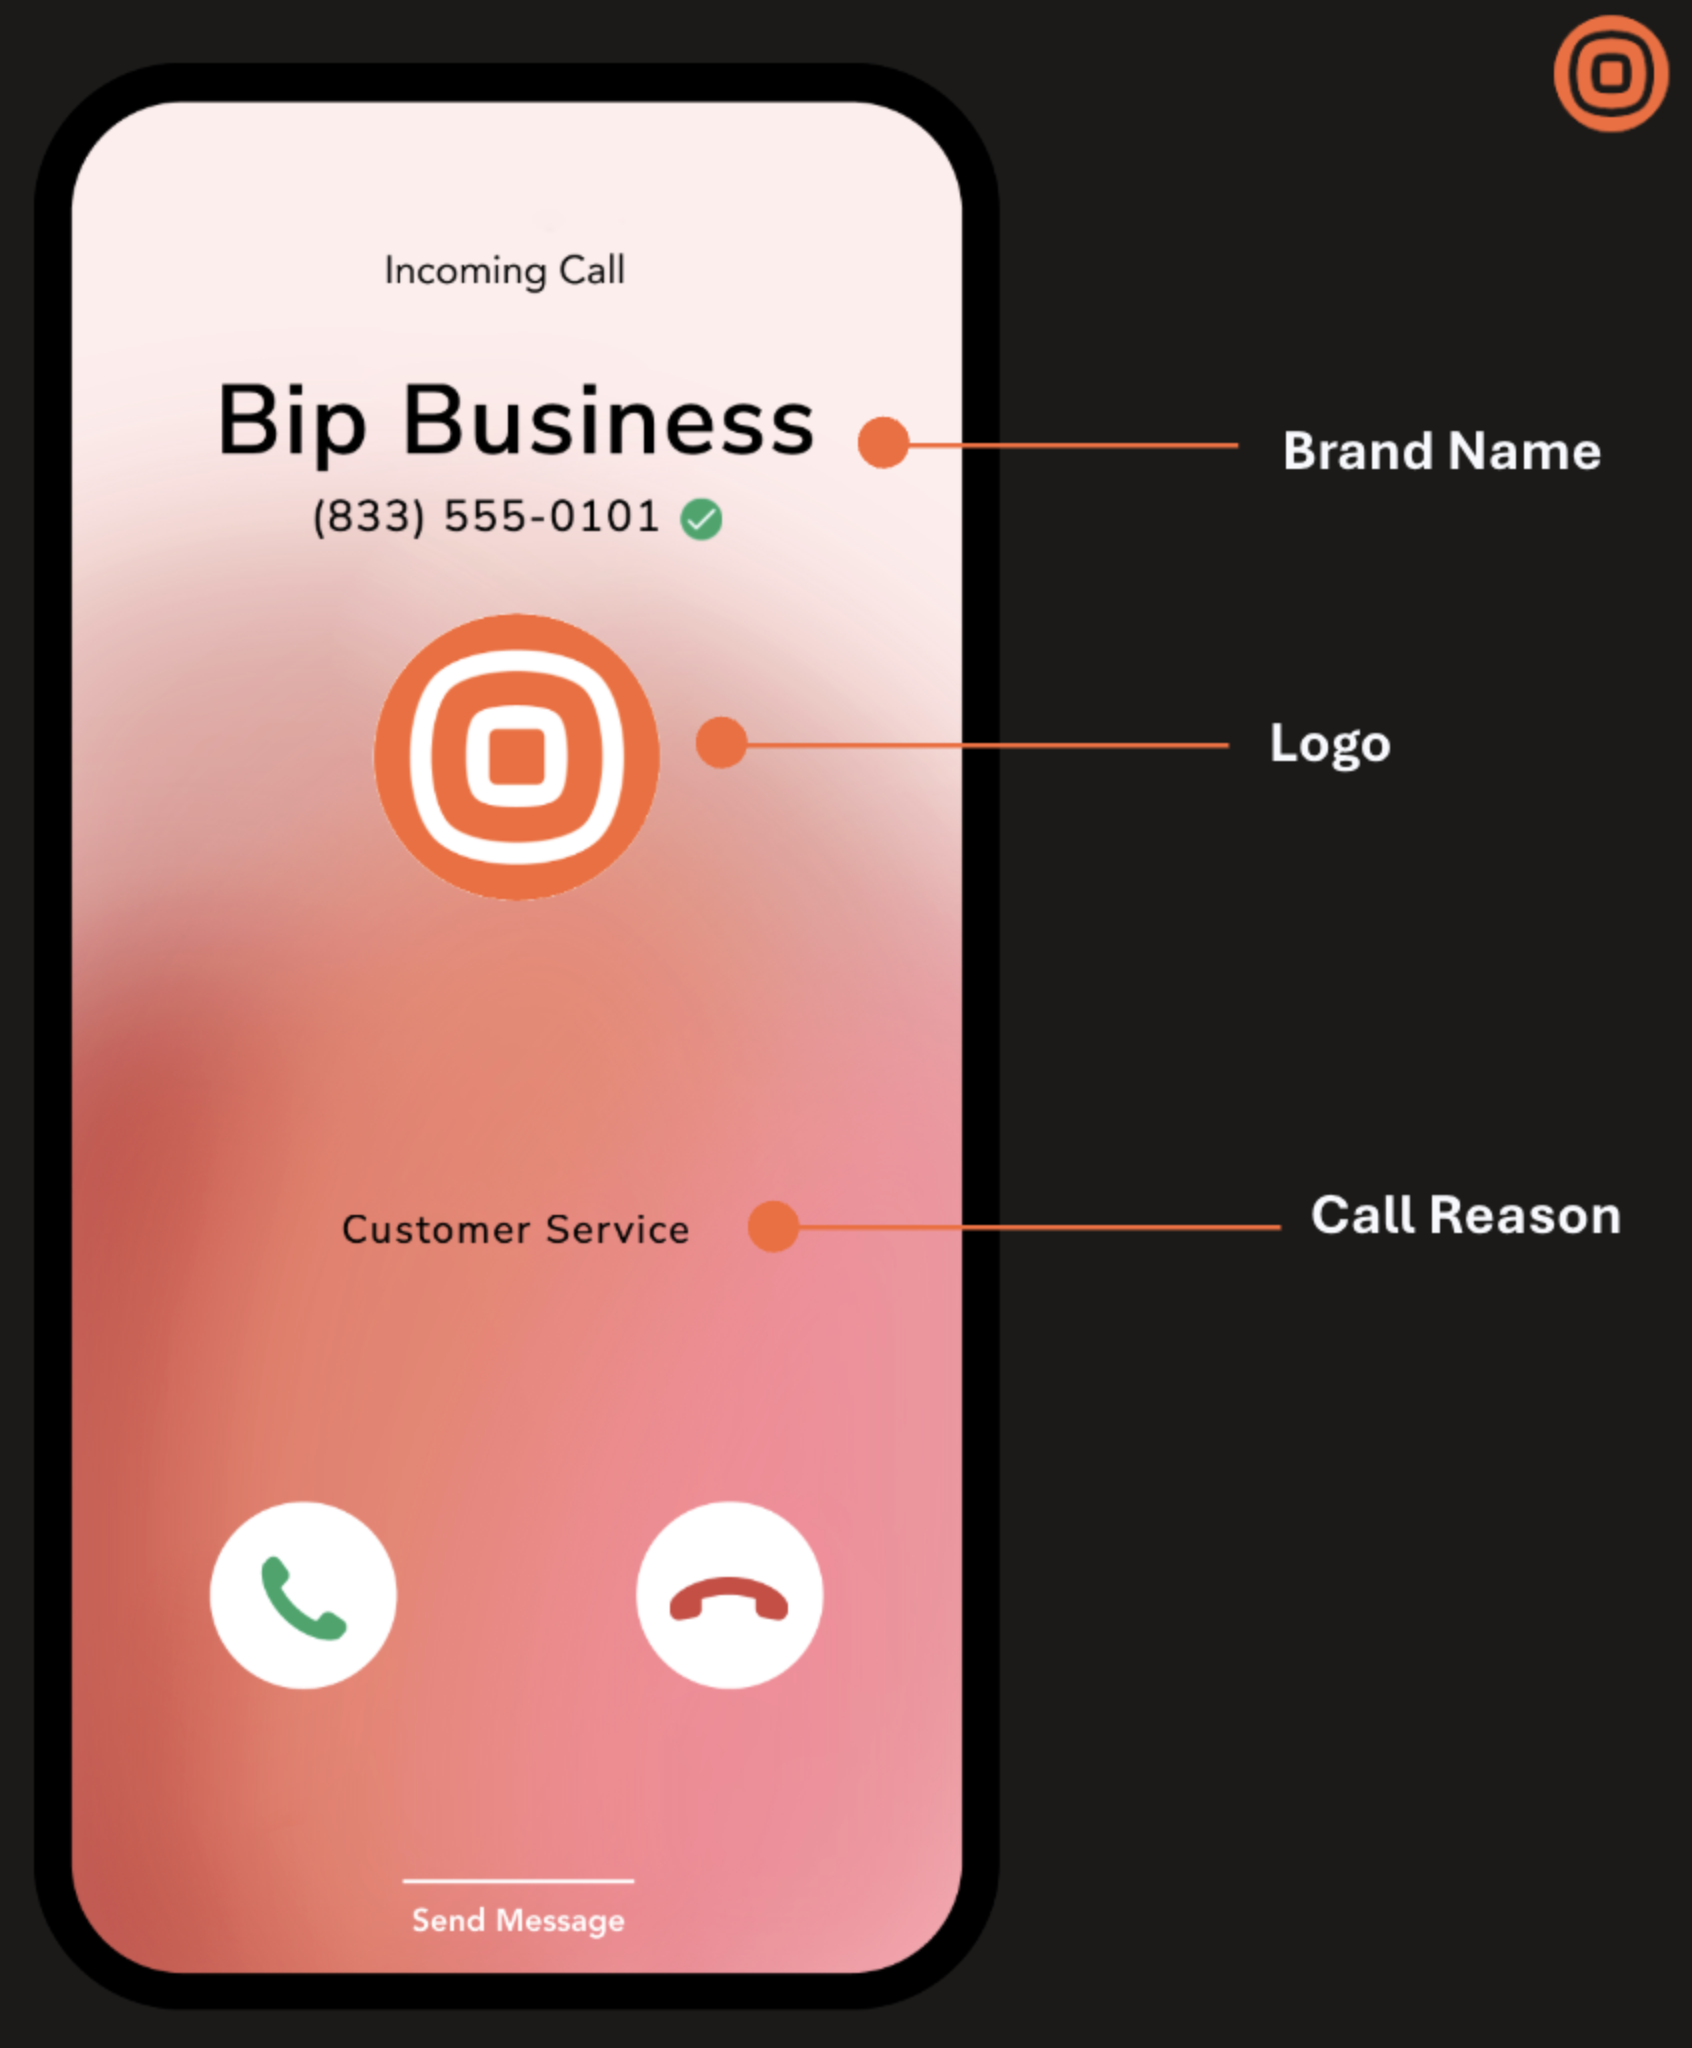
| Caller Name (Display Name) | The verified brand or company name (up to 35 characters) displayed on the recipient's device during an incoming call. |
| Caller Logo | A vetted image file (such as a company logo) associated with a phone number and displayed on the recipient's device for visual brand recognition. |
| Call Reason | A short, selectable message displayed on the recipient's screen indicating the purpose of the call before it is answered. Examples: Appointment Confirmation, Fraud Alert, Delivery Notification. |
| Rich Call Data (RCD) | The collective term for the enhanced, verified caller information delivered to a recipient's device as part of a branded call. RCD includes the Caller Name, Caller Logo, and Call Reason. |
| Display Identity | A vetted branded caller profile that groups RCD elements and associates them with one or more authorized phone numbers. The Display Identity defines how a business call is presented on the recipient's device. |
| Authorized Phone Number | A phone number that has been verified and approved for use with a specific Display Identity within the BCID ecosystem. Only authorized numbers can present the associated RCD when placing calls. |
| Impression | Occurs when your verified brand information is successfully delivered and presented on the recipient's mobile screen. |
| Settlement | An automated financial transaction triggered after a carrier verifies a successful impression. It covers the cost of delivering your brand data. |
In these definitions, "vetted" refers to the CTIA-governed process in which the Infobip authorized vetting authority verifies and approves a business entity, its branded caller identity, and associated assets for use within the BCID ecosystem. This process confirms:
- The legitimacy of the organization.
- Its authorization to use the associated phone numbers.
- Its rights to the submitted brand assets (such as display names and logos).
- Compliance with applicable industry requirements and policies, including STIR/SHAKEN and branded calling governance.
Vetting and setup process
Your business must first be vetted by an authorized Vetting Authority to confirm the legitimacy of your organization, brand identity, and associated assets within the BCID ecosystem.
- You submit an application for vetting and approval.
- After approval, you can create one or more Display Identities, which define how your brand appears to call recipients.
- Each Display Identity contains the relevant Rich Call Data (RCD) elements (Caller Name, Caller Logo, and optionally a Call Reason) and is associated with one or more Authorized Phone Numbers.
- When calls are placed from those authorized numbers, the configured branded identity and its RCD elements are displayed on compatible recipient devices.
For step-by-step onboarding instructions, see Set up Branded Calling ID.
Constraints and best practices
Display Identity limits
- There are no limits to the number of Display Identities that you can submit.
- Each Infobip phone number can only be associated with one Display Identity.
- Each Display Identity must have a minimum of 1 and a maximum of 20 associated phone numbers.
- Each Display Identity supports one Call Reason for all its associated phone numbers.
Phone number charges
- Adding phone numbers to an existing Display Identity results in a one-time charge.
- Removing phone numbers from a Display Identity does not result in a charge.
Dialing best practices
Using BCID on outbound calls does not eliminate the need for correct dialing practices. While BCID increases number reputation with participating carriers, the following behaviors may still affect number reputation:
- Aggressive call retries.
- Heavy use of caller-side cancels.
- High calling rates during quiet hours.
Approved call reasons
Each Display Identity supports one call reason that is displayed on the recipient's device before they answer. Choose a call reason from the CTIA-approved list below. To request a call reason that is not on this list, contact your account manager.
Set up Branded Calling ID
Complete the following steps to configure BCID for your account.
Branded Calling ID can only be configured from the web interface. API-based automation for BCID is not available.
During the Early Access phase of BCID, you can submit only one Display Identity per application. To submit additional Display Identities, contact your account manager.
Enterprise onboarding
Enterprise customers register themselves and submit Display Identities for their own brands.
-
Log in to your Infobip account.
-
Go to Channels and Numbers > Channels > Voice and WebRTC.
-
Select Trust Center in the left navigation pane.
-
Select the BCID trust product.
-
Select Request BCID activation and fill in your email address, contact details, and select your customer type.
-
Check the specified email address for an onboarding email. The email includes a link to the BCID onboarding portal and a temporary password.
IMPORTANTDo not use your Infobip credentials to log in to the BCID onboarding portal. Three authentication options are available:
- Sign in with Microsoft: Use your Microsoft account. Make sure you specify this account email address on the onboarding request from the Voice Trust Infobip application.
- Sign in with Google: Use your Google account. Make sure you specify this account email address on the onboarding request from the Voice Trust Infobip application.
- Sign in with Email: Use the temporary password included in the onboarding email.
-
Follow the BCID onboarding guide to complete the application submission.
-
During step 7 of the application submission (Display Identity Information), provide the list of DIDs to associate with this Display Identity. Go to Channels and Numbers > Numbers and capture an image that demonstrates your ownership of these numbers. Upload the image in your Display Identity definition by selecting Upload documents.
Platform and BPO onboarding
Platform or BPO customers register themselves and submit Display Identities for their customers' brands. Follow steps 1 to 5 of the Enterprise onboarding process, and select your customer type.
As a BPO/Platform type customer, you must submit a separate BCID Application for each of your customers. See the BCID onboarding guide for detailed instructions. Note the following differences from Enterprise onboarding:
- In steps 1 to 6 of the application submission, enter your customer's information (not your own BPO/Platform entity details).
- In step 7 (Display Identity Information), enter the brand assets of the customer you serve.
To submit a BCID application for your own BPO/Platform brand, enter your own entity information in steps 1 to 6 instead.
For the submission to be accepted, you must fill in and include the LOA for BPO Use of Brand Assets document. Add the document to the Display Identity information by selecting the Upload documents button.
In the LOA document:
- BCID Customer: Relates to your customer that you serve as a platform or BPO.
- Authorized BPO Information: Relates to your own company as a platform or BPO.
- The content of section 3 (Authorization of Branding Elements) must match exactly the content you submit on the onboarding portal.
- Exhibit B of the LOA is not supported. Your customer must use Infobip USA numbers from your Infobip account that you assign to their usage.
- The LOA must be signed by your customer.
Manage Display Identities
Check application and Display Identity status
The BCID tab on the Trust Center application in the Infobip portal provides an at-a-glance view of Display Identities you submitted and their associated status. To manage your Display Identities, use the onboarding portal. See the BCID onboarding guide.
Make changes to Display Identities
Use the onboarding portal to manage your Display Identities. See the BCID onboarding guide to understand the various sections and capabilities of the portal.
Get settlement reports
Use the onboarding portal to view your settlement reports. See section 2.6 of the BCID onboarding guide.
Settlement reports are not real-time. Carriers are expected to submit reconciliations of confirmed displays and deliveries within 12 hours. It may happen that carriers take longer to submit their confirmed impressions. At the end of a month, carriers have an additional seven days to fully reconcile the data from the previous month.
FAQ
Related documentation
- Calls
- Configure inbound calls
- SIP trunking
- Call routing
- Number management: Configure US voice number features