Business-initiated calling
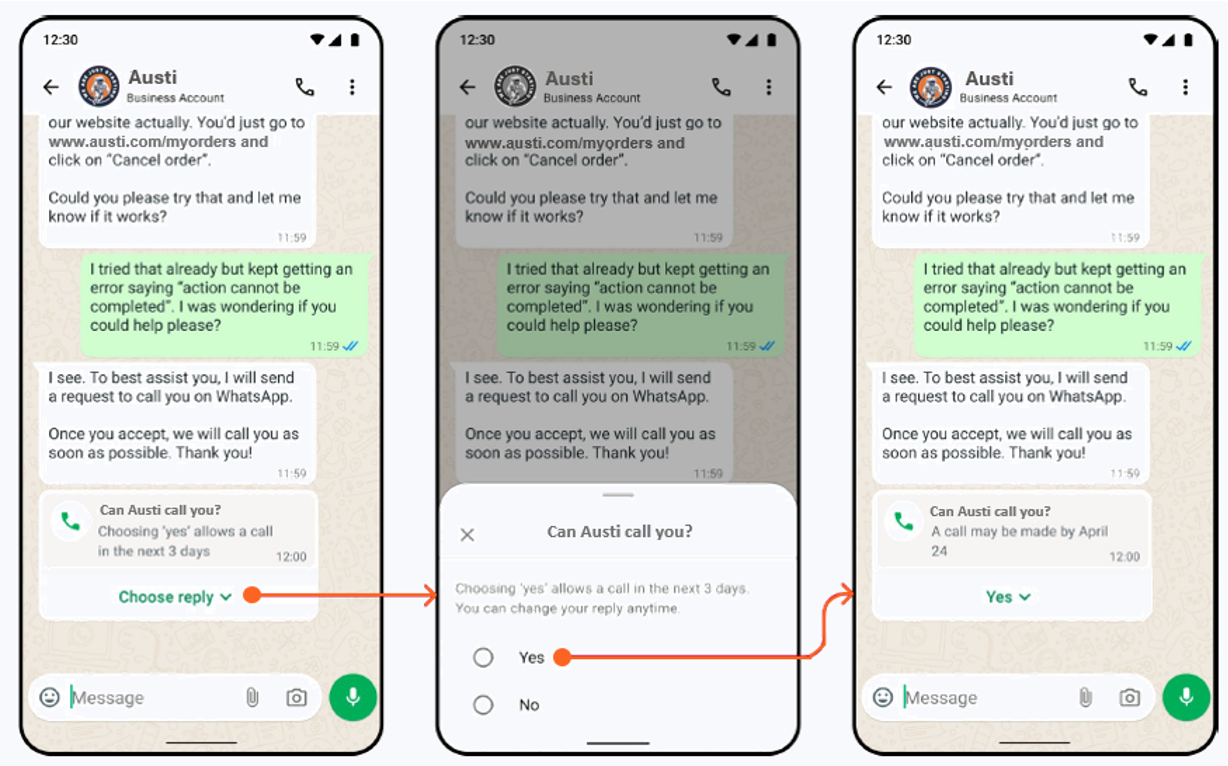
Business-initiated WhatsApp Business Calling allows your business to place a voice call to a user after the user has explicitly granted permission. This enables timely and direct communication while ensuring compliance with Meta's opt-in and usage policies.
You can enable WhatsApp Business Calling in the Infobip web interface. If you do not see the option to activate WhatsApp voice, the WhatsApp voice routes are not enabled on your account. Contact your account manager or Support.
Availability
Business-initiated calling is supported for WhatsApp senders based on the country code of their business phone number.
This feature is available in all countries where the WhatsApp for Business platform operates, except the following:
- Canada
- Cuba
- Egypt
- Iran
- Nigeria
- North Korea
- Syria
- Turkey
- Ukraine regions: Crimea, Donetsk, and Luhansk
- United States
- Vietnam
Businesses registered in these countries cannot use the business-initiated calling feature.
This list reflects current Meta support and is subject to change. Contact your account manager or Support for updates.
How to enable business-initiated calling
To use business-initiated calling, you must first activate WhatsApp voice for your sender in the Infobip web interface.
- In the web interface, open the Numbers app.
- Select your WhatsApp sender number.
- Open the WhatsApp tab.
- Select Activate WhatsApp voice.
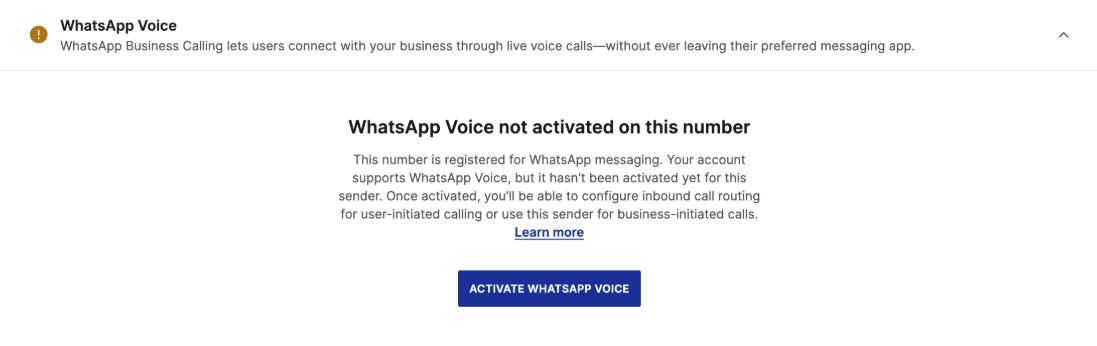
If you do not see the option to activate WhatsApp voice, the WhatsApp voice routes are not enabled on your account. Contact your account manager or Support.
Call permission rules
Before your business can place a call, the user must accept a permission request sent using the WhatsApp API. Meta applies the following rules:
- Request limits
- You can send one call permission request every 24 hours.
- If the user does not respond, you can send up to two permission requests within a 7-day period.
- After the user grants permission
- You can place up to five connected calls within a 24-hour window during the 7-day permission period.
- If a call connects successfully, all limits reset, and you can send a new permission request immediately.
- Missed calls
- If two consecutive calls go unanswered, the user receives a system prompt to review their calling preferences.
- If four consecutive calls go unanswered, the user's permission is automatically revoked.
- User control
- Users can revoke or update their call permissions at any time.
How to send a call permission request
You can use either a free-form, interactive call permission message (for active sessions), or a template message (outside the 24-hour window).
Free-form interactive message with a call permission request [#free-form-interactive-message-with-a-call-permission-request-how-to-send-a-call-permission-request]
Use this option to send a permission request during an active session. The user must have interacted with your business in the last 24 hours.
Use this method for ongoing conversations within the 24-hour session window.
Message template with a call permission request [#message-template-with-a-call-permission-request-how-to-send-a-call-permission-request]
Use a pre-approved template to request permission outside the 24-hour session window. This method is suitable for re-engagement or follow-ups after inactivity.
Use this method to re-engage users after the session has expired.
Sending a message template with a call permission request is similar to sending a WhatsApp template message.
How to receive user responses
The user response to a call permission request can be received on a webhook. You can configure the webhook either using the API or directly in the Infobip web interface.
For additional information on inbound message configuration, refer to our documentation.
- Set up webhook in the web interface
- Log in to Infobip web interface and go to Channels and Numbers > Numbers.
- Click or tap the number you want to configure and go to the WhatsApp tab.
- Under Inbound configuration, define a webhook where you want to receive responses to call permission requests.
- Set up webhook through the API
- To set up your webhook through the API, refer to the Receive WhatsApp inbound messages.
Here is an example of a successful response sent to your webhook when a user accepts a call permission request:
Explore supported business-initiated calling
See how WhatsApp Business Calling integrates with Conversations, SIP trunks, webRTC, and custom voice applications in supported scenarios.