Supervisor guide
The Supervisor guide covers everything a supervisor can set up in terms of managing their contact center, working hours, agent statuses, as well as queues and routing where and when necessary.
Also, check out how you can manage automations and set up surveys to be shown to the customer after a conversation ends.
Capacity
Capacity is the maximum number of defined opened conversations for an agent by channel; the default capacity for all agents or default system capacity for live messaging is 5 concurrent conversations.
Note that for voice calls - capacity is always one since one agent can talk to only one person at any given time. This default value cannot be changed on the system or agent level.
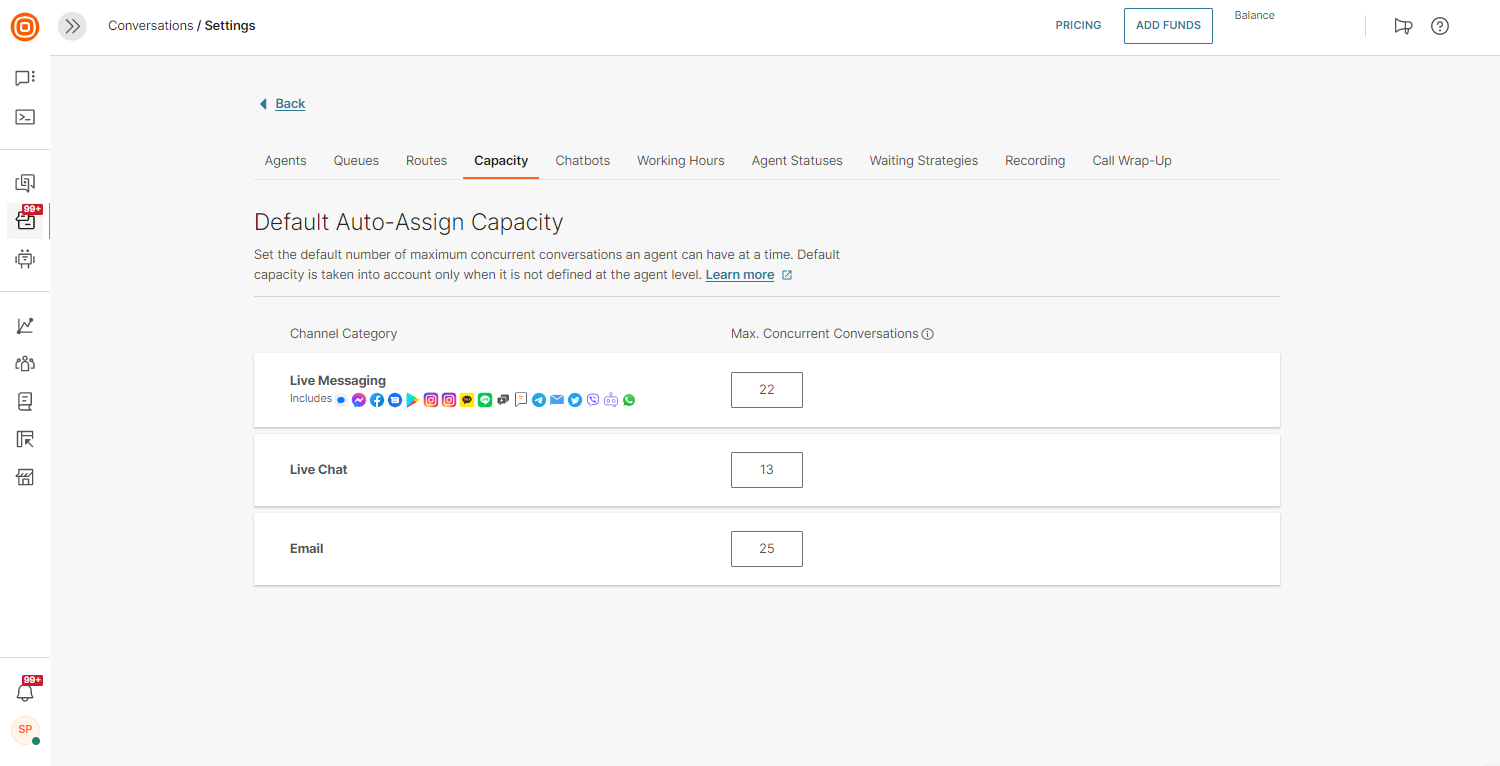
Default capacity
To set up the default capacity for all agents go to the Conversations module → Settings → General setup → Capacity. Capacity represents the maximum number of concurrent conversations that can be assigned to one agent over the automatic assignment.
Instant Messaging stands for a group of channels: SMS, WhatsApp, Viber, Telegram, Google's Business Messages, Apple Messages for Business, and Messenger.
Default capacity is taken into account only when not defined at the agent level.
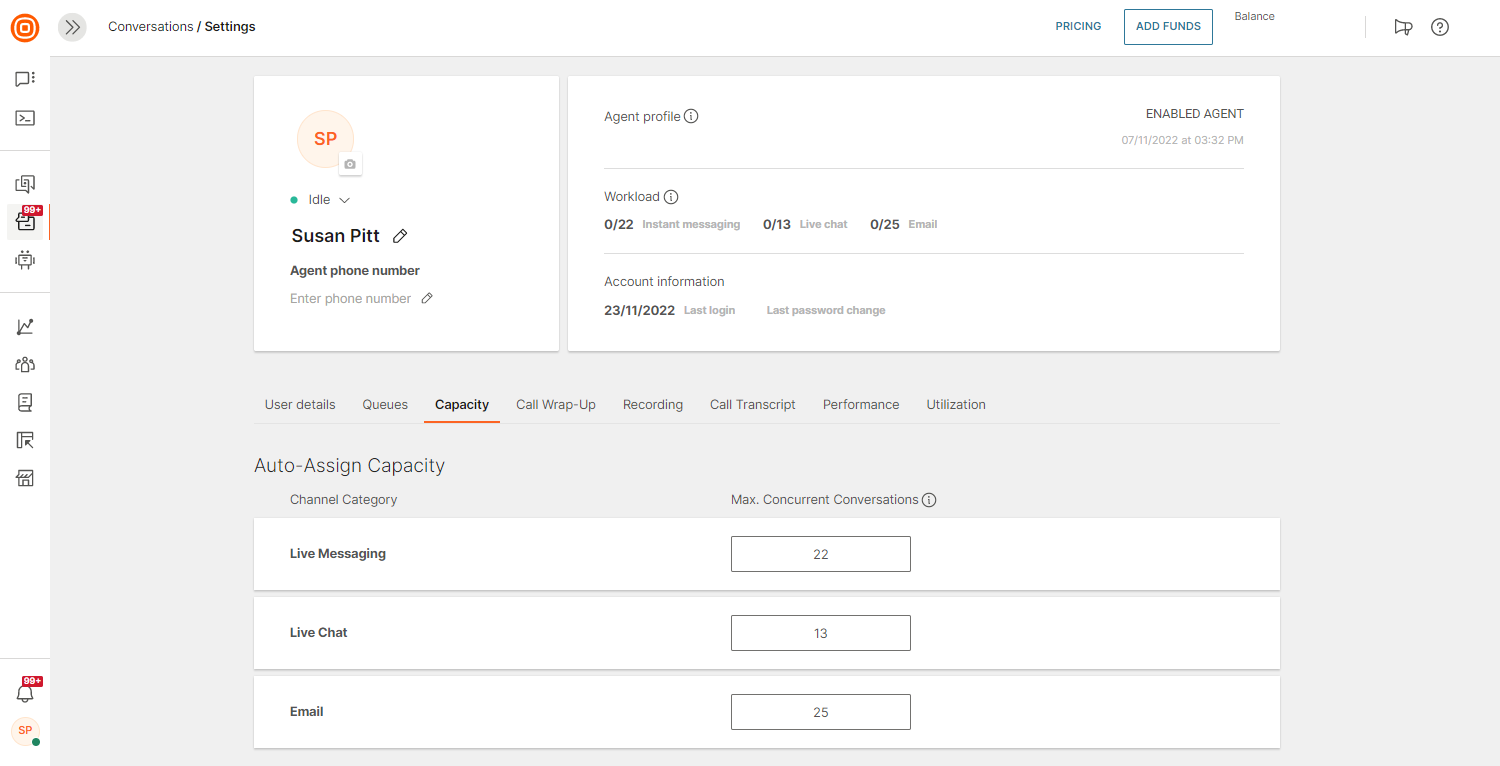
Agent capacity
To set up agent capacity, go to the Conversations module → Settings → General setup → Agents → select the agent you want to edit → Capacity. Agent capacity is considered first. In case it’s not defined, default capacity is considered for new conversations assignments.
Waiting strategy
NOTE
Currently available for Voice and Video channel only.
Being on hold can be frustrating for your customers so it is important that you are able to build a waiting strategy that establishes the best environment for callers while they wait to be connected to your agents.
To do so, navigate to the Conversations module → Settings → General setup. Click the Waiting Strategies tab, and to define a new waiting strategy, click on the Create New button.
Name your waiting strategy and define general information:
- Numbers or application (when using Web and In-App Calls) that your strategy applies to.
- Maximum waiting time that defines how long this strategy will run for.
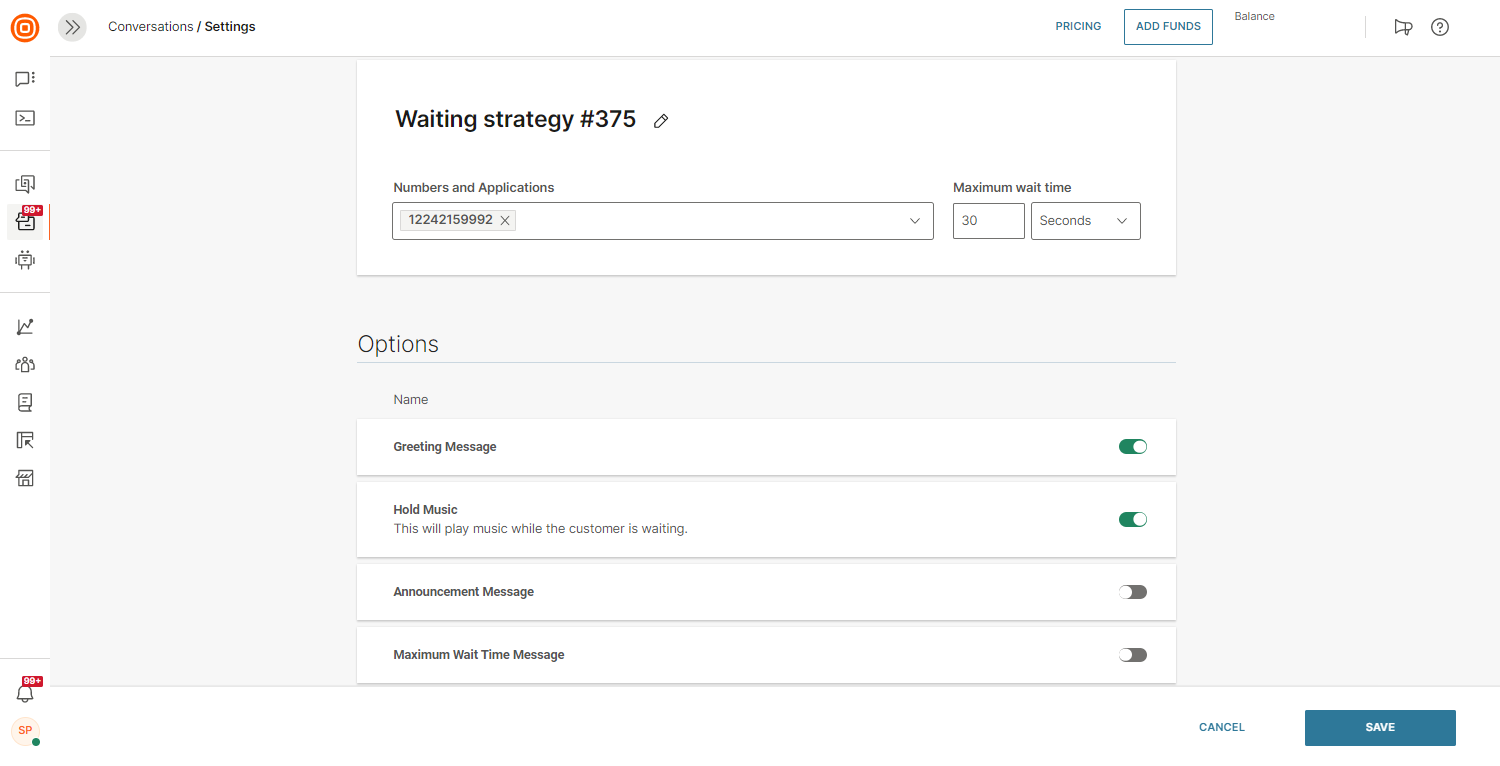
Subsequently, you can set up one or more available options depending on your business needs:
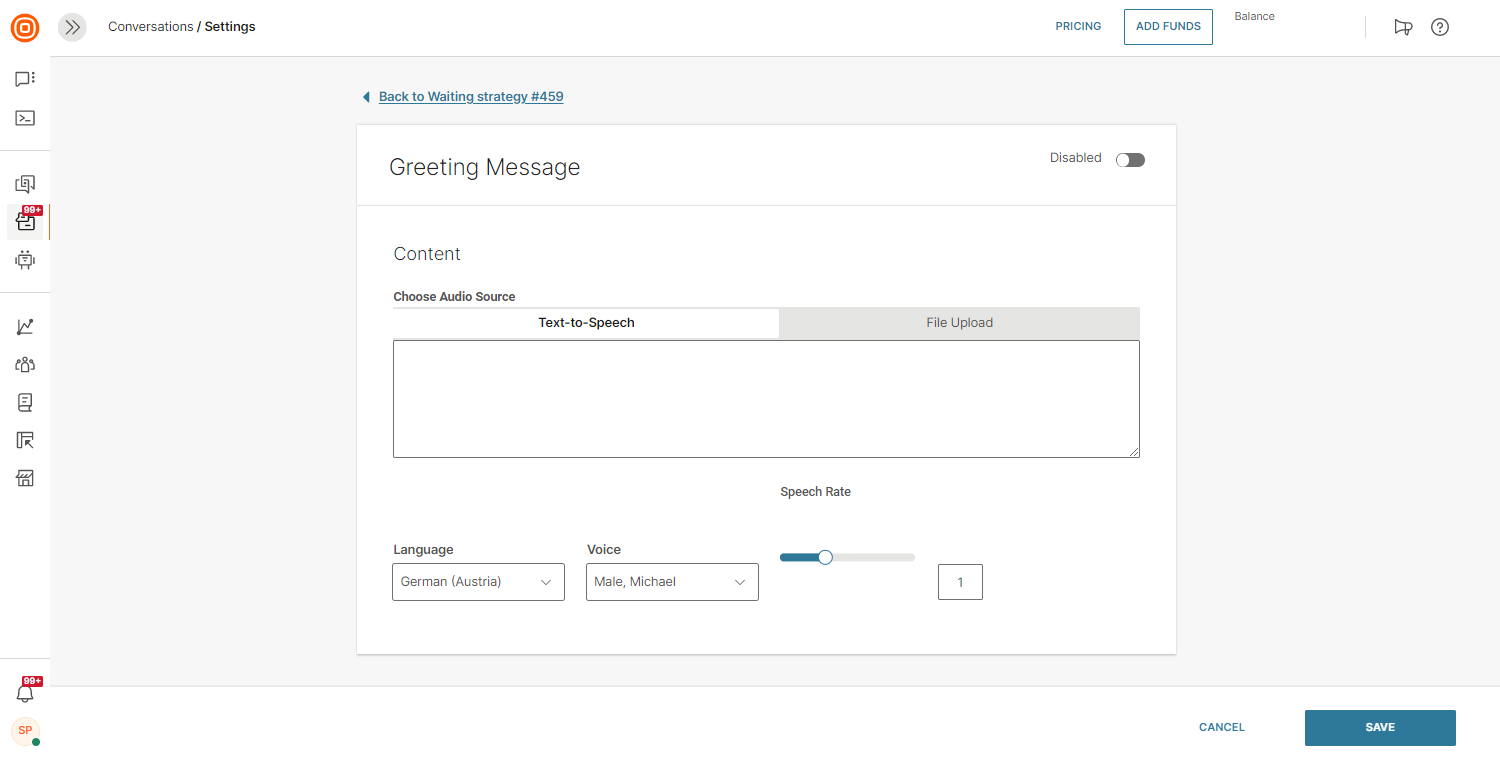
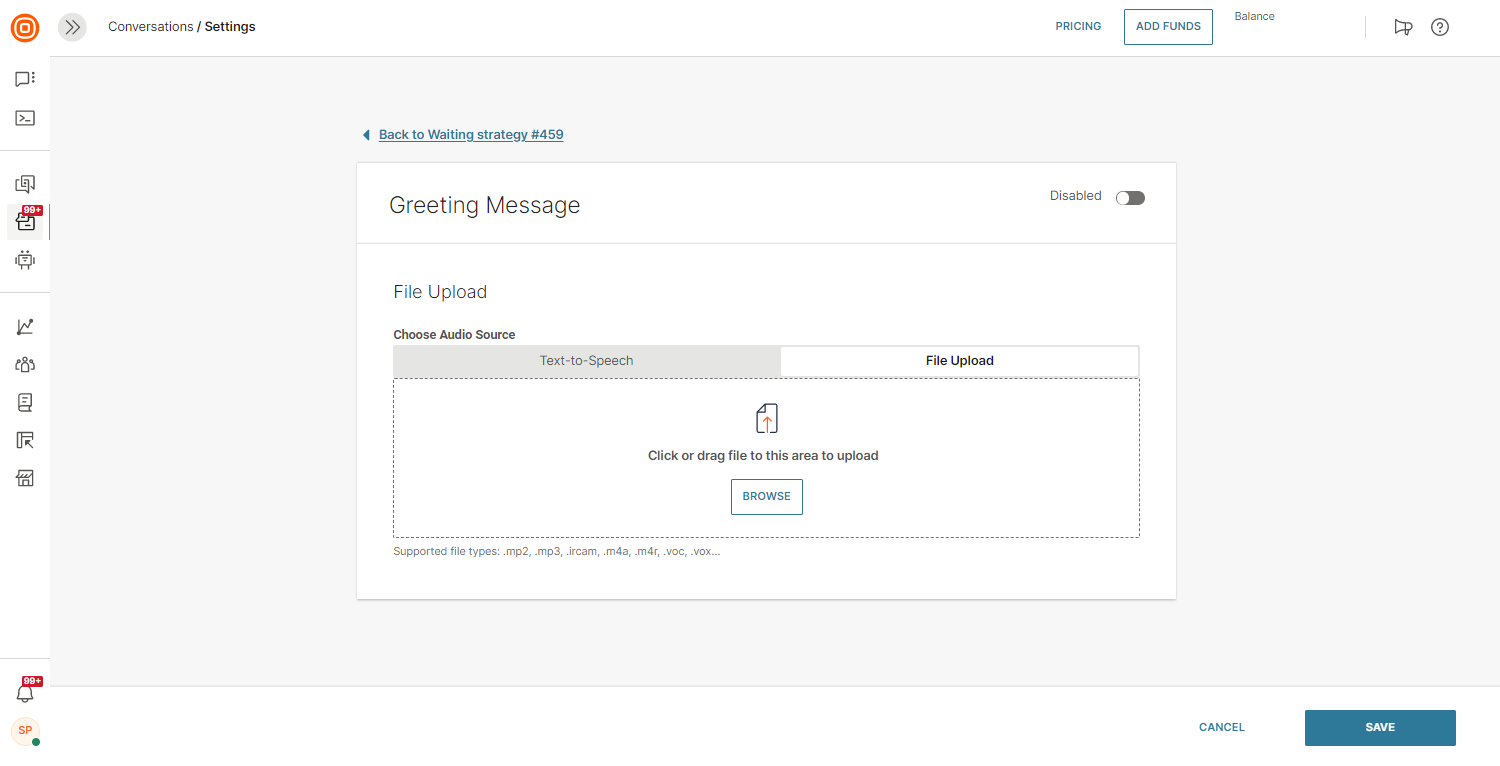
- Greeting message - this will be the first communication callers hear when they contact you. You can use the text-to-speech feature to craft a message or upload a file you would like to play to your callers.
- Hold music - certain types of music can calm a person while on hold and create a more positive experience for callers. You can upload your hold music file.
- Announcement message - when your customer's mind is occupied with something it makes the time they have to wait feel less burdensome. Keep callers engaged by periodically playing announcement messages.
- Maximum Wait Time Message - when the maximum wait time has been exceeded, and just before the call is about to be dropped, play a message to your customer letting them know that the call will end. You can use the text-to-speech feature to craft a message or upload a file you'd like to play to your customers.
You can enable/disable each option by clicking the toggle button.
Create message
You can decide to create your waiting strategy messages as a speech version of the text you provide in a written format. In that case you should use text-to-speech as audio source and write the message script in the provided text field.
To do so, configure these available parameters:
- Language - select one of the available languages
- Voice - select one of the available voices
- Speech Rate - adjust the speed at which words will be spoken to be in line with the language and the message you are communicating
Upload file
You can use a file that you have previously recorded or created in your waiting strategy messages. In that case, you should use file upload as the audio source. Click Browse (or use drag and drop action to upload your file), locate the file, and confirm the action to upload your file.
You can also delete uploaded files if needed.
NOTE
Bear in mind that the maximum file size is 4MB.
Waiting strategy for messaging channels
Waiting strategy for digital channels applies to all the text-based channels used in the Contact Center.
When set, the waiting strategy triggers when a conversation enters the contact center directly or after being transferred from a bot and is unassigned.
The conversation will be unassigned if auto-assignment is not set up on the queue or if there are no available agents for auto-assignment.
NOTE
In cases when a conversation is added in the queue while the queue is not working (the Working hours option has been set) the waiting strategy will not be triggered.
There can be only one waiting strategy for a sender.
The waiting strategy consists of three types of messages:
- Welcome message – a message sent to the customer when they enter the queue
- Announcement message – can be a periodic message
- Maximum wait time message – a message sent to the customer when they have waited the maximum defined time in the queue
At least one message must be enabled for the waiting strategy to be used.
Waiting strategy can end in three ways:
- A conversation assigned to an agent.
- A conversation waiting more than maximum wait time set up in which case this conversation is also closed. A closed conversation will be removed from the queue and won’t be assigned to an agent.
- A conversation waiting for more than an hour. The conversation will remain open, but there will be no more messages sent to the customer.
Welcome message
A welcome message is sent to the customer upon entering a queue, but the conversation is left unassigned.
This message is sent only once and it usually contains a greeting.
Announcement message
Announcement message can be sent after the welcome message in regular intervals while the customer is still waiting for an agent to take the conversation (waiting for conversation to become assigned to an agent). Minimum interval is one minute.
Using the option to set a number of announcement messages enables you to choose how many messages can be sent to the waiting customer. After sending these messages, the conversation will remain in waiting strategy.
Maximum time for sending announcement messages is one hour, meaning that the maximum number of messages that can be sent to the customer is 60.
If a conversation waits for assignment for more than an hour, and if there is no maximum wait time set, the conversation will remain open, but no more messages will be sent to the customer.
Maximum wait time message
Maximum wait time is used to close the conversation after the time has passed and the conversation was not assigned to an agent. It can be set to the maximum of 60 minutes.
If the time is reached, the message will be sent to the customer and the conversation will be closed.
Typically, the content of this message will inform the customer of alternative ways to contact the business and get help at a different time.
Working hours
Set working hours for your contact center – you can do that for each separate day of the week.
Also, holidays can be set as non-working days and you can set them by exact dates which throws repetitiveness out of the window.
On this page you can set:
- Working hours
- Holidays
- Away message
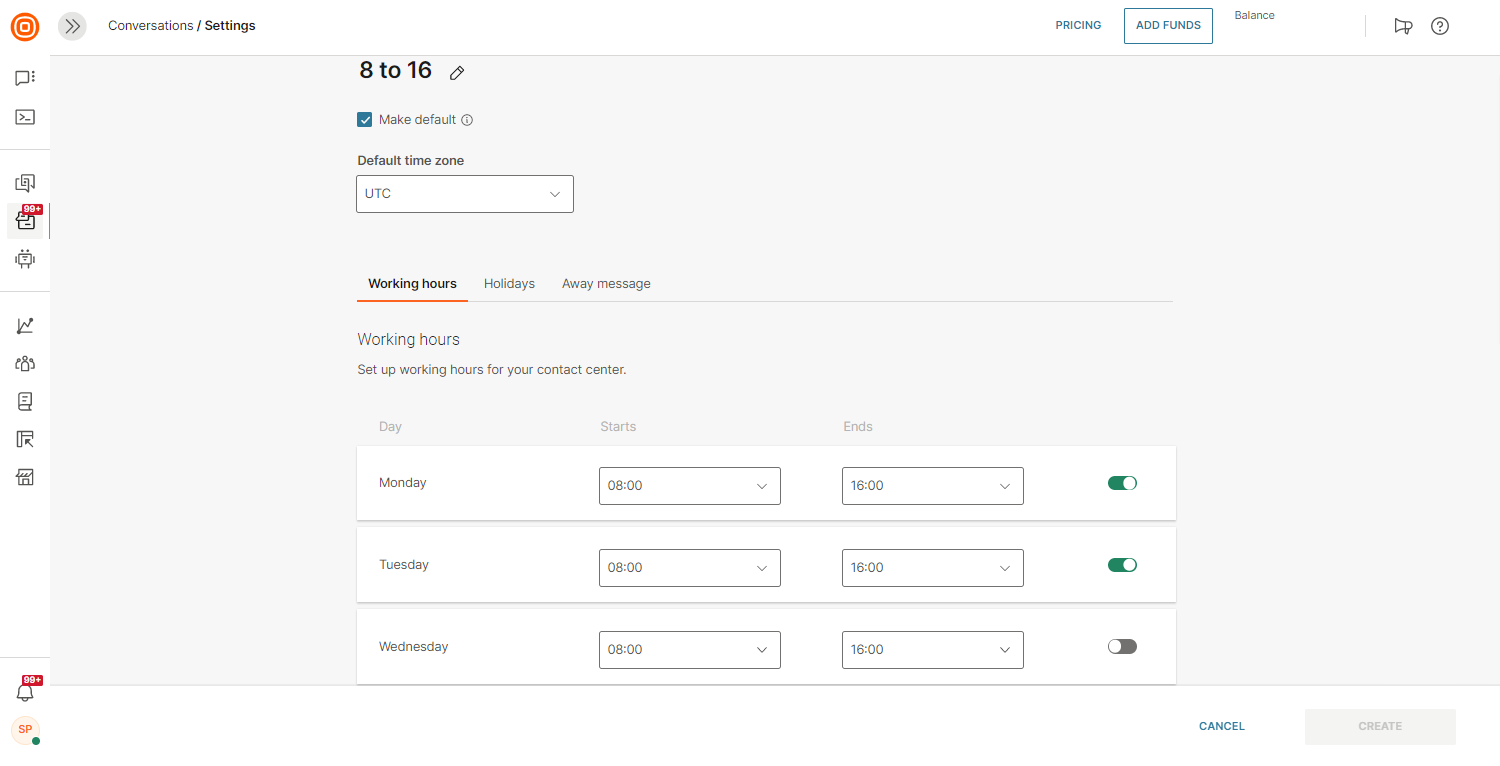
A working hour period can be set per queue, meaning that one working hour period can be assigned to each queue.
This is especially handy for companies dealing with different markets in different time zones.
One working hour period can be set as default which means that all queues created afterward will have this period set without the need for intervention.
If you happen to change the default working hour period, previously created queues will retain the old setup.
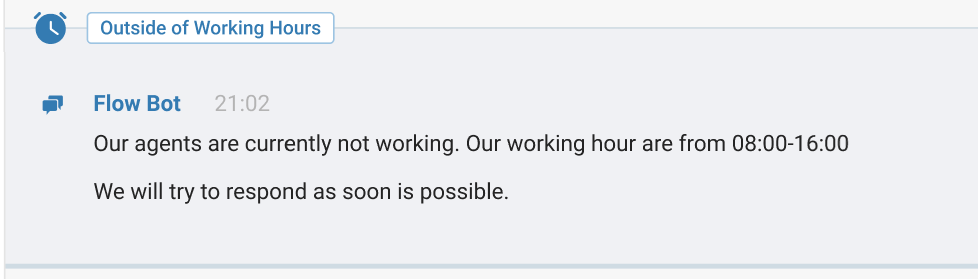
Agents and Supervisors will be able to see all conversations and messages created outside working hours to follow up with customers.
When a customer sends a message outside working hours they will receive the auto-reply over the same channel that they used to contact you.
Holidays
Here, you can define holidays for your team during which they will not be at the office to interact with customers. You can select your time zone and the start and end dates for your holidays.
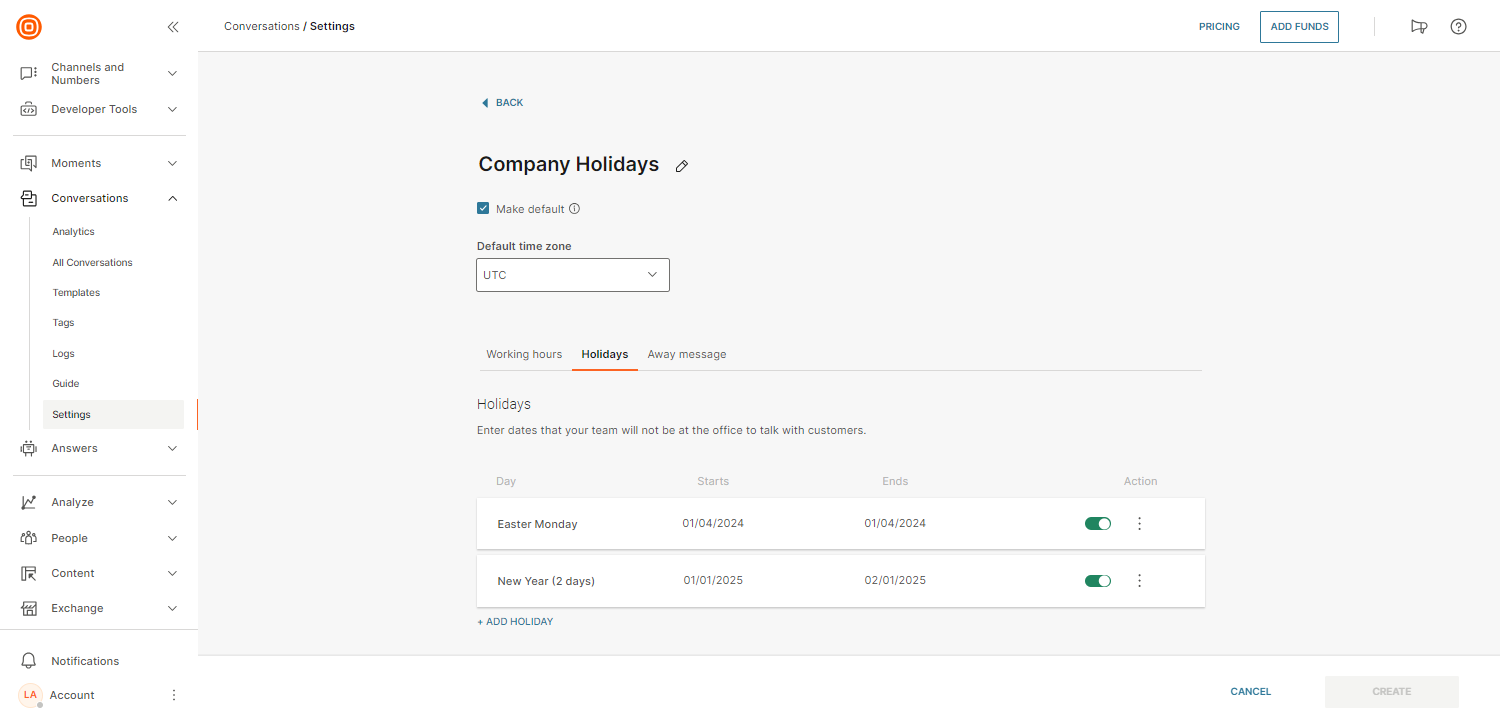
The important thing is to select your start and end date carefully since a holiday is defined by entering a start date (00:00 on the start day) and an end date (24:00 on the end day). That means that the end date is also included in the holiday. For example, if your holiday is only one day, your start and end day must be the same. If your holidays take up more than one day, the start day needs to be the first day of the holiday and the end day the last day of the holiday.
Away message
Define automated Away Messages for each queue where this message will be sent if a customer reaches out to your contact center outside the working hours.
NOTE
The automatic away message is sent only when a customer contacts you outside of the working hours and opens a new conversation that way. In case there's already an open conversation and your agents reply outside of working hours, the automatic away message will not be sent.
Callback
To find out more about the Callback configuration, click this link.
Service-level agreement (SLA)
A service-level agreement (SLA) is the level of service you expect from a vendor. It defines the metrics by which a service is measured, and it takes into account remedies and/or penalties if the agreed-upon levels are not respected.
Main values of having the Service-level Agreement active are:
- Provide an opportunity to track the conversations SLA for your customers
- Actively tracking the SLA increases customer satisfaction as every conversation is handled in dedicated time to avoid any breaches
- Supervisors can faster recognize breached SLA in conversations and proceed to quickly resolve those conversations to avoid long SLA breaches
- Focus on the most important conversations based on the severity of the issue
Key benefits of SLA in Conversations:
- A faster resolution of the most important conversations, as well as urgent customer issues
- Conditional SLA policy based on variable attributes bringing personalized approach into handling conversations from time urgency point of view
- The ability to identify the severity of the issue and thus prioritize the conversation
- Transparent tracking of the response time by displaying the remaining SLA time left before the breach
- Improve supervisor management by quickly identifying the conversations with breached SLA in time
Configuration
NOTE
SLA is available only for the Grow and Scale Conversations package.
To configure SLA, navigate to the Conversations module → Settings → and locate the Service-level Agreement tile.
Select the card to manage your existing and create new SLAs. To add your first SLA, select the Create New button.
Here you need to fill in all the details about your SLA:
- Name your SLA policy (default name will be pre-populated)
- Set the status:
- Status is Enabled by default. You can change it to Disabled after which this SLA policy is not valid anymore.
- Based on the validity period, once the SLA time is out, the policy will not be valid anymore.
Period
- Define the time period during which this SLA will be valid.
- To update the validity period, go to your Service-level agreements list (Conversations > Settings > Service-level agreement, select the three-dots menu on the right (under Actions) and then Edit.
- Note that the dates you set define the period when the configured SLA policy is valid and applies to all conditions for matched conversations.
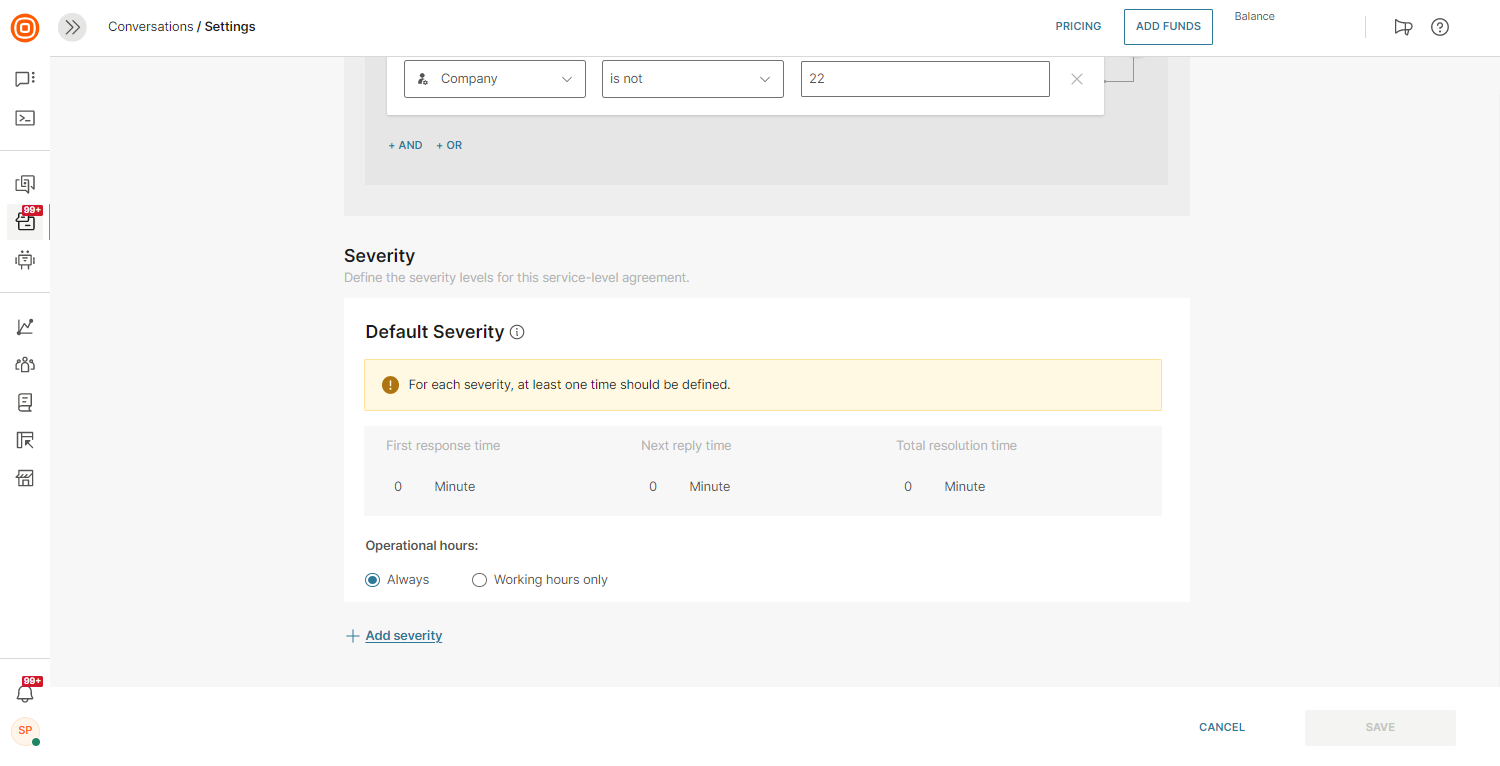
Conditions
- Conditions are rules that you need to configure based on which the SLA policy will apply to those conversations.
- You should set at least one condition.
For example, Set the SLA for all incoming conversations if ''Company'' is condition ''A''.
- In case you need to set conditions based on some custom company or user attributes, you can set such conditions here
- You can also apply +AND and +OR conditions to combine more attributes
The first SLA policy that fits the conversations based on the conditions set is the one that will apply to those conversations.
You can define which queues have the SLA policy set or ignored by assigning and applying the SLA policy based on a specific queue.
The other SLA policy is assigned to the conversation when it transfers from one queue to another and the second queue requires a different SLA policy. As a result, any prior breaches are recalculated using the newly allocated SLA policy.
Additionally, you can specify whether a queue or customer receives support 24/7 or just during working hours. By prioritizing tasks in this way, you can distinguish between those that are more urgent and require around-the-clock assistance and those that can wait until working hours.
Once a conversation is routed to a queue and has an assigned SLA policy, the following setup is added to the SLA logic if it is considering working hours or no time limitation (default):
- Working Hours indicates that the SLA needs to consider:
- the actual queue of conversation
- queue working hours setup
- in case there is an only working hours setup, the current time is checked, and if it is outside of working hours and the current severity is set to apply only during working hours, all SLA counters for these conversations are put on hold
- No limitations means that the SLA can fully ignore any working hours and is always counting based on already existing logic:
- if the severity setup is no time limitation, the SLA continues counting in already running timers
Excluding automated messages
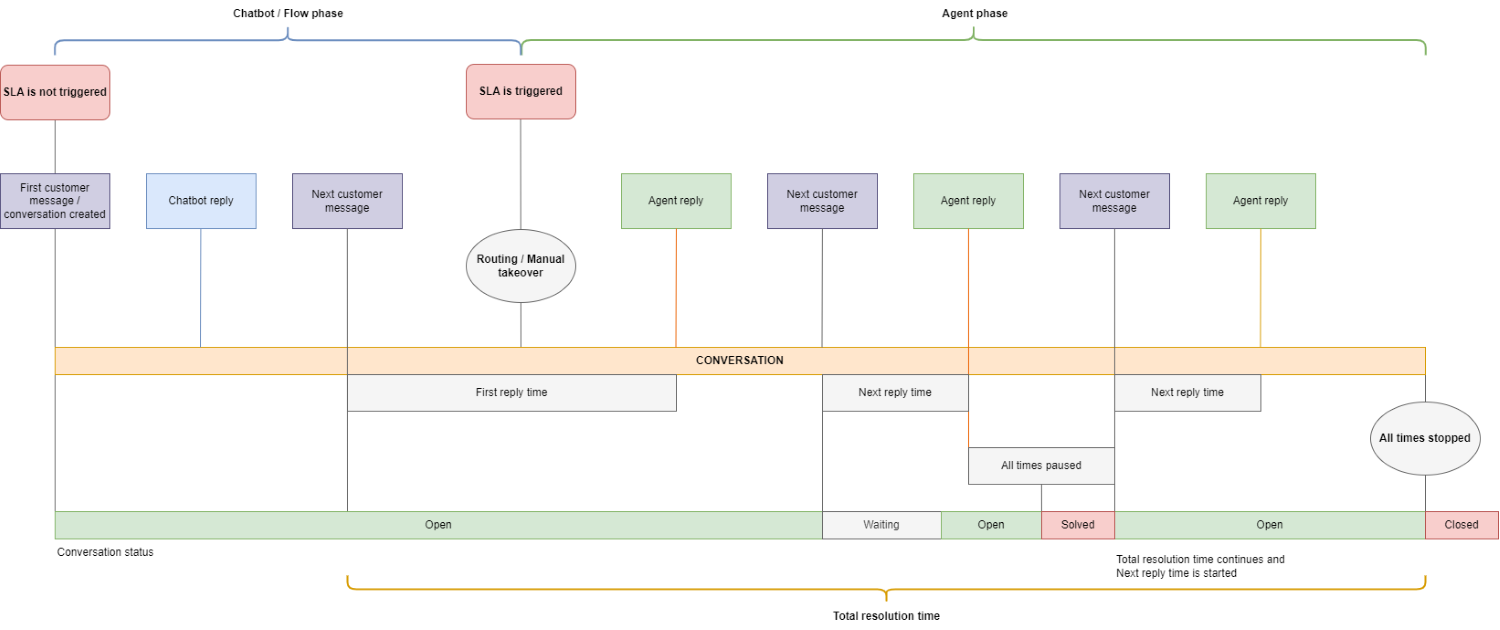
By default, SLA policy metrics count all outbound messages, including human responses and messages triggered by automation, working hours, waiting strategies, and chatbots.
However, if you need a more granular approach and want SLA calculations to consider only human replies, you can exclude automated messages from your SLA. This option lets you prioritize and measure real-time human responsiveness since the SLA countdown for the first response, next reply, and total resolution time is triggered when the chatbot handovers the conversation to an agent, and any automatic replies are ignored.
To enable it, select Exclude from your SLA.
Severity
- The Severity level represents the complexity of the issue the customer is facing
- Every SLA policy must have at least Default Severity level set
- Based on your business needs and policies, you can define different levels of Severity
For every Severity level you need to set:
- Name - This will be visible to Agents as an option to choose between severities for every conversation (Default Severity is set for every conversation that matches the SLA policy condition)
- Times:
- First response time
- Next reply time
- Total resolution time
It is mandatory to set at least one of these for each severity. Also, choose whether you want this SLA to apply Always or during Working hours only. This will depend on your business use case and what kind of support you have agreed upon.
Every SLA can have an unlimited number of severity levels so you can add as many as you need by clicking the +Add Severity button.
Example of severity levels:
| Severity | Description |
|---|---|
| Default severity | Default severity that applies to every new incoming conversation fitting the SLA policy. |
| Severity 1 | Could represent extreme infrastructure or product outage for many customers. |
| Severity 2 | A certain product part is unusable for many customers. |
| Severity 3 |
A certain product feature is unusable for many customers. |
This is how the resolution time is counted if excluding automated responses is NOT enabled::
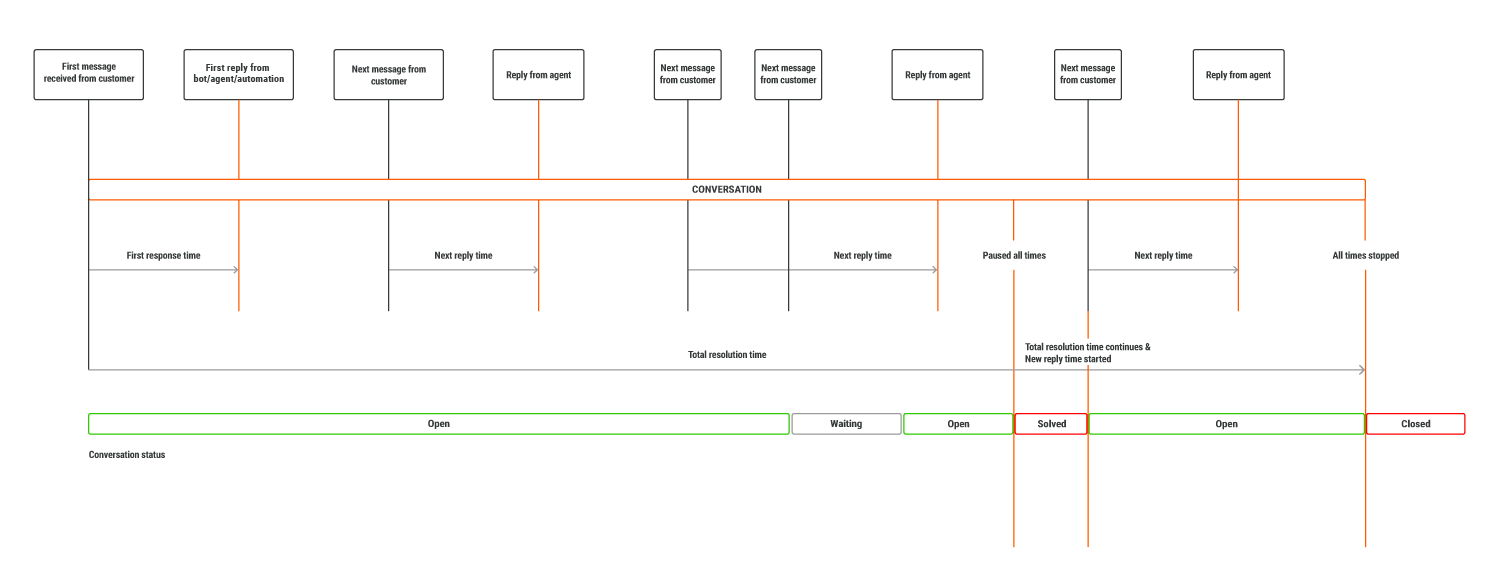
This is how the resolution time is counted with the option to exclude automated responses enabled:
- The SLA counting starts from the first message the end user sends
- First response time represents the time between the first message from the end user appeared and the agent's response
- Next reply time is the time between the next (not the initial) message from the end user and the agent's response to that message
- Total resolution time is the time between the conversation start and when the Agent has set the status to Solved.
- SLA is paused every time a conversation is set to the Solved status
Note that each of these Times is configured in minutes.
After you have set the Period, Conditions, and Severity levels, you can save your SLA.
List of SLA policies
The list of SLA policies allows you to define the priority of your SLAs.
- The SLA policy on the top is the most important.
- Based on this logic, if you have two policies that have similar conditions fitting your conversations, the system will apply the first one on the list.
You can edit the list if you click the three-dots menu and then choose to Edit, Delete, Send to top or Send to position (enter the number to move the SLA to that position).
Note that if you delete your SLA, it will no longer be valid and it will not be applied to any conversations anymore.
Usage
Once you have set up everything, your agents will be able to see SLA details in their My Work and All Work panels. Follow the aforementioned guides to learn more.
NOTE
Every update to the SLA policy setup triggers an SLA recalculation.
Agents
To manage Conversations Agents, navigate to Settings → Users tab. This section contains a list of all users where you can assign the Conversations role(s) for each user.
Add
To add a new agent, you need to create a new user in Settings → Users and assign the Conversations Agent role to your agent.
NOTE
When added, an agent is automatically enabled. Enabled agents have access to the Conversations module and can handle customer inquiries. If you want to disable an agent, hover over an agent on the list and change the toggle button status. When disabled, the agent will not be able to handle conversations. On the Agents page, supervisors can easily manage agents and filter based on enabled or disabled status.
Manage
To manage specific agent details, click on the agent’s name on the list of all agents.
The agent details page will open where you can do the following:
- Change Agent name
- Check Agent status (active, busy, offline, away)
- Enter title and phone number
- Enable/Disable Agent
- Check and manage user details, queues, capacity, call wrap-up, recording, call transcript, performance, and utilization
Moreover, you can assign agents to queues (a queue is a pool of agents that handle a certain topic). Click Add Queues, select a queue and click Assign. When assigned to a queue, the agent will see this queue and conversations within the queue in their All Work panel.
You can also configure some of the conversation parameters on the agent level, e.g., you can change the value for agent wrap-up time for Voice calls.

Agent statuses
Agents communicate their availability by setting their status which can be changed automatically or manually.
There are two types of agent statuses:
- Default statuses – Predefined and have automation logic based on the agent’s activity or workload.
- Custom statuses – Allow you to create new statuses for your agents to fit your business needs.
Additionally, there are 4 groups of statuses:
- Available - Indicates that agents are signed in and available to take on new conversations
- Busy - Agents are unable to receive new but can receive transferred conversations.
- Away - Agents are away from a computer and won’t receive new but can receive transferred conversations.
- Unavailable - Agents are not signed in and cannot receive any conversations.
Configuring and being aware of agents' statuses enables supervisors to better track how agents spend their time and get an insight into how to better utilize their agents.
Agent’s status is also connected to Auto Assignment, in a way that only agents in any status from the Available group of statuses will be a candidate to receive a new conversation.
Also, if the agent’s current workload is 90% (or higher) of their maximum capacity, they will automatically be transferred to the Full Capacity status.
The Full Capacity status considers three categories: Email, Live Messaging, and Live Chat. An agent reaches full capacity when the combined percentage across these categories reaches 90 or higher, e.g.:
Live Messaging 2 Occupancy / 6 Capacity + Live Chat 1 Occupancy / 5 Capacity + Email 3 Occupancy / 10 Capacity = 33% Live Messaging + 20% Live Chat + 30% Email = 83% - the agent has not reached the full capacity yet.
However, if an agent receives, e.g., an additional email on top of their current workload, resulting in percentages of 33% Live Messaging, 20% Live Chat, and 40% Email (totaling 93%), the agent will automatically switch to the full capacity status.
When their current workload drops below their maximum capacity, they will be back in the Under Capacity status.
Another important mechanism is the agent’s activity within the system. The system tracks whether agents are really in the status they set themselves in.
Example: If an agent sets themselves as Available but the system notices there is no activity in the browser (or the browser is closed), the system will automatically log them out to prevent further conversations assigned to them and inaccurate time tracking on Agent’s Utilization.
NOTE
Agents should end their shift by setting their status to offline and logging out of the system. Otherwise, they will remain in the current status while logged off.
Voice and Video channel statuses
For the Voice and Video channel there is an additional logic involved. To receive, accept and have a conversation and later wrap it up, agents will undergo several statuses:
- Ringing – Call is not yet connected to the agent but they are prompted with the ringing dialog.
- In a call – When the agent accepts the call.
- Wrapping – After the call has been completed, agent has some additional time to write important notes or conclude the call if there was a resolution with the customer.
Sensitive data masking
Sensitive data masking is a fundamental component of data security and privacy. It is used to protect sensitive or confidential information by replacing or hiding original data with a masked or hidden version. With data masking, you can ensure that sensitive information remains confidential while allowing non-sensitive parts of the data to remain usable.
The data masking feature hides or masks data labeled as sensitive from agents. This includes information such as:
- Text messages
- PDF and other files
- Images (with or without description)
- Videos
- Audio files
- Location data
- Links
The system identifies data as sensitive based on the configuration of your chatbot's attributes. These attributes (marked as sensitive) are masked and provided by the chatbot in the Conversations agent panel.
You can hide attribute values so that agents cannot view these values in the context card and conversation history:
- On the Infobip web interface, go to Answers → Chatbots and navigate to your chatbot.
- Go to the Attributes tab → Attributes section.
- Navigate to the attribute for which you do not want agents to see the values.
- Deselect the Available to agents field.
For example, when a customer contacts the bank and shares sensitive data with the chatbot, that data will be masked.
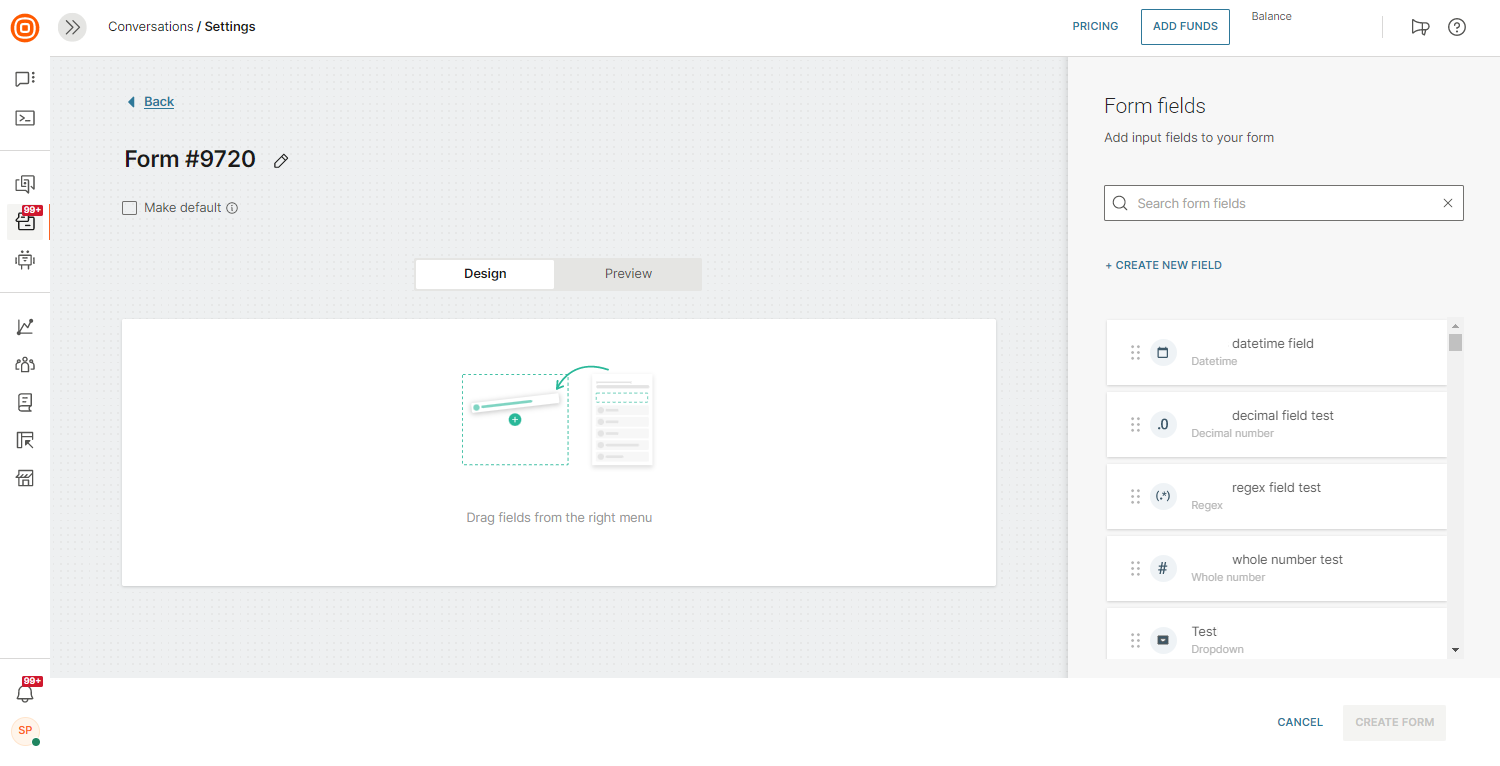
Conversation forms
These are fully customizable forms that agents can assign to conversations (Digital, Calls, and Social Media) based on each conversation's parameters. Agents can fill these forms to collect information that can later be used for analysis and re-engagement.
To set up forms, you need to navigate to the Conversations module → Settings → select Conversation Forms.
There are multiple types of input fields that you need to fill in:
- Text – simple text input
- Multi-line – larger texts
- Checkbox
- Dropdown – multiple levels of hierarchy are possible; you can create a new level using :: e.g. Clothing::Shirts will return results in a drop-down menu with the value 'Clothing' and sub-value 'Shirts'
- Whole number
- Decimal number
- Datetime
- Regex – a textual input that uses regular expressions to limit inputs from agents (e.g., So that they can only enter numbers in the input)
NOTE
The limit for the number of input fields per conversation is as follows:
- The maximum limit for custom input fields per account is set at 10,000.
- The maximum number of input fields that can be assigned to one conversation is limited to 500.
After you have created input fields, you can add them to your form. If needed, you can mark each input as mandatory. Empty mandatory input fields in the form will prevent agents from marking the conversation as Solved or Closed.
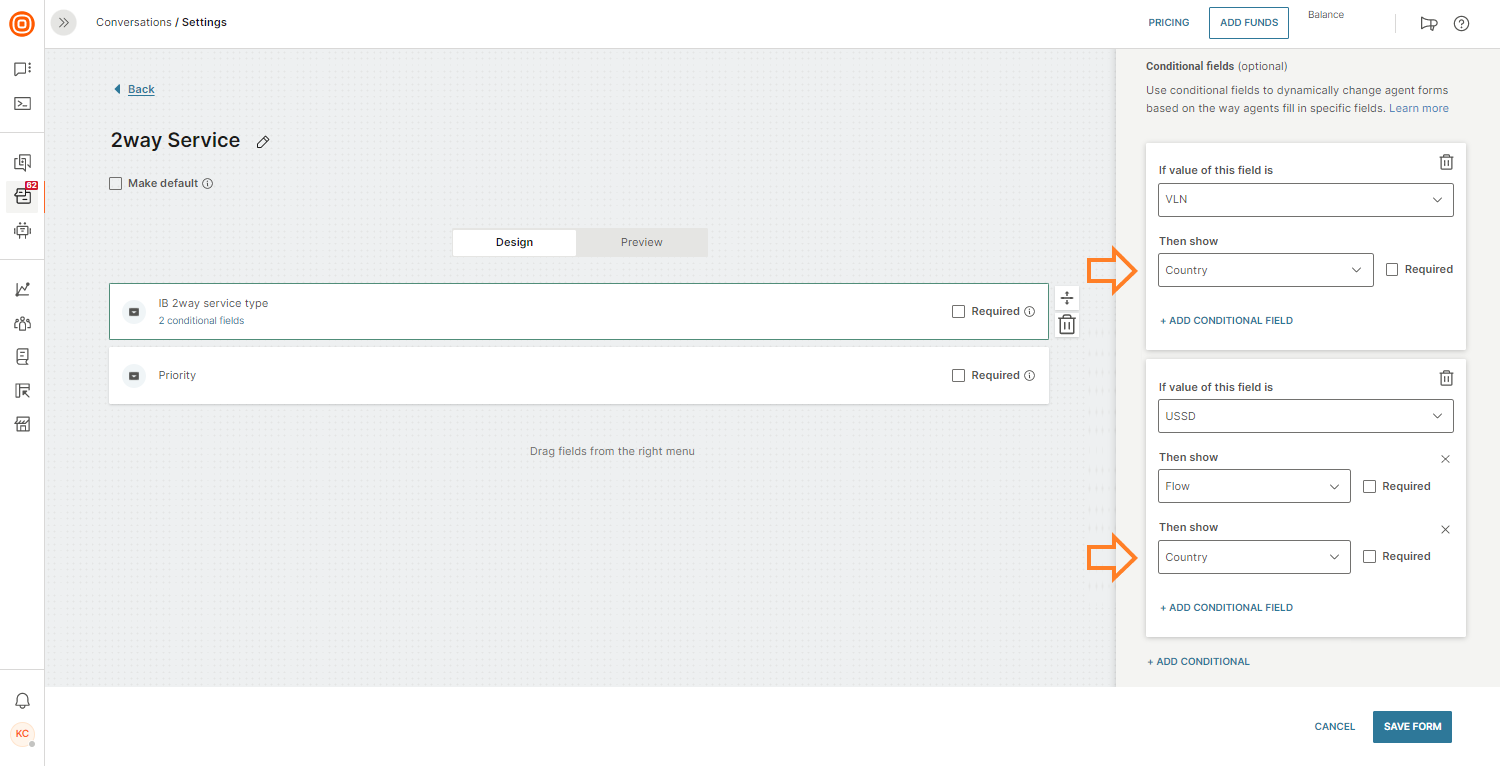
You can mark input as conditional, meaning that if some fields are set to a specific value, additional fields will be shown to the agent. Moreover, you can set any of these conditional fields as required so the agents know they need to fill them in.
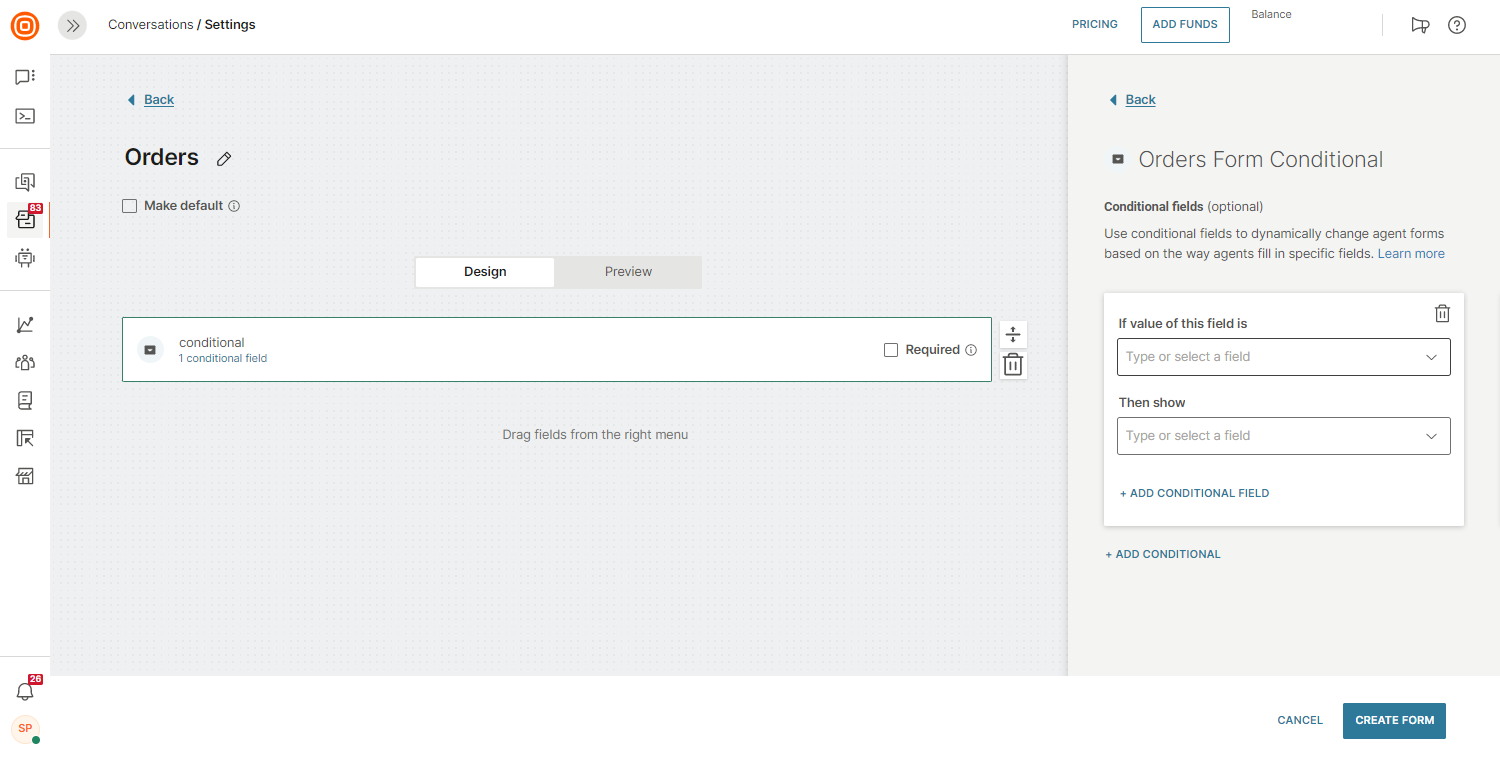
When creating a form, users can use the same conditional input fields multiple times in the form. Regardless of the setup, the input field will be shown only once. With this improvement, we are making forms more flexible and fulfilling for users:
- In the configuration, the same conditional field can be placed multiple times in the form.
- Forms cannot be created with inputs like "Input A, Input A, Input A" because conditional fields must be utilized if they are added more than once.
When you have created a form, you need to set triggers. They define which conversations will have the newly created form displayed. The triggering mechanism is similar to the one on Routing. If no triggers are fulfilled, the default form is assigned. You can mark any form as the default one.
Note that only one form can be default at any given moment.
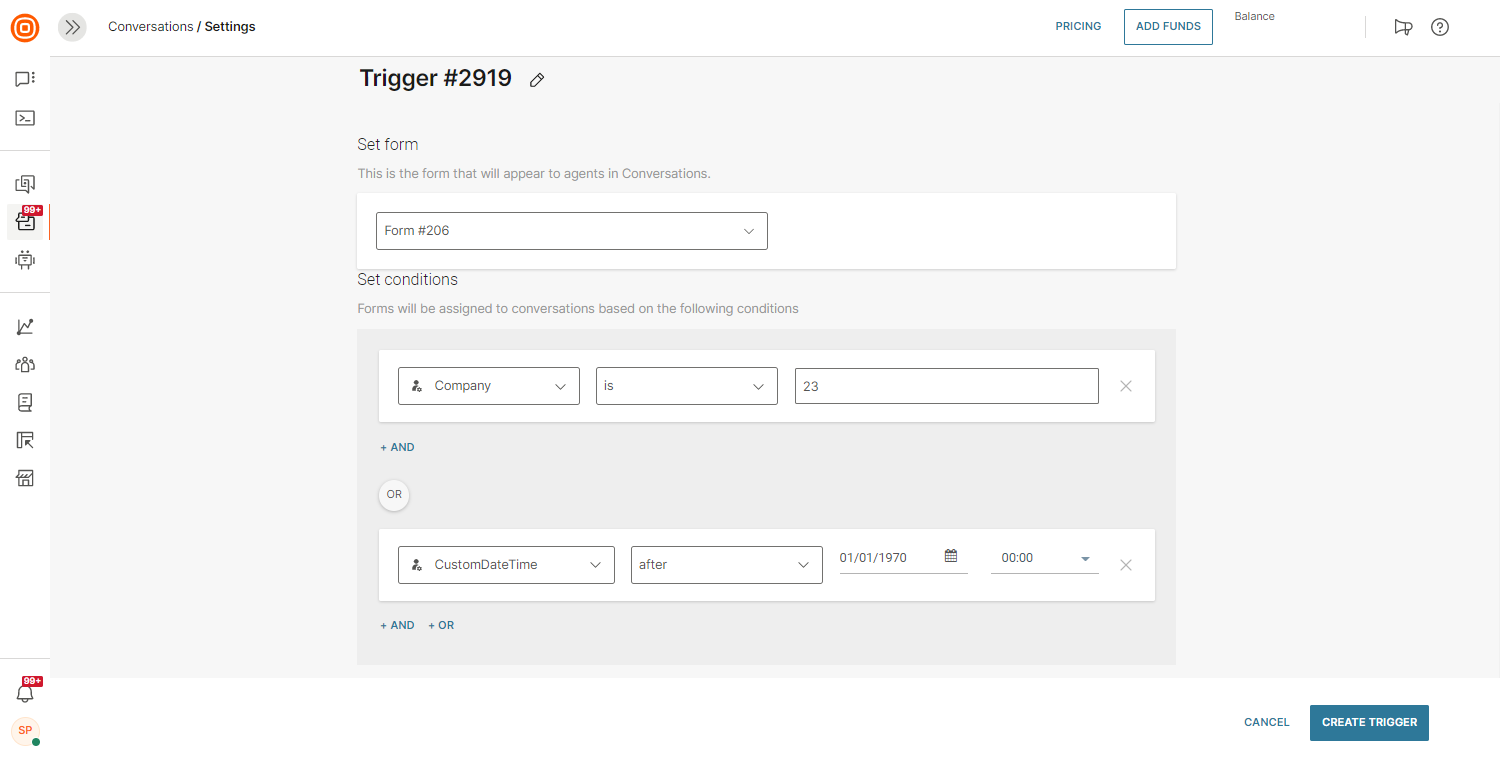
After you have added triggers, the form is ready to be displayed to agents. Also, forms will be assigned when conversations from bots or flows are transferred to an agent.
When they start a conversation, and it fulfills the parameters set in the triggers section, the form will be shown in the My Work panel so that the agent can fill in the data during or after the conversation with the customer. Agents can change the form for the conversation as needed.
As mentioned before, agents will not be able to mark the conversation as Solved/Closed if they do not fill in the required fields.
When merging two conversations, form fields set in the initiator conversation (not in the recipient conversation) are merged.
You can use the assigned forms and values entered in input fields to filter out conversations in the All Work and the Reporting section.
NOTE
In the background, all inputs are available for all conversations. The exact form that you want to use serves as a filter on input fields so that only relevant ones are shown in the conversation. This means that removing one input field from the form will not result in losing the value stored in it. This way, the input field will not be displayed within the form but is available for usage.
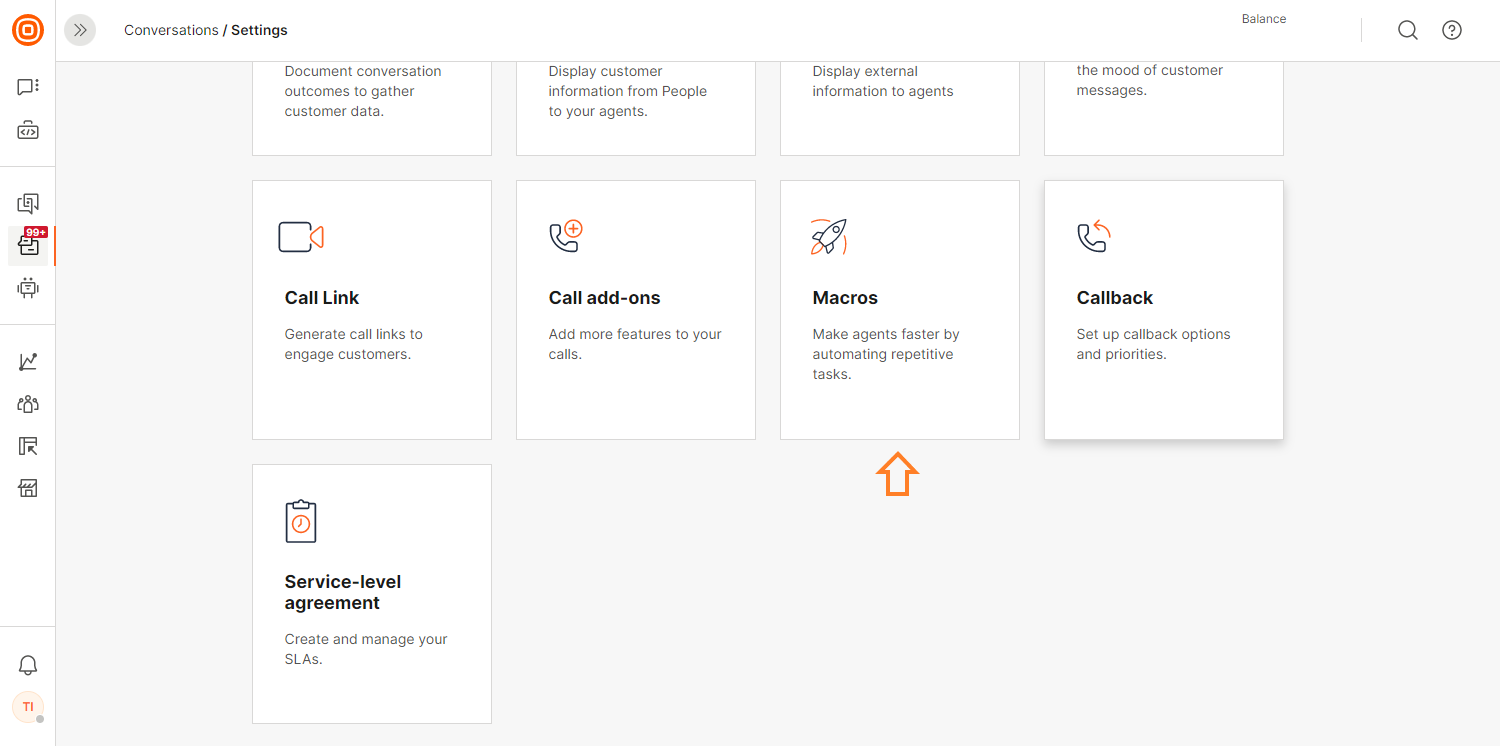
Macros
Macros are primarily used to help agents resolve repetitive tasks more quickly. These are previously made responses for agents to faster respond to customers if they often ask similar things or discuss the same topics, as well as create escalations to external sources, internal escalations within Conversations, etc. They simplify the agent's work and enable automation of the needed steps for the same use cases by simply choosing the appropriate macro, whether in open or new conversations, where all steps are completed automatically.
Available actions to automate are:
- Status (change the status of conversations)
- Priority (change the priority)
- Forms (fill in the form values/choose the correct form to be displayed to the agent)
- Template (pre-fill the template in message composer)
NOTE
Macros are only available in the Grow and Scale package.
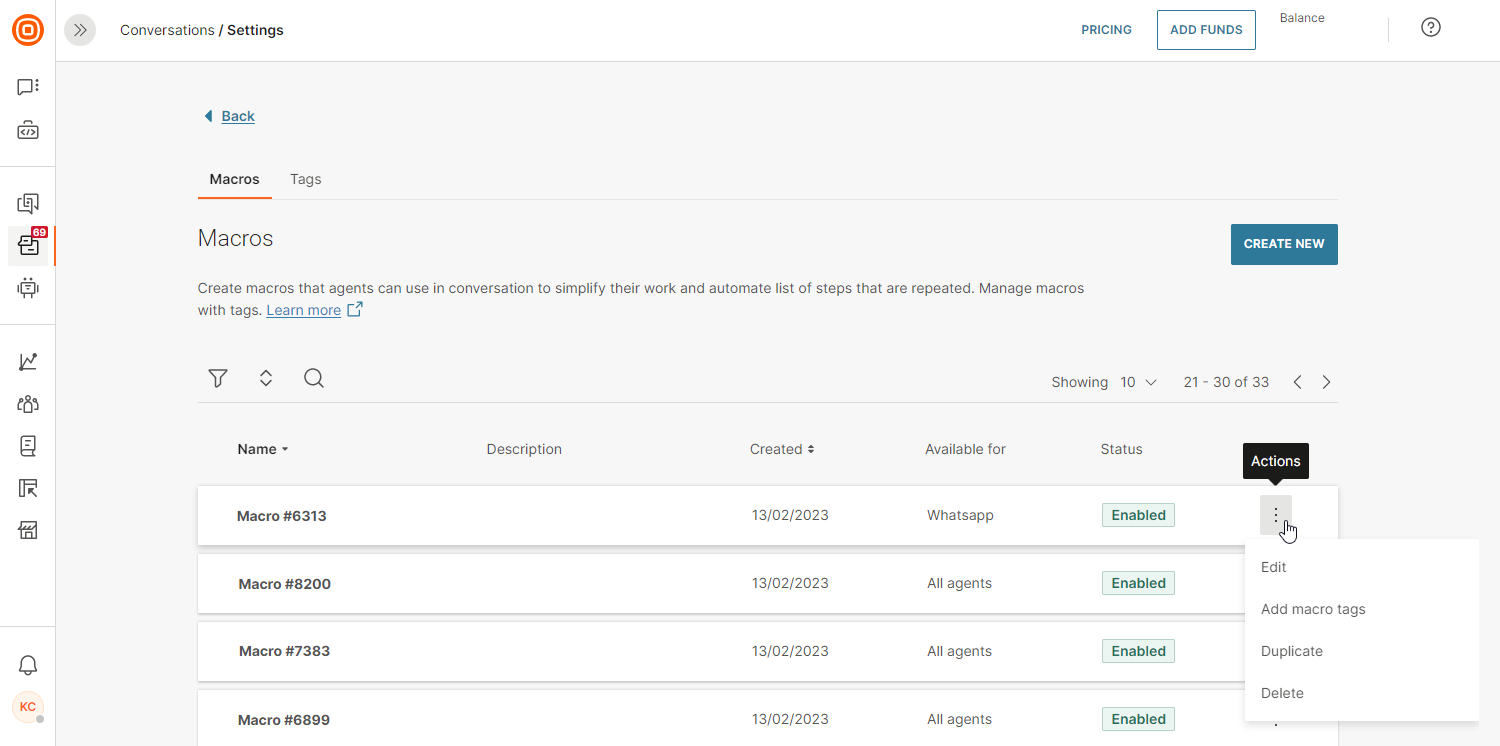
To create a new macro, navigate to Conversations → Settings → click the Macros tile.
From there, you can:
- Create new macros
- Search for the existing ones
- Edit macros
- Add macro tags
- Duplicate
- Delete
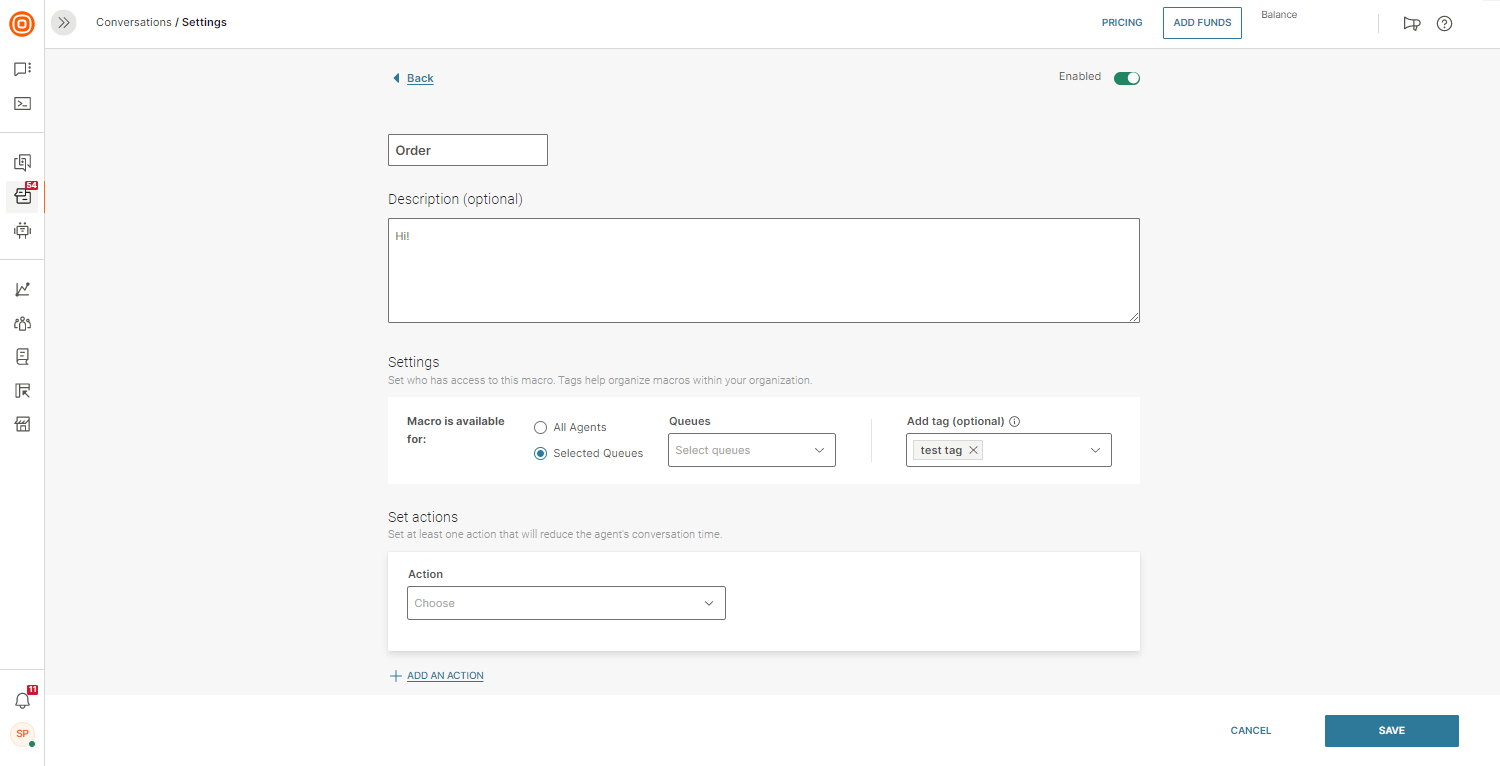
 When you click the Create New button, a new window opens where you can add the following macro details:
- Name
- Description
- Settings:
- availability for:
- All Agents (if you set it for all, then agents from all queues can use the macro)
- Selected Queues (if you click this option, you can select specific queues that will have access to the macro, and agents assigned to that queue can use it)
- Add tag (adding tags makes macros easier to find)
- availability for:
- Set actions:
- Conversation status
- Conversation priority
- Conversation form input fields
- Conversation form (you can choose which form is displayed to the agent once they apply the macro)
- Template (you can set a template per channel in one macro that is an omnichannel and can be used in multiple channels; in that case, the system automatically detects which channel the agent is in, and based on that, applies the proper template (if the template for that channel is not set, it is not populated))
- Tag conversation
- Assign agent to conversation (set the agent to which the conversation should be assigned once the macro is applied)
- Set topic or email subject for conversation
- Set conversation queue (set the queue to which the conversation should be assigned once the macro is applied)
- Fill in recipient field (choose a channel, and upon applying the macro, it will be utilized based on the sender previously selected; only supported for SMS, Viber Business Messages, WhatsApp, and Email channel)
- + Add an Action button
- Note: When setting actions, it is crucial to carefully select their order, as it can significantly affect the macro's ability to execute successfully. For instance, changing the conversation status to Solved cannot occur before assigning a form to the conversation. The proper sequence should be to first set the form for the conversation, fill in the form data, and then proceed to change the status to Solved.

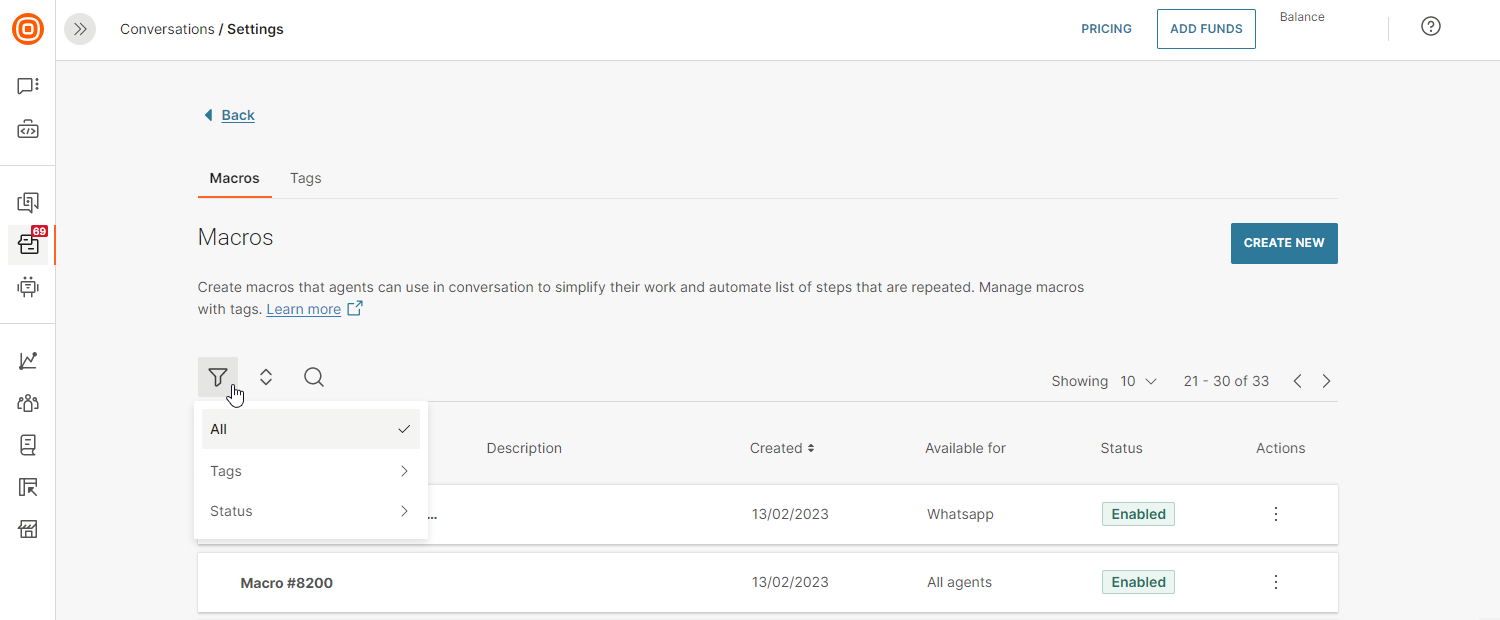
On the Macros page, you can filter them by:
- All
- Tags (these tags are not related to any other tags in Conversations since these are just macros tags that are used for faster searching or categorization of macros, e.g., escalation macros, Sales macros, etc.)
- Status
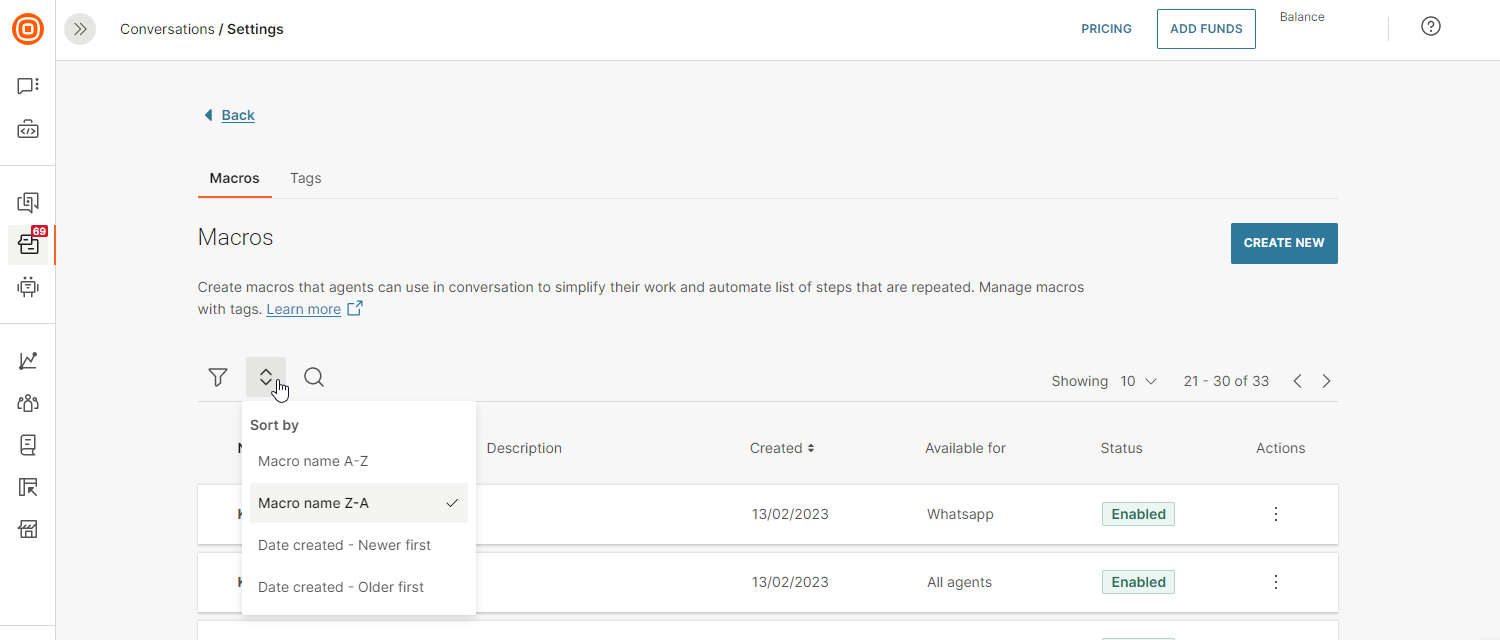
 The sorting is done by:
- Macro name A-Z
- Macro name Z-A
- Date created - Newer first
- Date created - Older first
Macro tags
Next to Macros, click the Tags tile to create new macro tags and/or edit/delete existing ones. Tags can be assigned to conversations to better categorize conversation topics or customer intent, and they are connected to the dashboard where Supervisors can analyze the number of conversations per specific tag.
The main purpose of macro tags is to group the related macros under the logical group from the supervisor perspective that could help agents in finding and utilizing the appropriate macro much faster.
Such tags can be used based on:
- Customer process flow (e.g. Problem acknowledgment (tag1), Problem resolution postponed (tag2), Problem resolved (tag3), etc.)
- Importance of customer (e.g. Gold customer macros, Silver customer macros, etc.)
Once the agent uses a certain macro, they do not need to remember its name, since they can simply use a tag suitable for the current situation they are handling, and based on that, get the needed macro faster because the list will be already filtered for the situation they are handling.
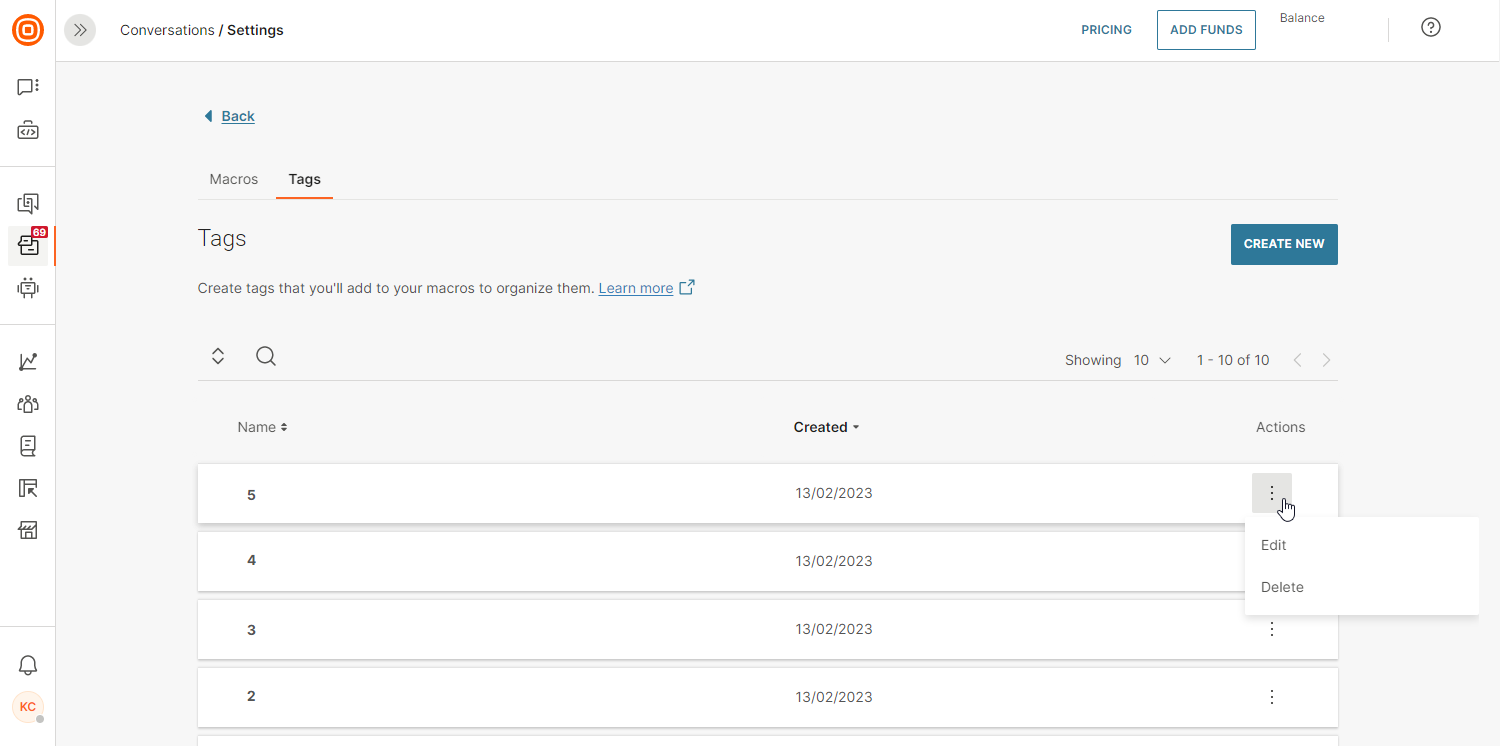
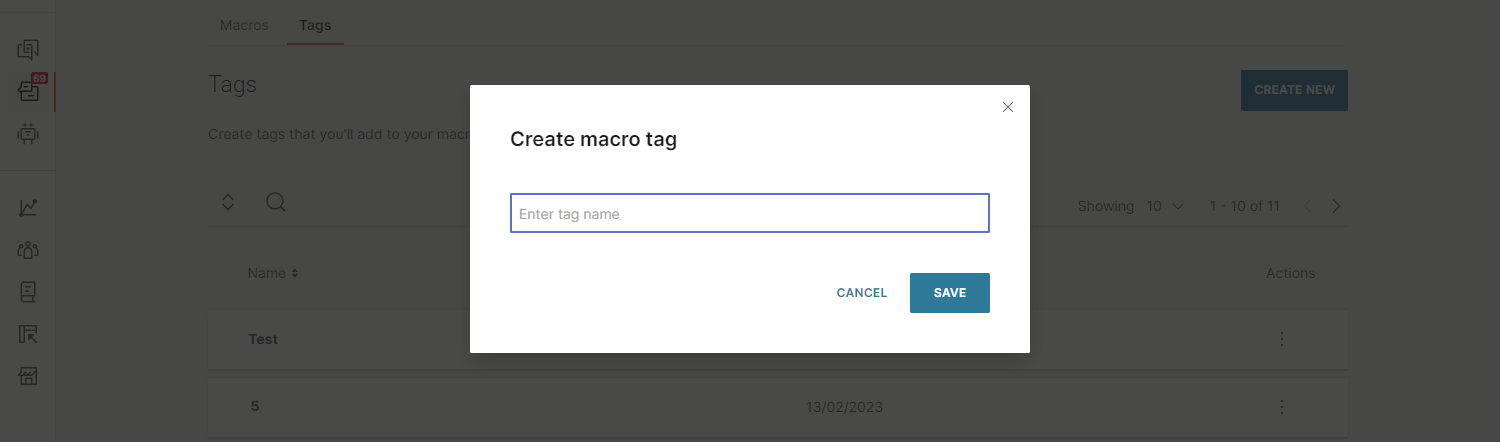
To create a new tag, click the Create New button, enter the tag name and click Save.
Users and permissions
In order to provide a more flexible approach to users and permissions, we have added four Conversations roles that can be set on the user’s profile:
- Conversations Agent – Users assigned to this role can handle conversations.
- Conversations Manager – This user can manage conversations regardless to whom they are assigned.
- Conversations Analytics Manager – Can check analytics and reports
- Conversations Account Manager – Users who can manage Conversations setup.
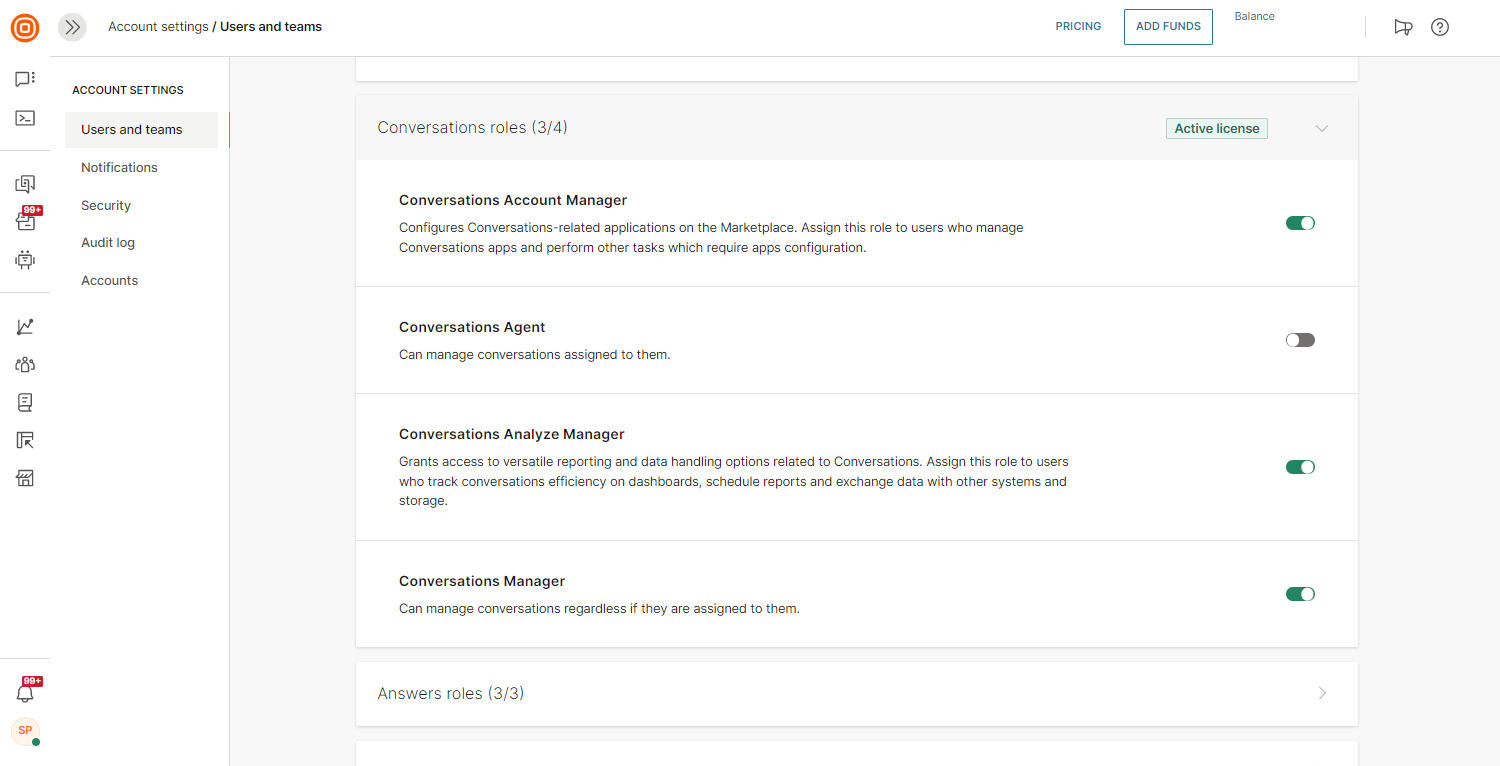
Note that these roles can be combined, which means that one user can have multiple roles assigned, thus fulfilling any specific permission needs the client might have. A user cannot have both Agent and Manager roles because the Manager role has all the permissions that the Agent role has and additional access rights.
Every user assigned to any of the Conversations roles needs to have an active Named User License (NUL).
After you have set this up, the new user will get an email with login data and can successfully log in to the Conversations module.
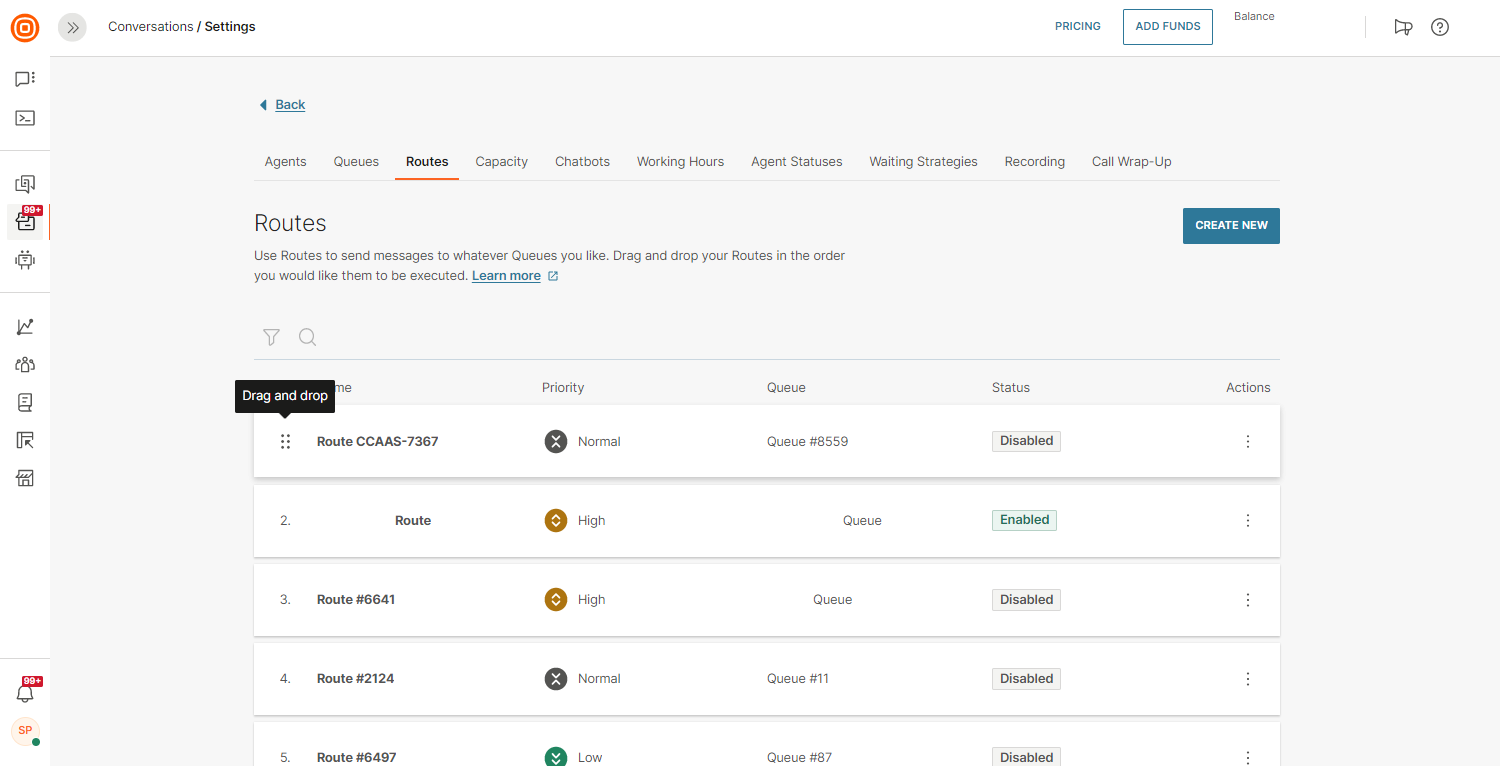
Queues and routing
Conversations routing is a process of finding the right queue for new messages from where they can be further processed. The new message is evaluated against each route in routing and when the first route is matched, the message is added to the specified queue. If no route is matched, the message is added to a default queue.
The order of routes inside routing is important because the new message is compared to a rule in a given order in routing to find the first match.
Routing is a set of rules which determine the assignment of a new conversation to a particular queue executed in a specific order.
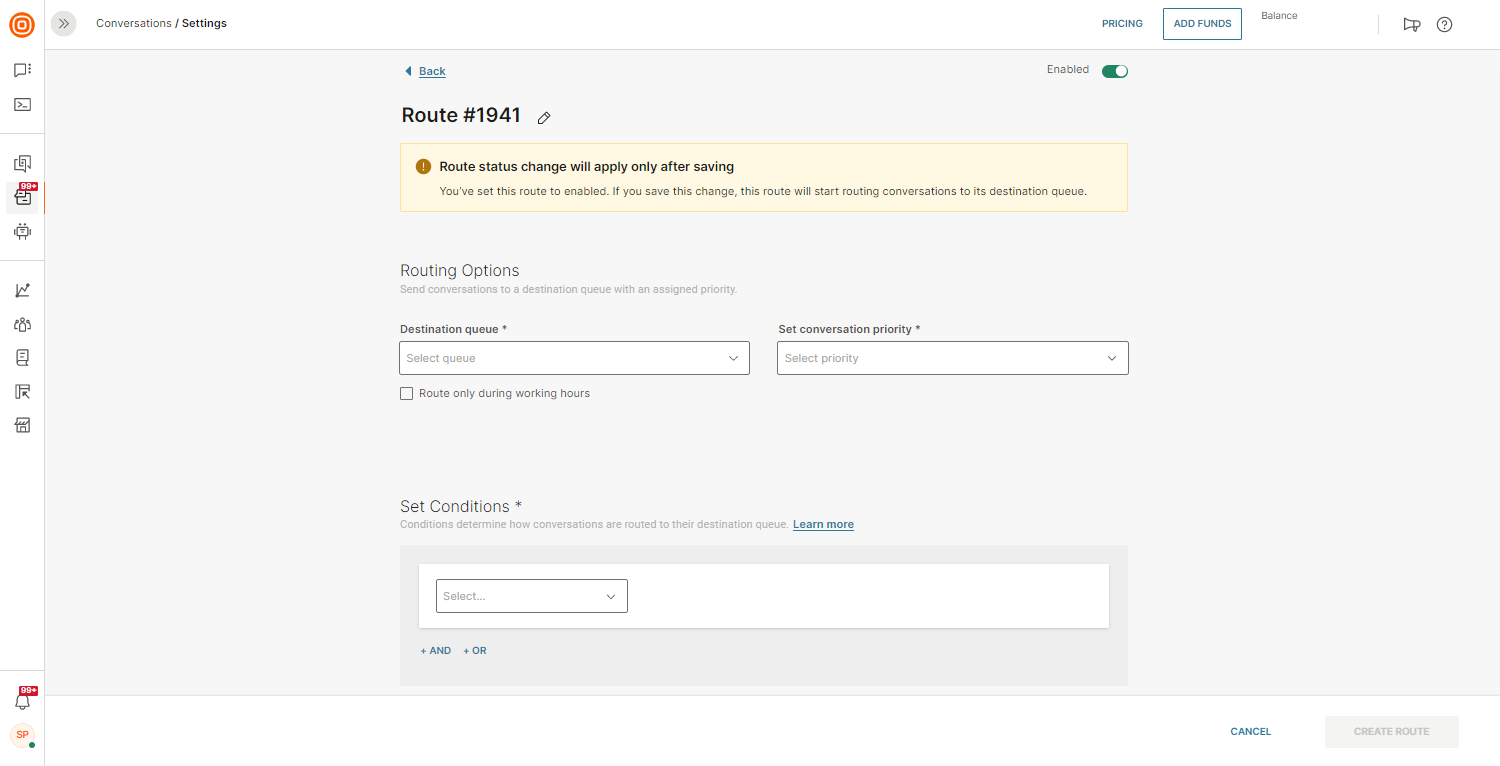
Route consists of a set of conditions that determine the destination queue and priority for a new conversation.
Conditions are expressions defined based on the message or customer attributes and conversations tags.
IMPORTANT
You can manage both queues and routes over the web interface and API.
Only supervisors can create and/or change route setup.
You can define and store customers' information in the People module.
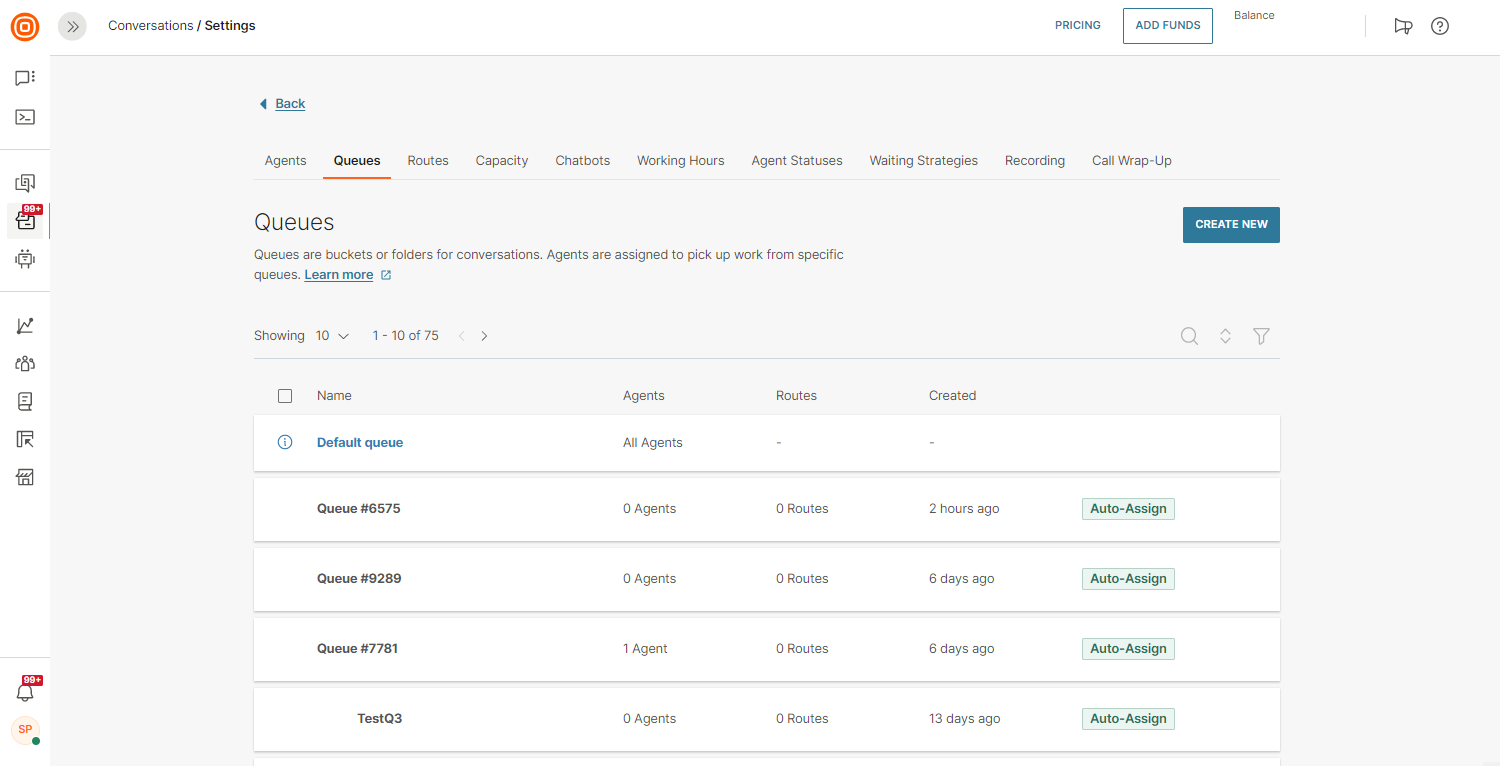
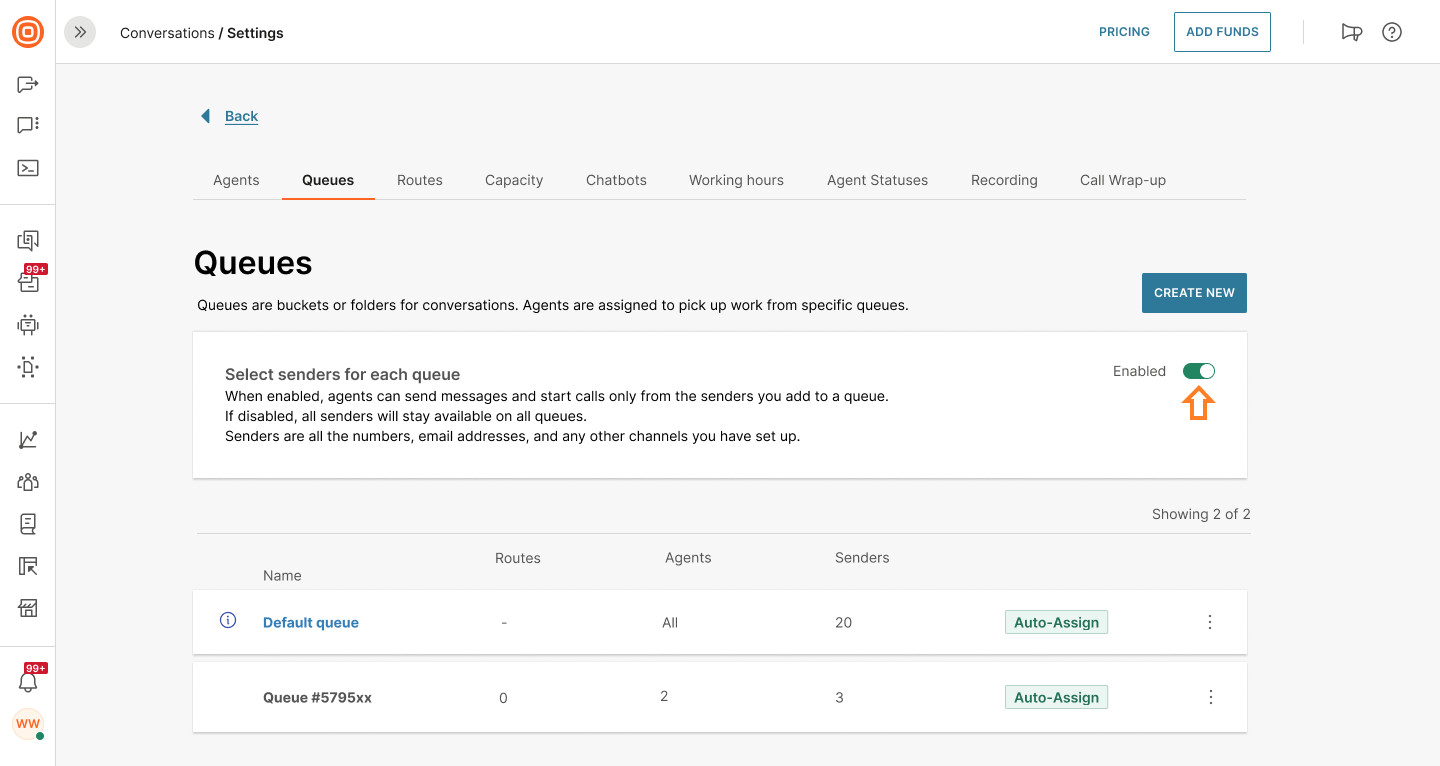
Queues
Queues are buckets or folders for conversations. Agents are assigned to pick up work from specific queues. New conversations are handled based on specific rules called routes. The purpose of queues is to categorize conversations. Supervisors can assign agents to certain queues, so conversations are managed in a timely manner by the most knowledgeable team members.
Important to note is that the Default queue is a system-defined queue that collects all unmatched conversations during routing. It is available to all agents and all agents are part of this queue automatically. All agents have access to conversations in the default queue and can reply to customers. The default queue can be changed in a conversation but it cannot be deleted.
Manage queues
Queue management inside the web interface is located within the Conversations module → Settings → General setup → Queues.
Previously created queues are listed on the Queues page, and this is where Supervisors can:
- Check the lists of created queues
- Create a new queue
- Manage existing queues
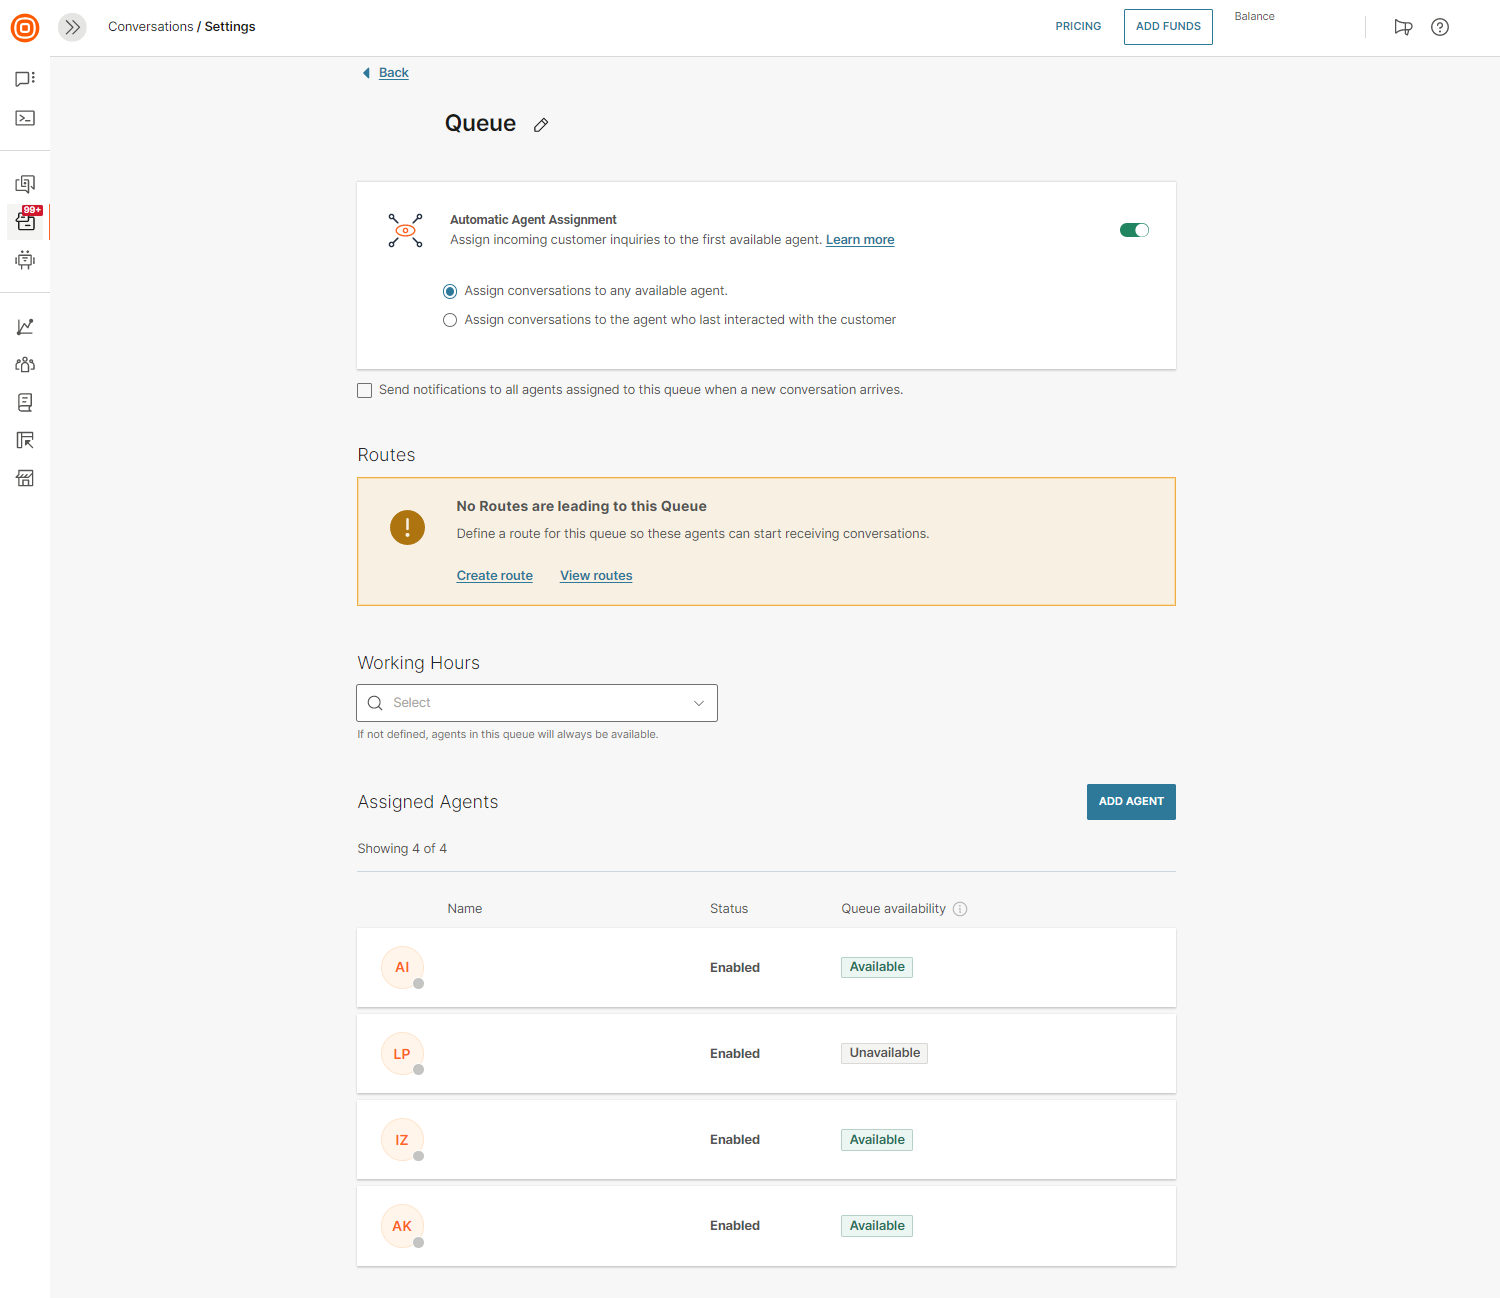
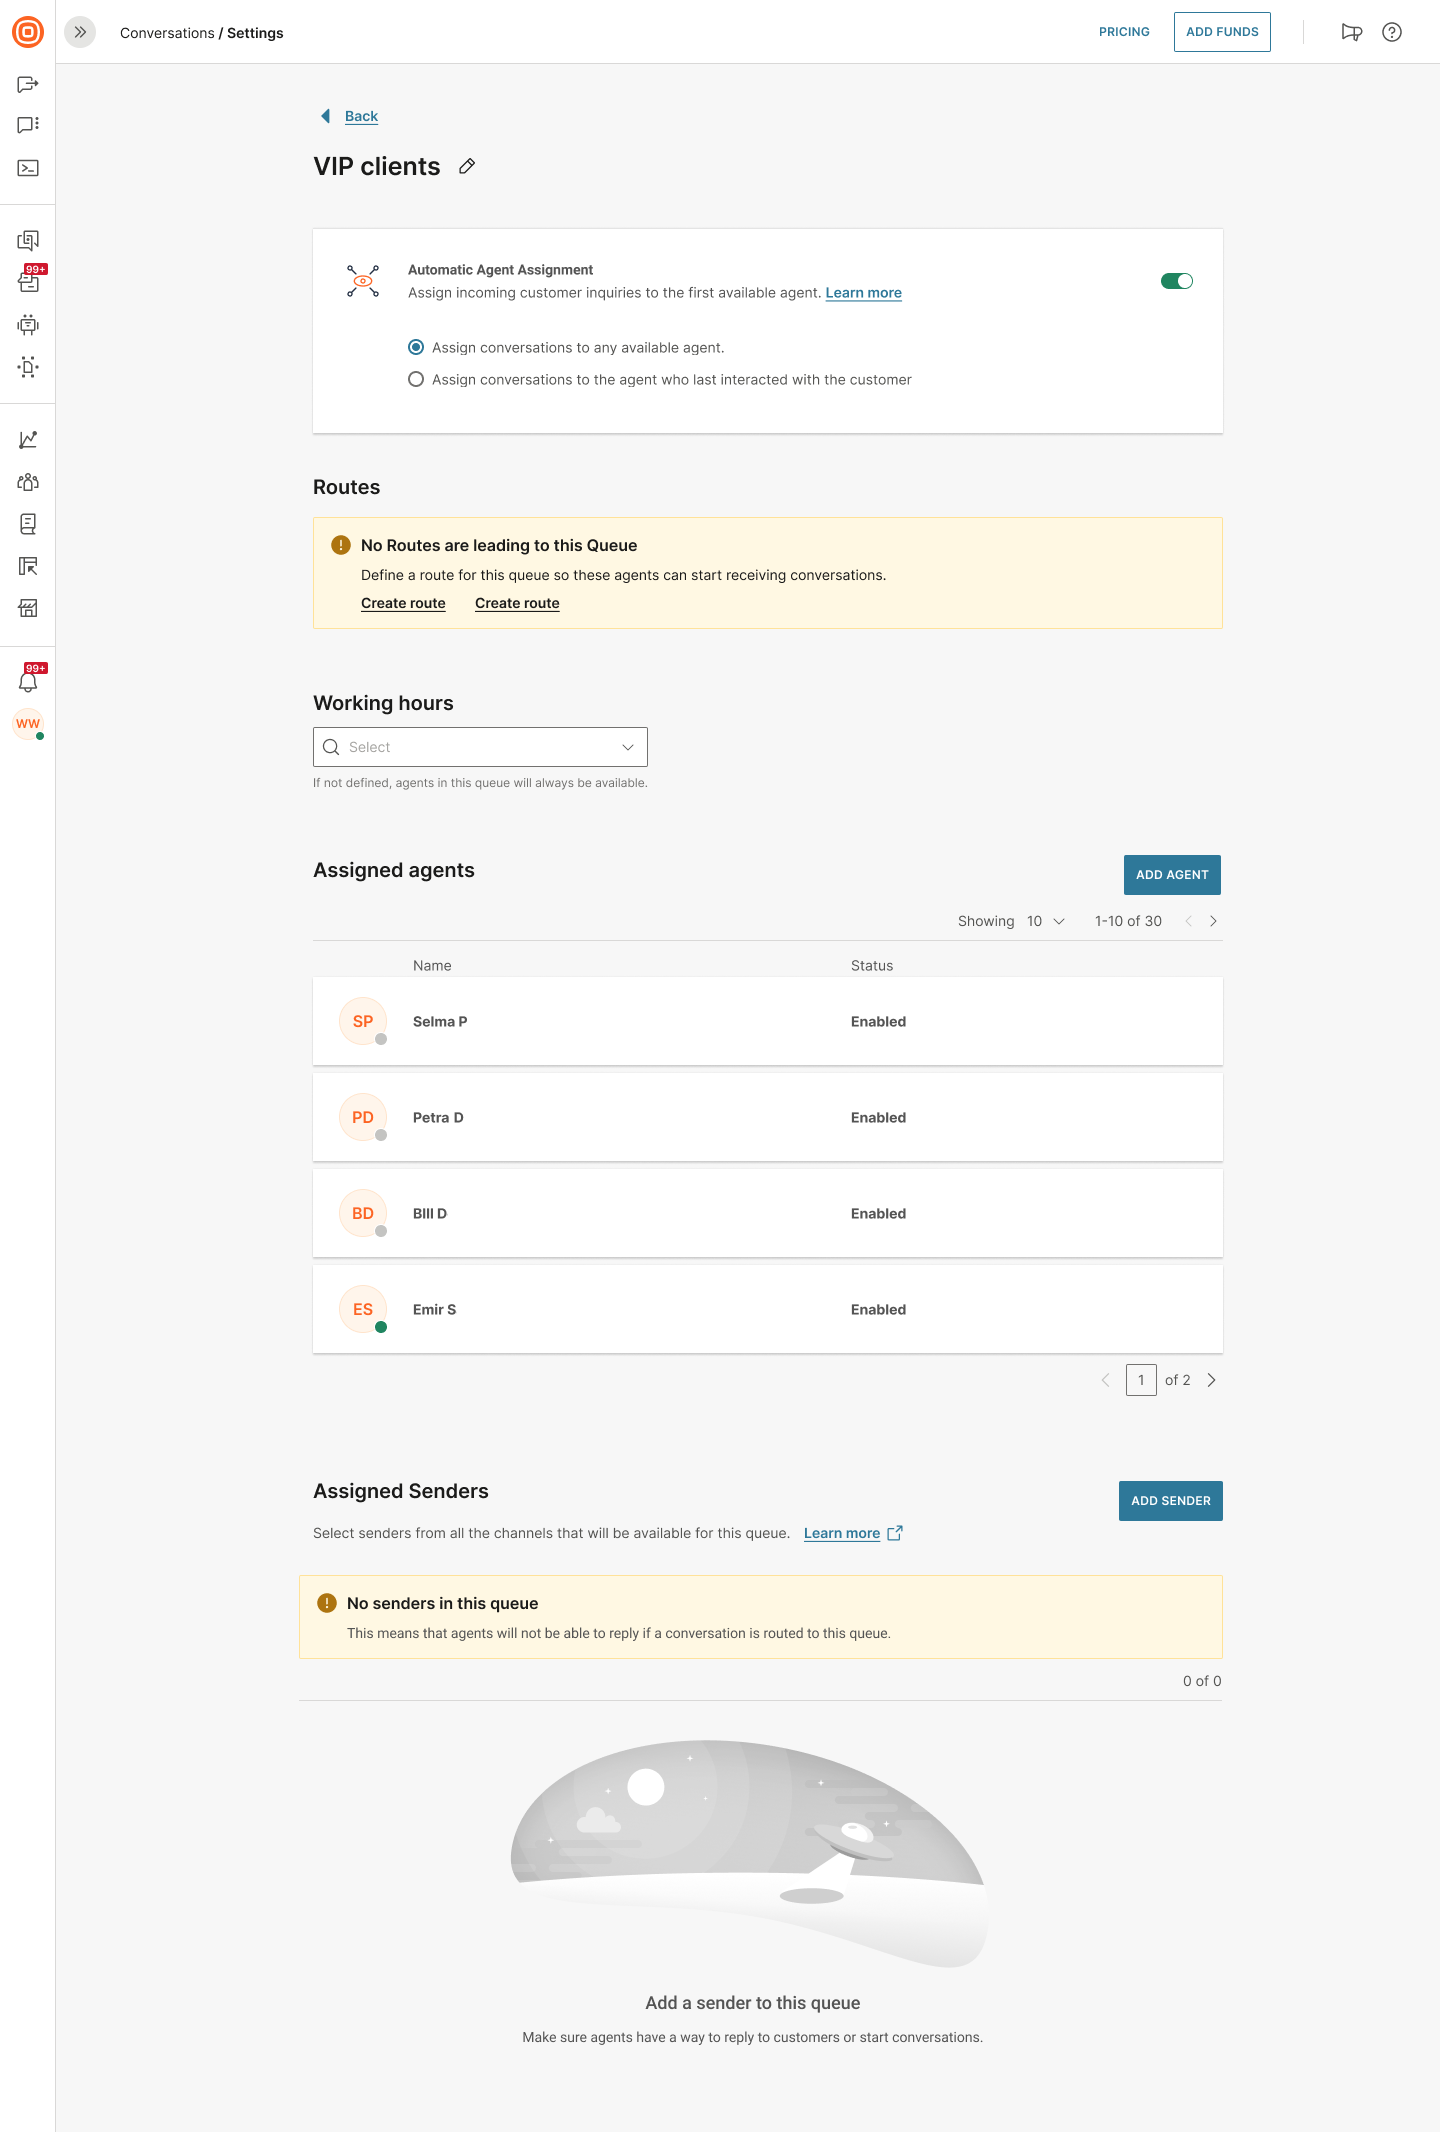
When you click on a queue name, the Queue detail page will open. Here you can find more information about the selected queue such as:
- Name of the queue
- List of agents assigned to the queue
- List of routes leading to that queue
For easier management, it is recommended to name the queue according to its purpose. For example, if you have frequent inquiries from premium customers you can name the queue 'Premium customers'. You can manage assigned agents and routes setup on the same page.
Create a queue
To create a new queue, click on the Create New button in the top right corner. Every new queue is named ‘Queue #X’ by default where X is a random number, but the Supervisor can rename the queue at any point. Agents and routes should be assigned to created queues to make them functional.
When you click Add Agent, the list of enabled agents appears on the right side panel and any agent can be added to the queue. To add a route, the Supervisor can choose from the list of existing routes or create a new one and assign it to the queue.
Auto assignment on the queue level is mandatory for calls, so you should enable this for the default queue and/or all other queues you expect calls to be routed to.
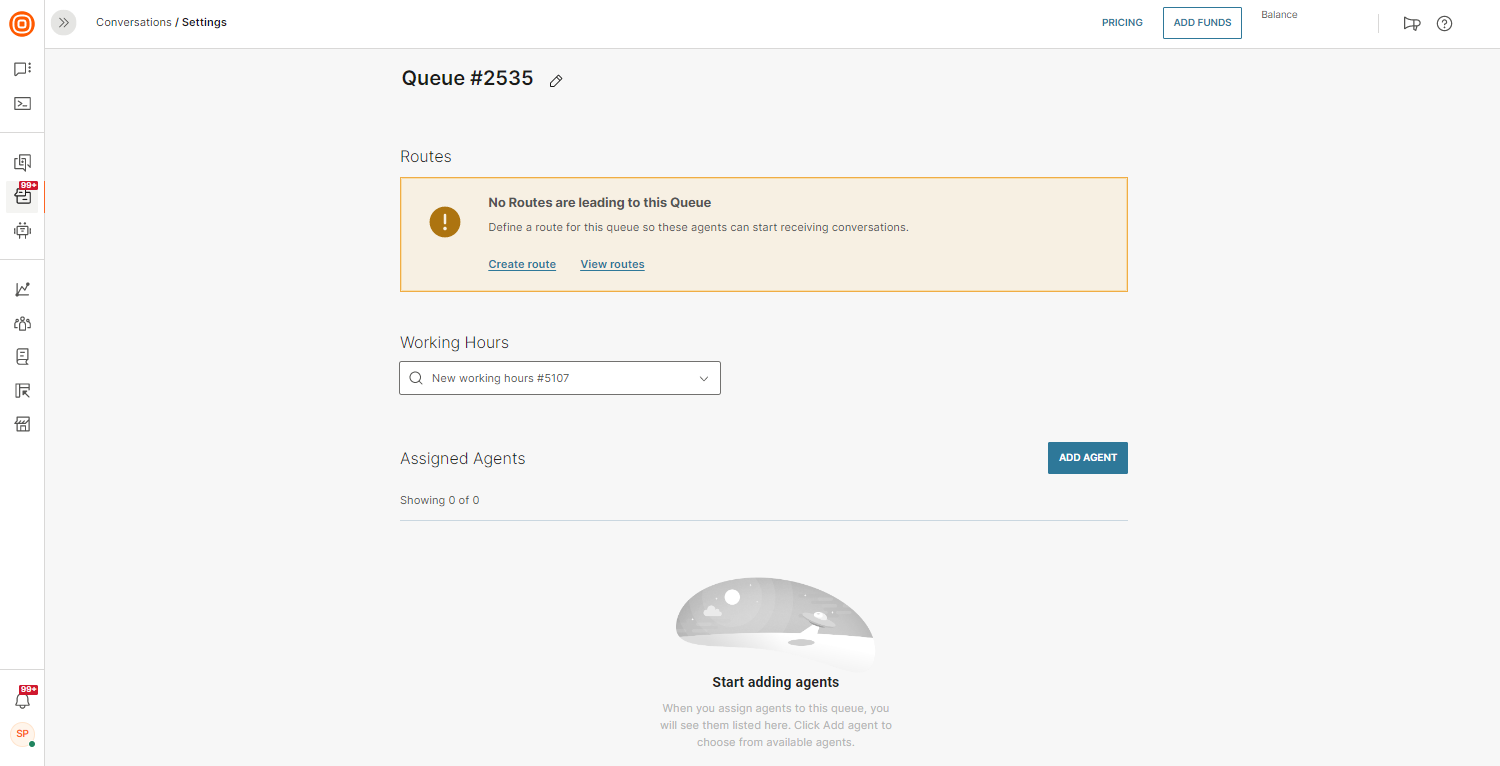
Delete a queue
To delete a queue, navigate to the list of all queues, click the three dots, and then Delete. Only queues that do not have an active conversation associated with it can be deleted.

Working hours
Set the working hours for this queue. Choose a suitable period from the drop-down menu. Read more on how to create new Working Hours.
Automatic agent assignment for chats
The Automatic Agent Assignment is a process of distributing conversations between available agents based on their workload, capacity, and idle time. Supervisors can configure this on the queue level in the Conversations module → Settings → General setup → Queues.
NOTE
This info is for automatic agent assignment for chats only. Calls have a different logic - please scroll down to that section to read more.
Automatic agent assignment is turned on by default for all new queues. This applies to all channels.
There are two options you can choose for the Automatic Agent Assignment:
- Assign conversations to any available agent – where agents are randomly picked out of all agents assigned to the queue the conversation is routed to
- Assign conversations to the agent who last interacted with the customer – where previous interactions with the customer are taken into consideration creating a situation where the agent might already have some context. When using this option, you can set an additional parameter: the period during which the agent had to have communicated with the customer to be considered for assignment.
For the second option, you can select one of the following:
- In the last 30 days
- In the last 60 days
- In the last year
- Ever
The process when a new conversation is assigned to a queue goes like this:
- Automatic Agent Assignment process starts (only one can run at any given time)
- On newly created conversations
- Or when an agent changes their status to Available
- Availability is calculated
An agent is marked as Available when their status is available, and they have fewer conversations assigned in any status other than Closed, than their defined capacity - Workload and waiting time is calculated for every agent marked as Available
When a conversation is in one queue, and is transferred to another one where the Automatic Agent Assignment is turned on, the agent is assigned automatically. However, if a conversation is in one of the statuses that are set not to occupy the agent, then the Automatic Agent Assignment does not occur, and, if needed, the agent manually assigns the conversation to themselves.
In the Conversations statuses and capacity section, you can exclude or include statuses that you do not want to be counted in the capacity. The conversation statuses you select here will be counted into an agent's maximum capacity.

NOTE
The Open status is displayed here but you cannot move it because it is counted by default.
You can exclude Solved and/or Waiting status when calculating capacity. This means that agents will appear Busy while in the status you select in this box.
Additionally, use the Reset to default button on the far right to reset this configuration.
NOTE
These options should alleviate any previous issues with agent capacity not being counted correctly or when agents were not able to receive new conversations.
When agent occupancy has dropped, AA is triggered for that specific agent. The following areas can cause a drop in occupancy:
- Conversation unassigned
- Conversation closed
- Conversation merged
- Transition from included to excluded conversation status
When a conversation is routed to a queue and assigned to an agent, and in the meantime, the queue changes, the following happens:
- If the agent is assigned to the new queue, they are left assigned to the conversation after the queue change.
- If the agent is not assigned to the new queue, they are unassigned from the conversation, and the Automatic Agent Assignment starts (if turned on) on the new queue. If the Automatic Agent Assignment is not turned on, the system is waiting for agents in that new queue to take the conversation and handle it.
Also, if an agent was previously assigned to a conversation, they are not eligible for AA for the same conversation.
NOTE
AA triggered on Working Hours starts on the corresponding queues for the conversations that arrived during non-working hours.
Bulk AA algorithm is triggered at the beginning of the working hours, which means that all conversations that arrive outside business hours will be assigned once the agents' shift starts. When an agent becomes available, either by coming online with free capacity or by unassigning some conversations, they enter an available status. At this point, unassigned conversations are retrieved for that agent and ordered. The ordering is such that those with higher priority are placed at the top, and if there are conversations with the same priority, they are further ordered by the createdAt timestamp. The conversations are then assigned to the agent until their capacity is full. This process is commonly referred to as "bulk auto-assignment."
Single AA algorithm has in mind the sticky agent first. If not found, the system looks for the best option (agent) in terms of workload and availability. This algorithm applies when a conversation changes its queue but also when a conversation is unassigned - it will exclude the previously assigned agent and look for a new one assignee.
Workload is represented as the ratio of occupancy and capacity. If two agents are eligible to be assigned to a conversation, and Agent A has the capacity of 4 and occupancy (number of open conversations assigned to the agent) of 2, and Agent B has the capacity of 8 and occupancy of 3, the conversation will be assigned to Agent B. This is because Agent A has an occupancy/capacity ratio equal to 0.50 and Agent B has a ratio of 0.38. We can say here that Agent B has more capacity to handle the new conversation.
Waiting time is the time marked from the last conversation assignment to the agent, meaning that the agent that was waiting longer has more chance to get a new conversation
Those two values are combined into a formula that results in the agent to whom the new conversation is assigned. This Automatic Agent Assignment logic applies to chat conversations only.
Automatic agent assignment in action
If the sticky agent option is not selected, then the system applies the Weight Sum Method. The following showcases how that is calculated (simplified).
A list of all Available agents in the queue is created, and every agent has two attributes assigned:
- Workload
([occupancyLiveChat] [occupancyLiveMessaging]
__________________ x100 + _____________________ x100 )
([capacityLiveChat] [capacityLiveMessaging]
Workload= ____________________________________________________________________________________2
- Unserved Time
UnservedTime = CurrentTime - TimeOfLastAssignment
| Agent | LiveChat Capacity | LiveChat Occupancy | LiveMessaging Capacity | LiveMessaging Occupancy | Workload | Unserved Time (seconds) |
|---|---|---|---|---|---|---|
| Agent 1 | 10 | 5 | 20 | 4 | 20 | 10 |
| Agent 2 | 5 | 1 | 10 | 5 | 35 | 200 |
| Agent 3 | 20 | 15 | 5 | 1 | 48 | 300 |
Weights are added to attributes, 0.5 for Workload and 0.5 for Unserved time, which means that both impact the overall result equally.
For any agent to be selected, the Workload should be as small as possible, and the Unserved time as large as possible. Workload is treated as a “non-beneficial attribute”, and Unserved time as a “beneficial attribute”.
| Agent | Workload (weight 0.5) | Unserved Time (weight 0.5) |
|---|---|---|
| Agent 1 | 20 (non-beneficial) | 10 |
| Agent 2 | 35 | 200 |
| Agent 3 | 48 | 300 (beneficial) |
For agents on the list, the minimum workload (non-beneficial attribute) of all agents is divided by the workload of each agent.
| Agent | Workload (weight 0.5) | Unserved Time (weight 0.5) |
|---|---|---|
| Agent 1 | 20 ÷ 20 = 1 | 10 |
| Agent 2 | 20 ÷ 35 = 0.57 | 200 |
| Agent 3 | 20 ÷ 48 = 0.42 | 300 |
For agents on the list, the Unserved time values are divided by the highest Unserved time value (beneficial attribute) of all agents on the list.
| Agent | Workload (weight 0.5) | Unserved Time (weight 0.5) |
|---|---|---|
| Agent 1 | 1 | 10 ÷ 300 = 0.03 |
| Agent 2 | 0.57 | 200 ÷ 300 = 0.67 |
| Agent 3 | 0.42 | 300 ÷ 300 = 1 |
Divided values are then multiplied by 0.5 (weights for Workload and Unserved time).
| Agent | Workload (weight 0.5) | Unserved Time (weight 0.5) |
|---|---|---|
| Agent 1 | 1 x 0.5 = 0.5 | 0.03 x 0.5 = 0.02 |
| Agent 2 | 0.57 x 0.5 = 0.29 | 0.67 x 0.5 = 0.34 |
| Agent 3 | 0.42 x 0.5 = 0.21 | 1 x 05. = 0.5 |
Performance score for each agent on the list is then calculated by summing up the values from previous steps.
| Agent | Workload (weight 0.5) | Unserved Time (weight 0.5) | Performance Score (Workload + Unserved Time) |
|---|---|---|---|
| Agent 1 | 0.5 | 0.02 | 0.52 |
| Agent 2 | 0.29 | 0.34 | 0.63 |
| Agent 3 | 0.21 | 0.5 | 0.71 |
The agent with the highest number wins and the conversation is assigned to them (as shown in the table above).
NOTE
The Default queue is a system-defined queue that collects all unmatched conversations during routing. All agents have access to conversations in the default queue and can reply to customers. The default queue can be changed on a conversation but it cannot be deleted.
The auto assignment is available on the Default queue as well. This is the queue where all conversations land in case no match is found in the Routing criteria for specific queues.
Automatic agent assignment for calls
Besides standard automatic agent assignment which applies to chats, you can also set it up for calls. The logic is a little bit different here.
This is what the process looks like when a new conversation is assigned to a queue:
- The automatic agent assignment process starts (only one can run at any given time)
- It is applied to newly created conversations
- Or when an agent changes their status to Available
Note that for calls, availability is taken into consideration. An agent is considered available to take on new calls when they set their status to Available, and they have fewer conversations assigned in any status other than Closed, than their defined capacity.
Workload and waiting times are calculated for every agent who is in the Available status.
Routing
As mentioned in the beginning, Routing is defined as a set of rules that determine the assignment of a new conversation to a particular queue executed in a specific order.
With route management, you can define business rules according to which incoming customer requests will be assigned to queues and agents for the most effective resolution.
Create a Route over Web Interface
To create a route over the web interface, you need to set up rules.
The rules are customizable and can refer to, e.g.,:
- Message attributes such as channel, sender, receiver, or message content
- Customer attributes that you specified in the People module (e.g., name, city, purchase power, etc.)
- Conversation tags assigned manually or through automated flow
- IVR inputs collected to a variable through automated flow
- Custom data from Web and In-App Calls and Video
Only when all the above-mentioned parameters are defined, you can create a new route and it will be shown in the list of all routes.
Any route can be set as Enabled or Disabled (default status is Enabled).
NOTE
Only routes set as Enabled will be taken into consideration when a new conversation starts.
In the table below you can find the options you can use to set up routes.
| Category | Existing attributes | Operators | Values |
|---|---|---|---|
| Conversation attributes | channel |
is is not |
Select channel |
| Content |
is is not contains starts with |
Free input
|
|
| Conversation Tags |
in list not in list |
Tags dropdown (you can select only one) | |
| from |
is is not contains starts with |
Free input | |
| is visitor |
is is not |
True False |
|
| to |
is is not |
Sender dropdown | |
| Standard person attributes | address |
is is not contains starts with |
Free input |
| birthDate |
is is not before after before or on after or on |
Date picker | |
| city |
is is not contains starts with |
Free input | |
| country |
is is not contains starts with |
Free input | |
| customer tags |
contains does not contain |
Free input | |
| externalPersonId |
is is not contains starts with |
Free input | |
| firstName |
is is not contains starts with |
Free input | |
| gender |
is is not |
Male Female |
|
| integrations |
is is not contains starts with |
Free input | |
| lastName |
is is not contains starts with |
Free input | |
| middleName |
is is not contains starts with |
Free input | |
| modifiedFrom |
is is not contains starts with |
Free input | |
| nickName |
is is not contains starts with |
Free input | |
| preferredService |
is is not contains starts with |
Free input | |
| type |
is is not contains starts with |
Free input | |
| Custom person attributes | N/A | ||
| Standard company attributes | accountManager |
is is not contains starts with |
Free input |
| country |
is is not contains starts with |
Free input | |
| customerStage |
is is not contains starts with |
Free input | |
| domains |
contains does not contain |
Free input | |
| industry |
is is not contains starts with |
Free input | |
| name |
is is not contains starts with |
Free input | |
| notes |
is is not contains starts with |
Free input | |
| segment |
is is not contains starts with |
Free input | |
| tags |
is is not contains starts with |
Free input | |
| vatNumber |
is is not contains starts with |
Free input | |
| Custom company attributes | N/A | ||
| (Channel specific) Apple Messages for Business attributes | device agent |
is is not contains starts with |
Free input |
| group |
is is not contains starts with |
Free input | |
| intent |
is is not contains starts with |
Free input | |
| locale |
is is not contains starts with |
Free input | |
| (Channel specific) Email attributes | email cc |
contains does not contain |
Free input |
| email from |
is is not contains starts with |
Free input | |
| email subject |
is is not contains does not contain starts with |
Free input | |
| email to |
in list not in list |
Sender dropdown | |
| Custom attributes | N/A | ||
| Sender | N/A |
in list not in list |
Queues drop-down |
Destination queue over web interface
Setting up routes means that when a new message arrives, the system will automatically check if message parameters comply with any of the rules specified within the route and will assign conversation according to the rules that match the defined destination queue.
Priority over web interface
If message parameters are matched with certain route rules, conversation will get a priority defined within that route setup. According to assigned priority, conversation will be shown in the list of All Conversations. Priority can be changed manually within the conversation details at any point.
Set conditions over web interface
Conditions are a set of criteria that will be checked when there is an incoming conversation. Based on those, a conversation will be added to a specific queue.
Set route order over web interface
Considering that several different routes can be set at the same time, you can set up route ordering.
When there is an incoming message, parameters will be checked, and message will be assigned according to the first route that matches against parameters.
Imagine you need to set two routing rules – one for Spanish speaking customers and another one for premium customers.
- Rule 1: If the message comes to the destination number 123 and the person sending the message has been marked as Spanish speaking within the Target module, route this message to the Spanish queue.
- Rule 2: If message comes to the destination number 123 and person sending message has been marked as premium customer within the Target module, route this message to the Premium queue.
Now each queue has a team of agents assigned to it:
- Spanish queue – Ten agents that can read and write Spanish but are juniors and don’t know anything about premium customers.
- Premium queue – Three agents who speak Spanish and English and know everything about premium customers.
What you want to make sure is that messages from your premium customers end up in the Premium queue and not in the Spanish queue. That’s why you need to set up the routing priority. The premium route should be priority number 1 and Spanish route priority number 2.
To re-arrange routes, drag and drop them according to their priority.
Enable or disable a route over web interface
All created routes can be enabled or disabled based on your needs. In case a route is set as disabled, incoming messages will not be checked against conditions in disabled routes.
Configure routing for Live Chat
This section explains what can be configured for Live Chat in Routing to assign specific requests to certain Agents queues.
To configure routing for Live Chat, navigate to the Conversations module → Settings → General setup → Routes → Create New.
Available fields that you need to set are as follows:
- To – Destination to which inbound conversation messages are sent. This field accepts
widgetIDfor Live Chat routing. Widget ID can be taken from the widget edit page and is unique for each widget configuration. - Channel – Defines if all inbound conversations from the specific channel shall be sent to a certain queue. For Live Chat applicable value is
Live_Chat - Person attributes – All Person attributes are applicable for Routing, however only if the session is coming from an authenticated (logged in) customer and if we have a Person associated with a key identity (email address, in this case).
- Authenticated customer/ anonymous visitor – can be used to differentiate which customer support queue should take on the on auth. customer or visitors. The parameter
is Visitordefines if the inbound conversation comes from an anonymous visitor. If set tofalse, then it’s treated as inbound conversation from auth. customer.
Senders configuration
NOTE
This feature is only available for the Grow and Scale package.
The Senders configuration feature limits access to specific senders based on different departments, preventing the misuse of incorrect email addresses.
The feature configuration is on an account basis, and once activated, it will be implemented throughout the entire account. The impact is evident through:
- My Work
- New conversations creation
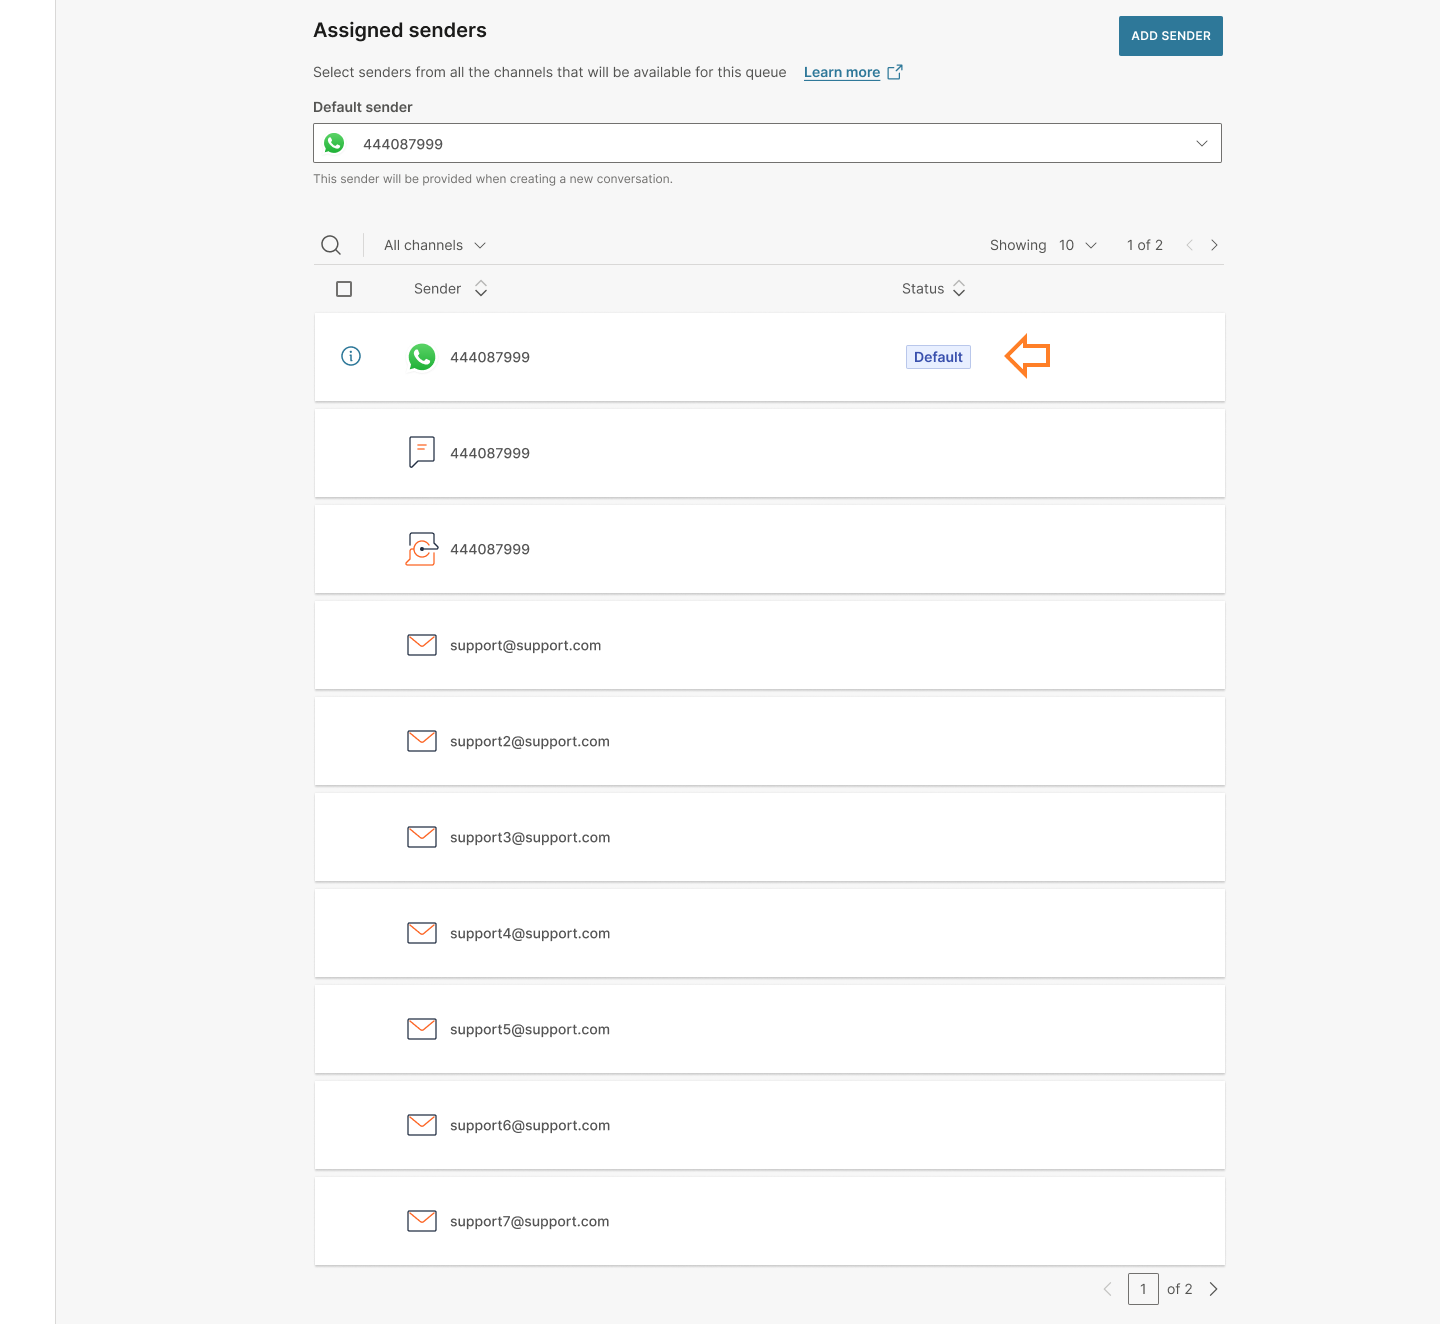
Once the Select senders for each queue feature is enabled, agents will have the ability to start conversations only with the default senders set in specific queues. Agents can send messages and start calls only from queues where the agent is assigned based on senders added in that queue. Senders are all numbers, email addresses, and any other channels you have set up. This optional queue setup allows you to define the default sender and a list of available senders for a specific queue.
To enable it, navigate to Conversations → Settings → General setup → Queues → click the toggle to enable the feature.
If the feature is disabled, all senders will stay available on all queues and all agents can access all senders without limitations.
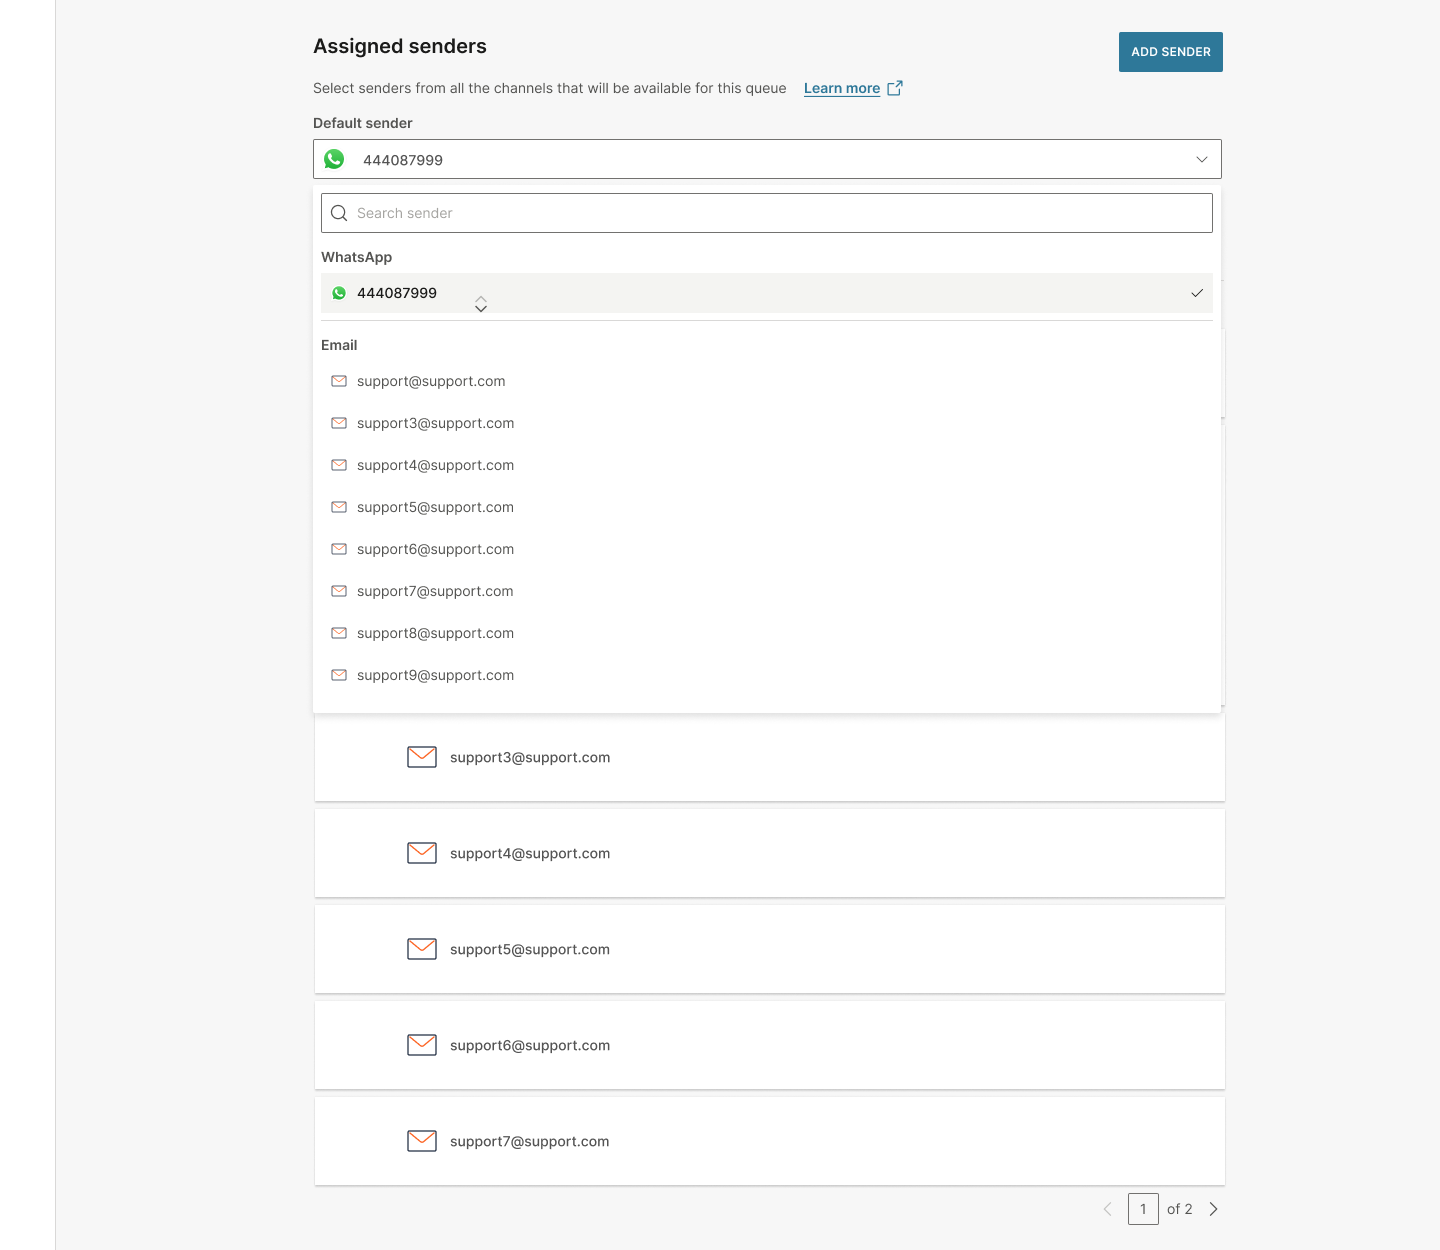
Once the queue setup page opens, click the wanted queue to select senders from all channels that will be available for this queue by navigating to the Assigned Senders modal. When you click the Add Sender button, the Add senders to queue window will open where you can search for the sender by name, number, or channel. The first sender you add will automatically be selected as the default one.
The default sender will be the only one provided when creating a new conversation, and they can be from any channel.
NOTE
Queues with Senders configuration can have only one default sender.
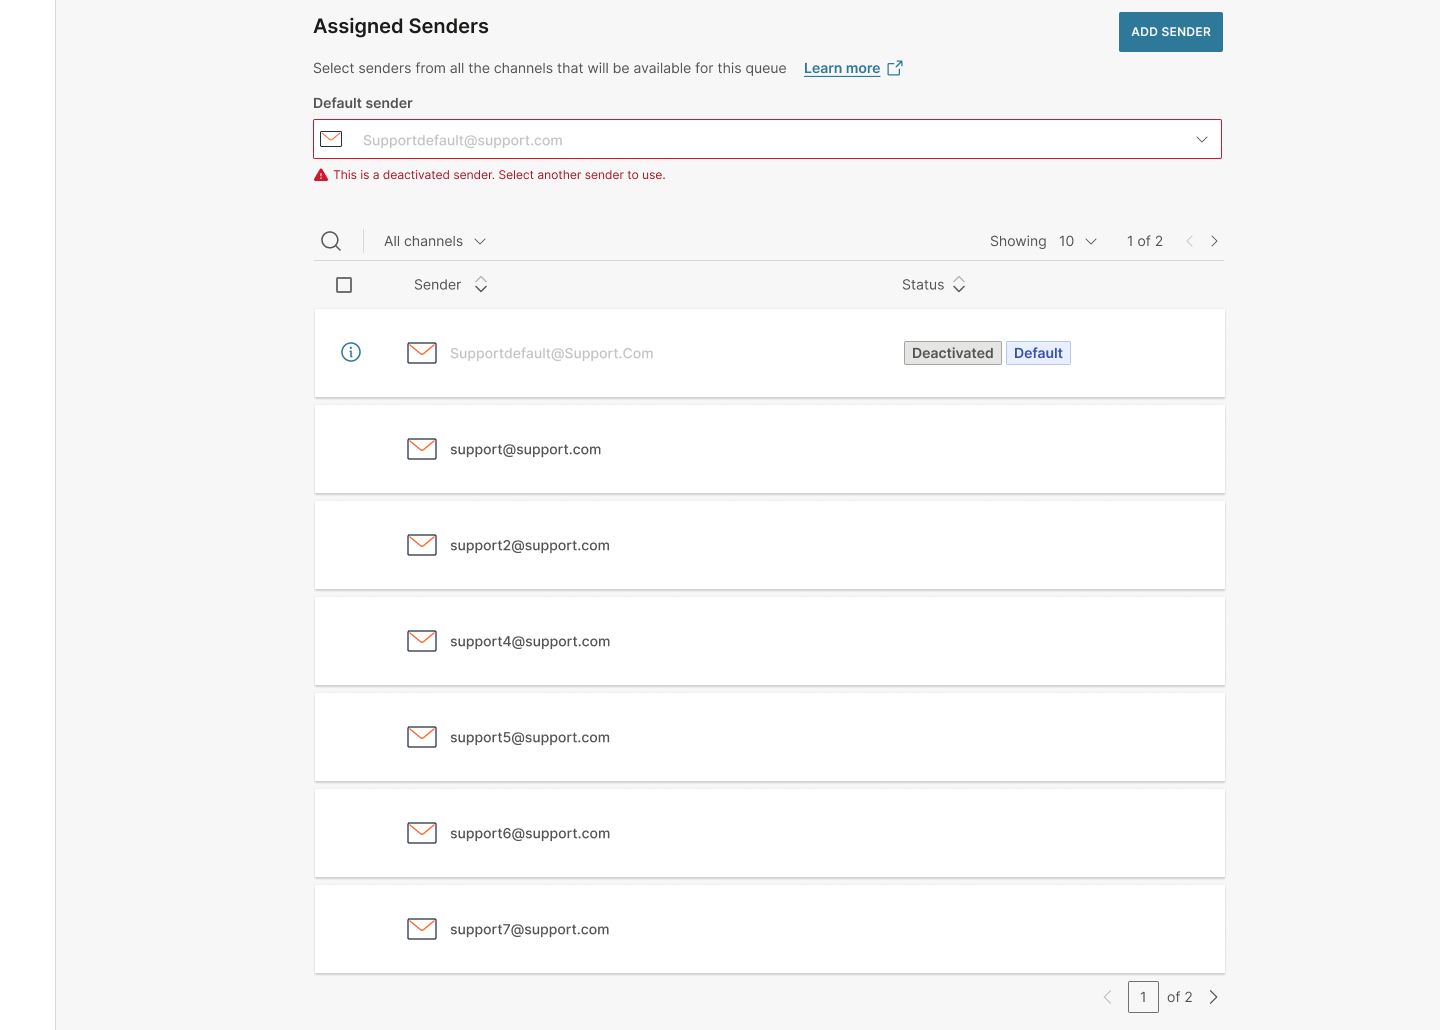
If you want to change the default sender, click the currently selected one. A list of all senders that were previously added to the queue will show, and select the one you wish to use as the default.
You will receive a warning message and be required to choose a new default sender if the current default sender is deactivated in the meantime.
If you want to add all available senders to a queue, click the Add All button and all senders available at that point of time will be added to the wanted queue.
Once you set everything up, the Sender queues will be added as a new condition in:
- Routing
- Automation
- Outbound email template
The condition represents a list of emails assigned to the chosen queue. As an example, within the context of routing, if an email is received by any of the email addresses specified in Queue 1, where you applied the conditioning, the system will identify the match and apply the appropriate routing. Consequently, rather than writing ten individual email addresses, agents can simply opt for the desired queue containing the appropriate addresses.
Modifying email addresses, such as adding or removing them, will not require updates to elements like the routing strategy. This is because any changes made to the email addresses will be automatically implemented.
NOTE
If the feature is disabled, all related automations using the Sender queue condition need to be updated.
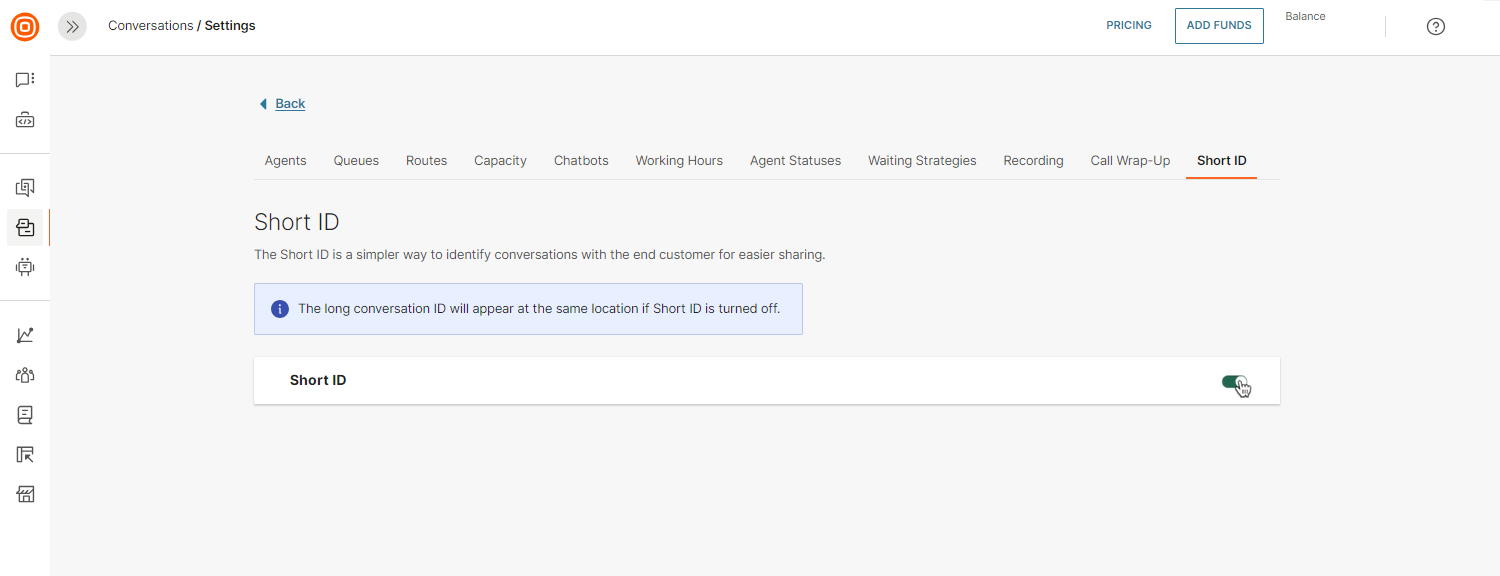
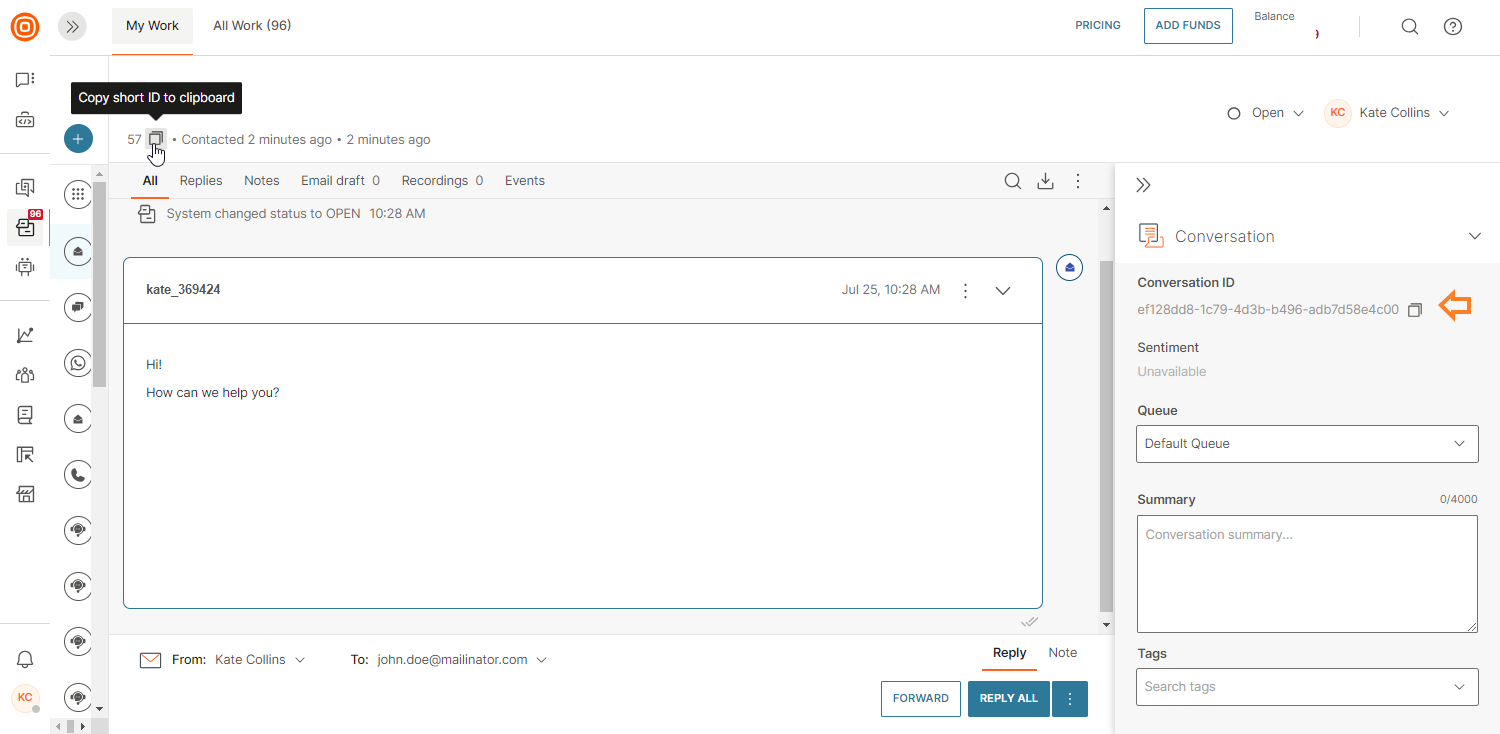
Short ID
NOTE
This feature is only available in the Grow and Scale package.
Short Conversation IDs are concise and easy-to-use identifiers that streamline the process of referencing and organizing conversations. Short IDs enable easier collaboration and quicker decision-making by allowing users to easily access and reference conversations with a few keywords.
Short IDs enable both customers and agents to quickly refer back to specific conversations and issues.
Navigate to Conversations → Settings → General Setup → Short ID, and turn on the Short ID feature.
Once you turn it on, the Short ID will appear in:
- My Work
- All Work
- Reports
- Outbound email templates (new variable in Conversation attributes)
The Short ID is set as an incrementally growing number and it replaces the Conversation ID in My Work which is moved to the Conversation Context Card.
Manage automations
Use automations to reduce manual and repetitive work and increase efficiency in your contact center. Check out the below mechanisms we have put in place to help you out in automating your contact center.
Workflows
Workflows are easy-to-use automations created within a simple “if-this-then-that” editor.
You can set up workflows in the Conversations module → Settings → Automations. To manage these subsequently, navigate back to Settings → Automations.
There are two types of workflows:
- Time-based – built on a good sense of order, these workflows will be triggered after a certain time period, e.g., if a conversation has been in the Solved status for more than 24 hours. They can affect older conversations too, as long as the triggering update occurred after the workflow was set up. You have the ability to define time-based automations with a duration of up to 90 days. For bot conversations, the time since the conversation was handed over is taken into account, rather than when the agent was assigned to it. Additionally, the system will not make another attempt unless specific conditions are met and the conversation is updated. The minimal pending time is 10 seconds.
- Event-based – triggered right after a certain event occurs. For example, when a conversation status changes to Solved.
A workflow consists of:
- Trigger(s) (mandatory) – refers to a time period or an event that triggers the workflow. You can set multiple triggers in a single workflow. If you have set up multiple triggers in a workflow, they will be tied to an ''OR'' operator, meaning that if any trigger is performed, the workflow will activate.
- Conditions (optional) – these are additional statements that allow you to select the actions that should be performed on different entities. The OR operator is supported in conditions, allowing for a combination of multiple conditions where only the AND operator is applicable between them. As a result, you can achieve any desired combination of conditions through these combinations. It is important to note that within the setup of a single workflow, one attribute in conditions cannot be utilized multiple times as a condition.
- Action(s) (mandatory) – changes that this workflow will perform. You can add single or multiple actions. If you add the “Close conversation” action, bear in mind that no other actions can follow this one. Add all other actions you need before you add the ''Close conversation'' action.
To put it simply, when certain triggers happen and conditions are met, actions will be performed.
You can order created workflows, meaning they are activated one after another and the result of one workflow can trigger one or more workflows later on the list.
NOTE
- Keep in mind that agents cannot send messages to customers if the conversation status is changed to Closed.
- Workflows are triggered for Open, Waiting, and Solved conversations.
- You can only use workflows in chat channels at this moment.
Find available triggers here:
| Trigger/New trigger name | Operator | Parameters | Type | Description |
|---|---|---|---|---|
|
Customer reply is pending for / Customer did not reply for |
More than | Days, hours, minutes (all set to 0 by default) | Time-based | Triggers a workflow when a customer does not reply for a set period of time. If an agent sends multiple messages, the set period starts when the first agent message is sent. |
|
Agent reply is pending for / Agent did not reply for |
More than | Days, hours, minutes (all set to 0 by default) | Time-based | Triggers a workflow when an agent does not reply for a set period of time. If a customer sends multiple messages, the set period starts when the first customer message is sent. |
| Solved conversation is unmodified for | More than | Days, hours, minutes (all set to 0 by default) | Time-based | Triggers a workflow when a conversation has been solved for a set period of time AND if there were no changes in the conversation. |
| Conversation is solved for | More than | Days, hours, minutes (all set to 0 by default) | Time-based | Triggers a workflow when a conversation has been in the Solved status for a set period of time, regardless if there were any changes. |
| Conversation status changed | To | Open, Waiting, Solved | Event-based | Triggers a workflow when the conversation status is changed to the set one. |
| Conversation form changed | N/A | N/A | Event-based | Triggers a workflow when an agent changes the conversation form or if the change happens automatically. |
| Conversation queue changed | N/A | N/A | Event-based | Triggers a workflow when the conversation is moved from one queue to another. |
| Conversation tag changed | N/A | N/A | Event-based | Triggers a workflow when tags are added or removed in a conversation. |
| Conversation customer changed | N/A | N/A | Event-based | Triggers a workflow when an agent unlinks a customer from the conversation. |
| Conversation channel changed | From/To | Any, SMS, Viber, Messenger, WhatsApp, Email, RCS, Apple Messages for Business, Line, Google's Business Messages, Telegram, Calls, Instagram, KakaoTalk | Event-based | Triggers a workflow when the first message over the second channel in the same conversation is sent. |
| Conversation in status waiting for | N/A | N/A | Time-based | Expands the functionality to work with all conversation statuses (except Closed), enhances automation abilities and introduces new use cases. |
| Note is created | N/A | N/A | Event-based | Triggers a workflow when an agent adds a note. |
| Outbound agent message is sent | N/A | N/A | Event-based | Triggers a workflow when an agent sends a message. |
| Inbound message received | N/A | N/A | Event-based | Triggers a workflow when an agent receives a message from a customer. |
| Survey feedback received | With score | Happy, Not happy (both can be picked) | Event-based | Triggers a workflow when a customer sends survey feedback (e.g., send a message to Slack). It can be used in combination with the existing workflow/automation conditions and actions. Works with the text channel surveys, however, if you also configure a follow-up question in the survey, both the survey score and the follow-up answer need to be received for the trigger to be activated. |
| Form field updated | N/A | N/A | Event-based | Triggers a workflow when any form value has been updated in a certain conversation. |
Find available conditions here:
| Condition | Operator | Parameters | Description |
|---|---|---|---|
| Queue | Is in list, is not in list | Multiselect of all existing queues | If you use the "Conversation queue changed" trigger, the condition refers to the destination queue. |
| Conversation direction | Is | Inbound, outbound | Inbound conversations are the ones initiated by a customer, and outbound ones by an agent. |
| Conversation tag | Is in list, is not in list | Multiselect of all existing conversation tags | If the conversation has any or none of the tags selected from the drop-down. |
| Conversation channel | Is, is not, is in list, is not in list |
For is/is not a single-select option: Internal, Multichannel, Chat, Email, Messenger, Google's Business Messages, Apple Messages for Business, Telegram, Calls, Viber, LINE, Instagram Messaging, SMS, WhatsApp, RCS. For is on the list/is not on the list: multiple-select option of all channels listed above. |
If the conversation is/is not ongoing over the selected channel;
|
| Conversation form | Is in list, is not in list | For is a single-select option of all existing forms; For is on the list/is not on the list: multi-select of all forms. |
If a conversation has a selected form assigned to it: If any of the Conversation forms is/is not assigned to the conversation. |
| Conversation status | Is in list, is not in list | Drop-down with statuses (Open, Waiting, Solved, Pending) | This condition allows you to filter and run the appropriate automation solely for conversations in specific statuses. |
| Email subject | Contains any, does not contain | Tag lookalike string adding | If the email subject contains or does not contain any of the defined strings. |
| Message | Is | First in the conversation | If a message is the first message sent in the conversation (by customer or agent). Only works for the following triggers:
- Outbound agent message is sent
- Inbound message received |
| Hours since assignee updated | Greater than | 6,12 | Denotes when was the last time the agent updated the conversation. |
| Agent | Is | Assigned, Unassigned | If the conversation is/is not assigned to an agent. |
| Agent status | Is in list, is not in list | Active, Busy, Offline, Away | If the agent currently assigned to the conversation is/is not marked with any of the statuses selected from the drop-down. |
| Agent contact | Is in list | Drop-down with available chat senders | The contact details to reach the company (such as email, phone number, ID, etc.). |
| Agent domain | Is in list, is not in list | Is: A single-select option of all domains Is on the list/is not on the list: A multi-select option of all domains |
If the email address the agent is using has a domain that was selected from the drop-down; If the email address has any or none of the domains selected from the drop-down. |
| Sender | Is in list, is not in list | Queues drop-down | Starts interactions only with the senders you add to a certain queue. For incoming emails, the actual recipient for whom the conversation was triggered is taken into consideration. |
| Customer contact | Is in list, is not in list | Parameters are added as input | If a workflow is triggered with an event, the condition is used as a filter. For example, when a message arrives from a specific customer, a tag is added to the conversation. |
| People tag | Is in list, is not in list | Multi-select option of all defined tags | If the customer in the conversation has/does not have any of the tags assigned in the drop-down. |
| Person country | Is in list, is not in list | Tag lookalike string adding | If the customer in the conversation has/does not have a country attributed in the People data platform match with any of the countries entered. |
| Agent email address | Is in list | Multiple-select option of all agent addresses | If the email sent by a customer is sent to an agent address selected from the drop-down. |
| Email routed to recipient | Is in list, is not in list | List of registered email addresses for Conversations where only one can be chosen | To ensure accurate internal conversation routing, this condition takes into account the actual recipient of the incoming email that triggered the conversation, i.e., this condition represents the email address to which that email has actually been sent. |
|
Company |
Is in list, is not in list | Input value | Allows you to set specific automation based on the company of the client. |
|
Company segment |
Is in list, is not in list | Input value | Allows you to set specific automation based on the company segment of the client. |
|
Company tag
|
Is in list, is not in list | Input value | Allows you to set specific automation based on the company tag of the client. |
|
Country |
Is, Is not, Contains any |
Input value | Allows you to set specific automation based on the company country of the client. |
|
Region |
Is, Is not, Contains any |
Input value | Allows you to set specific automation based on the company region of the client. |
|
Account Manager |
Is, Is not, Contains any |
Input value | Allows you to set specific automation based on the company account manager of the client. |
|
Stage |
Is, Is not, Contains any |
Input value | Allows you to set specific automation based on the company stage of the client. |
|
Industry |
Is, Is not, Contains any |
Input value | Allows you to set specific automation based on the company industry of the client. |
|
VAT Number |
Is, Is not, Contains any |
Input value | Allows you to set specific automation based on the company VAT number of the client. |
|
Notes |
Is, Is not, Contains any |
Input value | Allows you to set specific automation based on the company notes of the client. |
|
Domains |
Is, Is not, Contains any |
Input value | Allows you to set specific automation based on the company domains of the client. |
|
Custom company attribute - text |
Is, Is not, Contains any
|
Input value | Allows you to set specific automation based on the custom company attribute based on the text assigned to company to which the user belongs to. |
| Custom company attribute - Decimal/Wholenumber/False-True/Date |
Is, Is not, |
Input value | Allows you to set specific automation based on the custom company attribute based on the Decimal/Wholenumber/False-True/Date assigned to the company the user belongs to. |
| Form fields input | Is/Is not | All existing custom conversations form fields created in a conversation form. | This condition allow you to trigger the workflow based on a specific value updated in a specific form field. |
Find available actions here:
| Actions | Parameters | Description | Note |
|---|---|---|---|
| Send a message to the customer | Channel (hardcoded to the last used channel) Message (1000 chars) - no placeholders |
Sends a message to the customer that participated in the conversation that triggered the workflow, over the last channel that the customer used. The content of the message needs to be manually added. |
The message is sent over the channel that was used for the last inbound message, not the last used channel overall. |
| Apply tag(s) | A multi-select option of all tags | Adds selected tags to the conversation. | |
| Remove tag(s) | A multi-select option of all tags | Removes selected tags from the conversation. | |
| Email the customer | Email subject (no placeholders) Email content (no placeholders) |
Sends an email to the customer that participated in the conversation that triggered the workflow. | The last message in the conversation has to be an e-mail, otherwise, this action will not be executed. |
| Email the external recipient | From: A drop-down with senders registered for this purpose. To: Tag lookalike string adding. Email subject Email content (no placeholders; basic formatting options) |
Sends an email to any defined recipient(s), regardless if they were involved in the conversation that triggered the workflow, or not. The sender's email address used to send these emails must be manually set as a no-reply address. | |
| Email transcript | From: A drop-down with senders registered for this purpose Email subject |
Sends the transcript of the conversation that triggered the workflow, using the sender's email address that must be manually set as a no-reply address. |
The customer must have a defined email address in the People data platform. |
| Notify by email |
From: A drop-down with senders registered for this purpose |
Sends an email notification using the sender's email address that must be manually set as a no-reply address. Recipients need to be manually defined. | |
| Message on Slack |
Type: A drop-down with two options (Select recipient from conversations - shows a drop-down with form fields, free entry of recipients; (Manual) - shows 2 To fields (Channels and Users)
|
Sends a Slack message to a person or a channel defined by the user, or to Conversation users subscribed via Infobip Tools. To be able to use this action, Slack for Conversations integration on Exchange must be enabled. | |
| Set conversation status | Drop-down with an option to mark conversations as Solved | Changes the conversation status to Solved. | |
| Set conversation priority | Drop-down with priorities (low, normal, high, urgent) | Sets the conversation priority to the chosen one. | |
| Unassign agent | N/A | Unassigns agent. | |
| Email survey to the customer | N/A | Sends an email with the link to the CSAT survey. | |
| Close conversation | N/A | Closes the conversation. No other action can be added after this one. | |
| Call API |
Method URL Content type Headers Body |
Triggers Infobip and third-party APIs. When a customer sends a message and a conversation is created, Infobip needs to know if the customer reached out to Support or Marketing. When a conversation is created, the workflow is triggered to check to which sender the inbound message is sent. If the message is sent to a Support sender, the Call API action is triggered which updates the person's attribute with the "SUPPORT CUSTOMER" value. If the message is sent to a Marketing sender, the person's attribute is updated with the "MARKETING CUSTOMER" value. | The "Content", "From", and all Email variables within the Call API action are only available when using the "Outbound agent message is sent" and "Inbound message received" triggers. |
| Populate form fields | Drop-down with all available input fields. | When used, a list of all existing input fields is available in the autocomplete drop-down. The attribute can be populated with fixed text or a value picked from the standard attribute picker. | In order for the input fields to appear in the drop-down menu, they first need to be configured in the Conversation Forms. |
Placeholders for automatic replies
You can configure placeholders to customize automated replies for the following actions:
- Send message to customer (content)
- Email customer (content + subject)
- Email external recipient (message content + subject)
- Email transcript (subject)
- Notify by email (subject)
- Message on Slack (content)
Moreover, you can configure identical variables already supported in the Call API actions, along with a new placeholder referred to as the Short ID (also included among the supported placeholders in API actions).
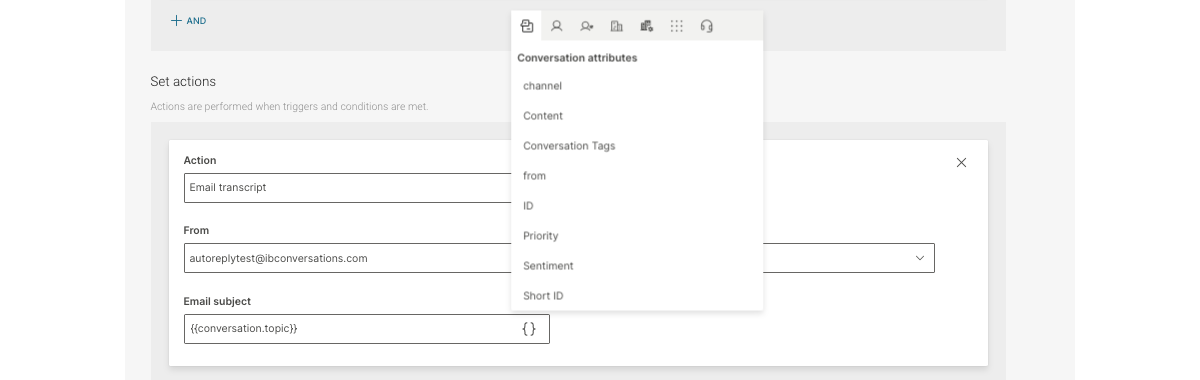
IMPORTANT
It is the customer's responsibility to monitor the message length, inclusive of the placeholder. Given our inability to predict, if the complete message, including the placeholder value, exceeds the length limit, the message will not be sent.
Call API
As mentioned in the table above, the Call API action in Workflows triggers Infobip and third-party APIs when a customer sends a message to differentiate if they reached out to Support or Marketing. It consists of the following parameters:
- Method
- URL
- Content type
- Headers
- Body
As mentioned above, the "Content", "From", and all Email variables within the Call API action are only available when using the "Outbound agent message is sent" and "Inbound message received" triggers.
Method
The Method parameter is used to specify the type of HTTP request you want to make to the endpoint. The method parameter indicates the desired action to be performed on the resource identified by the URL.
- GET: It is a read-only method and does not modify the resource. For example, when you want to retrieve information about a user from an API, use the GET method.
- POST: Used to submit data to the server to create a new resource. It is often used for creating or submitting data, such as submitting a form or creating a new user. When you want to create a new resource, use the POST method.
- PUT: Used to update an existing resource on the server. It replaces the entire resource with the new data provided. For example, if you want to update the details of a user, use the PUT method.
- PATCH: Similar to the PUT method, but instead of replacing the entire resource, it applies partial updates to the resource. It allows you to update specific fields or properties of an existing resource.
- DELETE: Used to delete a resource from the server. When you want to remove a resource, you would use the DELETE method.
URL
The URL in an API Call is the specific address where the API is located and the desired resource or action is identified. It consists of the base URL (API location) and the path (resource/action within the API). The endpoint uniquely represents the location within the API that you want to interact with.
For example, https://api.example.com/users represents the endpoint for the 'users' resource in the API.
Content Type
The Content Type in an API Call refers to the format of the data being sent or received, and it specifies how the data should be interpreted. It includes the following options:
- RAW
- JSON (application/json)
- Text (text/plain)
- XML (application/xml)
- URL-encoded (application/x-www-form-urlencoded)
- Form Data (multipart/form-data)
Setting the correct content type is important to ensure the data is processed accurately by the API.
Headers
Headers in an API Call are the key-value pairs that provide additional information in the HTTP request or response. They include details like authentication credentials, content type, caching directives, and more. Headers help the client and server communicate effectively and handle various aspects of the API interaction.
Body
The Body refers to the data transmitted in the HTTP request or response. It can contain various formats as explained under the Content Type. The Body allows for exchanging and manipulating data between the client and server and it can be set using key-value pairs or as text using the editor option.
Use ordered lists in workflows
You can drag and drop workflows to organize them in ordered lists. The system will then execute workflows according to their order, meaning that all actions from the first workflow are executed first, then all actions from the second workflow, and so on.
This helps you create more specific use cases and prevents some problematic cases such as random workflow execution and cycles.
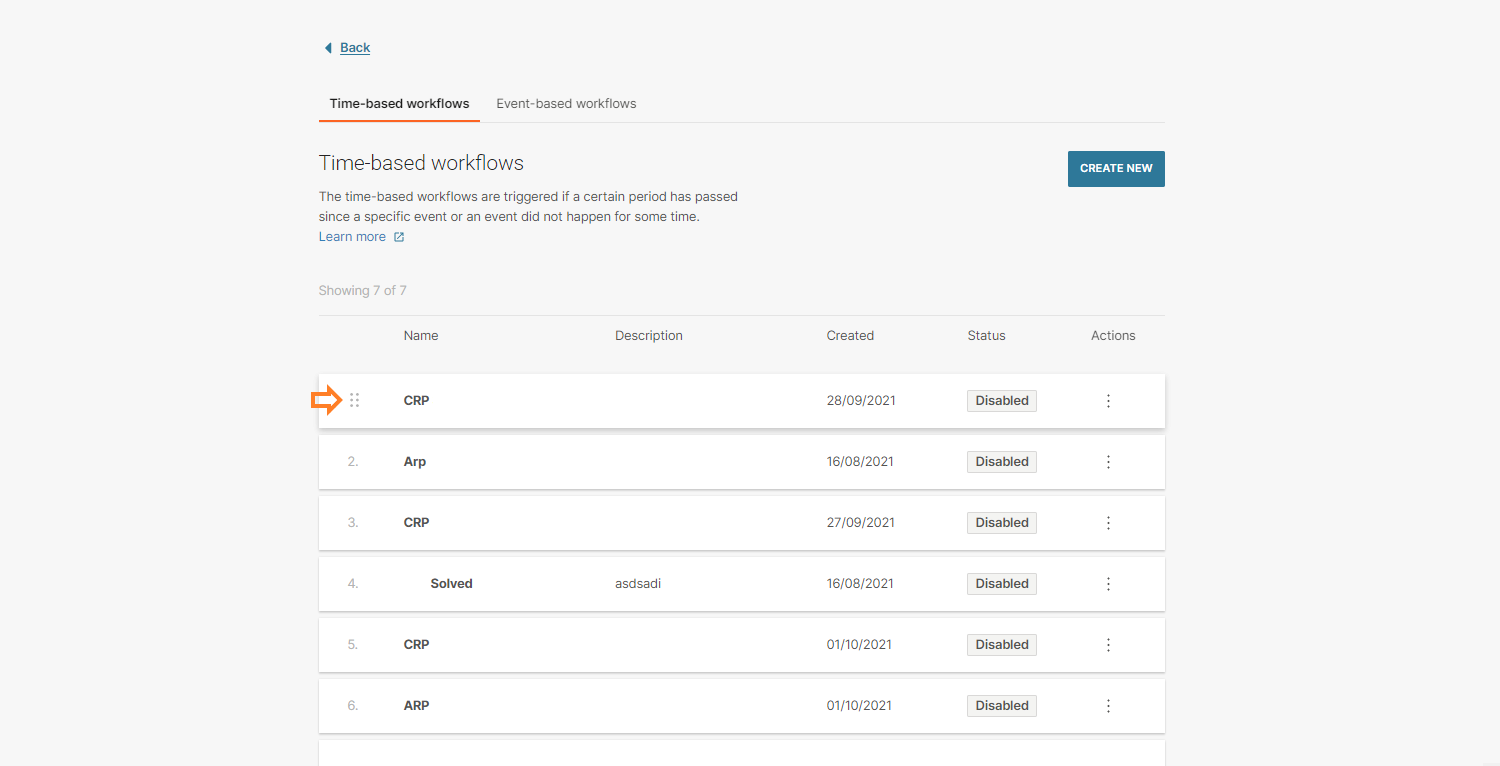
Voice of the customer
This dashboard offers insight into customers’ feedback that they provide after a conversation with an agent over surveys. This also ties in very closely with Analytics and the overall satisfaction the customers feel about Conversations and the services provided.
Surveys
Surveys can help you automatically collect Customer Satisfaction Scores.
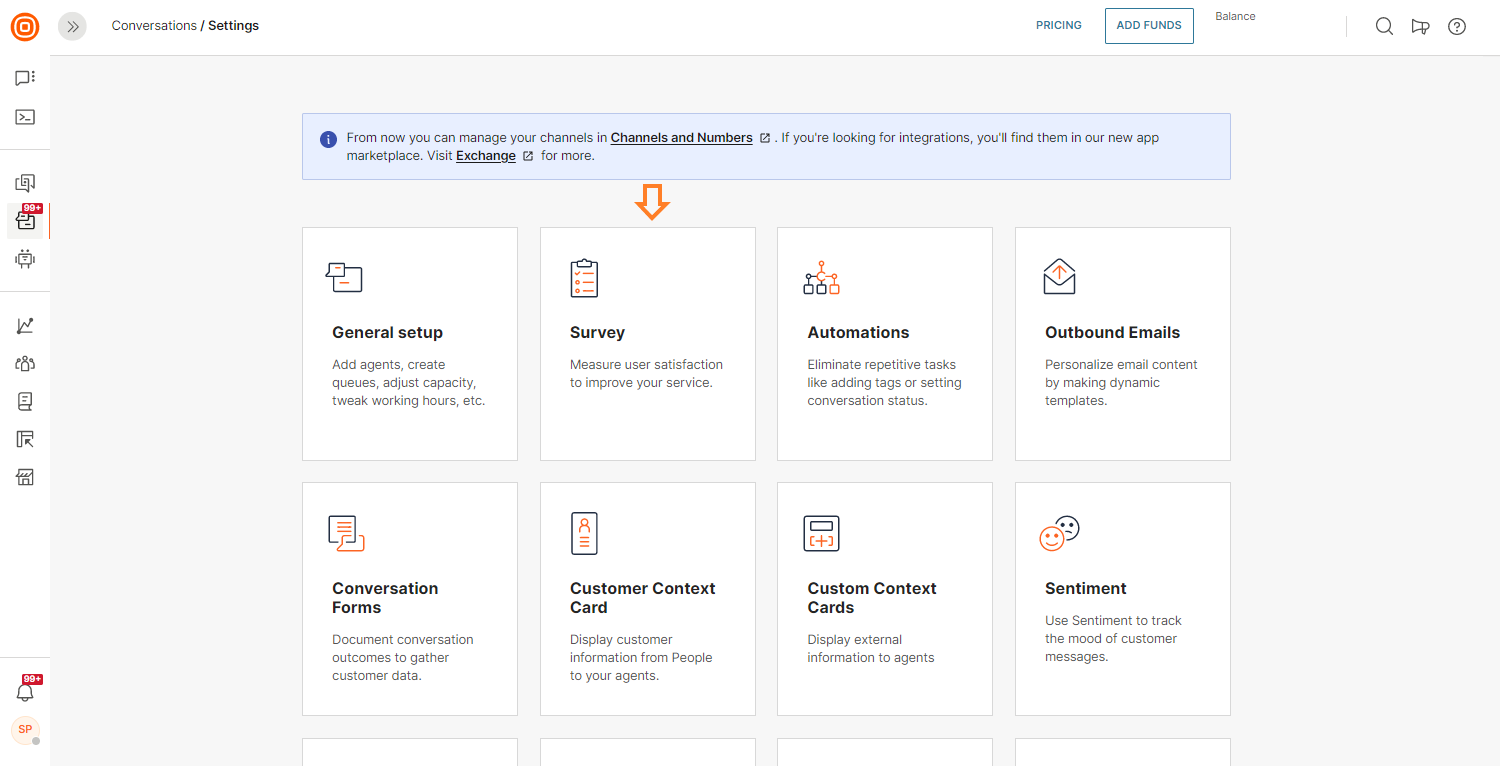
These can help in recognizing more or less satisfied customers, to adjust the tone of ensuing communication, and improve the overall quality of your contact center.
Survey is triggered when a conversation status is changed to Solved. Shortly after that, the customer will receive a message over the channel that they used last in their conversation. Message contains questions about their satisfaction with the current issue and whether it was resolved. The questions are predefined but you have the option to edit them.
There are two possible answers: happy and not happy.
Supervisors can define a follow-up question requiring additional feedback that customers may provide. Scores and comments are visible in the agent panel and in the Voice of the Customer dashboard.
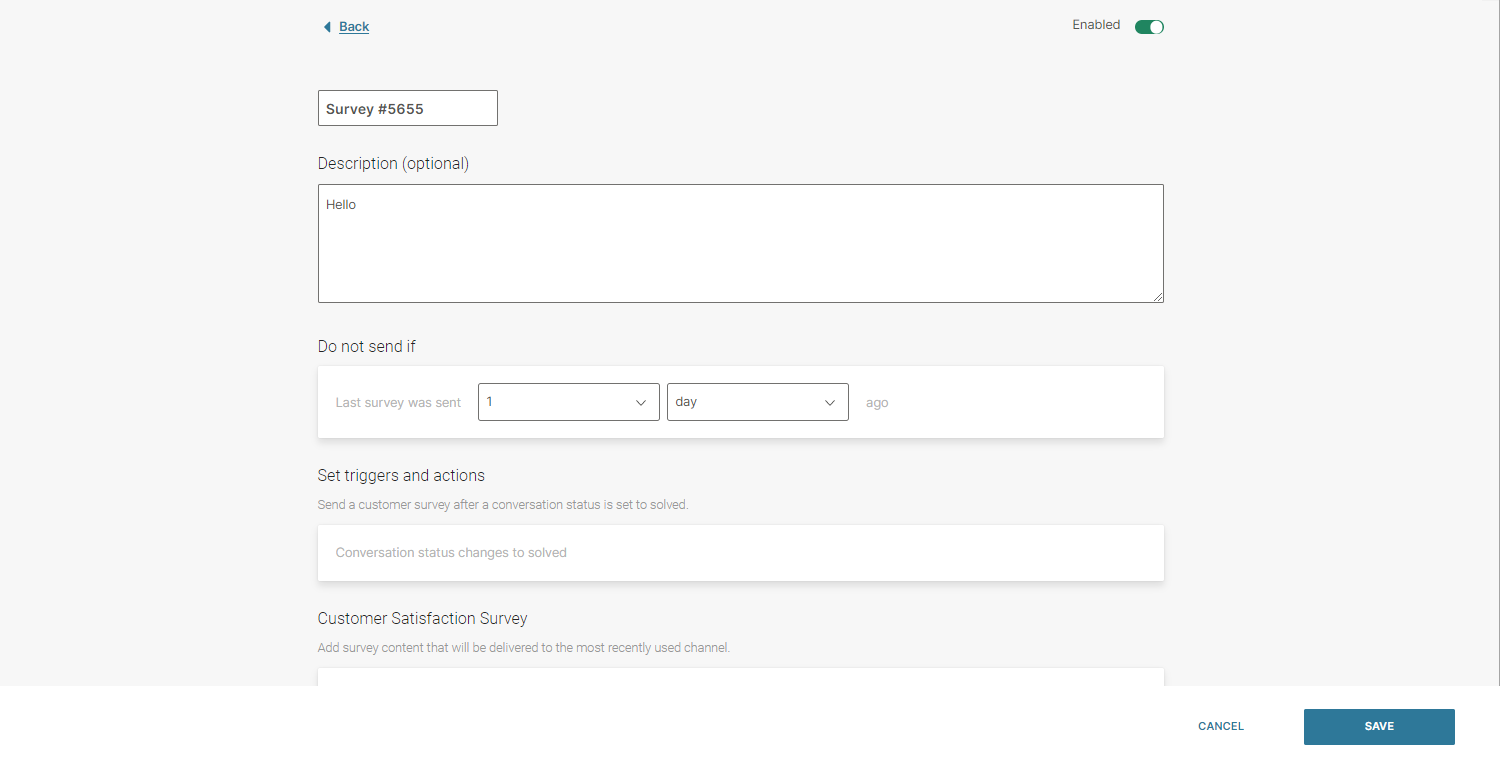
Along with the trigger saying that the conversation status is changed to Solved, you can set the time span between two surveys. This period starts after one survey has been sent to the customer. A new survey cannot be sent before this period elapses. This is a very important parameter that will protect customers from being spammed with multiple surveys within a short period of time.
Sentiment analysis
With sentiment analysis scoring, you can get feedback on your customers' satisfaction. Manage your agents' performance in a streamlined way and improve customer satisfaction faster.
Sentiment analysis uses natural language processing (NLP) to try to interpret customers’ feelings within messages and conversations. During a conversation, sentiment is analyzed in real time. That way Agents and Supervisors can track changes in the sentiment from the start to the end of the conversation.
This feature analyzes every message sent by the customer and scores it on a scale from -1 to +1 (-1 being the lowest score, and +1 the highest). The final sentiment score is determined as the average sentiment of all messages that contributed to the conversation. Messages sent later in the conversation have a higher weight since they show the latest sentiment of the customer.
The scoring follows this logic:
- -1 ; -0,35 - Negative
- -0,35 ; +0,35 - Neutral
- +0,35 ; +1 - Positive
To monitor how Agents handle their conversations, Supervisors can dive into ongoing or past conversations. Following on this information, they can advise Agents on how to improve their interactions with customers and increase the satisfaction score.
To enable sentiment analysis for your conversations, navigate to the Conversations module → Settings → locate the Sentiment tile and turn on the toggle for Conversations. When you activate this feature, we encourage you to share your feedback with us on the sentiment score accuracy. This will help us improve and further develop the Sentiment Analysis feature.
To leave your feedback, click the feedback button in the web interface located in the top right corner.
Self-service automation
To optimize resources in your contact center, use automated flows or chatbots to avoid repetitive work so your agents can focus on more complex tasks. Automation is available over our Chatbots, Flow builder in the web interface or over Flow API.
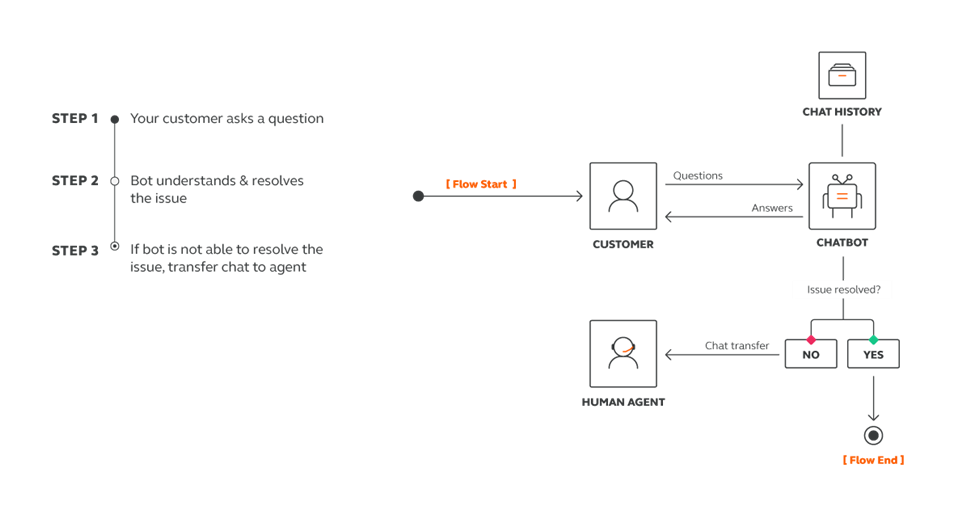
Self-service over Moments and IVR over Flow
Moments and IVR over Flow let you create automated flows to engage your customers and come to a satisfactory resolution in no time, thus avoiding any repetitive work for your agents.
Create Flows
Navigate to Moments and click Create Flow. Select a predefined Flow template or choose Start from Scratch to build your own.
You can choose one of the following options to start your flow:
- Inbound message – inbound messages through a channel, using a 2-way number or creating your own content
- One-time audience – you know your audience in advance and want to invite them to a conversation
- Flow API – audience is added to Flow via API
- People events – people are added to Flow after it starts, based on their profile changes
In the example below, the Flow is started by sending bulk messages to customers for special offers. If they are interested and wish to receive more information they can connect with an agent by replying YES.
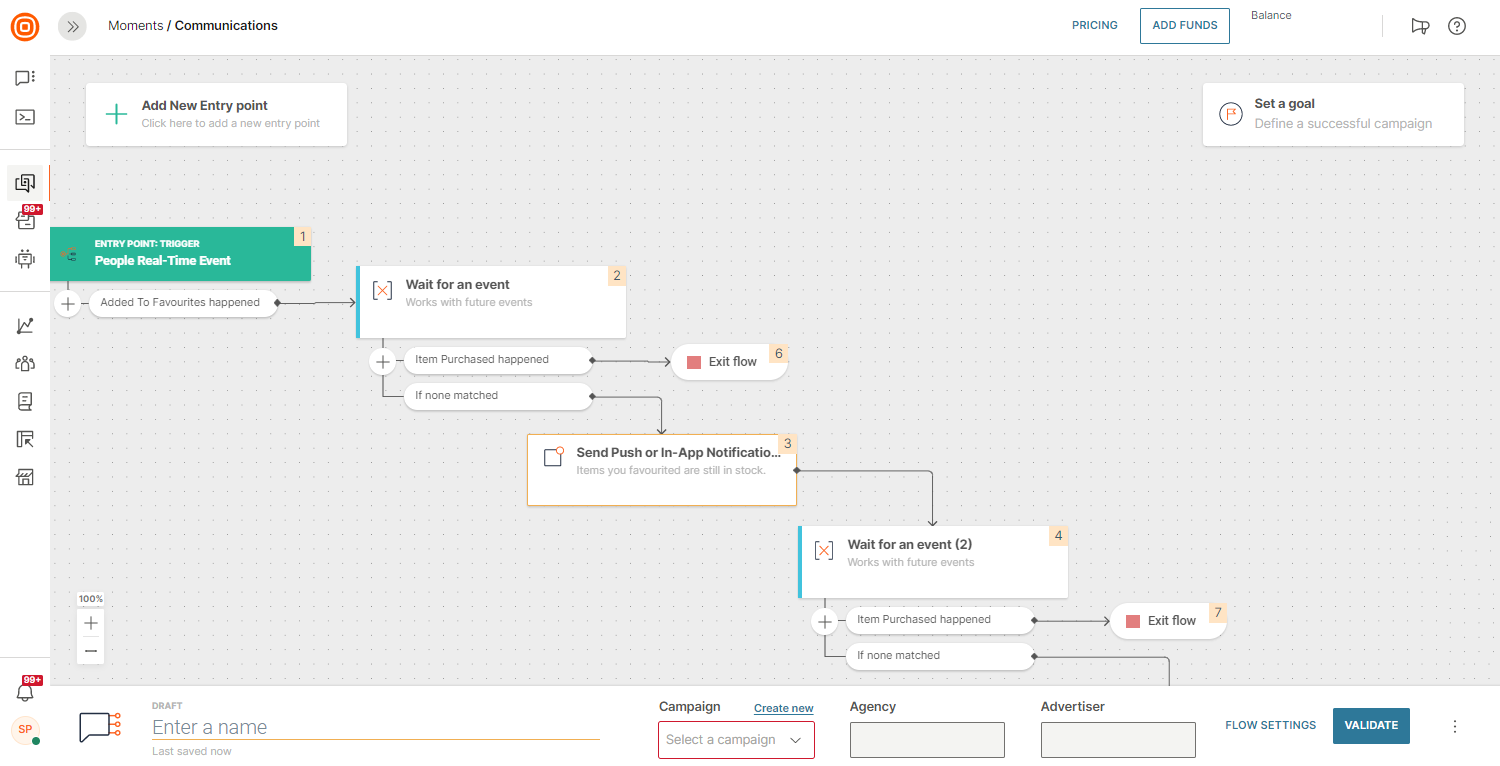
To enable the Flow to transfer a customer to a real agent, you need to specify the Start a conversation action. Any conversation transferred to agents has an option to get a tag for an effective routing or topic hint to agents.
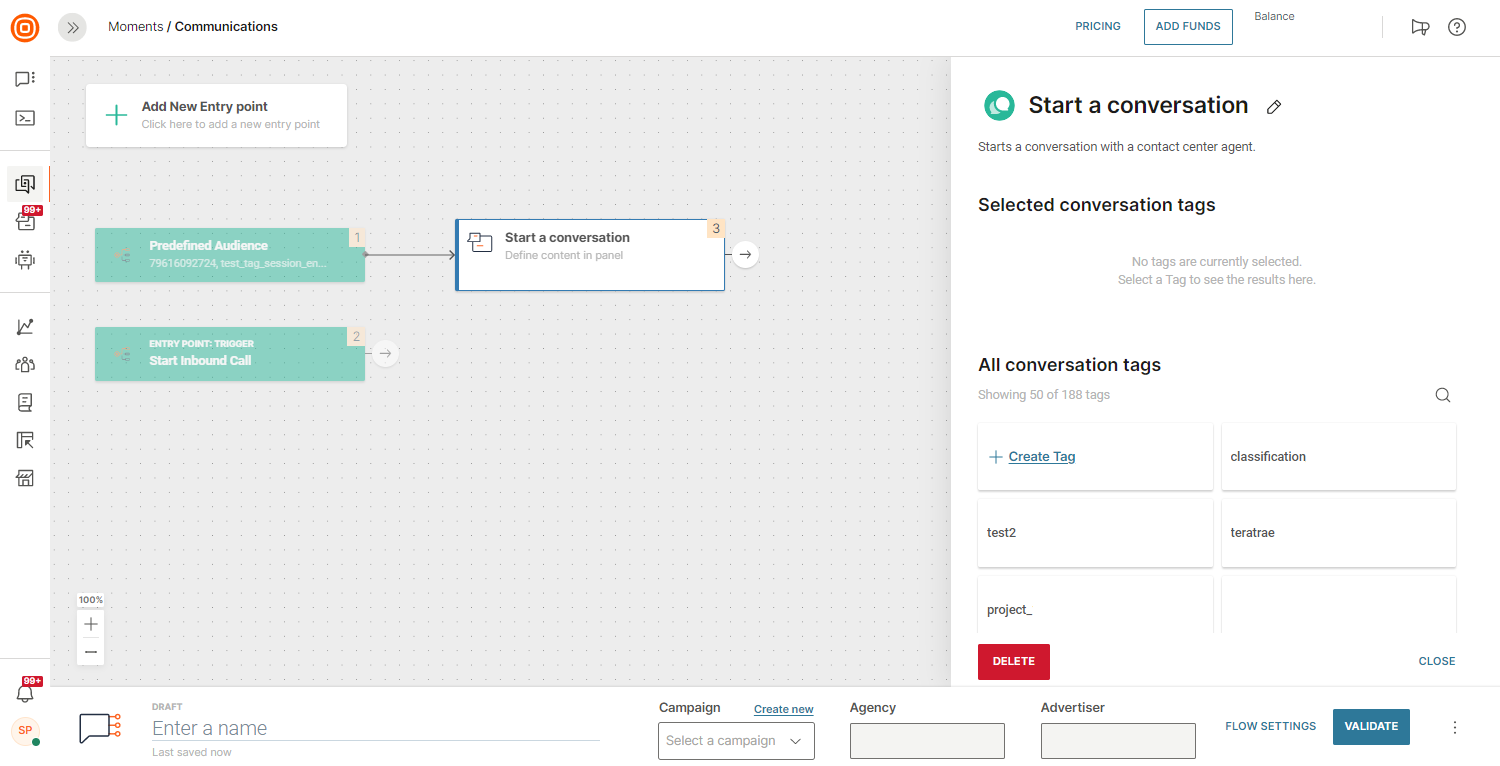
After the conversation is transferred to an agent, all messages exchanged between Flow and the customer are shown in the conversation details so the Agent can see the customer intent.
Create Outbound IVR over Flow
Navigate to the Moments module and click Create Flow. You can use a predefined Flow template or choose Start from Scratch to build your own and select Predefined Audience as your entry point. Existing users in the People module, either grouped or tagged will enter the flow.
In the example below, calls are placed to a predefined list of phone numbers when flow is initiated. An IVR message is played to the callee and later their inputs are collected to a variable.
Depending on the variable value, the flow will transfer the call to a real agent. To make this happen, you need to specify the Start a Conversation action.
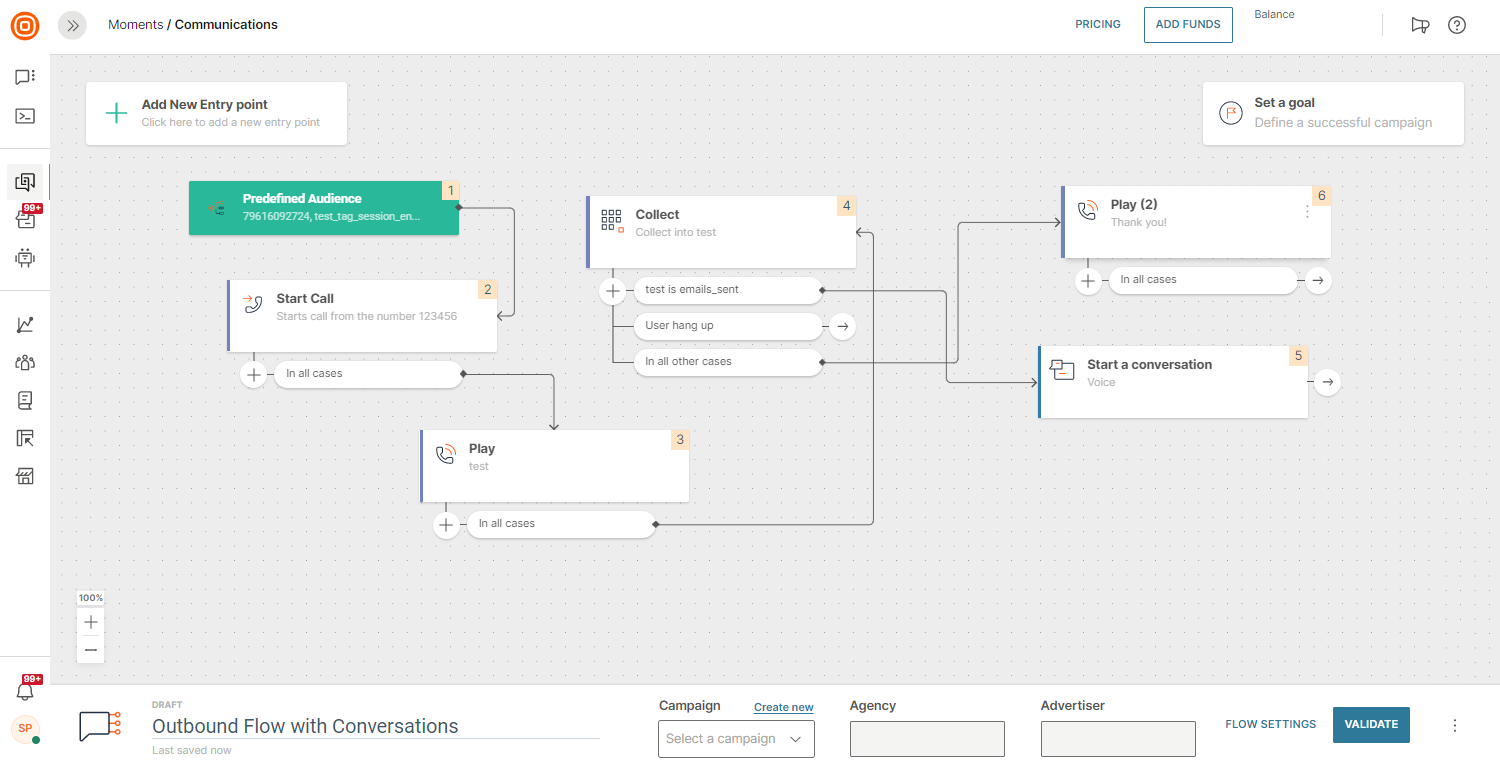
Having in mind the number of agents who will be answering calls, note that you should adjust sending speed. If there are no available agents at that moment, waiting strategy would be played to the caller. Also, you can tag any conversation that you want to transfer to an agent. Use tags to hint the conversation topic to agents.
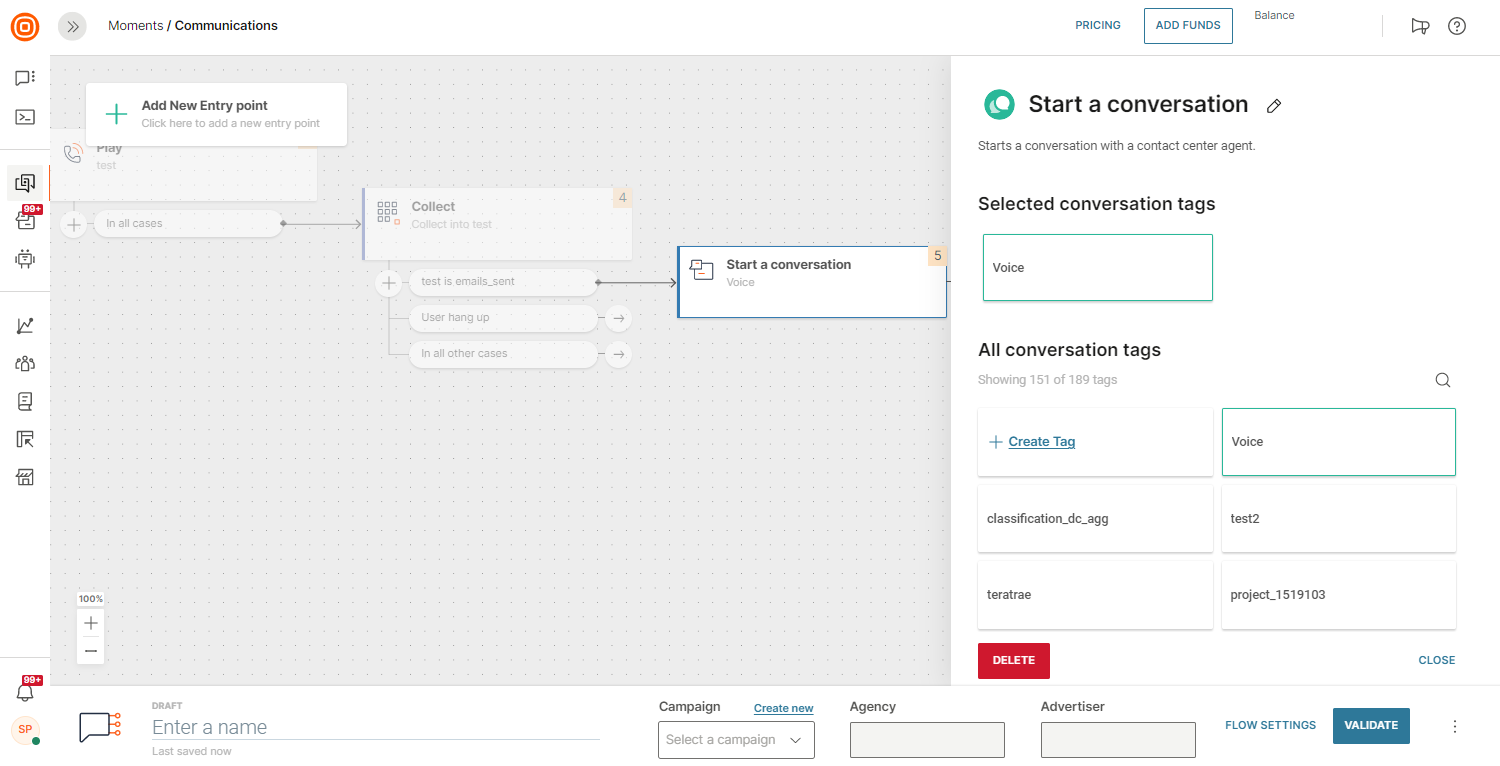
Both collected inputs and tags can be used for effective routing of conversations.
Self-service over Answers
Create chatbot
To create a chatbot, navigate to the Answers module → select Chatbots → and then click on the New Chatbot button.
Chatbots always start with inbound messages. You can create simple FAQ types of scenarios or more advanced AI-based chatbots. To enable the transfer of a customer to a real agent, you need to specify the Redirect to agent action in Answers. Any conversation transferred to agents has the option to get a tag for an effective routing or topic hint to agents.
Chatbots have the ability to automatically transfer customers to agents if they are not able to resolve the inquiry.
After the conversation is transferred to an agent, all messages exchanged between the bot and the customer are shown in the conversation details so the Agent can see the customer's intent.
View chatbot conversations
Chatbot conversations are conversations or parts of conversations exchanged between end users and an automated bot. Only chatbot conversations that have Start a conversation element defined will be visible in the Conversations module. All chatbot conversations will have a chatbot agent assigned. The chatbot name will be equal to the name of the Flow used to execute the chatbot conversation. To view chatbot conversations, Supervisors need to go to Conversations > All Work and select Chatbots view.
Monitoring chatbot conversations helps Supervisors identify bottlenecks in the chatbot setup and improve the user experience. It also helps measure how many conversations still end up transferred to agents and for which topics specifically. This helps predict further workload so the supervisor can adjust agent shifts and training accordingly.
In case chatbots are unable to resolve customer queries, supervisors can select the Agent takeover action to transfer the conversations to an agent and assist the customers in a timely manner.
Connect external bots
When you use an external bots solution to automate a part of the user journey, you can still connect it to the Conversations solution by triggering the transfer to agent action. The action will move the bot-to-customer conversation to the agent along with all the conversation history.
Bots are similar to Agents in the sense that they can have a conversation with customers by sending and receiving messages through an API endpoint.
Set up external bot
To configure a bot, go to the Conversations module → Settings → General setup → Chatbots → click on the Connect Chatbot button on the far right and define the following as an admin:
- Bot name - A unique name that will be visible in the bot conversations queue. It’s different from the existing Flow or Infobip bots.
- Bot URL - The URL where all inbound messages will be forwarded to until the bot triggers the Transfer to the agent action.
- The number for which the bot is configured - Any inbound message from customers to this number will be forwarded to the bot.
- Conversation history - If checked, messages exchanged between the customer and the bot will be visible to agents after they take over the conversation. Otherwise, the Agent will not be able to view messages exchanged between the customer and bot.
- Whether the bot is active or not
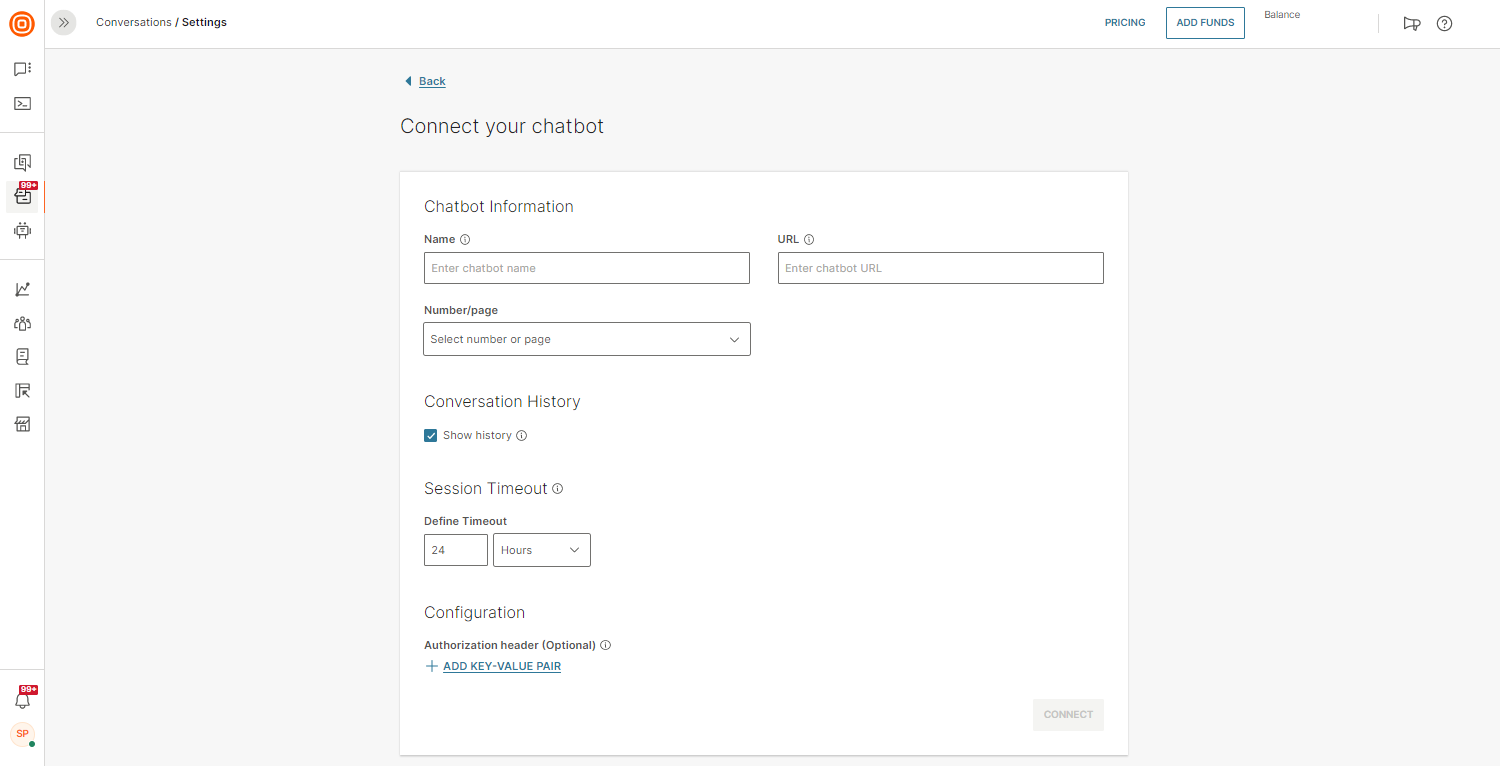
Optionally you can define the Session timeout parameter. This timeout is the time period in which the bot conversation session will expire if there are no messages exchanged by the end user.
NOTE
A bot cannot start a conversation. Conversations can be initiated by the end user only.
Receiving messages
All inbound messages received on the defined destination number assigned to an active bot will automatically be forwarded to its webhook URL via the POST HTTP method with the conversationId parameter.
Based on the threading mechanism, a new conversation is created or customer messages are added to an ongoing conversation.
Conversations are automatically assigned to the Bot. Bots are managed as special types of agents by the system.
When a human agent takes over the conversation, all new customer messages are not sent to Bot webhook URL but rather shown to agent only.
Sending bot messages
To send messages from a bot, use our standard Conversation Messaging API. To do this, you must have the conversationId in the URL path and an identifier x-agent-id in the header. The conversationid parameter is used to keep track of messages exchanged between the end user and bot and later agent, while the x-agent-id parameter is a bot identifier.
Transferring conversation from bot to agent
There are two ways you can do this:
-
Conversation can be transferred to an Agent by invoking the Route conversation endpoint.
It will remove the bot as an assignee from the conversation, execute routing logic, and find the appropriate queue if any. If you’ve configured the auto-assignment, the conversation will be assigned to the first available Agent.
The bot won’t receive any further inbound messages for this conversation and it won't be able to send any outbound messages. -
Conversation can also be transferred to the agent by invoking the Change conversation assignment endpoint and passing the new
agentIdparameter. This way routing is avoided and direct assigning is committed.
Intent
You can set the customer intent by adding a tag to the conversation which can later be used for routing.
Refer to the Add Tag to Conversation article for more information.
Conversation Metadata
Use Conversation Metadata to store and manage additional information. Conversations metadata provides context for Agents when taking over a conversation from a bot. It’s displayed in the Agent Panel so the end user does not have to repeat the entire conversation they had with the bot when switching to an Agent.
Here’s an example of conversation metadata:
{ "Manufacturer": "Mazda", "Model": "CX-5", "EngineType": "Diesel", "EnginePower": 90.0 }
Refer to the Metadata article on our API docs for more information.