Get started with Conversations
Set up your Infobip account
To use Conversations, you need an active Infobip account.
If you do not have an account, sign up for a free account. For more information, see Create an account.
Choose how to start with Conversations
After creating an account, you can:
- Book a demo - schedule a demo session with Infobip product experts.
- Purchase - contact your Infobip account manager or Support to purchase Conversations. See Pricing plans for products for details.
- Upgrade - if you already have an account, contact your Infobip account manager or Support to upgrade to a higher plan. See Paying account for more info.
Users and permissions
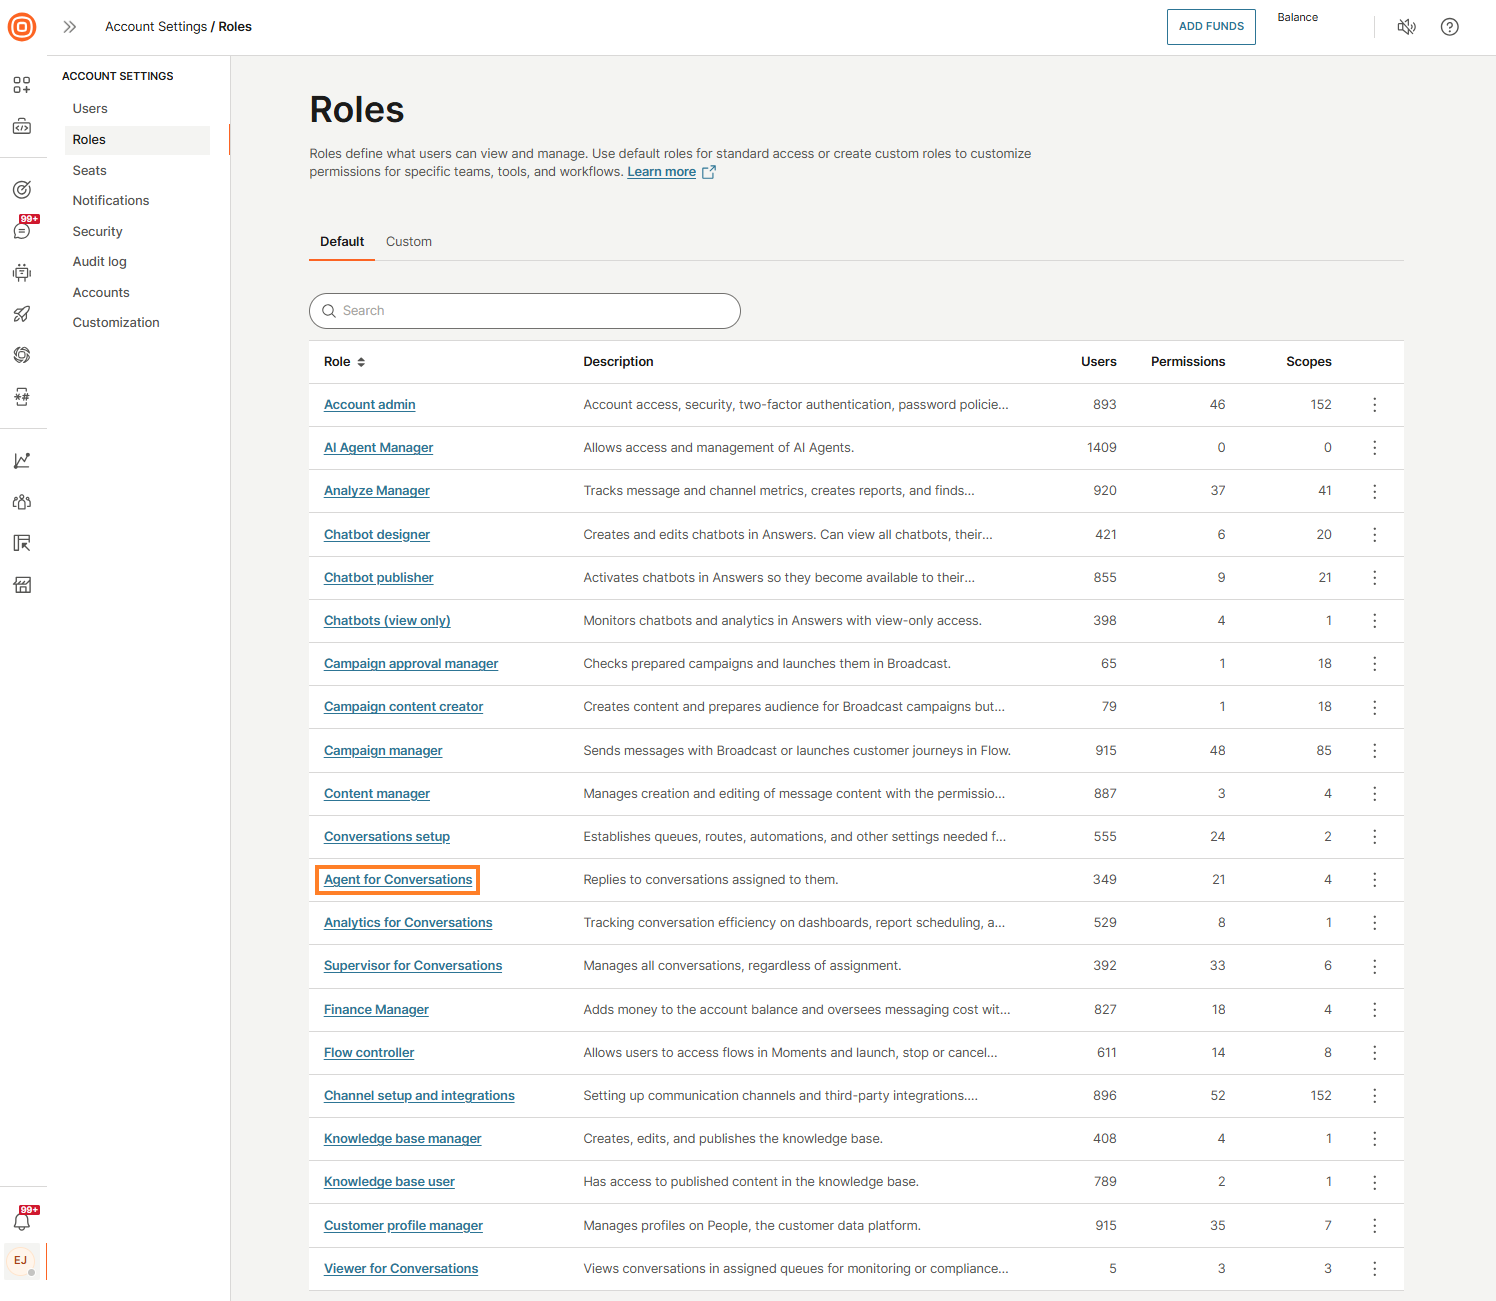
To make permissions more flexible, Conversations introduces five roles that can be assigned to a user’s profile:
- Conversations setup - Create and manage queues, routes, automations, and other system settings.
- Agent for Conversations - Reply to conversations assigned to them.
- Analytics for Conversations - Monitor efficiency on dashboards, schedule reports, and exchange data with other systems.
- Supervisor for Conversations - Manage all conversations, regardless of assignment.
- Viewer for Conversations - Views conversations in assigned queues for monitoring or compliance. Does not consume a seat, impact capacity or analytics, or allow replying to conversations.
Key details
- Roles can be combined. A user may have more than one role if needed.
- A user cannot have both agent and supervisor roles because the supervisor role already includes all agent permissions plus additional rights.
- Every user with a Conversations role must have an active seat, except the one with a Viewer for Conversations role.
- Once a user is set up, they will receive an email with login details and can access Conversations.
Learn more about managing roles and users.
Permission-based access in Conversations
Conversations uses a permission-based access control (PBAC) model to manage what users can see and do in the product.
Instead of relying on fixed roles, PBAC assigns access at the individual permission level. This approach allows teams to precisely control user capabilities while remaining flexible as workflows, responsibilities, and organizational needs evolve.
Modern support teams often require highly specific access configurations. Different users, such as agents, supervisors, admins, or specialists, may need distinct combinations of capabilities depending on their responsibilities.
Permission-based access enables accurate definition of these combinations without being constrained by predefined role structures.
Key benefits of permission-based access
- Better access control: Permissions are assigned at the individual level, which allows you to control exactly which actions a user can perform.
- Flexibility and customization: Permission-based access allows you to combine permissions as needed, rather than relying on predefined roles.
- Improved security and compliance: Limiting users to only the permissions they require helps reduce unnecessary access.
- Managing complex user scenarios: Permissions can be scoped to specific features or modules in Conversations.
Permissions behavior and dependencies
Permissions that belong to a default role cannot be edited. To change the set of permissions, you must duplicate the default role and update the permissions on the copied role.
Most Conversations permissions require the user to have an active seat. The only exception is Viewer for Conversations, which can be assigned without an active seat.
View-only access without an active seat
Any user who has a Conversations view permission (contact-center/conversations/view) can access conversations in a view-only mode, even if they do not have an active seat.
In this case, the user is treated as a Conversations viewer. They can view conversations and can be added to queues as a viewer, but cannot interact with conversations.
This behavior applies even if the user is assigned a default Agent or Supervisor role that includes the contact-center/conversations/view permission, but does not have an active seat assigned. As a result, the user remains an active viewer in Conversations.
Seat visibility for users with custom roles
For users assigned to custom roles that include Conversations permissions, the system cannot always determine the exact level of Conversations access based on a default role.
These users are therefore shown as having no default role in seat management views. This helps identify users who may be consuming a seat without requiring full Conversations access and supports better seat usage review and optimization.
How permissions work in Conversations
In Conversations, each feature or action is controlled by a discrete permission. Permissions can be combined to create custom access configurations that match your team’s needs.
Available permissions in Conversations
The following table lists all available permissions and explains what each permission allows a user to do.
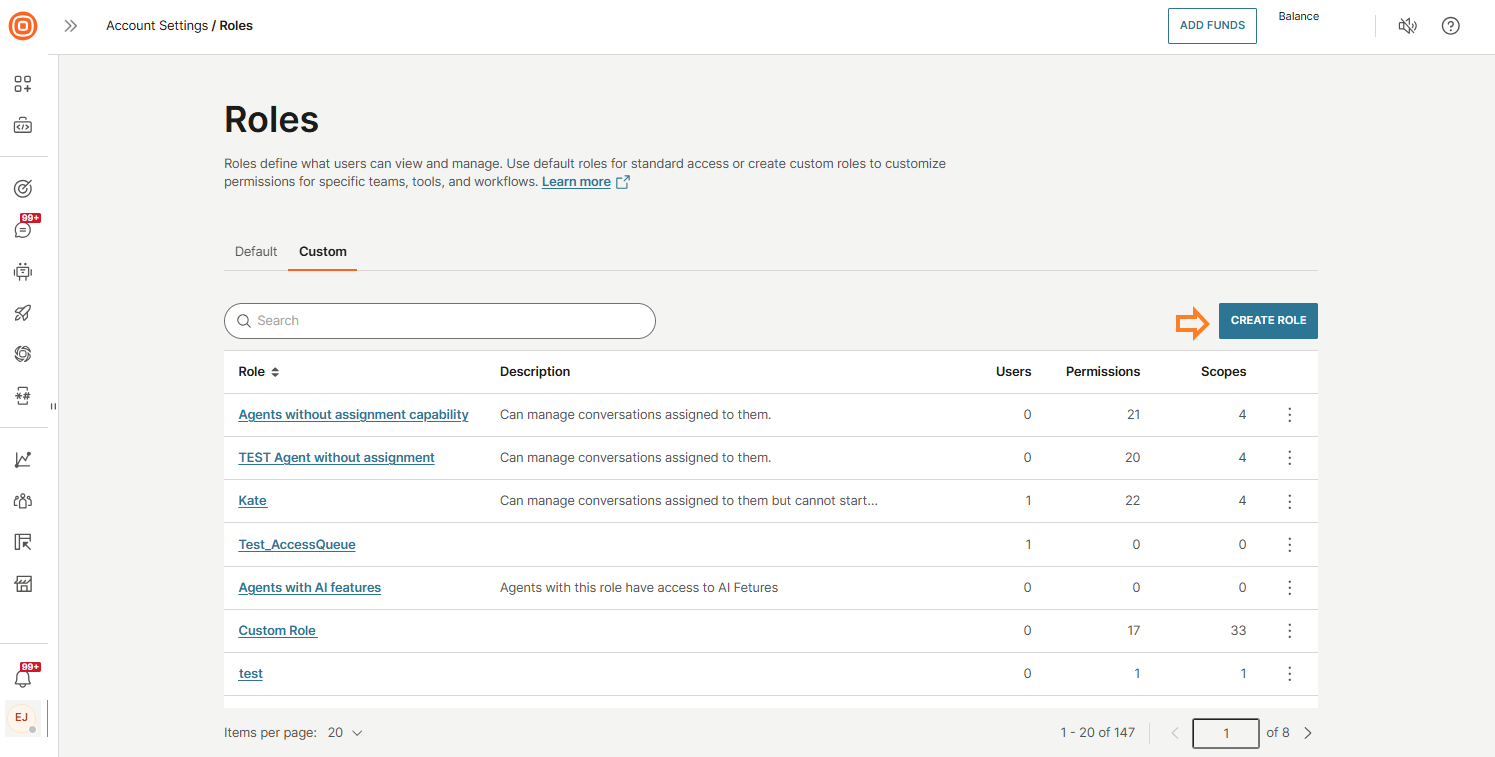
Create a custom role with Conversations permissions
To access roles and permissions:
- Log in to your Infobip account.
- In the navigation menu, select the Profile icon.
- Go to Account settings → Roles.
The Roles page contains two tabs:
- Default: View and manage predefined system roles.
- Custom: View, create, and manage roles tailored to your organization’s needs.
See the Manage roles page for details on predefined and custom roles and how to manage them.
Example: Grant an additional Conversations permission to agents
If you want to grant agents access to a specific feature, such as downloading conversation transcripts, create a custom role that includes only the required permission.
This approach allows you to extend agent capabilities without modifying the default role or granting additional permissions.
To do this:
- On the Custom tab, select Create role.
- Enter the role name.
- Open the Conversations permissions section.
- Enable only the conversations/my-work/download-conversation permission.
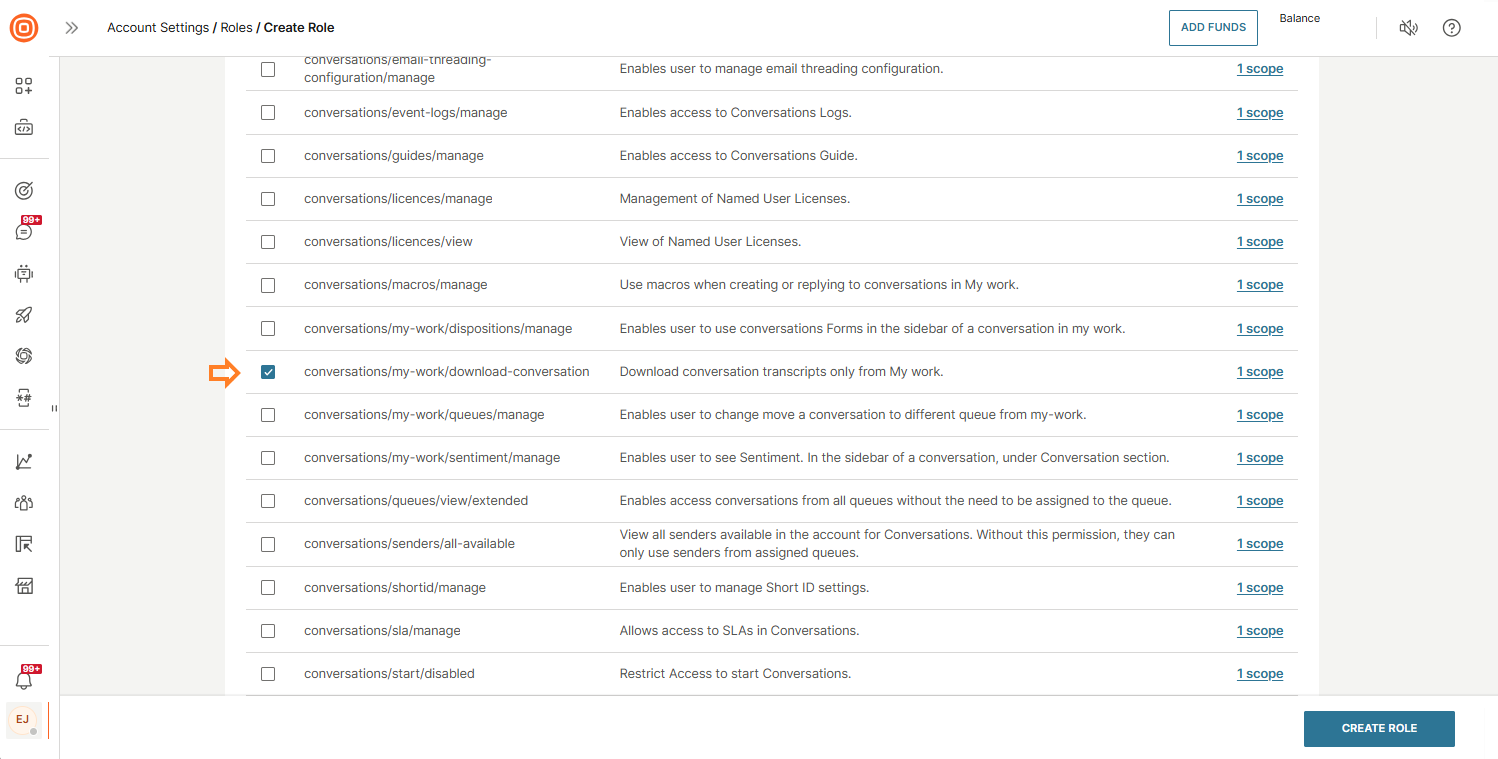
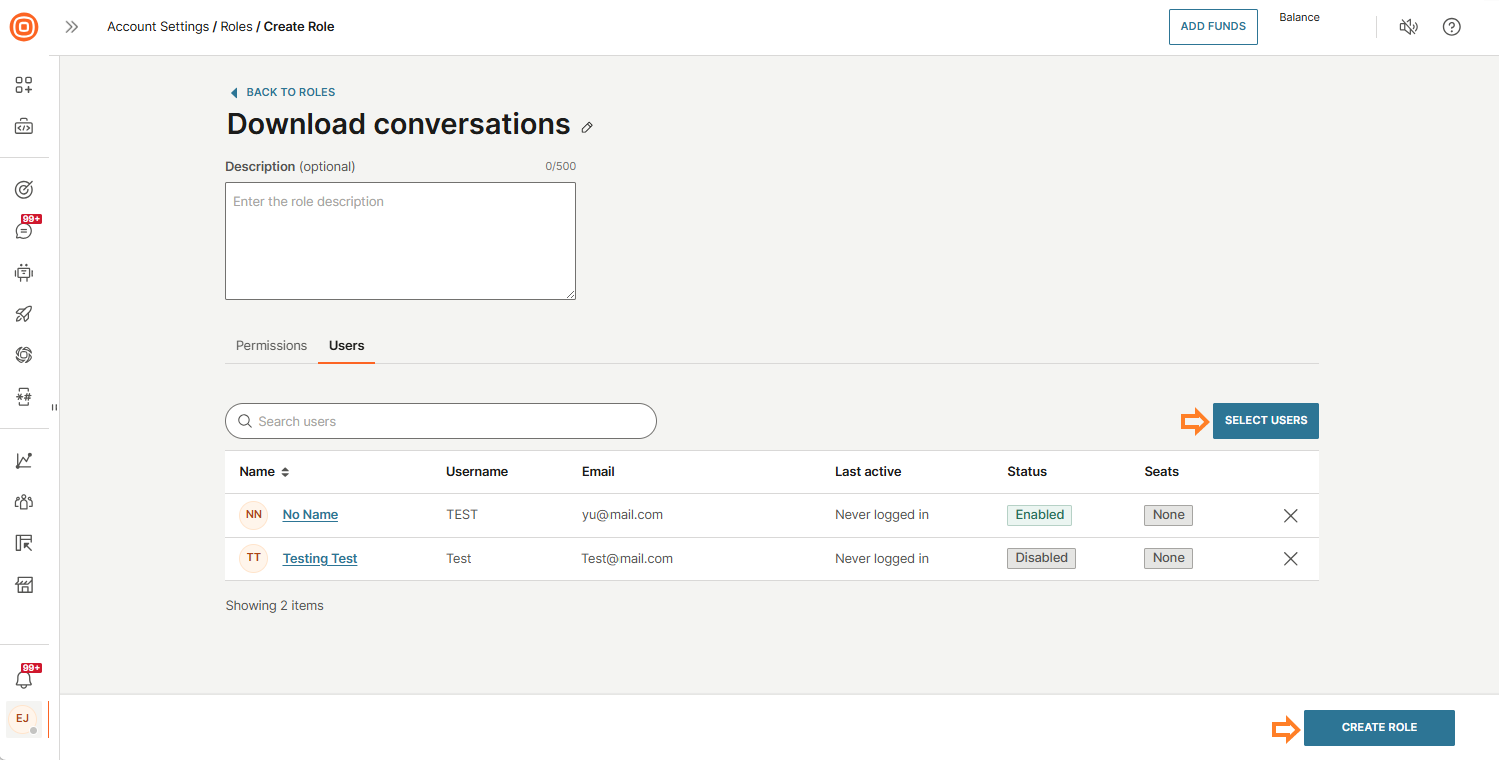
- Open the Users tab.
- Click Select users and then assign this custom role to users who already have the default Agent for Conversations role.
- Select Create role.
Example: Create a custom role with limited Conversations permissions
To create a custom role based on an existing Conversations role:
- On the Default tab, select a role such as Agent for Conversations.
- Select Duplicate.
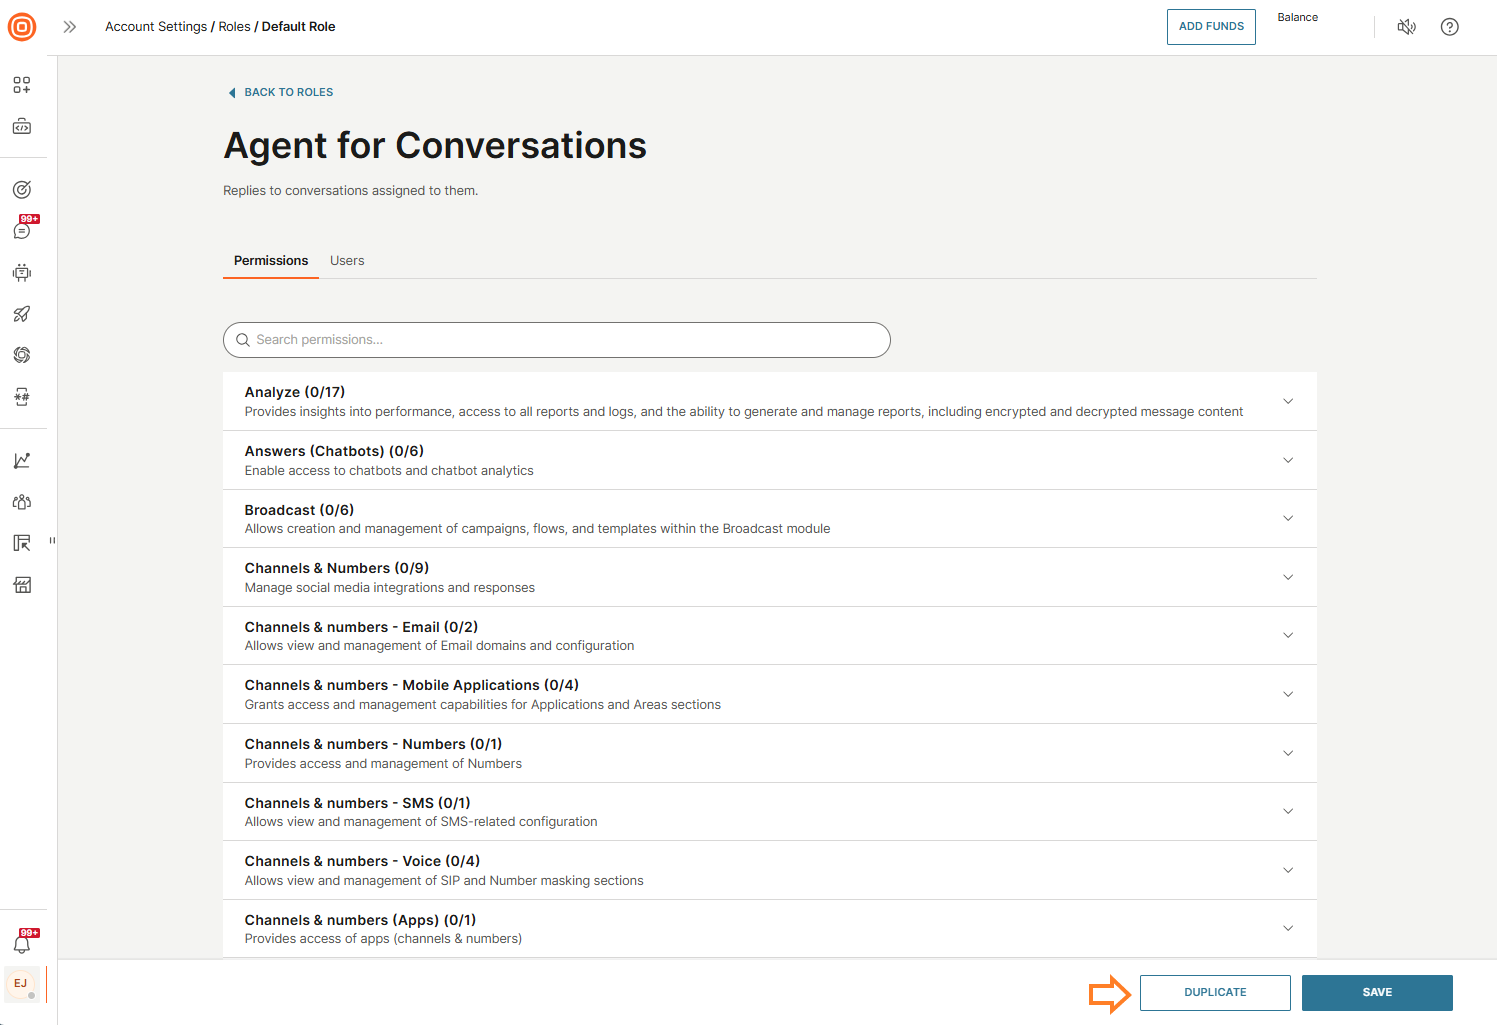
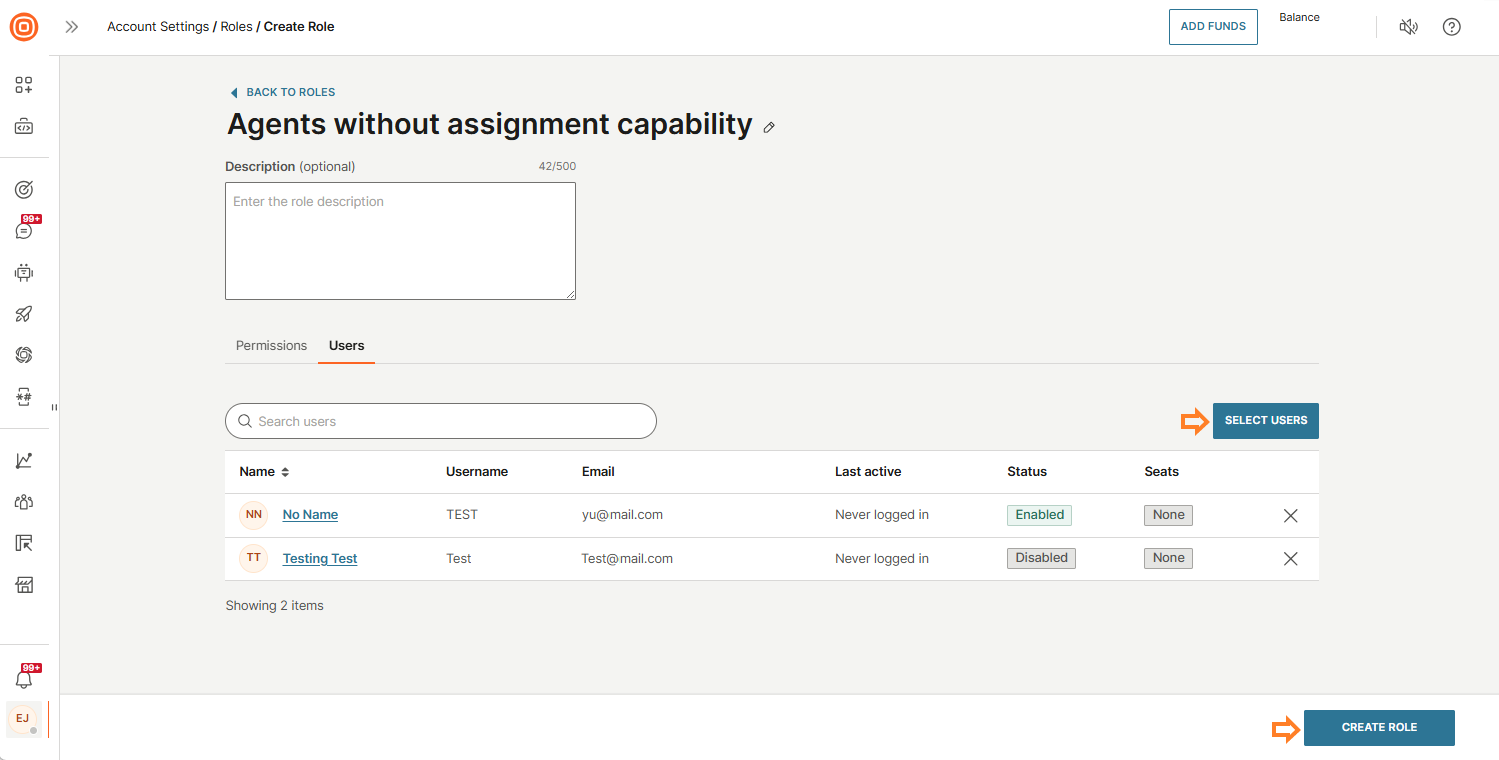
- When the role page opens, update the role name (for example, Agents without assignment capability).
- Open the Conversations permissions section.
- Remove the check mark from the permission to assign conversations (conversations/allow-assignment).

- Open the Users tab.
- Click Select users and add the users you want to assign to this role. Note: Users assigned to this custom role must not have the default Agent for Conversations role assigned at the same time.
- Select Create role.
Configure channels
Currently, you can set up SMS and Voice calls over the web interface.
To set up the channels:
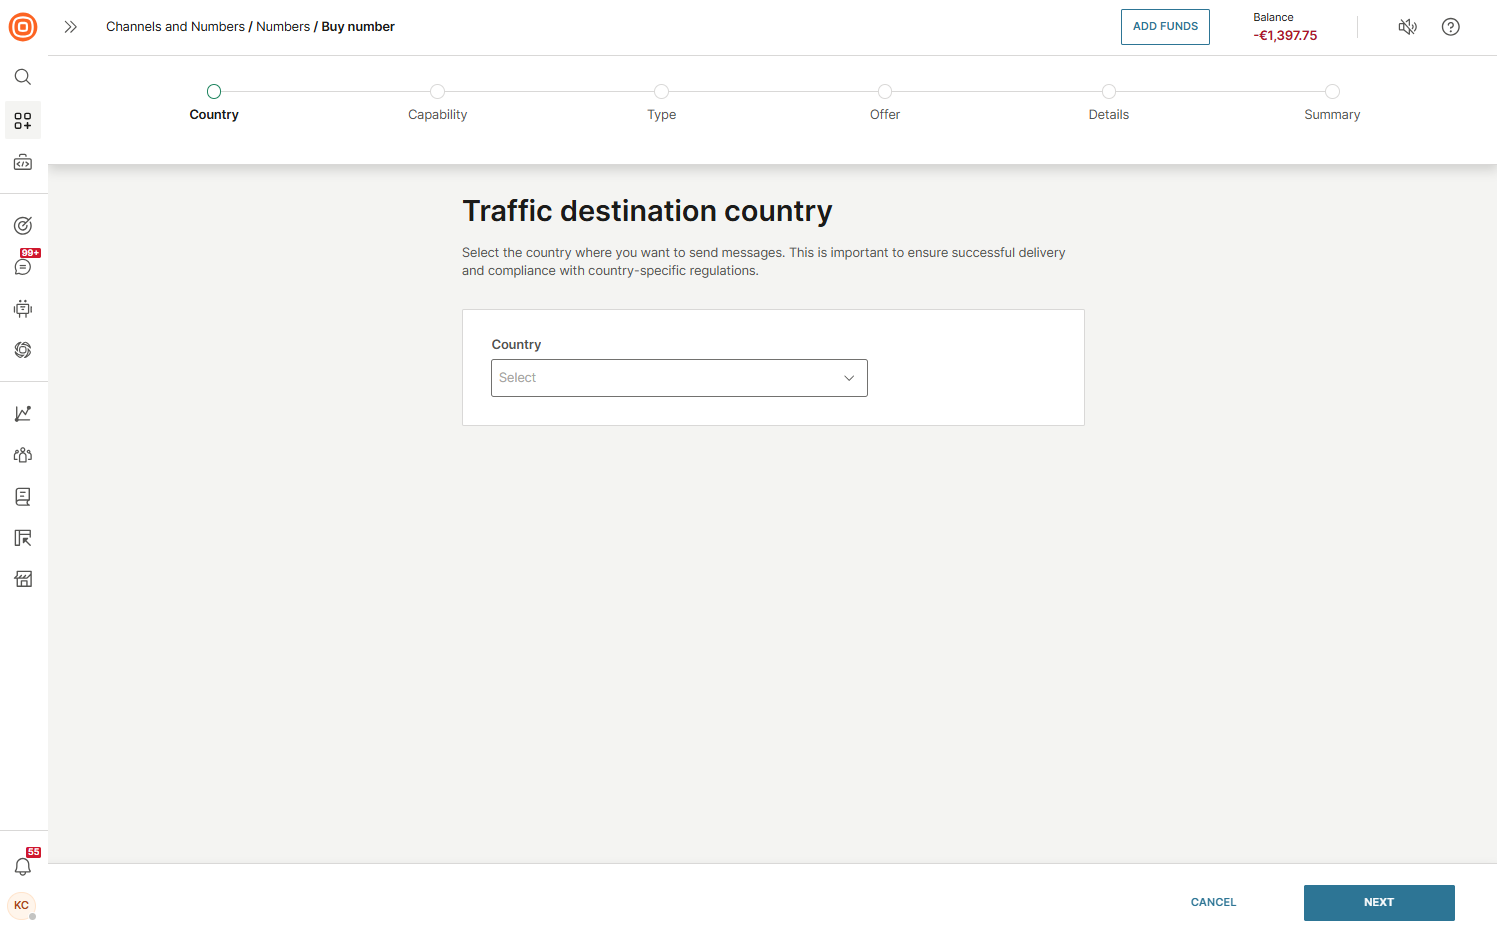
- In the web interface, go to Channels and Numbers → Numbers.
- In the My numbers tab, you will see all the numbers you currently own.
- Select Buy Number to purchase two-way numbers.
- Select the country where you want to send messages.
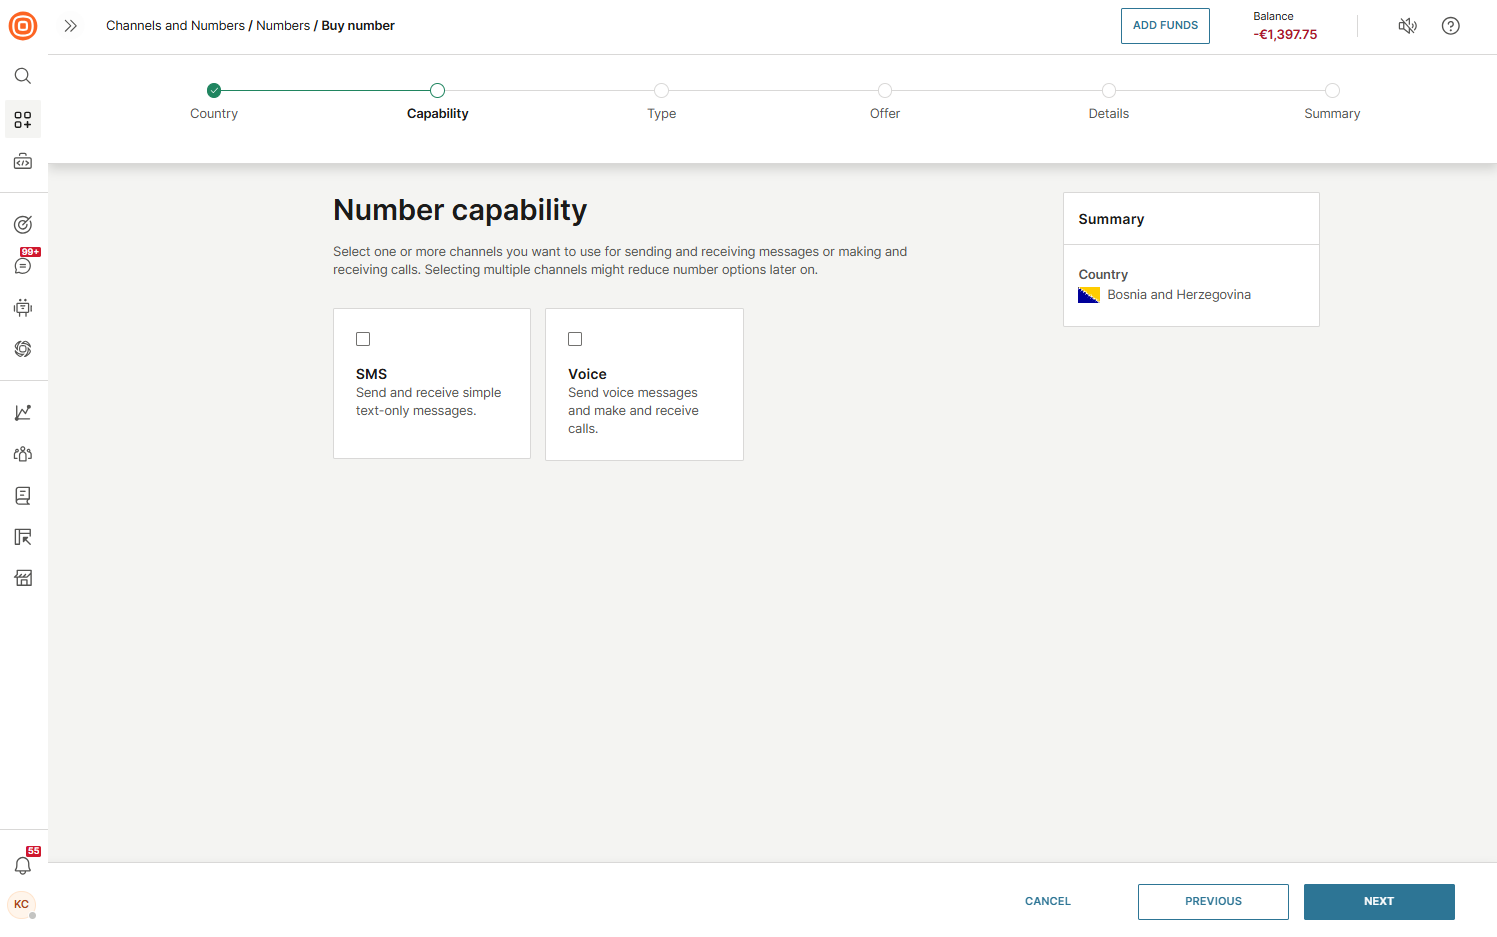
- Select the SMS channel for sending and receiving messages, and/or the Voice channel for making and receiving calls.
- Select the number type that fits your business needs the best.
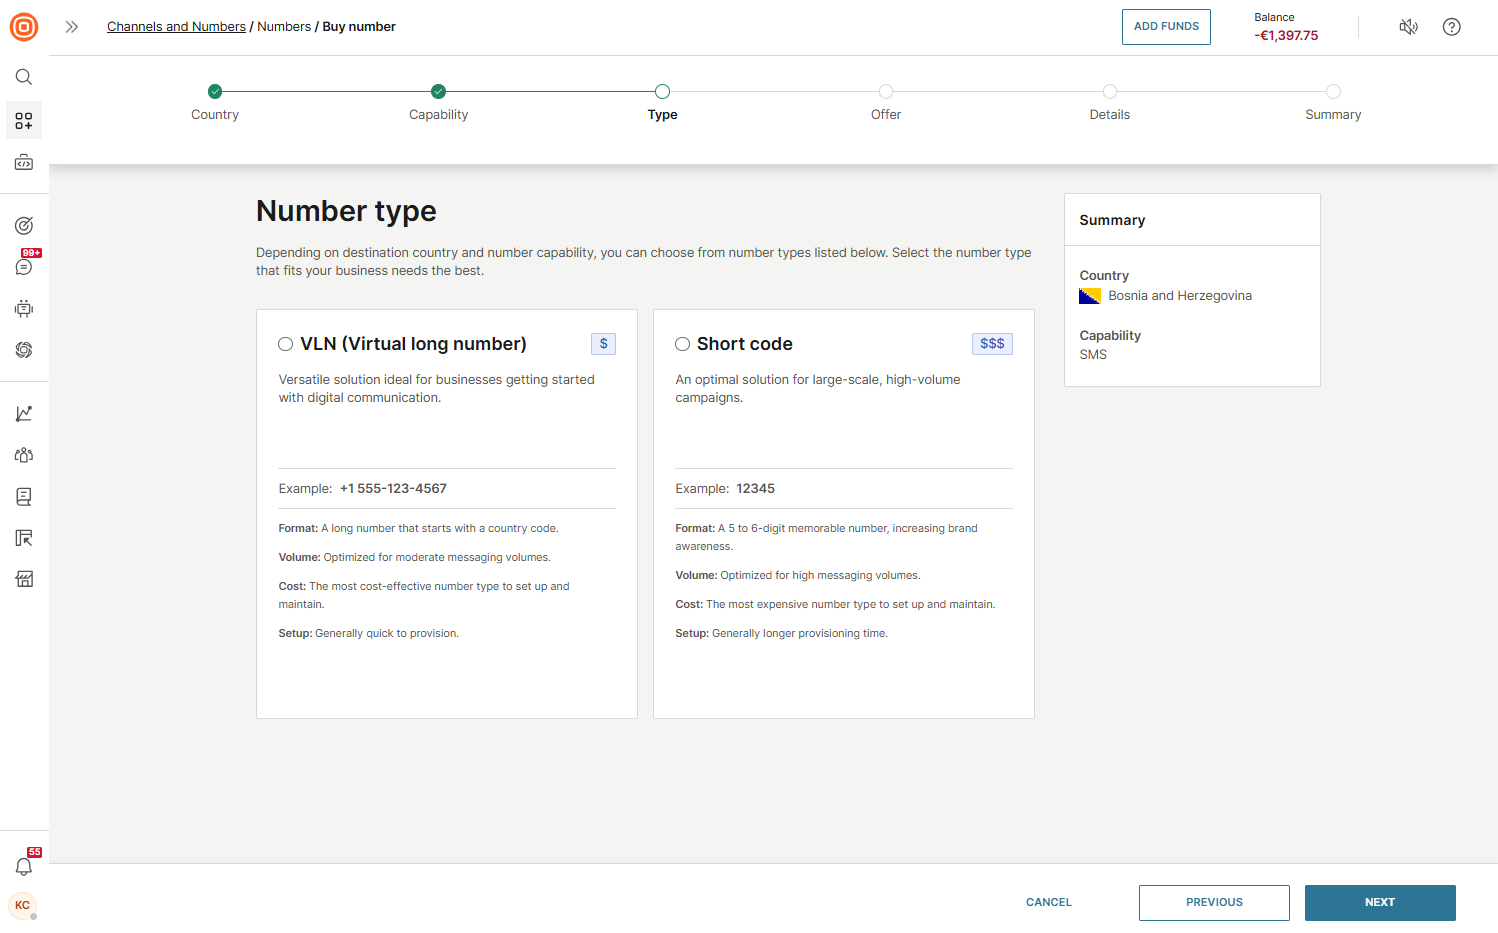
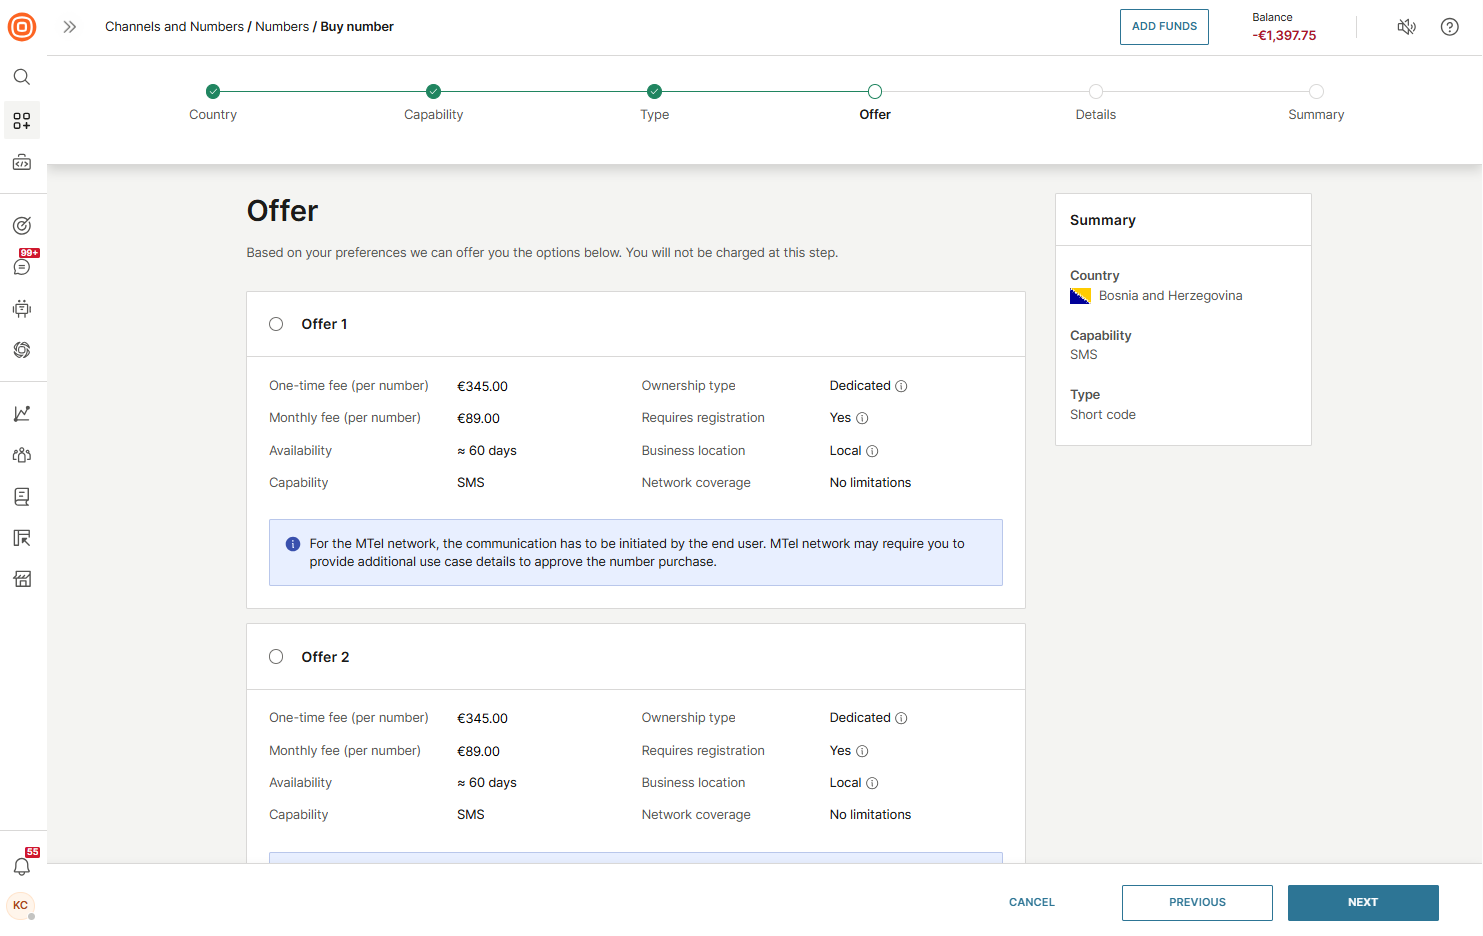
- Choose the best offer based on your preferences.
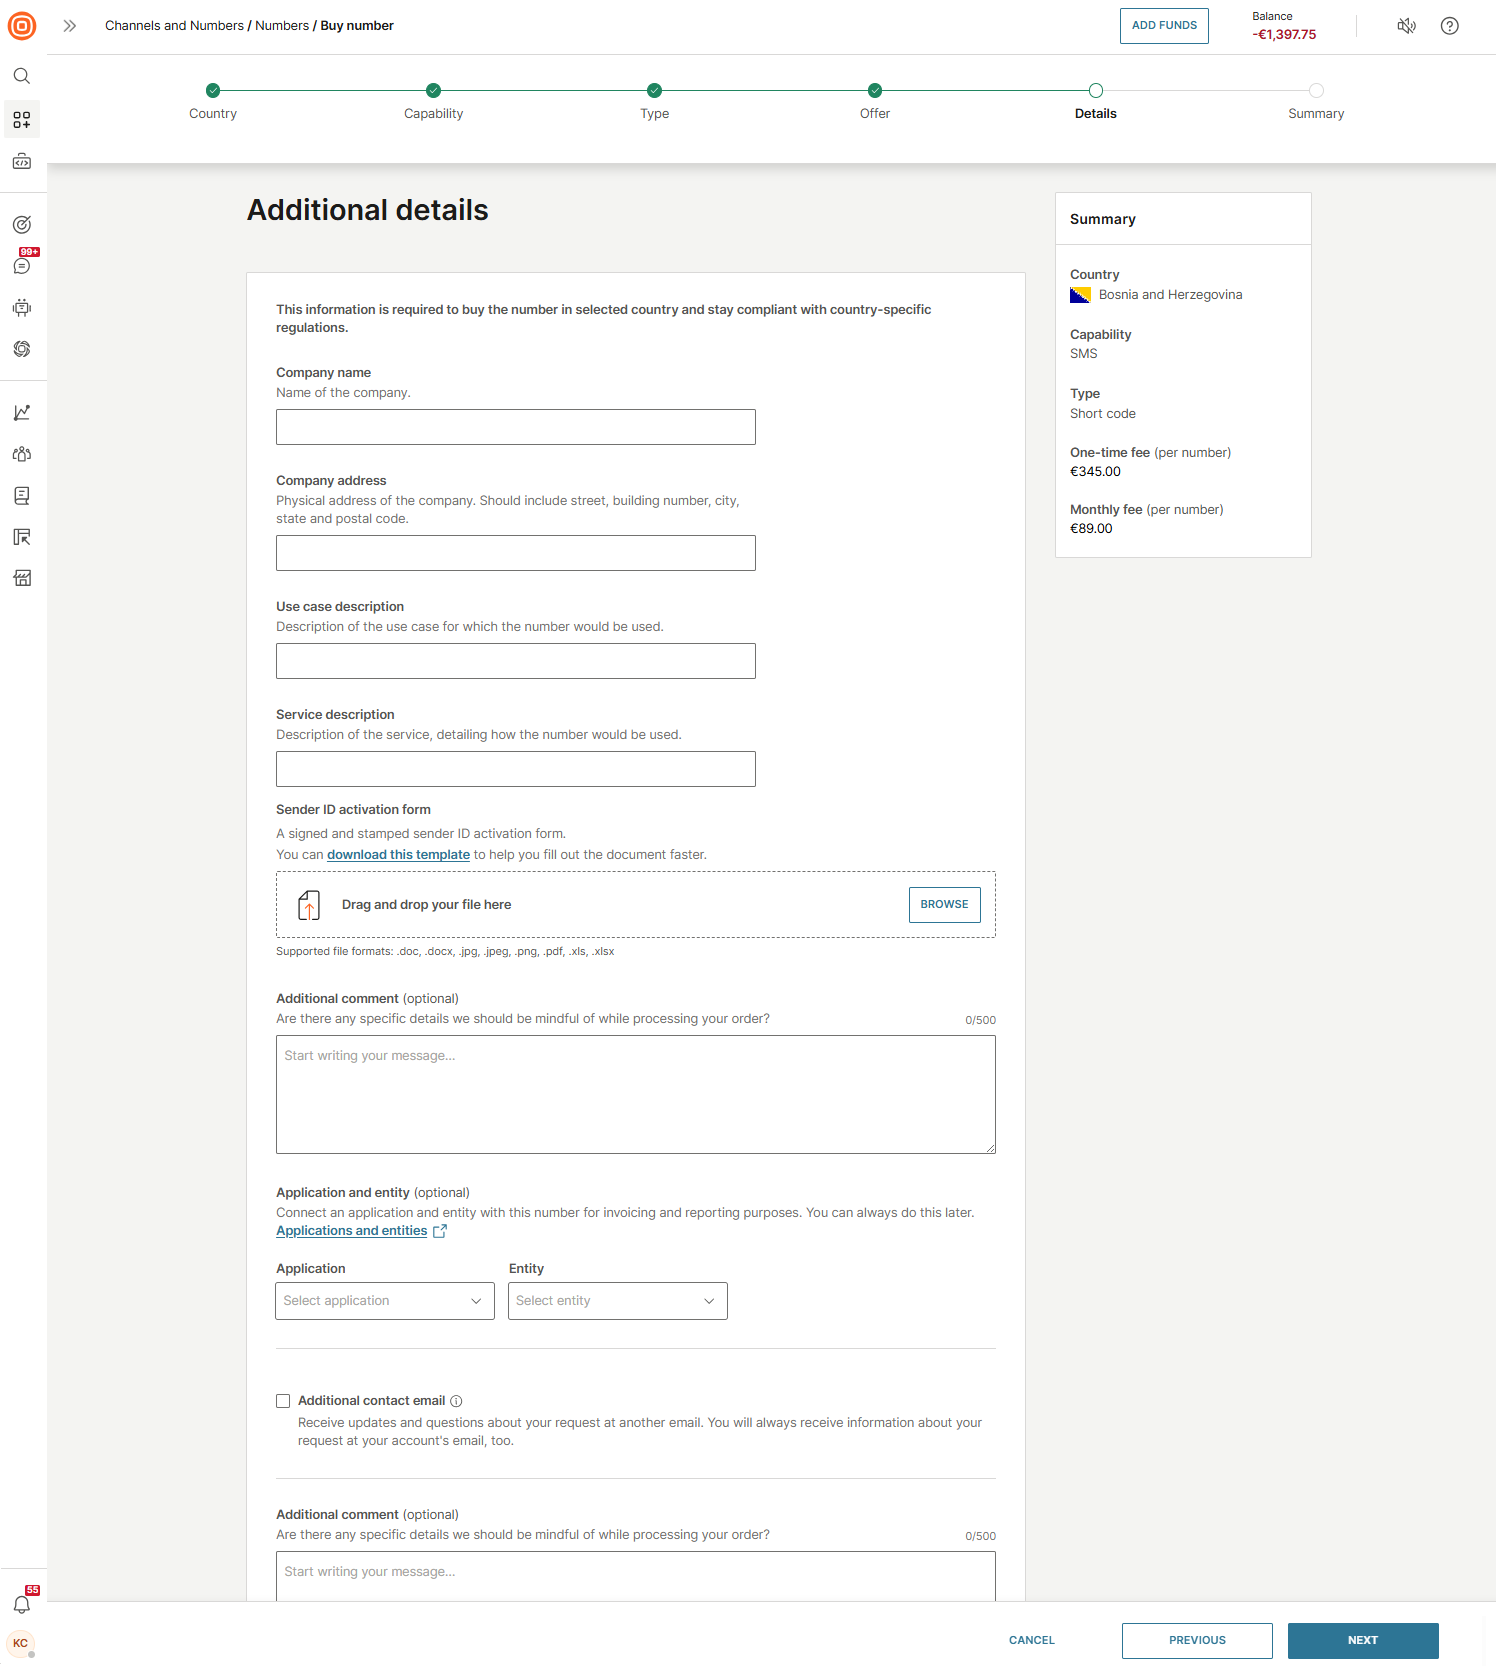
- Add the necessary details to stay compliant with country-specific regulations.
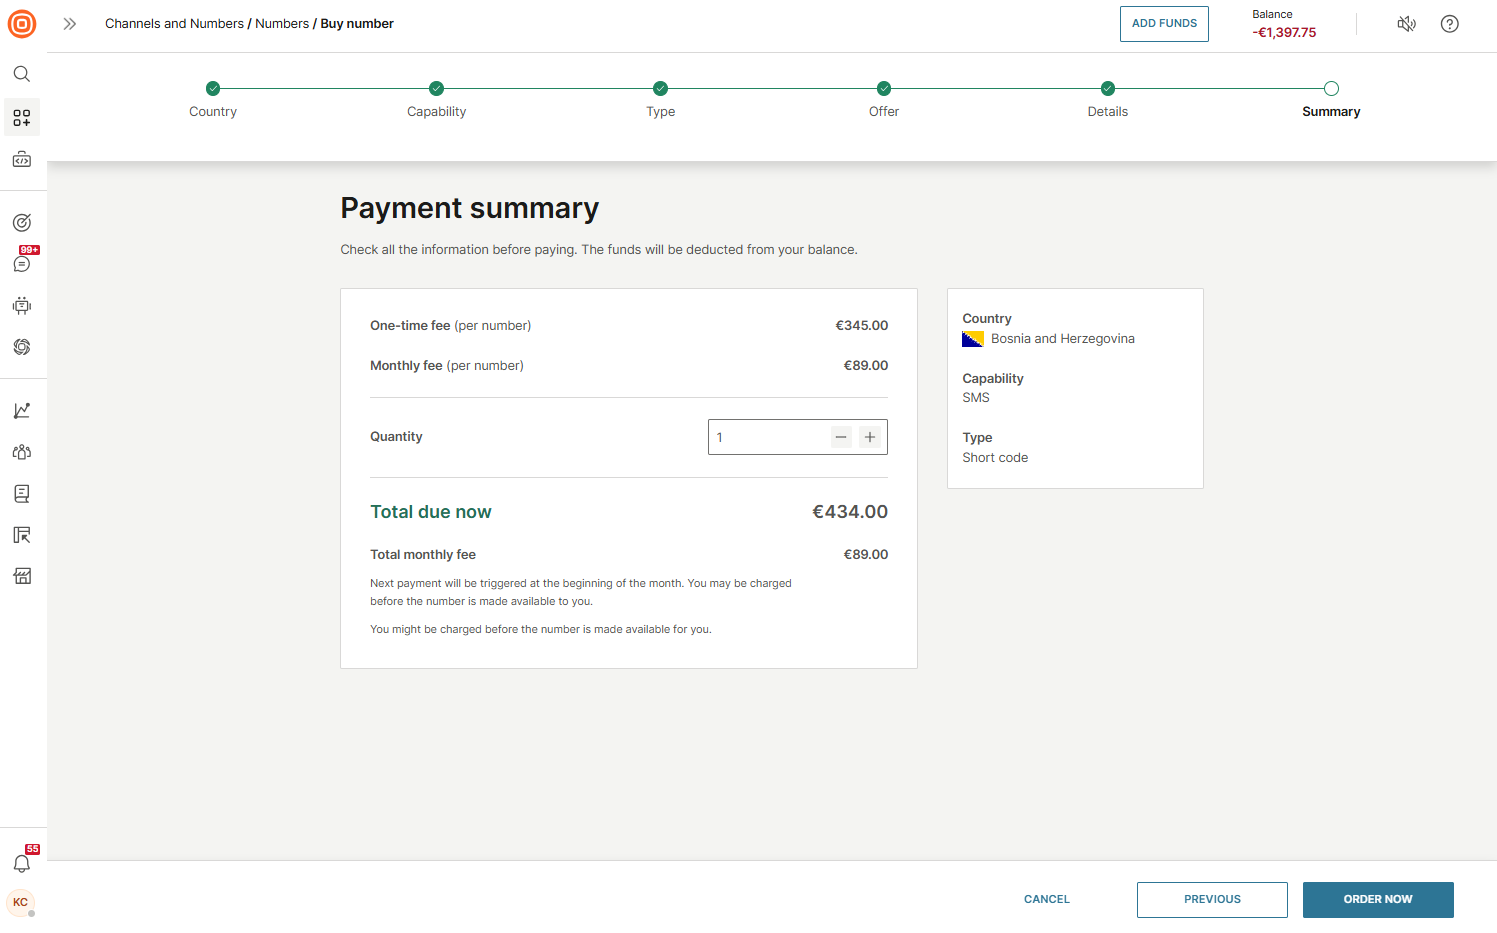
- On the Payment summary, check all information before paying. If everything is correct, select Order now.
- Go to the Numbers page and select your purchased two-way number.
- Open the SMS or Voice tab, depending on the selected channel.
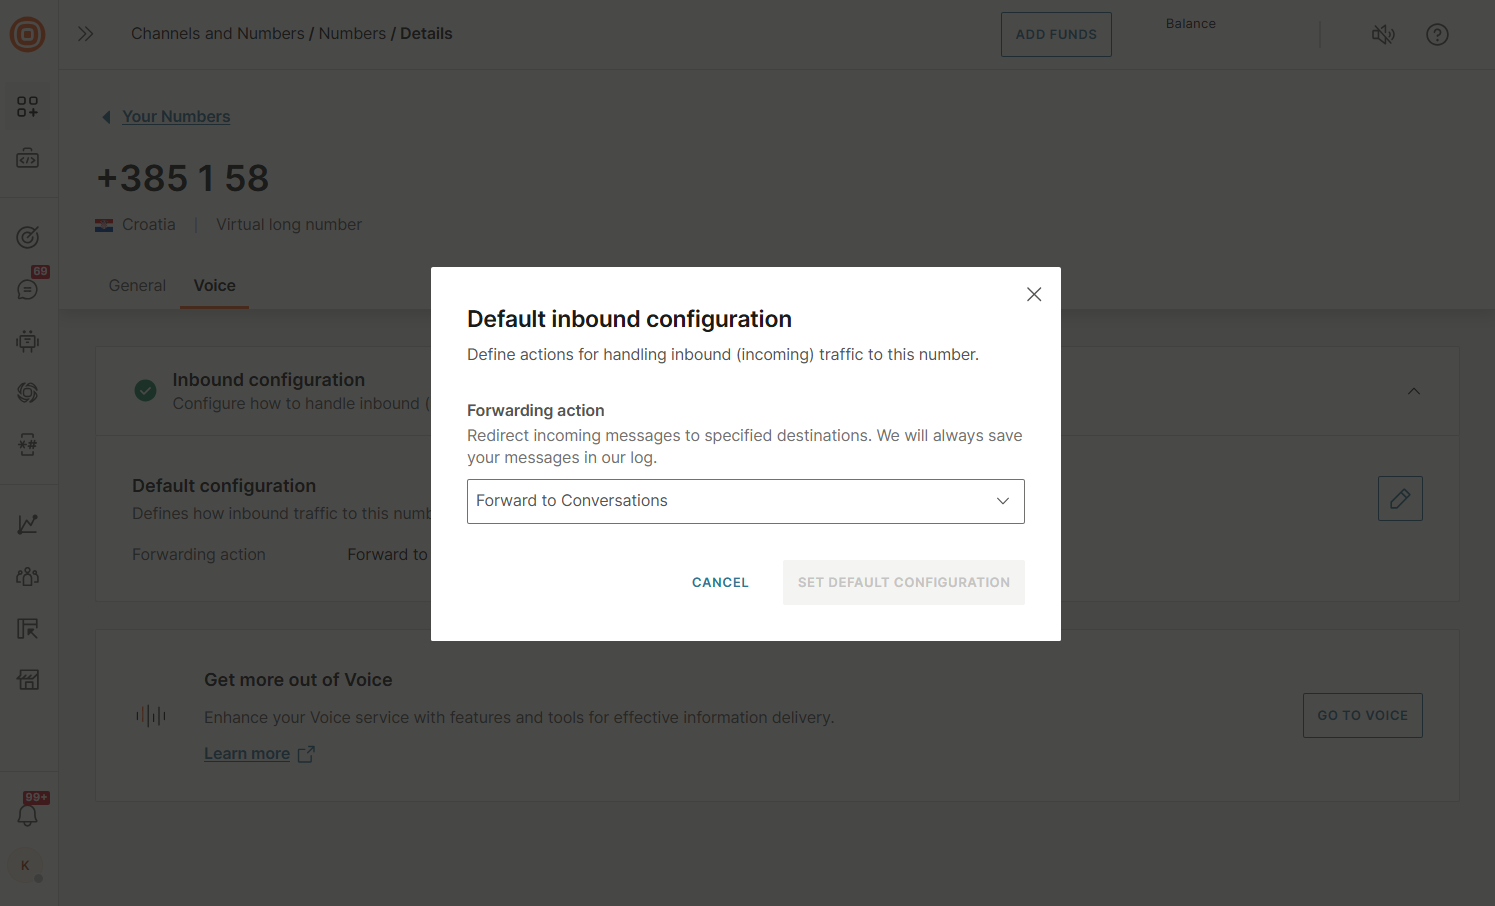
- In the Inbound configuration section, select the pen icon next to Default configuration.

- From the drop-down menu, choose Forward to Conversations as the forwarding action.
- Select Set default configuration to save your changes.
Web and in-app calls setup
To enable calls over the Internet, follow these steps:
- Create your application via the Infobip web interface.
- Optional: configure Push for mobile
- Define application type for Conversations use case
- Set up SDKs in your application project.
Use the following guides on GitHub:
Configure push [#configure-push-start-using-conversations]
This is an optional step, but using push is highly recommended if you want to place calls to users in the application.
For iOS:
- Upload APNs Certificate
- If the certificate is encrypted, you must enter the password
For Android:
- Enter the FCM Server API Key