Adobe Journey Optimizer messaging
 SMS
SMS
 MMS
MMS
Use Adobe Journey Optimizer messaging to send text and rich messages for transactional alerts and marketing campaigns across multiple channels in the Infobip platform. Messages can be delivered through SMS, MMS, RCS, WhatsApp, Viber, and other Infobip-supported channels.
Each message is executed as part of the customer journey you design, allowing you to manage delivery, timing, and personalization across all supported channels.
Features
Seamless integration across channels
Send and orchestrate messages over SMS, MMS, RCS, WhatsApp and Viber from Adobe Journey Optimizer, automating campaigns within your customer journey workflows.
Personalized, targeted messaging
Tailor content to each customer’s preferences, behaviors, and journey stage across every channel.
Two-way conversations
Enable real-time interactions for support, surveys, and feedback, making it easy for customers to engage with your brand.
Real-time reporting and analytics
Monitor delivery, engagement, and outcomes across channels and journey steps to continually optimize performance.
What you will need
- An Infobip account. If you do not have Infobip account, you can create one.
- Adobe Journey Optimizer account
Configure channels in Adobe Journey Optimizer
Before sending messages from your journeys, you must configure your Adobe Journey Optimizer environment:
- Integrate the provider settings.
- Create a channel configuration.
Configure provider
To configure Infobip with Journey Optimizer, configure the API credential. The configuration steps depend on the channel you choose: SMS, MMS, or other channels like RCS, WhatsApp, and Viber.
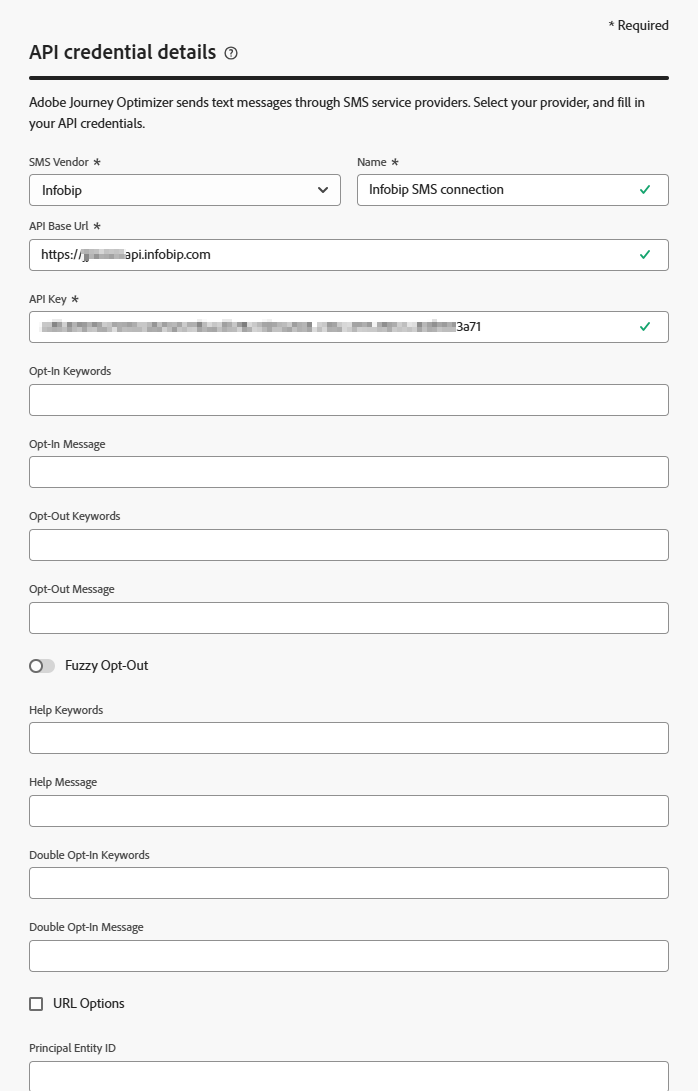
Configure API credential for SMS and MMS
To set up SMS and MMS messaging, follow detailed steps in the Configure Infobip provider (Configure credential for SMS) guide.
Configure RCS, WhatsApp, and Viber
Messaging for RCS, WhatsApp, and Viber is supported in Adobe Journey Optimizer through Infobip using the Custom SMS Provider feature.
Existing Infobip SMS credentials are not compatible because these channels require a distinct payload format.
To configure the RCS, WhatsApp, and Viber channels, use the following information in the Journey Optimizer documentation:
- Configure a custom SMS webhook in Journey Optimizer. This webhook is responsible for handling delivery receipts, inbound messages, and status updates from Infobip’s platform.
- Create a new API credential within Journey Optimizer, selecting Custom as the SMS provider. For the channel-specific configuration, see Configure API credential for RCS, Viber, and WhatsApp.
For each message structure (template) you need to create a separate API credential with its distinct payload definition. Personalization options are currently limited – only one message attribute. For example, message text, file URL, or card description can be personalized, using the {{message}} placeholder.
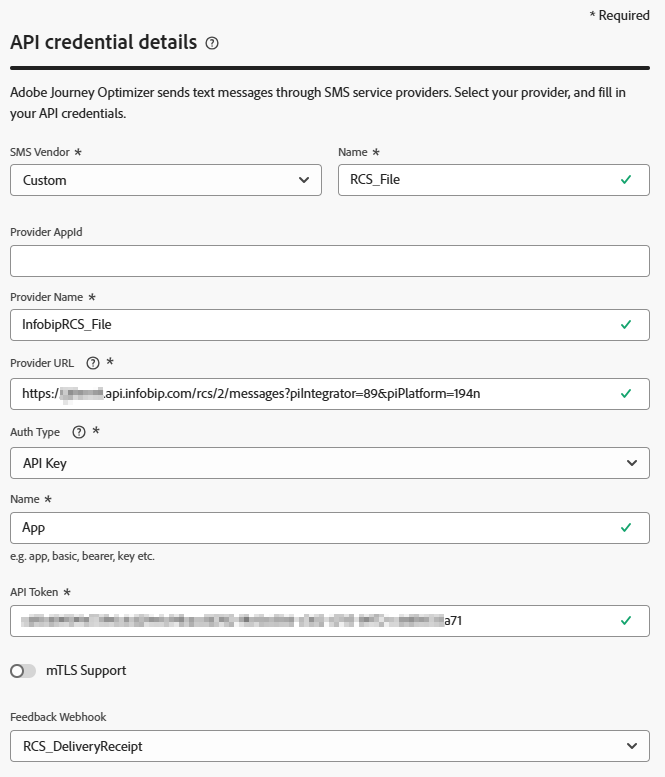
Configure API credential for RCS, Viber, and WhatsApp
To configure the API credential, use these steps to guide you through the process in Journey Optimizer:
-
In Provider URL, fill the Infobip API endpoint with your Infobip base URL, depending on the channel:
Channel Infobip base URL RCS https://[baseURL]/rcs/2/messages?piIntegrator=89&piPlatform=194nViber https://[baseURL]/viber/2/messages?piIntegrator=89&piPlatform=194nWhatsApp https://[baseURL]/whatsapp/1/message/template?piIntegrator=89&piPlatform=194n -
Use
API keyas Auth Type. -
Use
Appas Auth Name. -
Use your Infobip API key as API Token. Your API key must be valid and needs to have the
message:sendscope. -
From the Feedback Webhook drop-down select the custom SMS webhook you created as a part of this setup.
-
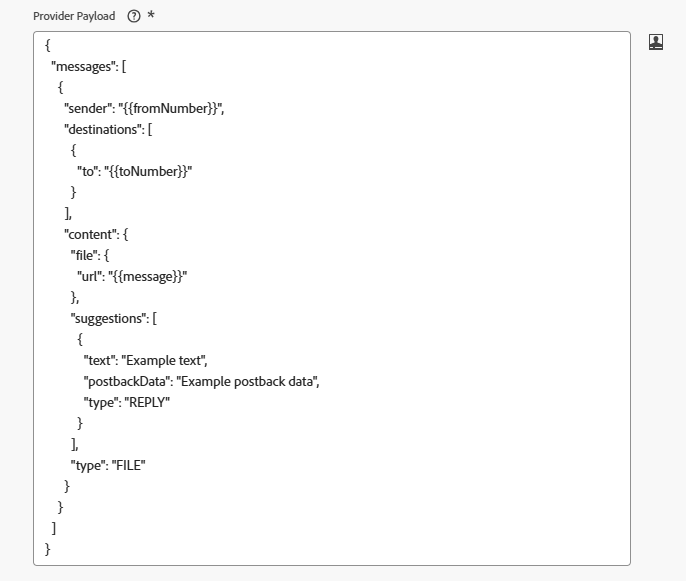
For composing the Provider Payload for RCS or Viber:
- Open the RCS API documentation or Viber API documentation respectively
- In the Request samples section, select the message type. You can use any message type available.
- Copy the payload and paste it in a text editor for further adjustments.
- Replace Sender value with
{{fromNumber}}. - Replace Destination value with
{{toNumber}}. - Replace the message attribute you want to personalize with the
{{message}}placeholder. Personalization options are currently limited, and only one message attribute (for example, message text, file URL, or card description) can be personalized.
-
For composing the Provider Payload for WhatsApp templates:
- See the Create and register a WhatsApp message template over the Infobip web interface guide.
- On the template list, open the JSON payload and click Copy.
- Paste the payload in a text editor for further adjustments.
- Replace From value with
{{fromNumber}}. - Replace To value with
{{toNumber}}. - Replace the message attribute you want to personalize with the
{{message}}placeholder.
The following image is an example configuration for an RCS File message.
The following image shows the payload. The file media URL is the personalized attribute.
After you have finished creating and configuring your API credential, create a channel configuration for your messages. See Configure Infobip provider for more information.
Create a channel configuration
When your channel is configured, create a channel configuration to be able to send SMS, RCS, MMS, WhatsApp and Viber messages from Journey Optimizer.
See Create a channel configuration to guide you through the steps. Use these details for the configuration settings:
- For the channel, select SMS.
- For SMS configuration, select the name of the API connection you created in the previous step.
- For Sender number, enter the sender (business phone number, alphanumeric sender or the RCS agent name).
- For SMS execution, select the field you use for keeping phone numbers of your contacts, for example,
mobilePhone.number. - Submit the configuration.
Send messages in journeys or campaigns
When your channels and provider settings are configured, you can create audiences and profiles, and then you can build journeys or campaigns, defining the message content.
Create an audience
To create journeys, you need to create audiences and profiles in your Journey Optimizer.
For more information, see Audiences, profiles & identity.
Create a journey or campaign
Create and send messages in a journey or in a campaign. For SMS, MMS, RCS, WhatsApp or Viber, use the SMS action.
Create and send messages in a Journey
- Create a journey.
- Add an SMS activity.
- Define the basic settings.
- Browse to the SMS Actions pane on the right to create the content for the message. See Learn how to create a journey.
Create and send messages in a Campaign
- Create a campaign.
- Select SMS as your action.
- Define the basic settings.
- Edit the message content to define the message to send. See Learn how to create a campaign.