Adobe Commerce messaging
 SMS
SMS
This Infobip extension in the Adobe Commerce Marketplace lets you send one-way notifications to your customers about time-sensitive events using SMS and WhatsApp. You can send notification messages when certain events happen, for example, for an order update, or back-in-stock, price drop, and cart abandonment notifications. You'll also be able to receive message reports so that you can check which messages were successfully delivered directly from the Infobip extension in Adobe Commerce.
This app works with Adobe Commerce 2.4.x. Adobe Commerce was previously known as Magento. To install the app go to the Adobe Commerce (Magento) Marketplace.
What you will need
- Adobe Commerce version 2.4.x
- Shell access to your server
- Composer installed
Install the Infobip extension in Adobe Commerce
Check that you have the right version of Adobe Commerce ready, and then follow these steps:
- Ensure that you are using the correct access keys (see My Profile - Access Keys).
- Paste the access keys into the
auth.jsonfile inside your project. - Use the Composer
require :command to add the extension to your project. If you only need the extension package code for a specific version (for example, for code review purposes), you can initialize an empty project and add the Composer require statement for the extension to a blankcomposer.json. - See the list of versions in the selector below the extension module name.
Configure base settings
To enable the extension and access the rest of the configuration, you need to provide the following credentials:
- Base URL
- API Key
If you don't yet have an Infobip account, you can create an account and get the credentials.
Use a URL with authorization to receive reports - the Base URL setting allows you to choose an endpoint with a Magento access token for Adobe Commerce to receive Infobip message delivery reports for all channels.
See the Adobe Commerce (Magento) developer documentation for more information on how to obtain this token. If it is set to Yes, you must share this token with Infobip support. Use the s-pass.app when sharing this token. If you don’t need to receive these message reports in the extension, you can skip this step.
To connect your Infobip account with this extension, use the following steps:
- Provide a Base URL and API key.
- Click Save Config to save the configuration.
- After saving and refreshing the page, the Enable Plugin select option becomes available. Select Yes and save the configuration again.
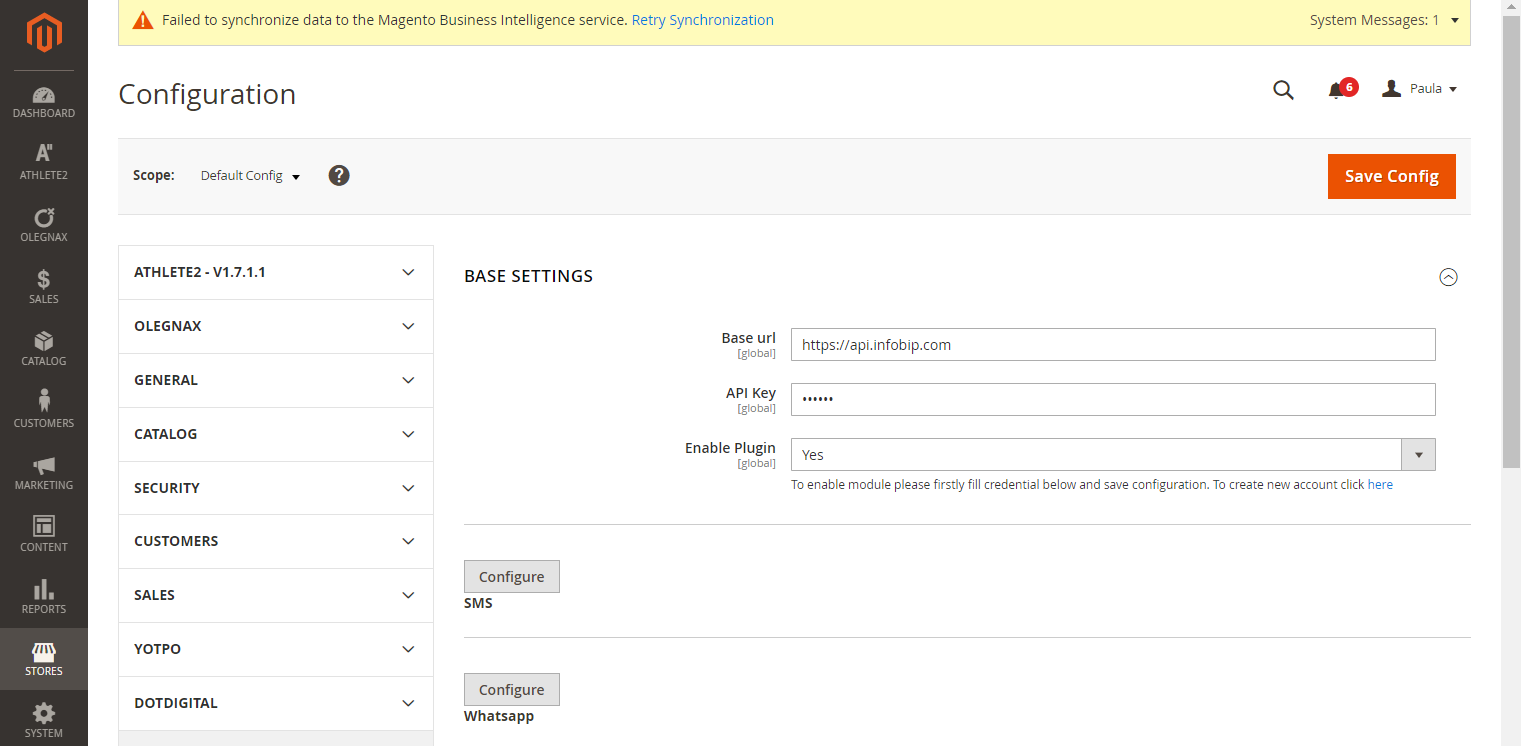
Occasionally, you may experience cache issues and the Enable Plugin option is not be available, even though you provided the correct credentials. In this case, try to refresh the page or save the configuration again.
Configure the channels
After successfully enabling the extension, you see Configure buttons for both SMS and WhatsApp.
Click on one of the buttons and configure the channel. The process is the same for both channels.
| Enabled | Enable notifications to be sent through the channel. Select Yes or No to switch on/off all notifications through the SMS channel. |
| Select sender | Displays 2-way senders available on your account. Select a number that sends the message. This number is visible to your customers. If you need additional numbers or new numbers for a specific country, you can obtain them by logging into Infobip and navigating to Channels and Numbers. |
| Language code | Two-letter code of sender country origin. Enter a two-letter language symbol. |
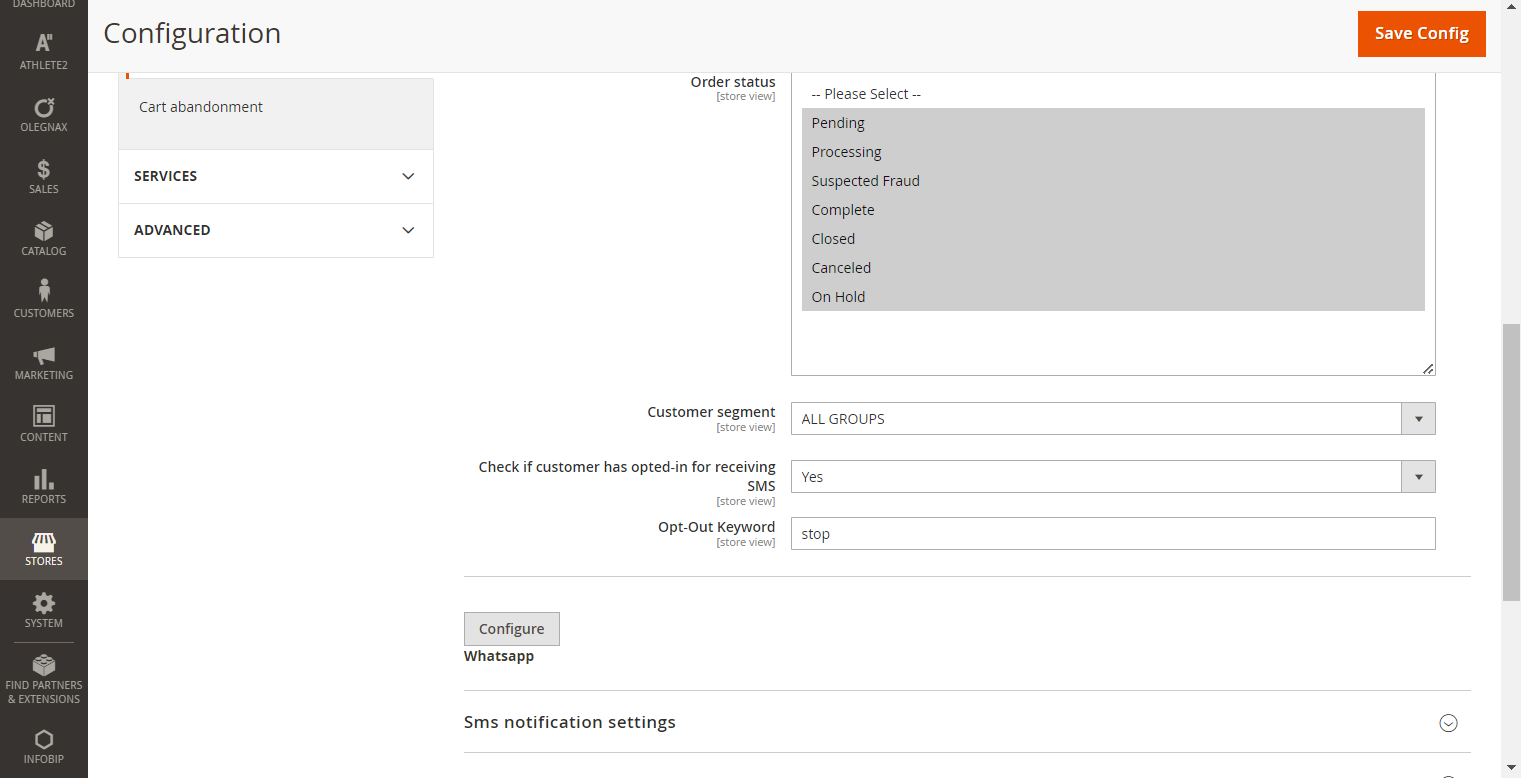
| Order status | Multi-select input option lets you decide what kind of status-related notification you want to send to your customers. Select the status notifications you want to send. The options trigger an SMS notification. |
| Customer group | Specify which customer group receive notifications: select ALL GROUPS to send notification to all customer groups. For example, if you select General customers, the general customer group receive notifications via this channel.
|
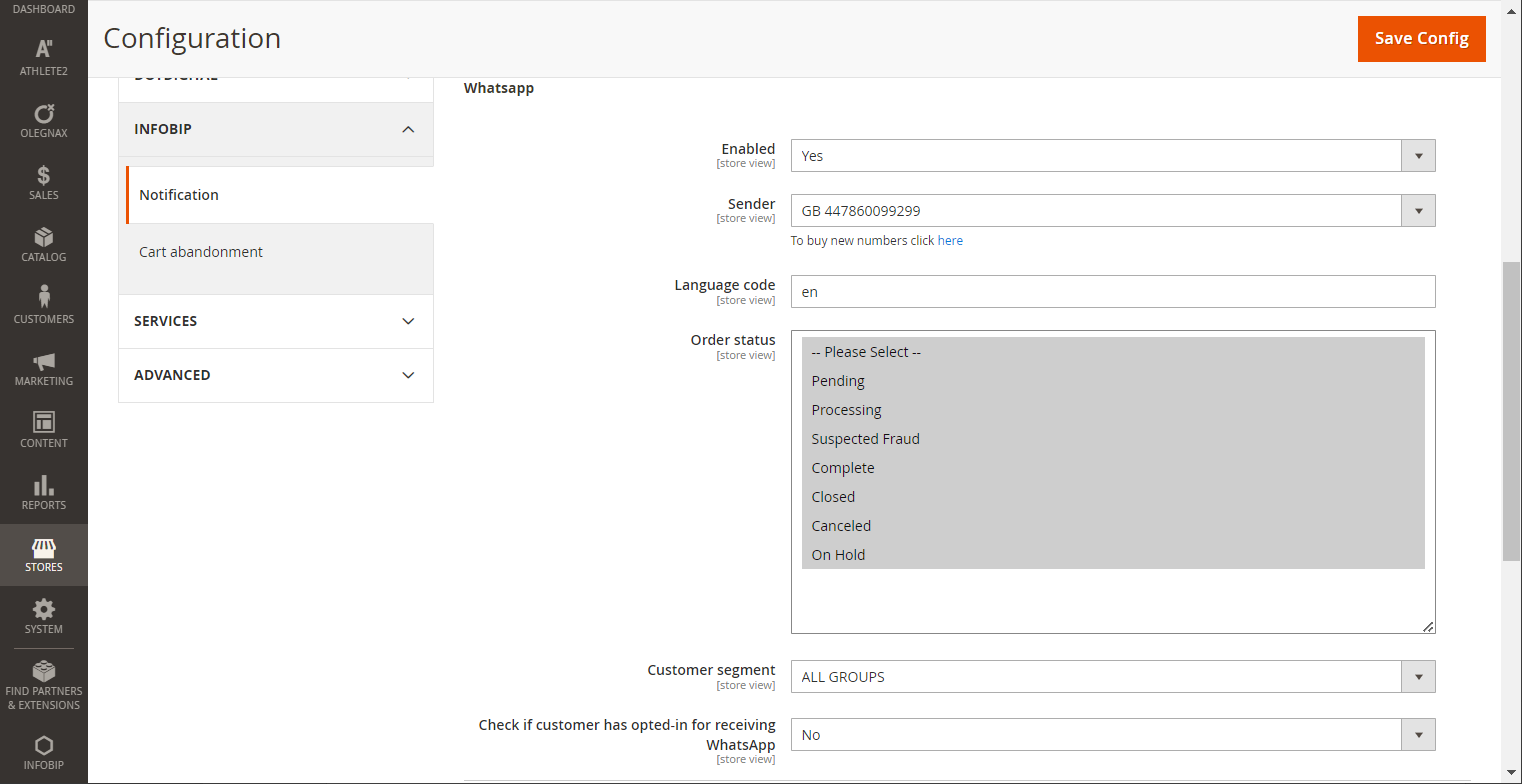
Set up message opt-in
Select whether to collect customer opt-in for WhatsApp and customer opt-out for SMS. This means that, if a customer explicitly notifies you that they either want or don't want to receive messages, you can filter them out.
For SMS there are two additional fields:
- Check if the customer has opted-in to receive SMS, choose ; Yes or No.
- Opt-Out Keyword, which defines which customer message is accepted as opt-out.
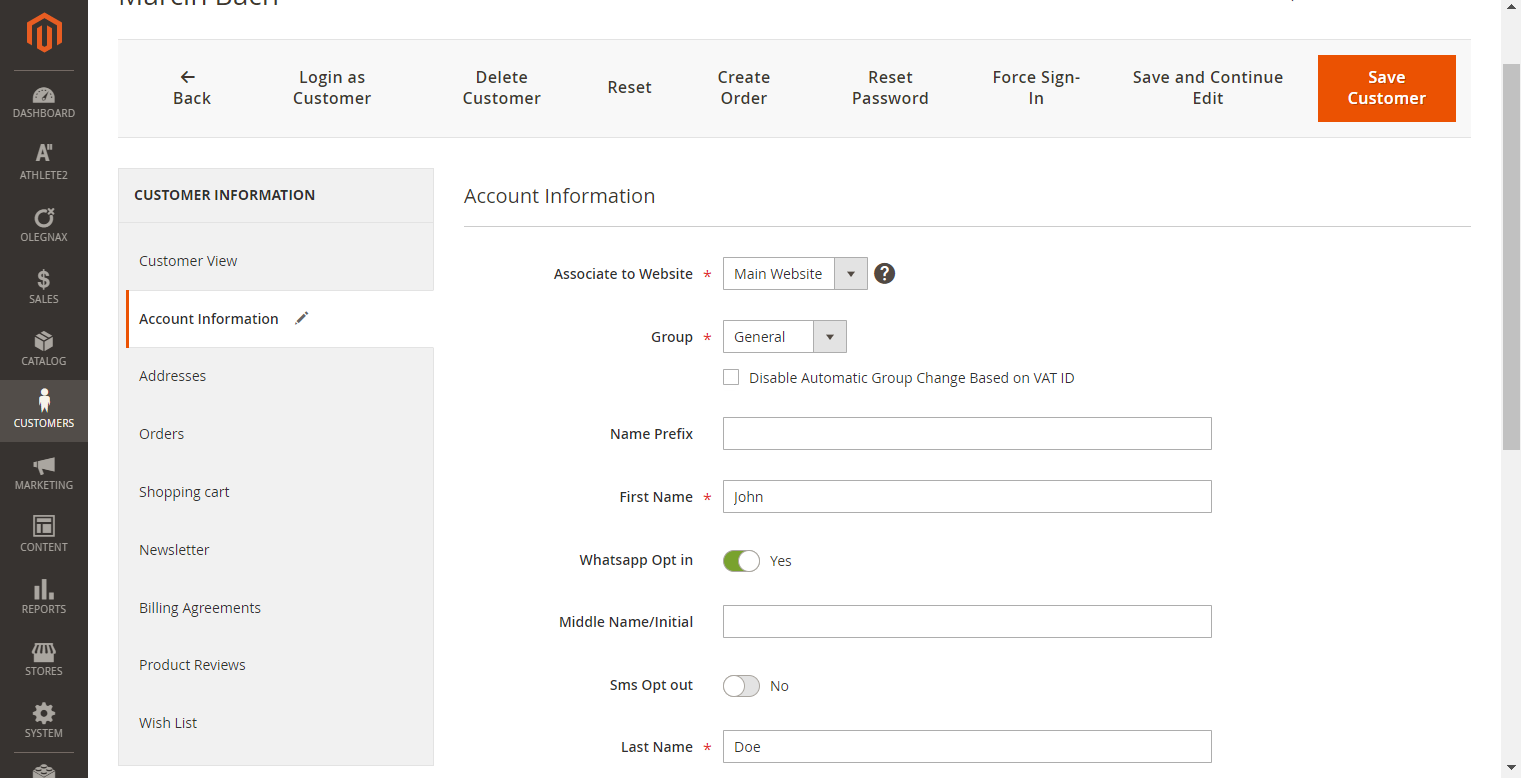
For WhatsApp, you can select to collect opt-ins. In Account information, toggle Whatsapp Opt in to Yes.
In both cases of SMS and WhatsApp, a Magento administrator can manually opt-in or opt-out customers.
To receive incoming messages and delivery reports, contact [email protected] to configure endpoints for receiving this information. You need to create an integration tokenfor both endpoints.
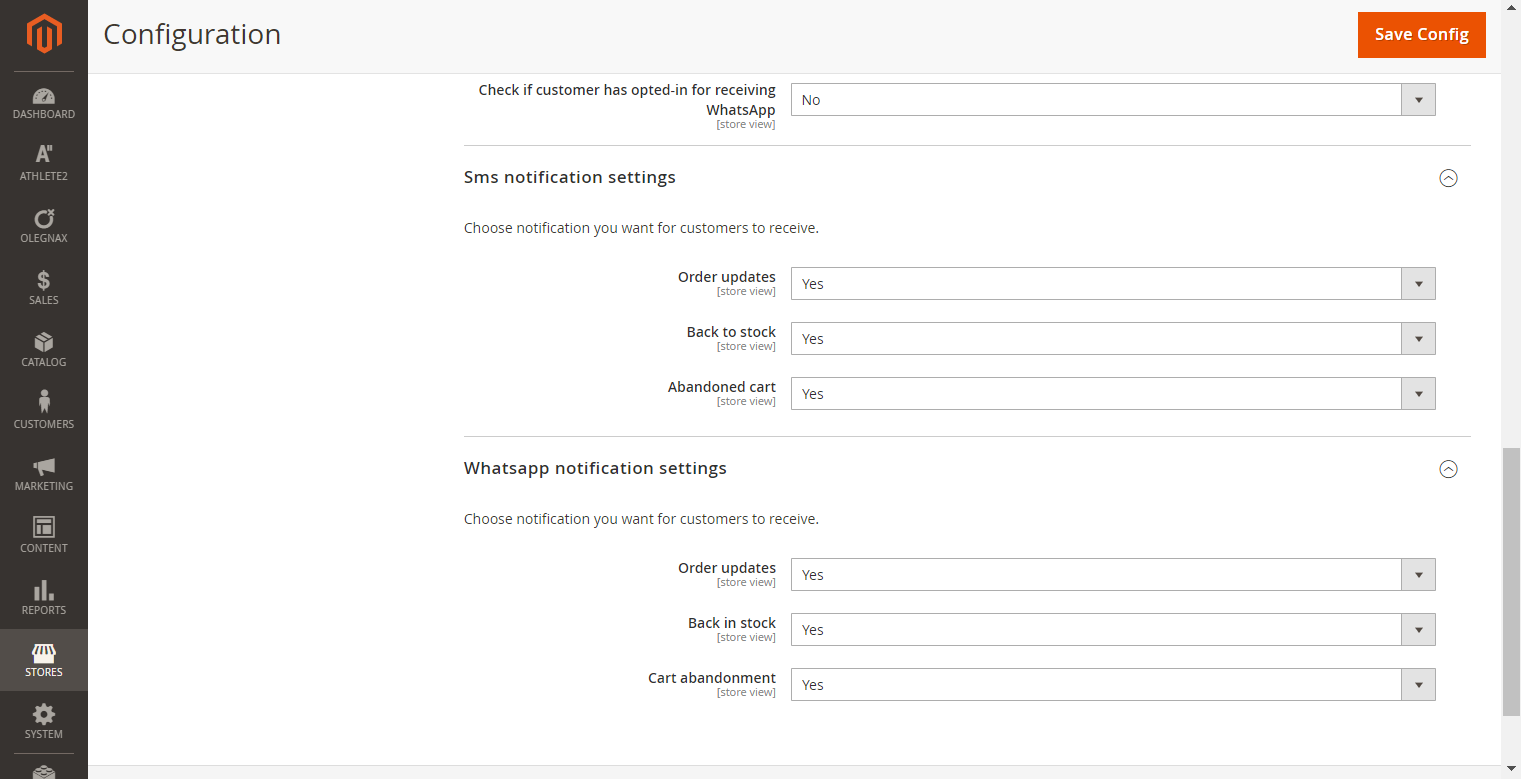
Notification settings
This section describes the settings for managing the types of notification that you want to send to your clients.
| Order updates | Enable or disable all notifications related to order status. Select Yes to turn on all notifications related to order update status changes. |
| Back to stock | Enable notifications about products that are returned to stock. Remember that the functionality works only if native Adobe Commerce back to stock functionality is enabled. Go to Store > Configuration > Catalog > Catalog > Product Alerts and set Allow Alert When Product Comes Back in Stock to Yes. |
| Abandoned Cart | Enable notifications to customers that do not finish their order. For more information about abandoned cart notifications, see the Abandoned Cart section. |
Back to stock [#back-to-stock-notification-settings]
The in-stock alert creates a link called Notify me when this product is in stock for every product that is out of stock. Customers can click the link to subscribe to the alert. When the product is back in stock, customers receive an SMS notification that the product is available. Infobip back to stock functionality depends on the built-in back to stock alert. This works only for registered users.
It is important to rememberthat to make it work you have to turn on and configure the schedule for built-in Magneto functionality. For more information about how to configure the back to stock functionality, see the official Adobe Commerce (Magento) documentation.
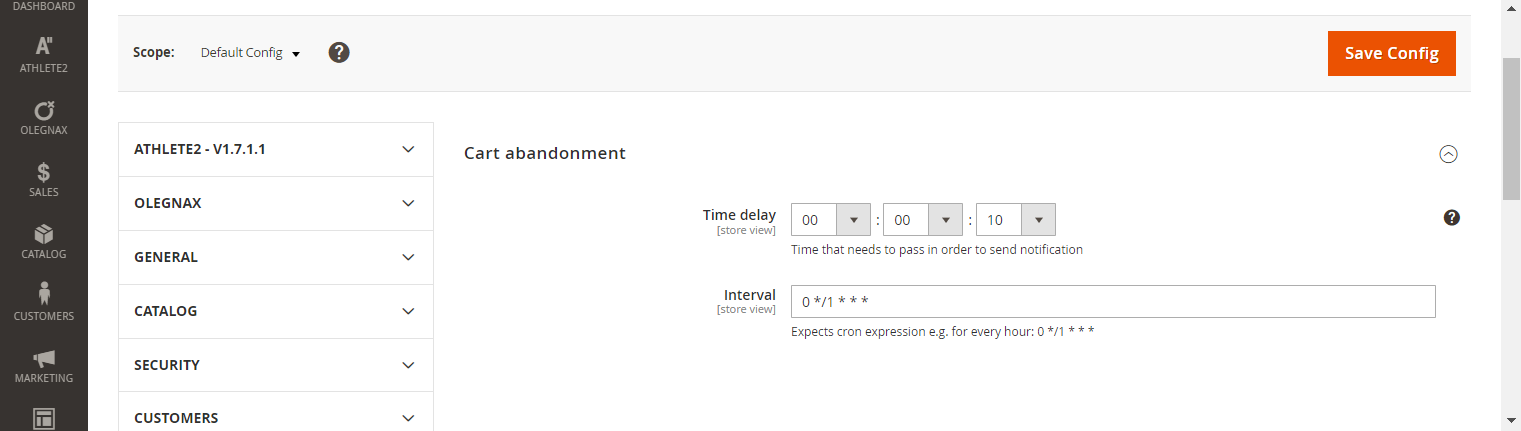
Cart abandonment [#cart-abandonment-notification-settings]
The abandoned cart functionality tracks any cart left by logged users in your shop and automatically sends a notification after a certain time with a link to the checkout so that customers can finish their shopping.
To configure the abandoned cart, go to Infobip > Configuration, and then select the Abandoned cart Tab.
Using Templates
Templates are predefined message content that are sent based on specific notification events. Templates let you customize and personalize notification messages sent to customers. After you successfully install the extension, you see the list of default templates. You can create separate templates for SMS and WhatsApp. The configuration settings for the SMS and WhatsApp templates are separate because of the different channel features.
For more information on message types, see:
- SMS product documentation
- WhatsApp product documentation
To use the templates, go to Infobip > Notification templates. The Infobip notifications template page shows a grid that lists all your templates for the available channels. The templates list offers rich filtering functionality to quickly find the desired template.
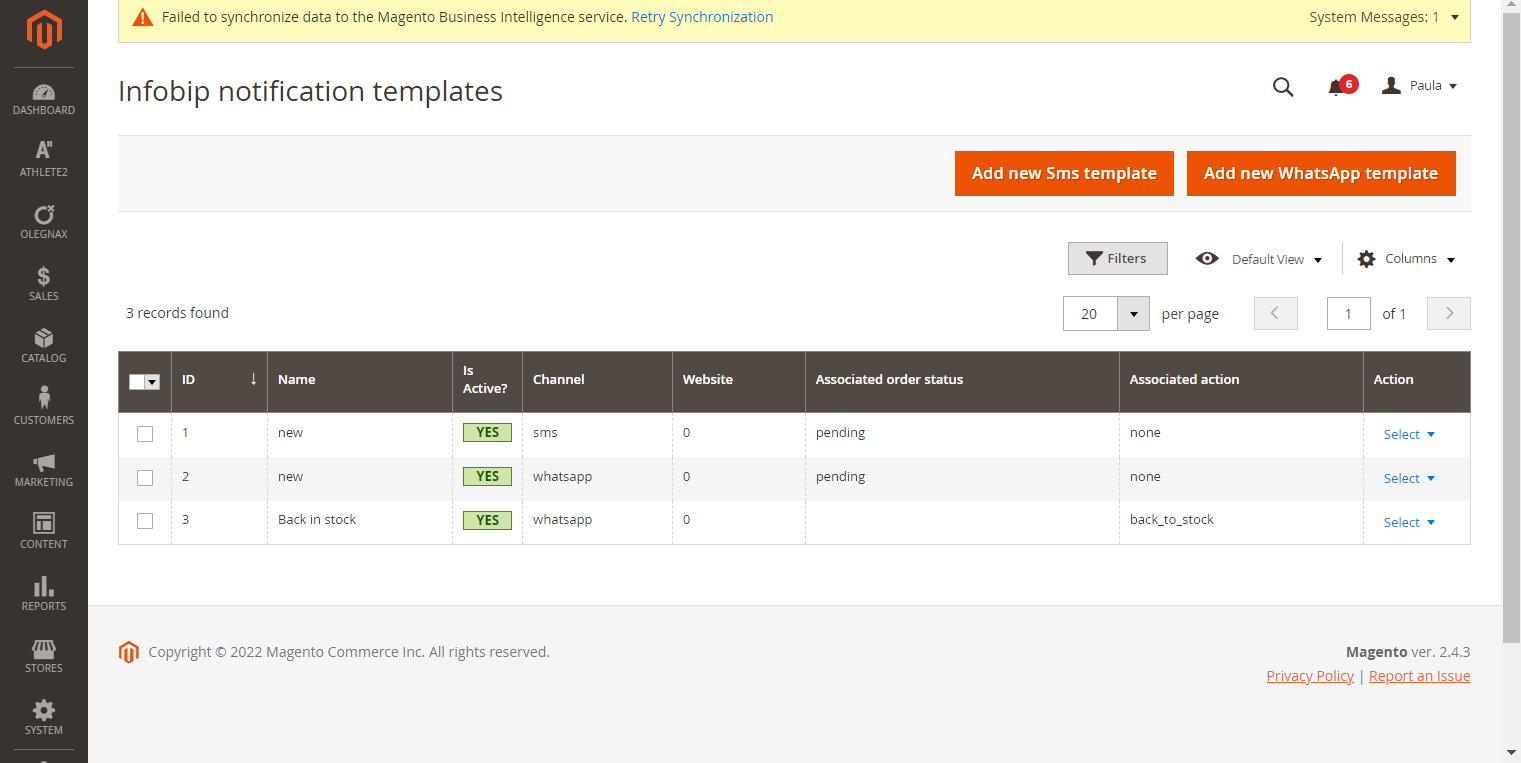
The Infobip notification templates page shows the following information for each template:
- ID – The unique Adobe Commerce template identification number.
- Is Active – The template being used by the system.
- Name – The user-defined template name.
- Channel - The channel that the template uses: either SMS or WhatsApp. You can use only one channel for each template.
- Associated order status – The template can be associated with any of the order statuses.
- Associated action – The template can be associated with the back to stock or cart abandoned action. Templates can not be associated both with order status and action.
- Website – The template can be used in all websites or in just one. So it can not be associated with two websites if you have three websites. You would have to use separate templates for each website.
- Action – Select either to edit a template or to delete the template.
Templates Filters [#templates-filters-using-templates]
By default, the Infobip notification templates page does not filter the templates. To view the filters, click Filters.
Click Filters to expand the Filters tab. You can define one filter or all of them.
The logic behind the filters is based on the AND operand, so if you choose more filters, the result are more restricted. To apply filters, click Apply Filters.
Add new template [#add-new-template-using-templates]
To add a new template, on the Infobip notification templates page, select either:
- Add new SMS template
- Add WhatsApp template
Each button opens a suitable template form dedicated to your chosen channel.
Click on the button and you are redirected to the appropriate template form. Adjust the template according to your needs and click Save.
If you want to edit the template, locate the name of the template, and then choose Select > Edit.
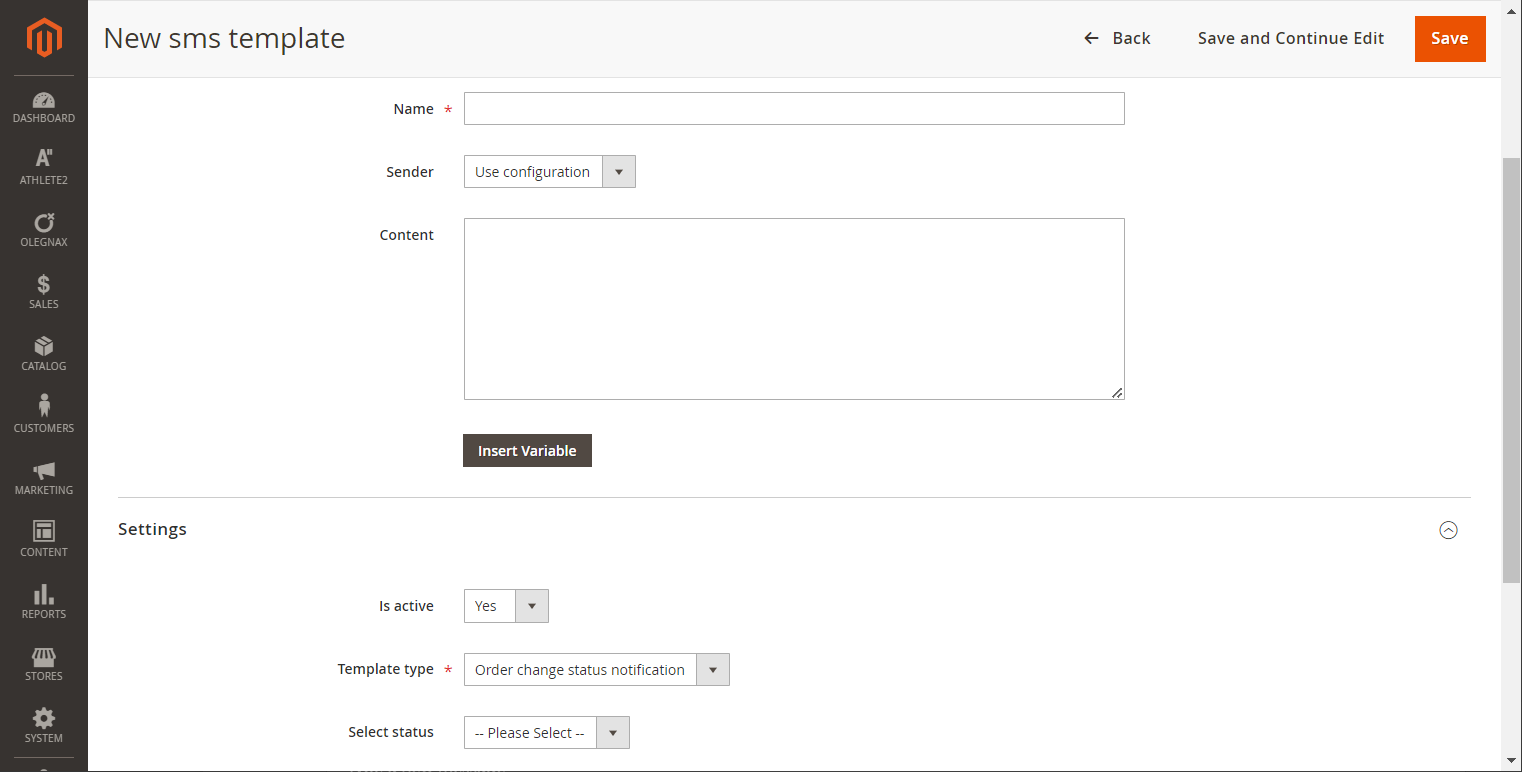
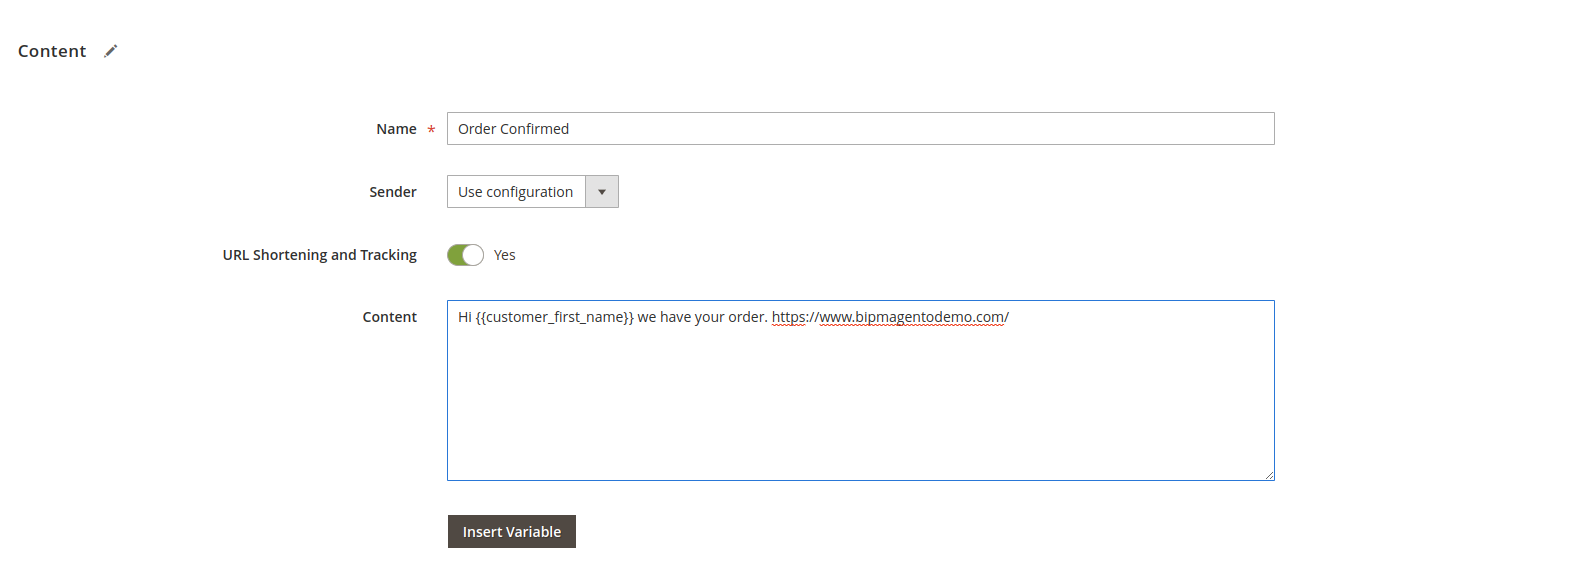
SMS template form [#sms-template-form-using-templates]
The SMS templates form consists of two parts: the content-related block and the settings.
| Name | Enter the template name. Use an informative name so that you can quickly find the appropriate template using filtering. |
| Sender | Set “use default” to use the general configuration or select the desired number. This option overrides the system configuration in the Infobip SMS/MMS section. |
| Url shortening and tracking | Set to Yes so that all URLs are shortened, and then additional data is returned in delivery reports, such as, clicks count, device type, and operating system. |
| Content | Enter the message content. |
| Insert Variables | Opens a variable list where you can select variables to use within the message content. |
Whatsapp template form [#whatsapp-template-form-using-templates]
The Whatsapp templates form consists of two parts: the content-related block and the settings.
| Name | Enter the template name. Use an informative name so that you can quickly find the appropriate template using filtering. |
| Sender | Set “use configuration” to use the general configuration or select the desired number. This option overrides the system configuration in the Infobip WhatsApp section. When you change this option, the "template pattern name" option reloads because each sender has its own templates. The predefined template is related to specific senders. |
| Template Pattern name | Select a predefined message template already approved by WhatsApp. You must select a template pattern for creating the content of the WhatsApp message. You do not define the content from scratch. When you select a pattern, some sections of the form reloads depending on which one you select. Templates can have the following header types:
|
| Preview | A text area field with the loaded content from the selected template. This field cannot be edited. You can only provide placeholders that are put in place of {{1}} marks. |
| Placeholders | These are the values that are substituted with {{}} marks from the preview in the same order. Placeholders can be a store variable or any static value. To use a store variable, for example, "customer name”, select it from the drop-down list. To provide a static value, select the "use static value” from the drop-down list and provide a value in the field on the right. |
The WhatsApp template may show some buttons on the page, for example:
- Static url – A button with a predefined URL. There is nothing to configure. You can treat the fields like a preview.
- Dynamic url – A button where you can define a part of a URL. In other words the same like message content here in content you can see pattern with {{1}} where you can provide a value
- **Quick reply –**A quick reply button without any other parameters than predefined text. There is nothing to configure. The "Text only” value in the content column is for information only.
- **Phone number –**a button that starts a call when clicked. You can provide the phone number on the third field. The "Digits" value in the content column is for information only.
Template Settings form [#template-settings-form-using-templates]
The templates form contains several additional settings.
| Is active | Only one template can be active. You may have many templates assigned to any order status or event. If you duplicate the configuration, your configuration saves but the active status is automatically set to No. To assign a template to a desired action, you have to be sure that the action does not already have any templates assigned. If this is the case, then you must deactivate the template by setting Is active to No or by deleting the template. You are then be able to save the template as active. |
| Template type | There are two template types available:
|
| Chose event | Assign the template to the available notifications. Select from Order Update, Back in Stock, or Abandoned Cart. |
| Select status | Assign the template to the status. |
| Customer group | Specify one global template for use by all customer groups by selecting the option ALL GROUPS, or you can have separate templates for each customer group and assign it here by selecting the appropriate customer group. |
| Website | The same as customer group for global templates. Set All Store Views or in case you have multi store and want to have different templates for each store create template per each store and assign it here accordingly. |
For WhatsApp, you need to pre-register template you want to use for notifications. See the WhatsApp template documentation.
Not all variables are accessible on every event. For more detail check the table in Variables section.
Delivery Reports
To view the delivery reports, go to Infobip menu > Delivery Reports.
You can filter and sort this page to make it easier to find accurate delivery reports and investigate the message delivery. The default view shows the delivery reports from all channels. To see the delivery reports from one channel, use the filter to choose a channel.
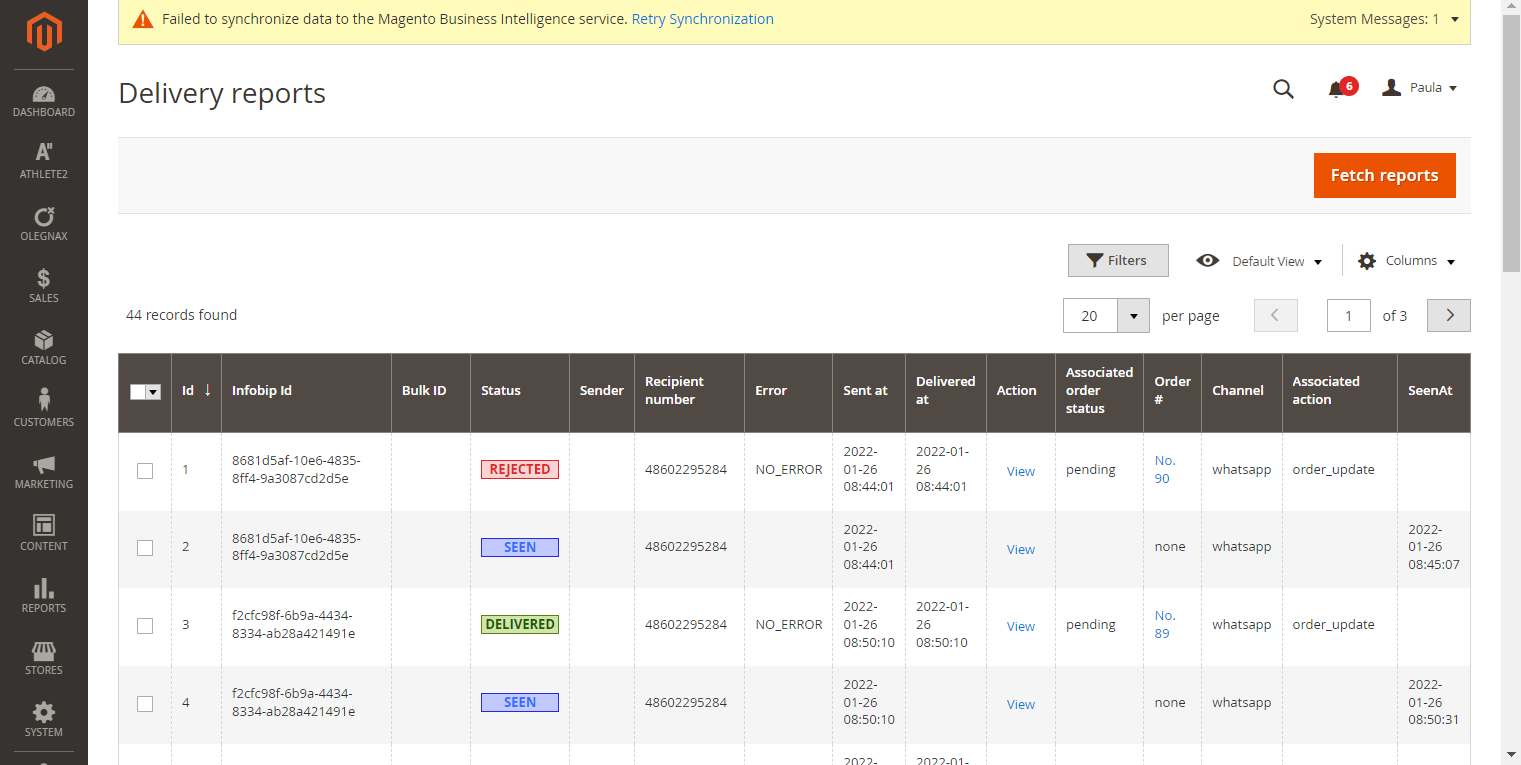
SMS live delivery reports [#sms-live-delivery-reports-delivery-reports]
The synchronization of delivery reports is run periodically, and they are sent automatically. For this, you need to provide Infobip with the access token and endpoint address. The endpoint is exactly the same as for receiving WhatsApp delivery reports. See the WhatsApp Delivery Reports section.
To receive the delivery reports for SMS manually, click Fetch reports.
URL Shortening and Tracking report [#url-shortening-and-tracking-report-delivery-reports]
If the message sent to the customer includes a URL and you enabled the URL Shortening and Tracking option for the template, you see an extra table on the bottom of the report.
The following tracking URL information is available:
- URL link - The clicked URL
- Clicks - Shows how many times the user clicked on the URL
- Device Type
- Device name
- Operating system
When any SMS message gets delivered to the customer, the delivery report appears with the status Delivered. When the customer clicks any URL that was included in this message, the same delivery report changes its status to Clicked.
Whatsapp delivery reports [#whatsapp-delivery-reports-delivery-reports]
To receive the WhatsApp delivery reports, you need to create a Magento integration token. Read more about this in this documentation https://docs.magento.com/user-guide/system/integrations.html.
When you have your integration token, you need to provide it to Infobip. You also need to provide Infobip with a URL where your store listens for incoming reports. The link is like the following:
https://{{your_domain}}/rest/V1/infobipintegration-notifications/infobipreports
Whatsapp seen reports [#whatsapp-seen-reports-delivery-reports]
Seen reports are available on the same table as delivery reports. To focus only on seen reports, use a status filter and select “SEEN”.
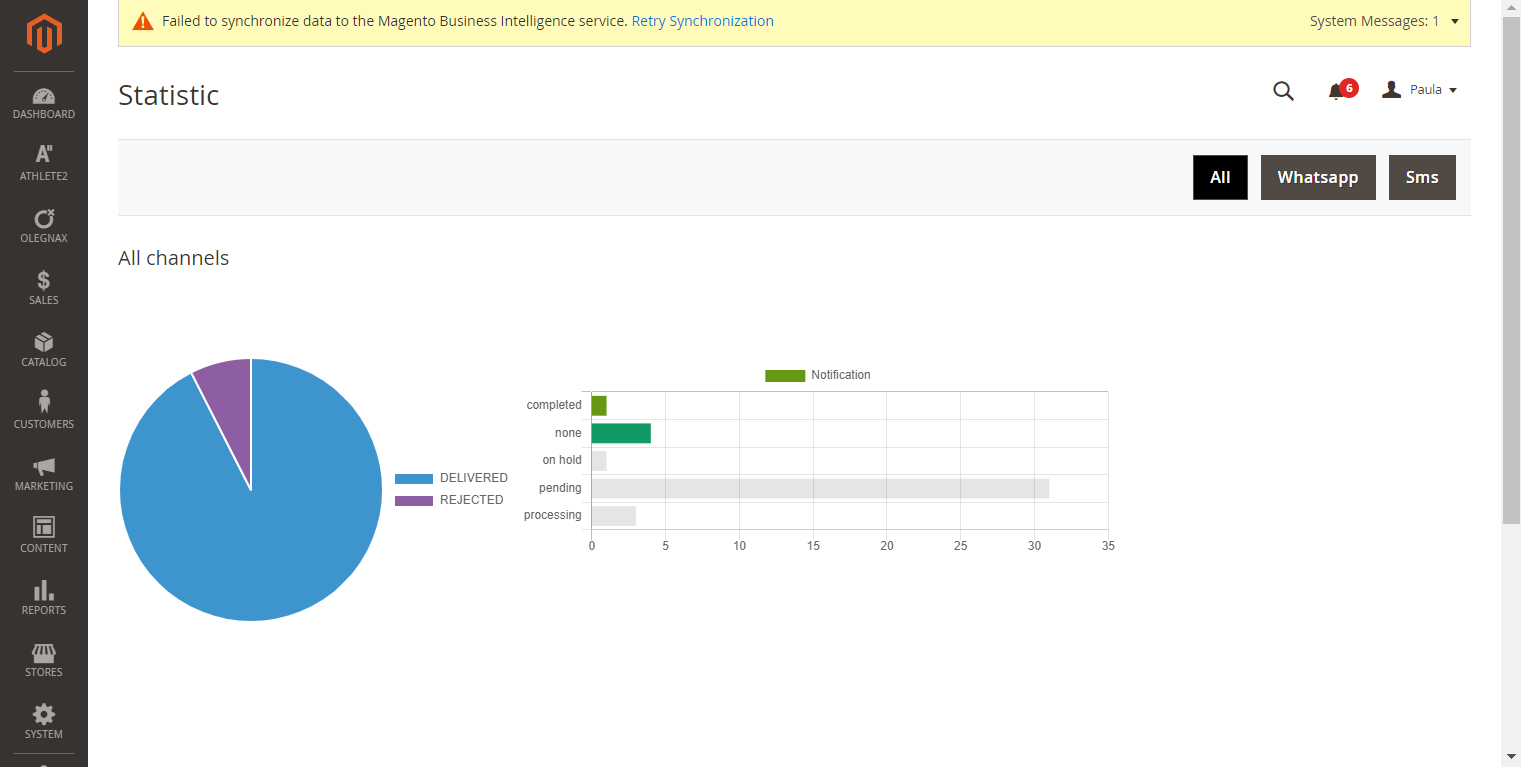
Delivery Statistics
To open the Delivery statistics section, go to Infobip menu > Delivery statistics.
The delivery statistics display as a pie chart. This pie chart shows the participation of each delivery status in general, a bar chart indicating how many messages were sent for each event, and a simple summary of total sent messages, total delivered messages, and percentage delivery rate in general.
When you first go to the reports dashboard, you see the data summarized from every channel. To see the statistics for one channel, select the appropriate channel by clicking the button on the top right corner. The data reloads immediately.
This pie chart view indicates the occurrence of each delivery status as well as a simple summary of total sent messages, total delivered messages, percentage delivery rate in general, and seen information for WhatsApp messages.