BigCommerce
When you connect your BigCommerce Store to Infobip with our Exchange App, you can:
- Sync your customer data to People so that you can use it in all Infobip products. For example, if you use Moments, you can use your BigCommerce contacts in campaigns and broadcasts
- Connect your chatbots easily in BigCommerce for Answers by implementing conversational commerce use cases through digital channels
What you will need
- An Infobip account
- A BigCommerce account with Owner role
- An API account for BigCommerce
To get started, set up the authentication (link) between Infobip and BigCommerce. Then follow the instructions for:
- Using BigCommerce in People
- Using BigCommerce in Answers
Set up authentication
Create API account [#create-api-account-set-up-authentication]
Follow this procedure with a user that has the Owner role.
- Log into your BigCommerce account and go to the admin panel on the left side.
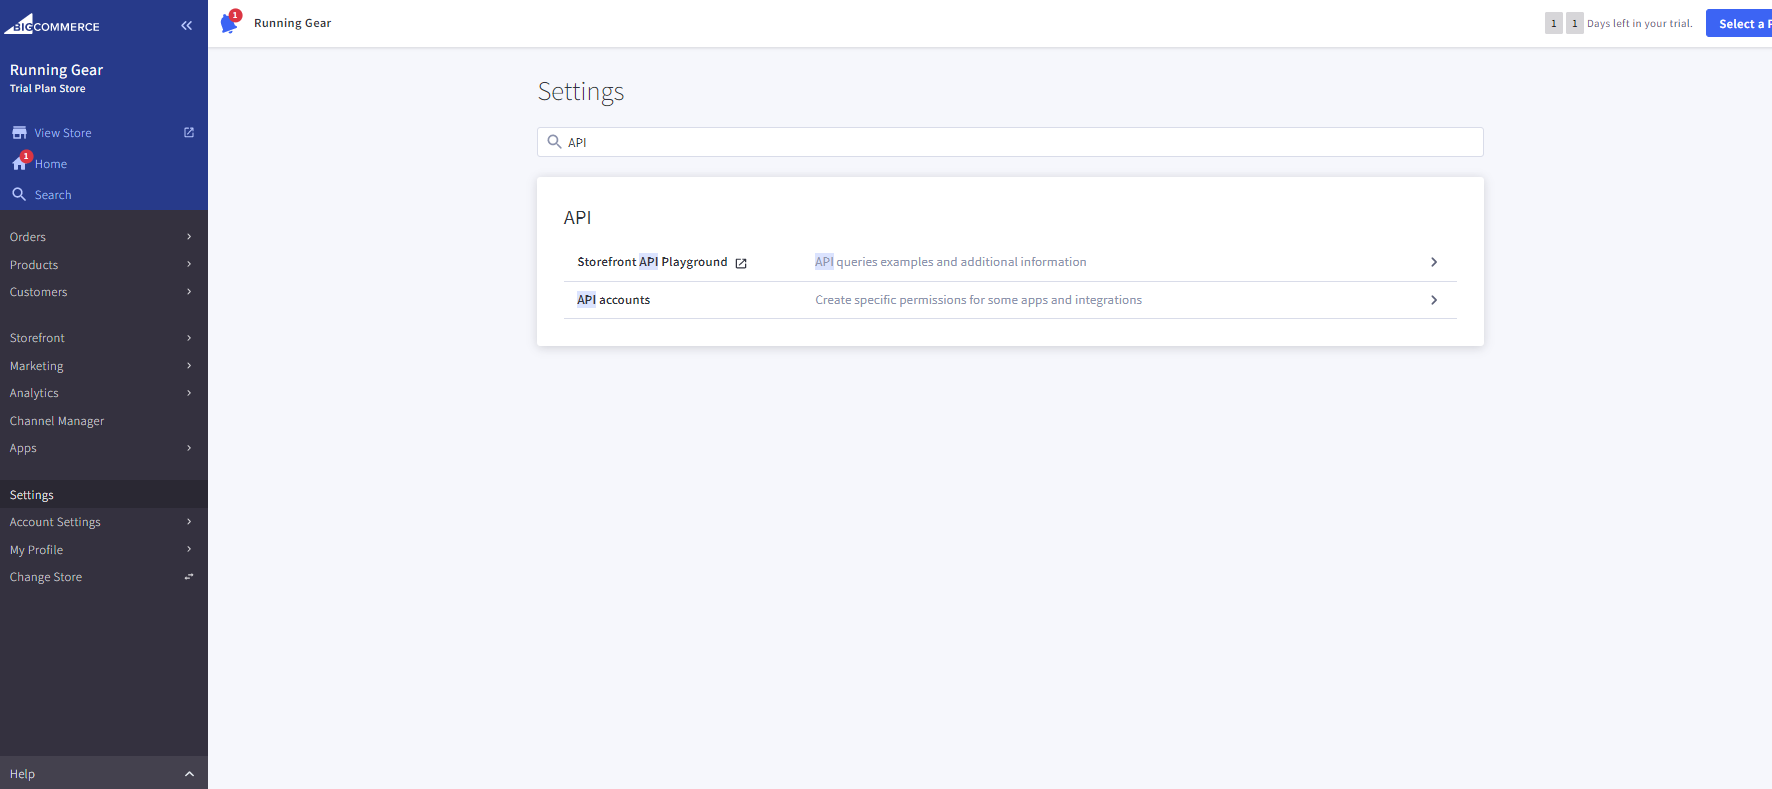
- Go to Settings and search for API. Then select API accounts.
- ClickCreate API account and choose Create V2/V3 API Token.
- Enter a name for the app/migration corresponding to this account, and then copy or make note of the API Path. You need this to interact with the API.
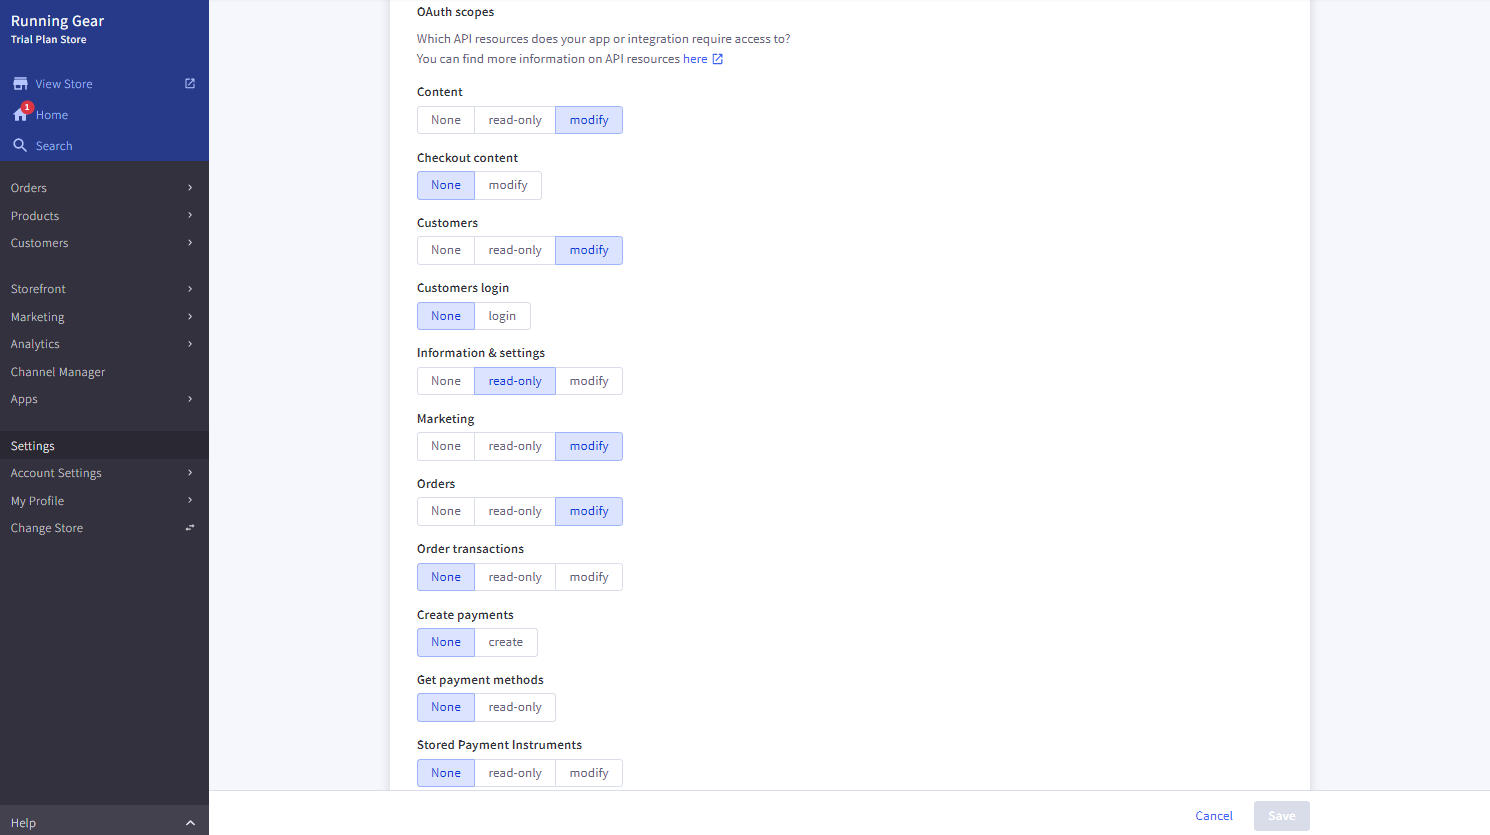
- Under OAuth Scopes, specify the API resources and permissions to which your app/migration requires access. If you want to use this Private app for Next-Cart migration program, set all access levels of the following scopes to either:
- Read-only if BigCommerce is your Source store
- Modify if BigCommerce is your Target store
- Click Save. If successful, a TXT file containing the API credentials downloads to your computer and a pop-up shows the credentials.
- Copy the Client ID, Client Secret, and Access Token information, or save the downloaded file.
If you lose track of the credentials, you need to delete the API account and create a new one.
Add credentials to Infobip [#add-credentials-to-infobip-set-up-authentication]
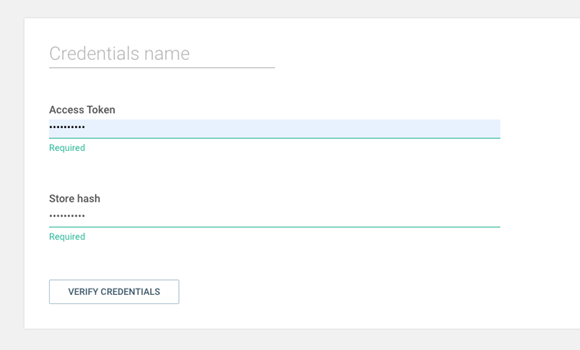
- Log into Infobip and go to Exchange > All Apps > BigCommerce.
- Click Add and accept the Exchange Terms & Conditions. Next, you see a configuration page.
- Select the Credentials tab and click ADD CREDENTIALS.
- Add the Access Token & Store hash obtained when you created the API account. The hash is embedded in the store URL.
- Click Submit.
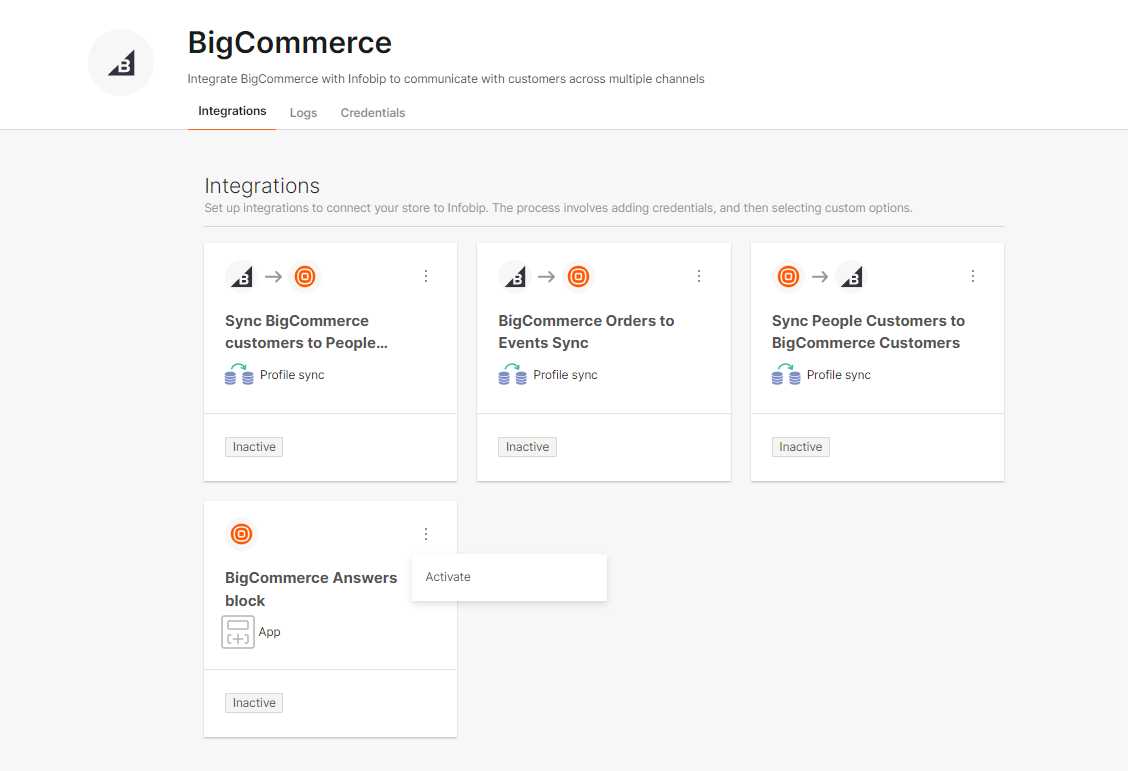
Using BigCommerce in People
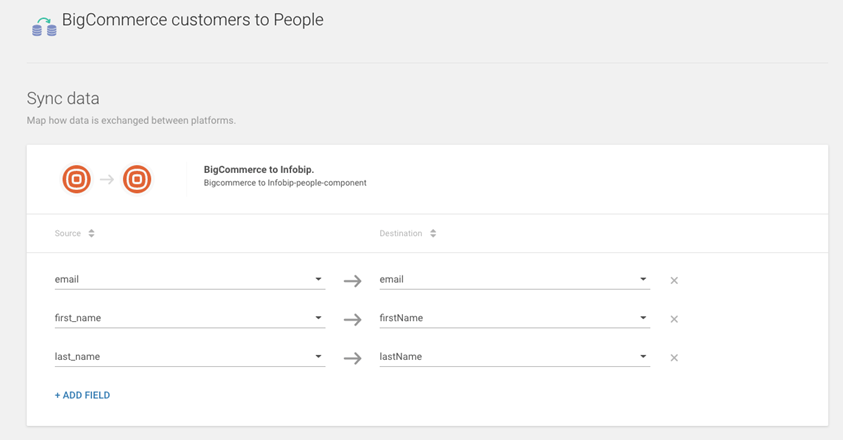
To complete the integration with People, you need to map the BigCommerce data fields to People.
- Logon to Infobip and go to Exchange > App Apps.
- Open the BigCommerce integration and select the Integrations tab.
- On Sync BigCommerce customers to People, click Configure to update the mappings.
- The left column displays your BigCommerce fields and the right column displays the available People fields. Map the fields you want to make available in People so they are available to other Infobip products.
Using BigCommerce in Answers
Let your customers use their favorite channel to buy directly from the BigCommerce store. Connect your chatbots easily in BigCommerce for Answers by implementing conversational commerce use cases through digital channels.
The Infobip BigCommerce Answers block allows store owners to use valuable information and automate actions on orders, products, and customers on their preferred E-Commerce platform.
Example use-cases:
- Providing product information
- Providing order status information
- Placing an order
- Modifying buyer's personal data
Activate the Answers Block Card [#activate-the-answers-block-card-using-bigcommerce-in-answers]
Before using the block in Answers, you need to activate the integration:
- Log into Infobip and go to Exchange > All Apps > BigCommerce.
- Go to the Integrations tab.
- Click on the three dots over the BigCommerce Answers Block Card.
- Select Activate.
BigCommerce block [#bigcommerce-block-using-bigcommerce-in-answers]
You can find the BigCommerce block in the right-hand side panel under the Integrations section.
The BigCommerce block provides a wide set of functions that can be used in any journey. Drag and drop the block on any part of the dialog where you need to use some function of the block.
Once the block is added in the dialog, choose the function you want from the drop-down list.
Each function has its own set of parameters in the request tab. For example, the FindCustomerUsingEmail function expects an email address as a parameter. The value filters the BigCommerce customer database for a customer with that email address.
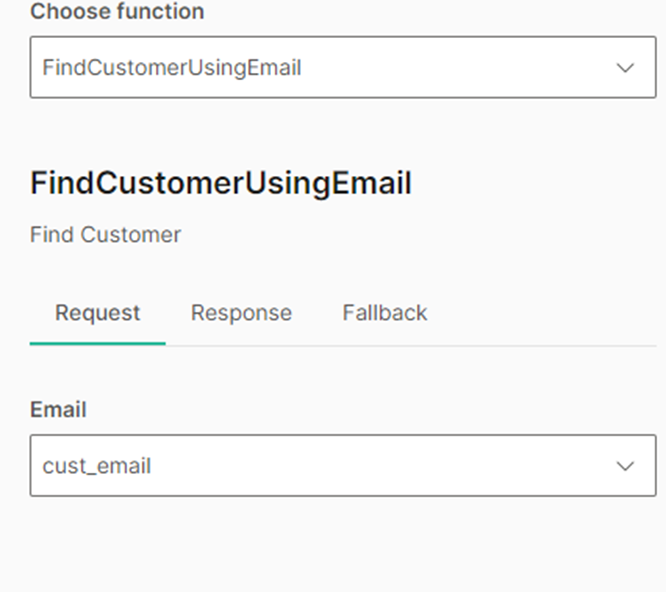
Most of the functions return data that are useful for the bot and/or the journey. The data retrieved from the function can be stored in Answers attributes using the Response tab. The data in transfer uses JSON format and in order to get the data, you can use the dotted notation.
For example, the FindCustomerUsingEmail function returns the customer object from BigCommerce that contains all of the information stored there. If you'd like to store the customer's first name in an Answers attribute, refer to it as:
first_name or $.first_name
where $ indicates the root of the JSON payload.

The functions available on the BigCommerce Answers Block are:
- Find Customer Using Email: Get the customer data stored on BigCommerce based on their email address.
- Get Orders Using CustomerID: Get the orders related to a customer stored on BigCommerce based on their Customer ID.
- List Product Categories: Get the information of all product categories listed on your BigCommerce store.
- Get Products in Category: Get the information of all products listed on a specific category in your BigCommerce store based on the Category ID.
- Search Product By Name: Get the information of product(s) on your BigCommerce Store that match with a keyword inserted in the request.
- Get Product By ID: Get the information of an specific product on your BigCommerce store based on the Product ID.
- Create a Cart: Create a cart/checkout with one item for an specific customer on your BigCommerce store. For creating a cart, you need the Customer ID, Product ID of the item to be added to the Cart, Quantity of items and the Channel ID related to your Marketplace in BigCommerce.
- Get a Cart: Get the information of an existing cart/checkout in your BigCommerce store based on the Cart/Checkout ID.
- Add item to Cart: Add a new item to an existing cart in your BigCommerce store. Parameters needed are Cart/Checkout ID, Product ID of the item to be added and Quantity of items.
- Add Consignment: Add a Consignment information to an existing Cart/Checkout on your BigCommerce store. This function is used to add Shipping Information to an specific cart/checkout.
- Select Shipping Option: Add the selected shipping option chosen by the customer to a cart/checkout. Parameters needed are Cart/Checkout ID, Consignment ID and Shipping Option ID. The Select Shipping Option function can not be used in a cart/checkout that does not have a consignment added.
- Add Billing Information: Add billing information to an existing cart/checkout based on its ID.
- Create Order: Convert a cart/checkout into an order that is placed on your BigCommerce store. Parameters required are the Cart/Checkout ID and the status ID of the order status desired for the order. List of status IDs can be found in the BigCommerce developer documentation.
- Get Redirect URLs: Get a cart redirect URL for redirecting a shopper to a already created cart using an specific Cart ID as an input parameter. Once a redirect URL has been visited, it will be invalidated and cannot be used again. The response will contain cart_url and checkout_url properties. Use these URLs to redirect the customer to the BigCommerce-hosted cart or checkout pages.
Get order ID in Answers webhook [#get-order-id-in-answers-webhook-using-bigcommerce-in-answers]
You can inform the user of the order ID/order number generated after a shopper finishes the checkout using the redirect URL obtained with the Get Redirect URLs function. To create the webhook:
-
Create a Webhook in BigCommerce using the API: https://developer.bigcommerce.com/docs/webhooks/webhooks/manage-webhooks-bulk#create-a-webhook. Use the following parameters:
- scope: store/cart/converted
- destination: Contact your Infobip account manager to get the required endpoint
- is_active: true
-
Add a Webhook block in a dialog of your chatbot where you expect to receive the order status. An example of the JSON structure that you are going to receive in the Webhook block is:
json12 {3 "producer": "stores/1xxxxx",4 "hash": "33f9585a381xxxxxxxxxxxxxxxxxx",5 "created_at": 1686238730,6 "store_id": "1001000000",7 "scope": "store/cart/converted",8 "data": {9 "type": "cart",10 "id": "7ff6ef6f-1e0b-435e-b57b-42486fec7488",11 "orderId": 2472512 }13 }
Save the orderId in an attribute and use it for sending a personalized message from your chatbot to the user with the order number assigned to their purchase.
Building the checkout flow [#building-the-checkout-flow-using-bigcommerce-in-answers]
To create a valid order in BigCommerce, there is mandatory data that has to be produced. The technical details can be found in the BigCommerce developer documentation.
The checkout consists of the cart (items to be purchased), customer information including shipping and billing addresses, and a consignment. All of these steps are exposed as functions in the BigCommerce block:
- CreateACart
- AddItemToCard
- AddBillingAddress
- AddConsignment
- SelectShippingOption