Oracle Eloqua messaging
 SMS
SMS
This guide covers how to connect Oracle Eloqua with Infobip using SMS, WhatsApp, RCS, Viber, and MMS as communication channels.
What you will need
- Infobip account. If you don't have an account, you can create one.
- Oracle Eloqua account
- Sender for SMS, WhatsApp, RCS, Viber, or MMS
Features
SMS
- Outbound text messages with placeholders
- Decision service that uses a trigger to check whether the message was delivered to customers
- Reports about sent messages and service instances
- URL shortening and URL tracking
- Configure keywords for opt-out
- Filter contacts entering campaigns based on opt-outs
- Outbound text and media messages with placeholders
- Decision service that uses a trigger to check whether the message was delivered to customers
- Reports about sent messages and service instances
- URL shortening and tracking
- Configure keywords for opt-out
- Filter contacts entering campaigns based on opt-outs
Broadcast
- Outbound text and media messages with placeholders for MMS, RCS, and Viber BM
- Decision service that uses a trigger to check whether the message was delivered to customers
- Reports about sent messages and service instances
Installation and configuration
To install the Infobip Messaging App, go to Oracle Marketplace and search for the Infobip Messaging App.
If you cannot find the app, contact your dedicated Account Manager or contact the Infobip Sales team.
After installing the Infobip Messaging App, you need to configure the app to link your Infobip account with Oracle Eloqua.
- Click Authorize to give Infobip access to your data in Oracle Eloqua.
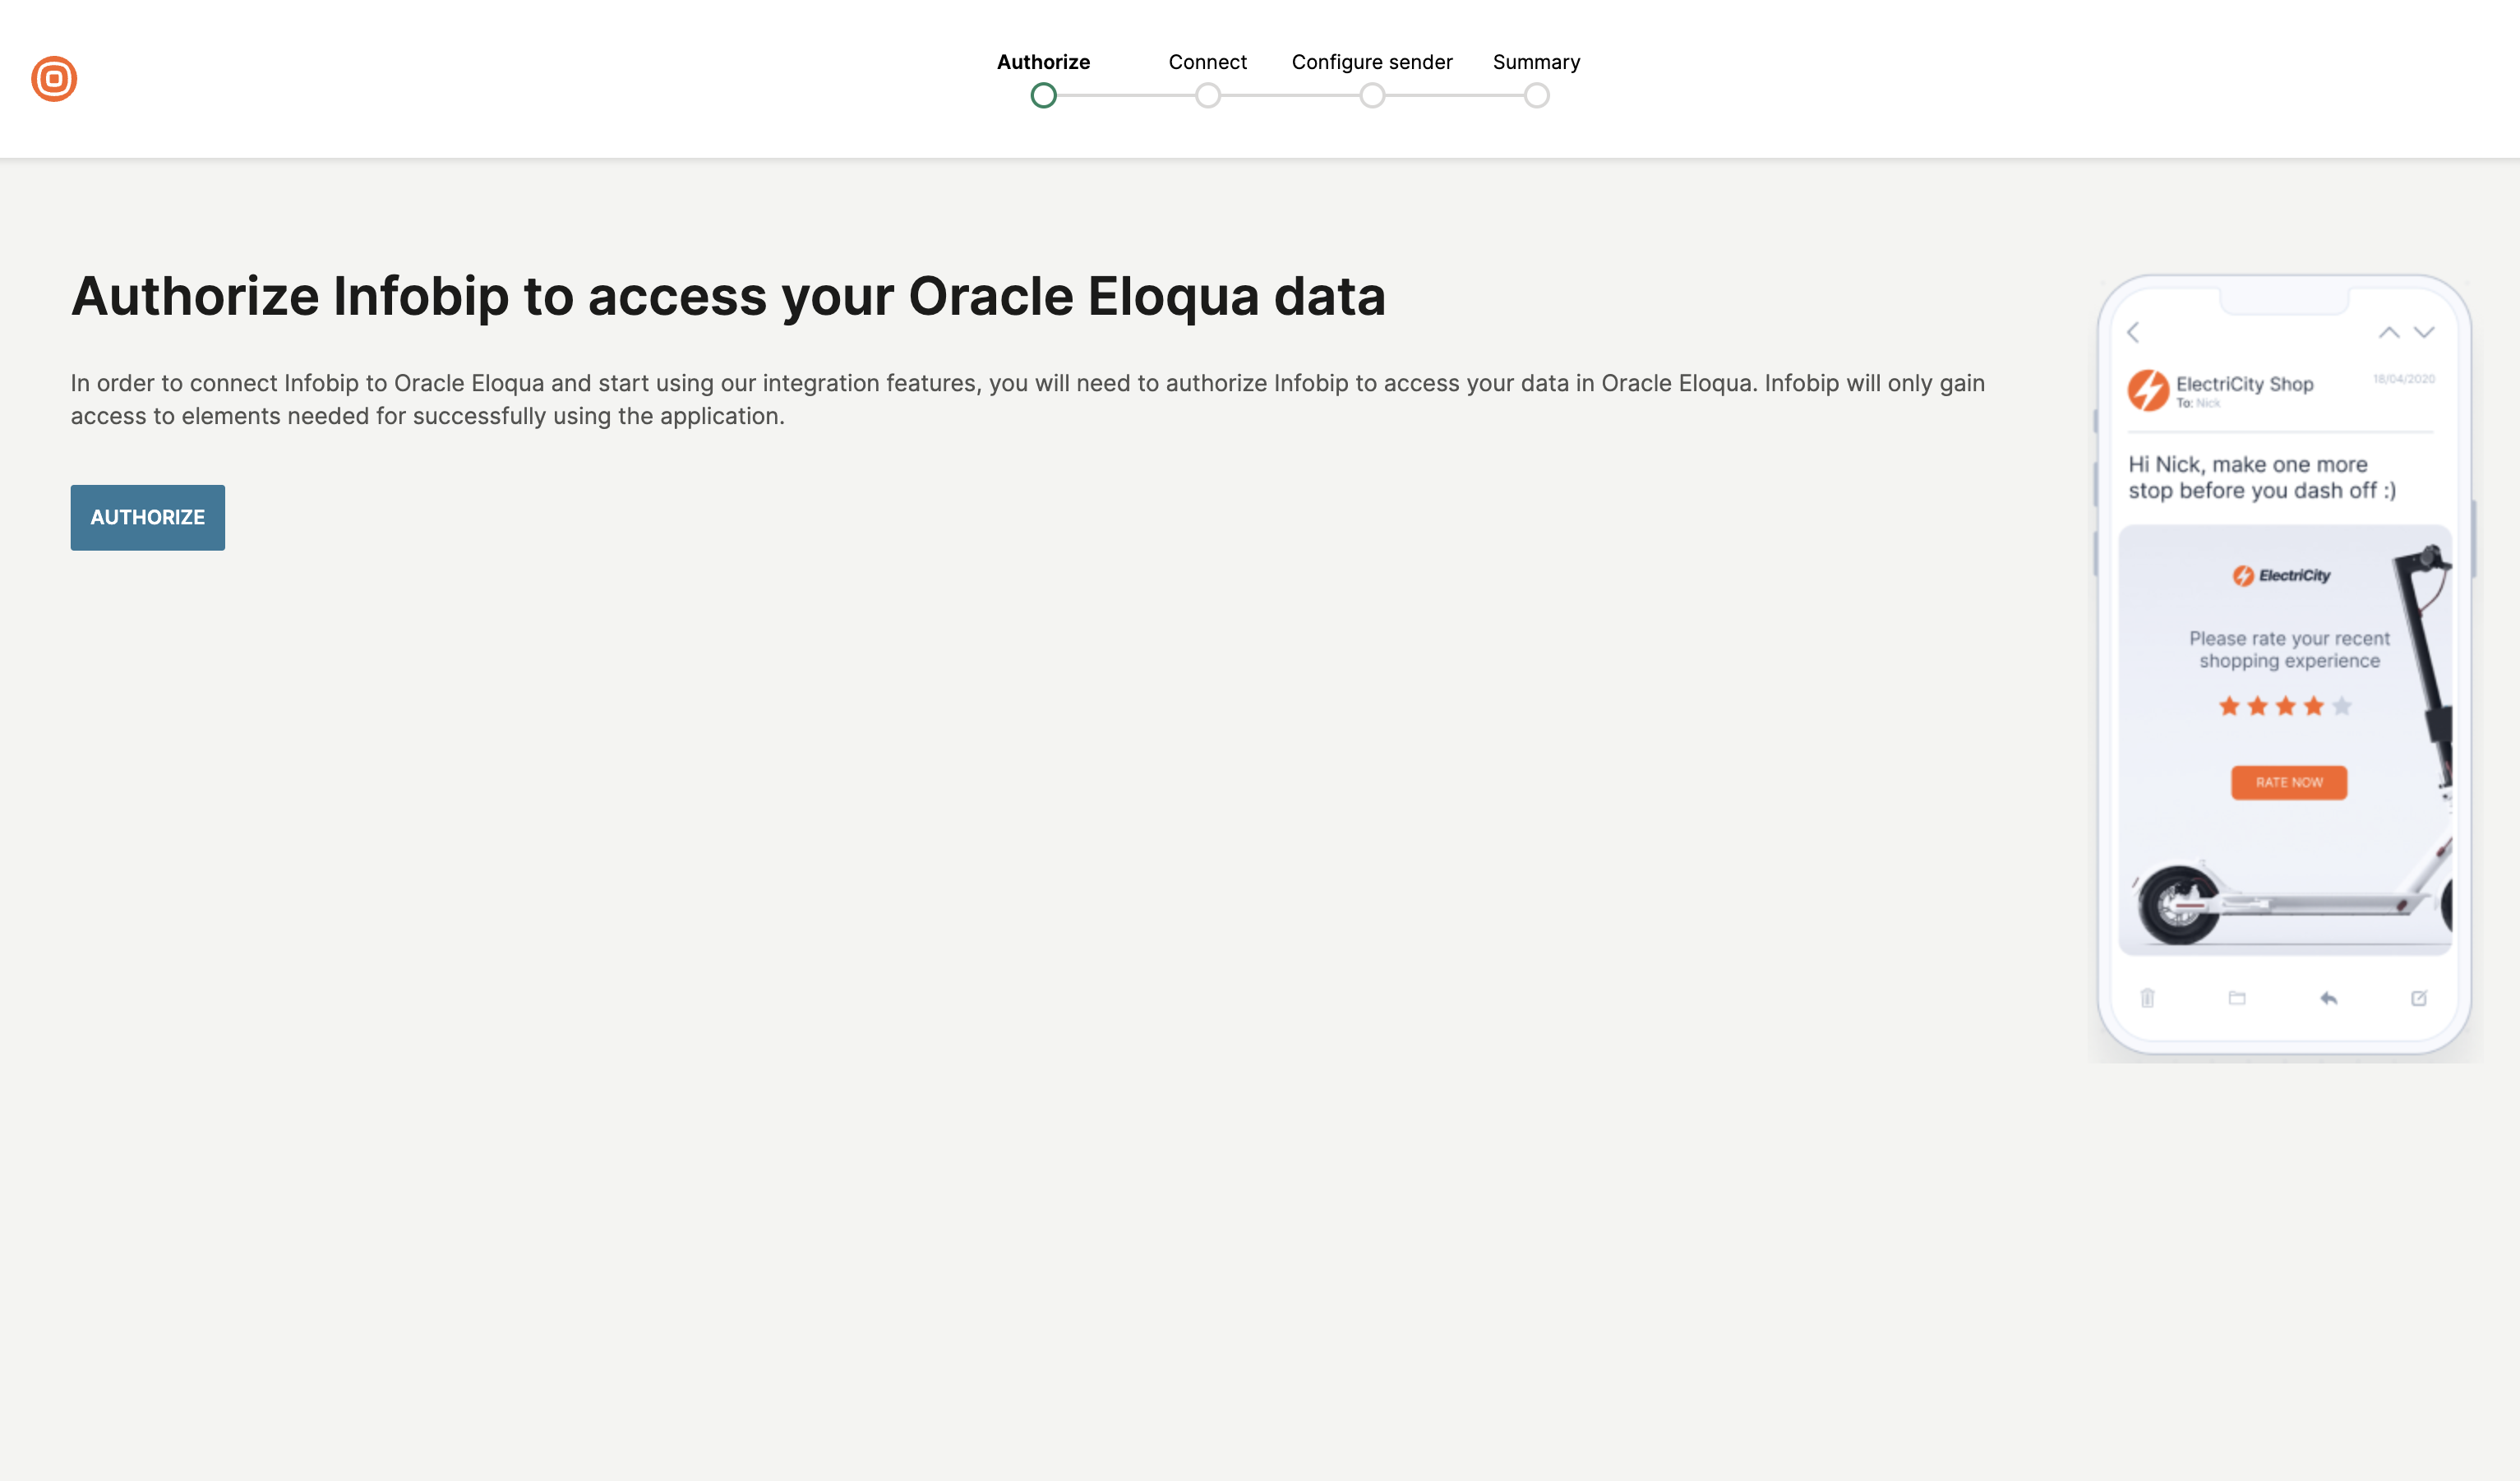
- After authorization is complete, you see the Oracle Eloqua authentication popup. Sign up and continue to the next step. If you do not have an Infobip account, you can sign up for an account.
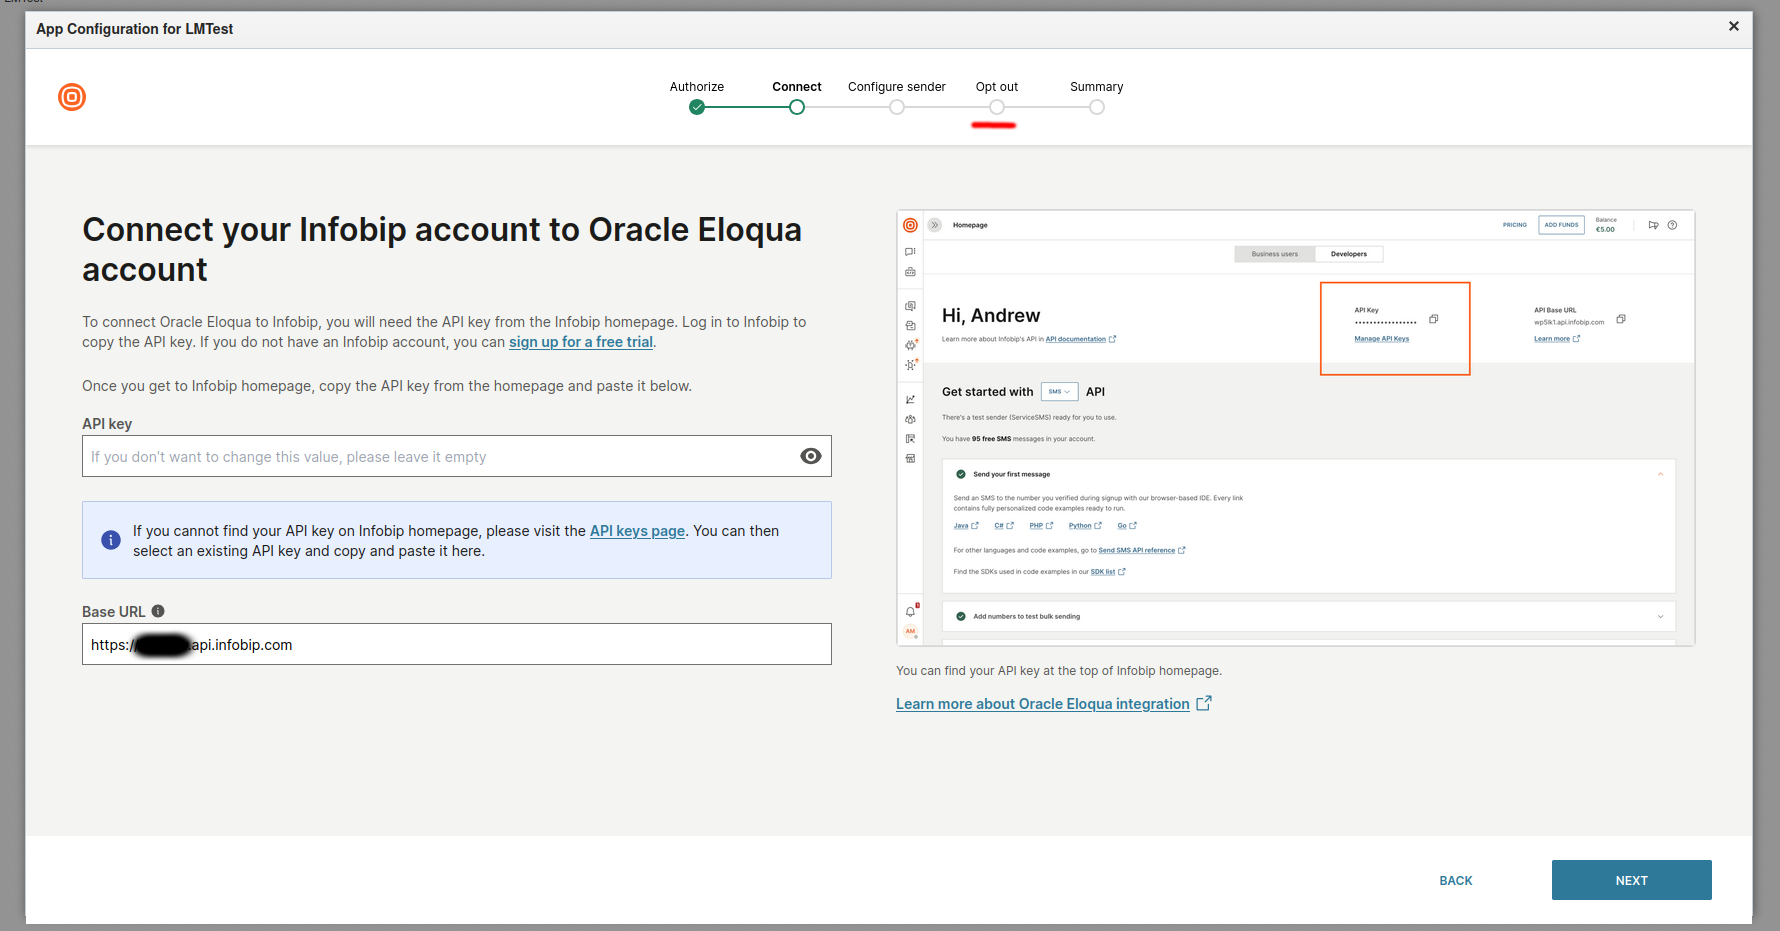
- Click Add Account to add your Infobip account to your Oracle Eloqua account.
- Add your API key, and then click Next.
- Ensure that your API key has the following API scopes enabled:
json1 message:send2 account-management:manage3 numbers:manage4 whatsapp:manage
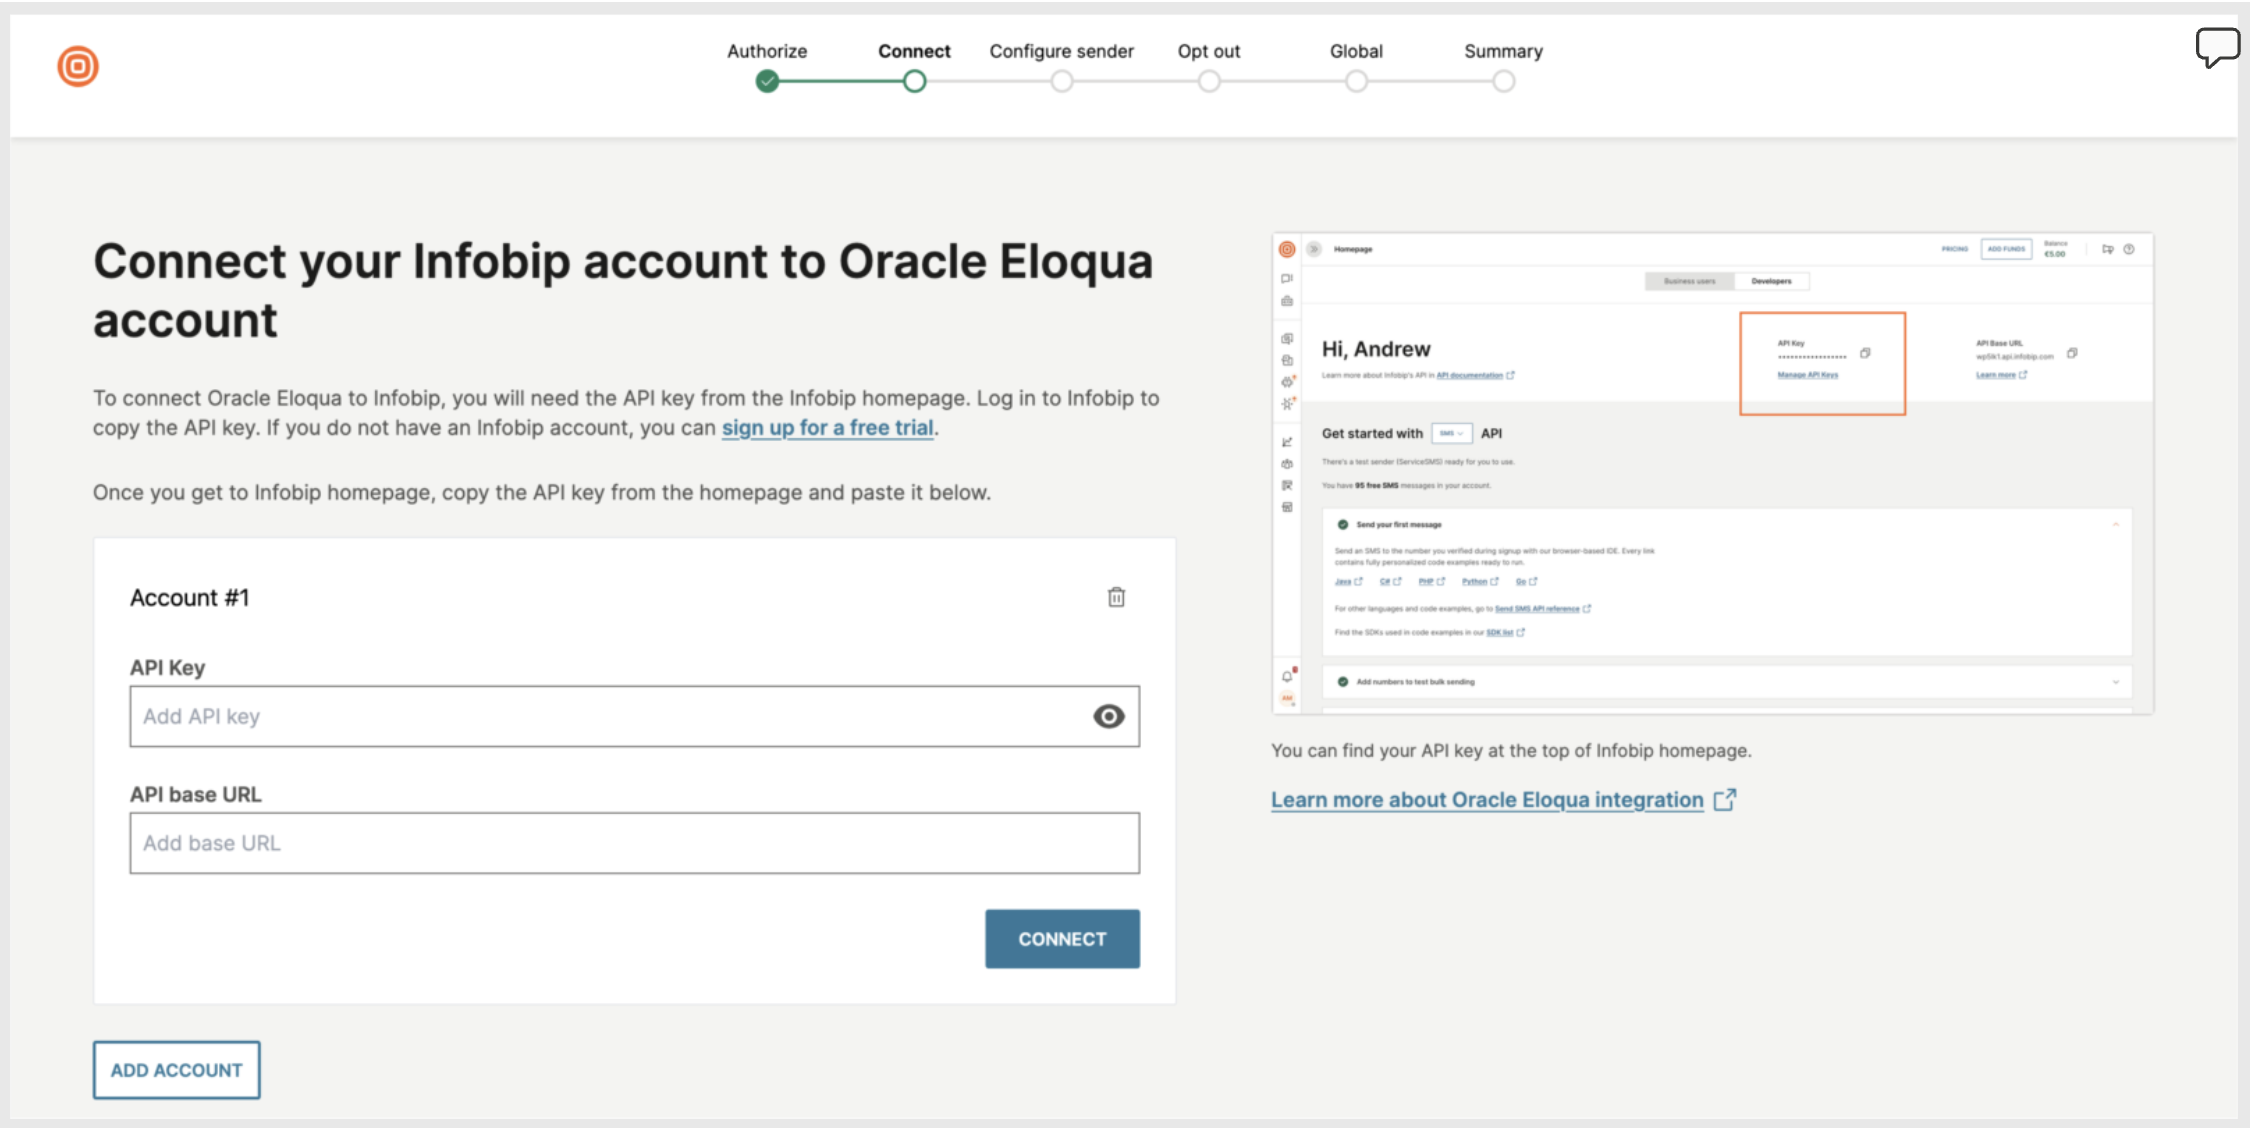
- Enter your Infobip API Base URL. Type
https://in front of the API Base URL. You can find it on the Homepage in the upper right section.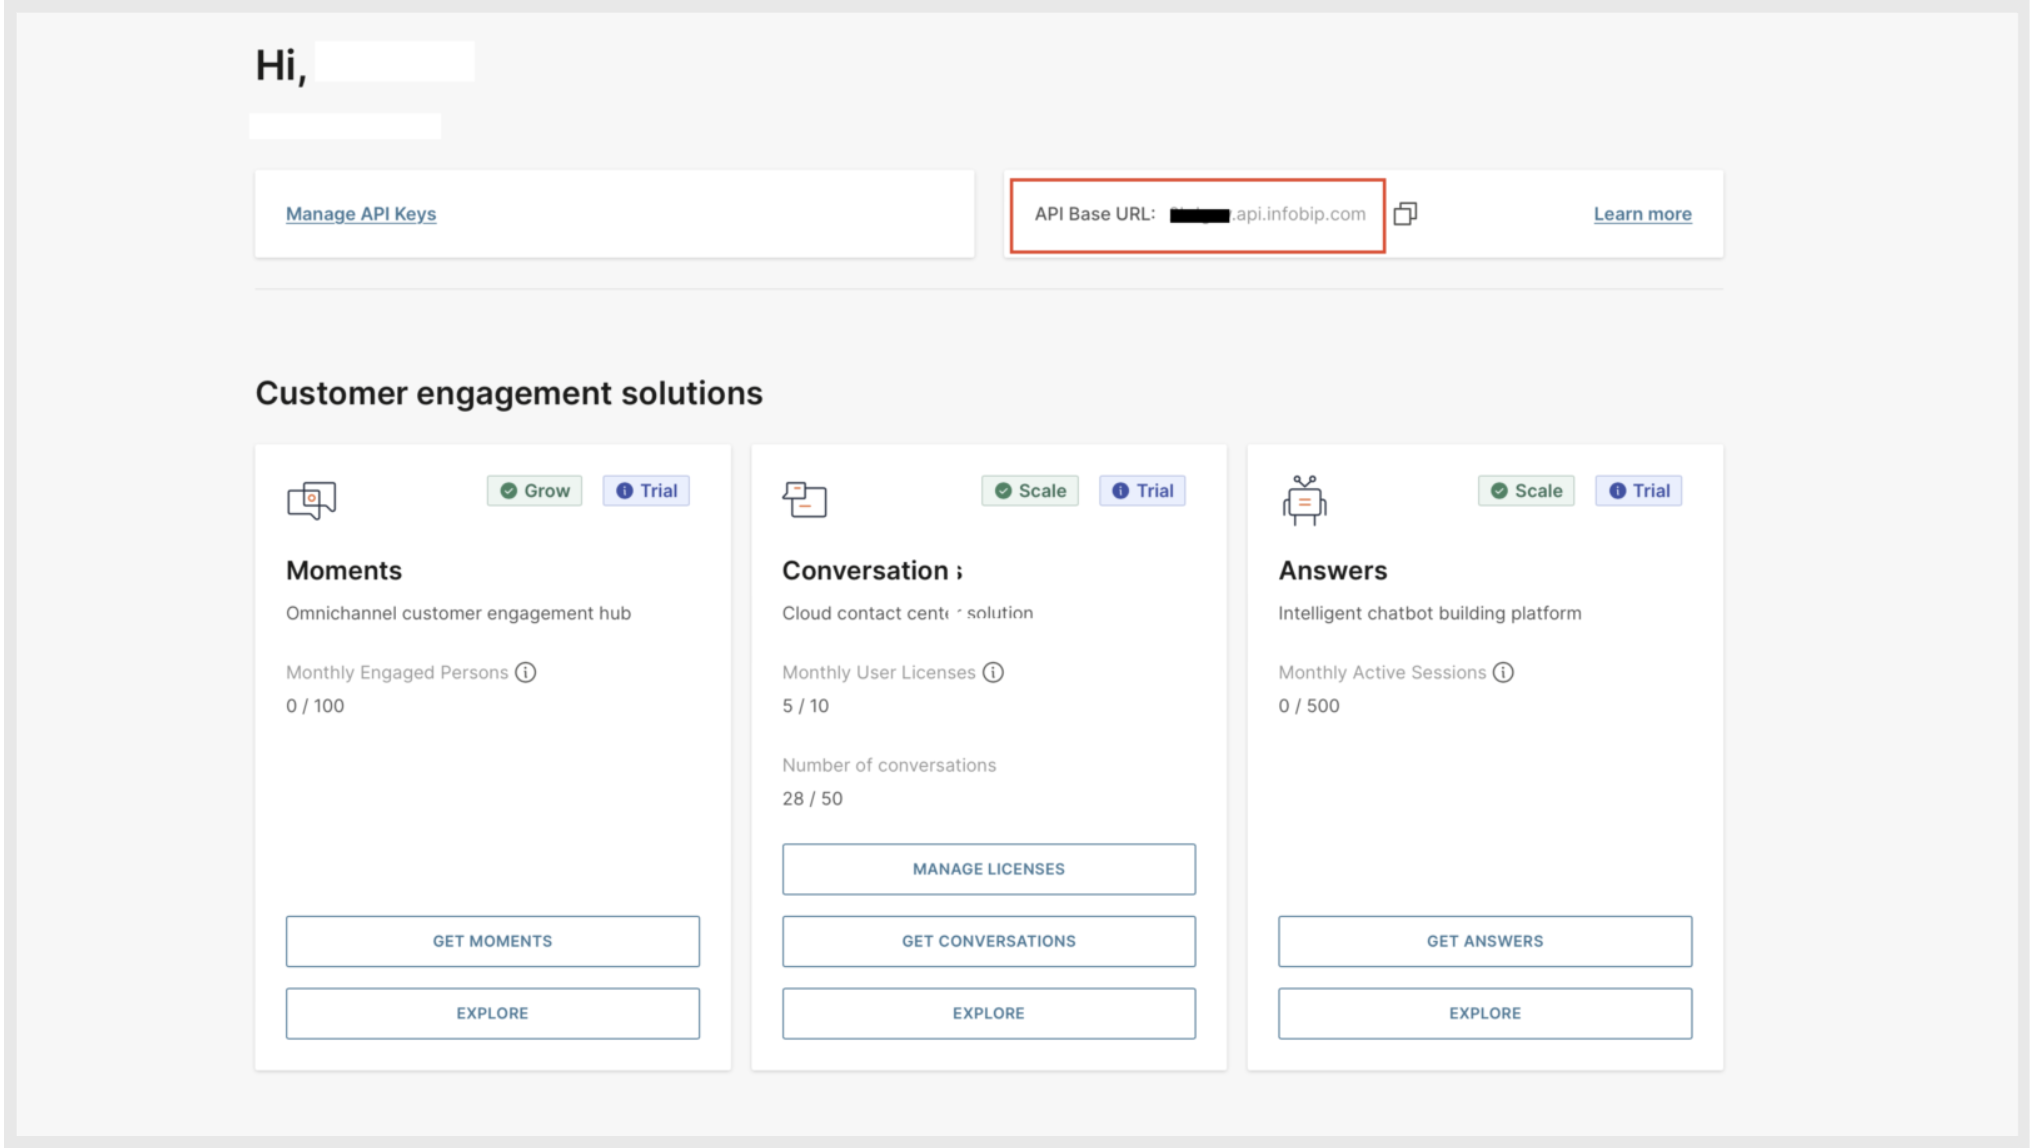
- Configure and select the channels you want to use by clicking the toggle button. If you plan to use an Alphanumeric Sender add it to the predicted text box.
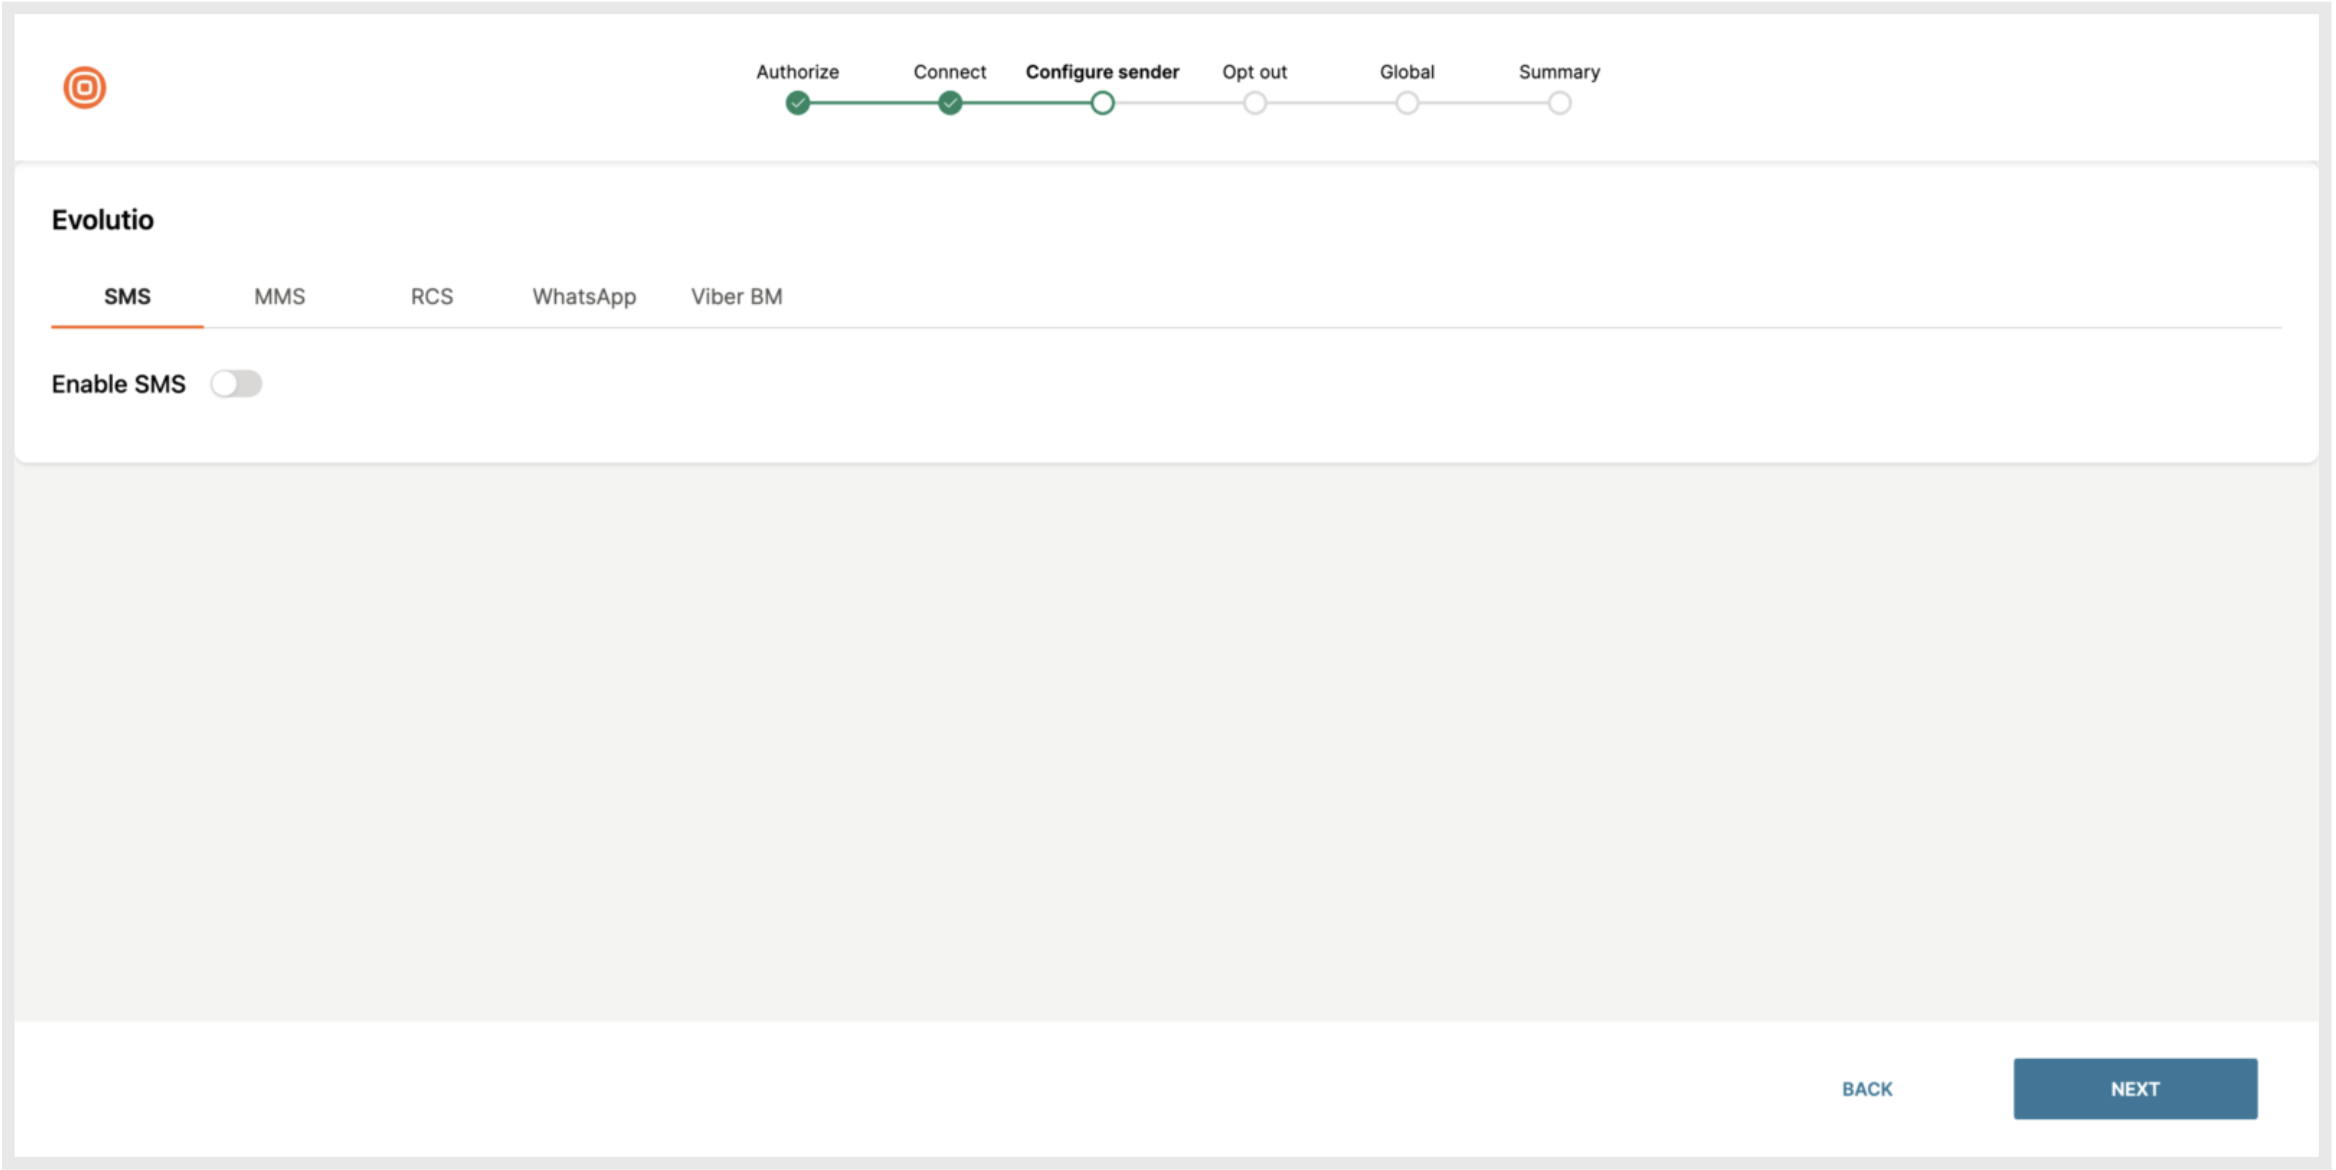
- Click Finish to save the configuration.
Send a campaign
When you have an Infobip account and your testing or purchased Infobip SMS and WhatsApp numbers, you can start testing and sending campaigns.
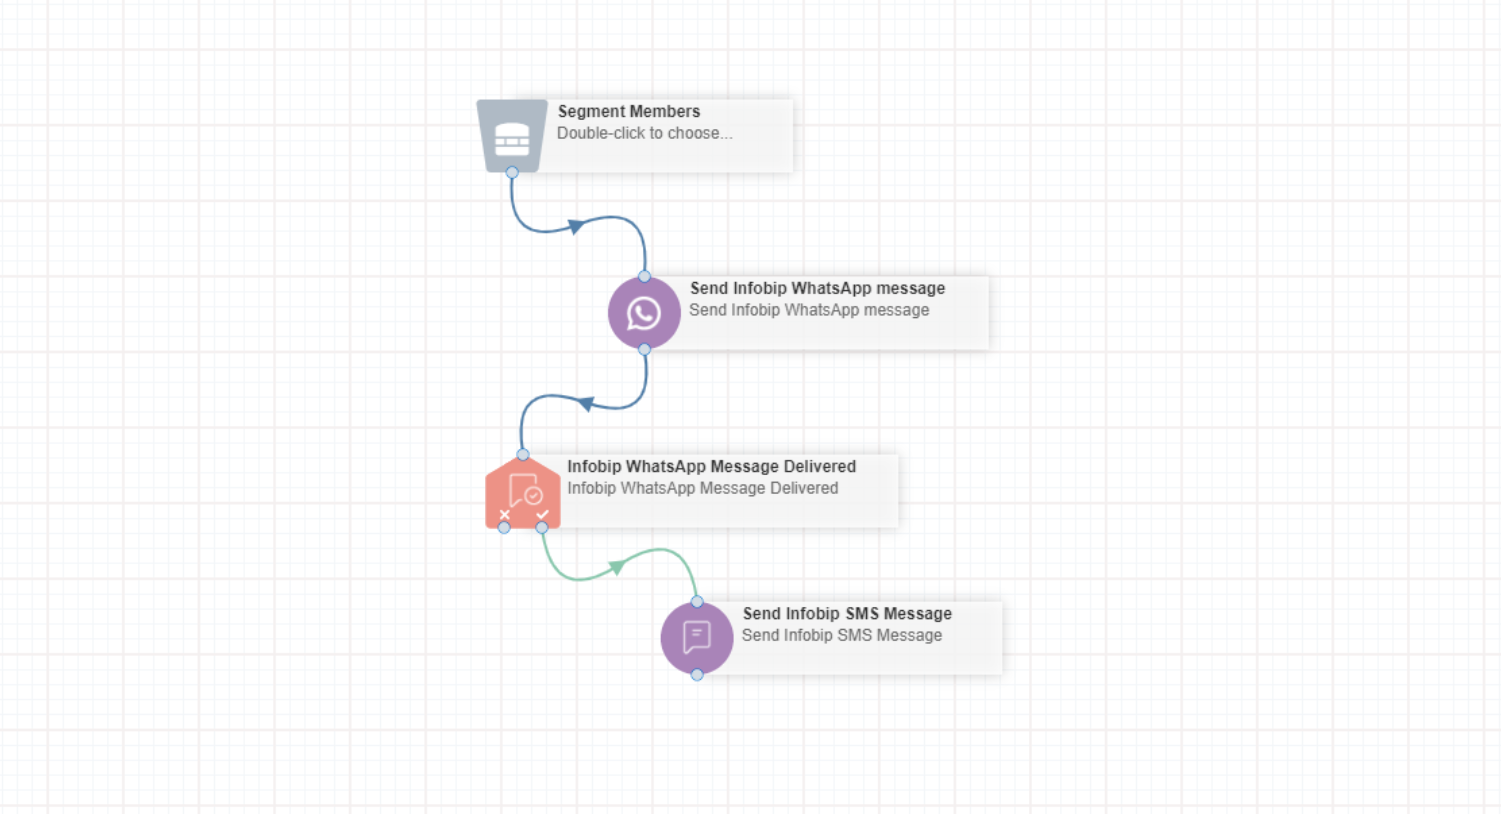
This campaign example uses the following elements:
- Segment members as an entry point
- Infobip Action Service to configure the Infobip Messaging action
- Infobip Decision Service to save the information from the Delivery Reports
- Verify and Publish
Create a segment and filter [#create-a-segment-and-filter-send-a-campaign]
Segments allow you to group people according to certain criteria, which you can then use to target a campaign. To create a segment of people, see the Oracle Eloqua documentation.
Set up the filter criteria for filtering the segment based on URL clicks.
To filter a segment:
- In Oracle Eloqua, go to Audience > Segment > Filter Criteria.
- Search for Sms Link Clicked – Infobip Sms Activity.
- Click this activity.
- Find the URL for which you want to create the filter.
- Depending on the use case, include or exclude filtered customers.
Create a Campaign [#create-a-campaign-send-a-campaign]
When creating campaigns, you can give a custom name to each service. This enables you to identify the relevant service when analyzing campaign results in reports.
To create a campaign in Oracle Eloqua using Infobip Messaging:
- In Oracle Eloqua, on the menu bar, go to Campaigns.
- Click Create a Multi-Step Campaign > Blank Campaign.
- Click Choose.
- In the menu on the left, choose Segment Members to specify the people to whom you want to send the message.
- You can send Infobip SMS, WhatsApp, RCS, and Viber messages.
Send Infobip SMS message
In the menu on the left, choose Send Infobip SMS Message, and then:
- Double-click the Send Infobip SMS Message element.
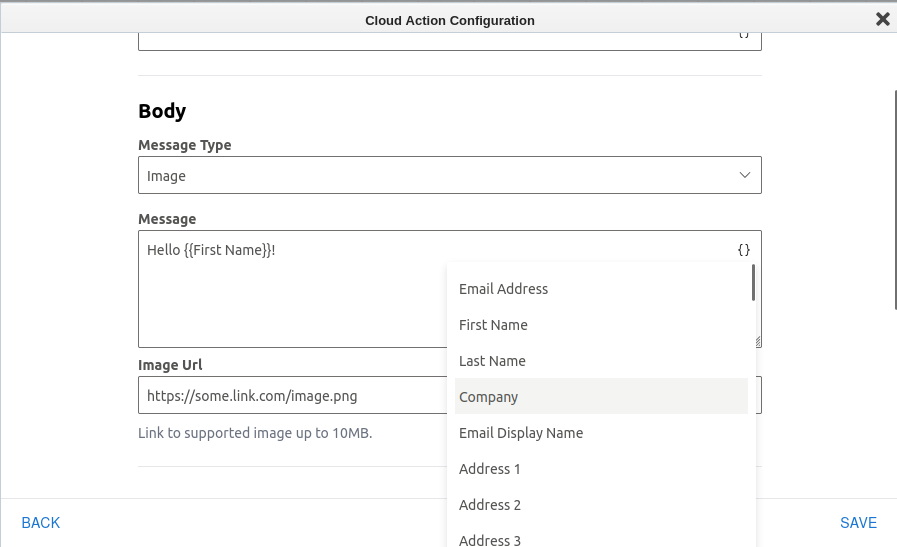
- Click the Edit icon to open a blank SMS composition slate (Cloud Action Configuration).
- Select sender from the Choose sender drop-down list of registered Infobip senders.
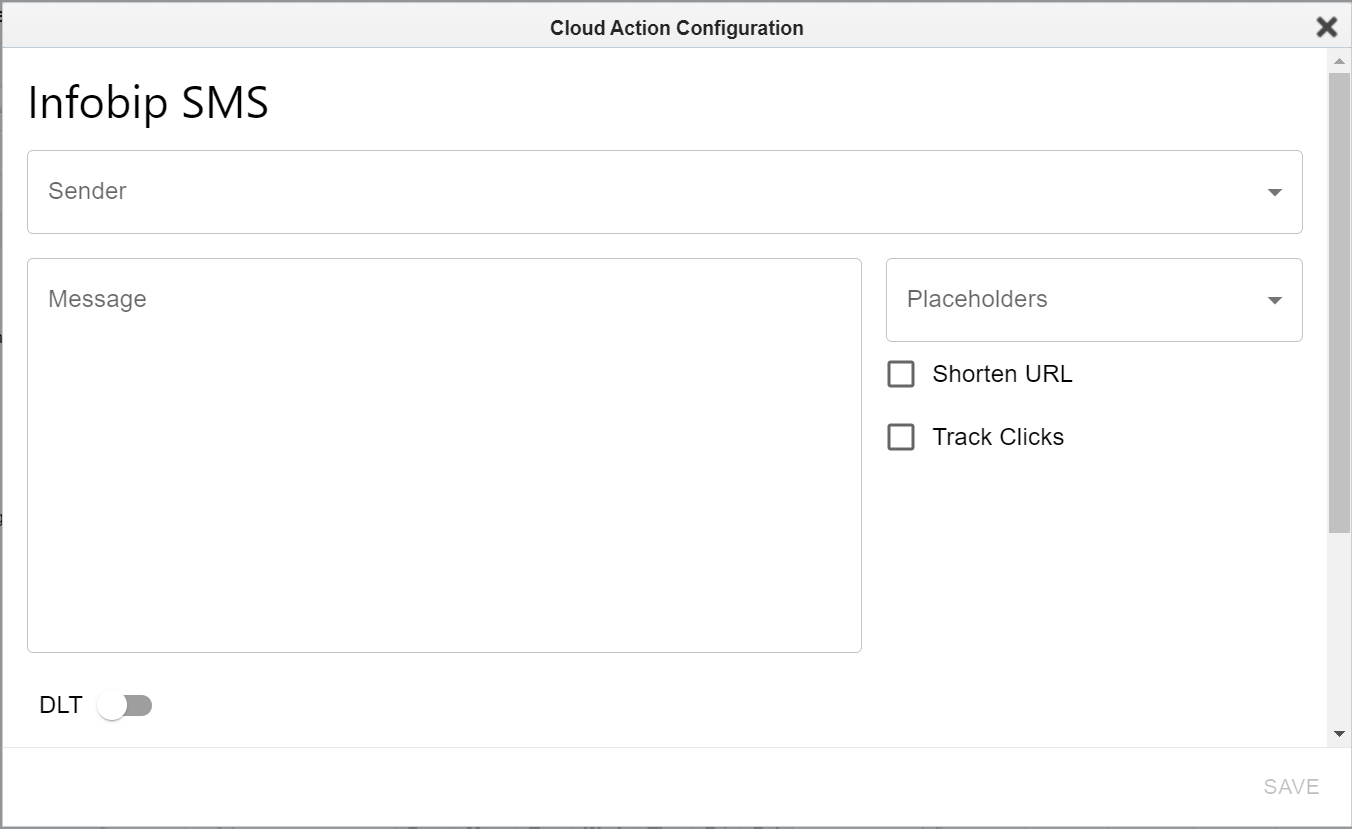
- Compose the message.
- Select a Placeholder to personalize the message, or manually type in the information in the Placeholder textbox. (optional)
- Enable URL shortening and/or Track the number of times an end-user clicks a URL by enabling the Track clicks checkbox. (optional)
- (Optional) Enable and define action block validity period.
- Click Save.
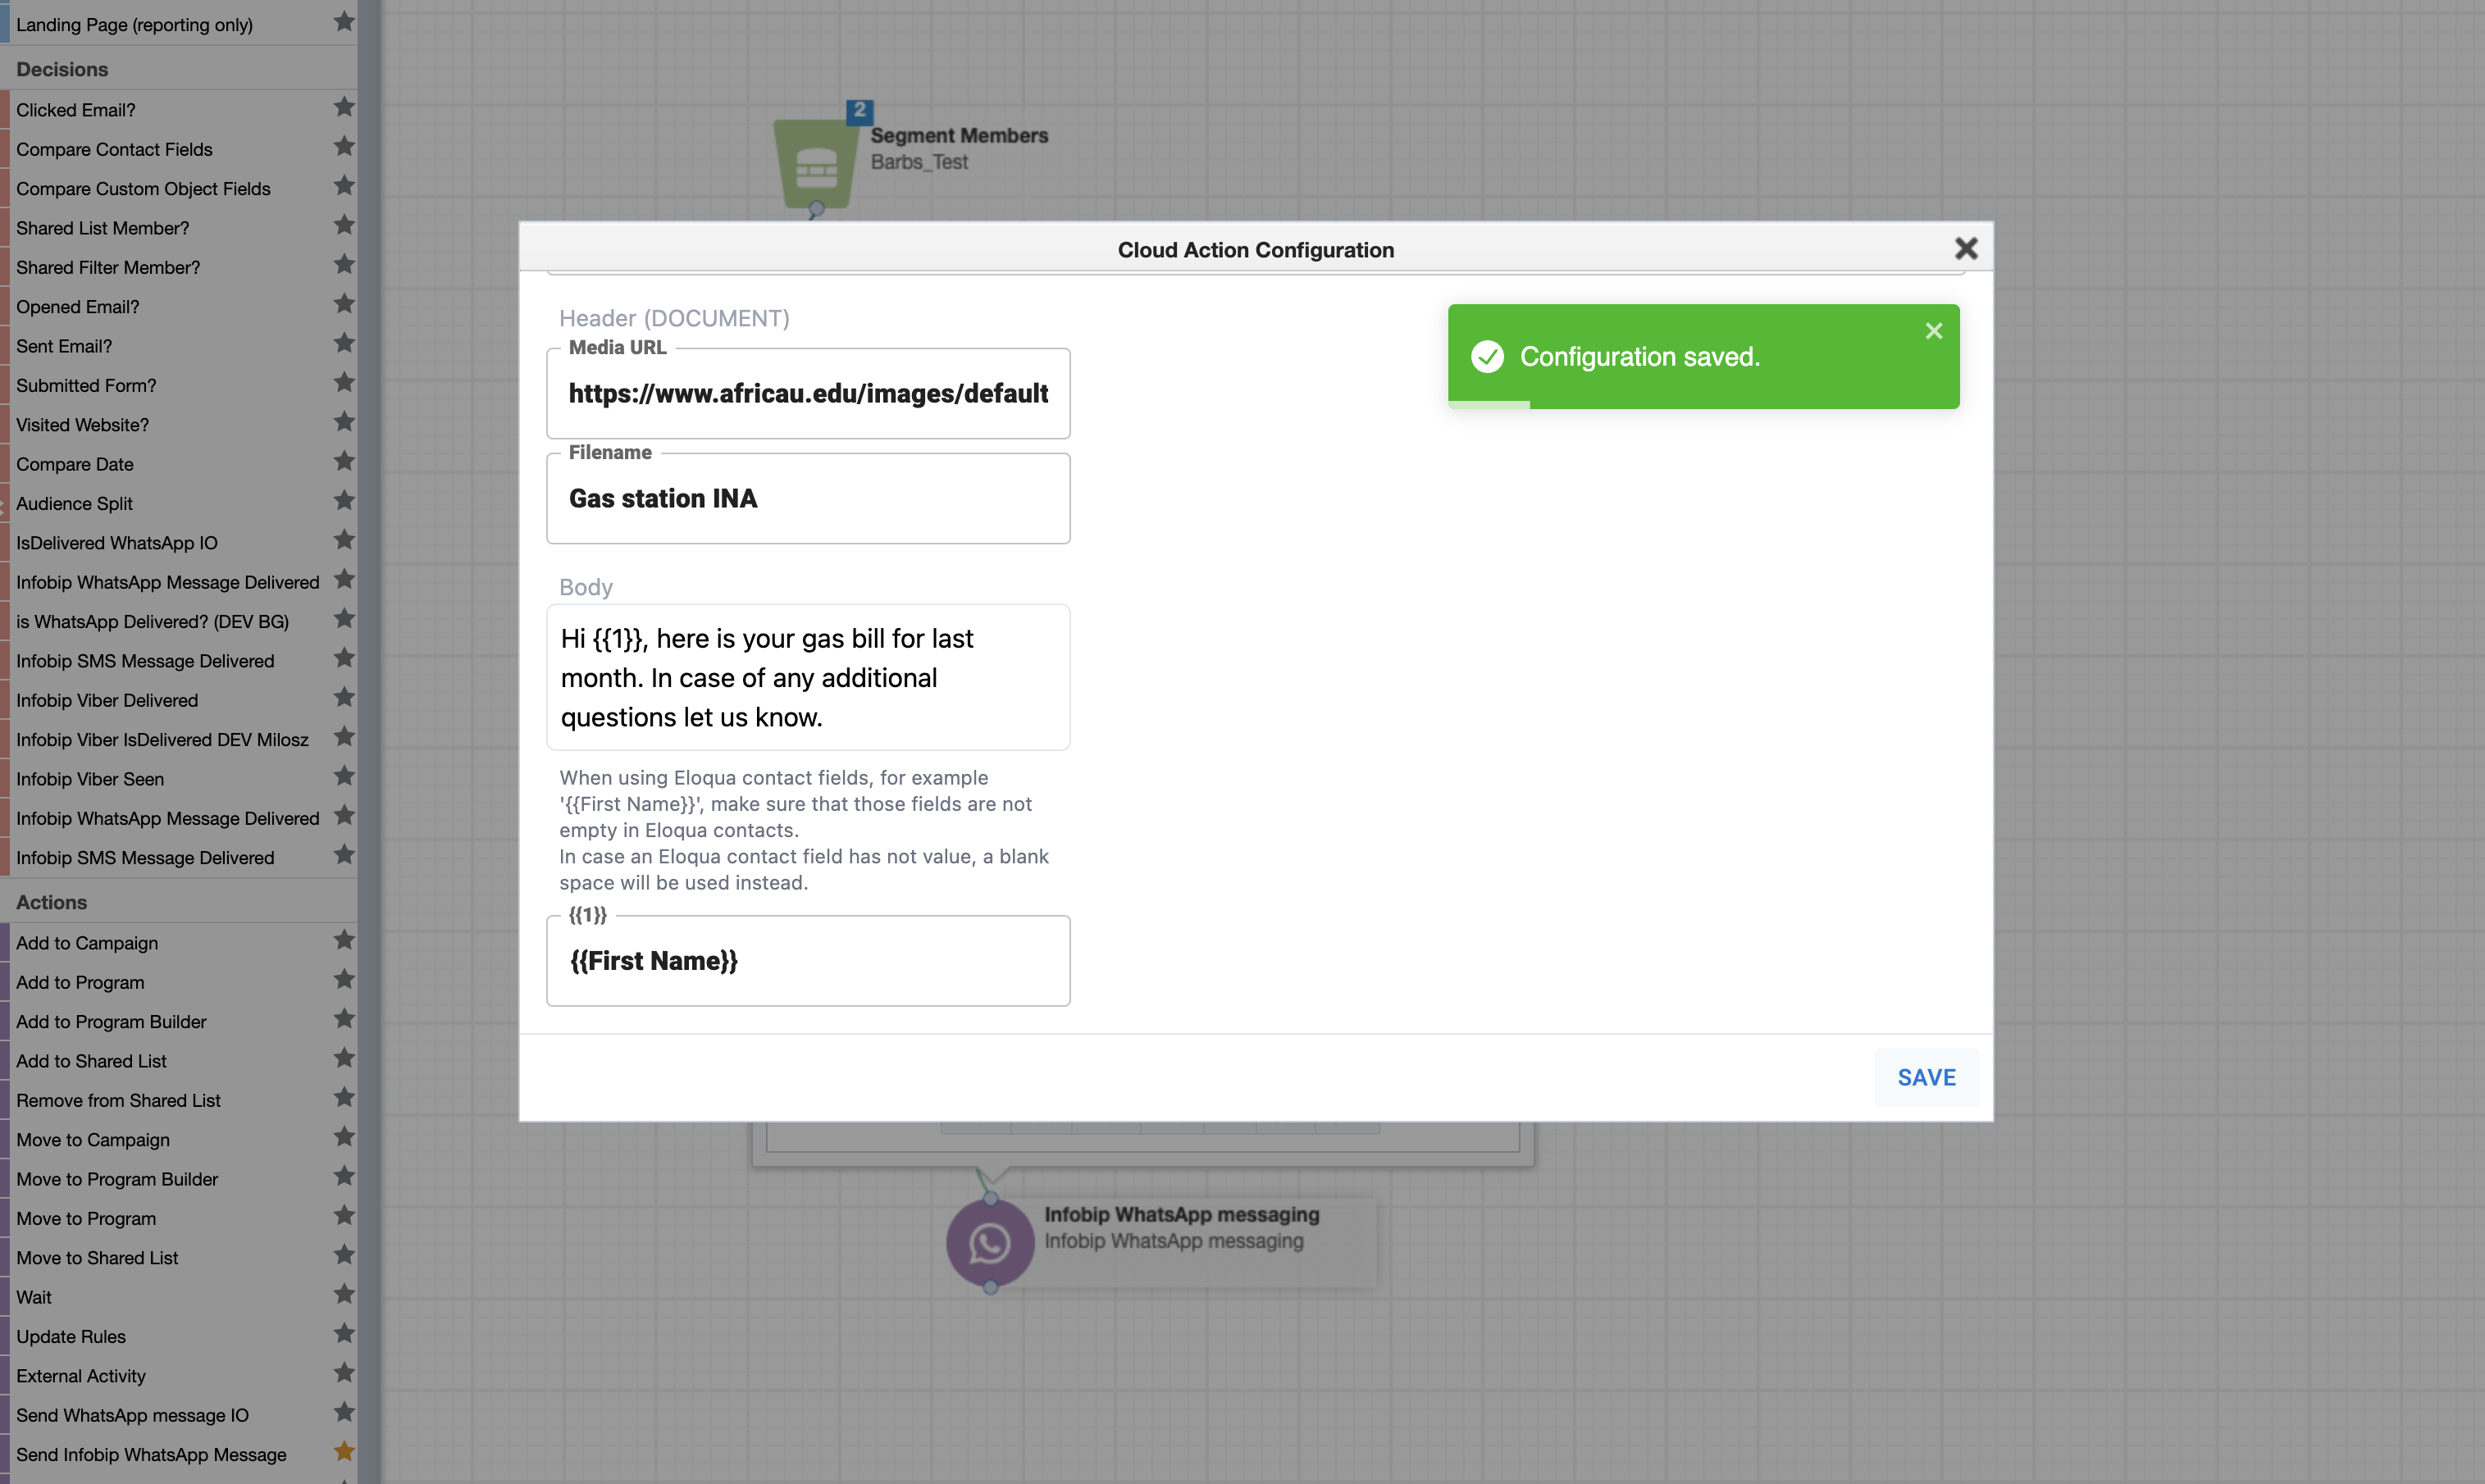
Send Infobip WhatsApp message
Choose to send an Infobip WhatsApp message:
- Double-click the Send Infobip WhatsApp Message element.
- Click the Edit icon to open a blank WhatsApp composition slate (Cloud Action Configuration).
- Select sender from the Choose sender drop-down list of registered Infobip senders.
- Select a Template Type to compose a message:
- Text Template
- Rich Media Template which contains different types of headers, buttons, and footers
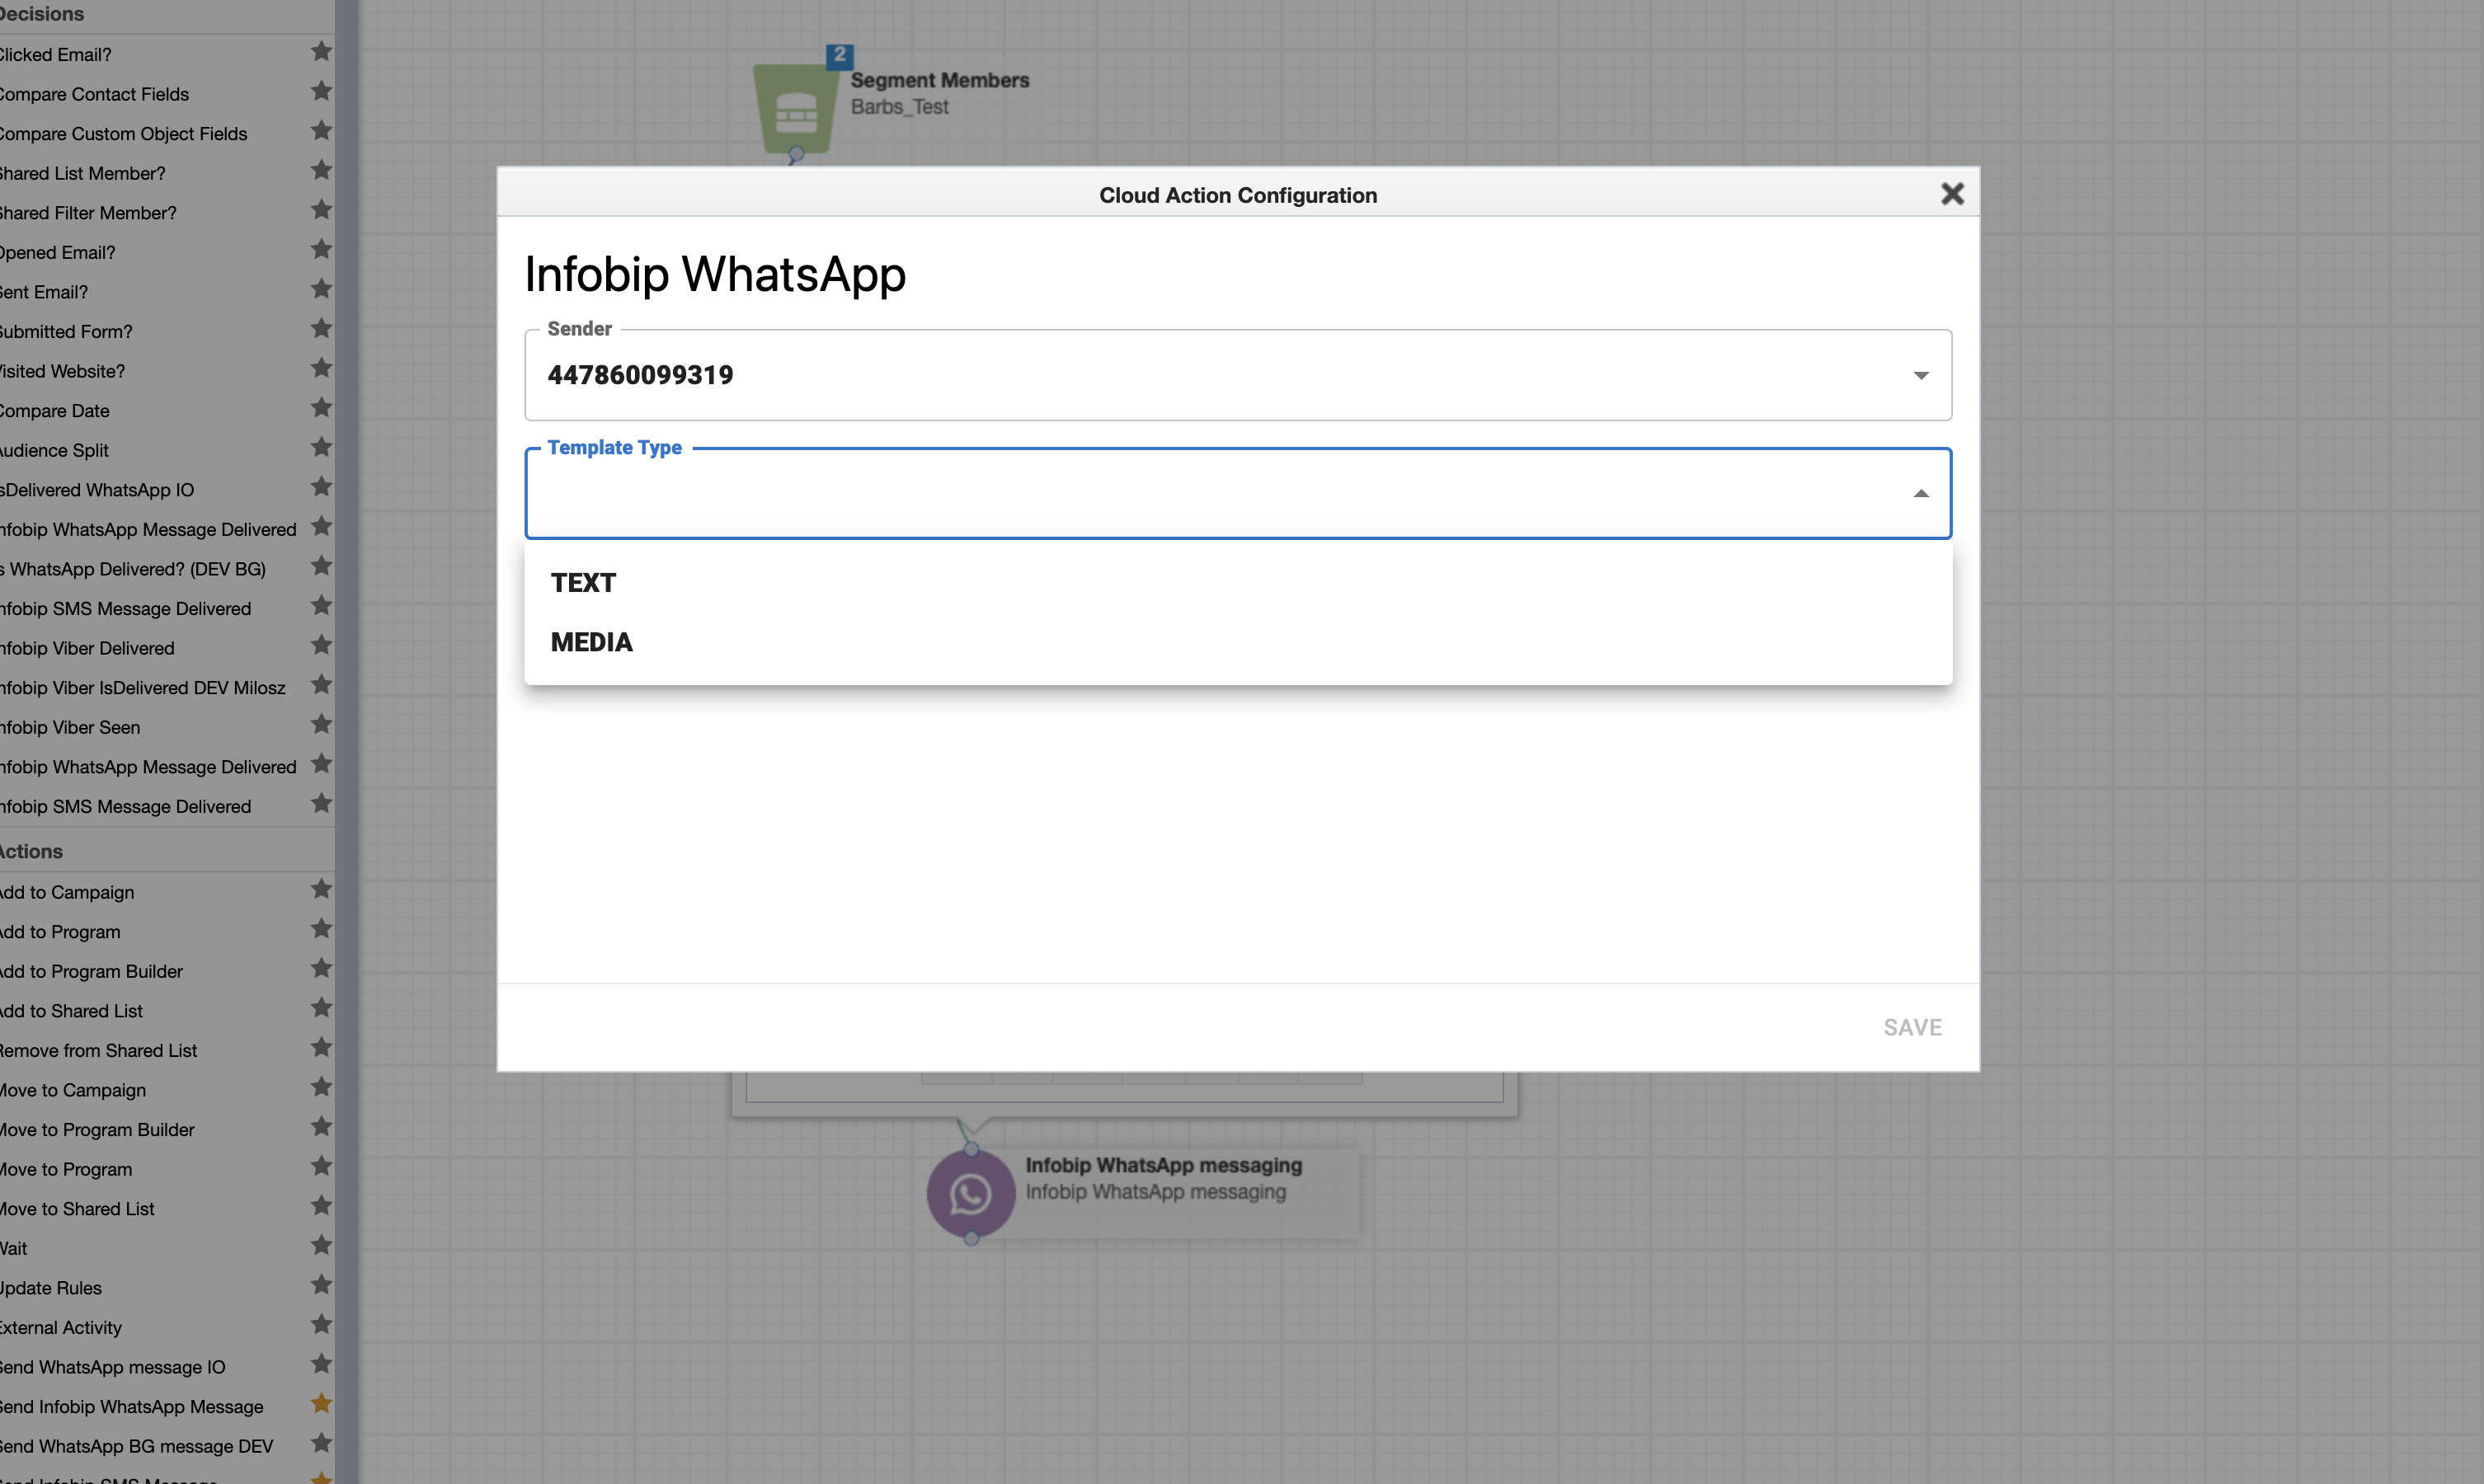
- Define your message in the predefined textbox and rich media if selected.
- If the template contains options to personalize the message, carry out one of the following actions in the Placeholders field.
- Choose a placeholder from the list
- Manually type in the information in the Placeholder textbox
- (Optional) Enable and define action block validity period.
- Click Save.
- Add the Is Message Delivered service (Infobip SMS / WhatsApp Message Delivered decision element). This service checks whether the message was delivered to the customer.
- Branch the customer journey for each possible outcome.
- Click Verify and Save to check whether there are any errors.
- Click Activate to activate the campaign. You can schedule the campaign to Start Now or Start Later.
Send Infobip Broadcast message (RCS)
Choose to send an Infobip Broadcast message for RCS:
- Double-click the Send Infobip Broadcast Message element.
- Click the Edit icon to open a blank Broadcast composition slate (Cloud Action Configuration).
- Select RCS channel from the Select a channel drop-down list of registered Infobip channels.
- Select sender from the Select a sender drop-down list of registered Infobip senders.
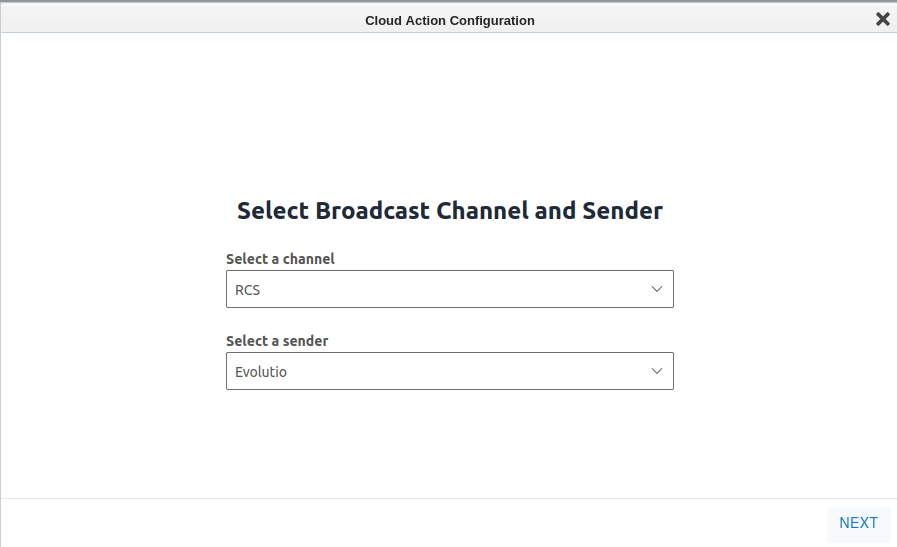
- Click Next.
- Select a Message Type from a list of supported message types.

- Write the message content and you can optionally select a Placeholder to personalize the message.
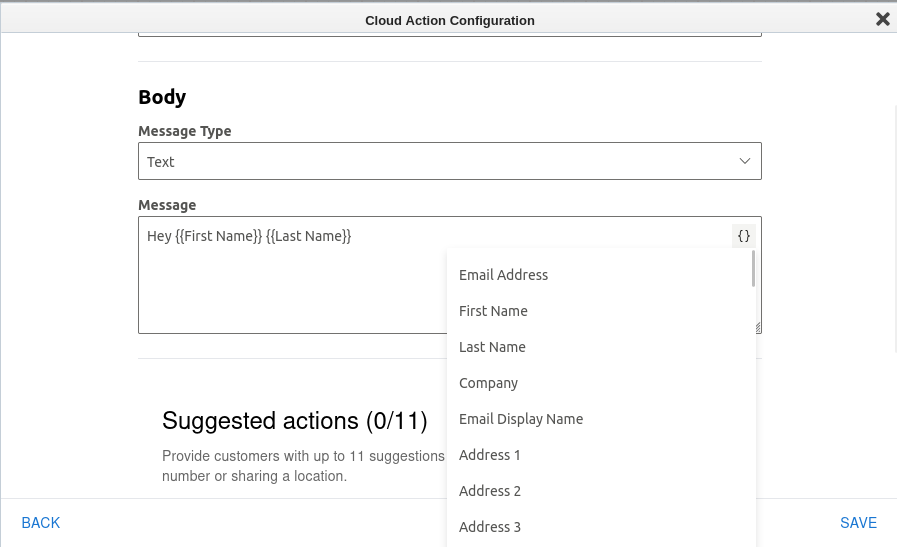
- Click Save.
Send Infobip Broadcast message (Viber)
Choose to send an Infobip Broadcast message for Viber:
- Double-click the Send Infobip Broadcast Message element.
- Click the Edit icon to open a blank Broadcast composition slate (Cloud Action Configuration).
- Select Viber channel from the Select a channel drop-down list of registered Infobip channels.
- Select sender from the Select a sender drop-down list of registered Infobip senders.
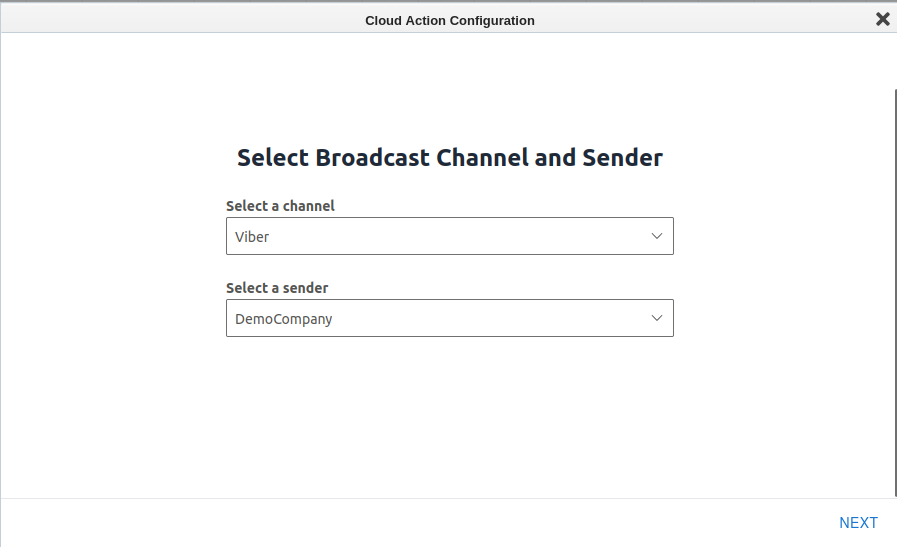
- Click Next.
- Select a Message Type from a list of supported message types.

- Write the message content and you can optionally select a Placeholder to personalize the message.
- Click Save.
URL Shortening and URL Tracking
The Infobip SMS and WhatsApp app offers the following features:
- URL shortening: reduce the length of URLs
- URL tracking: track the number of times an end-user clicks a URL
Enable URL Shortening and URL Tracking [#enable-url-shortening-and-url-tracking-url-shortening-and-url-tracking]
You can enable URL shortening and URL tracking in the Send Message window in the SMS and WhatsApp activities.
You can enable URL shortening without enabling URL tracking. However, if you enable URL tracking, URL shortening is enabled automatically. If you deactivate URL shortening, URL tracking is disabled automatically.
After you activate your campaign, the URL activity for each customer is saved in that customer’s profile. The URL activity is saved in External Activity – Infobip SMS Activity.
Validity period
When a message delivery fails due to the customer's phone being off, or having no network or internet access available, Infobip initiates a retry procedure. This procedure attempts to deliver the message periodically within its validity period, which lasts up to 48 hours.
For users who prefer not to wait for the final message update (which occurs within 48 hours) and want to unblock the contact flow (moving contacts from the action service to the next step), this feature can be enabled. By setting a custom validity period, users can force the flow to sync once the validity period has expired.
Enable validity period
Enable a validity period for both SMS and WhatsApp service activities to ensure synchronization of contacts and their message statuses. Prevent “pending“ messages from blocking the campaign flow by defining a duration for the validity period.
Set the validity period by selecting Sync Timeout and using the Timeout Period scale. The minimum timeout is 10 minutes, and the maximum is 48 hours.
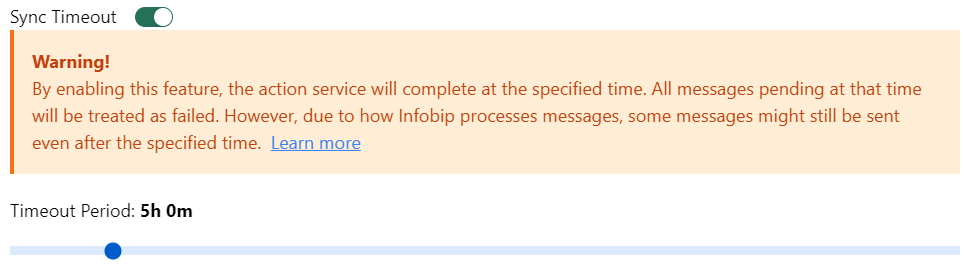
Do not use very short validity periods because local network operators send message delivery statuses to Infobip. If the validation period is too short, there is a risk that the decision service could misinterpret the message status.
Validity period works in the following way:
- Pending messages: If a message isn't delivered to a contact's device within the defined validity period, it is directed to the Error side of the decision service activity when the validity period expires
- Delivered messages: Messages successfully delivered within the validity period are marked as Delivered
- Other statuses: All other message statuses are marked as Error after the validity period expires
The impact on campaign flow is as follows:
- Delivered messages: Messages delivered within the validity period proceed to the Success side of the decision service activity in the campaign flow.
- Expired Messages: Messages not delivered within the validity period will be marked as expired and will proceed to the Error side of the decision service activity
- Late Deliveries: For messages that are delivered after the validity period, (customers who's phone is turned on, have internet access now, and so on) they proceed to the Error side of the decision service activity and are marked as Delivered in the Infobip Reports in
AFTER VALIDITY PERIODwith timestamps of that validity period.
Reports activity with validity timeout period enabled
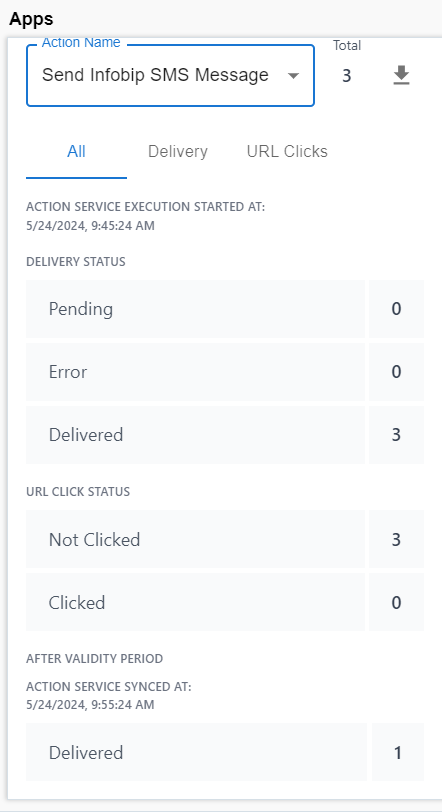
If the validity period is enabled for SMS and/or WhatsApp service actions, a new field named AFTER VALIDITY PERIOD appears in the Infobip Reports for that service action, with timestamps of the period. When the validity period expires, the status of Pending messages are updated to either Delivered or Error, depending on whether the customer received the message.
This feature helps maintain an efficient campaign flow by ensuring that only messages delivered within the specified time frame are considered to be successful, whereas those that fail to deliver in time are appropriately marked and managed.
Distributed Ledger Technology (DLT) Templates
This feature is applicable only when you send SMS messages to customers who are in India.
When you send messages to customers who are in India, you must use distributed ledger technology (DLT) templates. Your Eloqua account must have an Entity ID and you must register your templates on the DLT platform. To create and register the templates, contact your dedicated Account Manager or contact our Sales team by using the Infobip Contact form.
To use the registered DLT templates in your campaign, carry out the following actions:
- In Oracle Eloqua, go to your campaign.
- Double-click the Send Infobip SMS Message element.
- Click the pencil icon.
- Enable DLT.
- In the DLT Entity ID field, enter the entity ID of your Eloqua account. You can obtain this value from the ID field.
- In the DLT Template ID field, enter the ID of the DLT template that you want to use. You can obtain this value from the Template field.
Enable inbound messaging
To enable incoming messages from end-users for both SMS and WhatsApp service activities, you need to enable inbound messages. This ensures that users can respond directly to the messages they receive, and their replies are captured in a designated field. It is recommended that you create separate, unique fields for inbound messages from SMS and WhatsApp as this can provide clearer organization and better tracking of responses across both channels.
Contact your account manager or Infobip support to activate pairing on your Infobip account.
To enable inbound messages:
- Create a contact field to capture end-user responses.
- Configure the service activity, SMS and/or WhatsApp, and click the Enable Inbound Messages toggle.
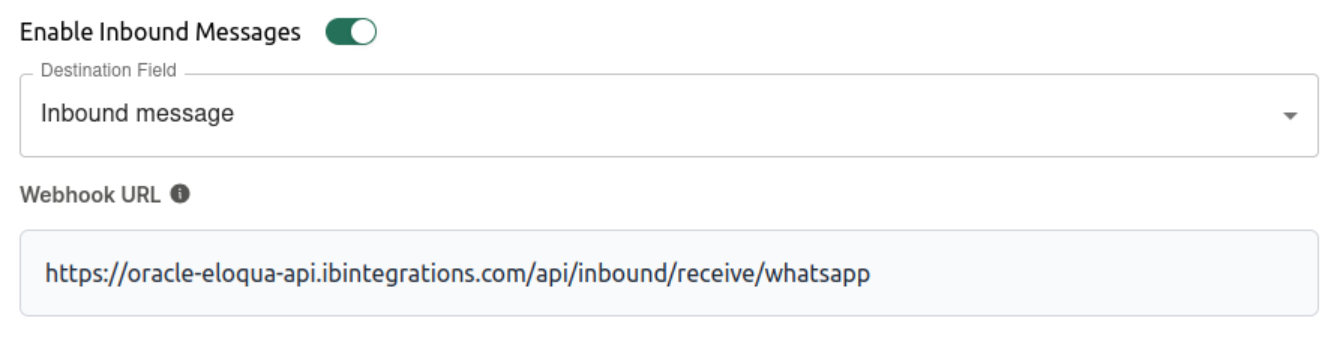
- Select the contact field you created to store end-user responses.
- Copy the webhook into the Infobip number configuration to ensure you receive responses.
- SMS webhook:
https://oracle-eloqua-api.ibintegrations.com/api/inbound/receive/sms - WhatsApp webhook:
https://oracle-eloqua-api.ibintegrations.com/api/inbound/receive/whatsapp
- SMS webhook:
- End-user responses can be found in the contact details. Look for the designated field where responses are stored, and the reply should be saved there.
If you select the same field for capturing end-user responses, only the most recent reply will be saved in that field, overwriting any previous messages.
Additionally, if you run two campaigns targeting the same segments simultaneously and enable inbound messaging for both, only the last response received will be stored in the designated field.
View delivery reports
Use the following steps to view reports in Oracle Eloqua for a campaign that uses Infobip messaging:
- In the menu on the right, click Apps > Infobip Messaging Reports.
- Specify the Action Message Service for which you want to see the report.
- If you select Infobip SMS Action there are three tabs where you can see All status messages numbers together, Delivery Status numbers, and URL Clicks
- If you select Infobip WhatsApp Action there are three tabs where you can see All status message numbers together, Delivery Status numbers, and Seen number
- Action service execution timestamps with include date and hour at the top of the Action service execution.
- Click Export Details to generate a report in Excel.
The Delivery Status messages are as follows:
- Pending: The number of messages that are in the delivery process
- Error: Information about messages that could not be delivered. Example: Customer's mobile is switched off or unreachable
- Delivered: Total number of SMS messages that were sent successfully
The URL Click Status messages:
- Not Clicked: The number of URL Links that are not clicked
- Clicked: The number of URL Links that are clicked
Seen Status messages:
- Not Seen: The number of messages that are not seen
- Seen: The number of messages that were seen
You can also generate an overall report that includes all campaigns for your account in a specified time frame.
Currently, Eloqua does not support media templates that use the location as a header.
Using opt-in and opt-out
The following steps ensure that you can effectively manage and respect user preferences, ensuring that only subscribed users receive your campaign messages.
To use the opt-in and opt-out feature effectively:
- Enable opt-in and opt-out. To enable these features, go to: Settings > Apps > Eloqua App > Configure.
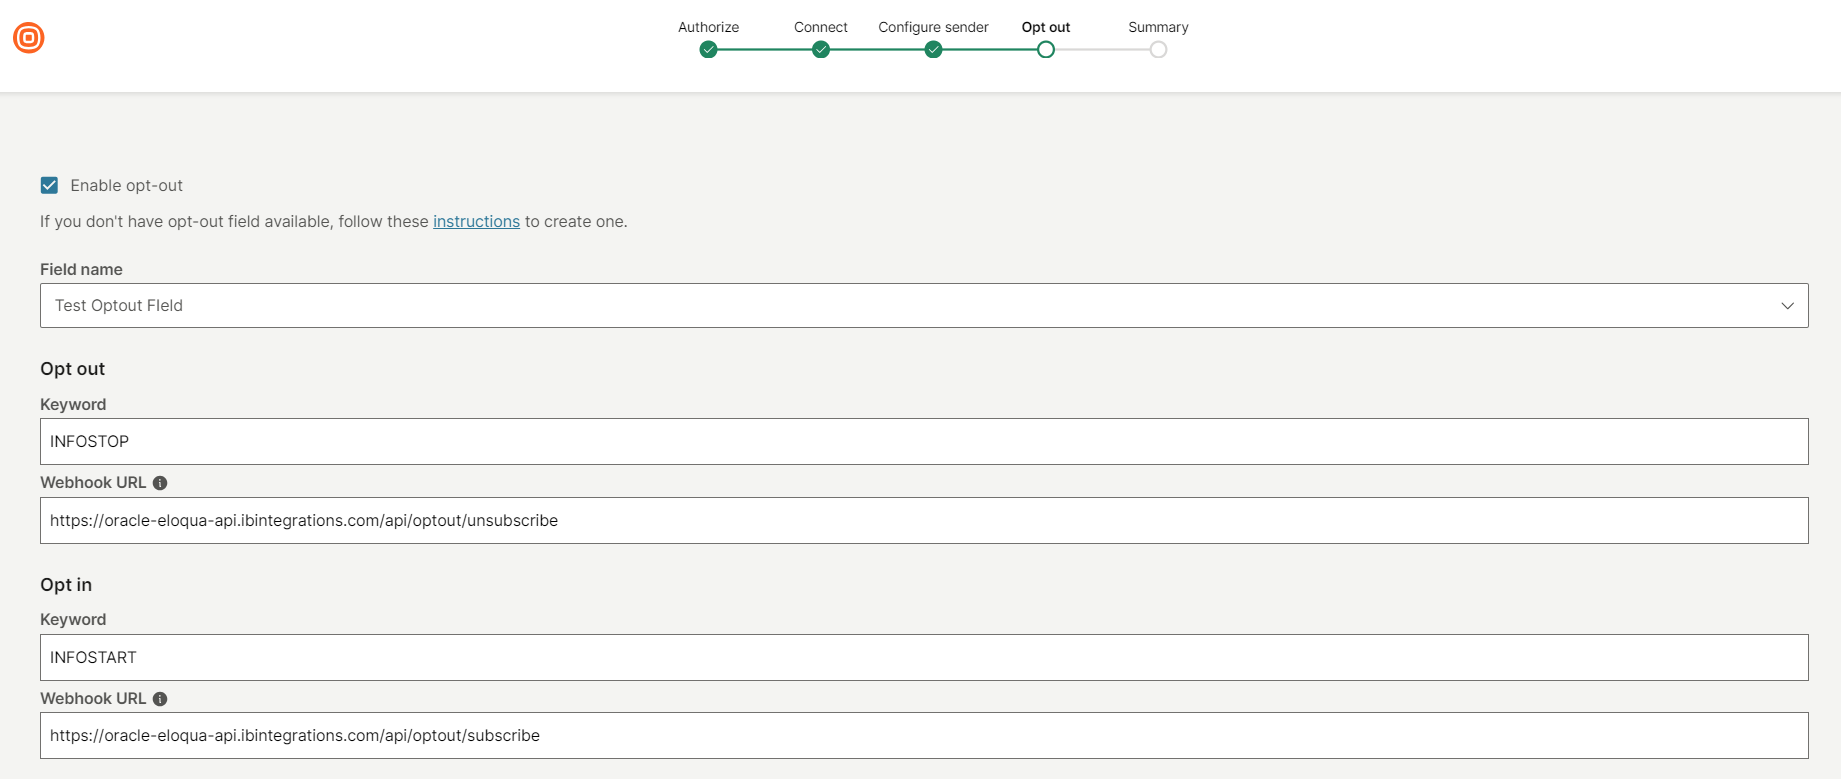
- Configure the opt-out settings.
- Select the contact field name to store the user's opt-out status.
- Specify the keyword for users to opt-out of campaigns (for example, INFOSTOP)
- Select and copy webhook URL:
https://oracle-eloqua-api.ibintegrations.com/api/optout/unsubscribe.
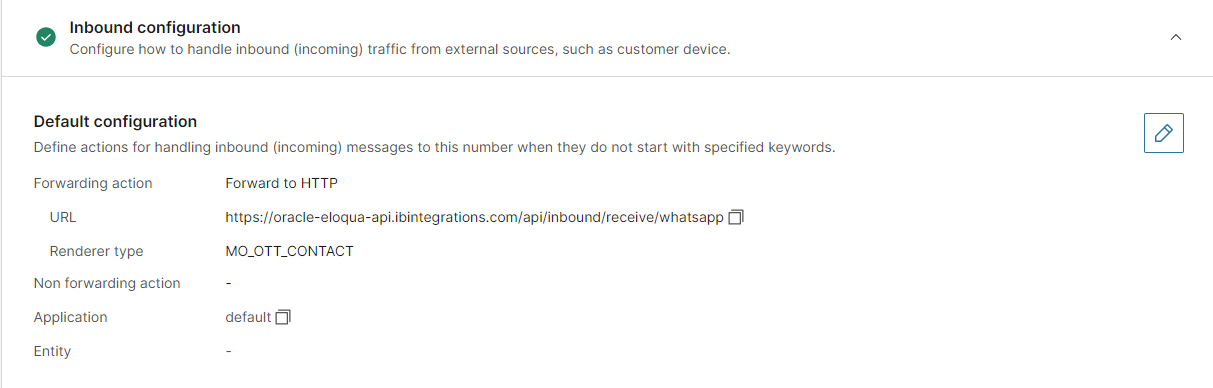
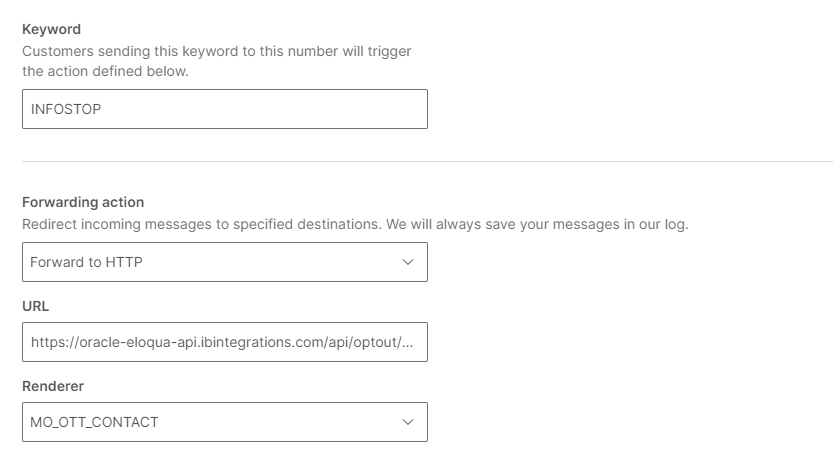
- Go to Numbers in the Infobip web interface and click on the number you wish to use for receiving opt-out messages.
- Create the keyword (for example, INFOSTOP).
- Choose the Forwarding to HTTP forwarding action and set the
Rendererfield to MO_OTT_CONTACT. - Paste the webhook URL field to the URL field:
https://oracle-eloqua-api.ibintegrations.com/api/optout/unsubscribe
- Configure the opt-in settings.
- Specify the keyword for users to opt-in into campaigns (for example, INFOSTART).
- Select and copy webhook URL:
https://oracle-eloqua-api.ibintegrations.com/api/optout/subscribe. - Go to Numbers in the Infobip web interface and click on the number you wish to use for receiving opt-in messages.
- Create the keyword (for example, INFOSTART).
- Choose the Forwarding to HTTP forwarding action and set the
Rendererfield to MO_OTT_CONTACT. - Paste the webhook URL field to the URL field:
https://oracle-eloqua-api.ibintegrations.com/api/optout/subscribe.
- Keyword detection and status update.
- When a user sends an SMS or WhatsApp message with the text INFOSTOP, the system detects the keyword "INFOSTOP".
- The system retrieves the user's contact information and updates their status to UNSUBSCRIBED in Eloqua.
- Filter opted-out users in future campaigns. To exclude opted-out (unsubscribed) users from future campaigns, create a shared filter to filter out these contacts. For example:
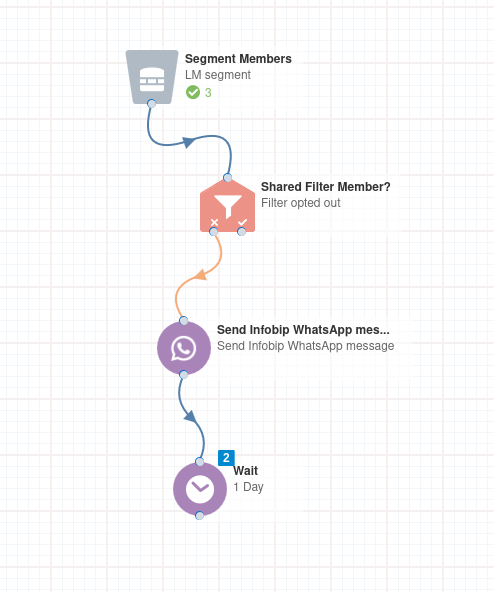
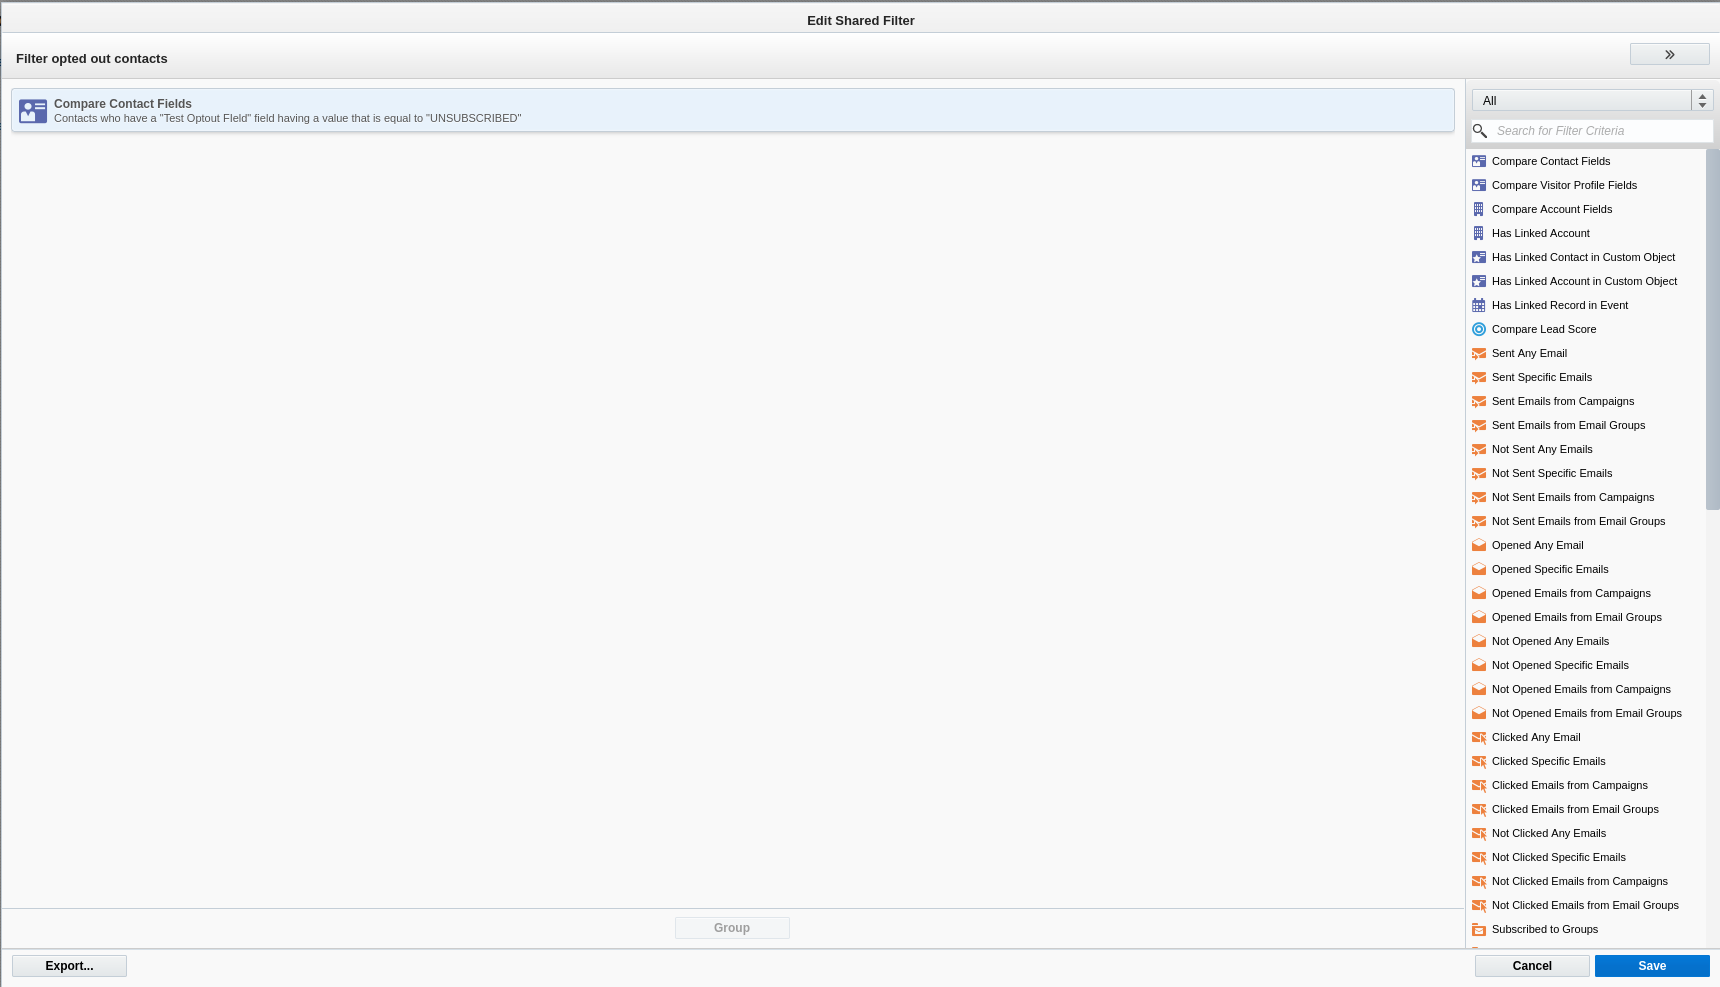 The following is a campaign example using shared filter:
- Use a shared filter in your campaigns to exclude users who have opted out
- WhatsApp messages, or any other campaign communications, are sent only to users who have not opted out