Microsoft Dynamics 365 Customer Insights - Journeys messaging
 SMS
SMS
Microsoft Dynamics 365 Customer Insights - Journeys app, integrated with Infobip, offers robust messaging capabilities across SMS, RCS, WhatsApp, and Viber.
The integration with Microsoft Dynamics 365 Customer Insights - Journeys provides the following benefits:
- Enhance customer engagement with multi-channel communication
- Simplify operations with a single interface for all messaging needs
- Channel-specific capabilities for SMS, WhatsApp, RCS, Viber
SMS messaging offers:
- Direct communication: Reach customers instantly on mobile devices
- Personalization: Use customer-specific data for tailored messages
- Inbound messaging: Trigger journeys based on customer replies
- Real-time analytics: Track delivery and engagement for campaign insights
WhatsApp, RCS, Viber messaging offers:
- Rich media support: Send images, videos, and clickable links
- Trigger-based journeys: Automate interactions based on customer actions
- Failover mechanism: Switch to SMS if primary channels fail
- Unified templates: Maintain consistency across channels
What you will need
Before you start, you will need:
- Your Infobip account. If you do not have an Infobip account, you can create one
- Microsoft Dynamics 365 account with the Customer Insights solution
- Infobip Messaging Admin or Infobip Messaging User Marketing security role in Dynamics to access and configure the app.
For more information on configuration, see the Dynamics 365 Customer Insights - Journeys documentation.
Configure SMS in Customer Insights – Journeys
The SMS channel is available in Microsoft Dynamics 365 Customer Insights – Journeys using the native SMS integration with Infobip.
To configure the SMS channel connection to Infobip, follow the Set up text messaging instructions in the Microsoft Dynamics 365 Customer Insights documentation.
Install the app - WhatsApp, RCS, Viber
The Microsoft Dynamics 365 Insights app is built in Power Apps and is available for an easy installation on the AppSource marketplace. To install the app:
- Go to the AppSource listing Messaging for Dynamics 365 Customer Insights and click on Get it now.
- Select the environment where the Customer Insights solution is deployed.
- Wait until the installation is completed.
Configure the app
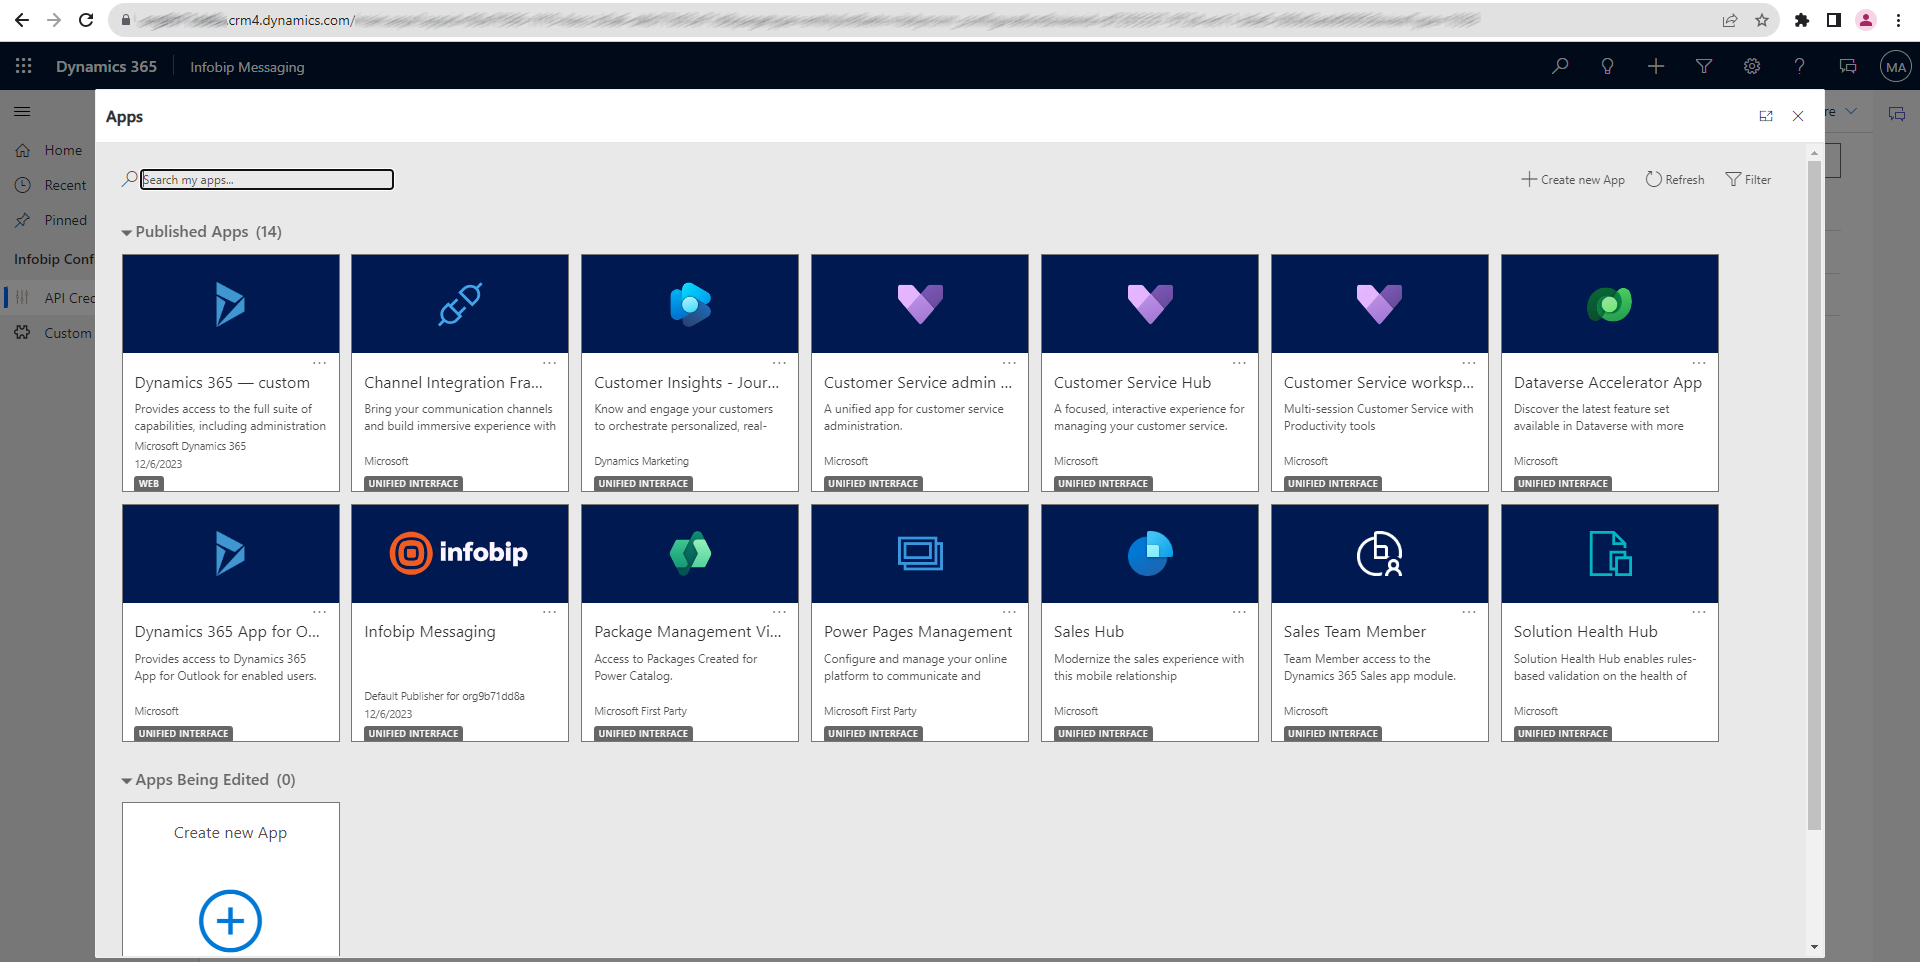
In Dynamics 365, go to Apps and open the Dynamics 365 link. Then, select Infobip Messaging.
To configure the app, use the following steps:
Step 1 - Give Consent [#step-1-give-consent-configuration]
- Go to Settings and click Give Consent.
- Use an account with System Administrator privilege to get permissions.
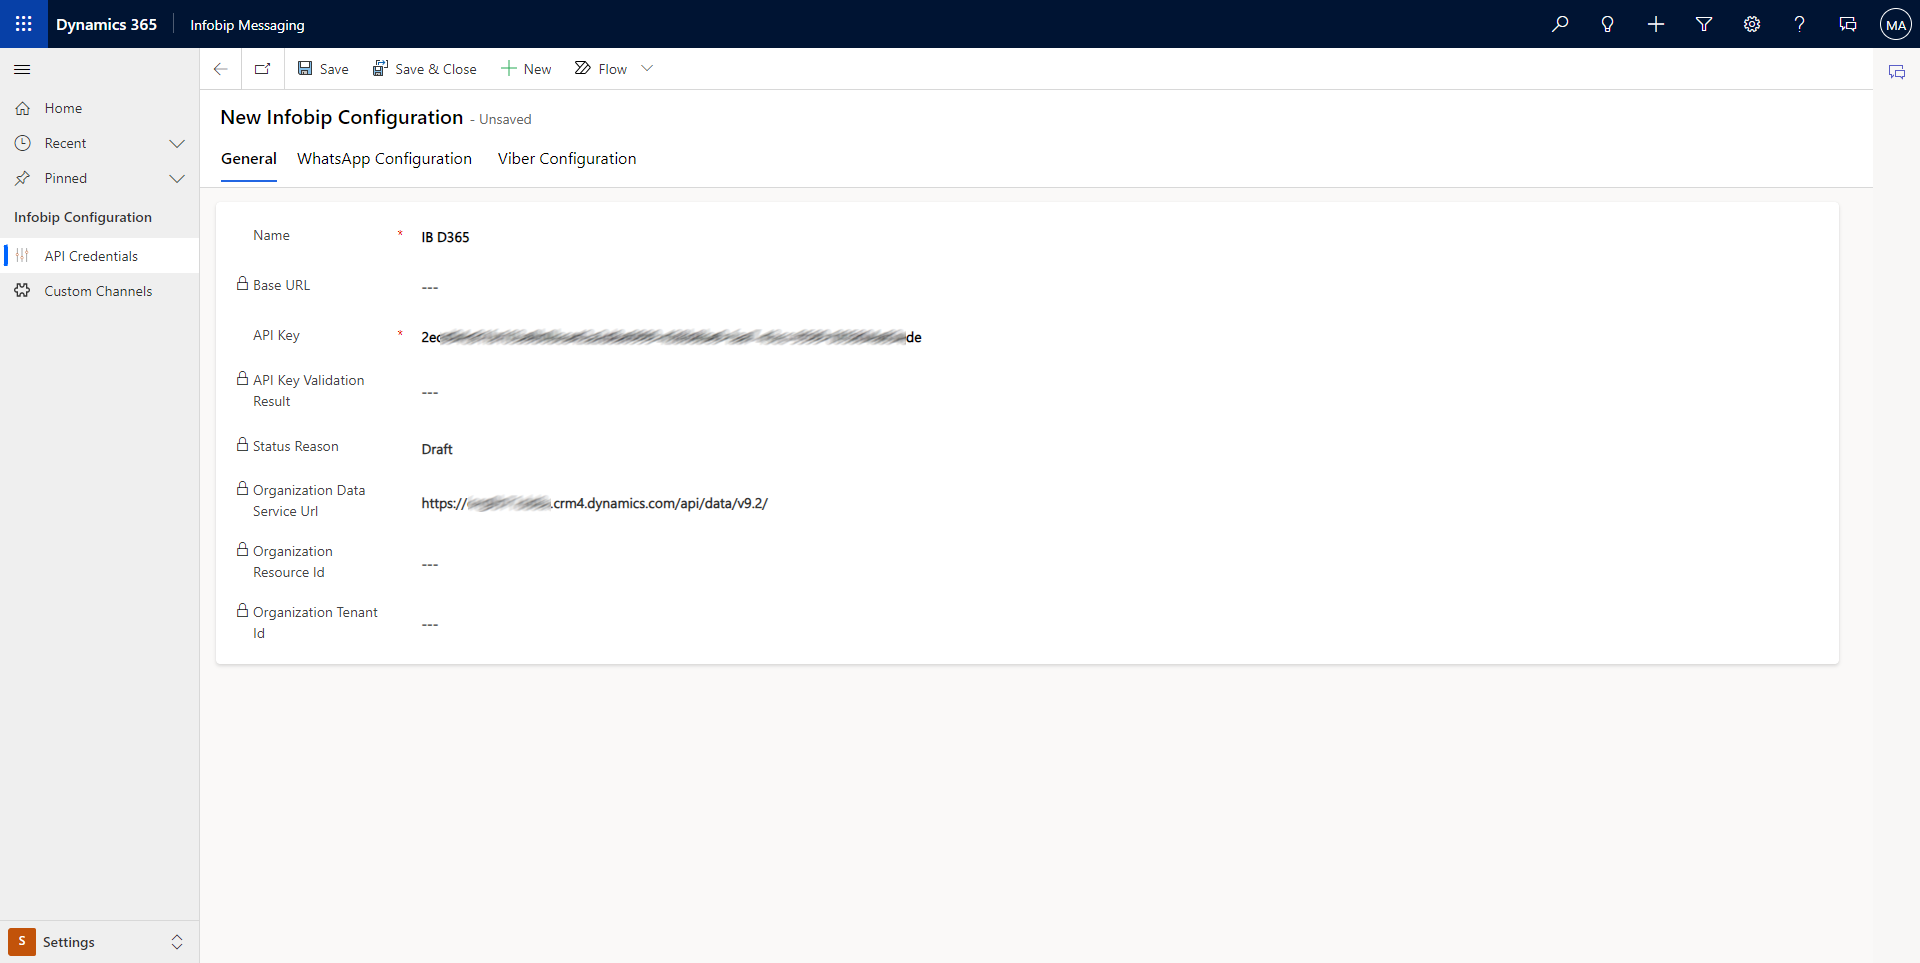
Step 2 - API Credentials [#step-2-api-credentials-configuration]
- Go to Settings and then go to API Credentials.
- Click New.
- On the General tab, add the following information:
- Insert the name of the configuration.
- Insert the API Key that you received from Infobip.
- Depending on your Infobip account settings, select the delivery report settings:
- Use subscriptions – enable if you plan to use subscriptions for delivery reports
- Use application ID – enable if your Infobip account is not a subaccount and can use Infobip Subscriptions with Application ID
- Click Save.
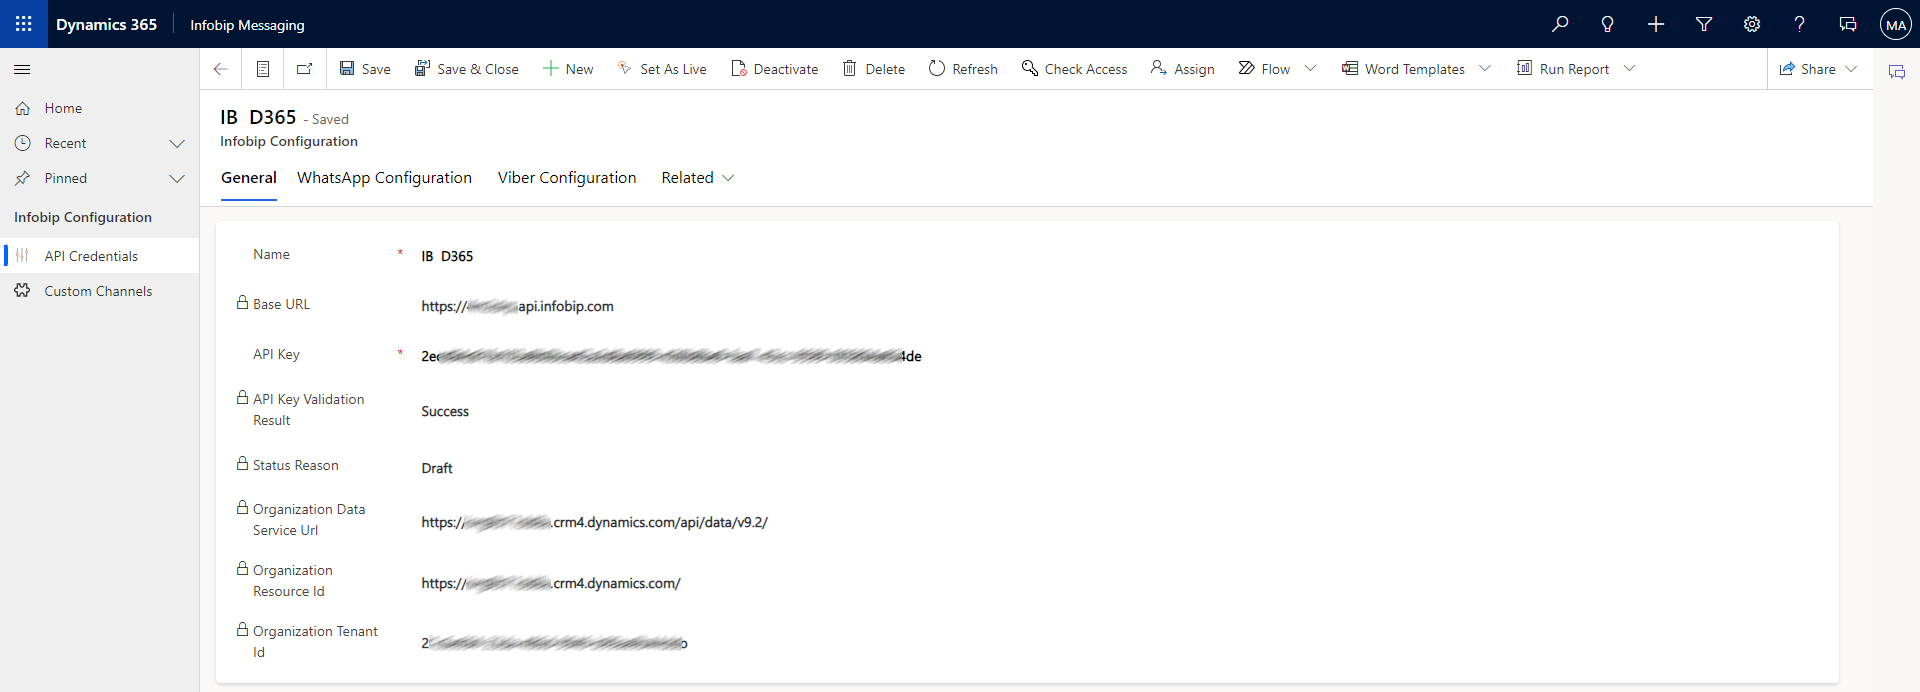
Step 3 - Set as live [#step-3-set-as-live-configuration]
- Share the Organization Data Service Url with Infobip to register for sending reports.
- Click Set As Live.
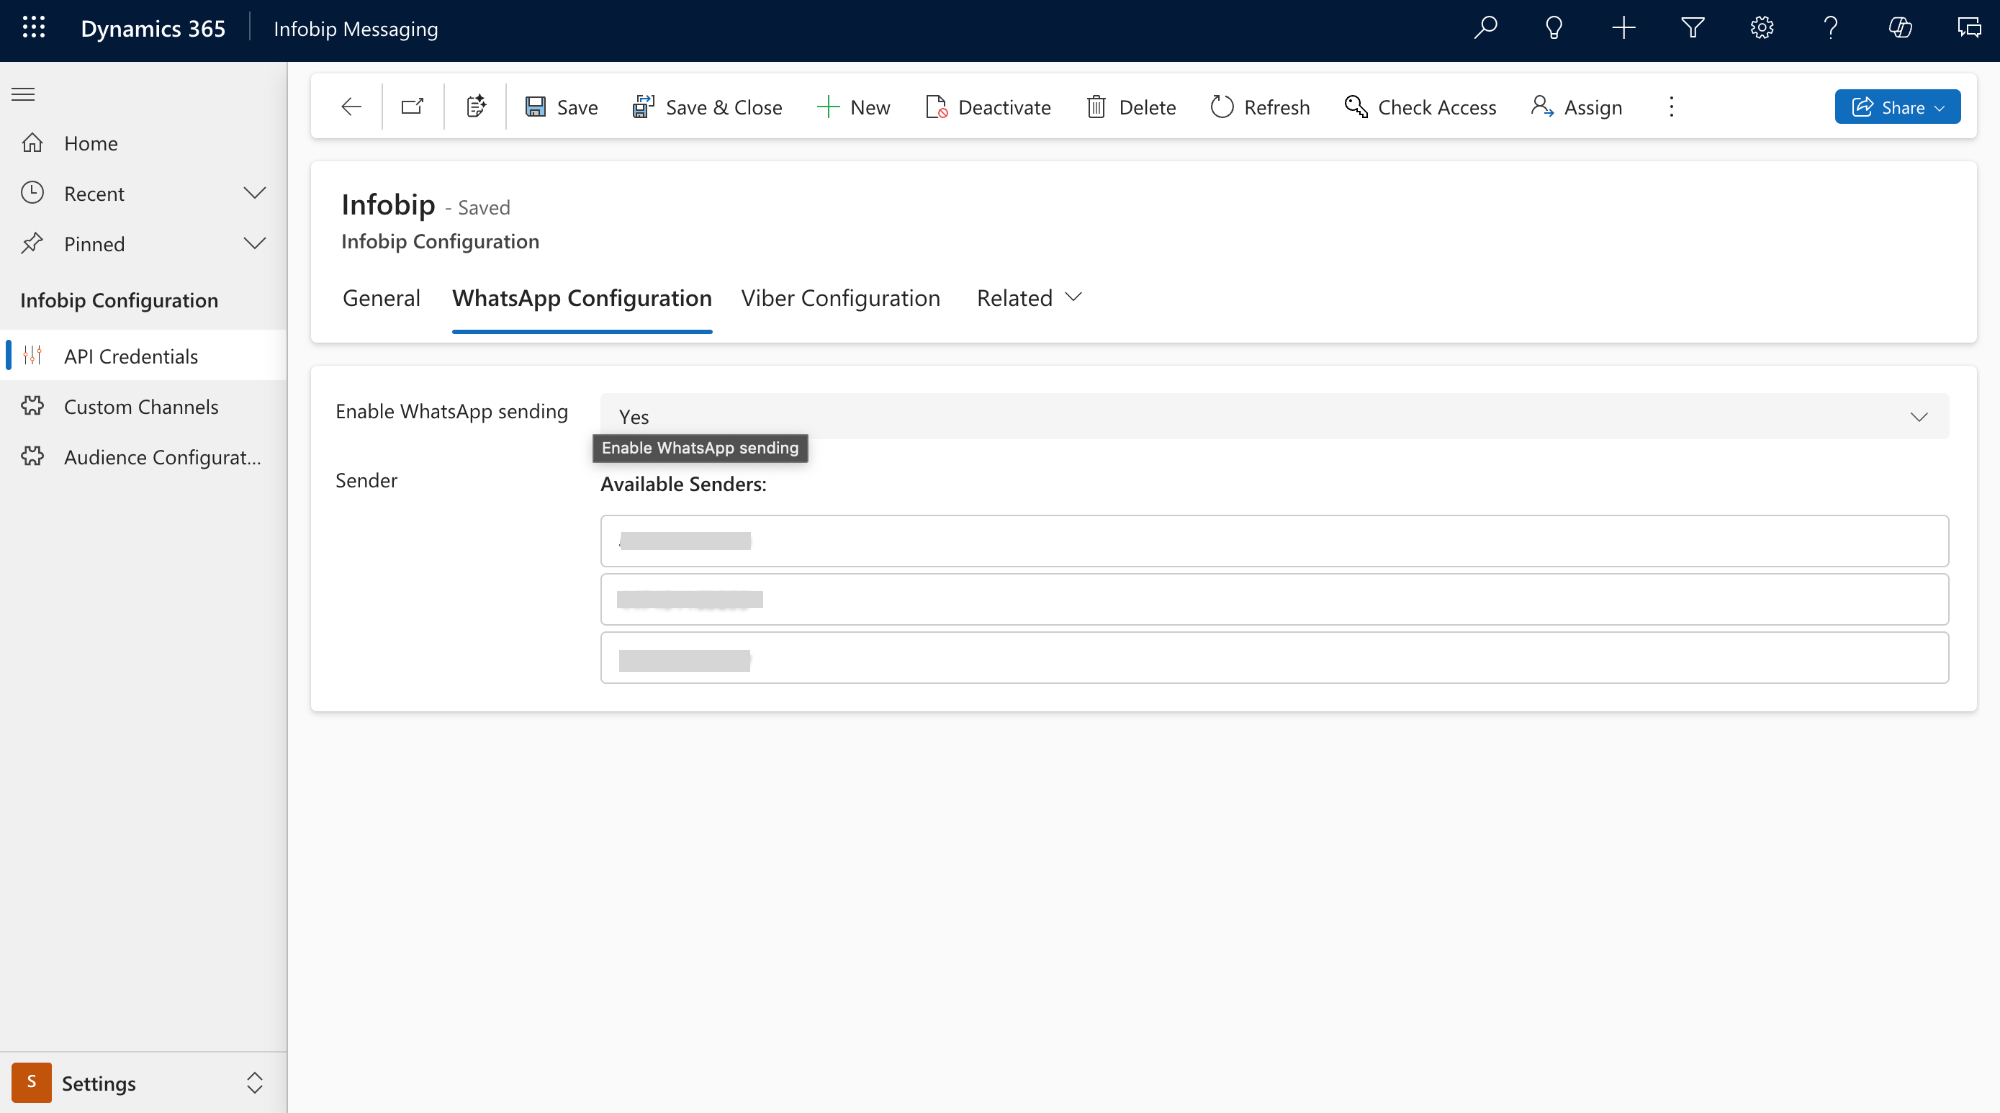
Step 4 - WhatsApp configuration [#step-4-whatsapp-configuration-configuration]
These steps describe how to configure the WhatsApp channel.
- Go to WhatsApp Configuration.
- Select Yes to enable the WhatsApp channel
- Click Save.
- On the Sender field, you see all the Available senders.
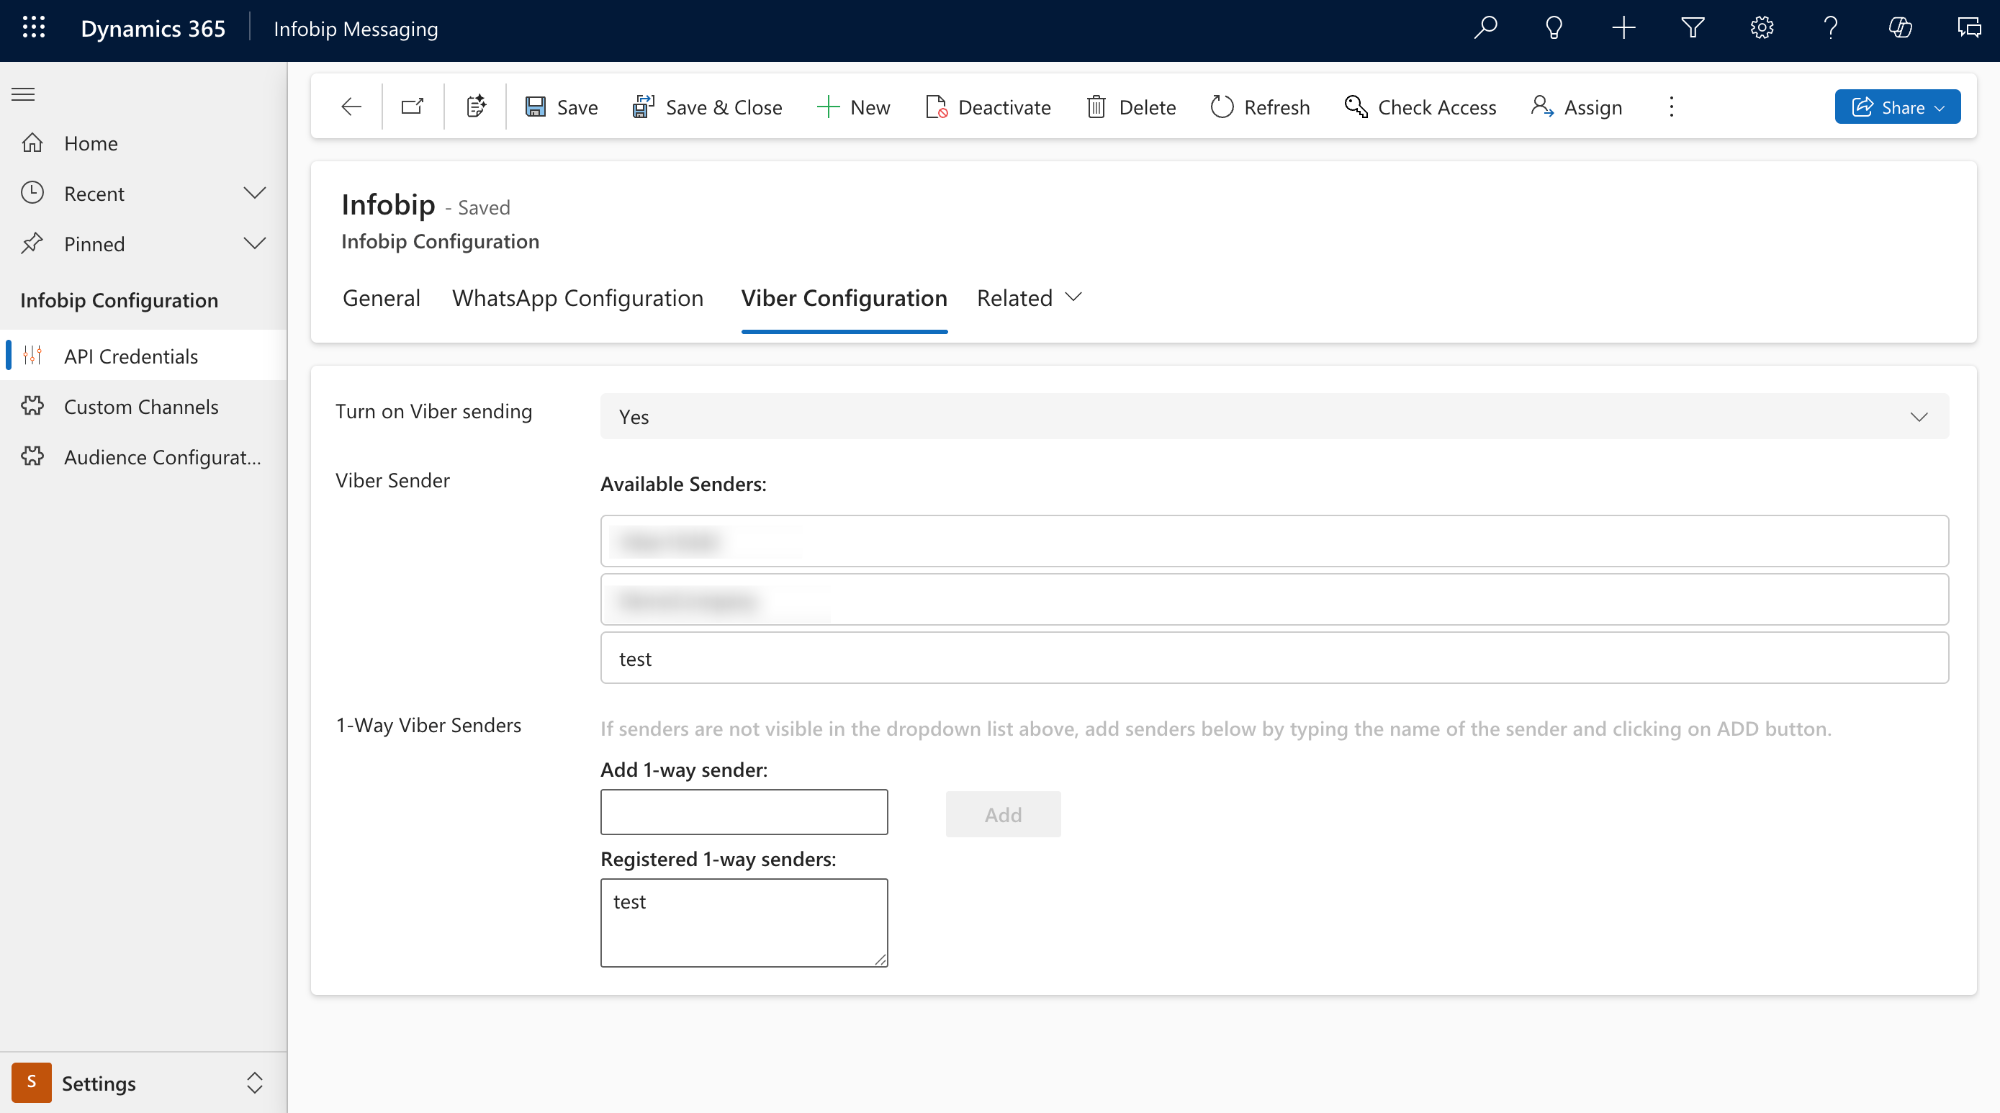
Step 5 - Viber configuration [#step-5-viber-configuration-configuration]
These steps describe how to configure the Viber channel.
- Go to Viber Configuration.
- Select Yes to enable Viber channel
- On the Sender field, you see all the Available senders.
- On the 1-Way Viber Senders field, you can type name and click Add.
- Click Save.
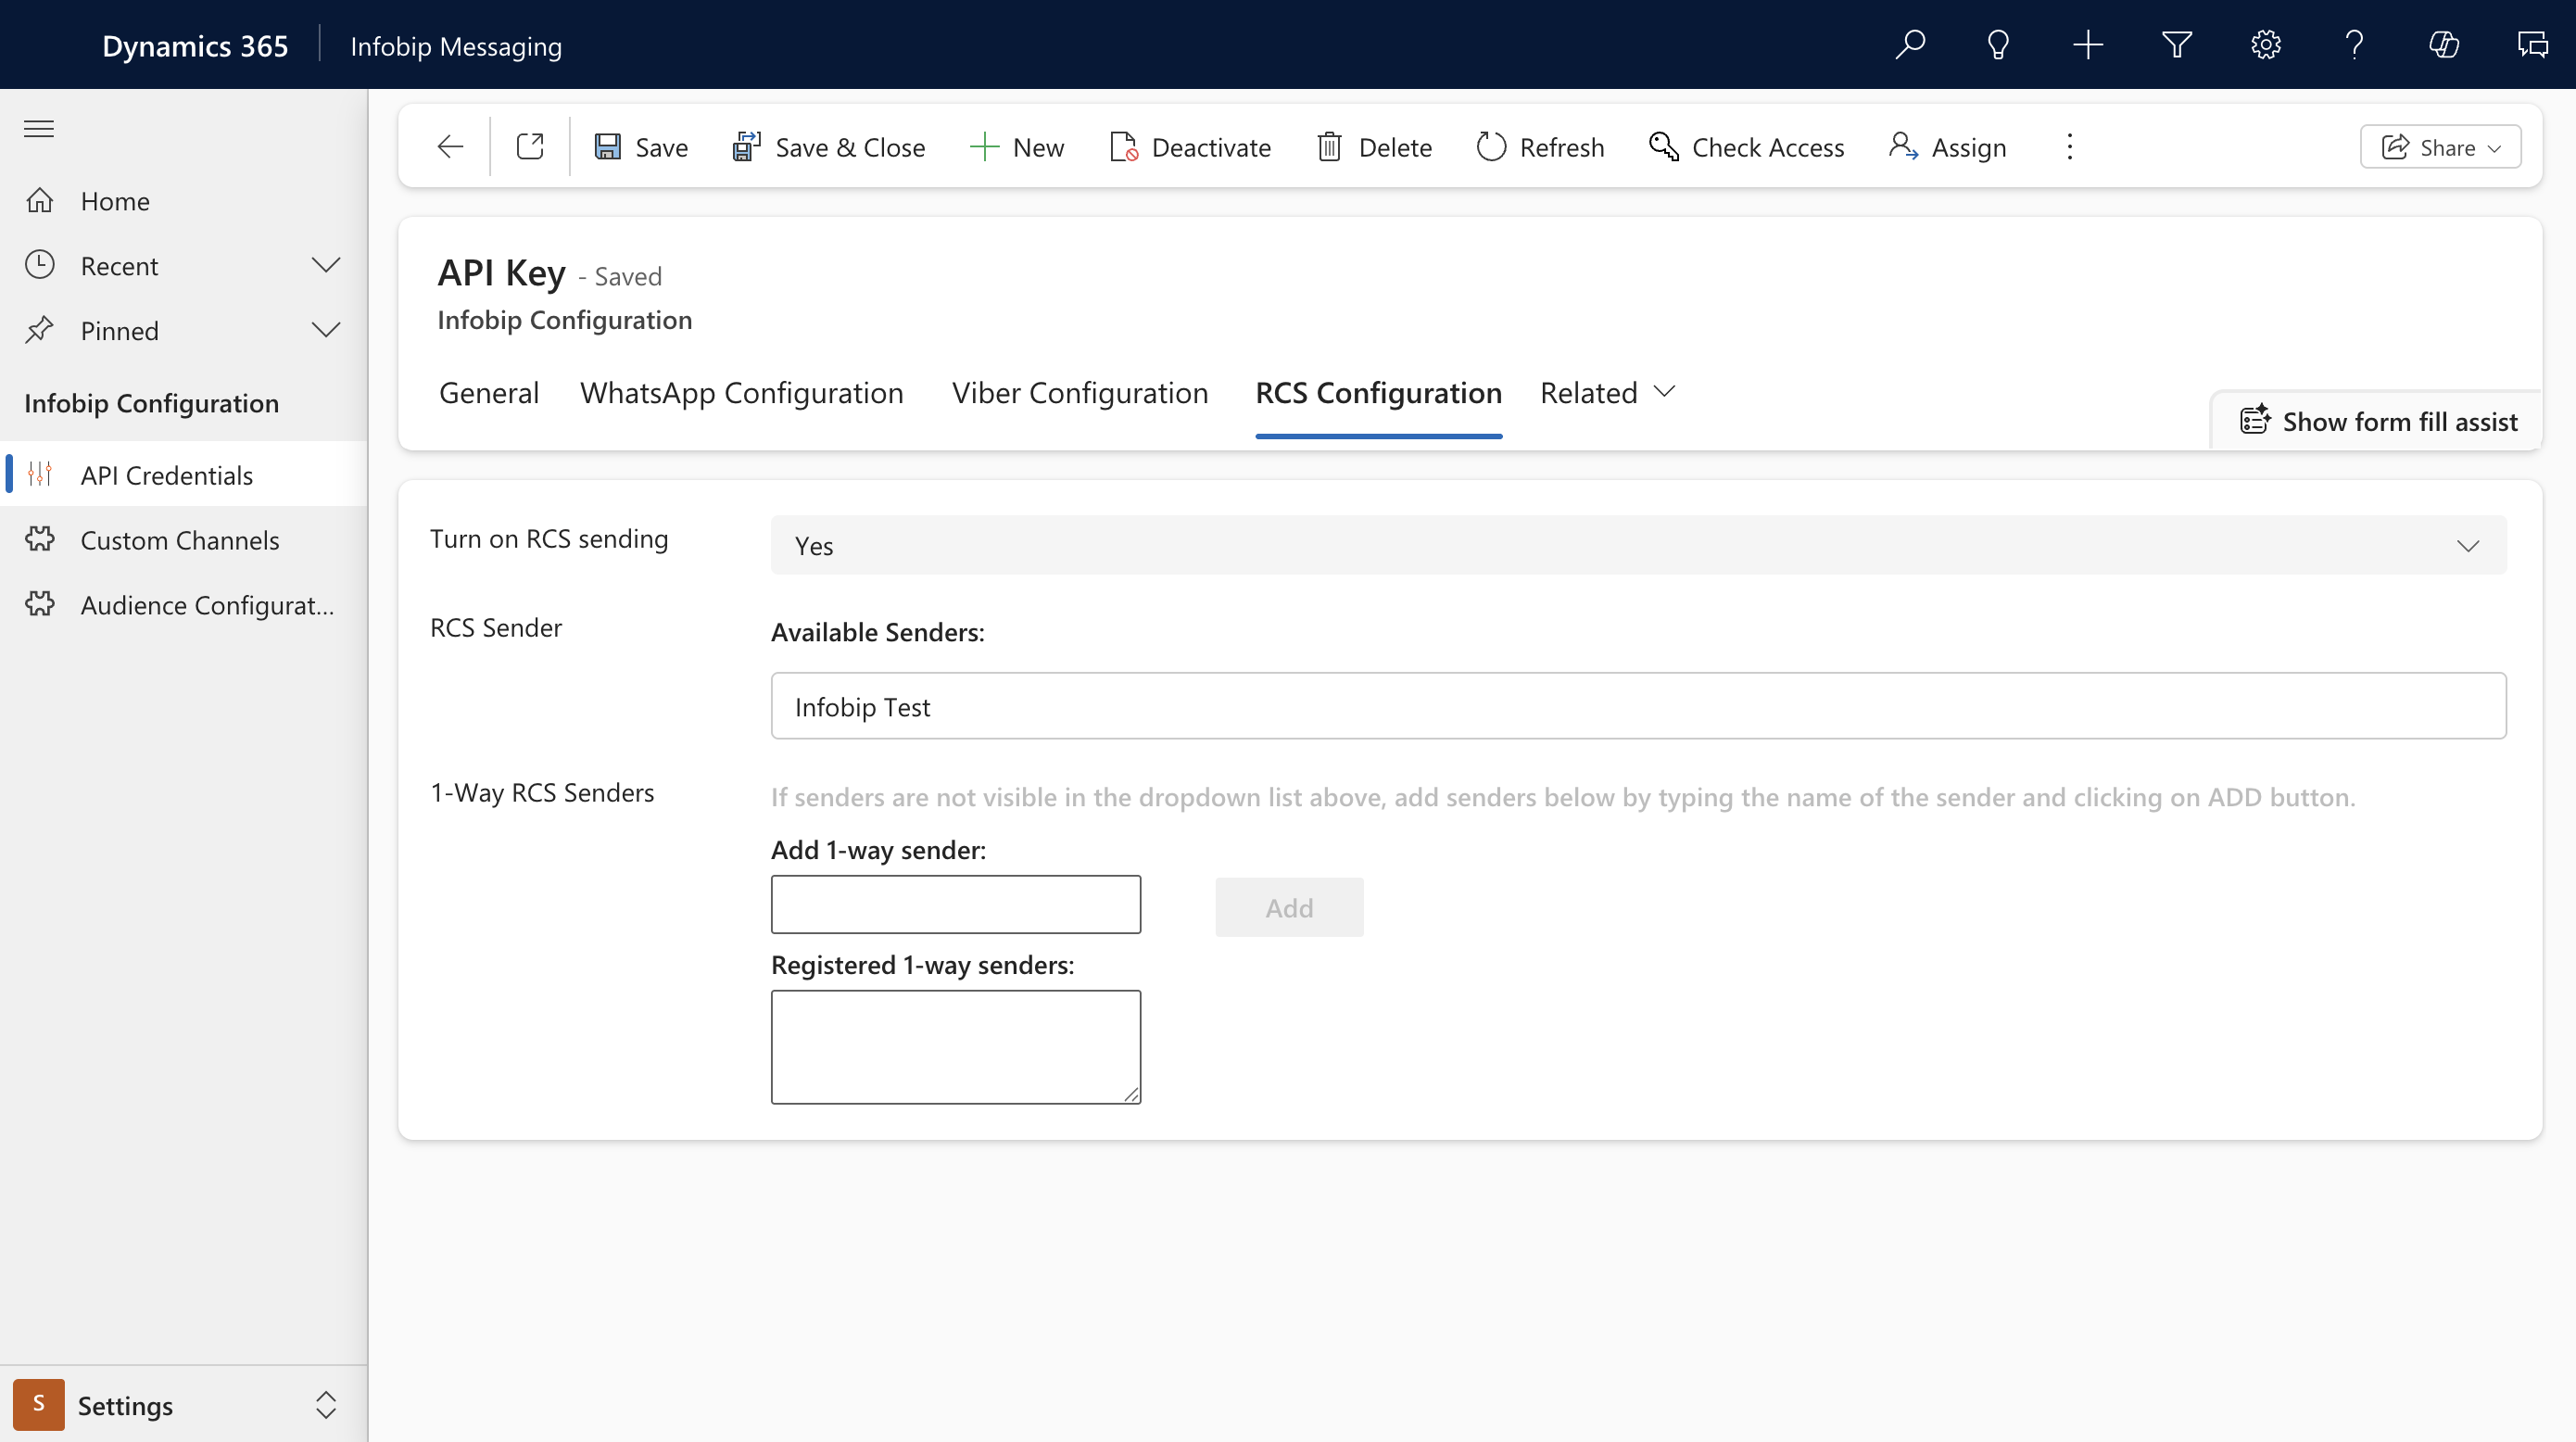
Step 6 - RCS configuration
These step describe how to configure the RCS channel.
- Go to RCS configuration.
- Select Yes to enable the RCS channel.
- On Sender field, you will see all the Available senders.
- On 1-Way RCS Senders field, you can type name and click Add.
- Click Save.
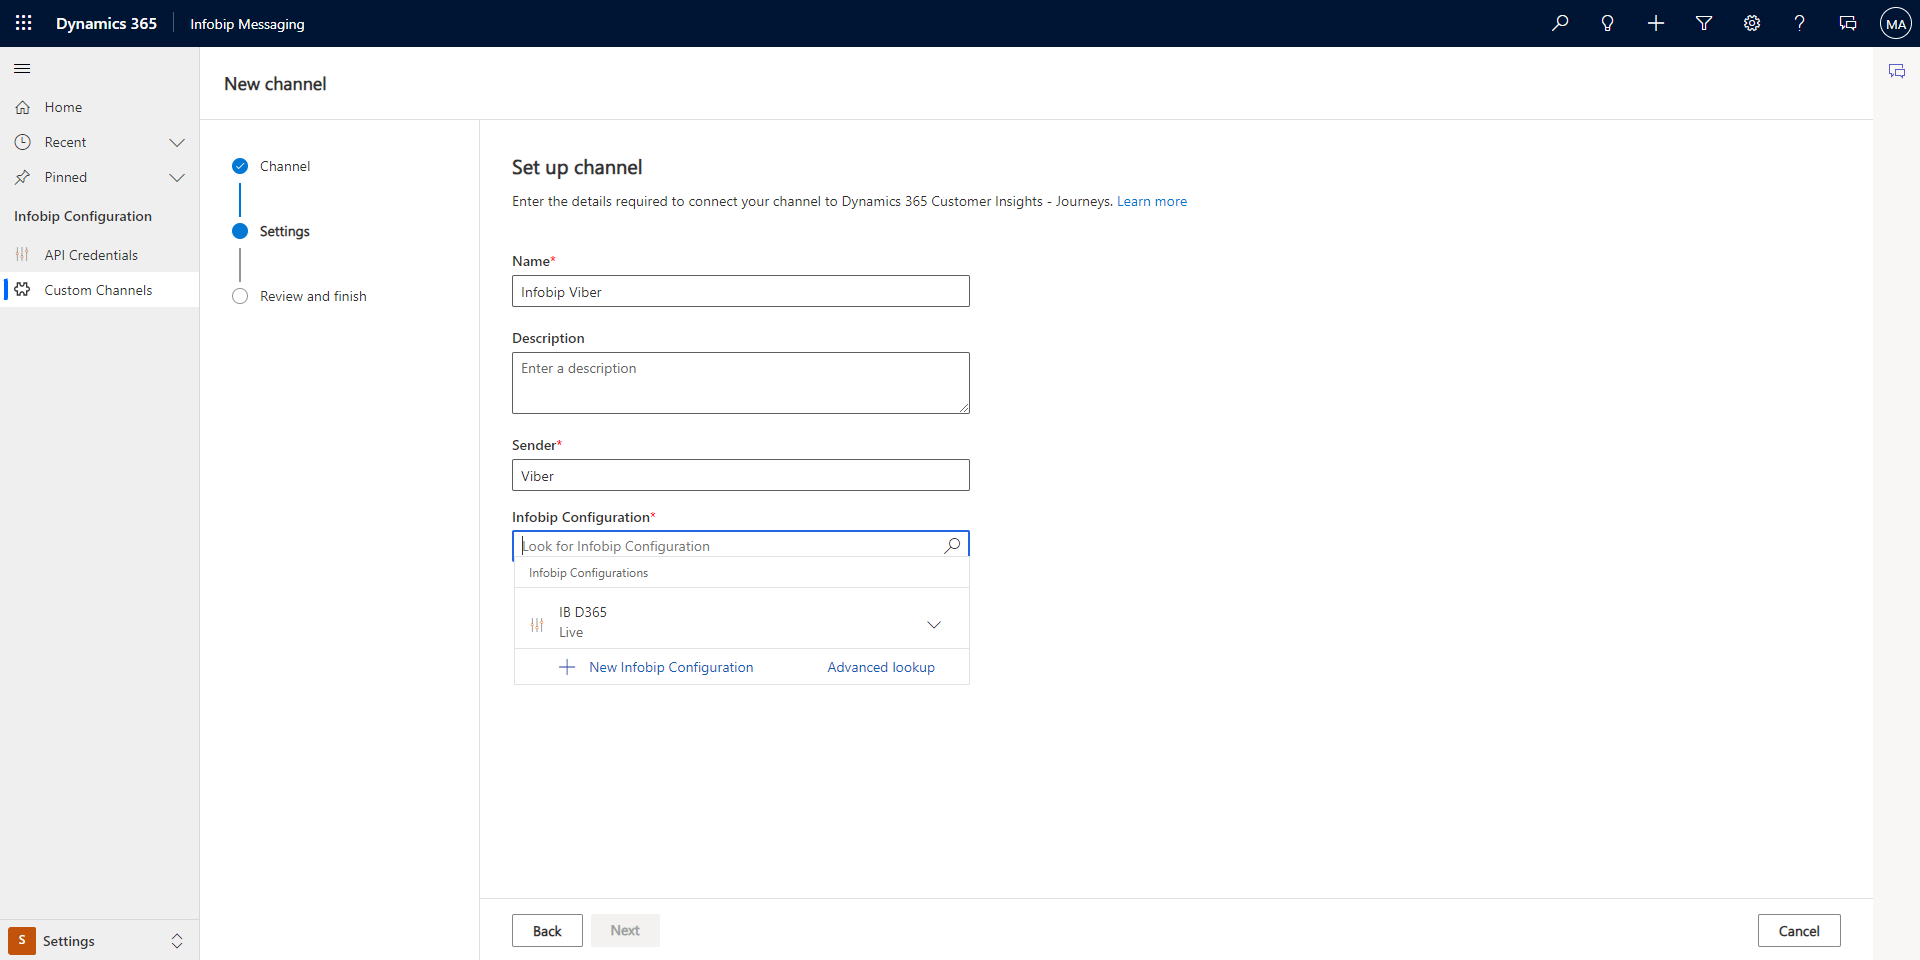
Step 7 - Custom channels configuration [#step-6-custom-channels-configuration-configuration]
You can configure additional channels. To configure a custom channel:
- Go to Custom Channels and click New custom channel.
- Select the channel that you want to add, and then click Next. This example describes Viber but you can repeat these steps for WhatsApp, if applicable.
- Add a name for the channel in Name. You can also add a description of the channel.
- Add a sender name in Sender. The sender name is displayed in Journey.
- Select the Configuration that you created in Step 2.
- Click Next and then click Done.
Configure delivery reports
Depending on your Infobip account settings, there are three possible ways to define how delivery reports are sent to your Dynamics instance, depending on the options you enable.
- No options enabled in your Infobip configuration on Dynamics: the application continues using the default behavior of delivery notifications.
- Enable Use subscriptions: you must manually create a subscription in your Infobip web interface.
- Enable Use application ID: you must create both an application and a subscription.
Create an application ID
When you enable Use application ID, you must create an application:
- In the Infobip web interface, go to Developer tools > Applications and entities.
- On the Applications tab, create a new application.
- For Application ID, enter exactly
d365-marketing. - For Application name, enter a descriptive value for easier identification.
Create a subscription
When you enable Use subscriptions or Use application ID, you must create a subscription:
- In the Infobip web interface, go to Developer tools > Subscription management.
- Create a new subscription.
- Enter a name for the subscription (any value), select the channel you plan to use, and then select Next.
- Select the following events: Click, Delivery, Seen, and then select Next.
- If you have enabled Application ID, select it under applications. Otherwise, select Next on Set filters.
- On Notification profile, create a new Notification profile.
- Enter a descriptive name for the profile.
- Paste the Notify URL value from your Dynamics 365 configuration.
- Save the subscription.
- Send a request to your Infobip account manager or Customer Support to set the following additional attributes to the new subscriptions:
| Additional attributes | Attribute settings |
|---|---|
| Pre-auth script | - Script name: preauth-msdynamics3.groovy- Auth token discriminator regex: ResourceId":"([^"]+).+TenantId":"([^"]+) |
| Special report formats for all created subscriptions | - Delivery: delivery.ms365.stringified.v1.json- Seen: seen.ms365.stringified.v1.json |
Use the app
When you have installed and configured the app, you can use it to work with contact and leads, segments, add consent to phone numbers, and templates.
Contacts/Leads [#contactsleads-using-the-app]
Create Contacts and/or Leads with phone numbers set in the fields configured in Step 4 and Step 5. You need to set all fields that will be used as Placeholders.
Segments [#segments-using-the-app]
Infobip Messaging supports Contact and Lead types of segments.
Create Segments by adding members. Save the segment and click Ready to use on the segment.
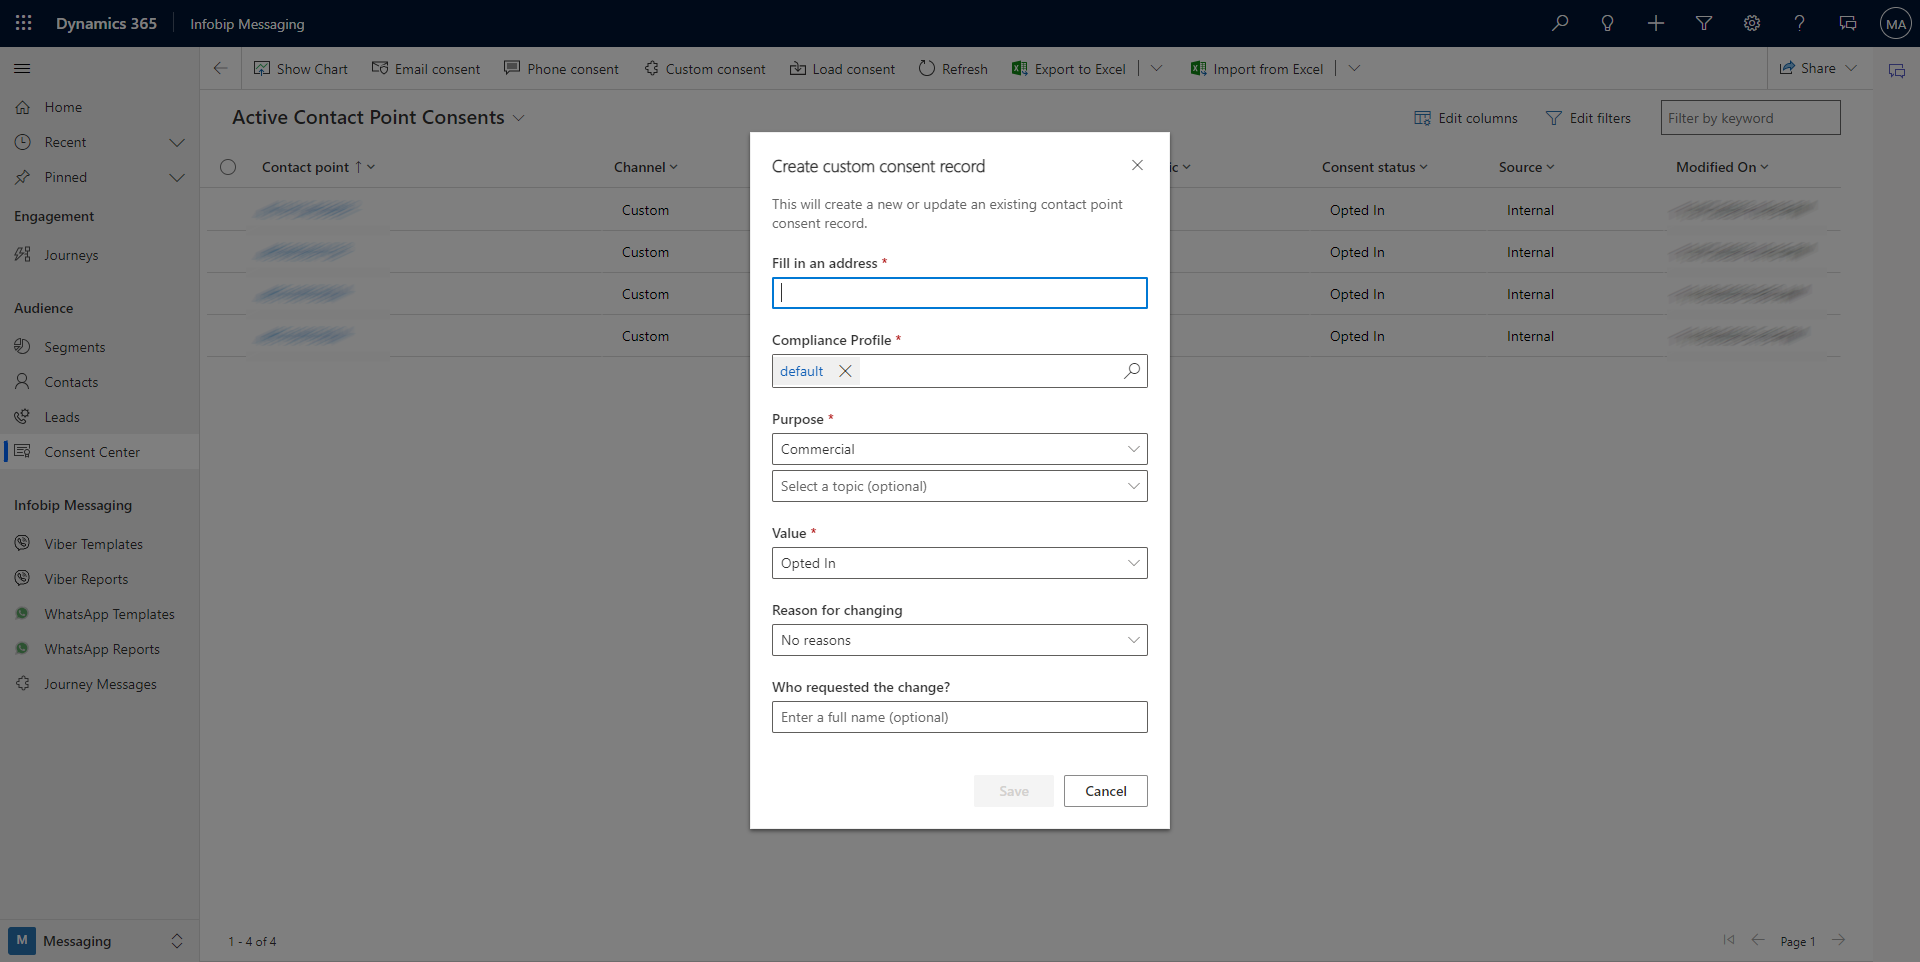
Add consent to phone numbers [#add-consent-to-phone-numbers-using-the-app]
Add all phone numbers you want to send message to the Active Contact Point Consent.
- Click Consent Center.
- Click Custom consent.
- Add the phone number.
- Select Compliance Profile.
- Select Purpose(this is the same purpose for Journey Message).
- Click Save.
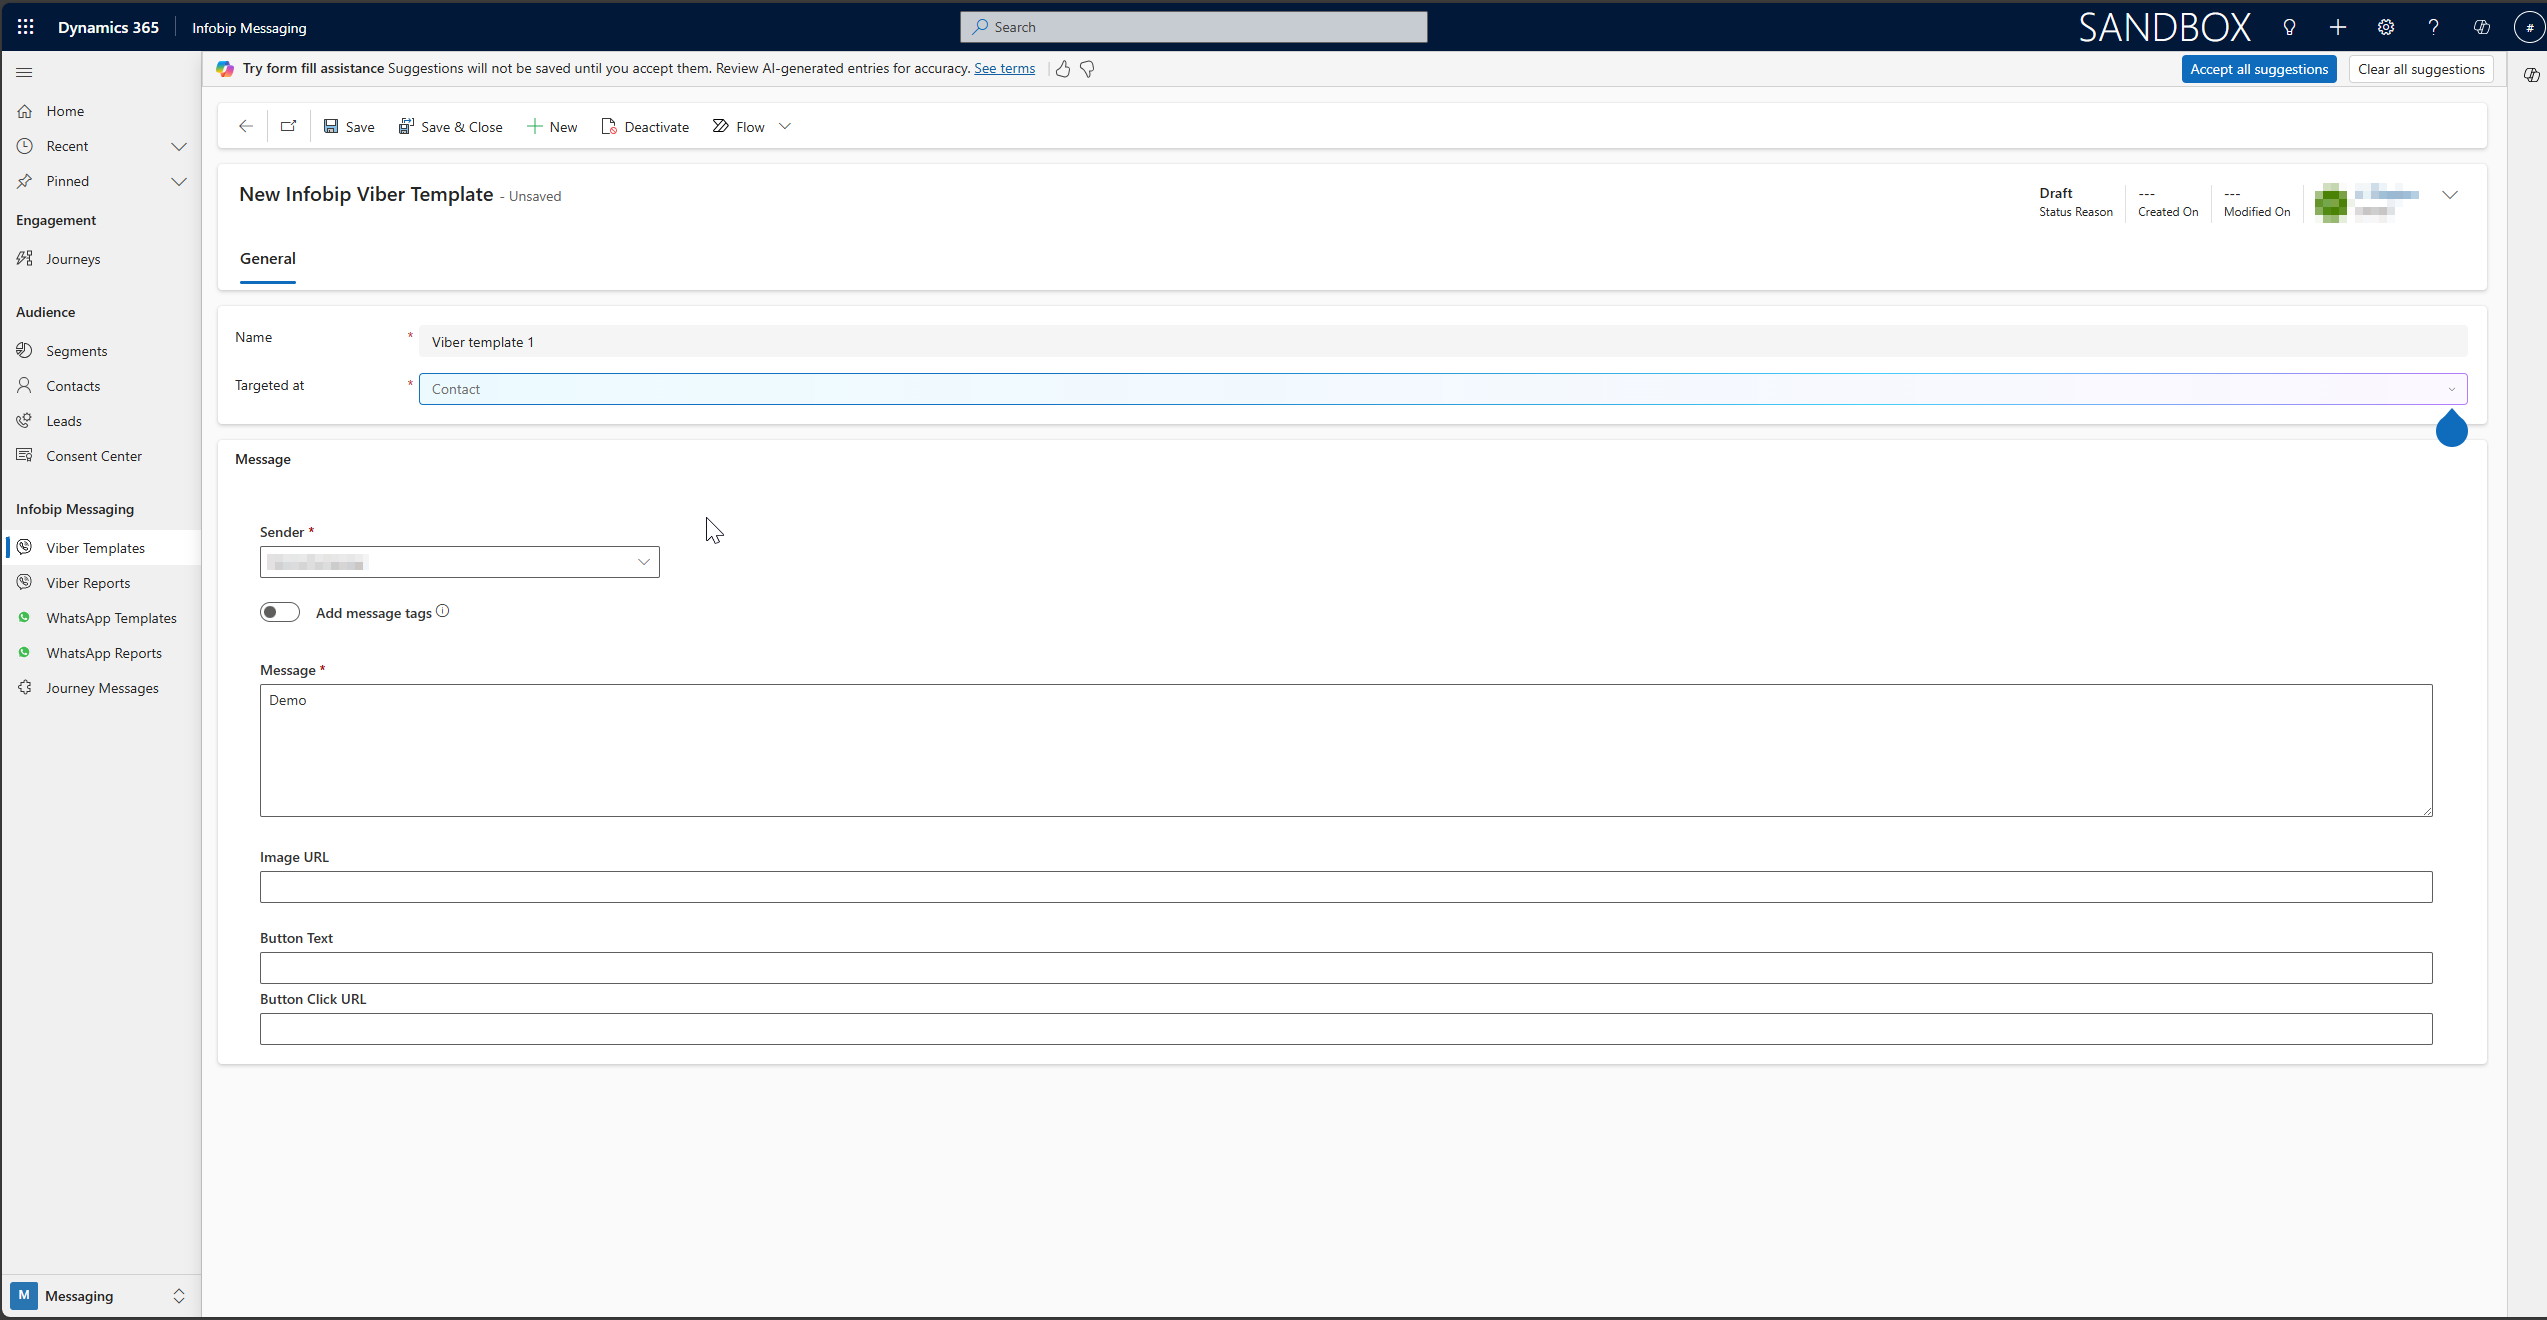
Create templates [#create-templates-using-the-app]
Create a Viber template
To create Viber template, use the following steps:
- Click Viber Templates.
- Click New.
- Add a name for the template in Name.
- Select if Placeholders should be taken from the Contact table or Lead table
- Select a Sender from the drop down list.
- Select Add message tags to add Placeholders to the message.
- Compose the message content in Message.
- Click Save.
- Then, click the Go Live button.
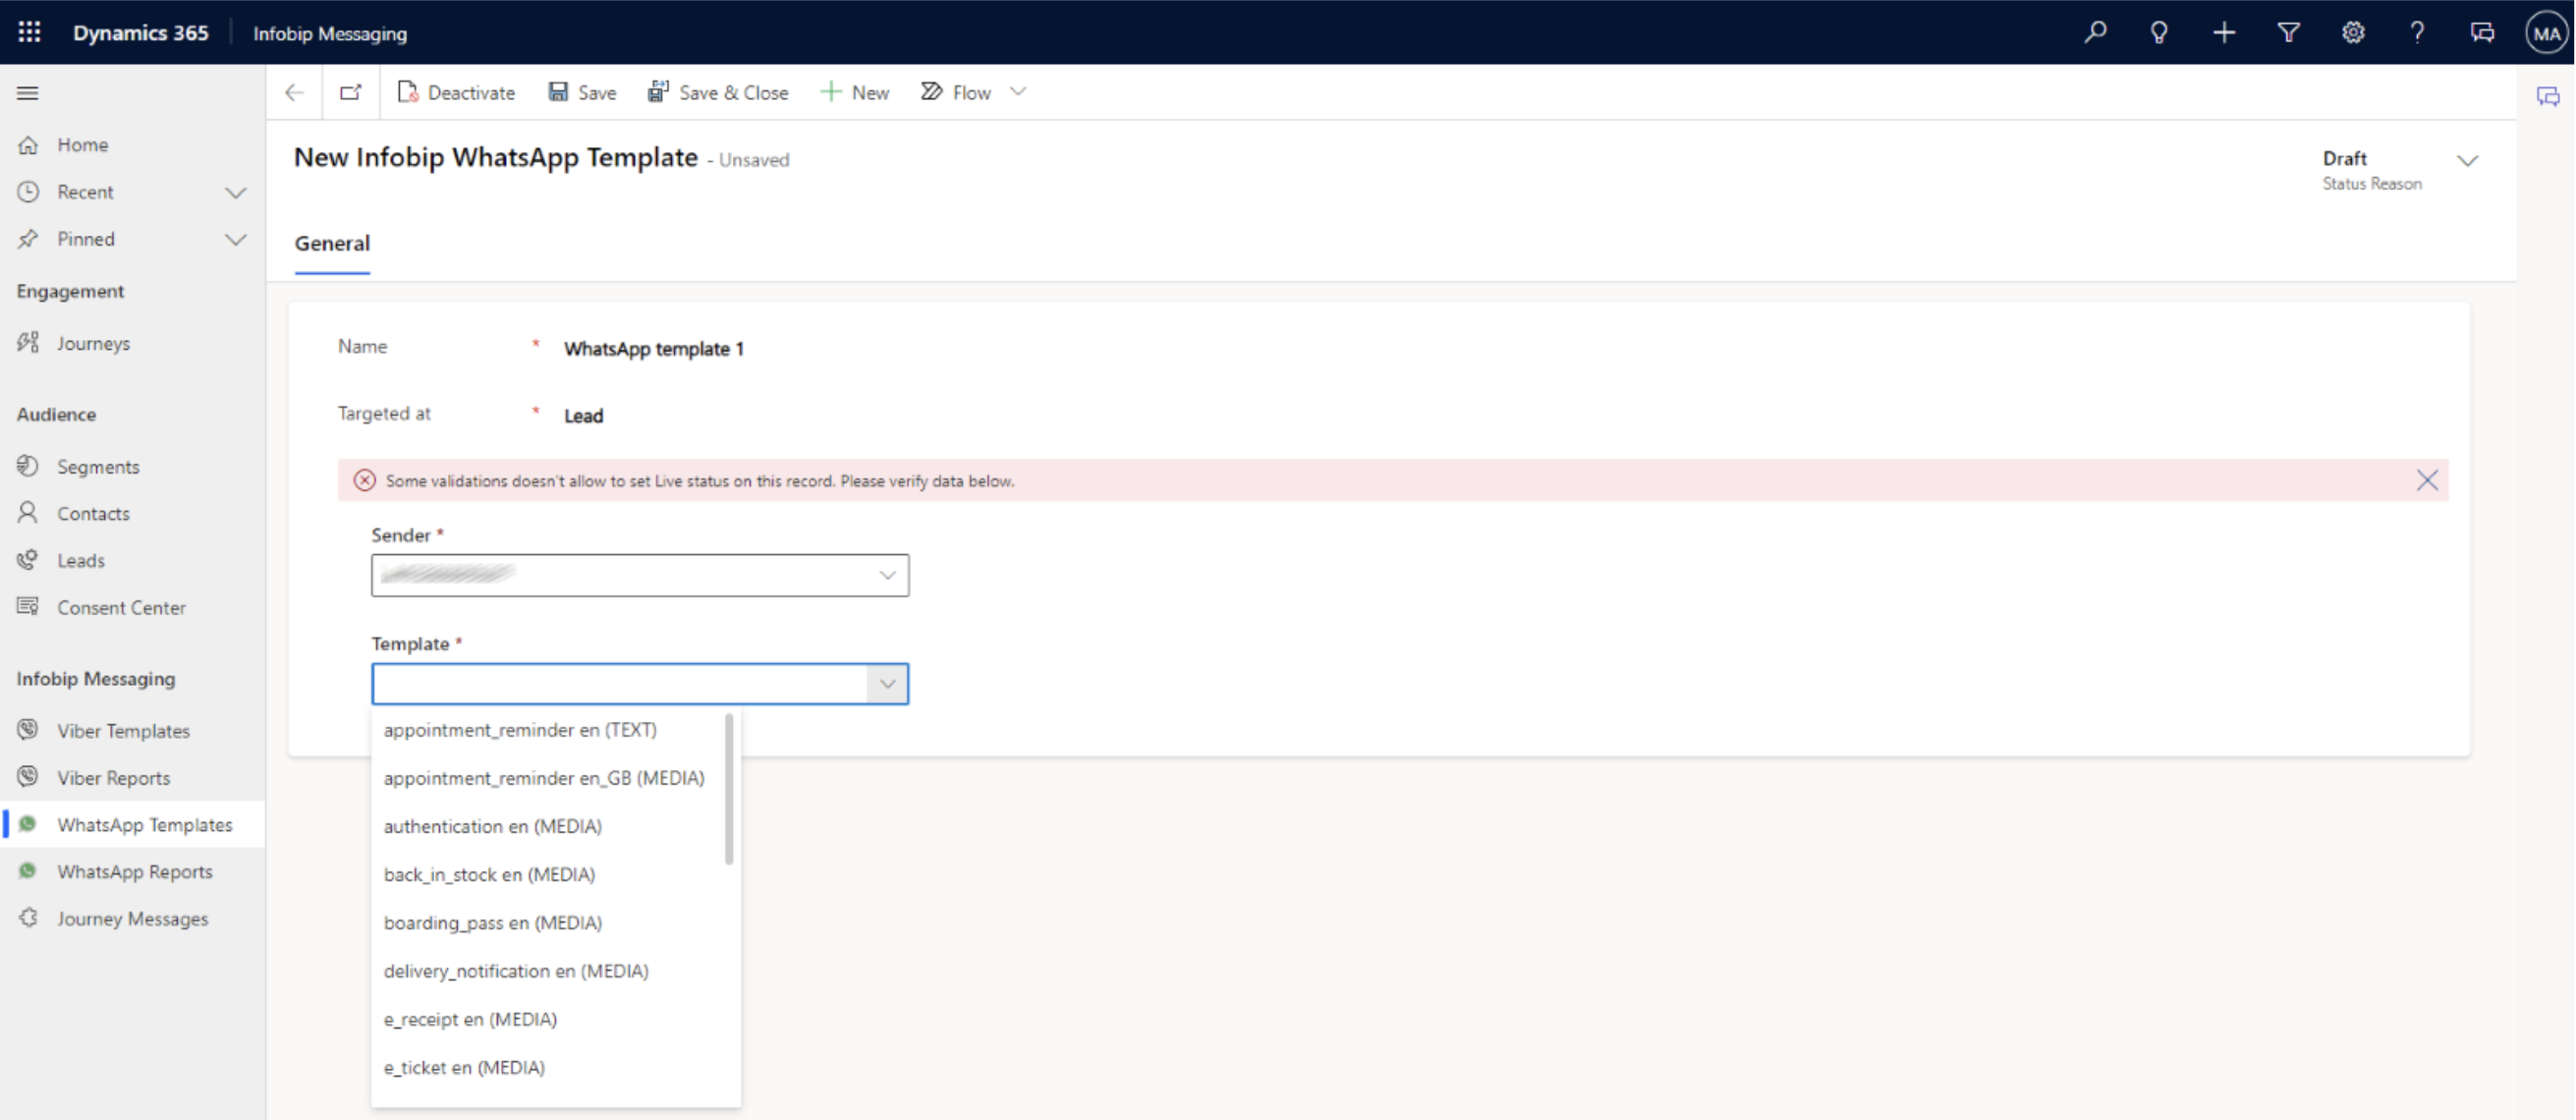
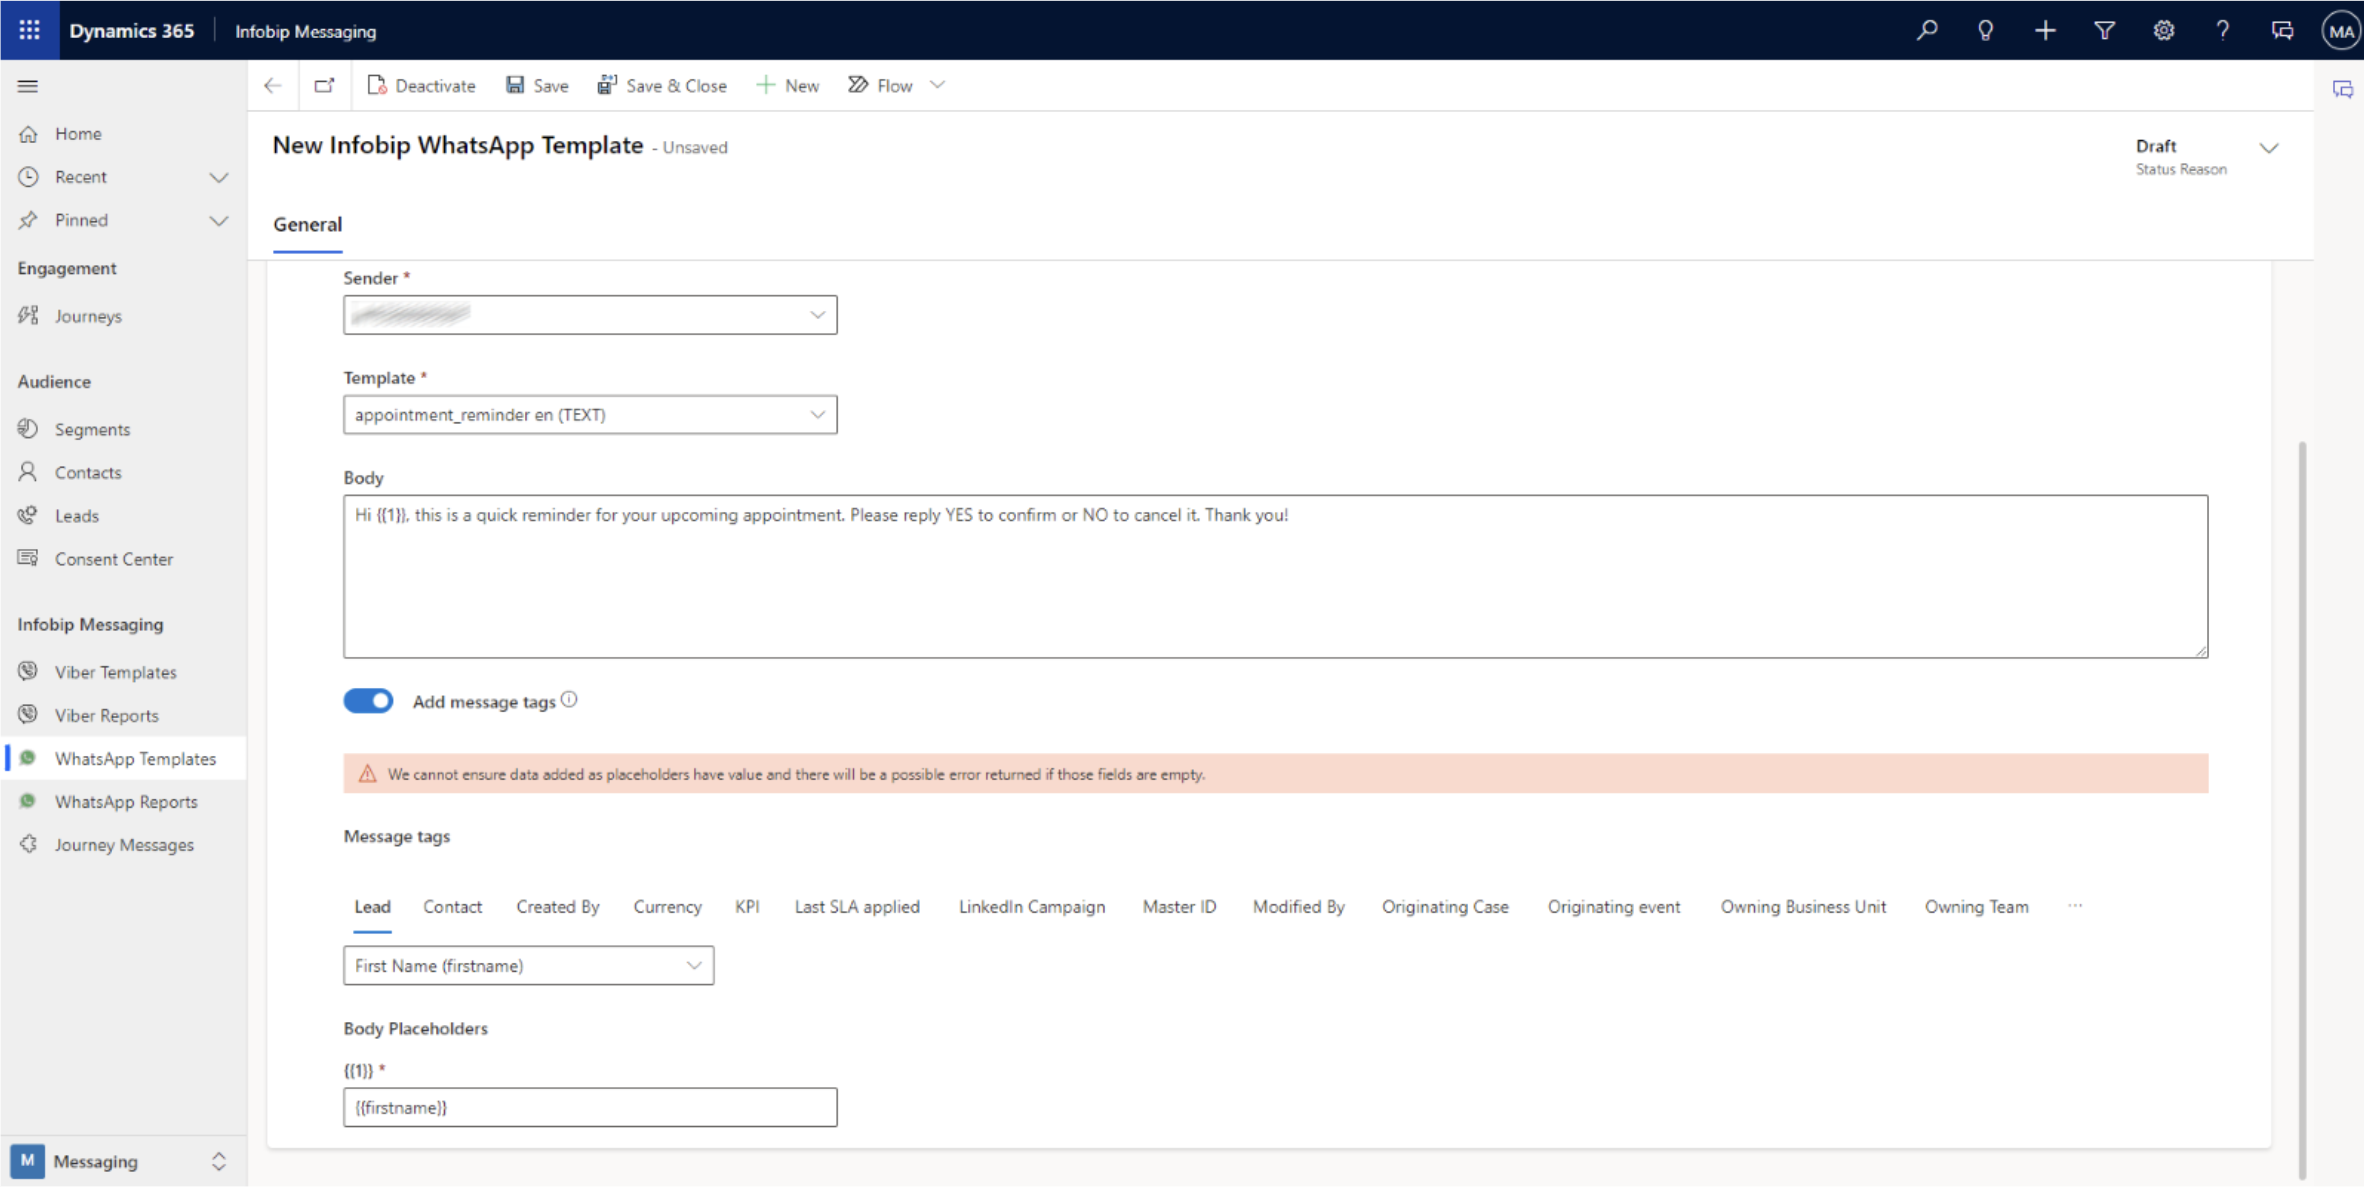
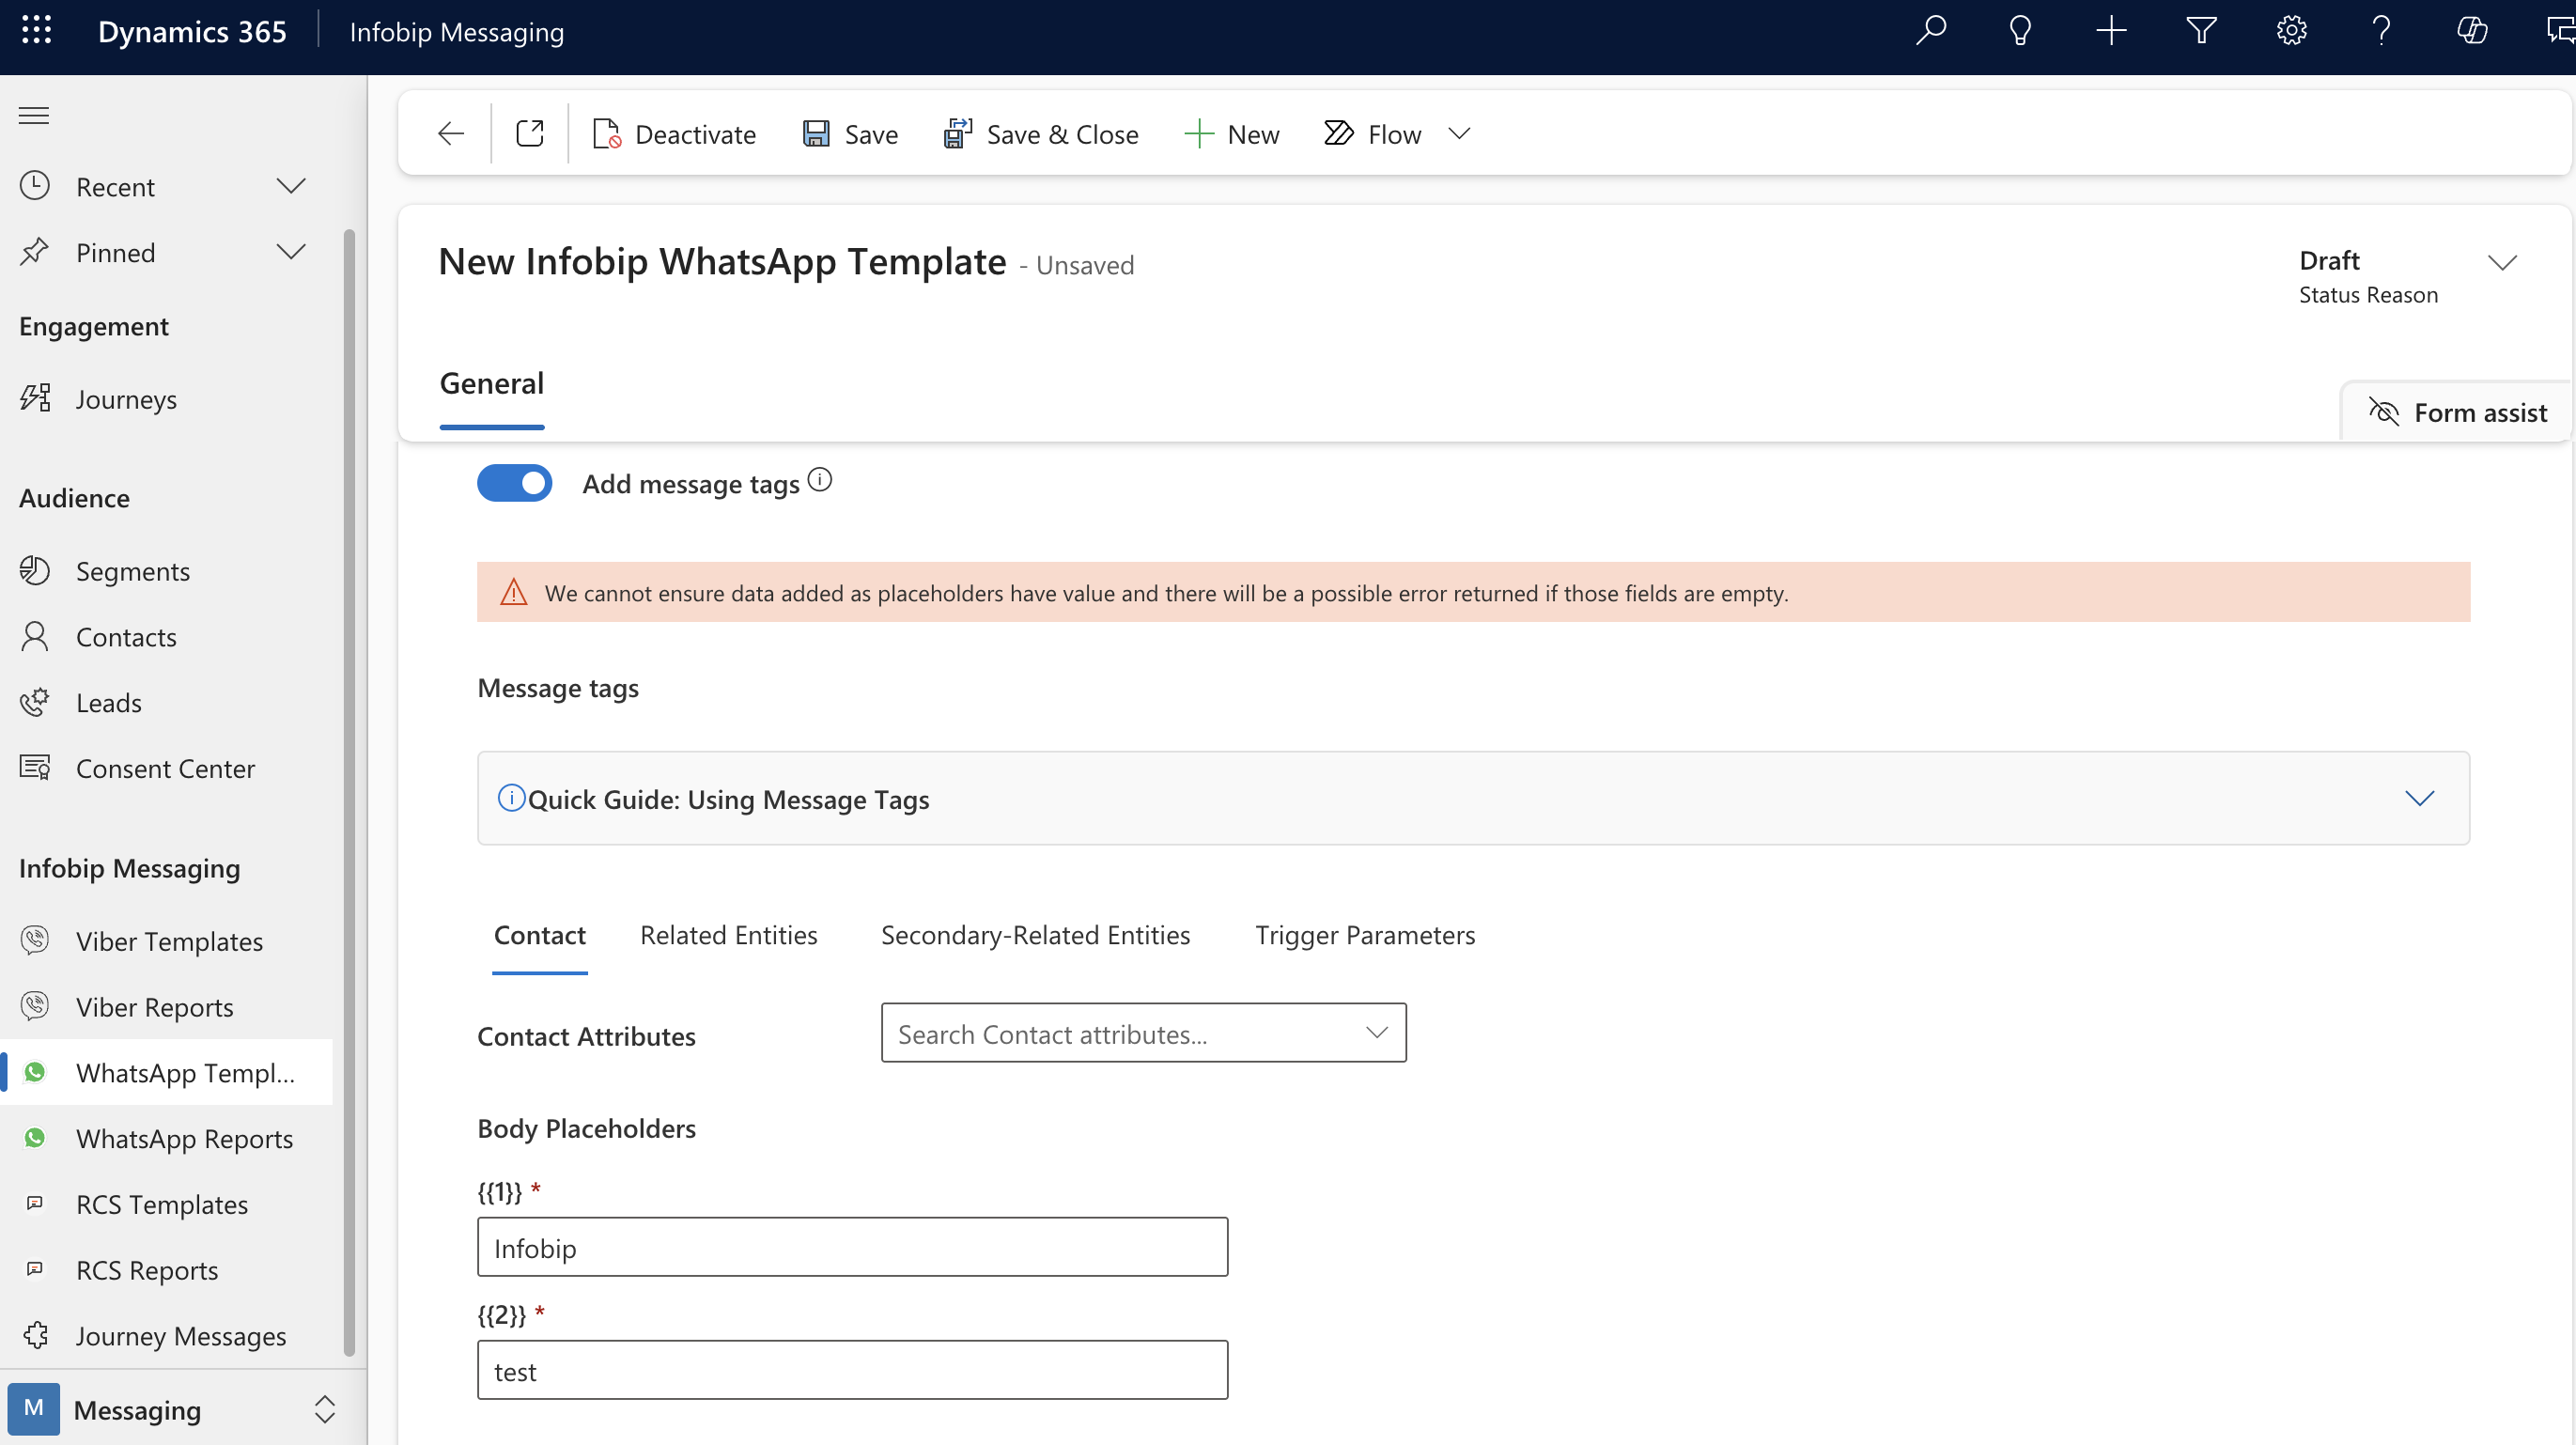
Create a WhatsApp template
To create WhatsApp template, use the following steps:
-
Click WhatsApp Templates.
-
Click New.
-
Add a name for the template in Name.
-
Select if Placeholders should be taken from the Contact table or Lead table.
-
Select a Sender from the drop down list.
-
Select a template from list of templates assigned to selected Sender.
-
Select Add message tags to add Placeholders to the message.
-
In the Body Placeholders field, select which field from Dataverse to input to particular Placeholder.
-
Click Save.
-
Then, click the Go Live button.
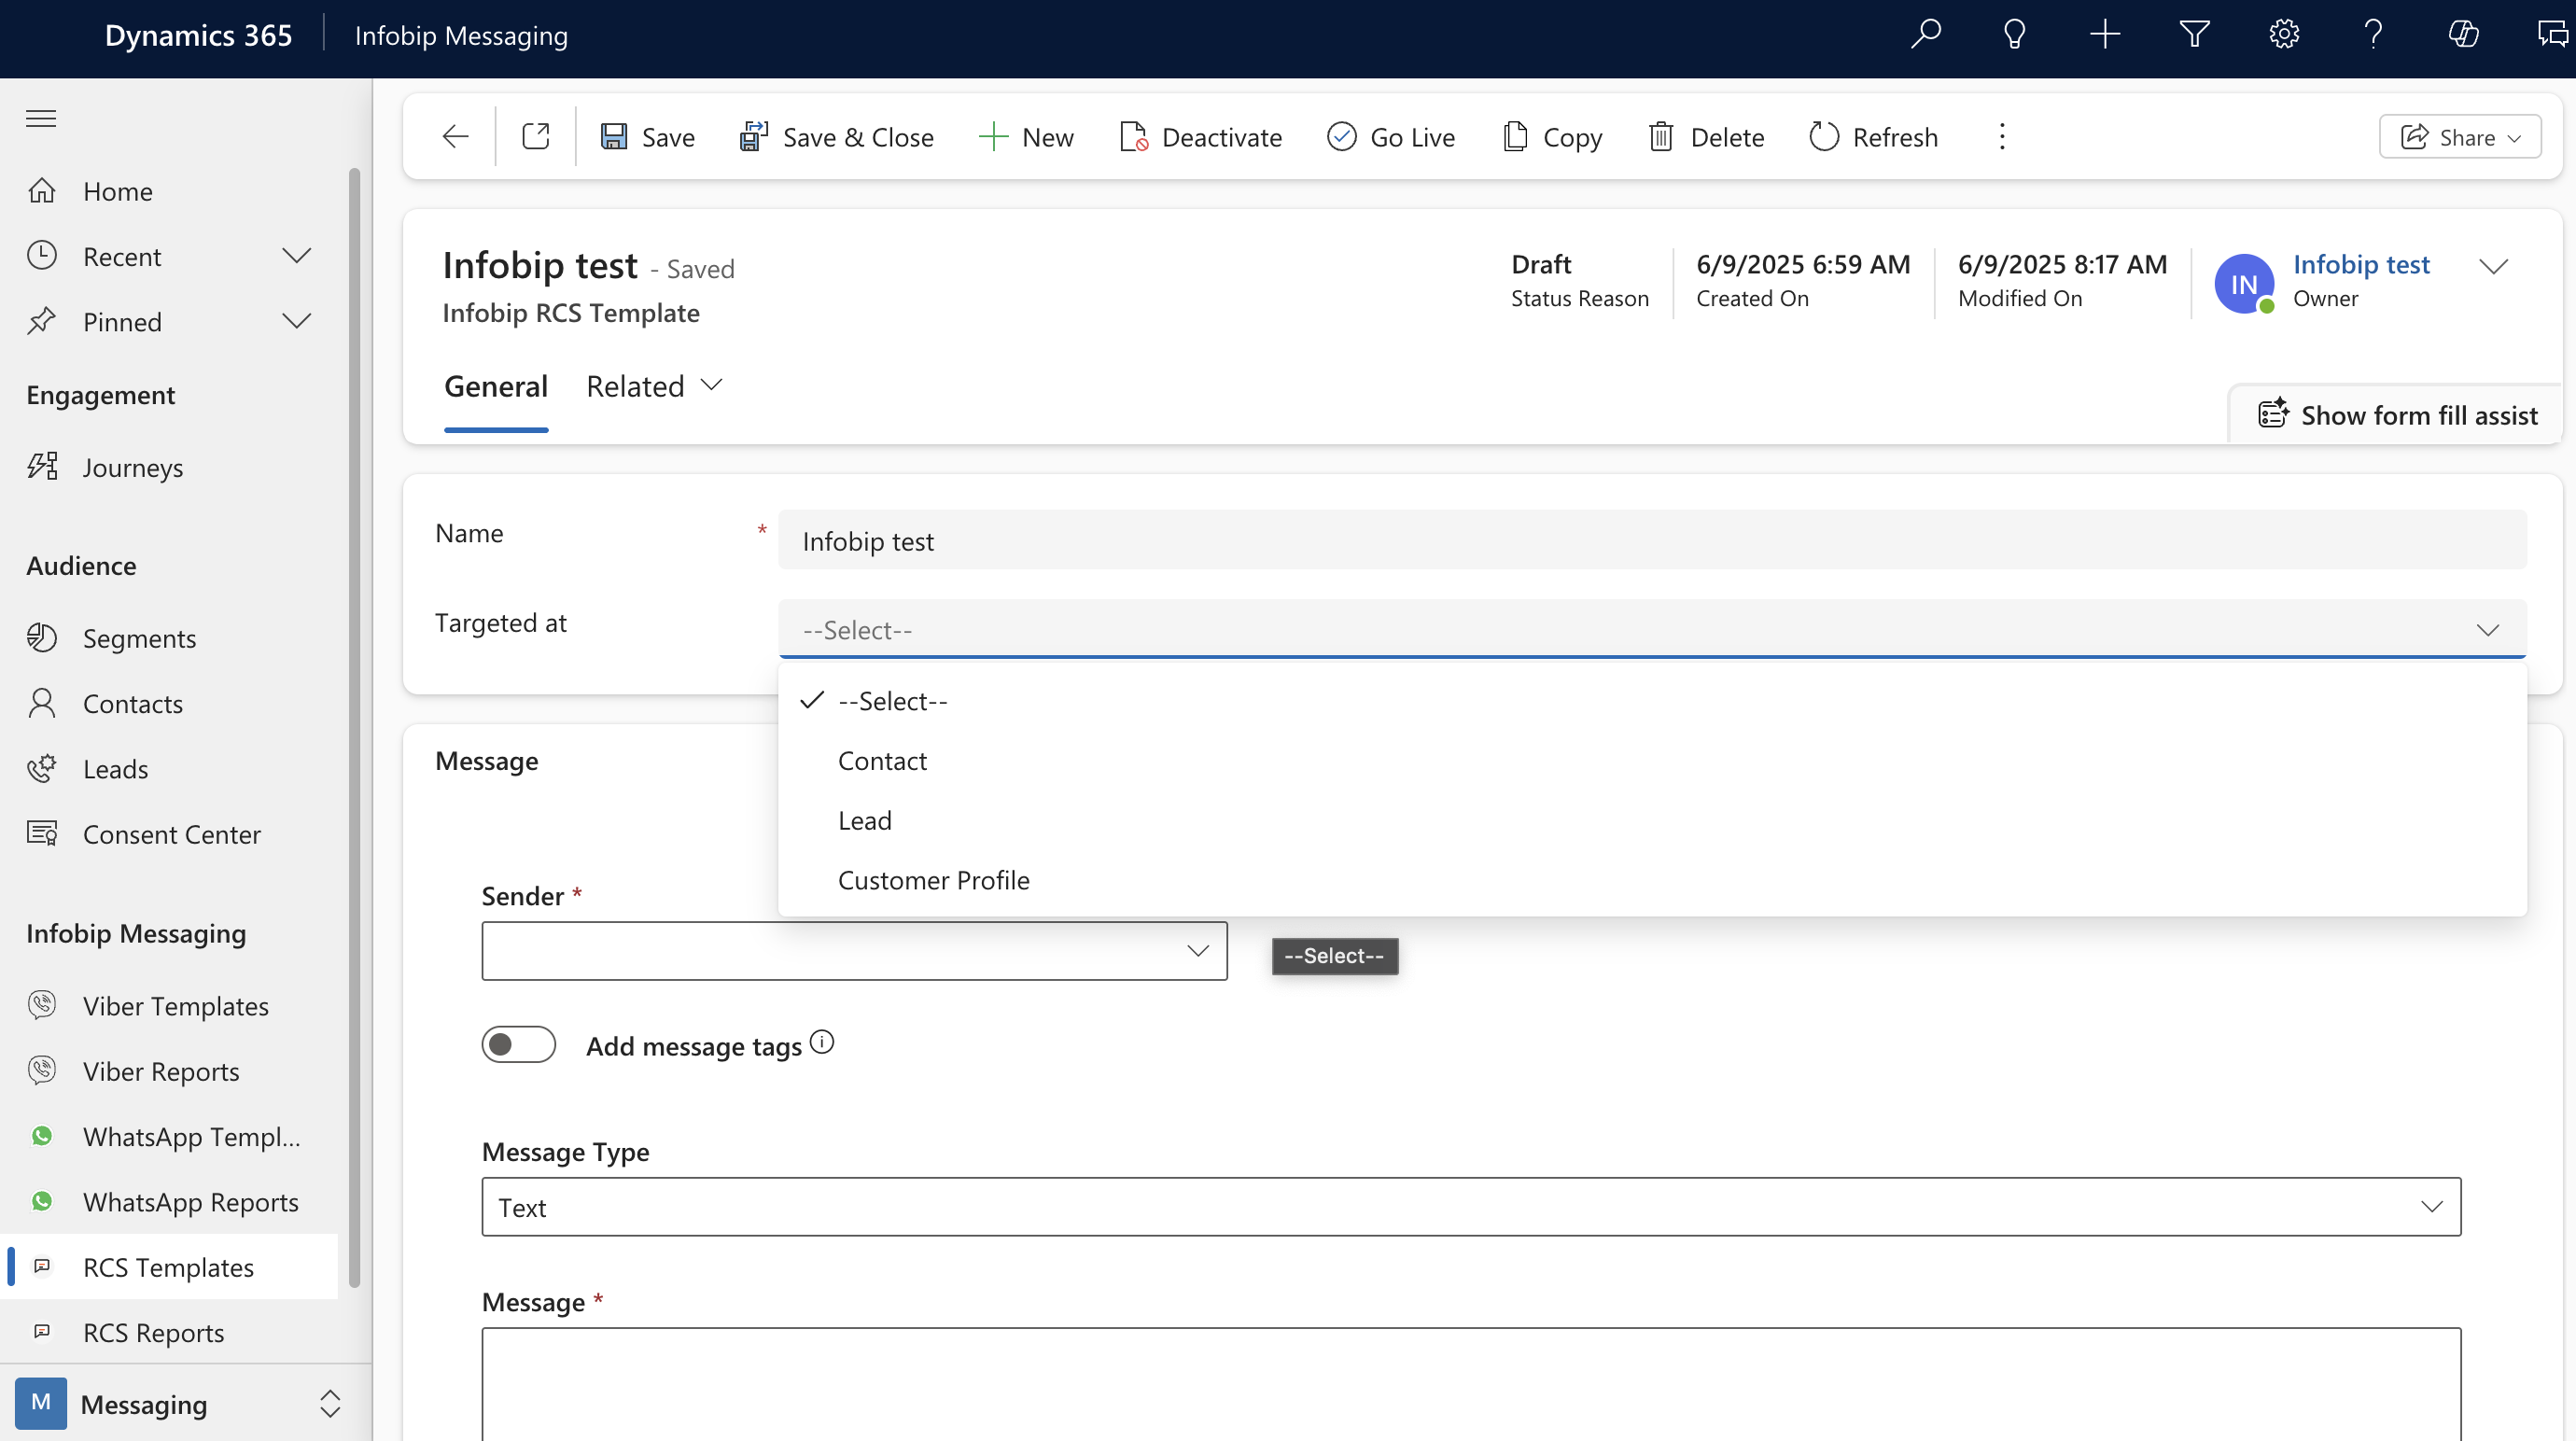
Create an RCS template
To create RCS template, use the following steps:
-
Click RCS templates in the left menu.
-
After click, you see list of all templates, click New.
-
On the General tab, fill in the Name for template and choose the audience you want to target.
-
Select a Sender from the drop down list.
-
Toggle Add message tags to add Placeholders to the message.
-
Compose the message content in Message.
- You can choose a Message type of either Text, File, Rich Card, or Carousel
- Under each type you can add a suggested action (on Rich Card and Carousel they can also be added as buttons)
-
Click Save.
-
Click Go Live.
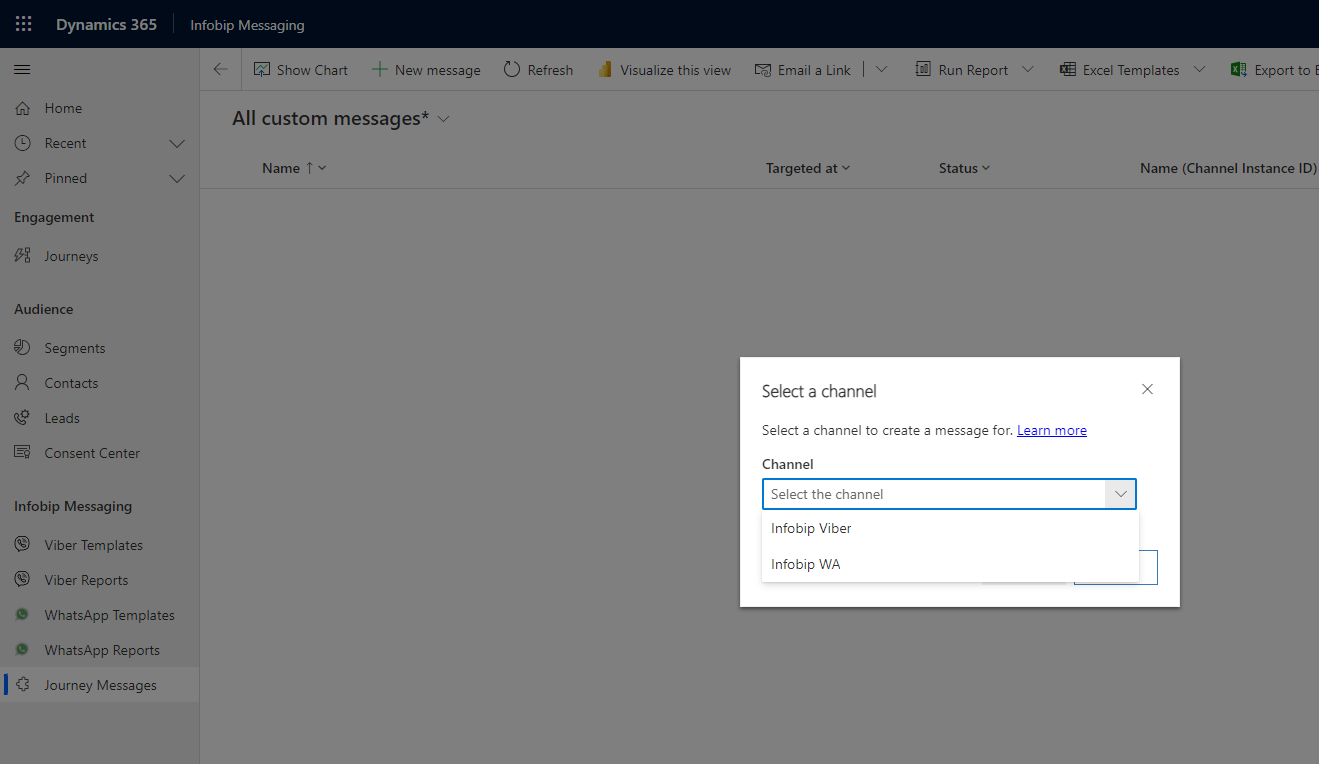
Create a Journey Message [#create-a-journey-message-using-the-app]
To create a Journey Message, you need to embed the created templates:
-
Click Journey Messages, and then New message.
-
Select the channel for the message from drop down list.
-
Add a name in Name.
-
Select a Template from the drop down list.
-
Select Purpose. Make sure that you have added target phone numbers to the Purpose group in the Consent Center.
-
Click Save.
-
Click Test send to test a message. You input the phone number in the next step.
-
Click Ready to send.
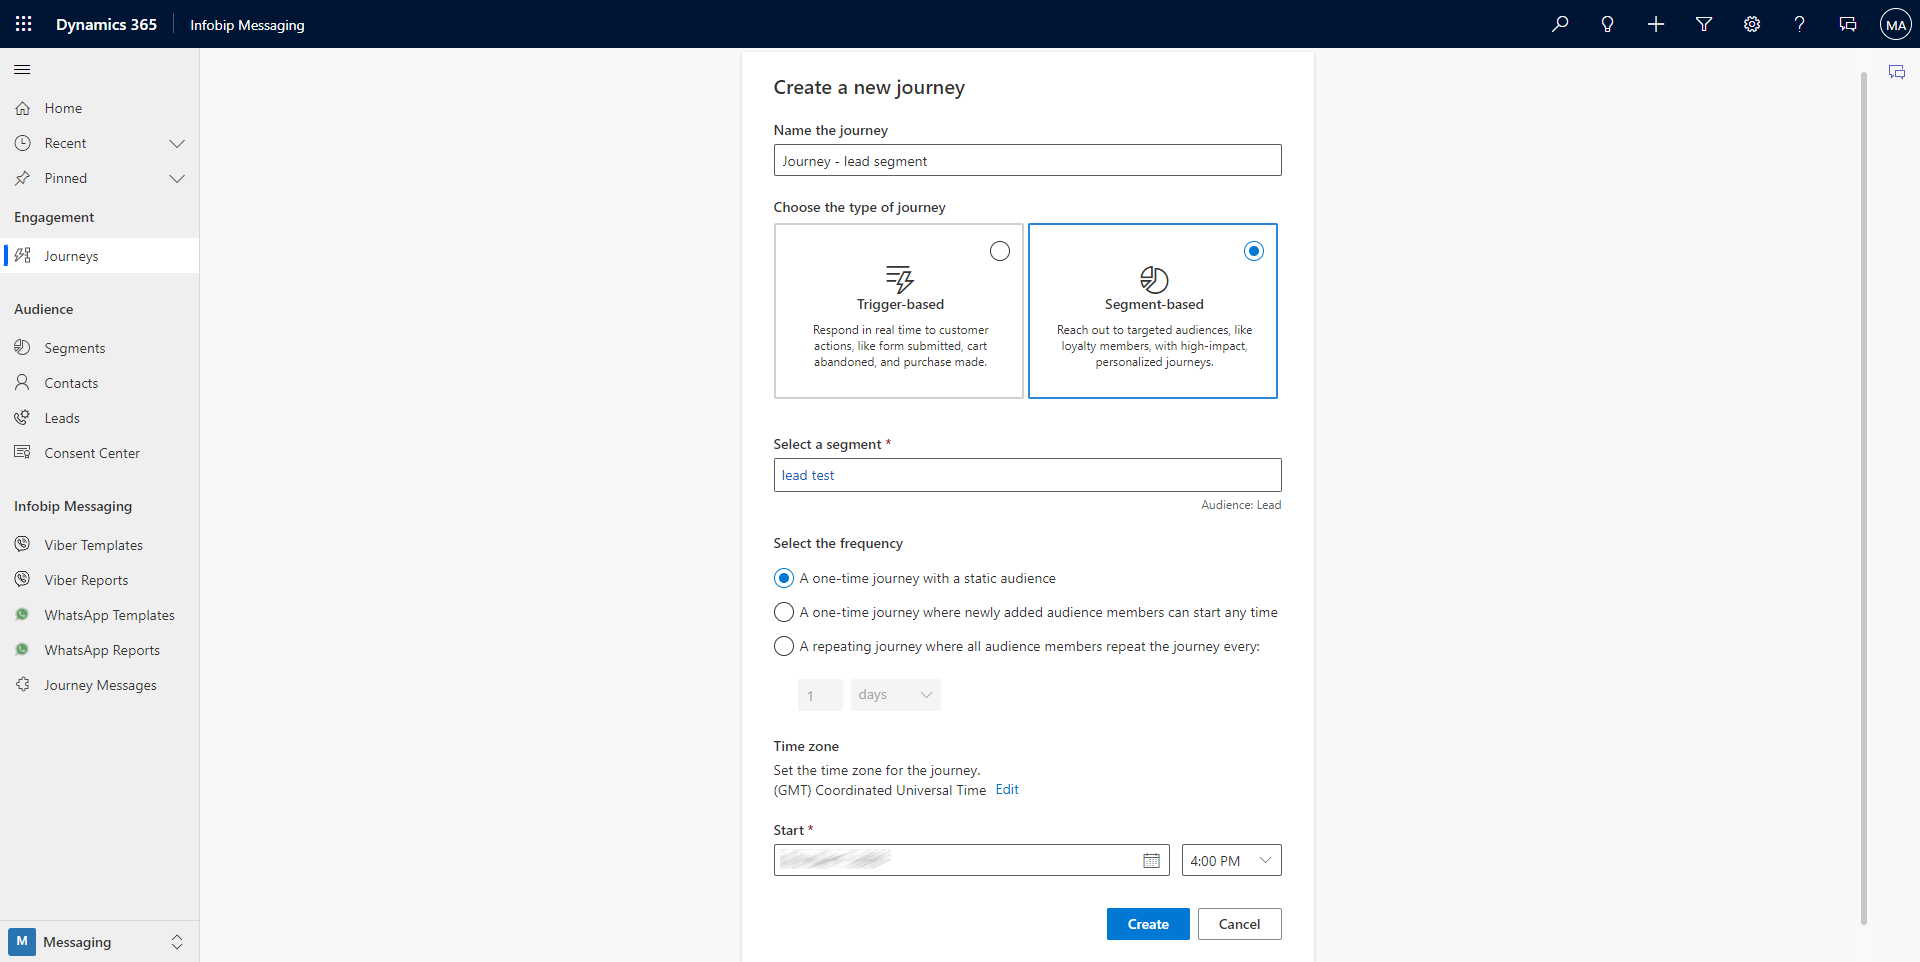
Create a Journey [#create-a-journey-using-the-app]
To create a Journey, click Journeys and then click New journey.
-
Add the name of a journey.
-
Select the type of journey. Infobip Messaging supports Trigger-based and Segment-based journey.
-
Select a segment of targets from the drop down list.
-
Set when the journey should be executed.
-
Click Create.
-
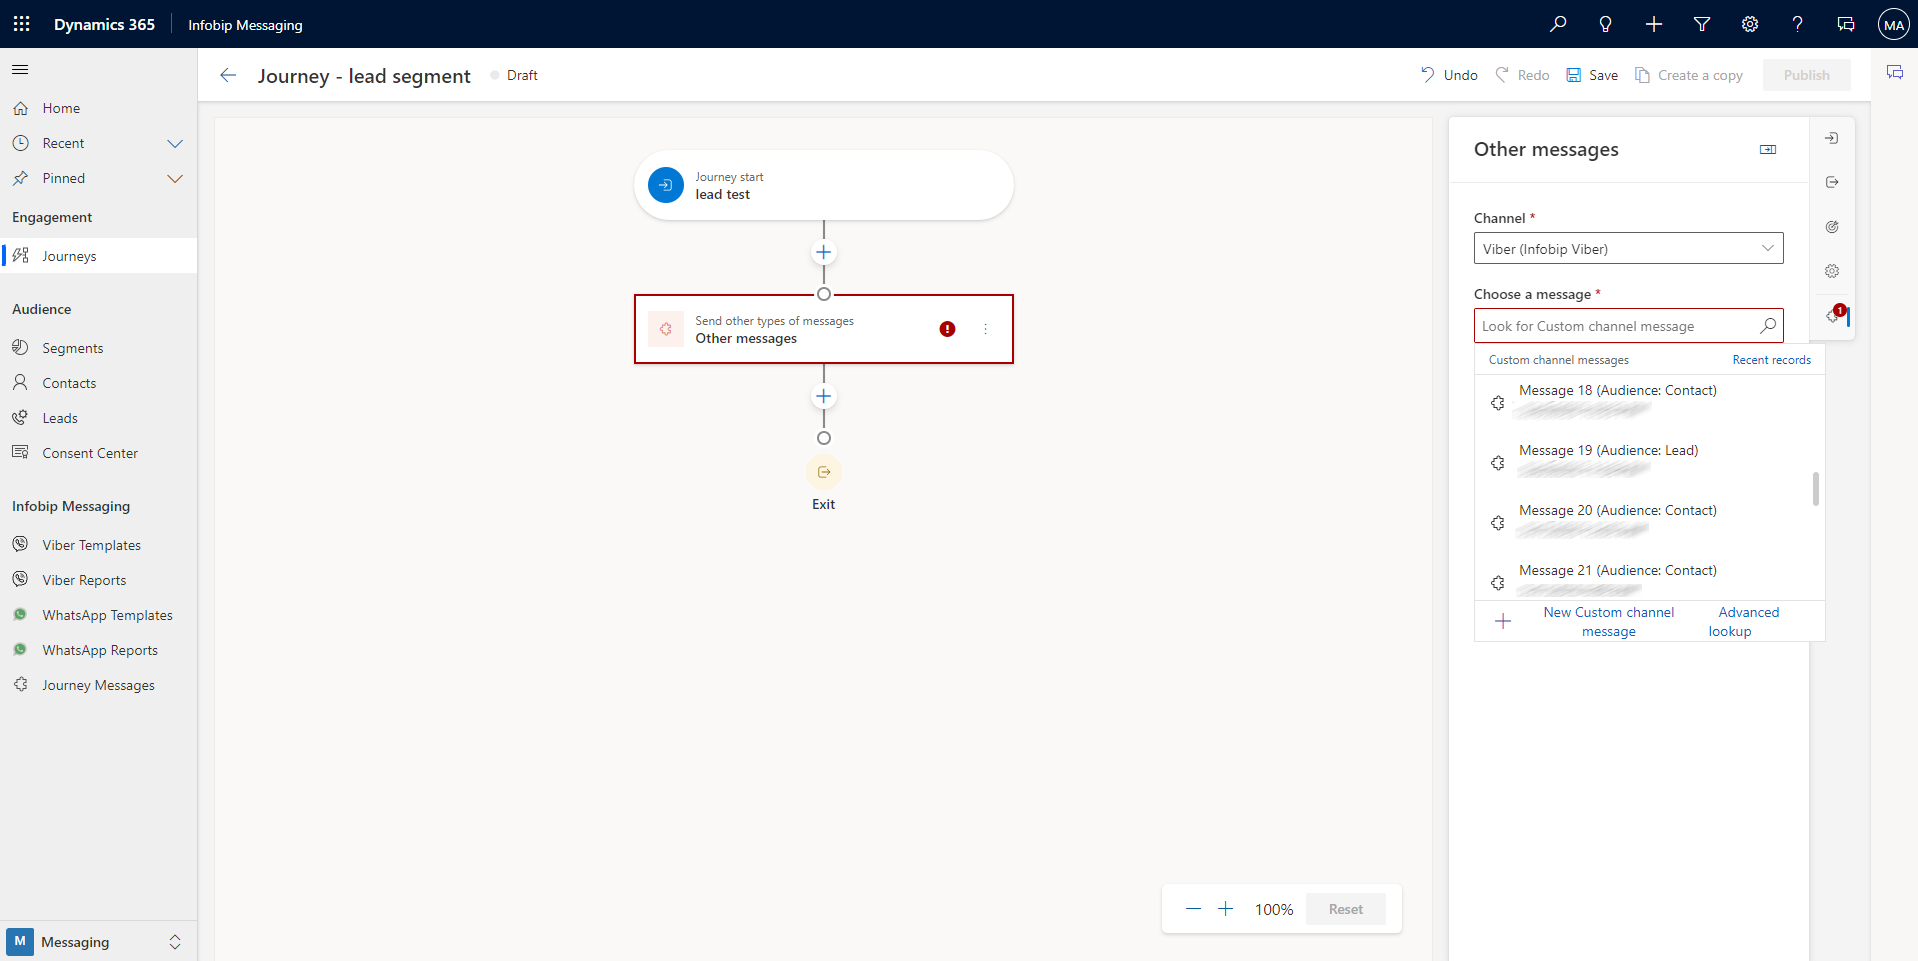
On the Add an action or other element window, select Send other types of messages.
-
Select a Channel from the drop down list.
-
Choose a Journey Message from the drop down list. The Journey Messages are available if the particular message is targeted at a Contact or Lead table.
-
Click Save.
-
Click Publish.
The journey target segment type (Contact or Lead) has to be aligned with selected messages types (Contact or Lead). If it is not aligned, error message will be displayed and the journey will not be published.
You can check the status of sent messages after selecting it in left menu.
Related entities, placeholders, and trigger parameters
Related entities placeholders and trigger parameters let you create highly personalized messaging campaigns across the WhatsApp, RCS, and Viber channels using message tags. You can access data from entities that are two relationships deep from the primary record and use journey context information, including journey details, segments, forms, and events.
Add message tags
To add message tags for related entities placeholders and trigger parameters:
- Open a WhatsApp, RCS, or Viber channel message template.
- Toggle the Add message tags in the template designer.
You see the Quick Guide: Using Message Tags. There are four tabs: Contact, Related entities, Secondary-related entities, and Trigger parameters.
- Click on the quick guide to see an overview of how to use each of the message tags.
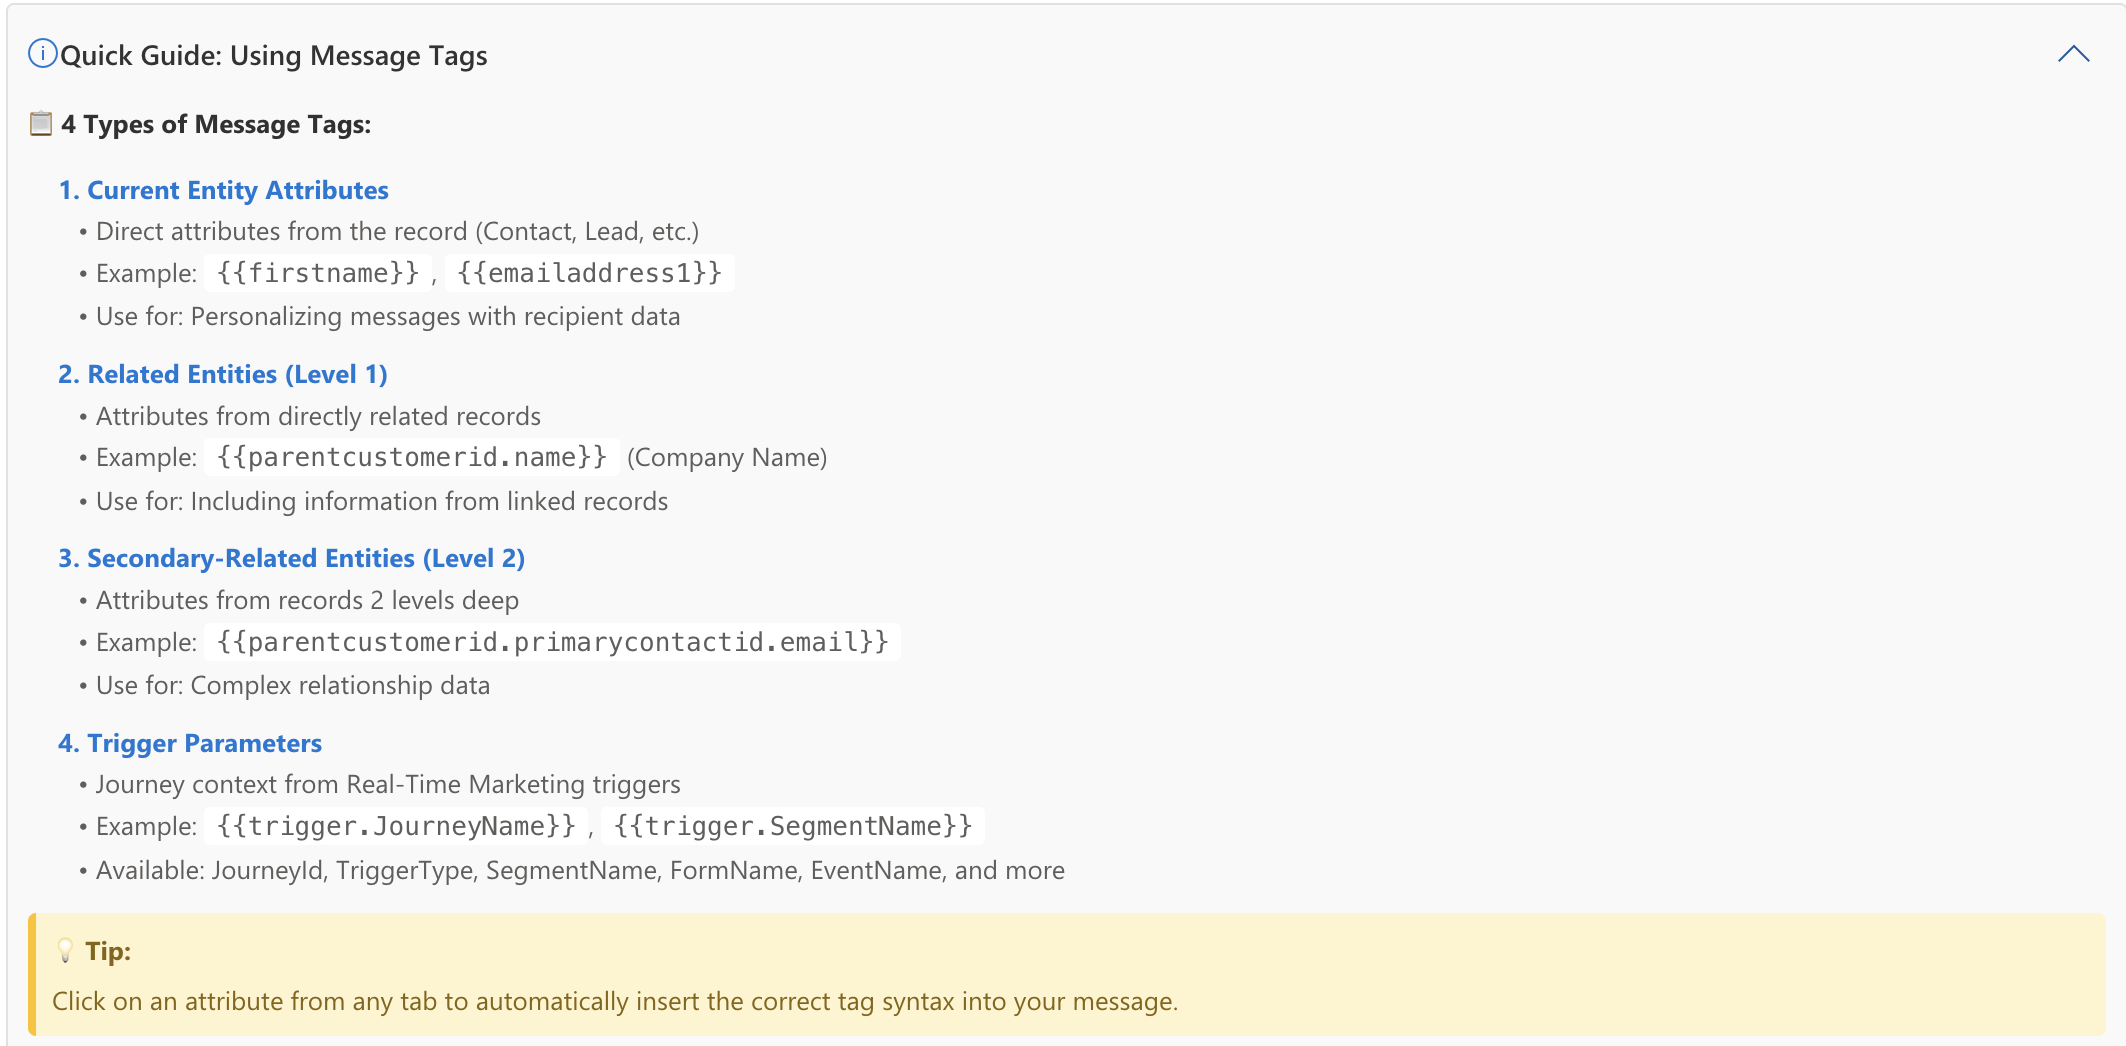
- On the default Contact tab, search for (or select in drop-down) the contact attribute you want to use. For example, First Name (
firstname).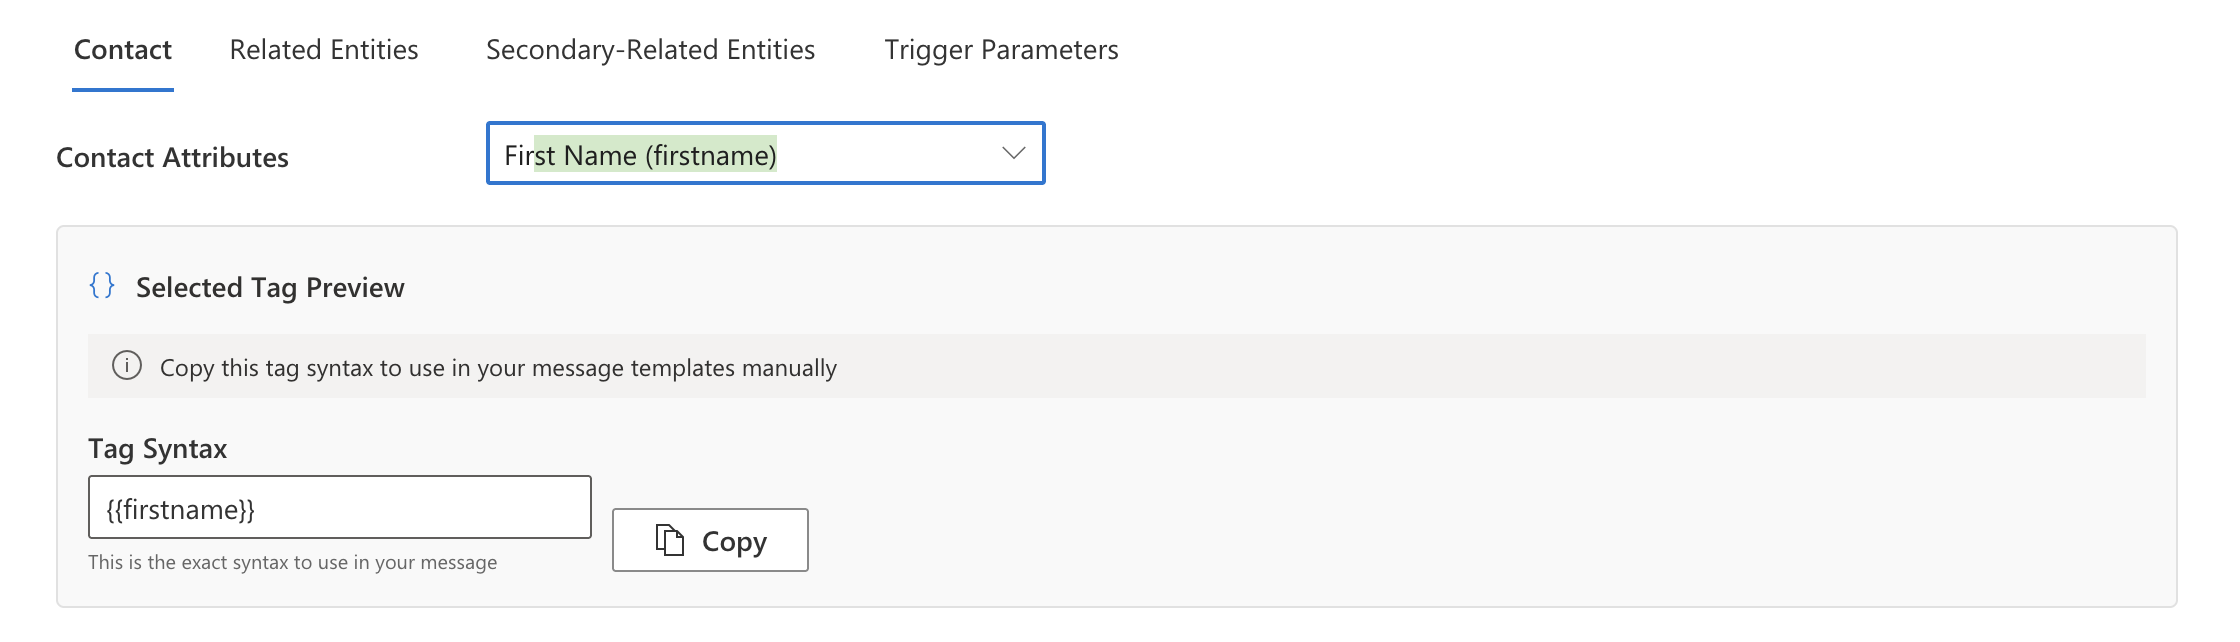
- On the Related entities tab, add attributes from directly related records to include that information. For example,
{{parentcustomerid.name}}. - On the Secondary-related entities tab, add these entities to include information from a record that is two relationships away (for example, the primary contact’s email from the contact’s parent account).
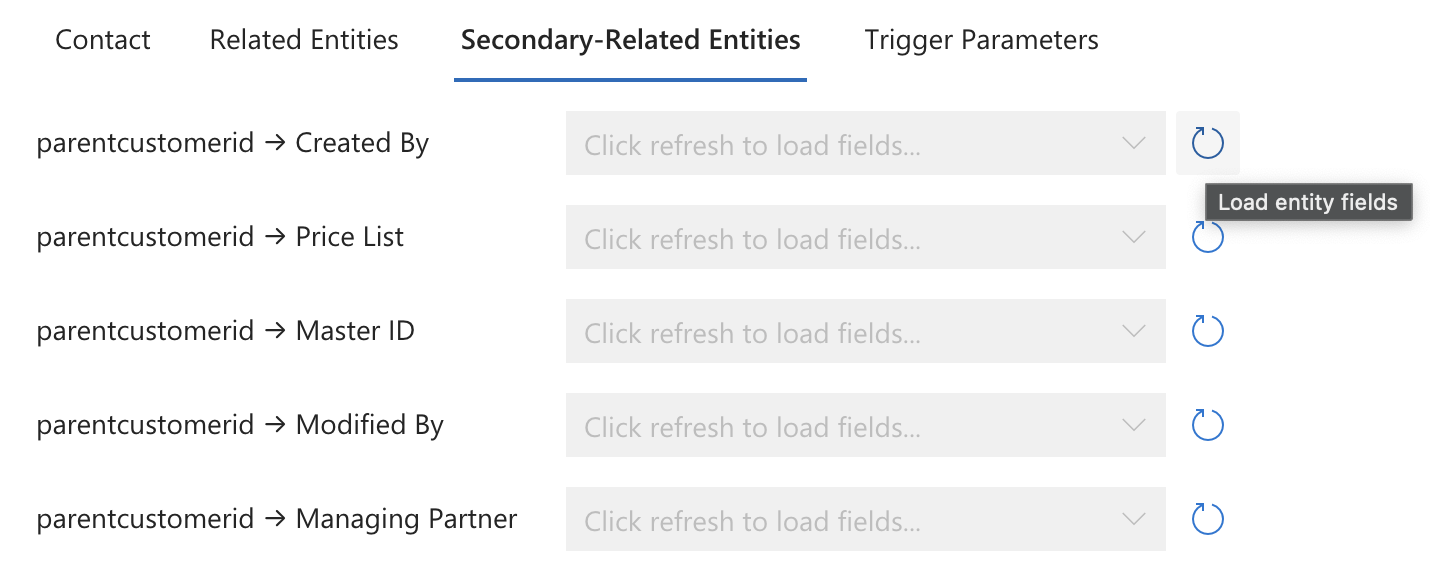
- Click the Refresh icon next to the entity to load its fields, and select the entity from the drop-down.
- On the Trigger parameters tab, browse or search for the parameters you wish to use:
- Journey Context:
JourneyId,JourneyName,JourneyVersion. - Trigger Details:
TriggerType,TriggerTime,EntityId - Segment Info:
SegmentId,SegmentName - Form Details:
FormId,FormName,FormSubmissionId - Event Info:
EventId,EventName,EventRegistrationId - Custom Attributes:
CustomAttribute1,CustomAttribute2,CustomAttribute3
- Journey Context:
