CleverTap messaging
 SMS
SMS
 RCS
RCS
CleverTap is a comprehensive customer engagement and retention platform designed to help businesses enhance their customer relationships and marketing strategies. CleverTap provides a suite of tools that enable companies to analyze user behavior, manage customer interactions across various channels, and personalize marketing efforts.
This integration lets you send WhatsApp, SMS, and RCS messages through Infobip directly from CleverTap.
Features
Send templated WhatsApp messages using one or more senders powered by Infobip.
SMS
CleverTap provides a native integration for SMS with Infobip.
RCS
For users in India, comply with local regulations using pre-approved RCS template messages.
Message status
Receive message status for visibility of delivery states and insights into how users are engaging with your messages.
Add callback data parameters
Monitor click rates by tracking when users tap on links included in your SMS, RCS or WhatsApp.
What you will need
- CleverTap solution
- An Infobip account (if you do not have an account, you can create one)
- SMS, WhatsApp, and/or RCS enabled on the Infobip account
See Create an account for more information on Infobip accounts.
Configure WhatsApp
Before you start to configure WhatsApp, you need to prepare the following:
- Enable a WhatsApp Connect add-on on the CleverTap account, in addition to the essentials price plan
- Complete the Infobip WhatsApp onboarding for the phone number you indent to use with CleverTap
- Find your Infobip user credentials
- Remember the Infobip API endpoint:
https://clevertap-whatsapp.ibintegrations.com/api/sendmessage
The configuration steps include:
- Find Infobip details
- Set up WhatsApp in the CleverTap dashboard
- Set up CleverTap callbacks in Infobip
Find Infobip details
To find the Infobip credentials:
-
Go to the Infobip web interface.
-
Create a new user in Account > User profile.
Create a separate user for the Infobip-CleverTap WhatsApp integration. Use these user credentials to authenticate the Infobip API endpoint and provide basic authentication on the CleverTap dashboard. For more information about user management, see Manage Infobip users.
-
Go to Channels and numbers > WhatsApp > Senders.
-
Copy the WhatsApp phone number.
Keep the API endpoint and login credentials ready to configure CleverTap.
Set up WhatsApp in the CleverTap dashboard
To configure the CleverTap dashboard:
-
In the CleverTap dashboard, go to Settings > Channels > WhatsApp > WhatsApp Connect.
-
Click +Add provider and Login to Facebook.
-
Enter the following details.
Provider configuration fields Description Provider Select Other (Generic) from the drop-down list. Nickname Enter Infobip or Infobip 10-digit number. Mobile number Phone number onboarded to WhatsApp API by Infobip. Request type Ensure that this is POST. HTTP endpoint https://clevertap-whatsapp.ibintegrations.com/api/sendmessage
For URL shortening and tracking features, add query parameters to change HTTP Endpoint URL in the CleverTap provider settings. To enable explicit URL shortening (without custom domains), add theshortenUrlparameter set to true:https://clevertap-whatsapp.ibintegrations.com/api/sendmessage?shortenUrl=true
If a custom shortening domain is already configured in the template, add thecustomDomainparameter set to your custom domain used for shortening:https://clevertap-whatsapp.ibintegrations.com/api/sendmessage?shortenUrl=true&customDomain=[your.domain]Authentication Select Basic authentication and enter the user credentials. Delivery report Callback URL Generated automatically. Share it with your Infobip account manager. Inbound message Callback URL Generated automatically. Share it with your Infobip account manager. -
(Optional) Select Mark this as default to make this service provider the default provider to send a WhatsApp message.
-
(Optional) Select Set auto-reply for users not tracked on CleverTap to automatically reply to users who message on WhatsApp but are not tracked on the CleverTap dashboard.
-
(Optional) You can set the Maximum Concurrent API requests anywhere between 30 to 1000 requests. Consider your requirement and the provider's limitations to define this value.
-
Click Save to save the details.
Set up CleverTap callbacks in Infobip
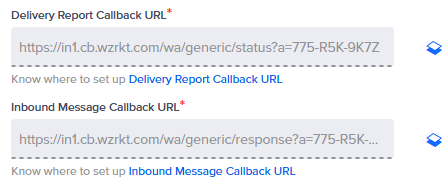
You can find the Callback URLs on the CleverTap dashboard on the Provider Setup page.
- Go to Settings > Channels > WhatsApp > WhatsApp Connect > Infobip.
- To set up the CleverTap callbacks, you need the following:
- Delivery Report Callback URL
- Inbound Message Callback URL
- For all callbacks and inbound messages to be processed correctly, you need to create two subscriptions on Infobip account:
- Subscription for Delivery, Seen, Click
- Subscription for Inbound messages
- Log in to the Infobip web interface and go to Developer Tools > Subscriptions Management.
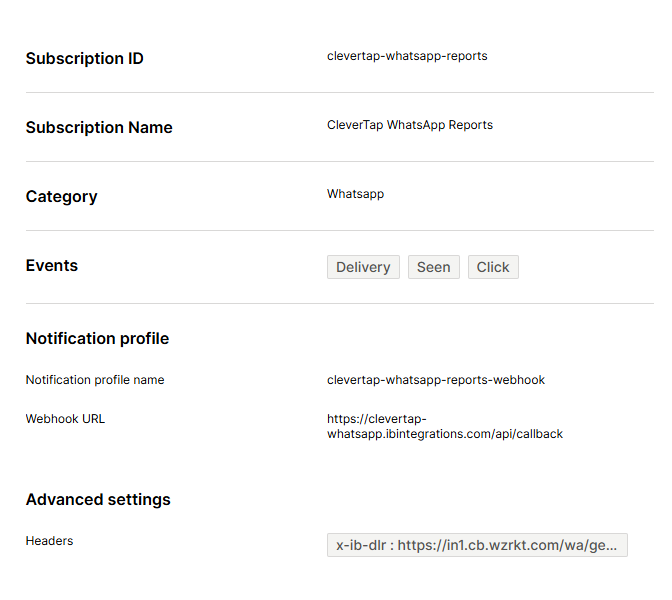
Create a subscription for Delivery, Seen, Click
Use these steps to configure a subscription in Infobip to forward WhatsApp delivery, seen, and click events to CleverTap using a webhook.
- Click Create subscription.
- On the Category step:
- Provide a subscription name, for example CleverTap WhatsApp Reports.
- Provide a subscription ID, for example clevertap-whatsapp-reports.
- Choose WhatsApp as the channel and click Next.
- On the Events step:
- Select Delivery, Seen, and Click, then click Next.
- On the Filtering step, click Next.
- On the Notification profile step:
- Click Create new notification profile.
- Provide a notification profile name, for example clevertap-whatsapp-reports-webhook.
- Provide this webhook URL:
https://clevertap-whatsapp.ibintegrations.com/api/callback
- In Advanced Settings:
- In Headers, add a header:
- Header name:
x-ib-dlr - Header value: Add the Delivery Report Callback URL from CleverTap, for example:
https://in1.cb.wzrkt.com/wa/generic/status?a=xxx-xxx-xxxx
- Header name:
- In Headers, add a header:
- Click Next.
- Review the summary and then click Save.
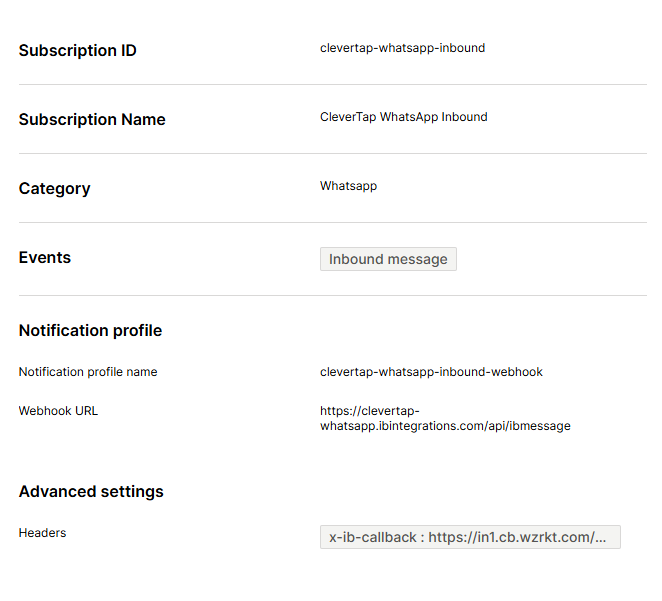
Create a subscription for Inbound messages
Use these steps to create a subscription that forwards inbound WhatsApp messages from Infobip to CleverTap.
- Click Create subscription.
- On the Category step:
- Provide a subscription name, for example CleverTap WhatsApp Inbound.
- Provide a subscription ID, for example clevertap-whatsapp-inbound.
- Choose WhatsApp as the channel and click Next.
- On the Events step:
- Select Inbound Message and click Next.
- On the Filtering step, click Next.
- On the Notification profile step:
- Click Create new notification profile.
- Provide a notification profile name, for example clevertap-whatsapp-inbound-webhook.
- Provide this webhook URL:
https://clevertap-whatsapp.ibintegrations.com/api/ibmessage
- In Advanced Settings:
- In Headers, add a header:
- Header name:
x-ib-callback - Header value: Add the Inbound Message Callback URL from CleverTap, for example
https://in1.cb.wzrkt.com/wa/generic/response?a=xxx-xxx-xxxx
- Header name:
- In Headers, add a header:
- Click Next.
- Review the summary and click then Save.
- Go to Channels and Numbers > Channels > WhatsApp > Senders, find your number, and then go to Edit configuration. Make sure that the default forwarding action is set to Follow Subscription.
Find or create WhatsApp templates
You can find or create WhatsApp templates in Infobip.
- Login to the Infobip web interface and go to Channels and numbers.
- Select WhatsApp, then go to the Senders tab.
- From the Actions menu, select View templates.
- From the list of templates, search for the required template.
- Expand the template you want to save in CleverTap.
- Export and save the template.
Infobip does not display all template details. Export the template and refer to the exported file when you configure templates in CleverTap. See Add message template.
Add WhatsApp message template
Template names and language variants must be unique for each provider configuration. This means that you can use the same template name once for each provider configuration.
For example, if you have multiple provider configurations, such as Phone_1, phone_2, you can use the same template name once within Phone_1 and x.
To create WhatsApp campaigns, you must have pre-approved WhatsApp message templates saved in the CleverTap dashboard. To add the message templates:
- Go to Settings > Channels > WhatsApp > WhatsApp Connect > Provider nickname.
- Select Templates, and then +Template.
- Enter the template name in the Namespace field.
- Choose the type of template header (Text or Media). For Media headers, you can use Image, Video, Document, and Location.
- You can choose to use the Limited Time Offer template for your message. For more information, see Limited Time Offer Template in the CleverTap documentation.
- Enter the message content.
- Select Footer to add a footer text and a button (Quick Reply or a Call To Action).
- Select the Language in which you want to display the message.
- Select Save template.
Test a message template
To send a test message:
- Open the template.
- Select the ellipsis (⋮) menu.
- Select Send test.
- Select test profiles or enter a phone number.
- Select Send test.
The success or failure response is displayed on the dashboard. If the message is not delivered, copy the response payload and share it with the Infobip team to debug the issue
Create a campaign
To create a WhatsApp campaign using Infobip as the provider, go to Create a WhatsApp campaign in the CleverTap documentation.
Create a journey
To create a WhatsApp journey using Infobip as the provider, go to Create a WhatsApp journey in the CleverTap documentation.
Configure SMS
To successfully set up Infobip on the CleverTap dashboard, configure your SMS settings and ensure seamless communication between the two platforms.
Before you set up CleverTap with Infobip SMS messaging, you need the following information:
- Infobip API Base URL
- API Key with the
message:sendscope
Set up Infobip SMS on CleverTap dashboard
Integrate Infobip with CleverTap for SMS messaging using the following steps:
-
Go to Settings > Channels > SMS > SMS Direct, and then select Add provider.
-
Enter the following details.
- Provider - Select CleverTap Infobip from the drop down list.
- Nickname - Enter a custom label to identify this Infobip SMS configuration in the CleverTap dashboard.
- Sender ID - Enter the sender identifier that recipients see when they receive your SMS messages. This value can be a name or a number, depending on regional requirements and Infobip or telecom partner configuration.
- Base API URL - Enter the Infobip SMS API base URL. Go to Login > Developer tools > Base API URL in the Infobip dashboard.
- API key - Enter the API key used to authenticate requests to Infobip’s SMS API. Go to Login > Developer tools > API key in the Infobip dashboard.
-
Select the Regional settings - Configure regional settings based on your operating country:
- India: Enter the Principal Entity ID from the DLT portal for India and is required to comply with local regulations governing SMS communications.
- Turkey: Enter the Brand Code and select BIREYCEL or TACIR, which are the authorized sender identifiers for your SMS messages in that region.
-
Inbound message callback URL - The Inbound Message Callback URL is an endpoint where Infobip sends incoming SMS messages, such as replies from recipients. This URL is necessary for handling two-way communication, allowing your system to process and respond to user replies. To find the URL, go to Numbers > SMS > Inbound Configuration in Infobip, and set the Callback URL under the phone number advanced settings.
NoteYou must select the MO JSON 2 option. This format is required for CleverTap to process inbound messages correctly.
-
Delivery report callback URL - Infobip uses the delivery report callback URL to send the delivery status updates for the SMS messages you have sent. It provides feedback on whether each message was successfully delivered, failed, or queued, enabling real-time tracking of your SMS campaigns. To configure this URL in the Delivery Reports section, go to SMS > Numbers.
-
Select Enable provider click tracking - Used to monitor user engagement with links in SMS messages:
- Default domain: Uses Infobip’s default domain for link tracking. It automatically generates trackable links for the SMS messages sent through the Infobip platform.
- Custom domain: Uses your own domain for link tracking, ensuring your SMS messages reflect your brand but enabling you to track user interactions. Configure and verify your custom domain in Infobip and then when it is verified, you can use it within CleverTap to send your campaigns.
-
Select Mark as Default to set Infobip as the default service provider. This designates Infobip as your primary service provider for sending SMS messages. This setting ensures that all outgoing SMS campaigns are routed through Infobip by default.
-
Select Save, then select Send test SMS to verify that the configuration is working correctly and messages are delivered as expected.
Configure RCS
To use RCS with CleverTap, you must have an RCS Agent registered with Infobip. The onboarding process includes:
- Registering your business with Infobip as an RCS sender.
- Submitting brand details and receiving approval from mobile carriers.
- Completing the agent verification process with Infobip.
Configure API parameters
Set up the necessary API parameters in CleverTap to integrate with Infobip. You need the following:
- Base API URL
- API Key
- Incoming Message Callback URL
Base API URL
To enable seamless integration between CleverTap and Infobip for sending and managing RCS messages, configure the following:
- Request Type: POST.
- HTTPS Endpoint (Base API URL): Primary endpoint for Infobip’s RCS API.
Locate the Base API URL in your Infobip account.
- Go to Developer Tools > Base API URL.
- Copy and paste this URL into CleverTap during the provider setup.
For more information on the Base API URL, see Base URL
API Key
The API key is used for authentication. Locate the API key in your Infobip account:
- Go to Developer Tools > API Key.
- If not already created, generate a new API Key with RCS and SMS messaging scopes.
- Copy and paste this key into CleverTap to enable secure communication between platforms.
For more information on the API keys and authentication, see API authentication
Inbound Message Callback URL
The Incoming Message Callback URL is generated automatically after saving provider settings in CleverTap. To configure the URL:
- Log in to Infobip and go to Channels & Numbers → Channels → RCS.
- Click Senders, select the sender you want to configure, and then click More Actions → Edit Configuration.
- Under Forwarding Action, select Forward to HTTP.
- In the Callback URL field, paste the CleverTap Incoming Message Callback URL.
- Under Renderer, select MO_OTT_MSISDN, and then click Save.
Ensure that the MO_OTT_MSISDN option is selected, as it is mandatory for proper integration. This format is required to ensure that incoming messages are correctly processed by CleverTap.
Configure RCS settings in CleverTap
When your RCS Agent is onboarded, configure RCS settings in CleverTap:
- Go to Settings > Channels > SMS Direct in your CleverTap dashboard.
- Select Infobip RCS as the provider and enter the required credentials.
- Configure message templates, sender IDs, and any additional settings needed for your use case.
RCS Agent Go-Live
After setup, your RCS Agent will go live after a brief testing phase:
- Infobip and CleverTap validates message delivery and subscriber management flows.
- When testing is successful, your RCS Agent is fully activated for sending messages.
Set up Infobip RCS on CleverTap dashboard
To successfully integrate Infobip with CleverTap, use the following steps to configure your RCS settings and ensure seamless communication between the two platforms.
-
Go to Settings > Channels > SMS > SMS Direct and click + Add Provider
-
Add the following details:
-
Provider: Select Infobip RCS Provider from the drop-down menu.
-
Nickname: A customizable label for your Infobip RCS integration. This name helps you easily identify and manage the integration within the CleverTap dashboard, making it convenient to distinguish between multiple configurations.
-
RCS Sender ID: The RCS Sender ID is the unique identifier of your RCS Agent (business profile) used to send messages. It’s what recipients see as the sender of your RCS messages—typically a brand name or number associated with your business. This helps build recognition and trust with your audience. Depending on your region, the Sender ID may be provisioned by Infobip or your telecom partner.
-
Inbound Message Callback URL: Paste the CleverTap-generated Incoming Message Callback URL here. This URL is used by Infobip to forward user replies back to CleverTap. Refer to the Inbound Message Callback URL section for setup instructions.
-
Delivery Report Callback URL: The Delivery Report Callback URL is where Infobip sends the delivery status updates for the RCS messages you’ve sent. It provides feedback on whether each message was successfully delivered, failed, or queued, enabling real-time tracking of your RCS campaigns and does not require any manual configuration on your end.
-
Request Type and HTTP Endpoint: Enter the Base API URL retrieved from your Infobip dashboard. This is required to establish the connection between CleverTap and Infobip. Refer to the Base API URL configuration steps for more details.
-
API Key: Paste the API Key you generated in your Infobip account under Developer Tools > API Key. This key authorizes CleverTap to send RCS messages via Infobip. Refer to the API Key configuration steps for more details.
-
SMS Fallback: SMS fallback ensures message delivery when RCS messages fail due to factors like device incompatibility, lack of internet access, or carrier restrictions. If the recipient’s device doesn’t support RCS or is offline, the message is automatically sent as an SMS to maintain uninterrupted communication.
To enable SMS fallback in the CleverTap–Infobip integration, set the following required configuration in CleverTap:
- SMS Sender ID: Required if SMS fallback is enabled. This is the sender ID/number used to send SMS messages.
- Enable for India: Select this checkbox if SMS fallback applies to recipients in India to comply with local messaging regulations.
- Principal Entity ID: For businesses sending SMS and RCS messages to users in India, DLT (Distributed Ledger Technology) registration is required as per TRAI regulations. Principal Entity ID (PE ID) is a unique identifier assigned to businesses registered on the DLT platform.
NoteIf using CleverTap as an RCS provider, you must purchase SMS from CleverTap to enable fallback. If using a different SMS provider, configure SMS fallback via CleverTap Journeys.
-
Enable Provider Click Tracking: Track clicks on links within your RCS messages, providing insights into user engagement:
- Default Domain: Uses Infobip default domain for link tracking. It automatically generates trackable links for the RCS messages sent through the Infobip platform.
- Custom Domain: Allows you to use your own domain for link tracking, ensuring your RCS messages reflect your brand while still enabling you to track user interactions. Configure and verify your custom domain on Infobip to get started. When your domain is verified, you can use it within CleverTap to send your campaigns.
NoteCleverTap offers native click tracking for RCS campaigns, so using the provider’s click tracking is optional. If you choose to enable Infobip provider click tracking, all URLs in your RCS messages are shortened and tracked by Infobip.
Avoid enabling both CleverTap and Infobip click tracking simultaneously, which may result in duplicate URL wrapping, inconsistent or inflated click metric, or double event tracking.
For accurate and consistent analytics, use only one click-tracking system per campaign.
-
Set Infobip as Default Service Provider: Designate Infobip as your primary service provider for sending RCS messages. This setting ensures that all outgoing RCS campaigns are routed through Infobip by default.
-
-
Select Send Test to verify that the integration is functioning correctly. When you click Send Test, you are prompted to enter the following details:
- Country Code & Phone Number: Specify the recipient’s country code and phone number to test message delivery.
- RCS Message: Enter the message content to be sent via RCS.
- SMS Fallback Message: Provide the fallback message content that to be sent over SMS if RCS delivery fails.
- Template ID: Enter the template ID required for message sending (if applicable).
- Principal Entity ID (only if opted for India): If sending messages in India, you must enter the registered Principal Entity ID to comply with DLT regulations.
-
Select Save after you have successfully verified the integration.
When the Provider is added, go to the Provider Listing page for the provider operations.
Add RCS message template
The Add Template feature in the CleverTap dashboard allows you to create, manage, and deploy RCS message templates for Indian users seamlessly. These templates ensure consistent messaging and are automatically sent to the registered providers (for example, Vodafone, Jio) for approval and distribution. When you submit the template, the status updates within 24 hours, and you can track its progress directly within the dashboard.
Pre-approved RCS message templates let you efficiently run personalized and engaging messaging campaigns while ensuring compliance with provider regulations.
To access templates:
- Go to Settings > Partners > SMS > SMS Direct > + Provider.
- Select RCS Infobip from the drop down list.
- Go to Templates.
CleverTap supports three template formats, including the following:
- Text
- Rich Card
- Carousel
This feature lets you automate messaging workflows, maintain brand consistency, and enhance customer communication through RCS campaigns.