Migrate from Microsoft Azure Communication Services to Infobip
Microsoft is retiring standalone Azure Communication Services (ACS), its communications platform for embedding SMS, email, voice, video, and chat into applications. Microsoft and Infobip have worked together on a migration path for ACS customers, and Infobip is a Microsoft partner of choice for ACS migration.
If your messaging runs on ACS, moving to a different provider involves more than swapping an API. Your application may depend on sender numbers, delivery reports, inbound messages, and the business logic built around them. Learn what changes during migration, what stays the same, and the steps to move production traffic.
- September 23, 2026: Microsoft announced the retirement of Azure Communication Services.
- October 23, 2026: New customers can no longer sign up for ACS.
- September 30, 2028: Standalone ACS is fully retired and no longer supported.
For guidance from Microsoft, see the ACS retirement and breaking changes guide(opens in new tab).
Scenario overview [#scenario-overview]
Infobip has implemented the official ACS APIs for sending SMS and email. If you use the ACS SMS or Email SDKs, most of your integration stays the same. You point your connection string at an Infobip endpoint instead of ACS.
The migration touches four areas of your messaging architecture:
| Area | What it covers | What changes |
|---|---|---|
| Sender identity | Phone numbers and sender IDs your customers recognize | Get new numbers (recommended), reuse your Messaging Connect numbers, or migrate your existing ACS numbers to Infobip |
| API connectivity | How your application sends messages | Only the connection string for SMS and email; Infobip APIs for other channels |
| Messaging events | Delivery reports and status updates that trigger downstream processes | Configure an Infobip subscription that delivers events to an Azure Event Grid custom topic |
| Inbound messaging | Messages your customers send to your numbers | Route inbound messages to the same destination they use today |
Moving to Infobip also gives you:
- A single platform for more channels: The migration offering covers SMS, email, WhatsApp, and voice. Viber, RCS, and other channels are available on request, without adding new vendors.
- Global reach: Infobip delivers SMS for ACS customers in more than 100 countries outside the native Microsoft coverage.
- Azure Marketplace billing: Purchase Infobip through Azure Marketplace(opens in new tab) to receive a single invoice from Microsoft Azure. Your usage counts toward your Microsoft Azure Consumption Commitment (MACC).
If you already use the SMS for Microsoft Azure Communication Services - Messaging Connect app, your numbers are already in Infobip. Your traffic already runs through Infobip, so your migration path is much simpler.
Prerequisites [#prerequisites]
Before you start, make sure you have the following:
- Infobip account. If you do not have one, create a free trial account.
- An ACS integration that uses the ACS SMS or Email SDKs or APIs.
- Access to the application configuration where your ACS connection string is stored.
- Sender numbers or sender IDs for the countries you send to. See Step 2.
- If you consume delivery reports or inbound messages: access to the Azure portal with permissions to view and create Azure Event Grid topics.
Summary of the steps [#steps-summary]
To migrate from ACS to Infobip, complete the following steps:
- Sign up and onboard with Infobip.
- Set up your sender identity.
- Generate an Infobip connection string.
- Send your first message through Infobip.
- Configure delivery reports and inbound messages.
- Cut over production traffic.
Steps 1 to 3 are the same tasks you did when you set up ACS: create an account, get a number, and get a connection string. This time, you do them in Infobip. Your application code stays the same.
Step 1. Sign up and onboard with Infobip [#step-1-sign-up-and-onboard]
- Create an Infobip account. You can sign up with the same Microsoft credentials you use for your Azure account.
- Use the trial environment to validate your use case before you commit.
- Optional: To bill your Infobip usage through Microsoft and count it toward your MACC, subscribe through the Infobip listing on Azure Marketplace(opens in new tab).
Step 2. Set up your sender identity [#step-2-set-up-your-sender-identity]
Your customers recognize the numbers and sender IDs you send from, so decide early how you handle them. Keeping your existing numbers is possible, but it is the most complex and time-consuming option. For most migrations, new numbers are the faster and simpler path.
Choose the option that fits your situation:
- Get new numbers (recommended): The simplest and lowest-risk path. Buy new numbers, test your full flow with them, and move traffic over in a controlled way. Go to Channels and Numbers > Numbers and buy an SMS-capable number in each country where you send traffic. See How to get a number.
- Reuse your Messaging Connect numbers: If you use the Messaging Connect app, your numbers and traffic are already in Infobip. You can use them with the Infobip connection string at any time.
- Migrate your existing ACS numbers: Choose this option only if keeping your current numbers is a must-have for your business. Number migration is a multi-party process between Microsoft, Infobip, you, and the carriers. It takes longer and availability depends on the country. See Import an existing number or contact Support.
Even if you plan to migrate your existing ACS numbers, buy one new number to validate your integration, delivery reports, and inbound flows while the number migration is in progress.
Step 3. Generate an Infobip connection string [#step-3-generate-a-connection-string]
Infobip issues a connection string in the same format as ACS. It contains your Infobip endpoint and access key.
-
Log in to your Infobip account.
-
Expand Developer Tools and go to Microsoft ACS to generate a new connection string. The URL looks similar to the following, depending on your region:
jsonhttps://portal-ny.infobip.com/dev/microsoft-acs -
Copy the connection string. Store it where your application stores its ACS connection string, for example Azure Key Vault or your application settings. This way, your application picks up the new value without code changes.
The Microsoft ACS page is not shown in the web interface menu by default. Open it with the URL in item 2 of this step. If you cannot access the page, contact Support.
If you use channels other than SMS and email, create an Infobip API key in Developer Tools > API keys and use the Messages API. The Messages API uses a consistent design across channels: after you integrate one channel, the others follow the same shape.
Step 4. Send your first message through Infobip [#step-4-send-your-first-message]
Replace your ACS connection string with the Infobip connection string. Your ACS SDK code does not change.
The following example uses the ACS SMS SDK for Python:
Replace the placeholders:
<YOUR_INFOBIP_ENDPOINT>and<YOUR_INFOBIP_ACCESS_KEY>: Use the connection string from Step 3. In production, load it from your configuration instead of hardcoding it.FROM_NUMBER: The Infobip sender you set up in Step 2.TO_NUMBER: Your destination number. On a trial account, use the phone number you registered with.
Run the script. A successful response shows the message ID and a successful status for each recipient.
Your production code does not change [#production-code-does-not-change]
In production, your application loads the connection string and sender numbers from configuration, not from code. The migration changes only those configuration values.
The following example reads the connection string from Azure Key Vault and the sender number from Azure App Configuration. To migrate it to Infobip, you update the Key Vault secret with the Infobip connection string and the sms:sender setting with your Infobip number. The code stays exactly as it is.
What you change, outside the code:
| Configuration | Before migration | After migration |
|---|---|---|
Key Vault secret sms-connection-string | ACS connection string | Infobip connection string from Step 3 |
App Configuration key sms:sender | ACS number | Infobip number from Step 2 |
Step 5. Configure delivery reports and inbound messages [#step-5-configure-delivery-reports-and-inbound-messages]
When outbound delivery works, route delivery reports and inbound messages to Azure Event Grid. Infobip sends them in the ACS event format that your business logic already processes.
In Azure, a subscription is a billing and resource container. In Infobip, a subscription is a rule that sends selected events, such as delivery reports, to a webhook destination. A notification profile defines the destination and its authentication. In this step, you create an Infobip notification profile that points to Event Grid, and an Infobip subscription that uses it.
Use an Event Grid custom topic [#use-an-event-grid-custom-topic]
ACS publishes its events to an Event Grid system topic. System topics accept events only from Azure services, so Infobip cannot publish to them.
If your ACS events arrive through a system topic, create an Event Grid custom topic(opens in new tab) and connect your business logic to it. You can either:
- Repoint your event subscriptions, such as Azure Functions or Logic Apps, from the system topic to the custom topic.
- Add the custom topic as an additional trigger next to the system topic. Your logic then processes events from both ACS and Infobip while you move traffic gradually.
If you already use a custom topic, you can use it directly.
Create the Infobip notification profile and subscription [#create-notification-profile-and-subscription]
To send events from Infobip to your Event Grid custom topic, complete the following steps:
- In the Azure portal(opens in new tab), open your Event Grid custom topic and copy:
- The Topic Endpoint from the Overview page, for example
https://<topic-name>.<region>-1.eventgrid.azure.net/api/events - One of the access keys from Settings > Access keys
- The Topic Endpoint from the Overview page, for example
- Log in to your Infobip account and go to Developer Tools > Subscriptions Management.
- Create a notification profile:
- Webhook URL: The Event Grid topic endpoint.
- Headers: In Advanced settings, add a header with the key
aeg-sas-keyand your Event Grid access key as the value. Event Grid uses this header to authenticate requests from Infobip.
- Create a subscription for the SMS channel and select the notification profile from the previous step.
- In Select events, select Delivery, and in Format, select
acs-sms-delivery-report-received.v1.json. This format delivers reports in the same schema as ACSMicrosoft.Communication.SMSDeliveryReportReceivedevents.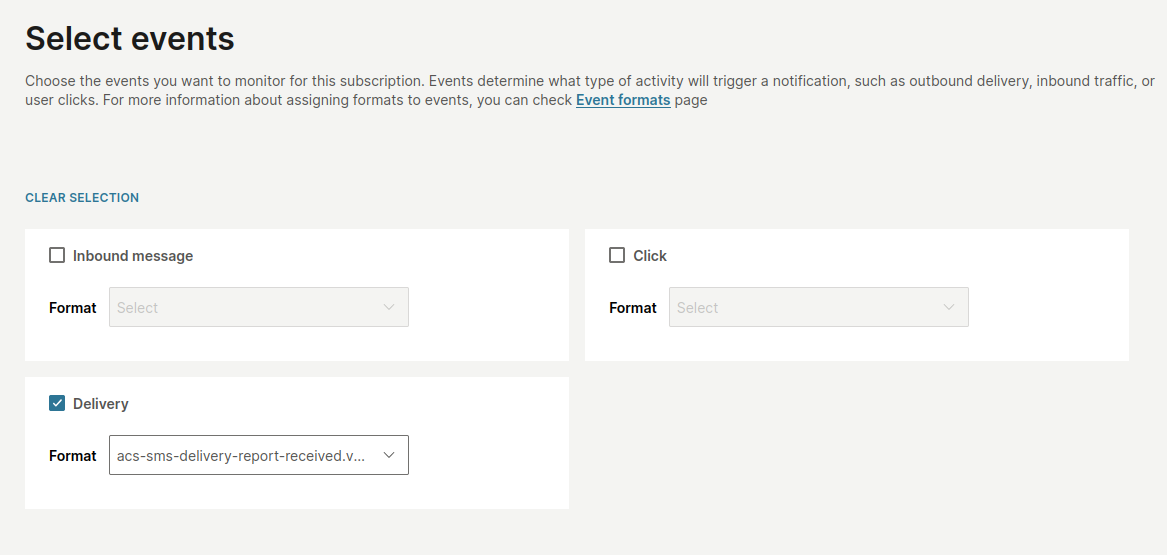
- Optional: To receive inbound messages, select Inbound message and the matching ACS format.
- Send a test message and reply to it from a handset. Confirm that the delivery report and the inbound message reach the Event Grid topic and trigger your downstream processing.
For more information about events and formats, see Available events and Event formats.
Step 6. Cut over production traffic [#step-6-cut-over-production-traffic]
Before you move production traffic, confirm that sender configuration, delivery reports, inbound messages, and the business logic connected to them work as expected.
Then complete the following steps:
- Validate each of your use cases against Infobip in parallel with ACS.
- Move production traffic from ACS to Infobip. To reduce risk, move traffic gradually, for example by country, sender, or use case.
- Monitor delivery rates and event processing after each move.
- When all production traffic runs through Infobip, decommission your ACS integration.
Track message delivery [#track-message-delivery]
Track the status of your messages in the following places:
- Azure Event Grid: If you completed Step 5, delivery reports arrive in your Event Grid custom topic in the ACS event format.
- Message logs: In the Infobip web interface, view the status and details of each message. See Message logs.
Troubleshoot and analyze your message [#troubleshoot]
If you have issues after migration, check the following:
- Authentication errors: Check that your application loads the Infobip connection string and not a cached ACS value. Generate a new connection string if you suspect it is invalid.
- Messages not delivered: Check the message status in Message logs. Confirm that your sender is approved for the destination country.
- Delivery reports or inbound messages missing in Event Grid: Check that your Infobip subscription is active and uses the
acs-sms-delivery-report-received.v1.jsonformat. Check that its notification profile points to a custom topic endpoint, not a system topic. A401 Unauthorizedresponse from Event Grid means theaeg-sas-keyheader is missing or contains an invalid access key. See the troubleshooting section in Reporting webhooks.
If the issue persists, contact Support.
Was this page helpful?