Salesforce Service Cloud messaging
EARLY ACCESS
Salesforce Service Cloud messaging is available as an Early Access feature. To learn more, contact your dedicated account manager or Support.
Salesforce Service Cloud is a customer service platform that enables support teams to manage cases, messaging sessions, and agent workflows across channels.
Set up a Bring Your Own Channel (BYOC) Messaging integration in Salesforce Service Cloud.
This integration supports two use cases:
- 2-way messaging: The end user initiates a messaging session. Messages sent by the user are delivered and displayed within the Service Cloud messaging session in real time.
- Chatbot to agent: The user initially interacts with a chatbot. If the conversation is transferred to a Service Cloud messaging session, the system imports all prior messages exchanged between the end user and the chatbot sequentially into the newly created session.
What you will need
To use this integration, you need:
- Infobip account and API key with required scopes
- Salesforce Service Cloud instance with the Digital Engagement SKU and Partner Messaging add-on license
- SCRT2 Integration User (
sfdc_scrt2) permission set in your Salesforce org
Verify that the authorized user has the following permission set licenses:
- Messaging for In-App and Web User
- Messaging User
- Partner Messaging User
- Service User

Verify that the authorized user has the following permission set assignments:
- Service Cloud User
- Messaging for In-App and Web User

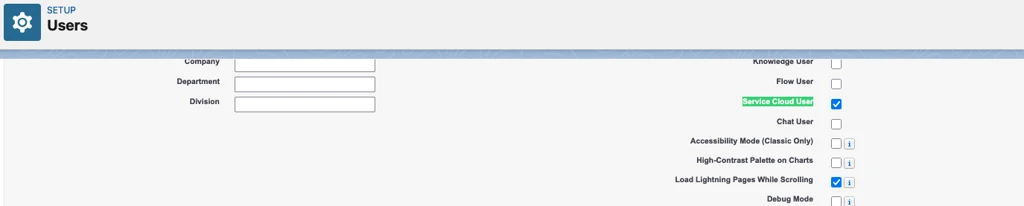
Verify that the authorized user has the Service Cloud User option selected in the user settings.
API key scopes [#api-key-scopes]
The required API key scopes depend on the use case.
2-way messaging:
numbers:manageaccount-management:manageinbound-message:readmessage:sendmessages-api:managemessages-api:message:send
Chatbot to agent:
numbers:manageaccount-management:manageinbound-message:readmessage:sendmessages-api:managemessages-api:message:sendanswers:manageconversations:manage
Add Connected App for OAuth
Create a connected app or external client app (ECA) to authenticate the integration between your platform and Salesforce.
Salesforce documentation states that external client apps (ECAs) are preferred over connected apps. To create a connected app, contact Salesforce Support to request the permission.
Create the connected app
-
Verify that you have a public certificate saved in your system. You upload this file when creating the connected app. If you do not have a self-signed certificate, see the Salesforce documentation.
-
From Setup, in the Quick Find box, enter
External Client Apps, and then select Settings. -
Enable the Allow creation of connected apps toggle.

-
Under Connected Apps, select New Connected App.
-
In the Connected App Name field, enter a name in the format
{prefix} {connectedAppName}(for example,Partner1 ConnectedApp1). The prefix is used as thedeveloperNamein the ConversationChannelDefinition record. -
In the Contact Email field, enter the email address of the person to notify about the connected app.
-
Select the Enable OAuth Settings checkbox and configure the following:
- Add a callback URL (endpoint), the same as the OAuth redirect URI. Use
https://login.salesforce.comto start. - Select Use digital signatures, select Choose File, and upload the public key file.
- Add the following OAuth scopes:
- Access Interaction API resources (
interaction_api) - Perform Requests at any time (
refresh_token,offline_access) - Manage user data through APIs (
api)
- Access Interaction API resources (
- Add a callback URL (endpoint), the same as the OAuth redirect URI. Use
-
Save your changes and select Continue.
Set OAuth policies
- From Setup, search for
Manage Connected Appsand select it. - Select your connected app, then select Edit Policies.
- In OAuth Policies, set Permitted Users to Admin approved users are pre-authorized and select OK.
- Save your changes.
- Select Manage Profiles, assign System Administrator (or your user group), and save.
Copy Consumer Key and Secret
-
Open App Manager, locate your app, select the app menu, and select View.
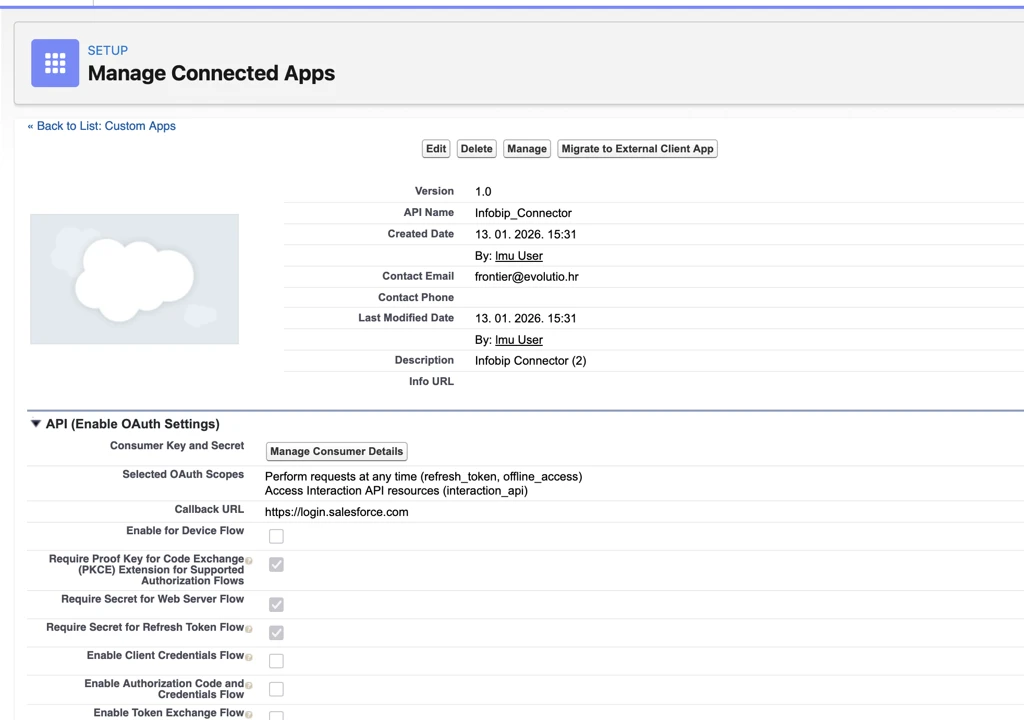
-
Select Manage Consumer Details and copy the Consumer Key and Consumer Secret.
-
Go to Company Settings > Company Information and copy the Salesforce Organization ID.
Create and configure the Custom Platform Event
Create a custom platform event to send and receive messages between Salesforce and the partner messaging system. Define fields to customize the platform event data, and assign permissions to the platform event.
Create the Custom Platform Event
- From Setup, search for
Platform Eventsand select it. - Select New Platform Event.
- In the Label field, enter a name (for example,
Infobip Event) and the plural form (for example,Infobip Events). - Verify that Event Type is set to High Volume, Publish Behavior is set to Publish After Commit, and Deployment Status is set to Deployed.
- Save your changes.
Add custom fields to the Platform Event
- From Setup, search for
Platform Eventsand select it. - Select your platform event.
- In Custom Field & Relationships, select New and create two fields:
- Data Type: Text, Field Label: EventType (length between 36 and 255).
- Data Type: Text Area (Long), Field Label: Payload.
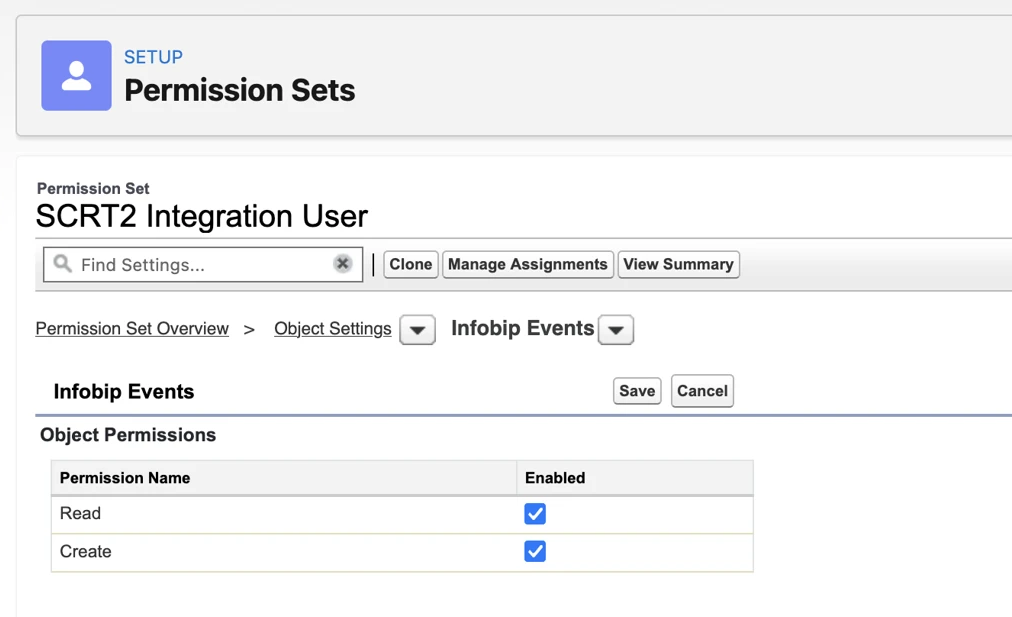
Assign permissions to the Platform Event
-
From Setup, search for
Permission Setsand select it. -
Select SCRT2 Integration User > Object Settings > your platform event.
-
Select Edit, enable Read and Create, and save.
Enable App Configuration
Add a Visualforce iFrame Component
-
Go to Setup > Visualforce Components > New.
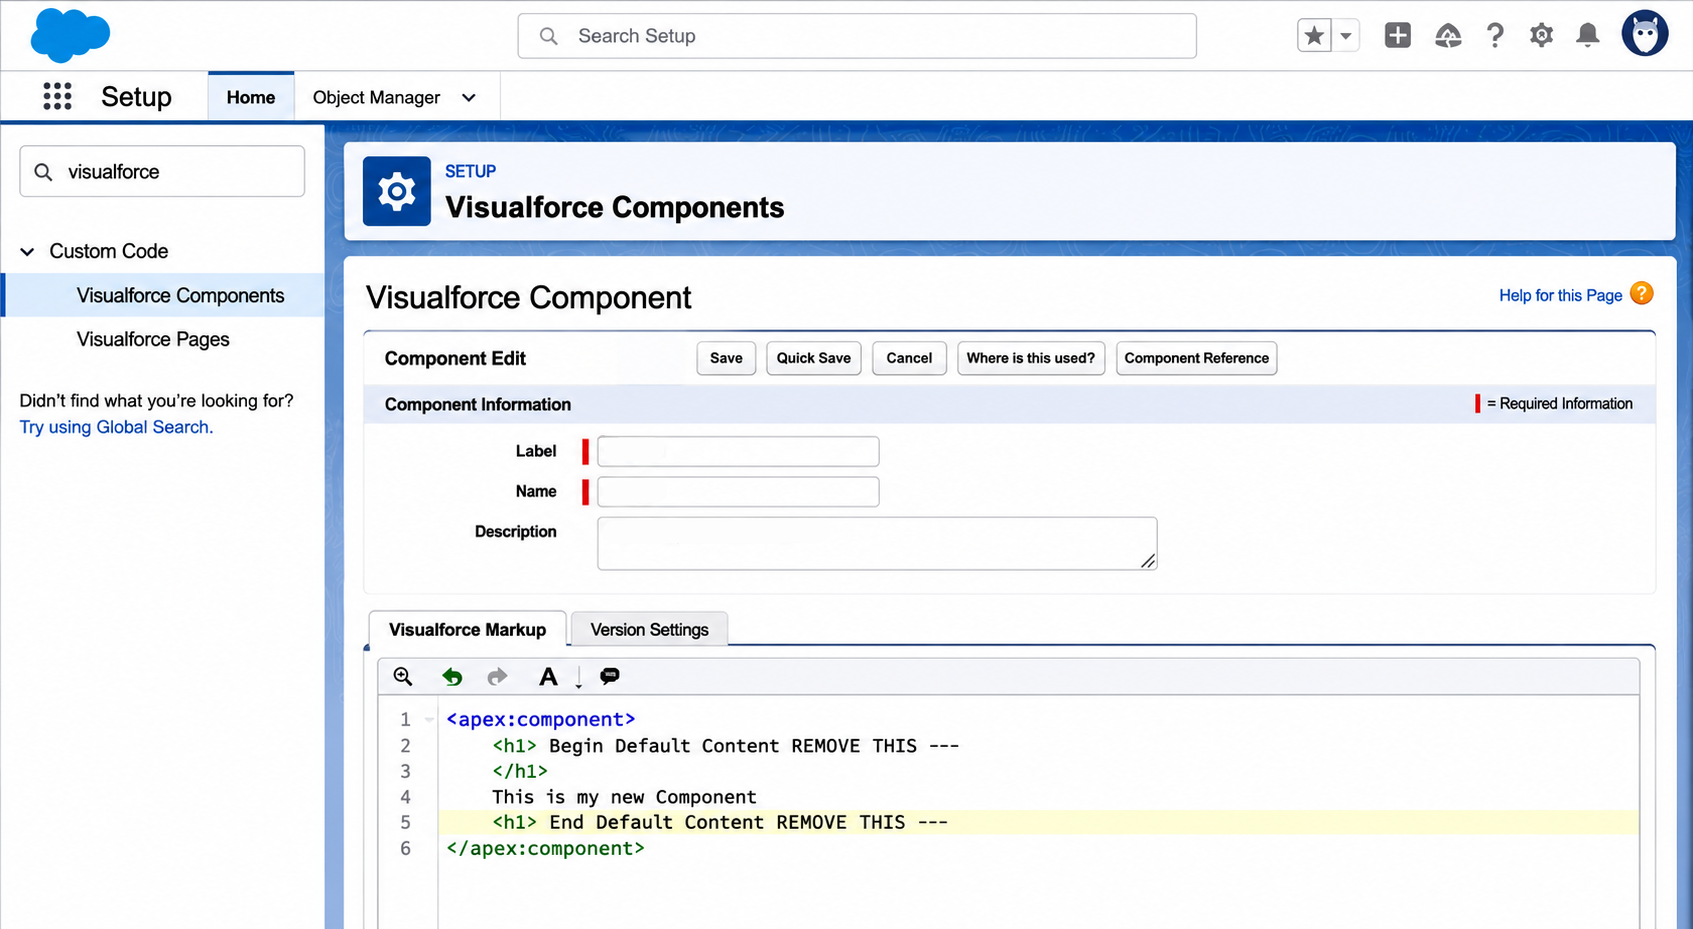
-
Paste the following component code and save your changes.
Add App Configuration Lightning page
-
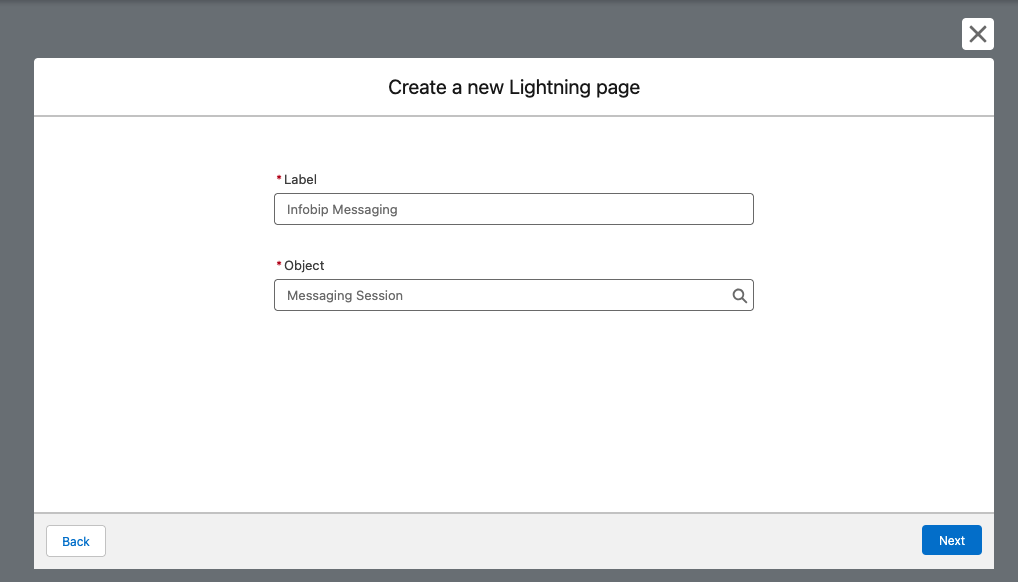
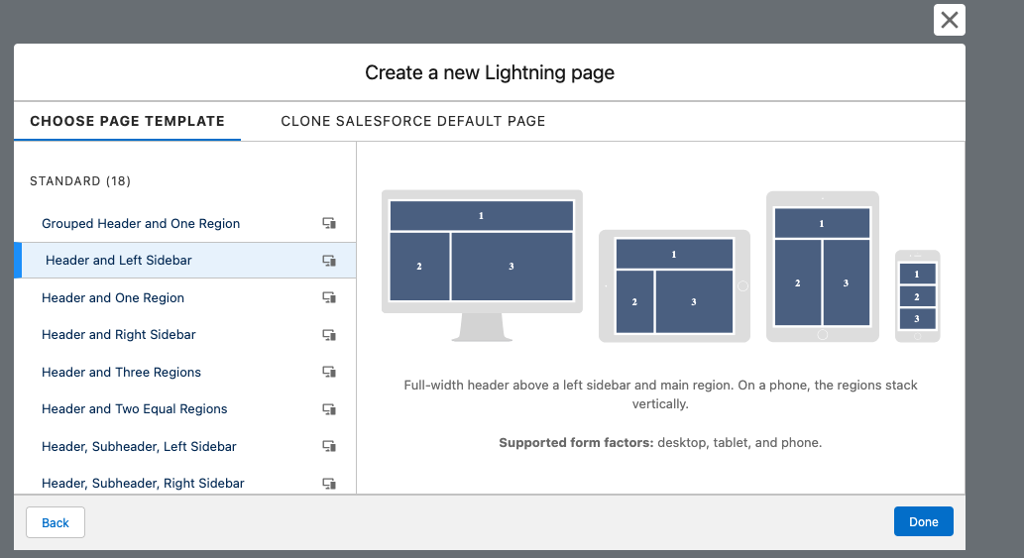
Open Setup > Lightning App Builder > New, then select App Page.
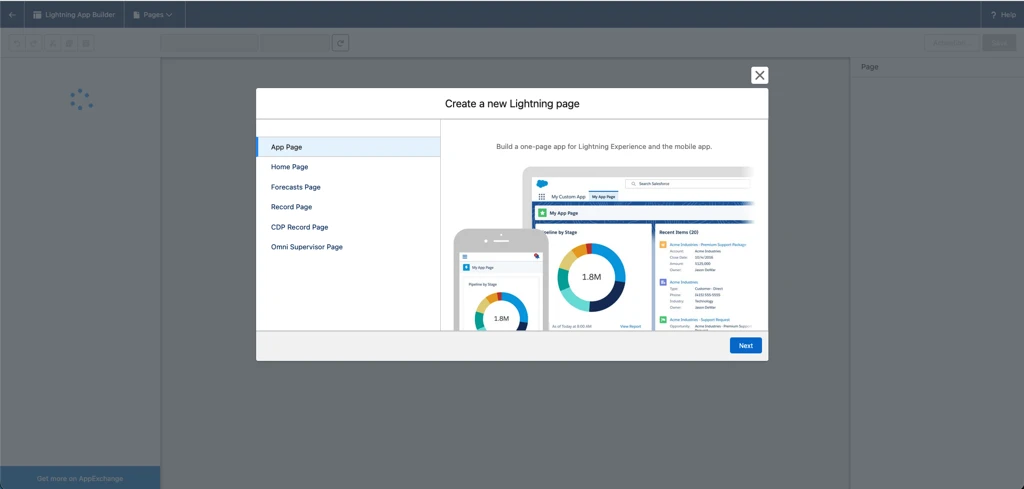
-
Add a page label (for example,
Infobip BYOC Configuration) and select One Region. -
Add the iFrame component. Set the Src URL to
https://sfsc-connector.ibintegrations.com/and increase the height to at least1000px. Save your changes.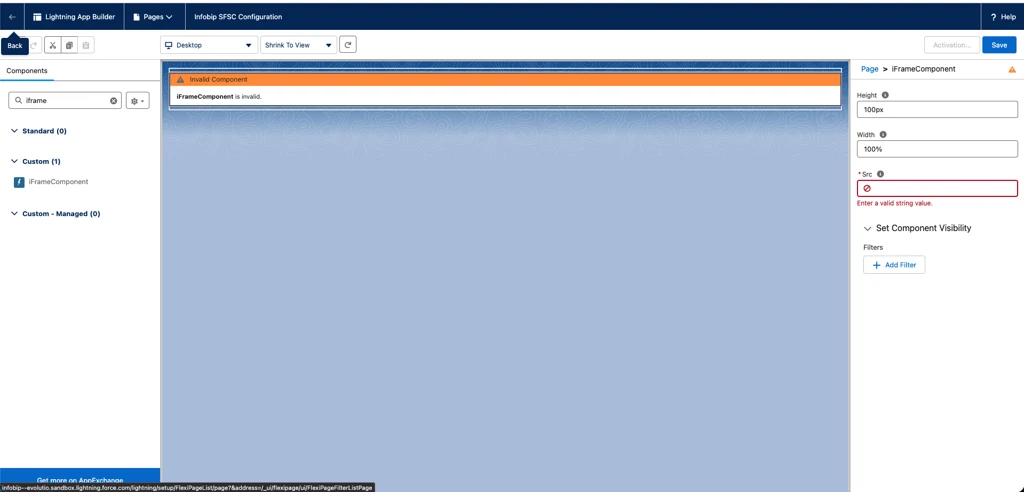
-
Open App Manager, find the Service Console app, and select Edit.
-
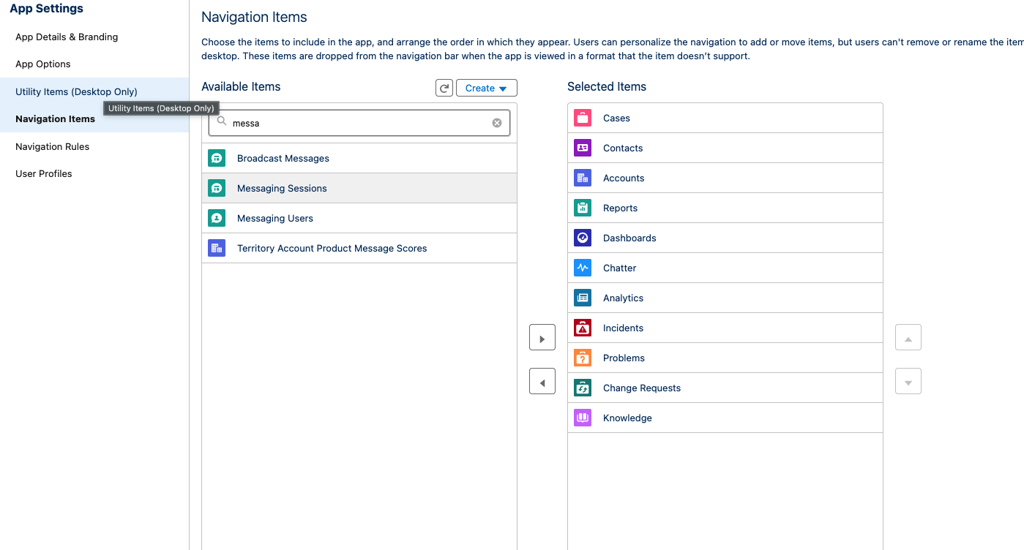
In Navigation Items, find your page and add it to Selected Items.
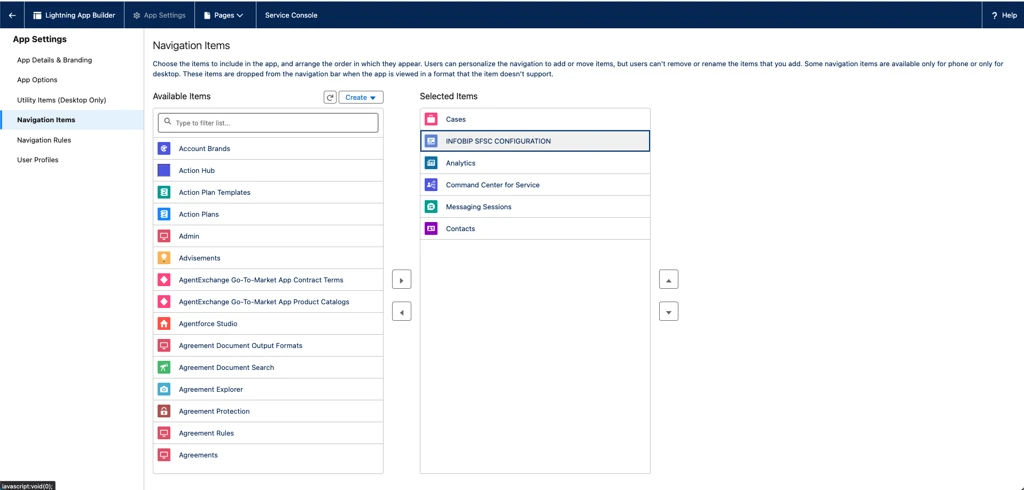
-
Save your changes and reopen the Service Console app. The configuration page appears in the navigation items.
Configure the Connector App
After adding the App Configuration page, follow the setup wizard and fill in the required fields.
-
Set up BYOC connection: The system generates an access token and automatically creates the
Conversation Vendor InfoandConversation Channel Definition. Fill in the required fields and select Next.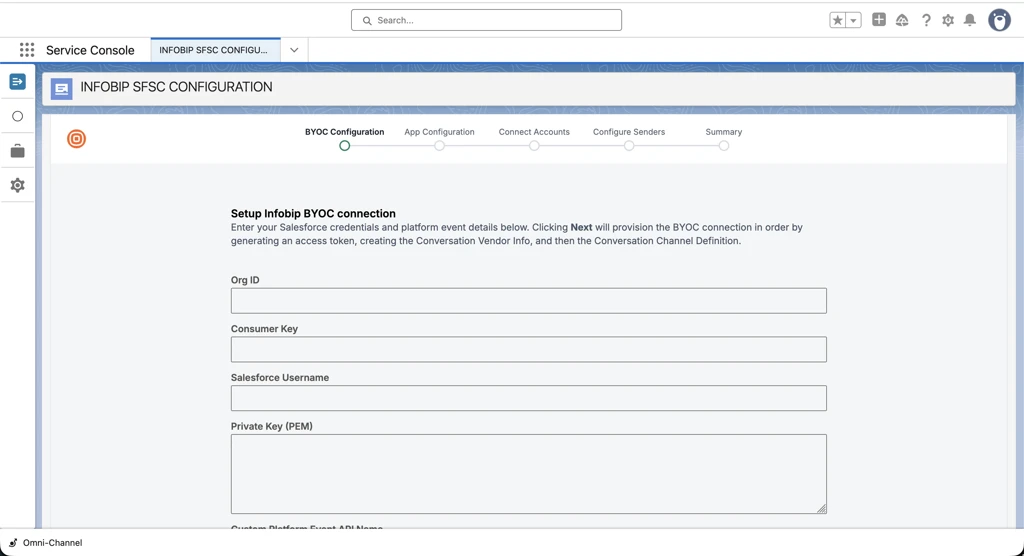
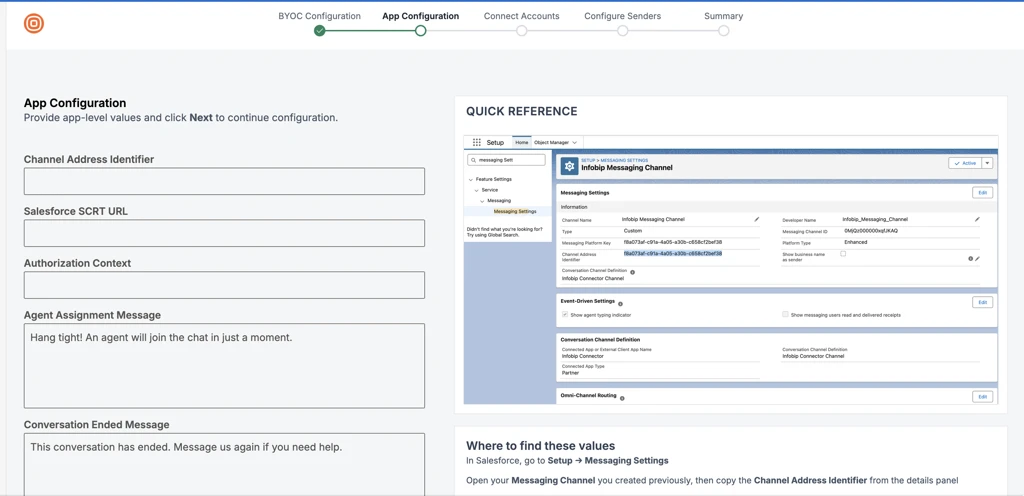
-
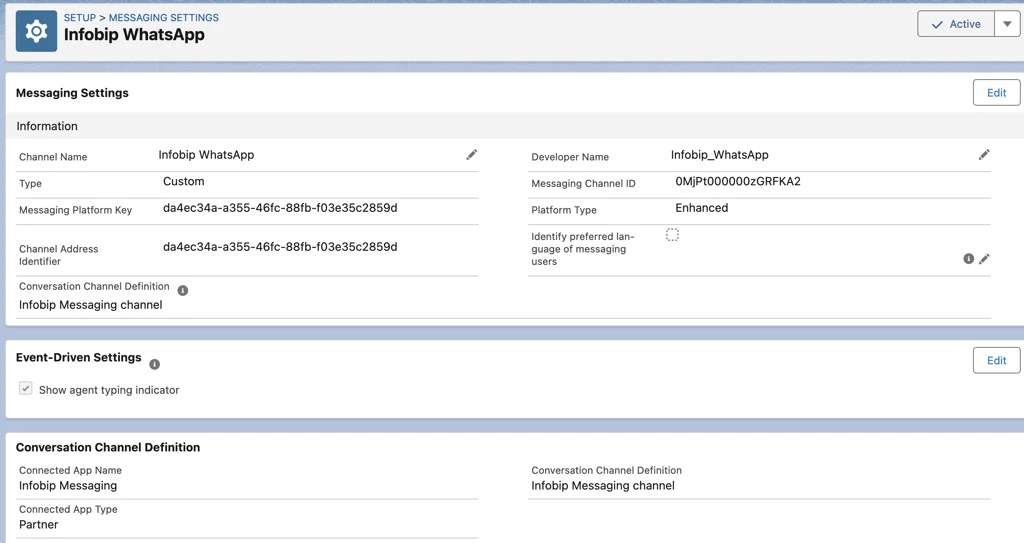
Configure the application: Provide the Channel Address Identifier, SCRT URL, and Authorization Context. To find the Channel Address Identifier, go to Setup > Messaging Settings and open your Messaging Channel.
-
Add Infobip account: Provide an API key with the required scopes. Optionally, specify the Base URL.
-
Select senders: Select an available and supported sender from the account you added and select Next.
After completing all steps, the summary screen confirms the configuration is complete.
Enable Messaging and create a channel
-
From Setup, search for
Messaging Settingsand select it, then select New Channel.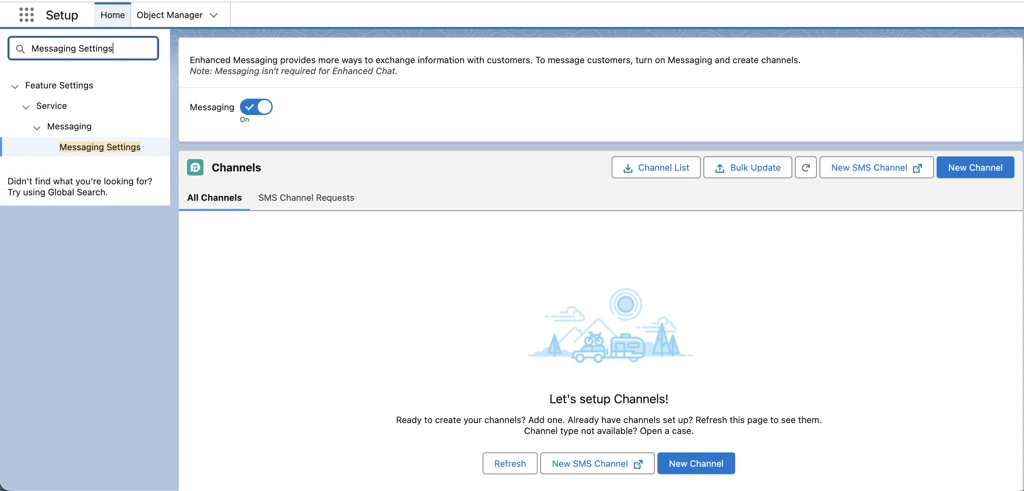
-
Select the Conversation Channel Definition tile that shows the definition you created and select Next.
-
Give your channel a name. Select anywhere on the page to auto-fill the Developer Name field.
-
Save your changes, select Activate, then copy the Messaging Platform Key. This is your Channel Address Identifier.
Route work items to an agent
Create a routing configuration
Prerequisites:
- Omni-Channel and Enhanced Omni-Channel Routing are enabled
- Login behavior is set to Automatically log agents in to Omni-Channel in the new window or tab
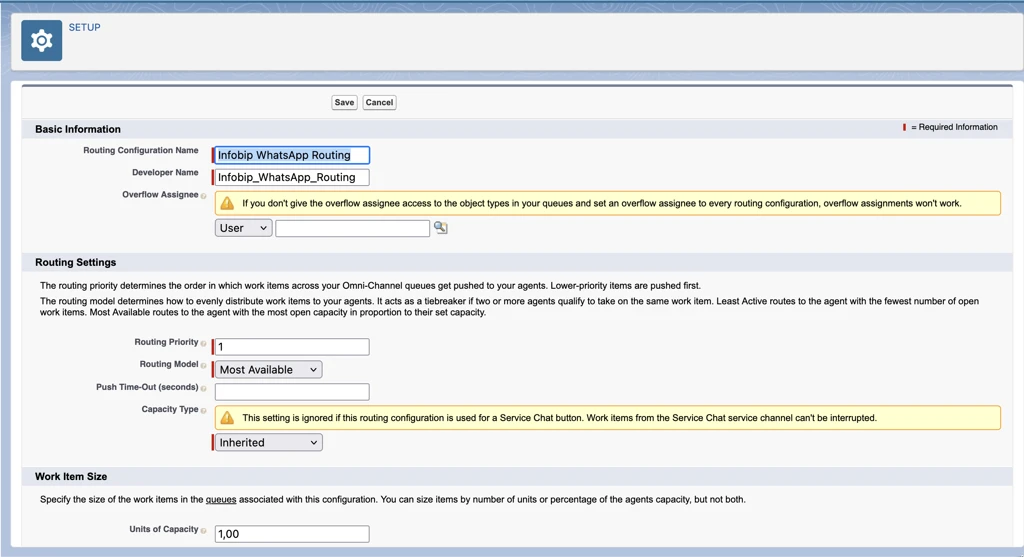
To create a routing configuration:
- Go to Omni-Channel > Routing Configurations > New.
- Set the Routing Model to Most Available and Units of Capacity to
1.00.
Create a queue
- Go to Users > Queues > New.
- Add the queue name and select Send Email to Members.
- Under Configuration with Omni-Channel Routing, select your routing configuration.
- Under Supported Objects, select Messaging Session.
- Under Queue Members, select the users or group to assign to this queue.
- Save your changes.
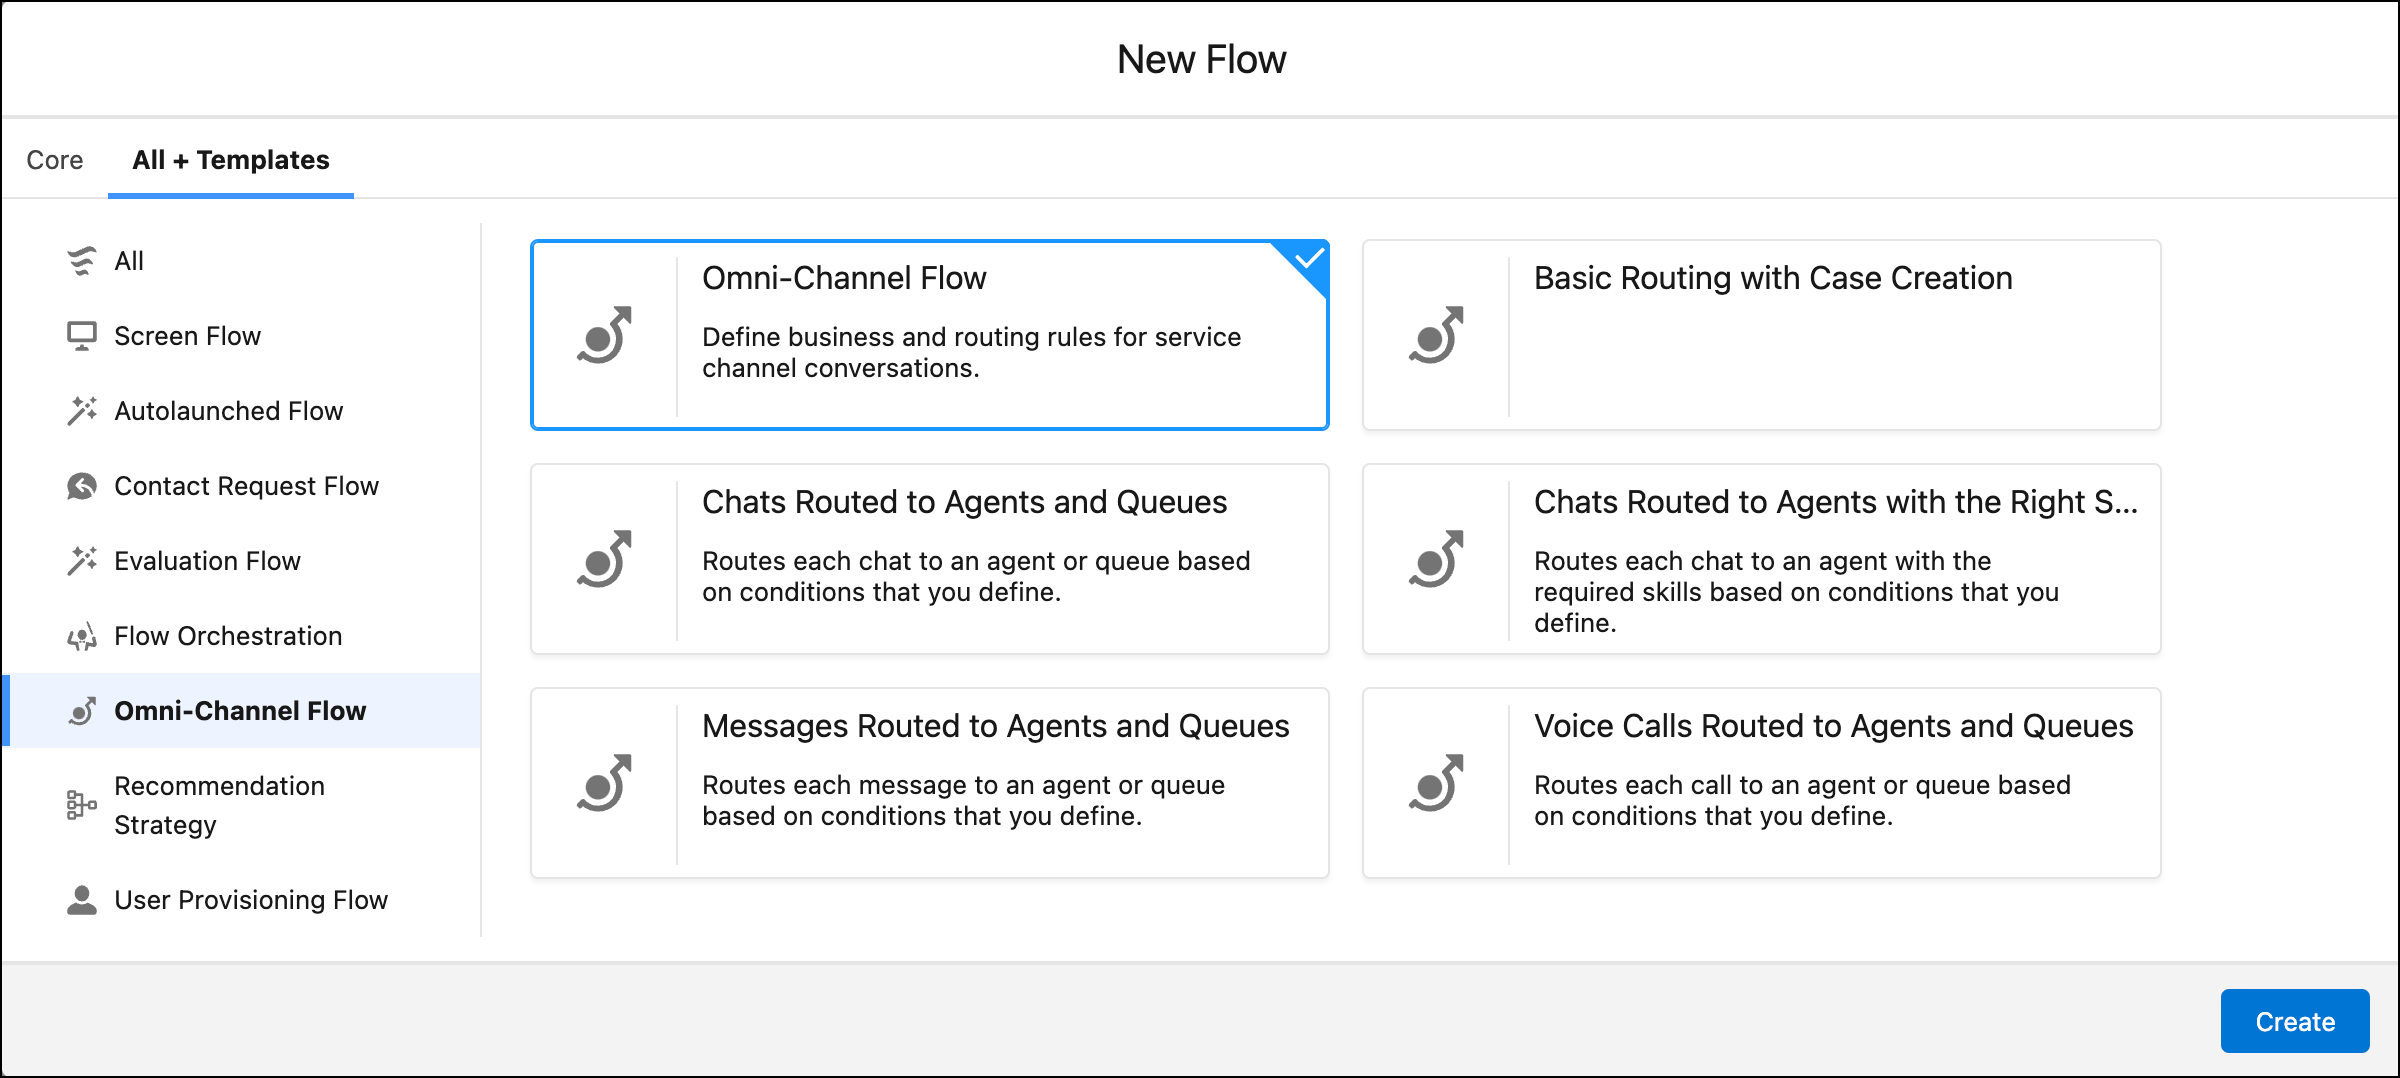
Create an Omni-Channel flow
Create the flow
-
From Setup, search for
Flowsand select it under Process Automation. -
Select New Flow > All + Templates > Omni-Channel Flow in the navigation pane.
-
Select a template or select Omni-Channel Flow to start from scratch, then select Next.
Add variables
-
In the sidebar, select New Resource > Variable. Set the Data Type to Text and select Available for input under Availability Outside the Flow.
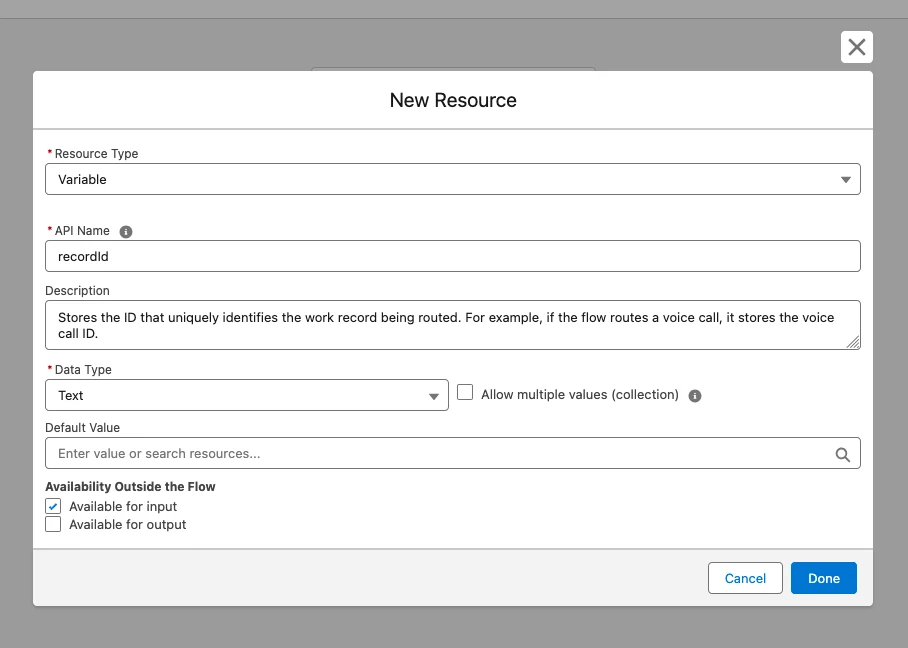
-
Save your changes and create a second variable named
errorReasonwith the same settings.
Add actions
-
Select + and add an Update Records action:
- Set the object to Messaging Session.
- Filter records where Messaging Session ID equals the
recordIdvariable. - Set the Error Reason field value to the
errorReasonvariable.
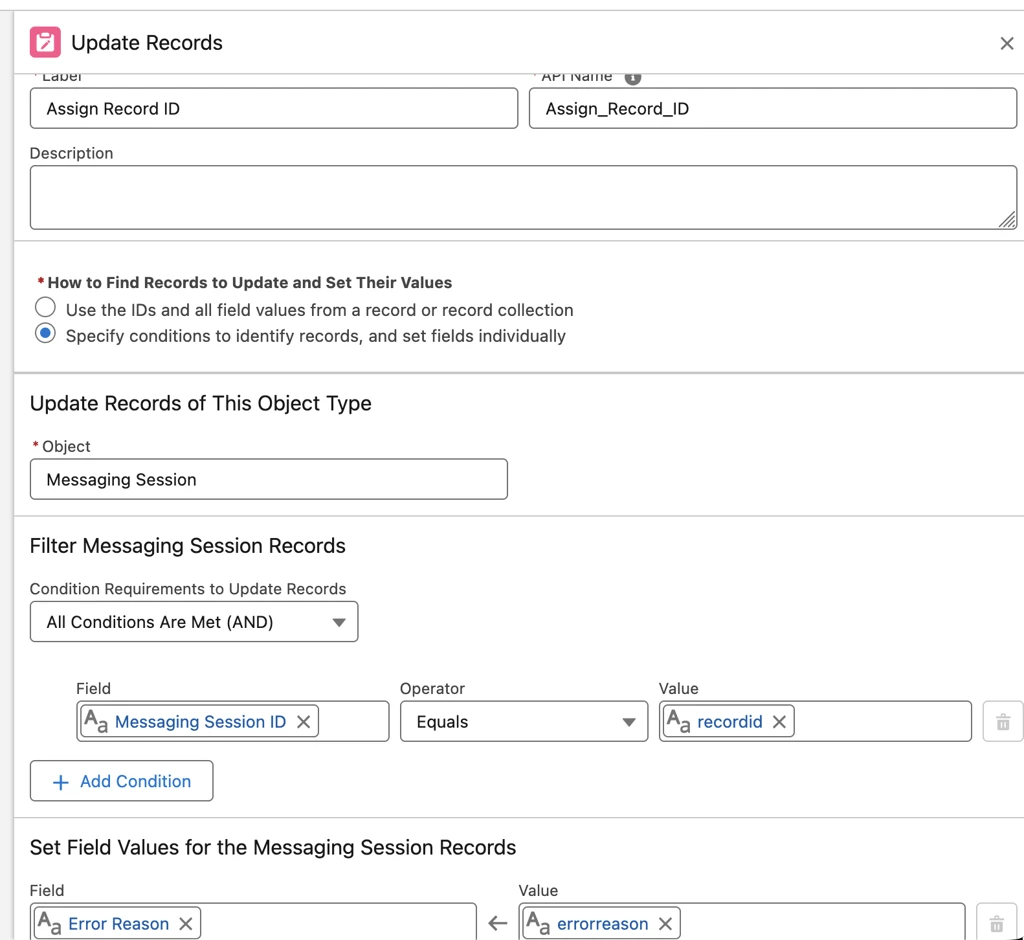
-
Save your changes.
-
Add a Get Records action:
- Set the object to Case.
- Filter records where Case ID equals the
recordIdvariable. - Set How Many Records to Store to Only the first record.
- Set How to Store Record Data to Automatically store all fields.
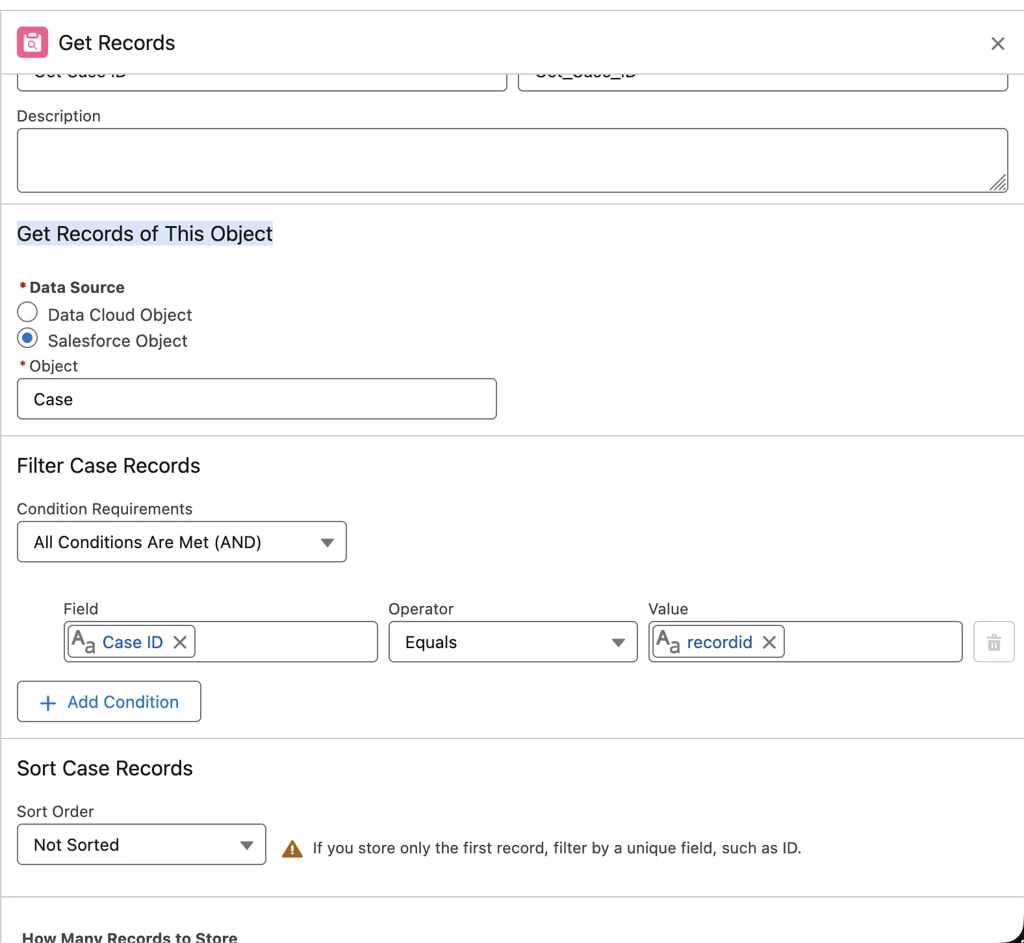
-
Save your changes.
-
Add a Route Work action:
- Set the Record ID Variable to
recordId. - Set the Service Channel to Messaging.
- Set Route To to Queue and select the queue you created.
- Set the Record ID Variable to
-
Save your changes and select Activate.
Start a session with Agentforce Service Agent (optional) [#agentforce-service-agent]
Optionally, enable the AI agent to proactively initiate conversations and send the first message to an end user, for example, on third-party self-service portals.
Call the Establish Conversation API (POST /api/v1/conversation) when an event occurs (for example, when a chat widget opens). This API returns a conversationIdentifier and messaging session ID. Optionally, include routingAttributes in the payload.
If the routing owner is Salesforce (routingOwner is Salesforce in the Conversation Channel Definition record), Omni-Channel routes the conversation and an AI agent proactively starts a conversation using platform events.
Set up Omni-Channel routing
- Open your messaging channel in Messaging Settings.
- Under Omni-Channel Routing, select Edit, set Routing Type to Omni-Flow, and save your changes.
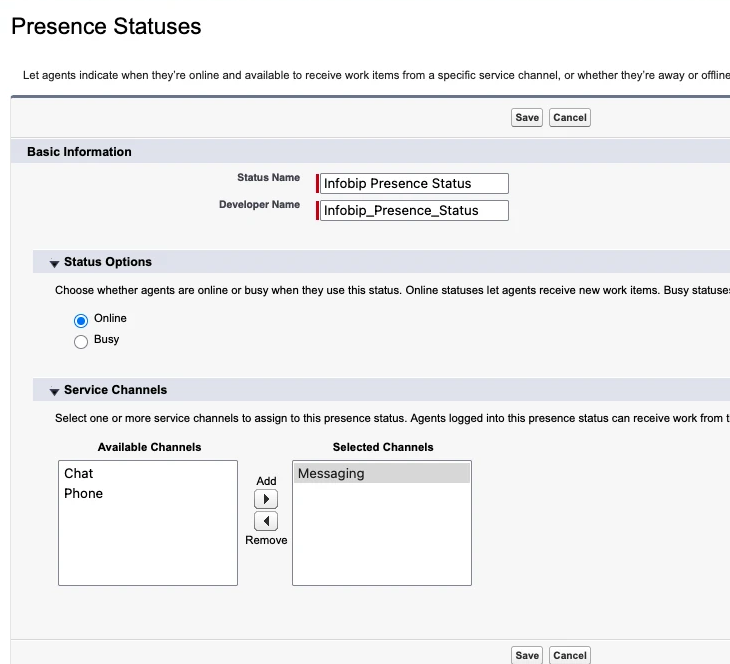
Create a Presence Status
- Go to Omni-Channel > Presence Statuses and select New.
- Set Status Options to Online, select Messaging under Selected Channels, and save.
Set up Presence Configuration
- Open Omni-Channel > Presence Configuration > Default Presence Configuration.
- Select Edit, increase the capacity to 10, and add your queue in Available Transfer Queues and Available Transfer Flows.
- Save your changes.
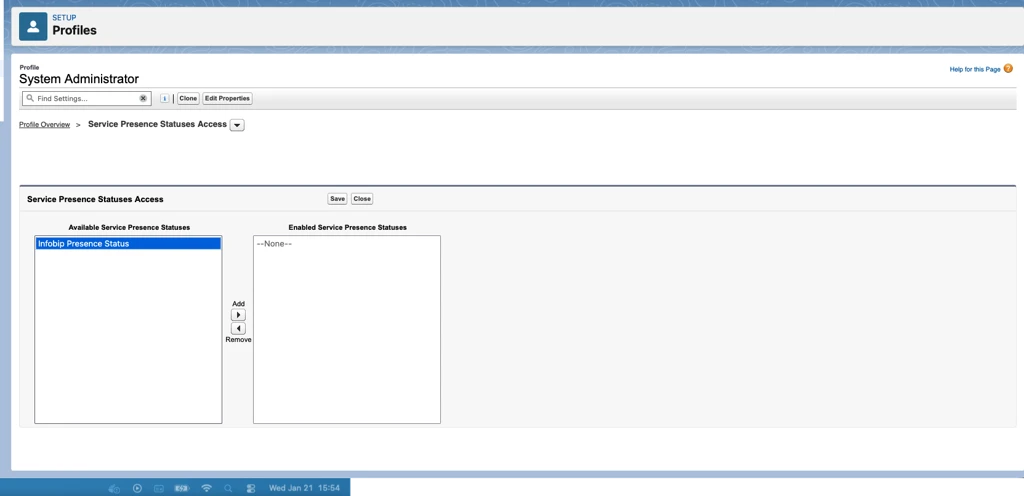
Go to Setup > Profiles > [your profile] > Service Presence Statuses Access and assign the presence status you created.
Configuration reference [#configuration-reference]
By the end of the Salesforce instance setup, you must have the following values prepared:
| Field | Description |
|---|---|
orgId | Your Salesforce organization ID |
channelAddressIdentifier | Channel Messaging Platform Key |
authorizationContext | The Connected App name |
Base URL | Your Salesforce instance base URL |
Consumer Key | Connected App consumer key |
Username | Account username used for authentication with the Connected App |
Custom Event Payload Field | API name of the custom event payload field |
Custom Event Type Field | API name of the custom event type field |
Custom Event Name Field | API name of the custom event name field |
Developer Name | Value used in the ConversationChannelDefinition |
Set up Infobip account for 2-way messaging
Subscription setup for 2-way messaging [#subscription-setup-bidirectional]
-
Log in to the Infobip web interface and go to Developer Tools > Subscription Management.
-
Open Authentication Settings and create a new setting: select HMAC type, add
XrPAnXqwPLvh9jLcqEowjT3ippwmFMpsecret key, select HMAC_SHA_256 algorithm, and save.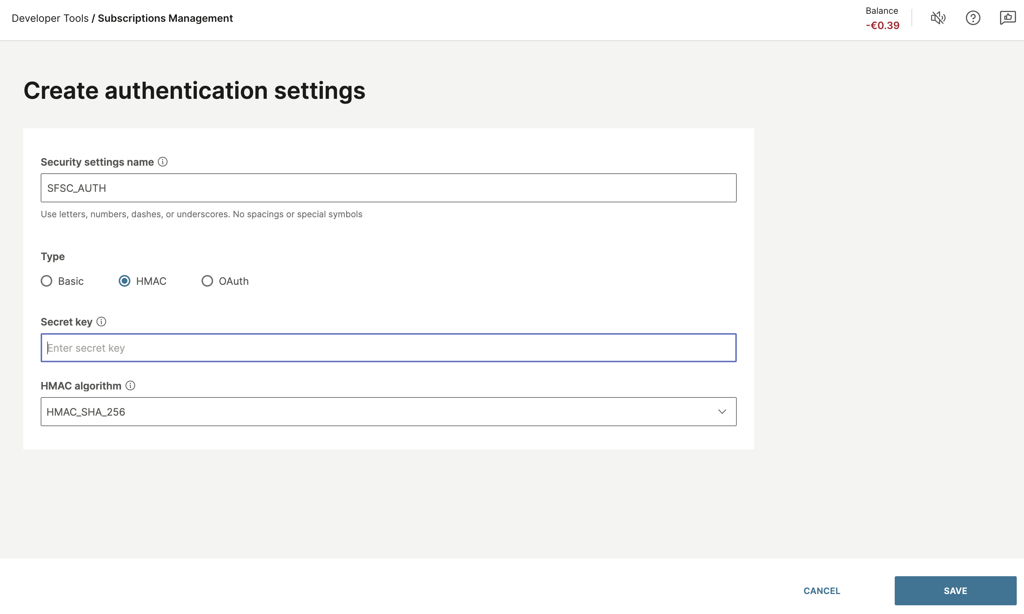
-
Create a notification profile: set the Webhook URL to
https://sfsc-connector.ibintegrations.com/api/infobip/inbound/messages, select your authentication setting under Security settings, and save.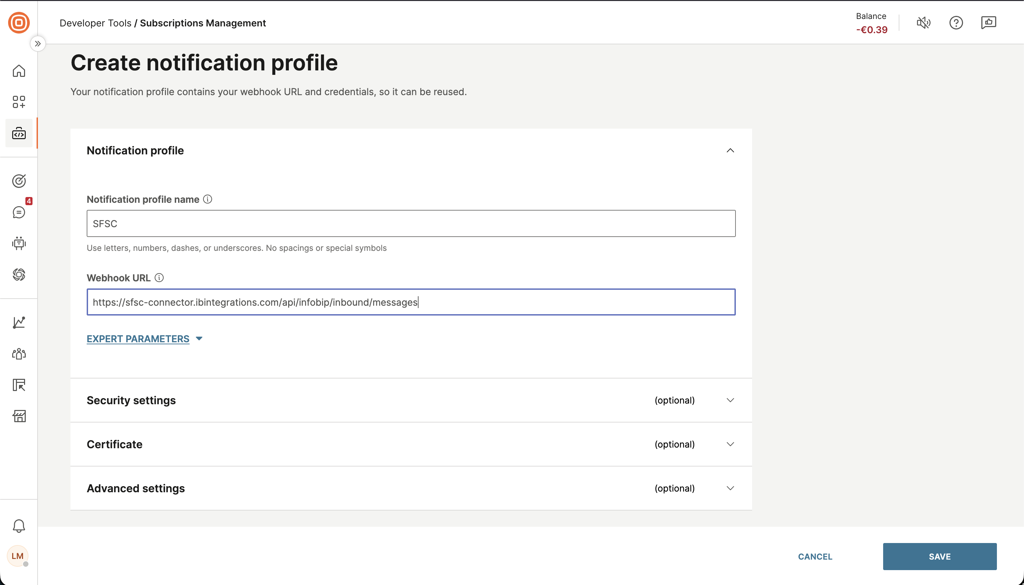
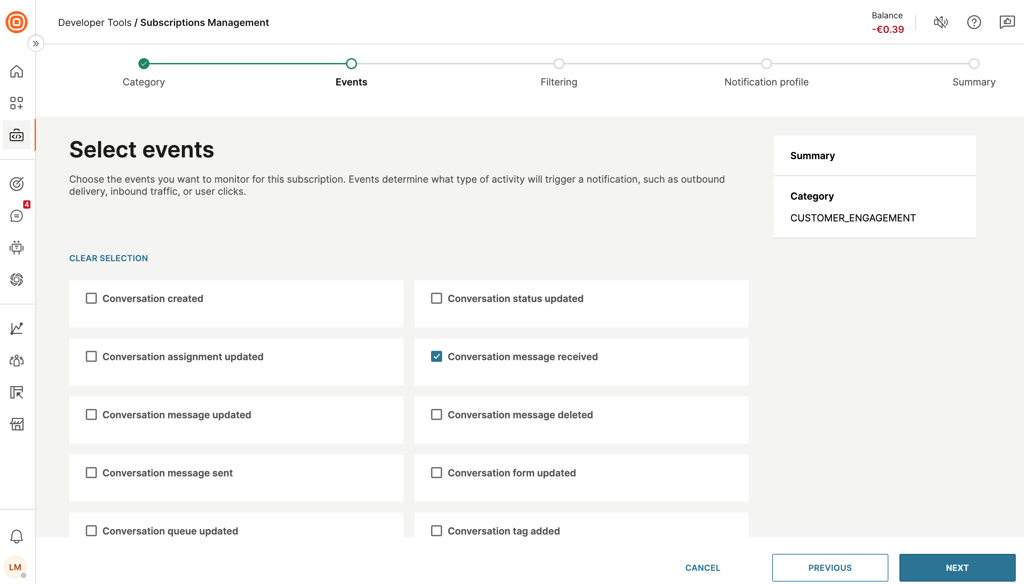
-
Open the Subscriptions tab and create a new subscription. Select WhatsApp channel and Inbound message event.
-
Select the notification profile you created and select Next, then select Save.
-
Open Numbers and select the sender number you want to apply this subscription to.
-
Select Edit. In Forwarding action, select Apply subscription and select Configure.
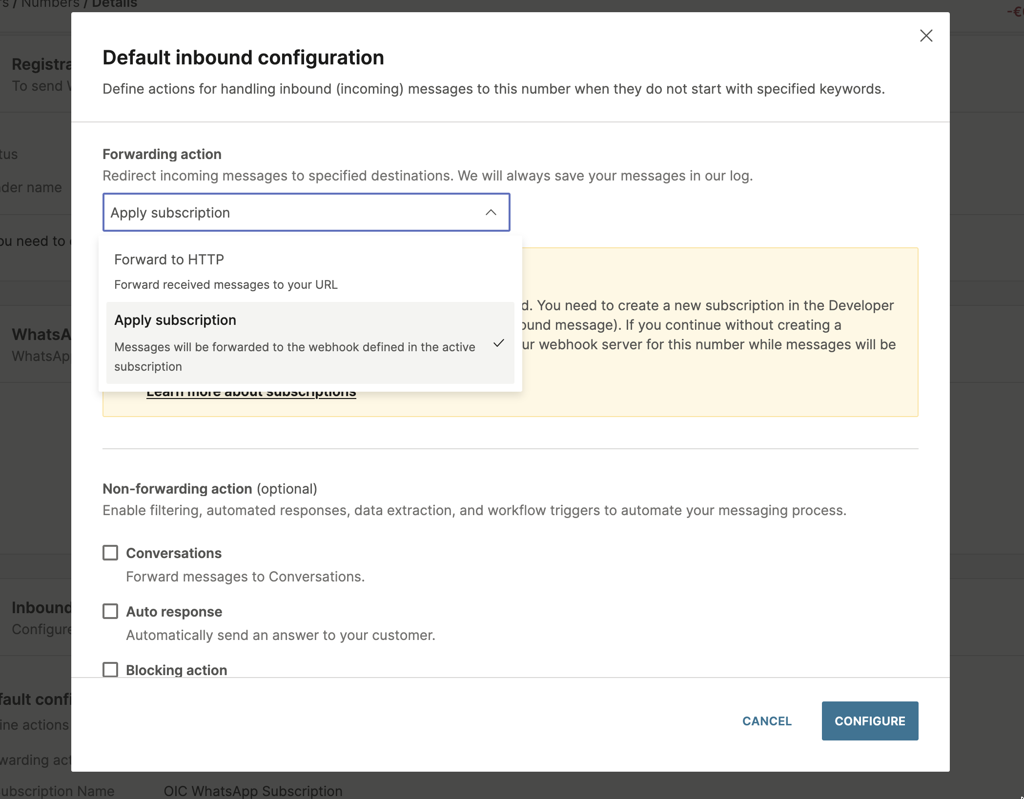
-
Send a test message to verify the configuration.
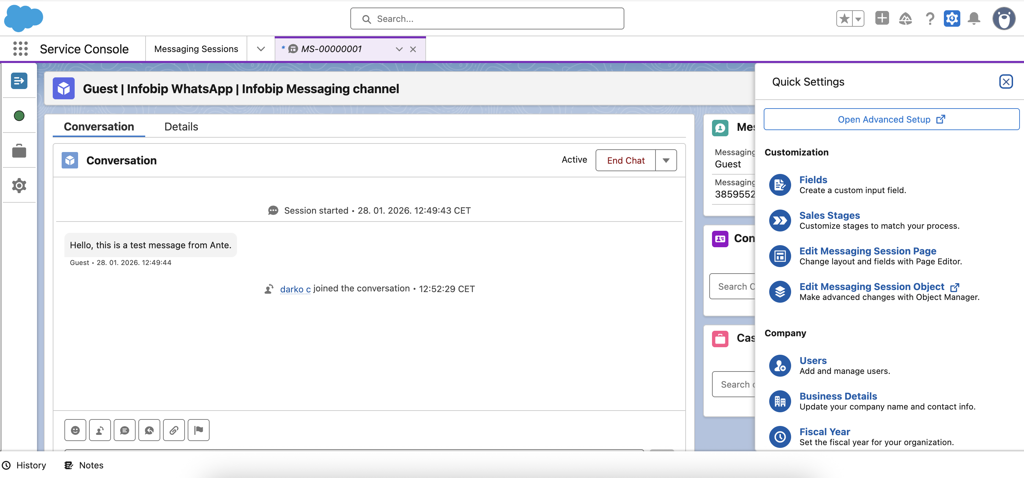
When the configuration is complete, a new messaging session opens in the Service Console when the system receives your message.
Set up Infobip account for chatbot to agent handover messaging
Chatbot flow [#chatbot-flow]
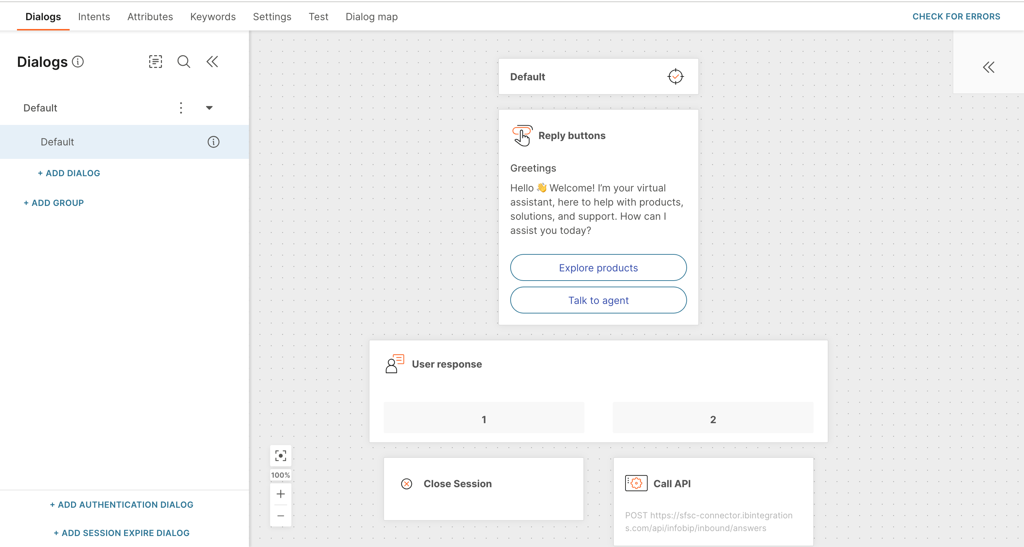
This use case shows a basic chatbot setup using Answers/Chatbots. The bot asks the user a simple question and, if needed, transfers to a live agent, which opens a Salesforce Service Cloud Messaging session.
Answers is an Infobip product available for existing accounts. New accounts use AgentOS and Chatbots. Existing accounts can upgrade to AgentOS at any time.
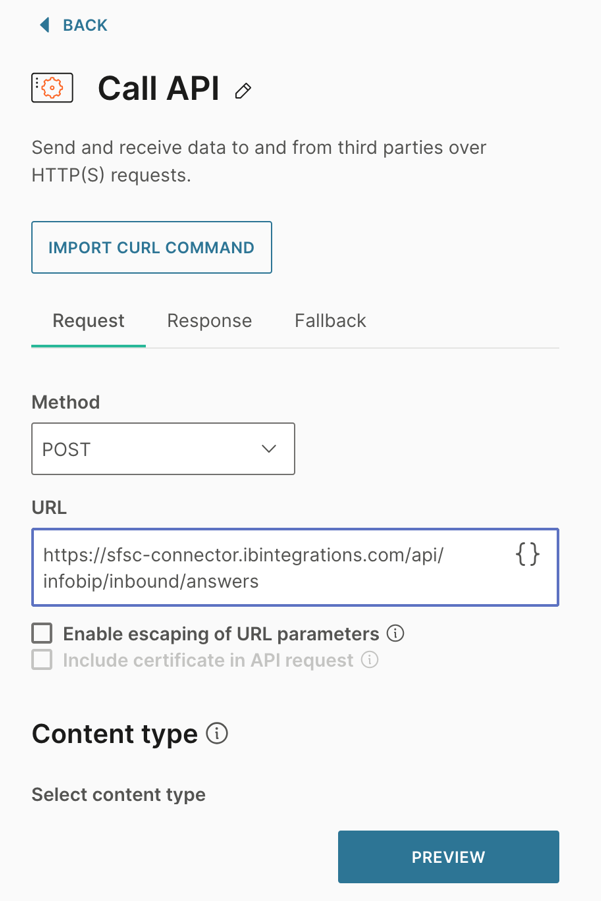
To trigger the handover, add a Call API step that sends a POST request with the required data. See Call API configuration for the required parameters.
Call API configuration [#call-api-configuration]
Use the following parameters for the Call API step in the chatbot flow.
| Parameter | Value |
|---|---|
| Request Type | POST |
| Endpoint URL | https://sfsc-connector.ibintegrations.com/api/infobip/inbound/answers |
| Headers | Content-Type: application/json |
The following image shows the configured Call API step in Infobip Answers/Chatbots.
Request body [#request-body]
Include the following fields in the request body.
| Field | Value (Infobip Placeholder) | Description |
|---|---|---|
conversationId | <conversationId> | Unique ID of the conversation from Infobip Answers/Chatbots |
senderNumber | <senderNumber> | End user's phone number from Infobip Answers/Chatbots |
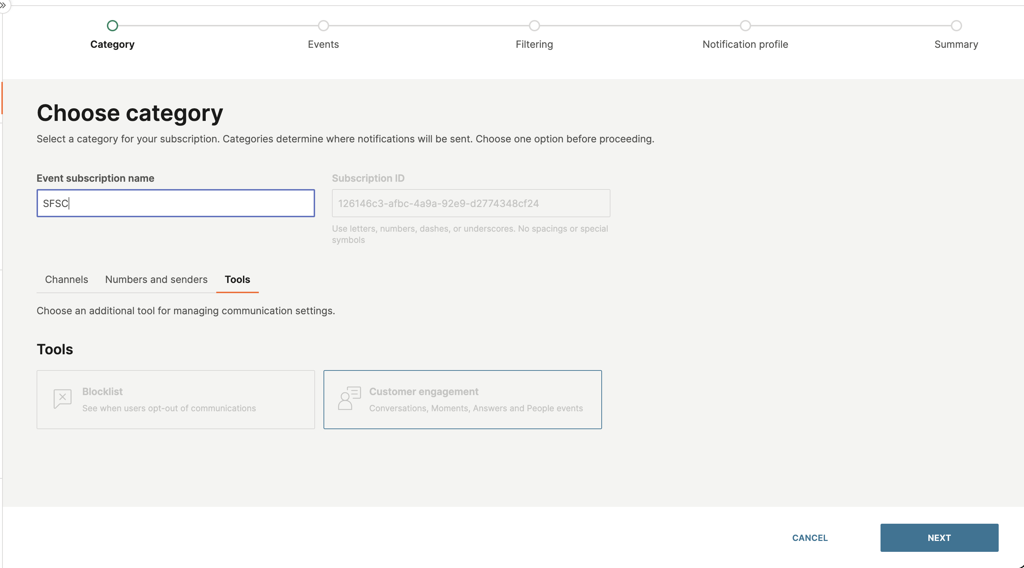
Subscription setup for chatbot transfer [#subscription-setup-chatbot]
-
Repeat steps 1 through 5 from the 2-way messaging subscription setup, but select the Tools tab instead of Channels.
-
Select Customer engagement.
-
Select Conversation Message Received event and select Next.
-
Skip the Set filters step.
-
Select your notification profile. Verify the Webhook URL is
https://sfsc-connector.ibintegrations.com/api/infobip/inbound/messagesand the authentication setting is applied. -
Select Next to go to the summary and save the subscription.
Expected behavior:
- The end user sends a message that triggers the chatbot response.
- The end user selects Talk to agent, which triggers the Call API step.
- When a Service Cloud agent is available (presence is enabled), a messaging session opens and the user receives a custom message such as "Hang tight, an agent will join the chat in just a moment."
- When the agent closes the session, a configurable closing message is sent to the user. For example, "This conversation has ended. Message us again if you need help."
The welcome and closing messages are configurable in the App Configuration step.
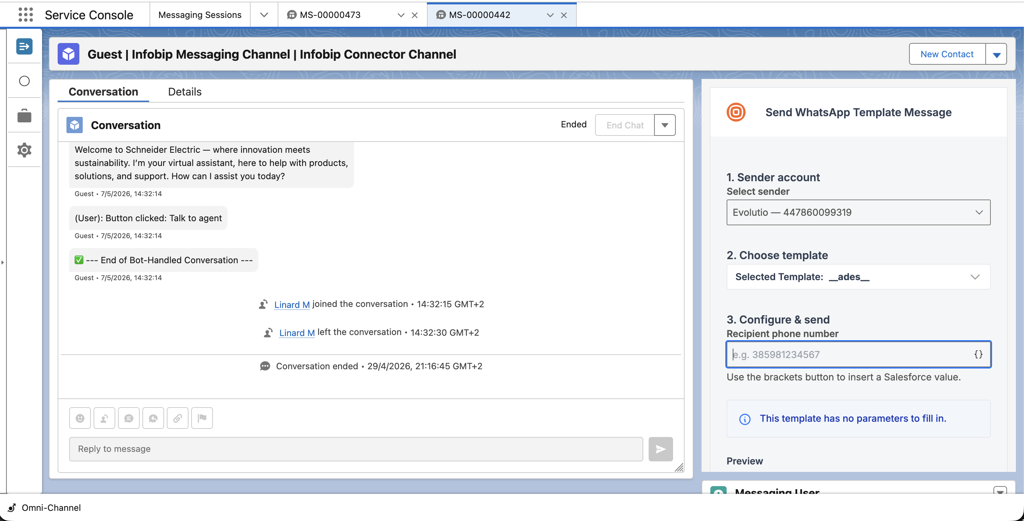
WhatsApp Templates Messaging
The WhatsApp Template Messaging panel is embedded in the Service Cloud Messaging Session page. Agents can select a WhatsApp sender, load approved templates, fill in values, and send templates without leaving the conversation.
Prerequisites:
- At least one Infobip account must be connected for the app.
- At least one WhatsApp sender must be selected in the app's sender configuration.
- The selected sender must already have approved WhatsApp templates in Infobip.
- The WhatsApp Templates iframe must be added to the Service Cloud Messaging Session page layout.
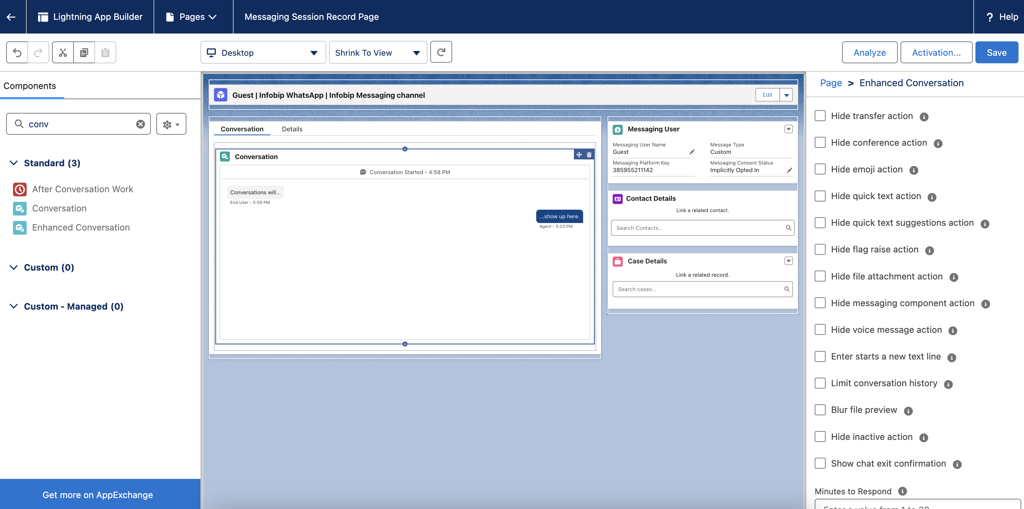
Add WhatsApp Templates iframe to Messaging Session page [#add-whatsapp-templates-iframe]
-
Open the Messaging Session page, go to Setup Menu > Edit Page.
-
Add the iFrame component next to the conversation component with
srcUrl:https://sfsc-connector.ibintegrations.com/templates.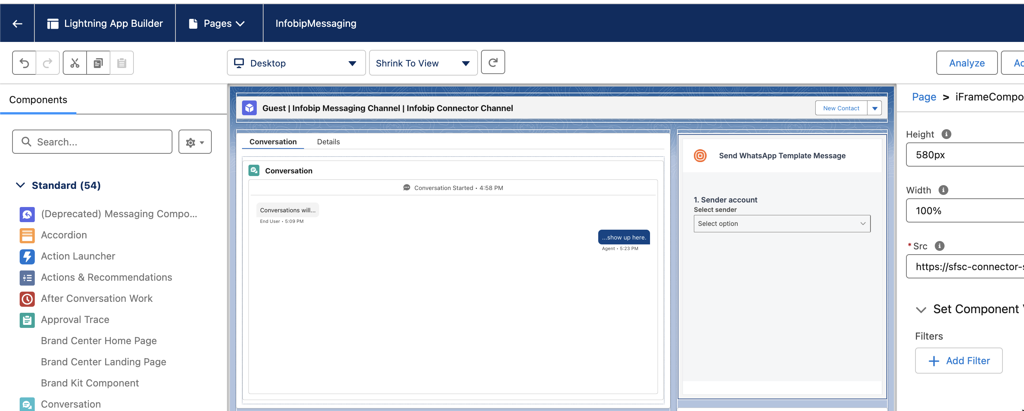
-
Save the page changes and reopen the page to view the changes.
Configure WhatsApp senders [#configure-whatsapp-senders]
- Open the app setup and connect the required Infobip account or accounts.
- Go to Configure WhatsApp Senders and select one or more senders for the app.
- Save the configuration and confirm that the WhatsApp Templates panel is available on the right side of the Messaging Session page.
Send WhatsApp templates from a messaging session [#send-whatsapp-templates]
- Open a Messaging Session in Service Cloud.
- In the right-side panel, open Send WhatsApp Template Message.
- In Select sender, choose the sender you want to use. The system loads approved templates for that sender.
- Select a template. You can search by template name or category.
- Confirm or update the recipient phone number and fill in any required template values.
- Review the preview and select Send.
Depending on the template, agents may need to provide the following values:
| Value | Description |
|---|---|
| Header text | Text for the template header |
| Header media URL | URL for image, video, or document templates |
| Filename | Name for document headers |
| Body placeholder values | Text for available body placeholders |
| Button parameters | Values for dynamic URL buttons |
| Quick reply payload values | Payload for quick reply buttons |
- Where supported, agents can insert Salesforce values using the placeholder picker. The recipient phone number may also be pre-filled from the session.
- Templates are loaded only after a sender is selected.
- Only approved templates are shown. Availability depends on the selected sender.
- If no sender is configured, the panel cannot be used.
- If context is unavailable, agents can still enter values manually.
- Static and fixed URL buttons are displayed as read-only references.
- Quick reply payloads have a maximum length of 128 characters.